MITSUBISHI SPYDER 1990 Service Repair Manual
SPYDER 1990
MITSUBISHI
MITSUBISHI
https://www.carmanualsonline.info/img/19/57345/w960_57345-0.png
MITSUBISHI SPYDER 1990 Service Repair Manual
Trending: center console, oil capacities, fuel cap release, window, height, wheel, weight
Page 1441 of 2103
AUTOMATIC
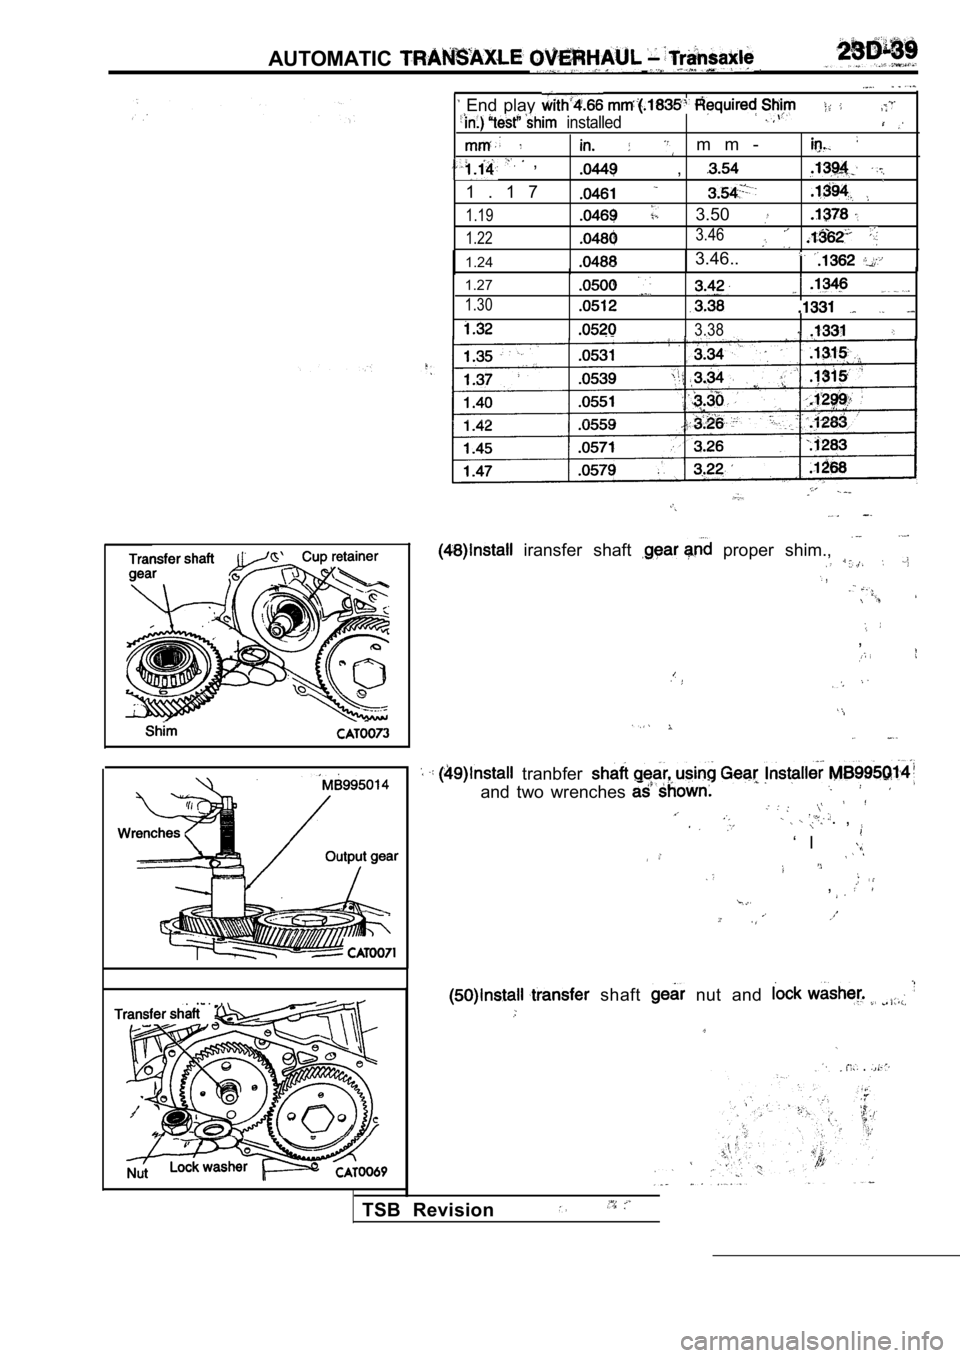
End play
installed .
m m -
,,
1 . 1 7
1.193.50
1.223.46
1.243.46..
1.27
1.30
3.38
iransfer shaft proper shim.,
,
,
tranbfer
and two wrenches
. ,
‘ I
,
shaft nut and
.
TSB Revision
Page 1442 of 2103
AUTOMATIC TRANSAXLE OVERHAUL Transaxle
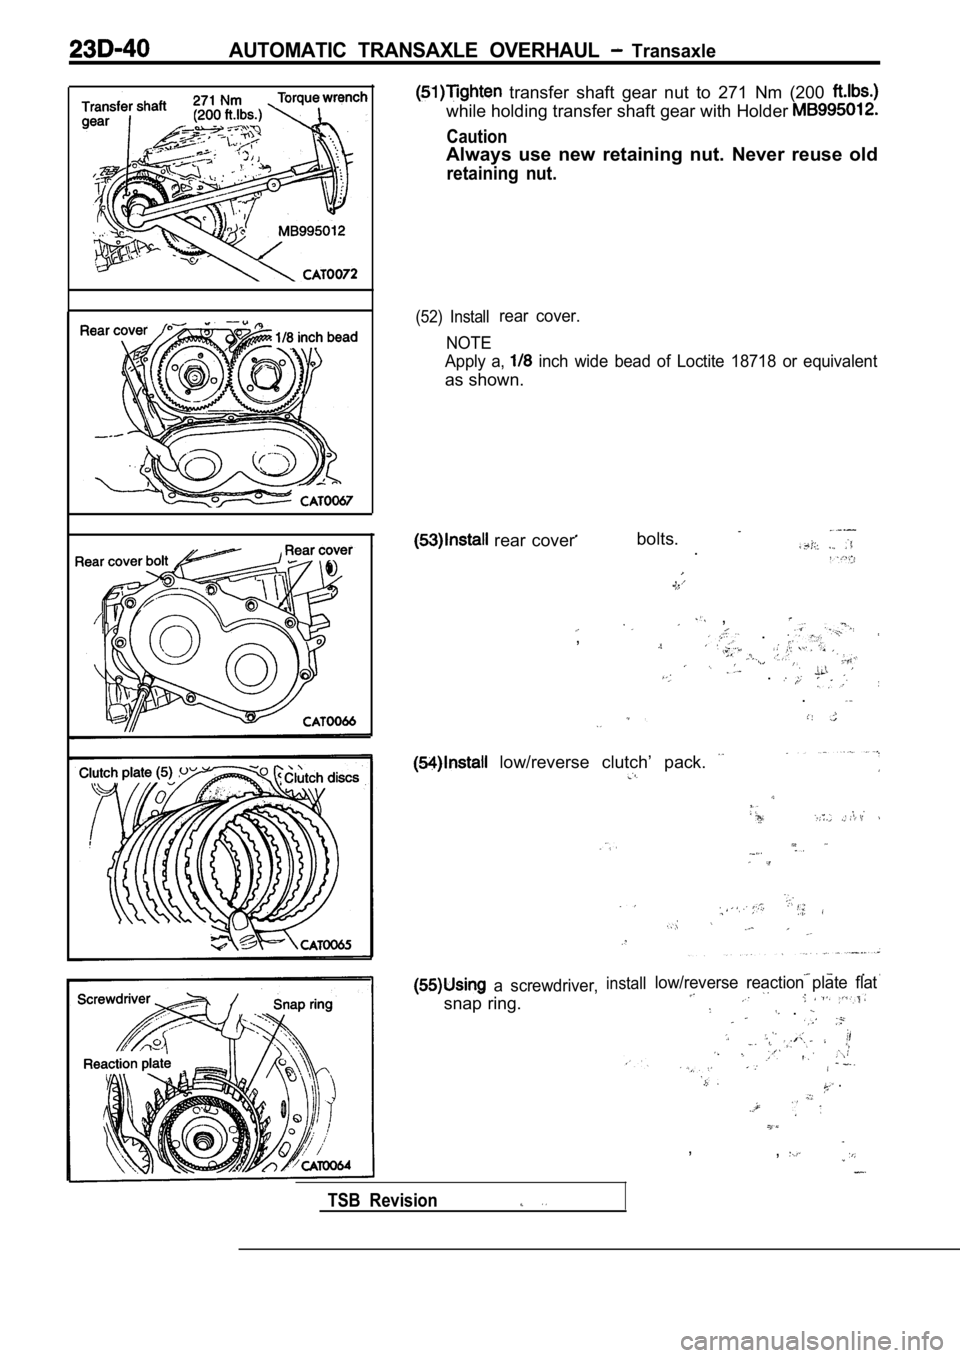
transfer shaft gear nut to 271 Nm (200
while holding transfer shaft gear with Holder
Caution
Always use new retaining nut. Never reuse old
retaining nut.
(52) Installrear cover.
NOTE
Apply a,
inch wide bead of Loctite 18718 or equivalent
as shown.
rear cover bolts. .
,
,
, .
.
.
low/reverse clutch’ pack.
a screwdriver,
snap ring.
install
TSB Revision
.low/reverse reaction plate flat.
.
.
, ,
Page 1443 of 2103
AUTOMATIC TRANSAXLE OVERHAUL Transaxle
Ho
c r e w d r i v e r
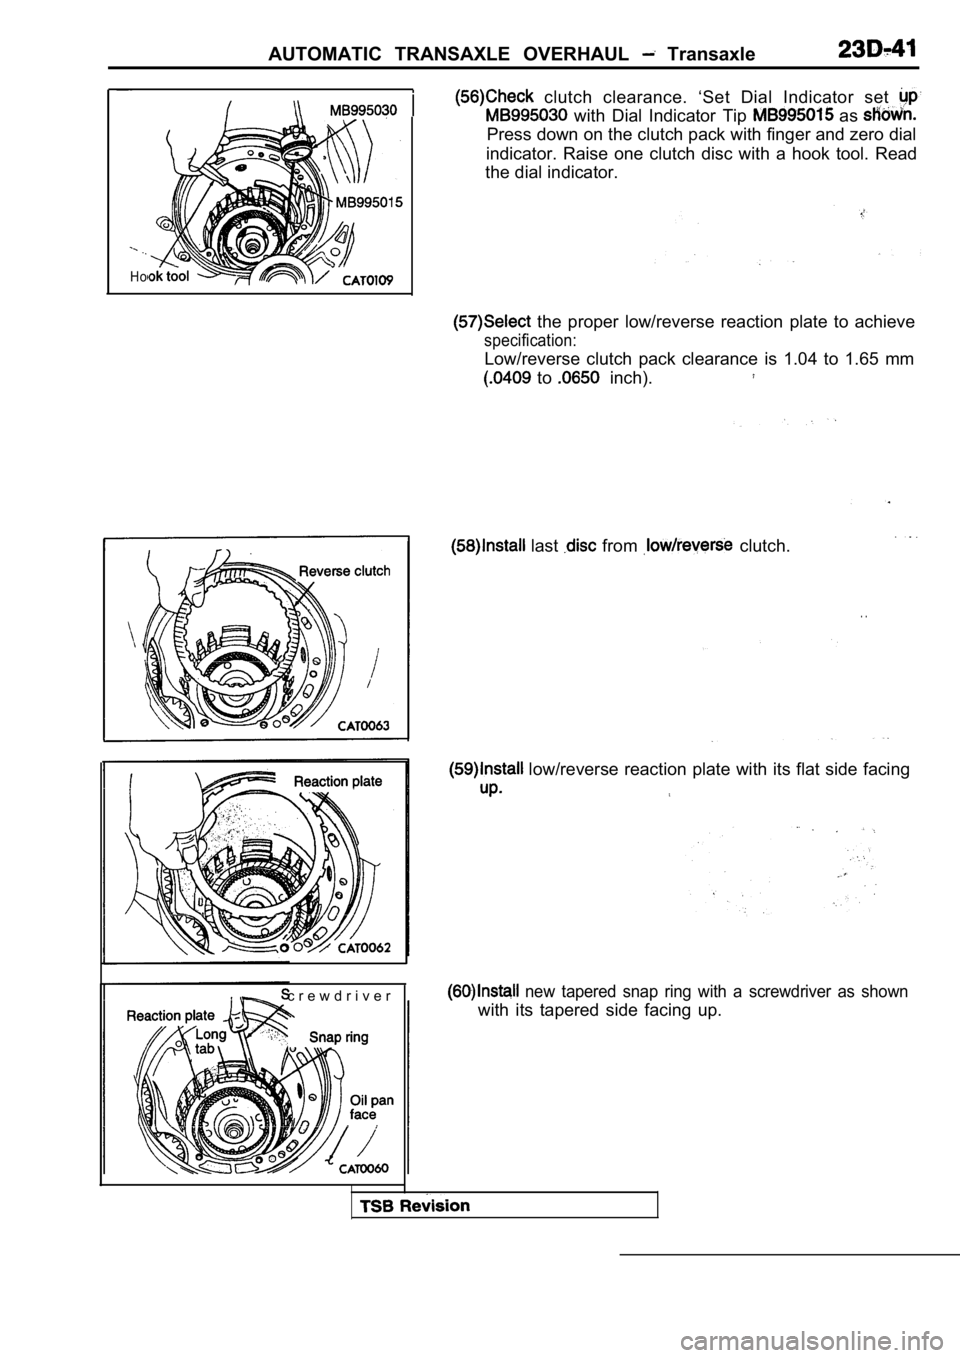
clutch clearance. ‘Set Dial Indicator set
with Dial Indicator Tip as
Press down on the clutch pack with finger and zero dial
indicator. Raise one clutch disc with a hook tool. Read
the dial indicator.
the proper low/reverse reaction plate to achieve
specification:
Low/reverse clutch pack clearance is 1.04 to 1.65 m m
to inch).
last from clutch.
. .
low/reverse reaction plate with its flat side facing
new tapered snap ring with a screwdriver as shown
with its tapered side facing up.
Page 1444 of 2103
AUTOMATIC TRANSAXLE OVERHAUL
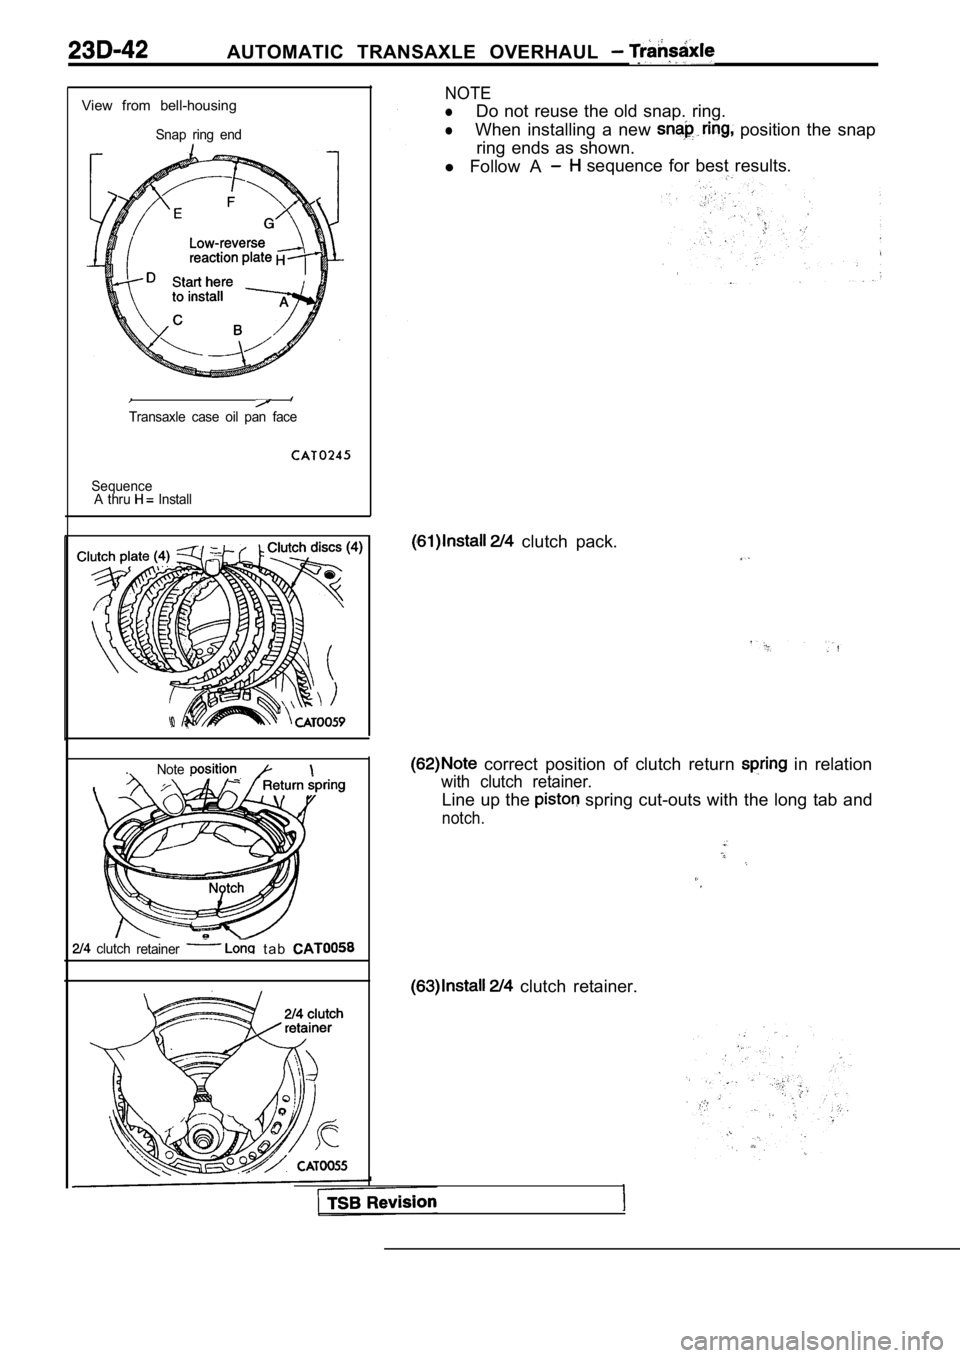
View from bell-housing
Snap ring end
Transaxle case oil pan face
SequenceA thru Install
.Note
clutch retainer t a b
NOTE
lDo not reuse the old snap. ring.
lWhen installing a new position the snap
ring ends as shown.
l Follow A
sequence for best results.
clutch pack.
correct position of clutch return in relation
with clutch retainer.
Line up the spring cut-outs with the long tab and
notch.
clutch retainer.
Page 1445 of 2103
AUTOMATIC TRANSAXLE OVERHAUL Transaxle
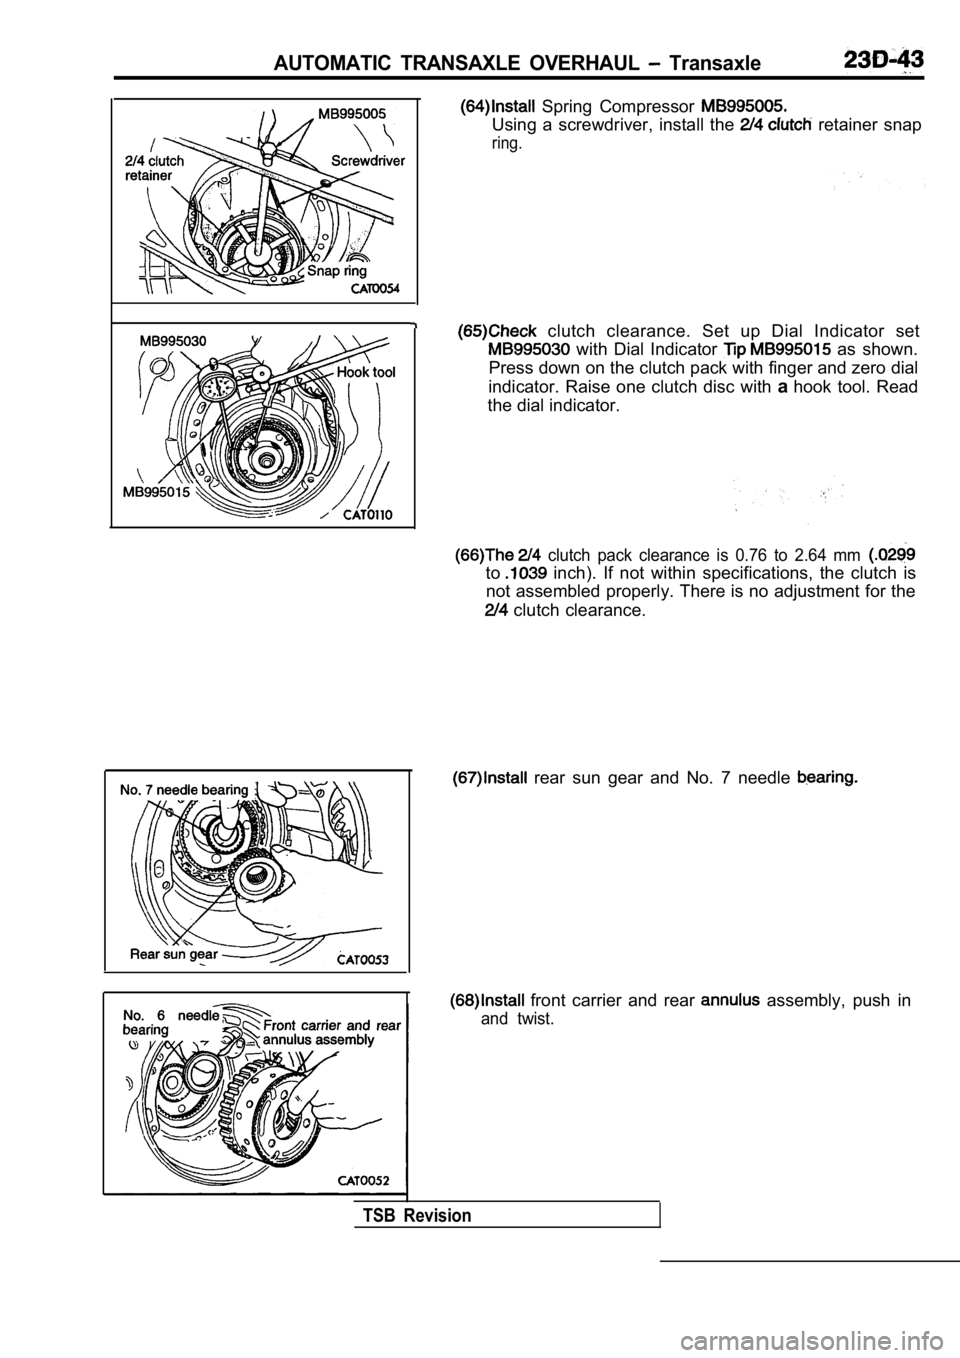
Spring Compressor
Using a screwdriver, install the retainer snap
ring.
clutch clearance. Set up Dial Indicator set
with Dial Indicator as shown.
Press down on the clutch pack with finger and zero dial
indicator. Raise one clutch disc with ahook tool. Read
the dial indicator.
clutch pack clearance is 0.76 to 2.64 mm
to inch). If not within specifications, the clutch is
not assembled properly. There is no adjustment for the
clutch clearance.
rear sun gear and No. 7 needle
front carrier and rear assembly, push in
and twist.
TSB Revision
Page 1446 of 2103
AUTOMATIC TRANSAXLE OVERHAUL Transaxle
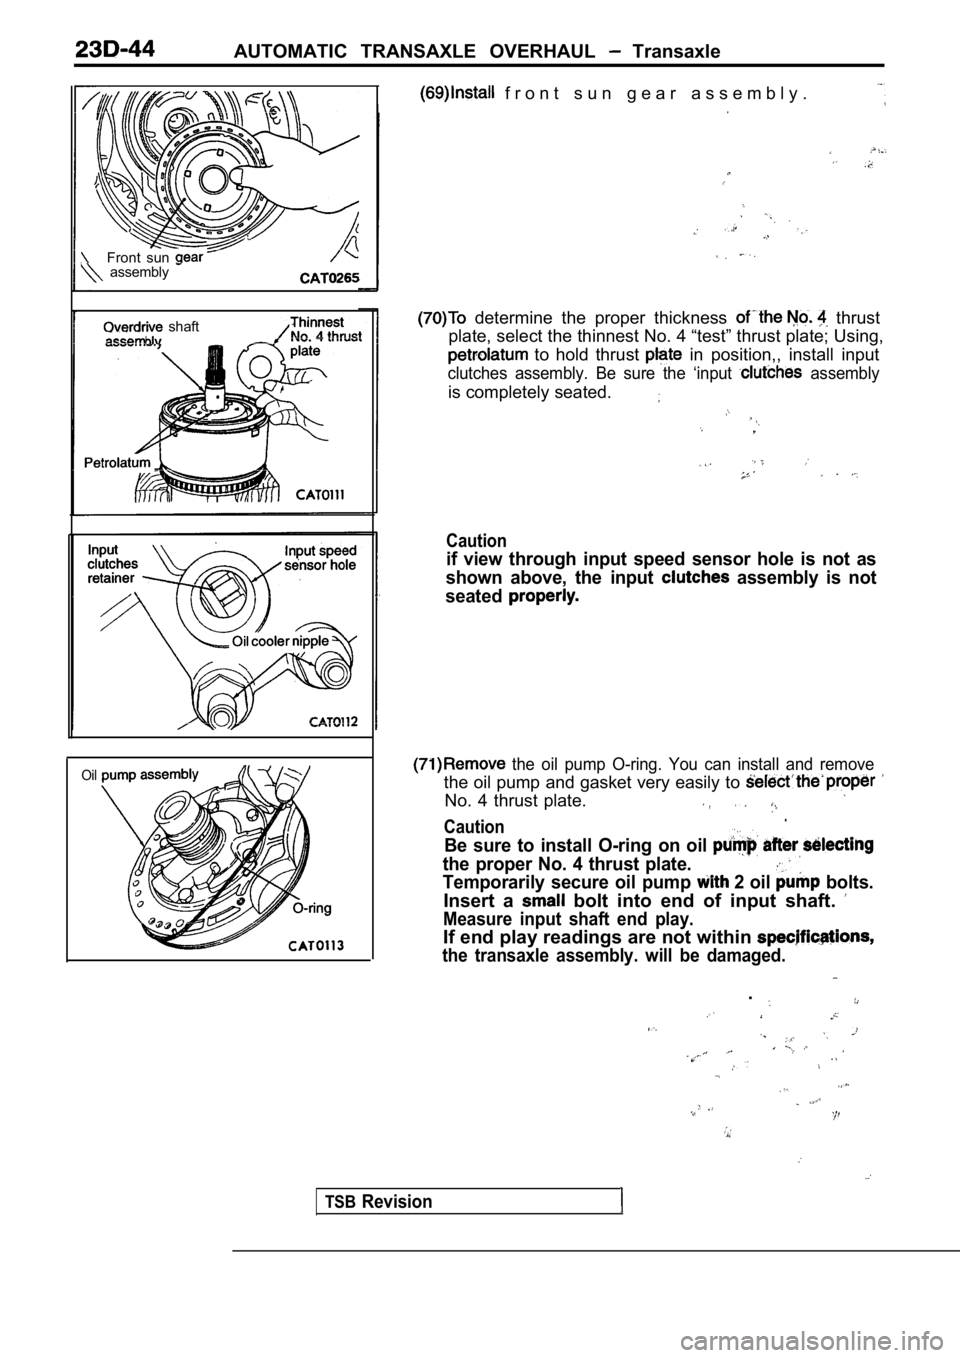
f r o n t s u n g e a r a s s e m b l y .
Front sun assembly
shaft
Oil
determine the proper thickness thrust
plate, select the thinnest No. 4 “test” thrust plat e; Using,
to hold thrust in position,, install input
clutches assembly. Be sure the ‘input assembly
is completely seated.
Caution
if view through input speed sensor hole is not as
shown above, the input
assembly is not
seated
the oil pump O-ring. You can install and remove
the oil pump and gasket very easily to
No. 4 thrust plate..Caution
Be sure to install O-ring on oil
the proper No. 4 thrust plate.
Temporarily secure oil pump 2 oil bolts.
Insert a bolt into end of input shaft.
Measure input shaft end play.
If end play readings are not within
the transaxle assembly. will be damaged.
.
TSBRevision
Page 1447 of 2103
AUTOMATIC TRANSAXLE OVERHAUL
Use 2 bolts to hold pump in placeInput
clutches
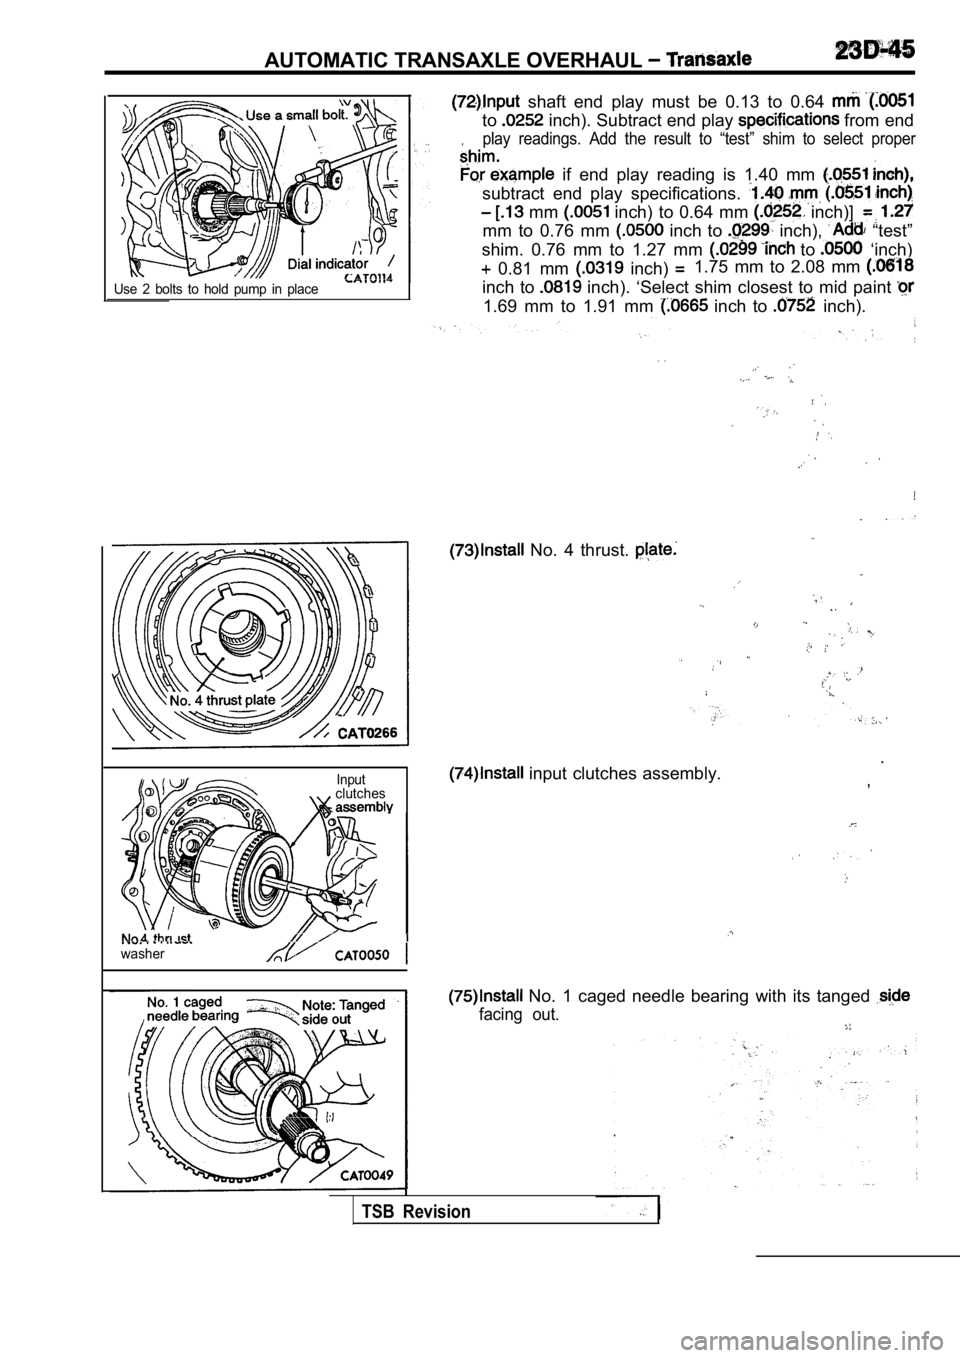
shaft end play must be 0.13 to 0.64
to inch). Subtract end play from end
play readings. Add the result to “test” shim to sel ect proper.
if end play reading is 1.40 mm
subtract end play specifications.
mm inch) to 0.64 mm inch)]
mm to 0.76 mm inch to inch), “test”
shim. 0.76 mm to 1.27 mm
to ‘inch)
0.81 mm inch) 1.75 mm to 2.08 mm
inch to inch). ‘Select shim closest to mid paint
1.69 mm to 1.91 mm inch to inch).
No. 4 thrust.
input clutches assembly. .
,
washer
No. 1 caged needle bearing with its tanged
facing out.
TSB Revision
Page 1448 of 2103
AUTOMATIC.
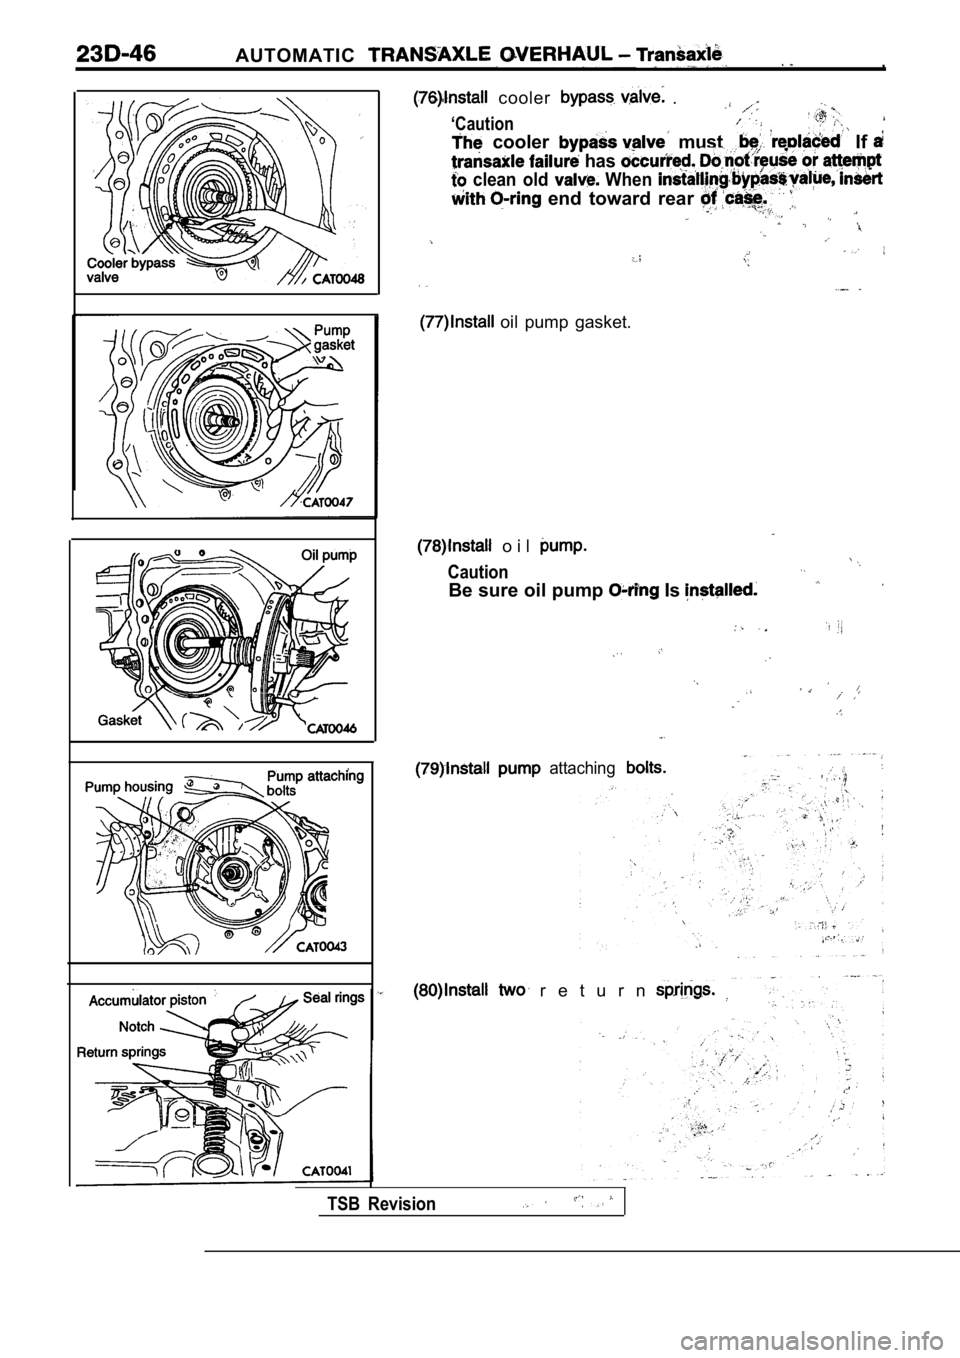
cooler .
‘Caution
cooler must If
has
clean old When
end toward rear
oil pump gasket.
o i l
Caution
Be sure oil pump Is
attaching
r e t u r n
TSB Revision
Page 1449 of 2103
AUTOMATIC TRANSAXLE OVERHAUL
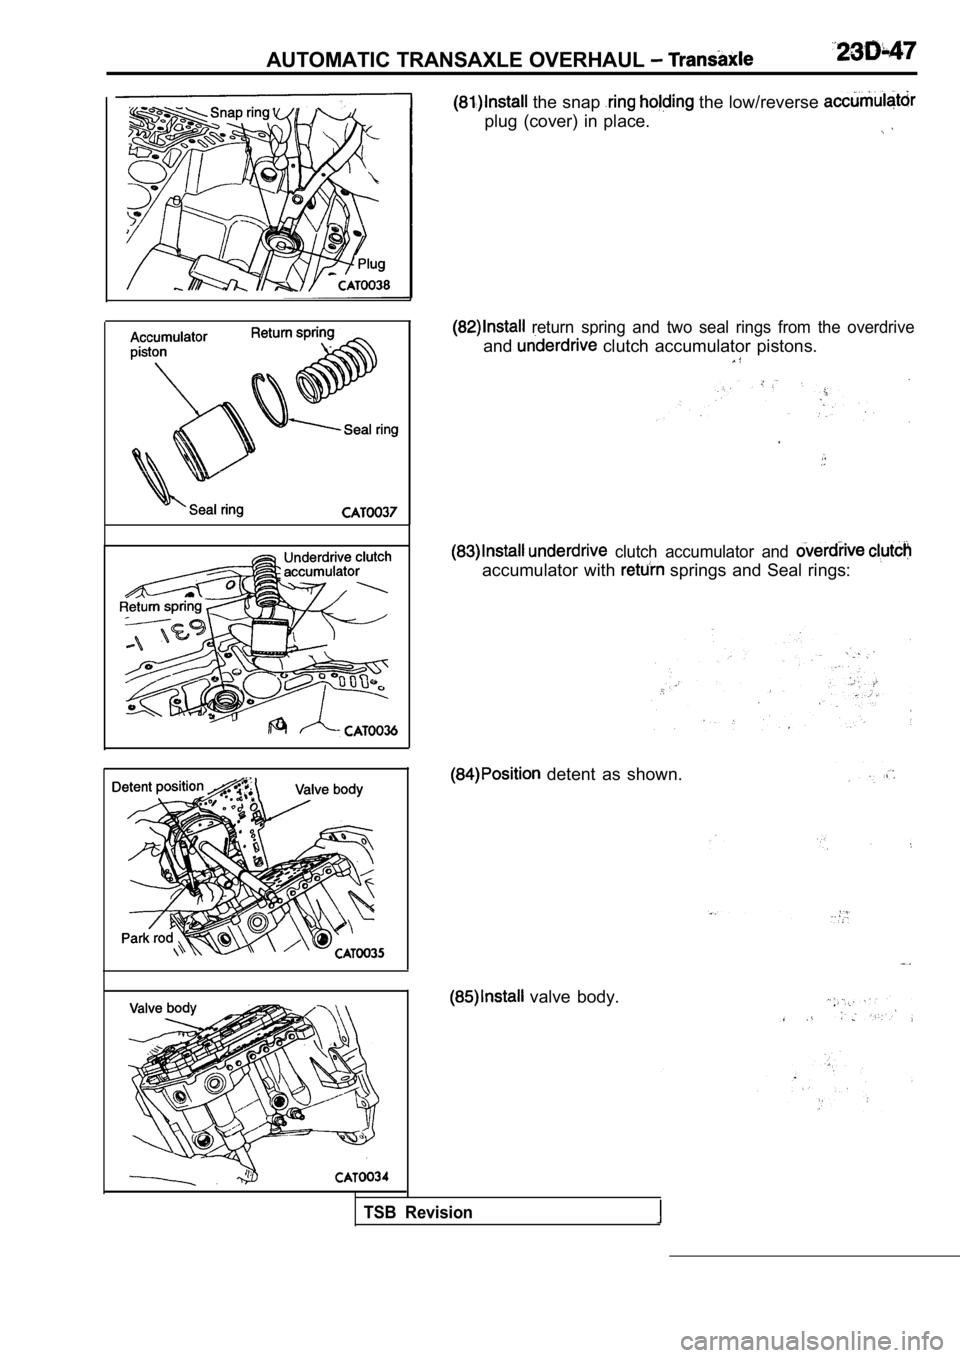
the snap the low/reverse
plug (cover) in place.
return spring and two seal rings from the overdrive
and clutch accumulator pistons.
clutch accumulator and
accumulator with springs and Seal rings:
detent as shown.
valve body.
TSB Revision
Page 1450 of 2103
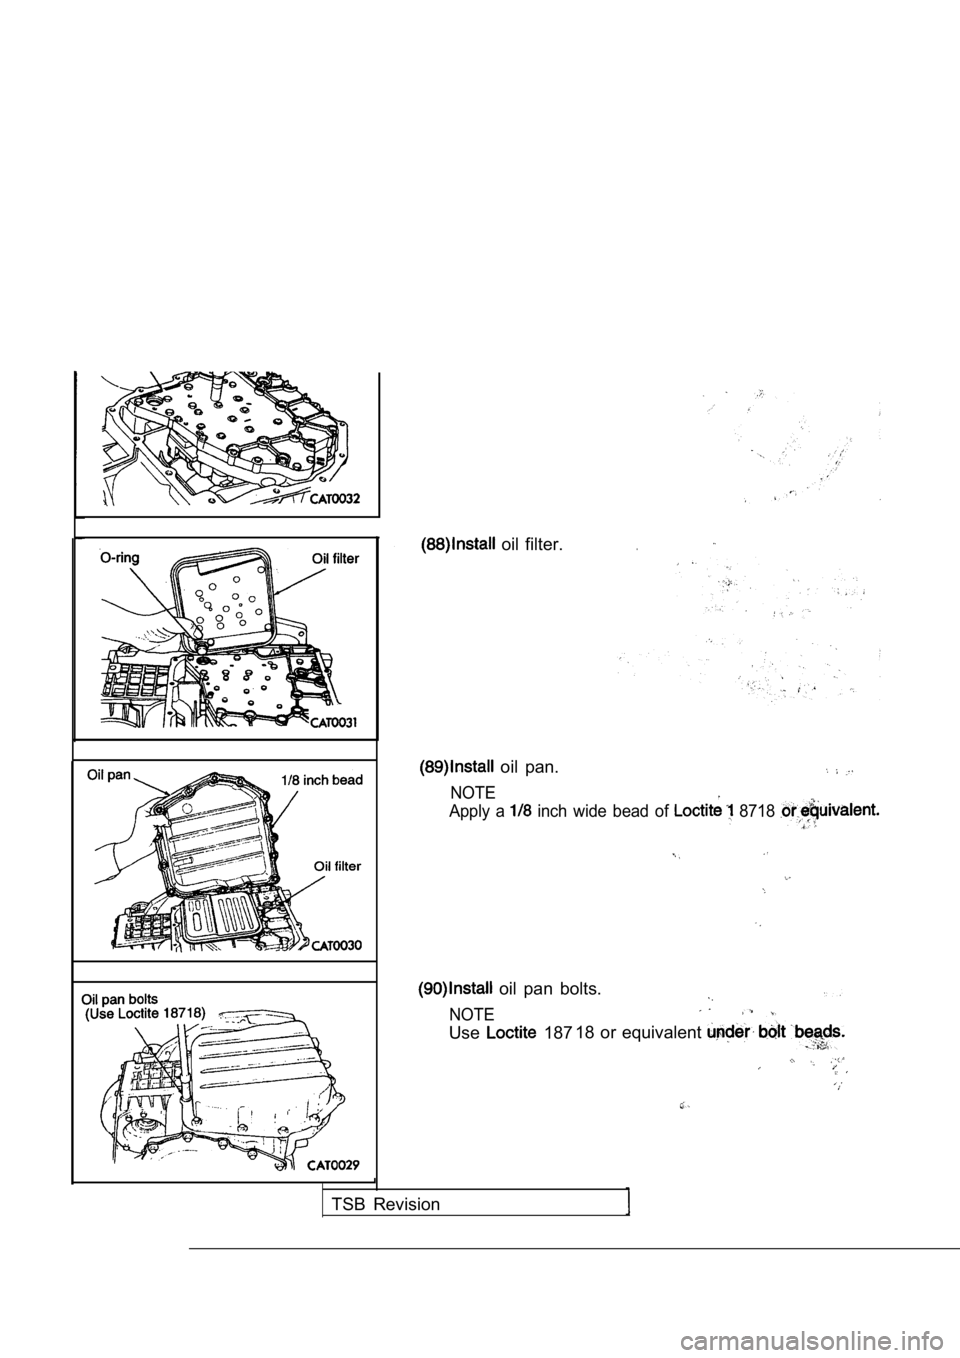
oil filter..
oil pan.
NOTE
Apply a
inch wide bead of 8718
oil pan bolts.
NOTE
Use 18718 or equivalent
TSB Revision
Trending: wheel bolt torque, coolant level, seat memory, oil pressure, rear view mirror, overheating, weight
