NISSAN X-TRAIL 2003 Electronic Repair Manual
Manufacturer: NISSAN, Model Year: 2003, Model line: X-TRAIL, Model: NISSAN X-TRAIL 2003Pages: 3066, PDF Size: 51.47 MB
Page 2371 of 3066
![NISSAN X-TRAIL 2003 Electronic Repair Manual INSTRUMENT PANEL ASSEMBLY
IP-5
C
D
E
F
G
H
J
K
L
MA
B
IP
Removal and InstallationEIS0 00 NI
TA B L E O F W O R K I T E M
[ ]: The number shows the removal order.
ComponentsInstrument
panelCombination
NISSAN X-TRAIL 2003 Electronic Repair Manual INSTRUMENT PANEL ASSEMBLY
IP-5
C
D
E
F
G
H
J
K
L
MA
B
IP
Removal and InstallationEIS0 00 NI
TA B L E O F W O R K I T E M
[ ]: The number shows the removal order.
ComponentsInstrument
panelCombination](/img/5/57402/w960_57402-2370.png)
INSTRUMENT PANEL ASSEMBLY
IP-5
C
D
E
F
G
H
J
K
L
MA
B
IP
Removal and InstallationEIS0 00 NI
TA B L E O F W O R K I T E M
[ ]: The number shows the removal order.
ComponentsInstrument
panelCombination
meterNavigation
DisplayAudio
Console
Up Down
Front speaker grille [1]
Instrument finisher A, B [2] [1]
Cup holder [3]
Instrument cluster lid A [4] [2]
Combination meter [5] [3]
Pocket [6]
Key cylinder escutcheon and steer-
ing column cover[7]
Instrument lower driver panel [8]
Mirror control switch [9]
GPS antenna [10]
Cluster lid C [11] [1] [1]
Audio unit and pocket [12] [2] [2]
Cluster lid finisher [13] [1] [1]
Heater control finisher [14] [2]
CD auto–changer and pocket [15] [3]
Heater controller [16]
A/T(M/T,CVT) finisher [17] [2]
Console mask [18] [3]
Center console [19] [4]
Lower instrument cover [20]
instrument lower center panel [21]
Glove box [22]
Lower instrument panel [23]
Glove box cover [24]
Front passenger air bag module [25]
Instrument reinforcement [26]
Instrument mask [27]
Front pillar garnish [28]
Instrument panel [29]
Page 2372 of 3066
IP-6
INSTRUMENT PANEL ASSEMBLY
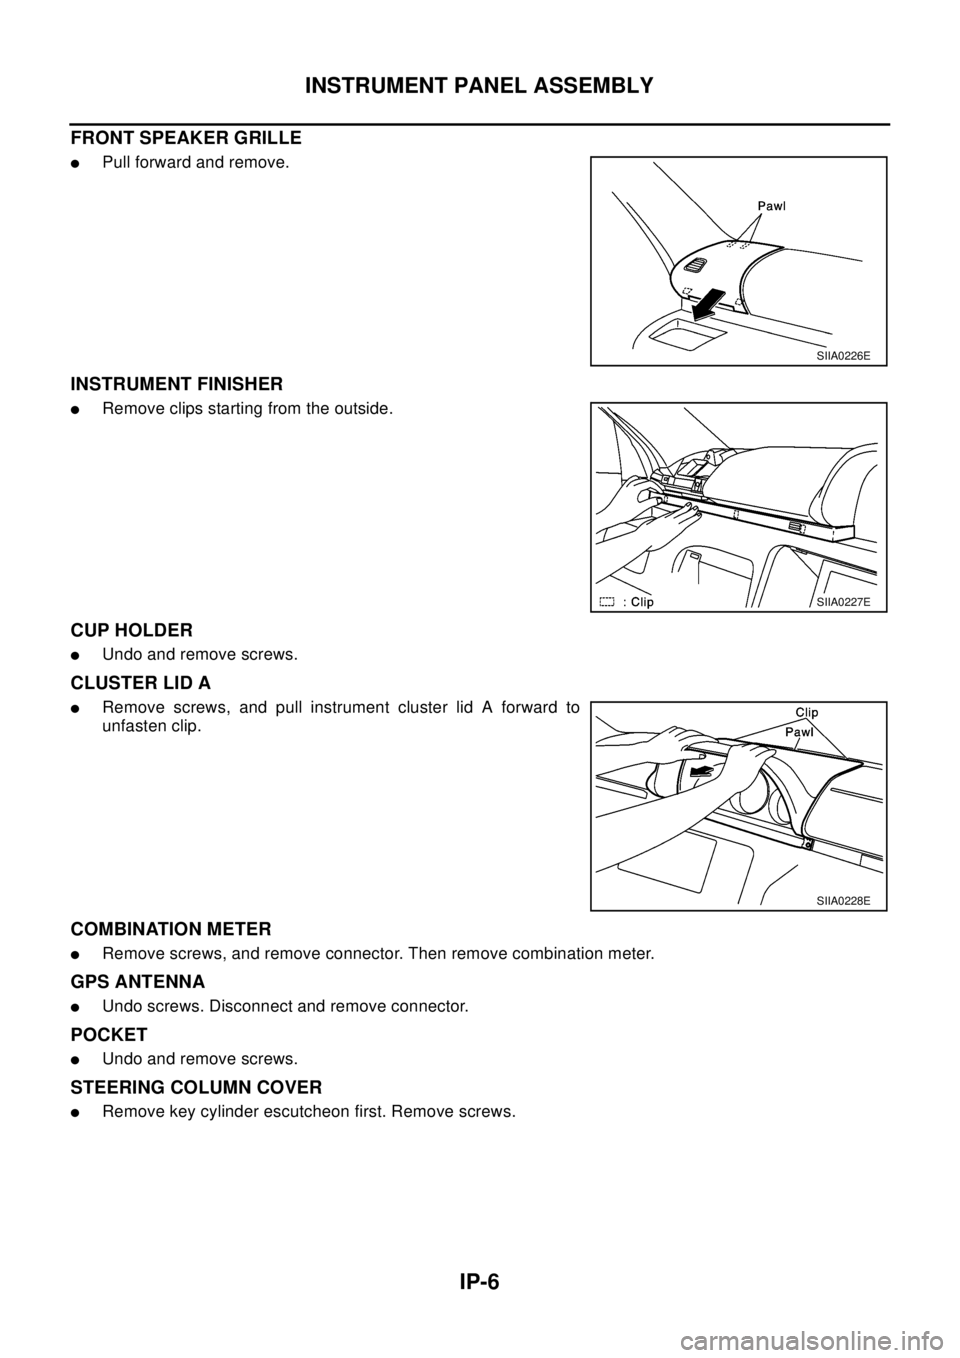
FRONT SPEAKER GRILLE
lPull forward and remove.
INSTRUMENT FINISHER
lRemove clips starting from the outside.
CUP HOLDER
lUndo and remove screws.
CLUSTER LID A
lRemove screws, and pull instrument cluster lid A forward to
unfasten clip.
COMBINATION METER
lRemove screws, and remove connector. Then remove combination meter.
GPS ANTENNA
lUndo screws. Disconnect and remove connector.
POCKET
lUndo and remove screws.
STEERING COLUMN COVER
lRemove key cylinder escutcheon first. Remove screws.
SIIA0226E
SIIA0227E
SIIA0228E
Page 2373 of 3066
INSTRUMENT PANEL ASSEMBLY
IP-7
C
D
E
F
G
H
J
K
L
MA
B
IP
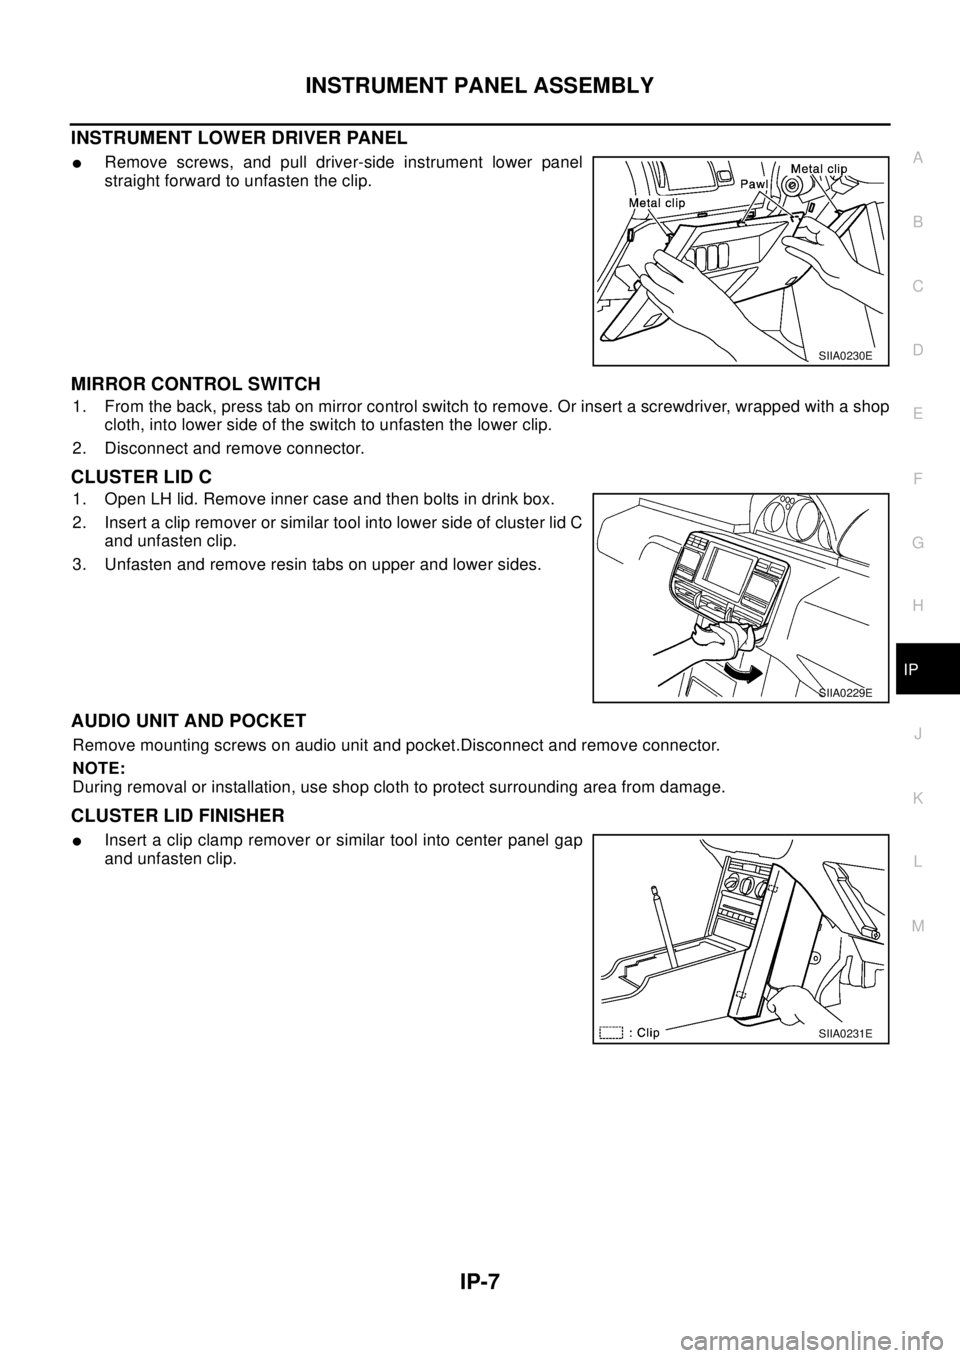
INSTRUMENT LOWER DRIVER PANEL
lRemove screws, and pull driver-side instrument lower panel
straight forward to unfasten the clip.
MIRROR CONTROL SWITCH
1. From the back, press tab on mirror control switch to remove. Or insert a screwdriver, wrapped with a shop
cloth, into lower side of the switch to unfasten the lower clip.
2. Disconnect and remove connector.
CLUSTER LID C
1. Open LH lid. Remove inner case and then bolts in drink box.
2. Insert a clip remover or similar tool into lower side of cluster lid C
and unfasten clip.
3. Unfasten and remove resin tabs on upper and lower sides.
AUDIO UNIT AND POCKET
Remove mounting screws on audio unit and pocket.Disconnect and remove connector.
NOTE:
During removal or installation, use shop cloth to protect surrounding area from damage.
CLUSTER LID FINISHER
lInsert a clip clamp remover or similar tool into center panel gap
and unfasten clip.
SIIA0230E
SIIA0229E
SIIA0231E
Page 2374 of 3066
IP-8
INSTRUMENT PANEL ASSEMBLY
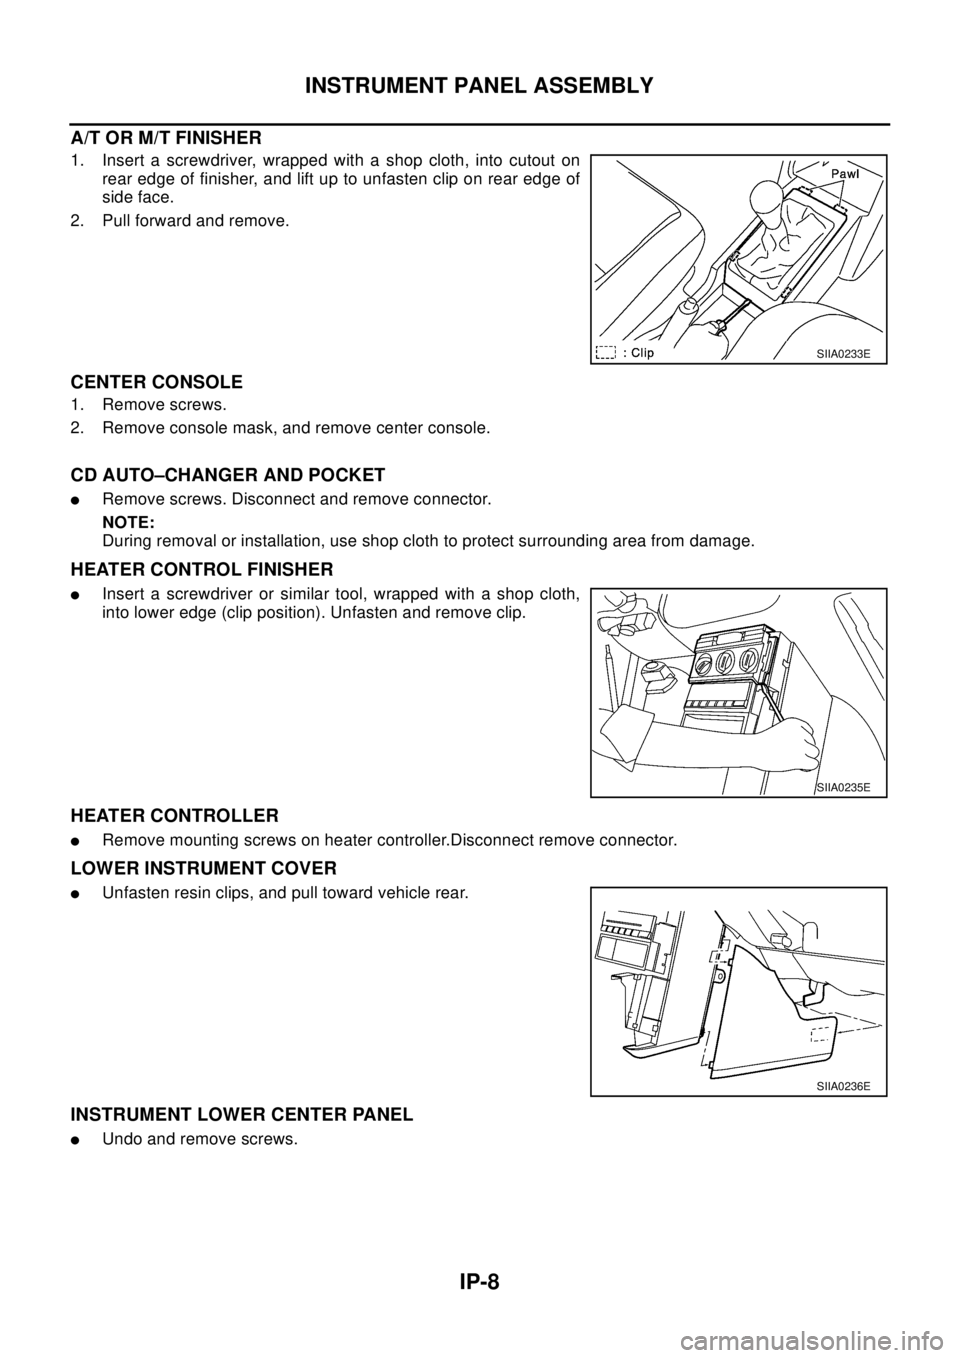
A/T OR M/T FINISHER
1. Insert a screwdriver, wrapped with a shop cloth, into cutout on
rear edge of finisher, and lift up to unfasten clip on rear edge of
side face.
2. Pull forward and remove.
CENTER CONSOLE
1. Remove screws.
2. Remove console mask, and remove center console.
CD AUTO–CHANGER AND POCKET
lRemove screws. Disconnect and remove connector.
NOTE:
During removal or installation, use shop cloth to protect surrounding area from damage.
HEATER CONTROL FINISHER
lInsert a screwdriver or similar tool, wrapped with a shop cloth,
into lower edge (clip position). Unfasten and remove clip.
HEATER CONTROLLER
lRemove mounting screws on heater controller.Disconnect remove connector.
LOWER INSTRUMENT COVER
lUnfasten resin clips, and pull toward vehicle rear.
INSTRUMENT LOWER CENTER PANEL
lUndo and remove screws.
SIIA0233E
SIIA0235E
SIIA0236E
Page 2375 of 3066
INSTRUMENT PANEL ASSEMBLY
IP-9
C
D
E
F
G
H
J
K
L
MA
B
IP
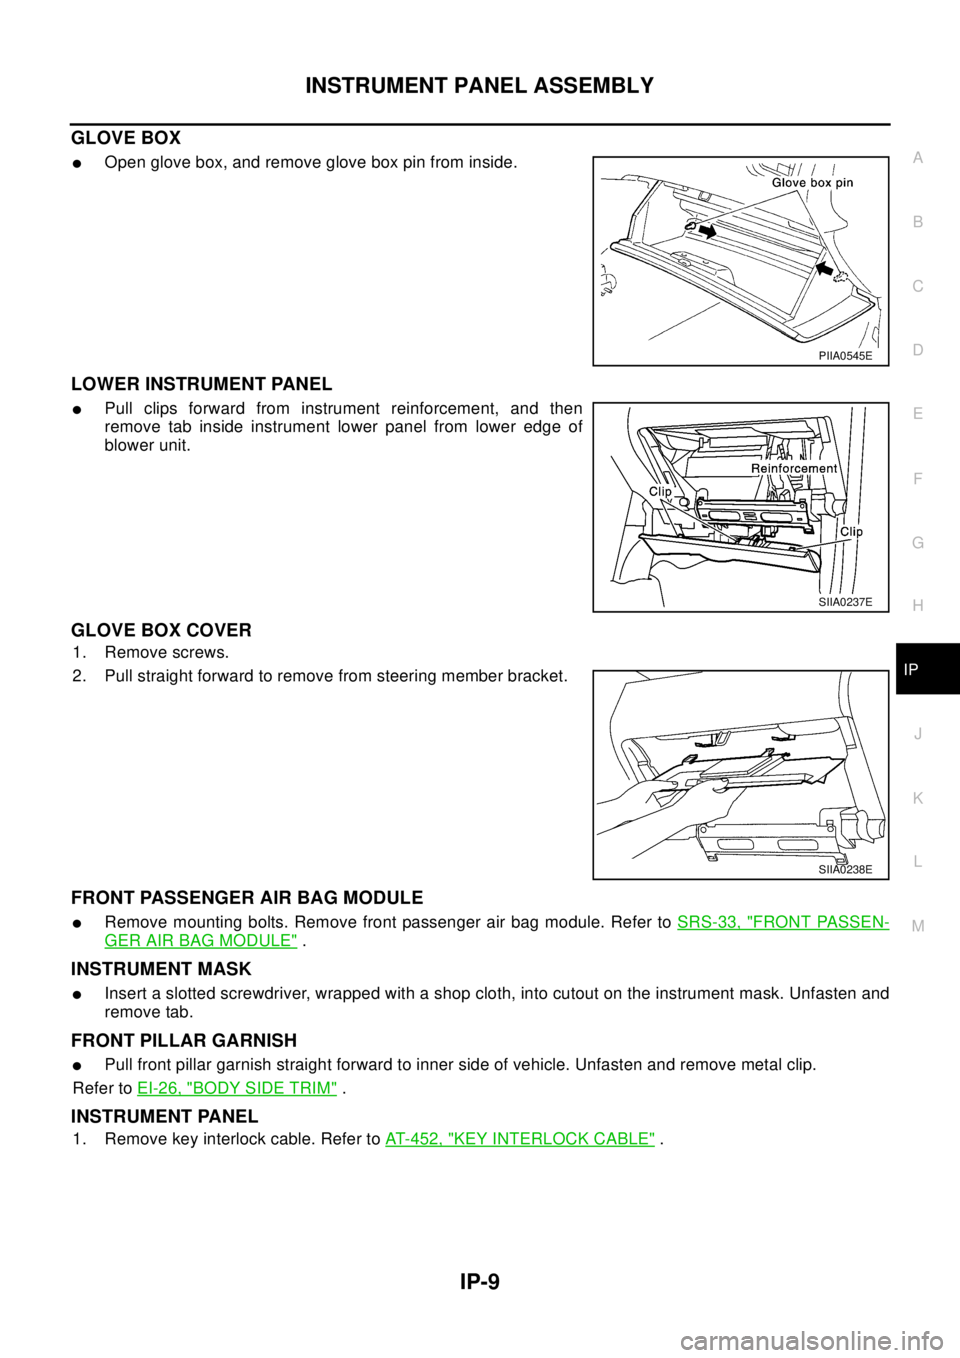
GLOVE BOX
lOpen glove box, and remove glove box pin from inside.
LOWER INSTRUMENT PANEL
lPull clips forward from instrument reinforcement, and then
remove tab inside instrument lower panel from lower edge of
blower unit.
GLOVE BOX COVER
1. Remove screws.
2. Pull straight forward to remove from steering member bracket.
FRONT PASSENGER AIR BAG MODULE
lRemove mounting bolts. Remove front passenger air bag module. Refer toSRS-33, "FRONT PASSEN-
GER AIR BAG MODULE".
INSTRUMENT MASK
lInsert a slotted screwdriver, wrapped with a shop cloth, into cutout on the instrument mask. Unfasten and
remove tab.
FRONT PILLAR GARNISH
lPull front pillar garnish straight forward to inner side of vehicle. Unfasten and remove metal clip.
Refer toEI-26, "
BODY SIDE TRIM".
INSTRUMENT PANEL
1. Remove key interlock cable. Refer toAT-452, "KEY INTERLOCK CABLE".
PIIA0545E
SIIA0237E
SIIA0238E
Page 2376 of 3066
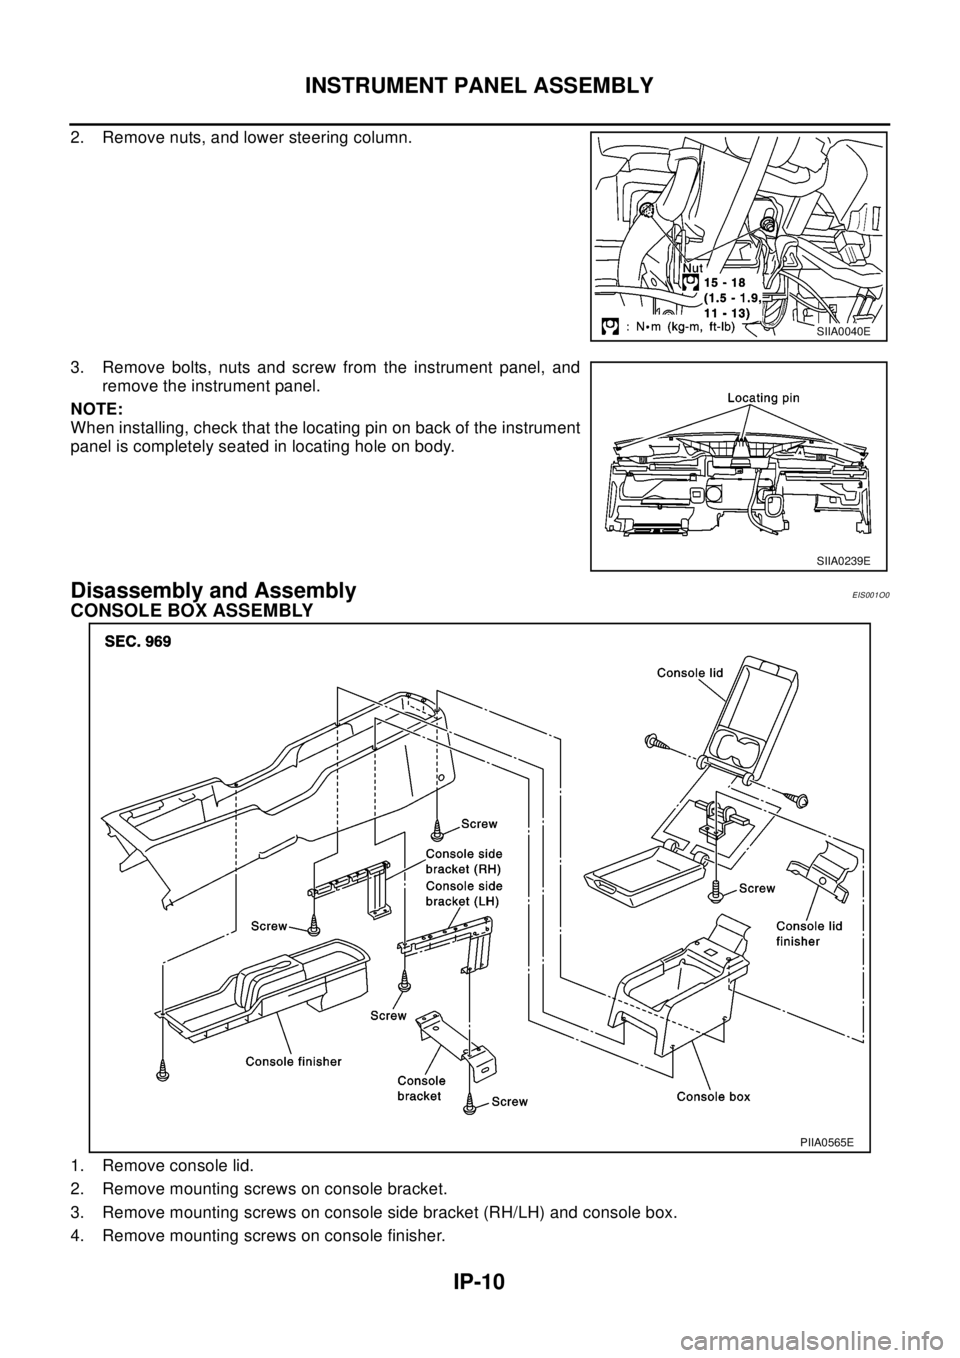
IP-10
INSTRUMENT PANEL ASSEMBLY
2. Remove nuts, and lower steering column.
3. Remove bolts, nuts and screw from the instrument panel, and
remove the instrument panel.
NOTE:
When installing, check that the locating pin on back of the instrument
panel is completely seated in locating hole on body.
Disassembly and AssemblyEIS001O0
CONSOLE BOX ASSEMBLY
1. Remove console lid.
2. Remove mounting screws on console bracket.
3. Remove mounting screws on console side bracket (RH/LH) and console box.
4. Remove mounting screws on console finisher.
SIIA0040E
SIIA0239E
PIIA0565E
Page 2377 of 3066

LAN-1
LAN SYSTEM
K ELECTRICAL
CONTENTS
C
D
E
F
G
H
I
J
L
M
SECTION
A
B
LAN
LAN SYSTEM
CAN
PRECAUTIONS .......................................................... 2
Precautions for Supplemental Restraint System
(SRS) “AIR BAG” and “SEAT BELT PRE-TEN-
SIONER” .................................................................. 2
Precautions For Trouble Diagnosis .......................... 2
CAN SYSTEM ....................................................... 2
Precautions For Harness Repair .............................. 2
CAN SYSTEM ....................................................... 2
CAN COMMUNICATION ............................................ 3
System Description .................................................. 3
FOR A/T MODELS ................................................ 3
FOR M/T MODELS ............................................... 3
CAN SYSTEM (FOR A/T MODELS) ........................... 5
System Description .................................................. 5
Component Parts and Harness Connector Location..... 5
Wiring Diagram — CAN — ....................................... 6
Work Flow ................................................................ 7
CHECK SHEET ..................................................... 8
CHECK SHEET RESULTS (EXAMPLE) ............... 9
INSPECTION ........................................................ 9CAN Communication Circuit Check .......................... 9
Component Inspection ............................................ 10
ECM/TCM INTERNAL CIRCUIT INSPECTION... 10
CAN SYSTEM (FOR M/T MODELS) ........................ 11
System Description ................................................. 11
Component Parts and Harness Connector Location... 11
Wiring Diagram — CAN — ..................................... 12
Work Flow ............................................................... 13
CHECK SHEET ................................................... 14
CHECK SHEET RESULTS (EXAMPLE) ............. 15
INSPECTION ...................................................... 16
Circuit Check Between Steering Wheel Angle Sen-
sor and 4WD Control Unit ....................................... 16
ECM Circuit Check ................................................. 17
4WD Control Unit Circuit Check ............................. 18
Steering Wheel Angle Sensor Circuit Check .......... 18
ESP/TCS/ABS Control Unit Circuit Check .............. 19
CAN Communication Circuit Check ........................ 20
Component Inspection ............................................ 22
ECM / ESP/TCS/ABS CONTROL UNIT INTER-
NAL CIRCUIT INSPECTION ............................... 22
Page 2378 of 3066
![NISSAN X-TRAIL 2003 Electronic Repair Manual LAN-2
[CAN]
PRECAUTIONS
[CAN]PRECAUTIONSPFP:00001
Precautions for Supplemental Restraint System (SRS) “AIR BAG” and “SEAT
BELT PRE-TENSIONER”
EKS001U0
The Supplemental Restraint System such as NISSAN X-TRAIL 2003 Electronic Repair Manual LAN-2
[CAN]
PRECAUTIONS
[CAN]PRECAUTIONSPFP:00001
Precautions for Supplemental Restraint System (SRS) “AIR BAG” and “SEAT
BELT PRE-TENSIONER”
EKS001U0
The Supplemental Restraint System such as](/img/5/57402/w960_57402-2377.png)
LAN-2
[CAN]
PRECAUTIONS
[CAN]PRECAUTIONSPFP:00001
Precautions for Supplemental Restraint System (SRS) “AIR BAG” and “SEAT
BELT PRE-TENSIONER”
EKS001U0
The Supplemental Restraint System such as “AIR BAG” and “SEAT BELT PRE-TENSIONER”, used along
with a front seat belt, helps to reduce the risk or severity of injury to the driver and front passenger for certain
types of collision. Information necessary to service the system safely is included in the SRS and SB section of
this Service Manual.
WAR NIN G:
lTo avoid rendering the SRS inoperative, which could increase the risk of personal injury or death
in the event of a collision which would result in air bag inflation, all maintenance must be per-
formed by an authorized NISSAN/INFINITI dealer.
lImproper maintenance, including incorrect removal and installation of the SRS, can lead to per-
sonal injury caused by unintentional activation of the system. For removal of Spiral Cable and Air
Bag Module, see the SRS section.
lDo not use electrical test equipment on any circuit related to the SRS unless instructed to in this
Service Manual. SRS wiring harnesses can be identified by yellow harness connectors.
Precautions For Trouble DiagnosisEKS001U1
CAN SYSTEM
lDo not apply voltage of 7.0V or higher to the measurement terminals.
lUse the tester with its open terminal voltage being 7.0V or less.
Precautions For Harness RepairEKS001U2
CAN SYSTEM
lSolder the repaired parts, and wrap with tape. [Frays of twisted
line must be within 110 mm (4.33 in)]
lDo not perform bypass wire connections for the repair
parts.(The spliced wire will become separated and the charac-
teristics of twisted line will be lost.)
PKIA0306E
PKIA0307E
Page 2379 of 3066
![NISSAN X-TRAIL 2003 Electronic Repair Manual CAN COMMUNICATION
LAN-3
[CAN]
C
D
E
F
G
H
I
J
L
MA
B
LAN
CAN COMMUNICATIONPFP:23710
System DescriptionEKS001U3
CAN (Controller Area Network) is a serial communication line for real time application. I NISSAN X-TRAIL 2003 Electronic Repair Manual CAN COMMUNICATION
LAN-3
[CAN]
C
D
E
F
G
H
I
J
L
MA
B
LAN
CAN COMMUNICATIONPFP:23710
System DescriptionEKS001U3
CAN (Controller Area Network) is a serial communication line for real time application. I](/img/5/57402/w960_57402-2378.png)
CAN COMMUNICATION
LAN-3
[CAN]
C
D
E
F
G
H
I
J
L
MA
B
LAN
CAN COMMUNICATIONPFP:23710
System DescriptionEKS001U3
CAN (Controller Area Network) is a serial communication line for real time application. It is an on-vehicle mul-
tiplex communication line with high data communication speed and excellent error detection ability. Many elec-
tronic control units are equipped onto a vehicle, and each control unit shares information and links with other
control units during operation (not independent). In CAN communication, control units are connected with 2
communication lines (CAN H line, CAN L line) allowing a high rate of information transmission with less wiring.
Each control unit transmits/receives data but selectively reads required data only.
FOR A/T MODELS
System diagram
Input/output signal chart
T: Transmit R: Receive
FOR M/T MODELS
System diagram
Input/output signal chart
T: Transmit R: Receive
SKIA0884E
Signals ECM TCM
Engine speed signal T R
Engine coolant temperature signal T R
Accelerator pedal position signal T R
A/T self-diagnosis signal R T
SKIA0885E
Signals ECMSteering wheel
angle sensor4WD control unitESP/ TCS / ABS
control unit
Engine speed signal T R R
Accelerator pedal position signal T R
ESP operation signal R R T
TCS operation signal R R T
ABS operation signal R R T
Stop lamp switch signalRT
Page 2380 of 3066
![NISSAN X-TRAIL 2003 Electronic Repair Manual LAN-4
[CAN]
CAN COMMUNICATION
Steering wheel angle sensor signal T R
ESP-OFFSW signalRT
Wheel speed sensor signalRT
4WD Mode signalTR Signals ECMSteering wheel
angle sensor4WD control unitESP/ TCS / A NISSAN X-TRAIL 2003 Electronic Repair Manual LAN-4
[CAN]
CAN COMMUNICATION
Steering wheel angle sensor signal T R
ESP-OFFSW signalRT
Wheel speed sensor signalRT
4WD Mode signalTR Signals ECMSteering wheel
angle sensor4WD control unitESP/ TCS / A](/img/5/57402/w960_57402-2379.png)
LAN-4
[CAN]
CAN COMMUNICATION
Steering wheel angle sensor signal T R
ESP-OFFSW signalRT
Wheel speed sensor signalRT
4WD Mode signalTR Signals ECMSteering wheel
angle sensor4WD control unitESP/ TCS / ABS
control unit