TOYOTA AYGO 2020 (in English) Owner's Manual
Manufacturer: TOYOTA, Model Year: 2020,
Model line: AYGO,
Model: TOYOTA AYGO 2020
Pages: 32, PDF Size: 2.64 MB
TOYOTA AYGO 2020 (in English) Owner's Manual
AYGO 2020
TOYOTA
TOYOTA
https://www.carmanualsonline.info/img/14/48404/w960_48404-0.png
TOYOTA AYGO 2020 (in English) Owner's Manual
Trending: change language, turn signal, language, lane assist, ECO mode, display, navigation system
Page 21 of 32
20 - NAVIGATION SYSTEM OWNER’S MANUAL
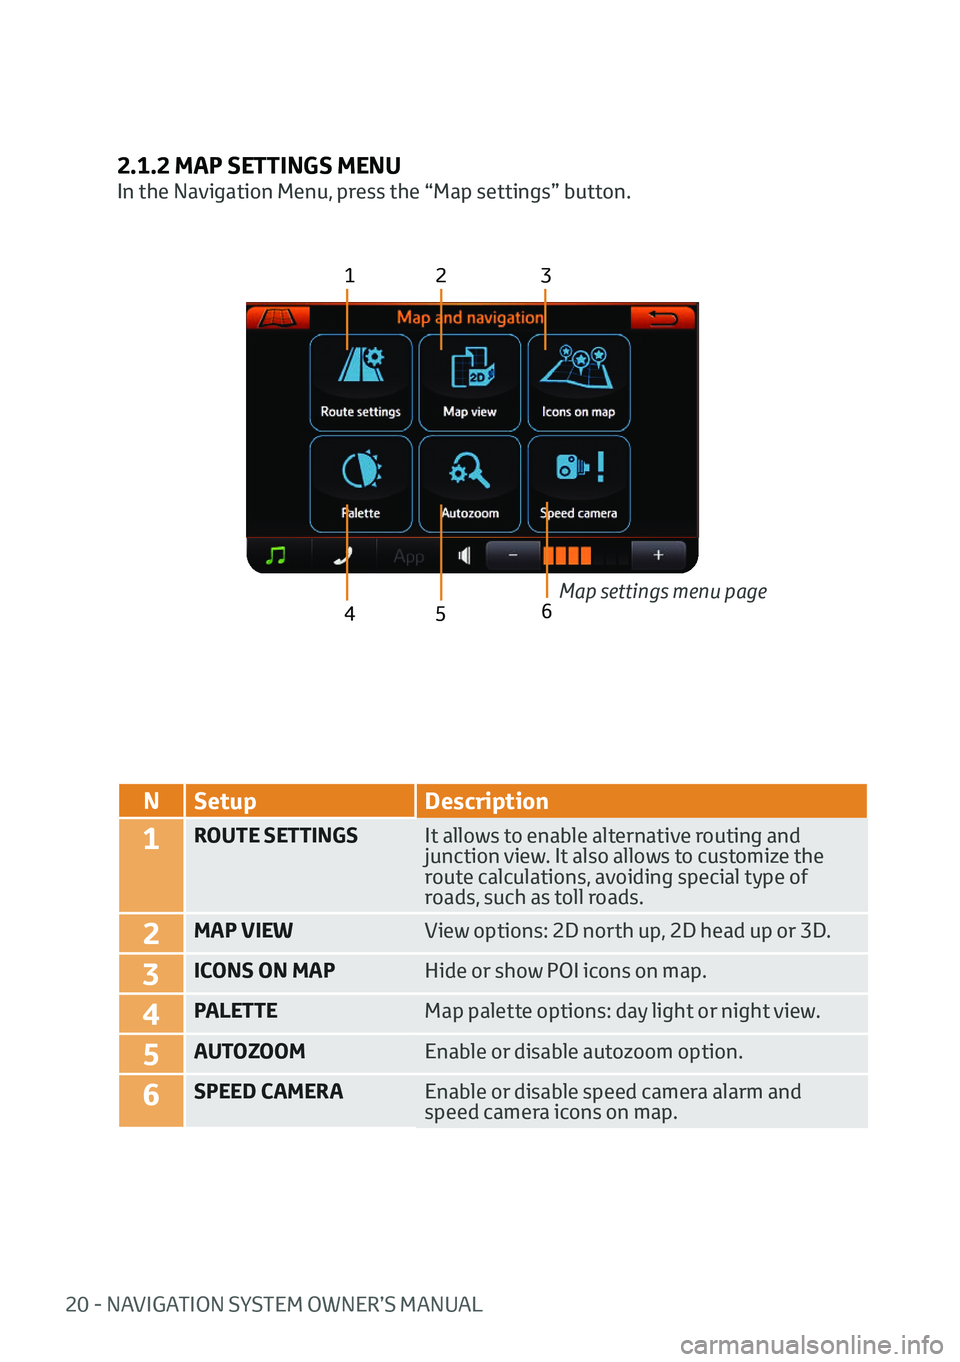
2.1.2 MAP SETTINGS MENU
In the Navigation Menu, press the “Map settings” button.
123
4 5
NSetup Description
1ROUTE SETTINGS It allows to enable alternative routing and
junction view. It also allows to customize the
route calculations, avoiding special type of
roads, such as toll roads.
2MAP VIEWView options: 2D north up, 2D head up or 3D.
3ICONS ON MAPHide or show POI icons on map.
4PALETTEMap palette options: day light or night view.
5AUTOZOOMEnable or disable autozoom option.
6SPEED CAMERAEnable or disable speed camera alarm and
speed camera icons on map.Map settings menu page
6
Page 22 of 32
NAVIGATION SYSTEM OWNER’S MANUAL - 21
2.2 DRIVE TO MENU
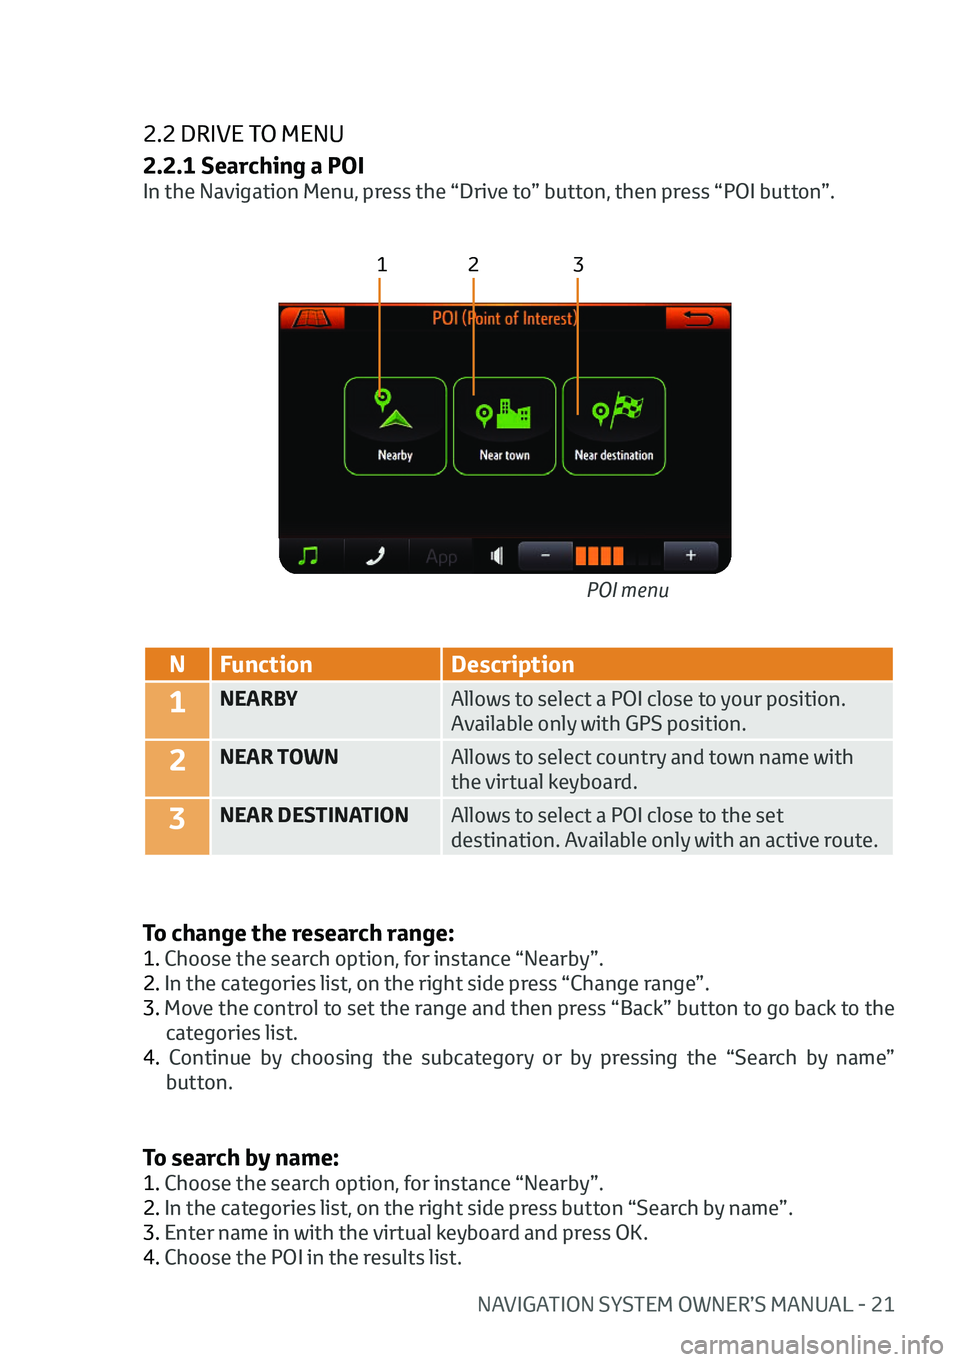
2.2.1 Searching a POI
In the Navigation Menu, press the “Drive to” button, then press “POI button”.
123
NFunction Description
1NEARBY Allows to select a POI close to your position.
Available only with GPS position.
2NEAR TOWNAllows to select country and town name with
the virtual keyboard.
3NEAR DESTINATIONAllows to select a POI close to the set
destination. Available only with an active route.
To change the research range:
1. Choose the search option, for instance “Nearby”.
2. In the categories list, on the right side press “Change range”.
3. Move the control to set the range and then press “Back” button to go back to the
categories list.
4. Continue by choosing the subcategory or by pressing the “Search by name” button. POI menu
To search by name:
1. Choose the search option, for instance “Nearby”.
2. In the categories list, on the right side press button “Search by name”.
3. Enter name in with the virtual keyboard and press OK.
4. Choose the POI in the results list.
Page 23 of 32
22 - NAVIGATION SYSTEM OWNER’S MANUAL
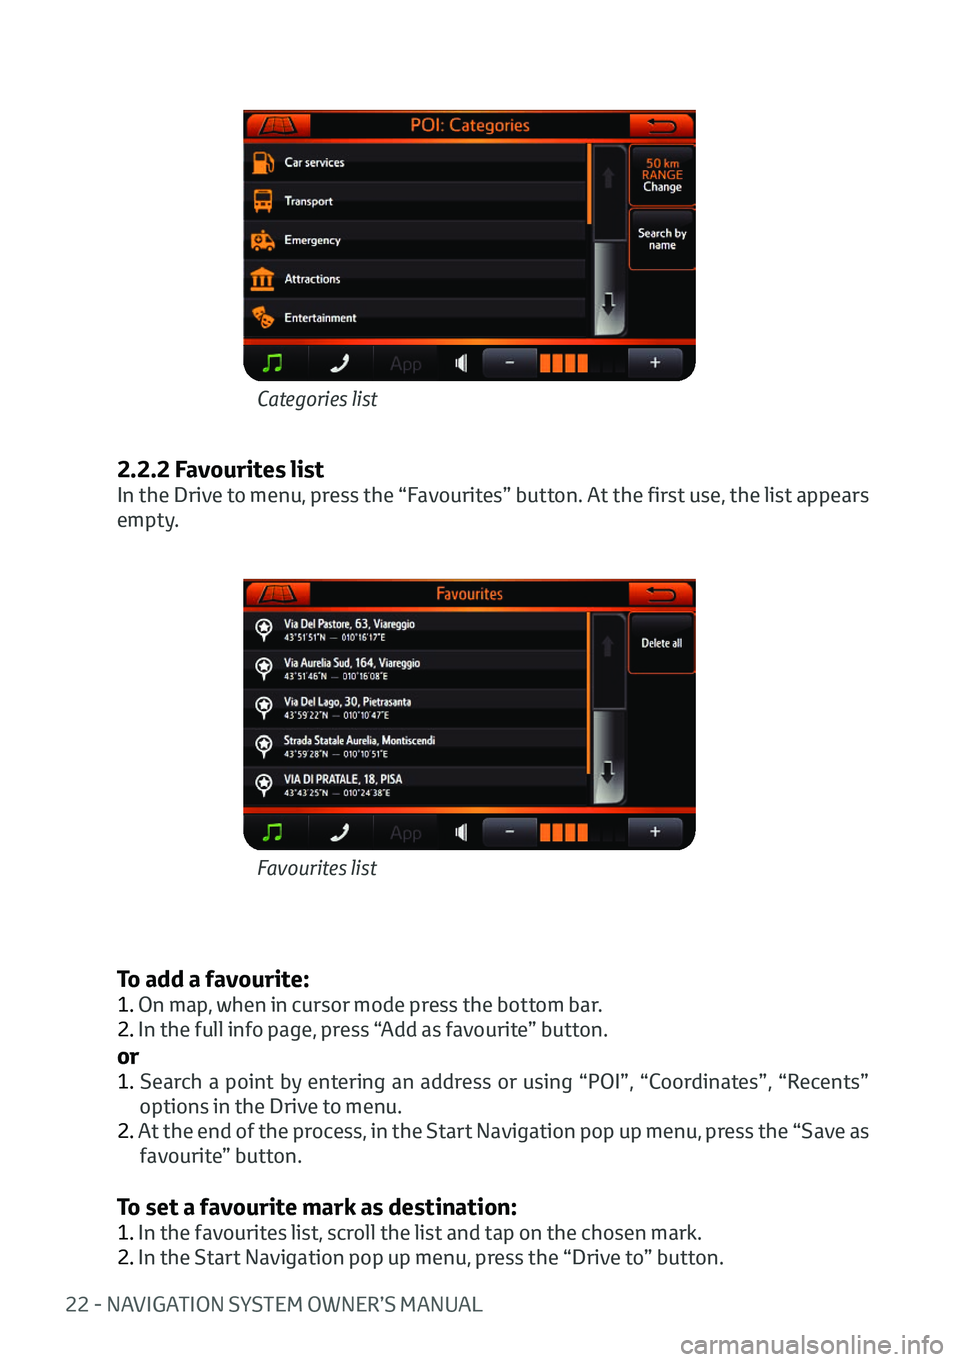
2.2.2 Favourites list
In the Drive to menu, press the “Favourites” button. At the first use, the list appears
empty.
To add a favourite:
1. On map, when in cursor mode press the bottom bar.
2. In the full info page, press “Add as favourite” button.
or
1. Search a point by entering an address or using “POI”, “Coordinates”, “Recents”
options in the Drive to menu.
2. At the end of the process, in the Start Navigation pop up menu, press the “Save as favourite” button.
To set a favourite mark as destination:
1. In the favourites list, scroll the list and tap on the chosen mark.
2. In the Start Navigation pop up menu, press the “Drive to” button.
Favourites list
Categories list
Page 24 of 32
NAVIGATION SYSTEM OWNER’S MANUAL - 23
Save Home mark from the navigation menu:
In the Navigation menu, press the “Drive me home” button. If home has not been
previously set, the software will ask the user to set it, using the same options present
in the Drive to menu.
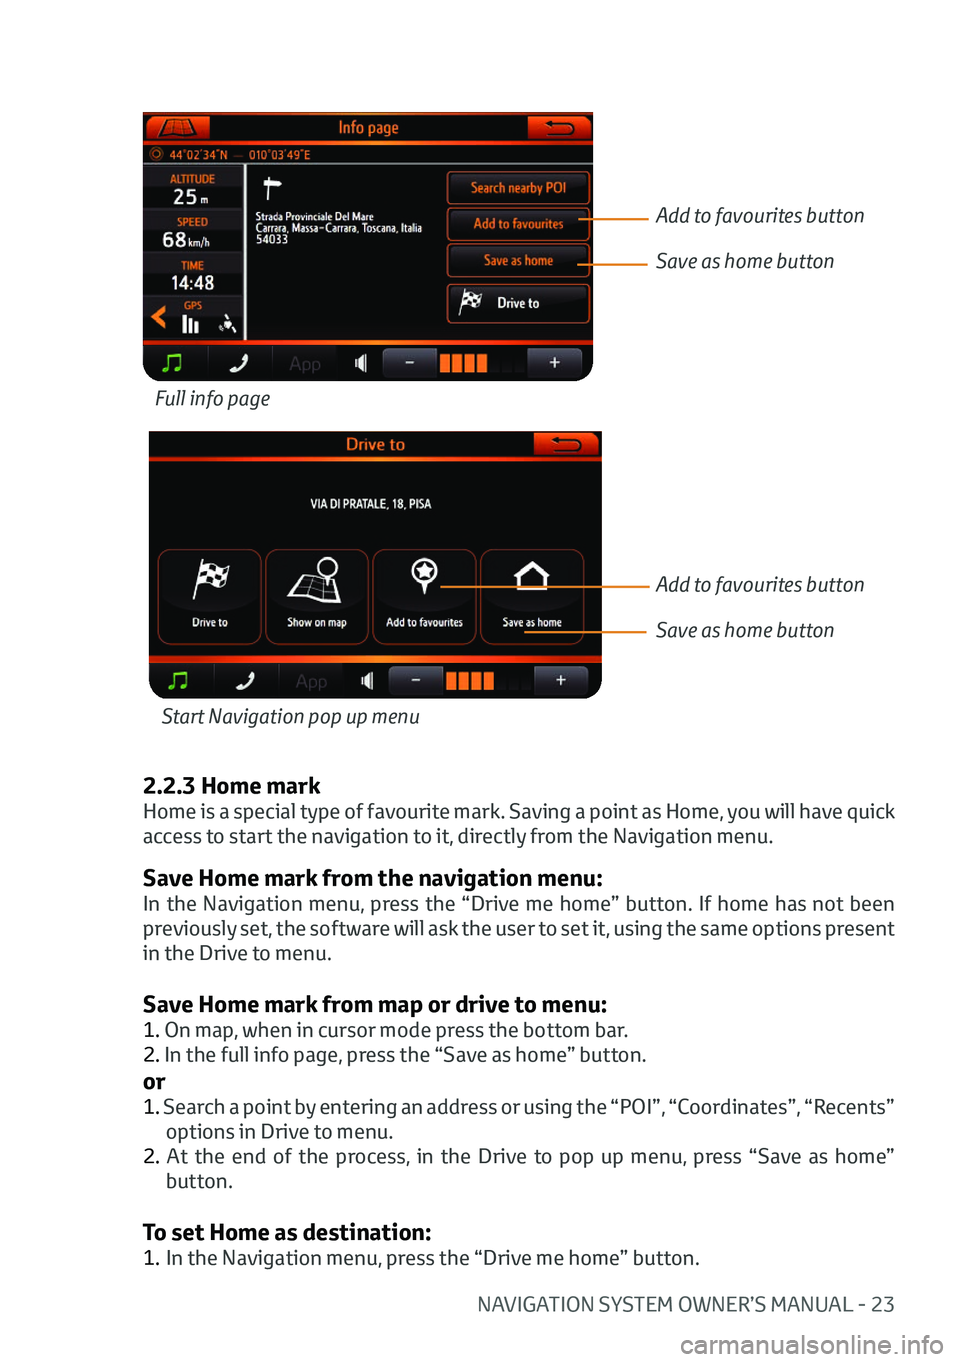
Save Home mark from map or drive to menu:
1. On map, when in cursor mode press the bottom bar.
2. In the full info page, press the “Save as home” button.
or
1. Search a point by entering an address or using the “POI”, “Coordinates”, “Recents”
options in Drive to menu.
2. At the end of the process, in the Drive to pop up menu, press “Save as home” button.
To set Home as destination:
1. In the Navigation menu, press the “Drive me home” button.
Full info page
Start Navigation pop up menu
Add to favourites button
Save as home button
Add to favourites button
Save as home button
2.2.3 Home mark
Home is a special type of favourite mark. Saving a point as Home, you will have quick
access to start the navigation to it, directly from the Navigation menu.
Page 25 of 32
24 - NAVIGATION SYSTEM OWNER’S MANUAL
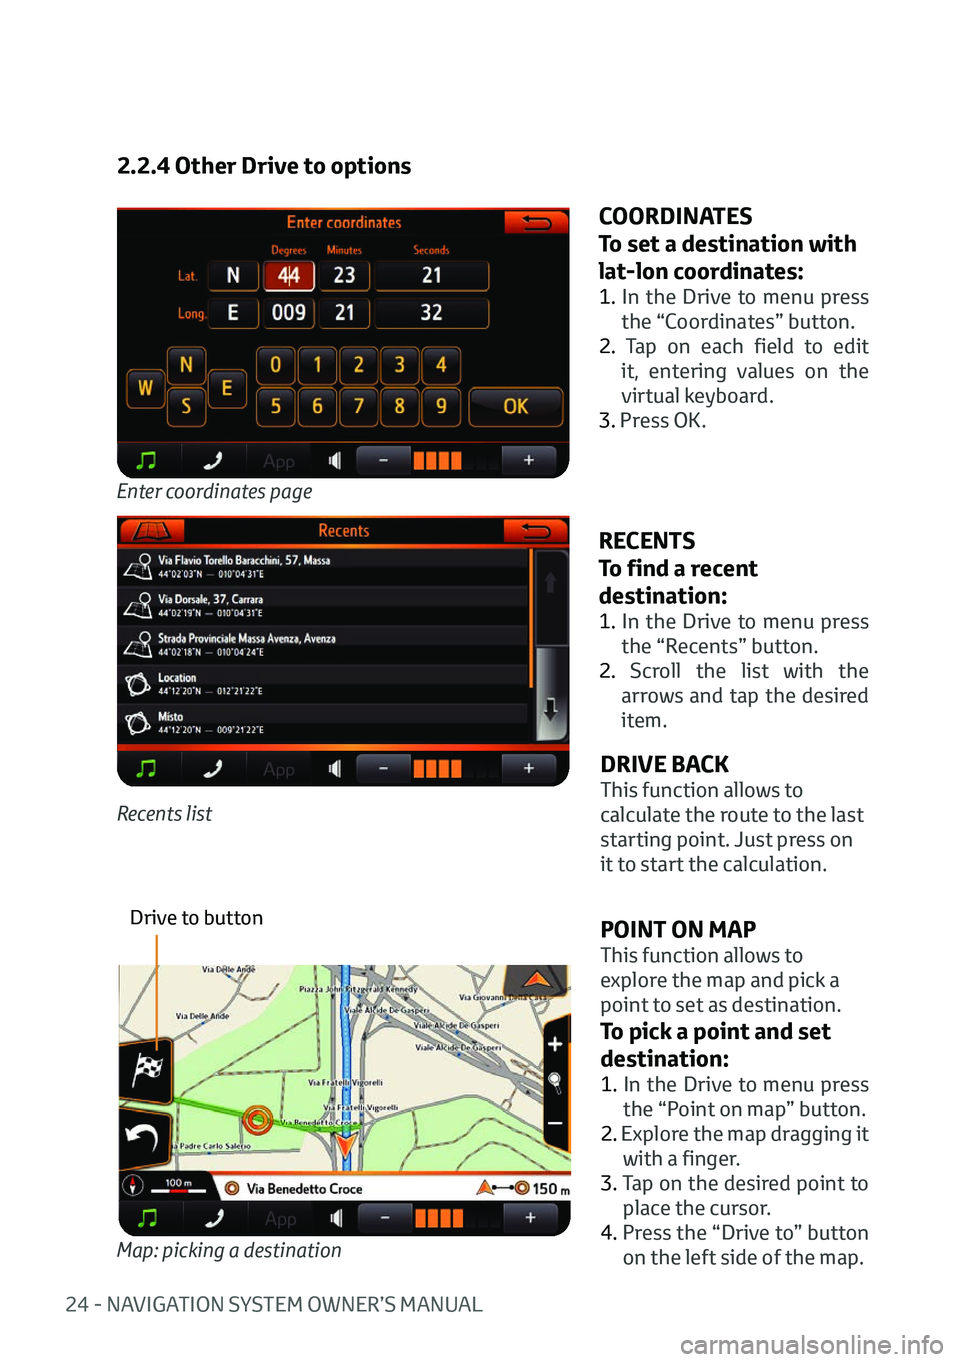
2.2.4 Other Drive to options
Enter coordinates page
COORDINATES
To set a destination with
lat-lon coordinates:
1. In the Drive to menu press
the “Coordinates” button.
2. Tap on each field to edit it, entering values on the
virtual keyboard.
3. Press OK.
RECENTS
To find a recent
destination:
1. In the Drive to menu press
the “Recents” button.
2. Scroll the list with the arrows and tap the desired
item.
Recents list
POINT ON MAP
This function allows to
explore the map and pick a
point to set as destination.
To pick a point and set
destination:
1. In the Drive to menu press
the “Point on map” button.
2. Explore the map dragging it with a finger.
3. Tap on the desired point to
place the cursor.
4. Press the “Drive to” button on the left side of the map.
Map: picking a destination
Drive to button
DRIVE BACK
This function allows to
calculate the route to the last
starting point. Just press on
it to start the calculation.
Page 26 of 32
NAVIGATION SYSTEM OWNER’S MANUAL - 25
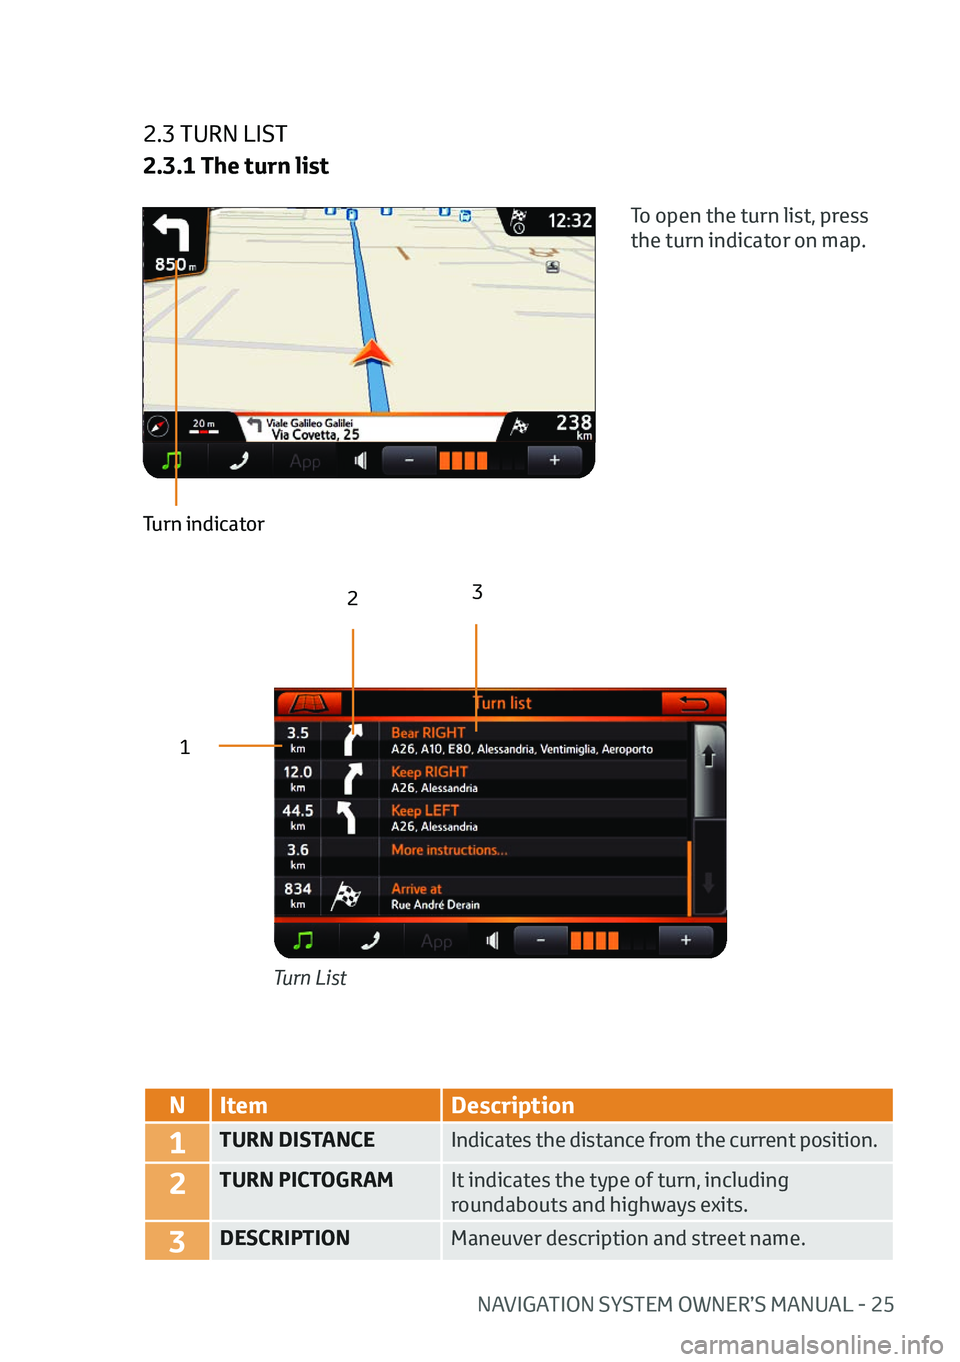
2.3 TURN LIST
2.3.1 The turn list
Turn List
To open the turn list, press
the turn indicator on map.
Turn indicator
12
3
N
Item Description
1TURN DISTANCE Indicates the distance from the current position.
2TURN PICTOGRAMIt indicates the type of turn, including
roundabouts and highways exits.
3DESCRIPTIONManeuver description and street name.
Page 27 of 32
26 - NAVIGATION SYSTEM OWNER’S MANUAL
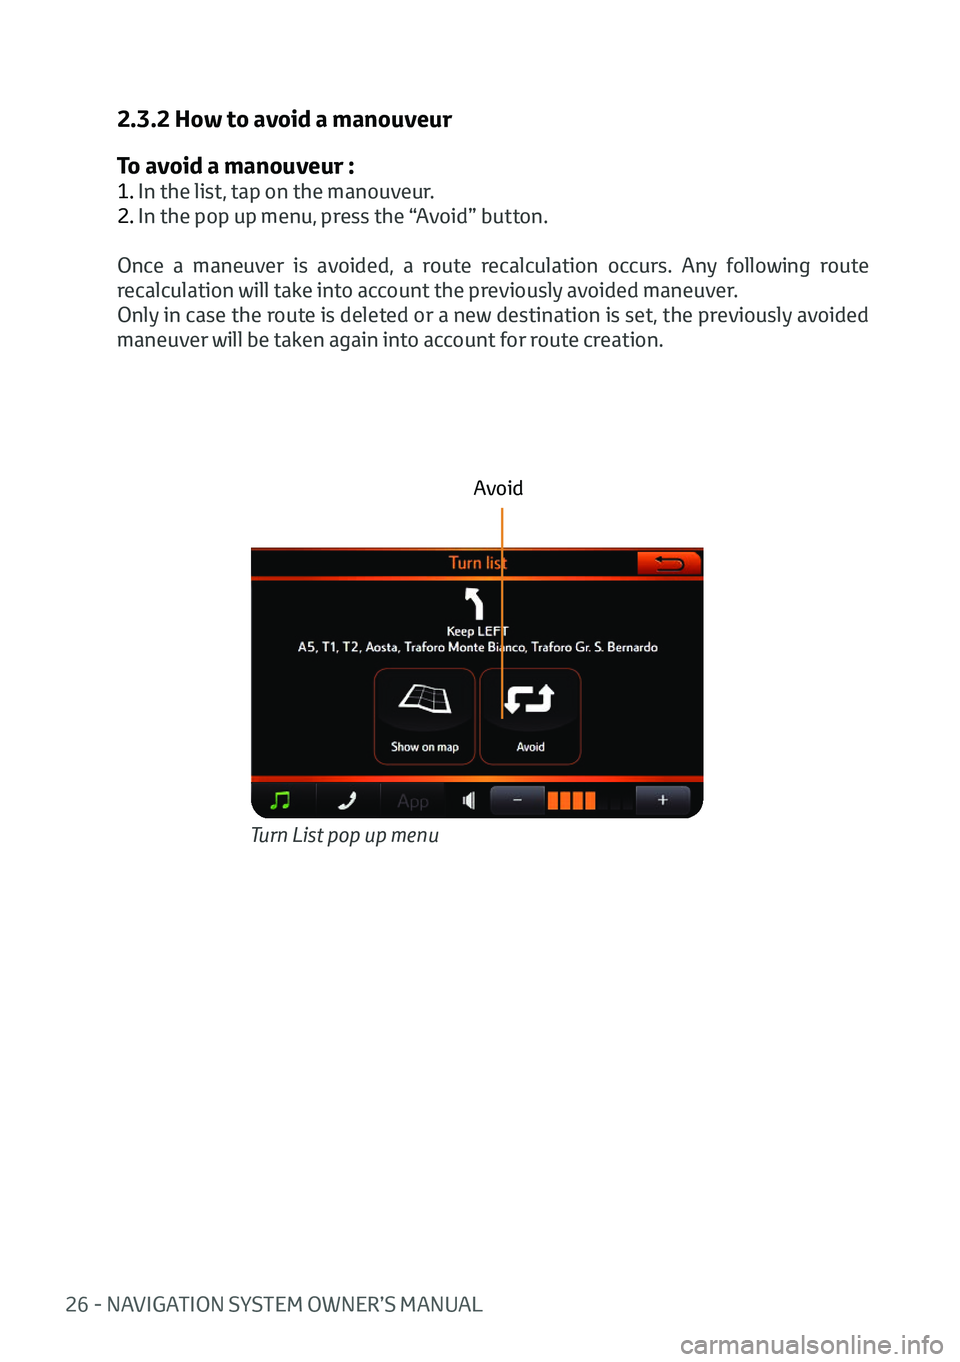
Turn List pop up menu
2.3.2 How to avoid a manouveur
To avoid a manouveur :
1. In the list, tap on the manouveur.
2. In the pop up menu, press the “Avoid” button.
Once a maneuver is avoided, a route recalculation occurs. Any following route
recalculation will take into account the previously avoided maneuver.
Only in case the route is deleted or a new destination is set, the previously avoided
maneuver will be taken again into account for route creation.
Avoid
Page 28 of 32
NAVIGATION SYSTEM OWNER’S MANUAL - 27
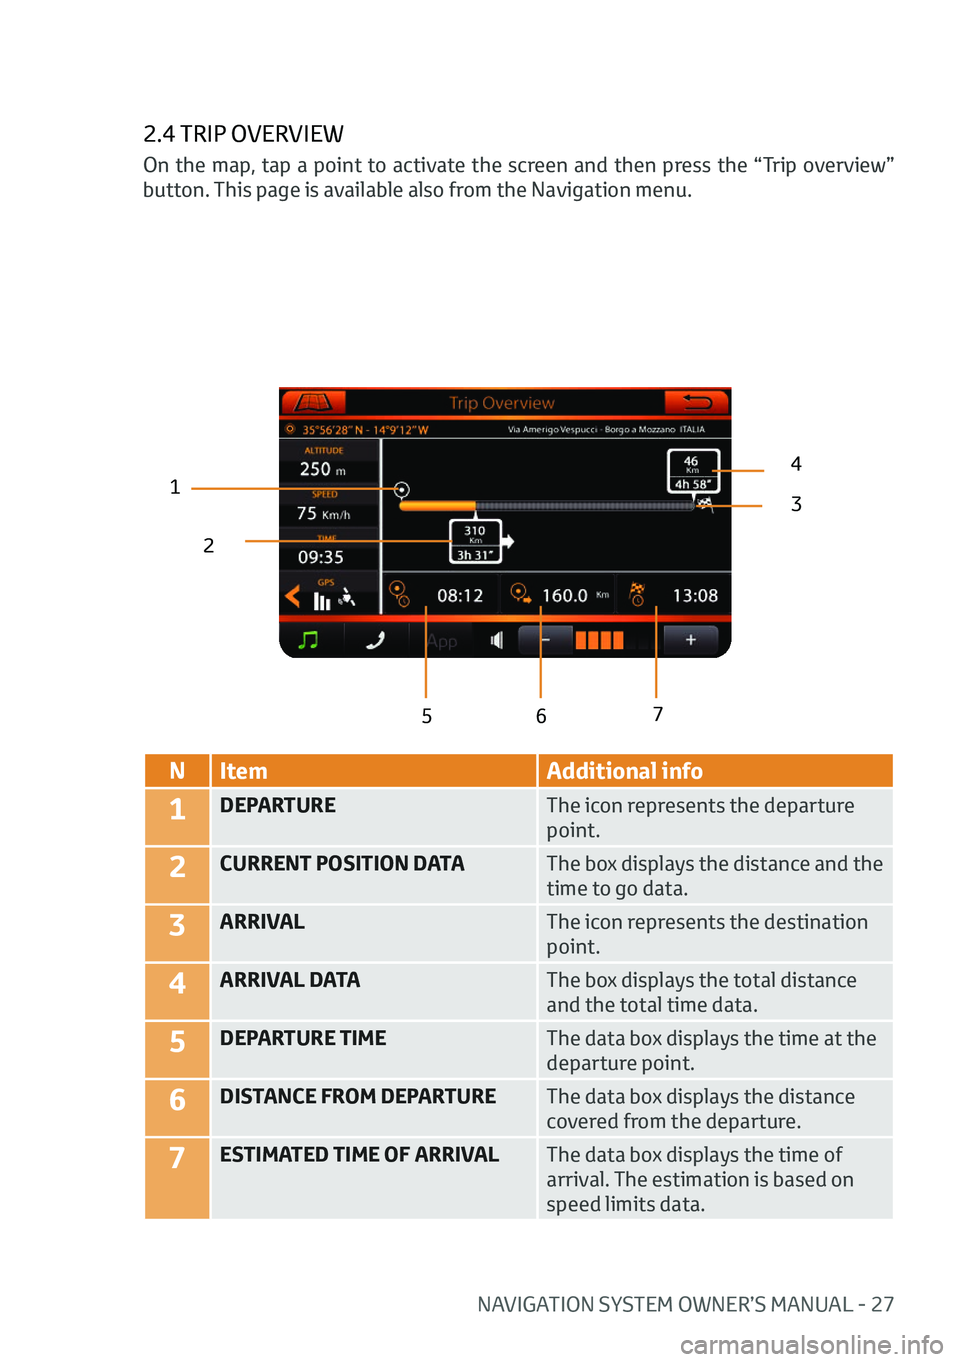
2.4 TRIP OVERVIEW
12
43
5 6 7
N
Item Additional info
1DEPARTURE The icon represents the departure
point.
2CURRENT POSITION DATAThe box displays the distance and the
time to go data.
3ARRIVALThe icon represents the destination
point.
4ARRIVAL DATAThe box displays the total distance
and the total time data.
5DEPARTURE TIMEThe data box displays the time at the
departure point.
6DISTANCE FROM DEPARTUREThe data box displays the distance
covered from the departure.
7ESTIMATED TIME OF ARRIVALThe data box displays the time of
arrival. The estimation is based on
speed limits data.
On the map, tap a point to activate the screen and then press the “Trip overview”
button. This page is available also from the Navigation menu.
Page 29 of 32
28 - NAVIGATION SYSTEM OWNER’S MANUAL
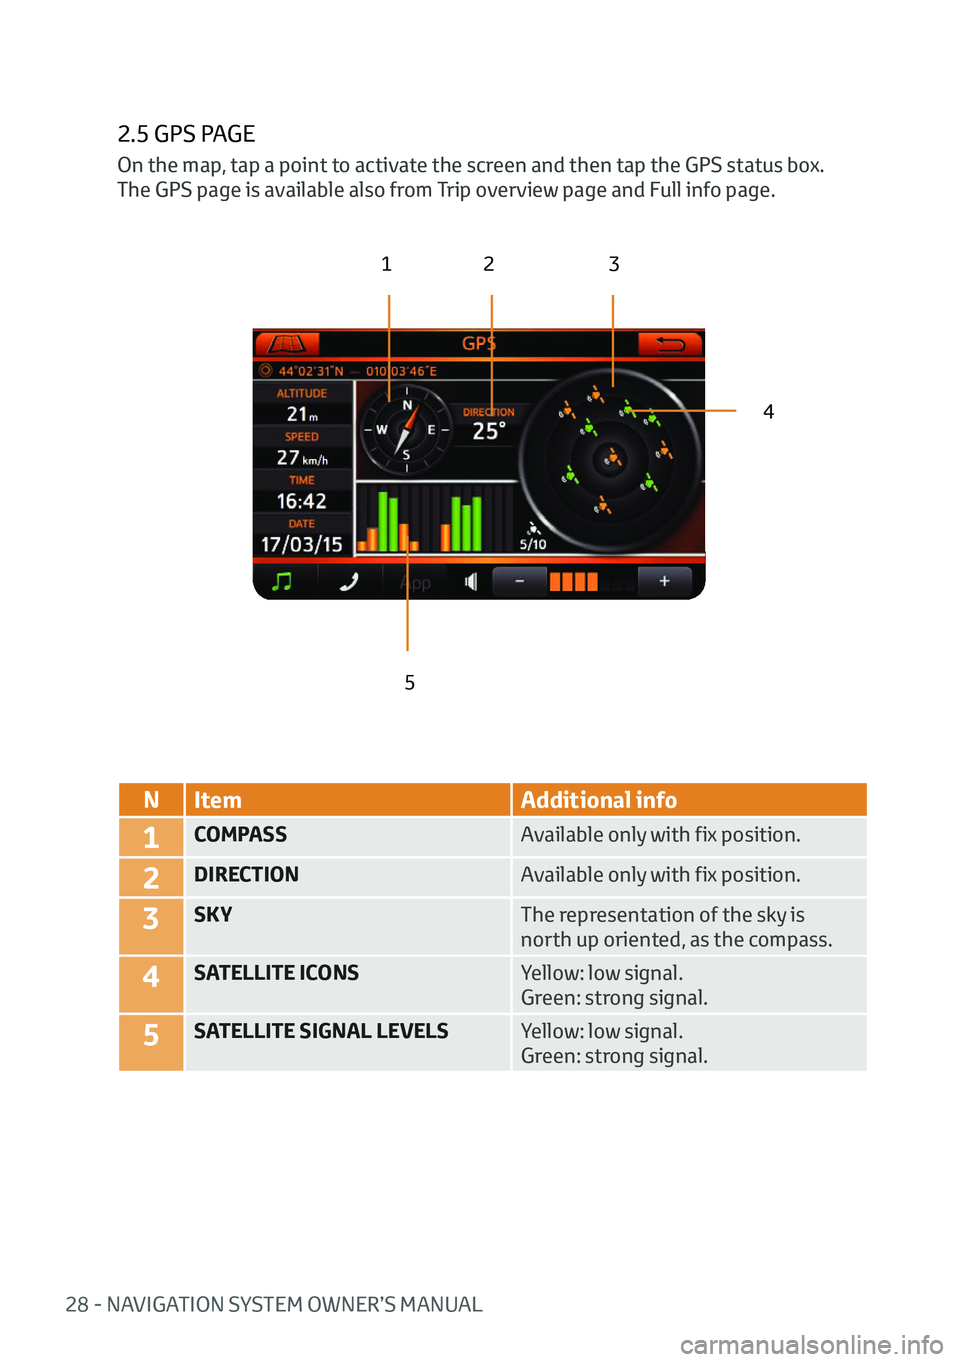
2.5 GPS PAGE
123
4
5
N Item Additional info
1COMPASS Available only with fix position.
2DIRECTIONAvailable only with fix position.
3SKYThe representation of the sky is
north up oriented, as the compass.
4SATELLITE ICONSYellow: low signal.
Green: strong signal.
5SATELLITE SIGNAL LEVELSYellow: low signal.
Green: strong signal.
On the map, tap a point to activate the screen and then tap the GPS status box.
The GPS page is available also from Trip overview page and Full info page.
Page 30 of 32
NAVIGATION SYSTEM OWNER’S MANUAL - 29
Trending: warning light, light, instrument panel, buttons, display, key, ESP
