TOYOTA RAV4 1996 Service Repair Manual
Manufacturer: TOYOTA, Model Year: 1996, Model line: RAV4, Model: TOYOTA RAV4 1996Pages: 1632, PDF Size: 41.64 MB
Page 401 of 1632

Fig. 4: Rear Differential Lock System Wiring Diagram (4Runner)
1999 Toyota RAV4
1999 WIRING DIAGRAMS Differential Locks
Microsoft
Sunday, November 22, 2009 10:10:16 AMPage 9 © 2005 Mitchell Repair Information Company, LLC.
Page 402 of 1632
1999-2000 STARTING & CHARGING SYSTEMS
Generators & Regulators
DESCRIPTION & OPERATION
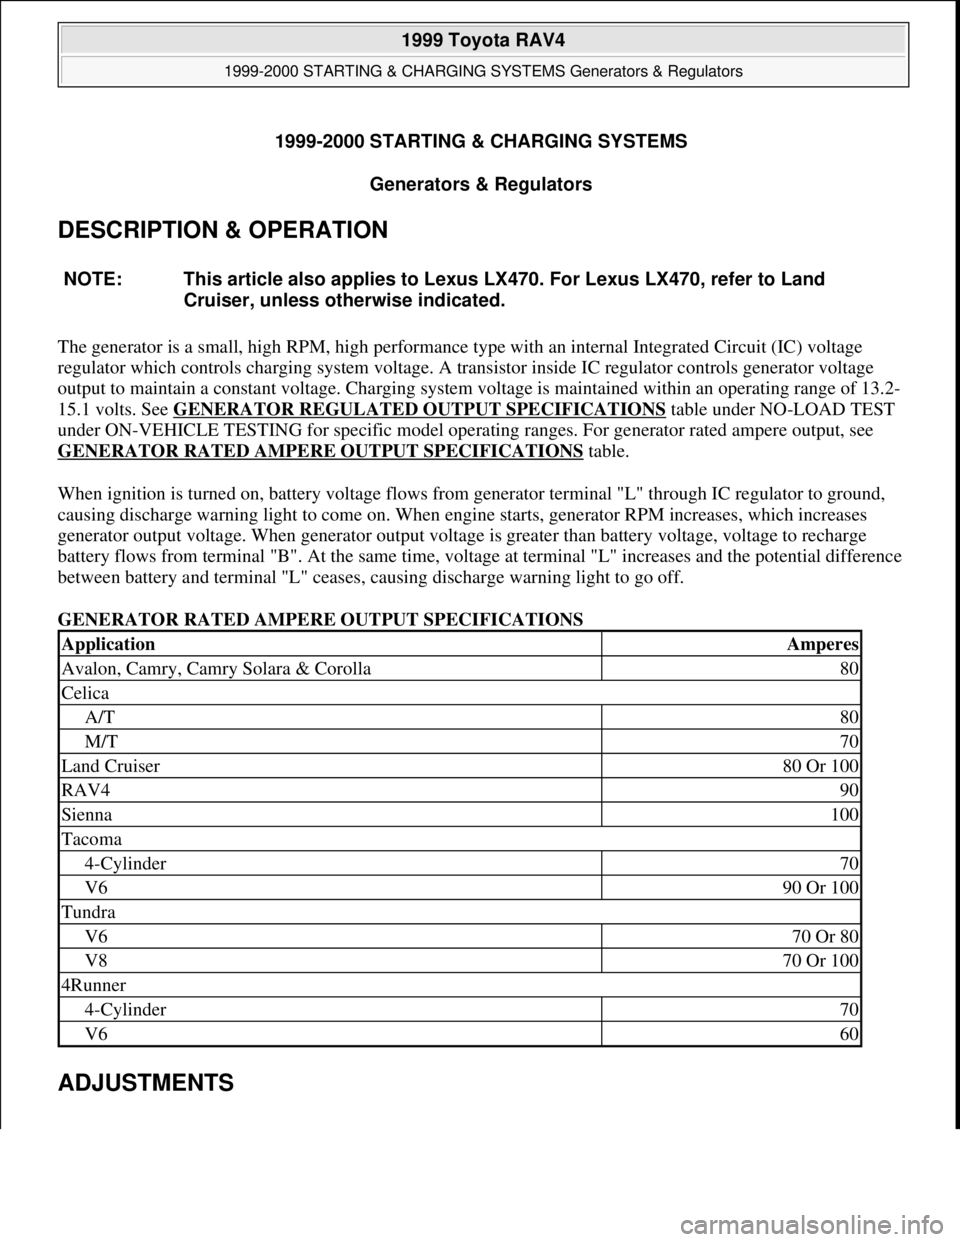
The generator is a small, high RPM, high performance type with an internal Integrated Circuit (IC) voltage
regulator which controls charging system voltage. A transistor inside IC regulator controls generator voltage
output to maintain a constant voltage. Charging system voltage is maintained within an operating range of 13.2-
15.1 volts. See GENERATOR REGULATED OUTPUT SPECIFICATIONS
table under NO-LOAD TEST
under ON-VEHICLE TESTING for specific model operating ranges. For generator rated ampere output, see
GENERATOR RATED AMPERE OUTPUT SPECIFICATIONS
table.
When ignition is turned on, battery voltage flows from generator terminal "L" through IC regulator to ground,
causing discharge warning light to come on. When engine starts, generator RPM increases, which increases
generator output voltage. When generator output voltage is greater than battery voltage, voltage to recharge
battery flows from terminal "B". At the same time, voltage at terminal "L" increases and the potential difference
between battery and terminal "L" ceases, causing discharge warning light to go off.
GENERATOR RATED AMPERE OUTPUT SPECIFICATIONS
ADJUSTMENTS
NOTE: This article also applies to Lexus LX470. For Lexus LX470, refer to Land
Cruiser, unless otherwise indicated.
ApplicationAmperes
Avalon, Camry, Camry Solara & Corolla80
Celica
A/T80
M/T70
Land Cruiser80 Or 100
RAV490
Sienna100
Tacoma
4-Cylinder70
V690 Or 100
Tundra
V670 Or 80
V870 Or 100
4Runner
4-Cylinder70
V660
1999 Toyota RAV4
1999-2000 STARTING & CHARGING SYSTEMS Generators & Regulators
1999 Toyota RAV4
1999-2000 STARTING & CHARGING SYSTEMS Generators & Regulators
Microsoft
Sunday, November 22, 2009 10:13:07 AMPage 1 © 2005 Mitchell Repair Information Company, LLC.
Microsoft
Sunday, November 22, 2009 10:13:12 AMPage 1 © 2005 Mitchell Repair Information Company, LLC.
Page 403 of 1632
BELT TENSION
4-Cylinder
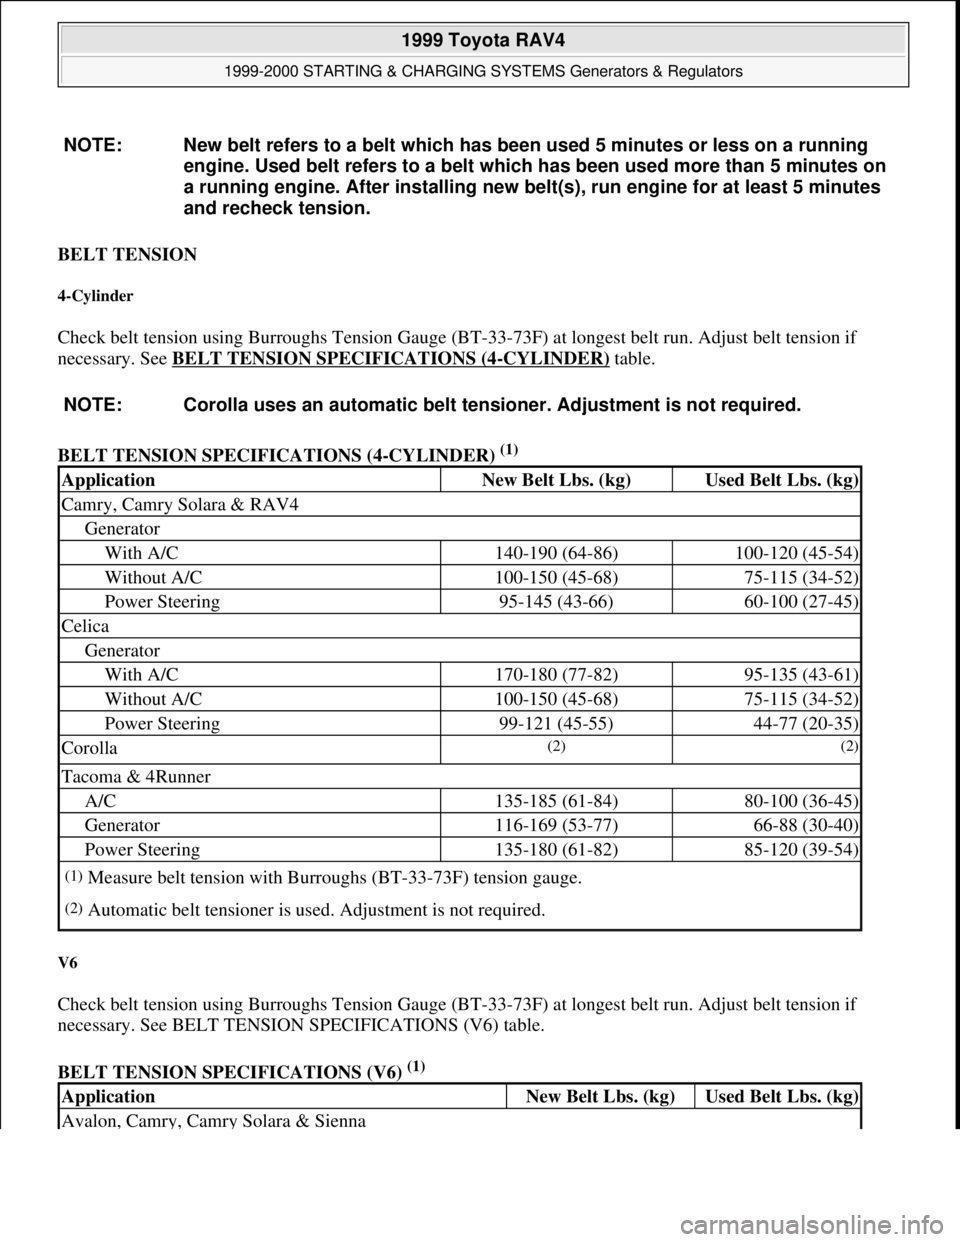
Check belt tension using Burroughs Tension Gauge (BT-33-73F) at longest belt run. Adjust belt tension if
necessary. See BELT TENSION SPECIFICATIONS (4
-CYLINDER) table.
BELT TENSION SPECIFICATIONS (4-CYLINDER)
(1)
V6
Check belt tension using Burroughs Tension Gauge (BT-33-73F) at longest belt run. Adjust belt tension if
necessary. See BELT TENSION SPECIFICATIONS (V6) table.
BELT TENSION SPECIFICATIONS (V6)
(1) NOTE: New belt refers to a belt which has been used 5 minutes or less on a running
engine. Used belt refers to a belt which has been used more than 5 minutes on
a running engine. After installing new belt(s), run engine for at least 5 minutes
and recheck tension.
NOTE: Corolla uses an automatic belt tensioner. Adjustment is not required.
ApplicationNew Belt Lbs. (kg)Used Belt Lbs. (kg)
Camry, Camry Solara & RAV4
Generator
With A/C140-190 (64-86)100-120 (45-54)
Without A/C100-150 (45-68)75-115 (34-52)
Power Steering95-145 (43-66)60-100 (27-45)
Celica
Generator
With A/C170-180 (77-82)95-135 (43-61)
Without A/C100-150 (45-68)75-115 (34-52)
Power Steering99-121 (45-55)44-77 (20-35)
Corolla(2) (2)
Tacoma & 4Runner
A/C135-185 (61-84)80-100 (36-45)
Generator116-169 (53-77)66-88 (30-40)
Power Steering135-180 (61-82)85-120 (39-54)
(1)Measure belt tension with Burroughs (BT-33-73F) tension gauge.
(2)Automatic belt tensioner is used. Adjustment is not required.
ApplicationNew Belt Lbs. (kg)Used Belt Lbs. (kg)
Avalon, Camry, Camry Solara & Sienna
1999 Toyota RAV4
1999-2000 STARTING & CHARGING SYSTEMS Generators & Regulators
Microsoft
Sunday, November 22, 2009 10:13:07 AMPage 2 © 2005 Mitchell Repair Information Company, LLC.
Page 404 of 1632
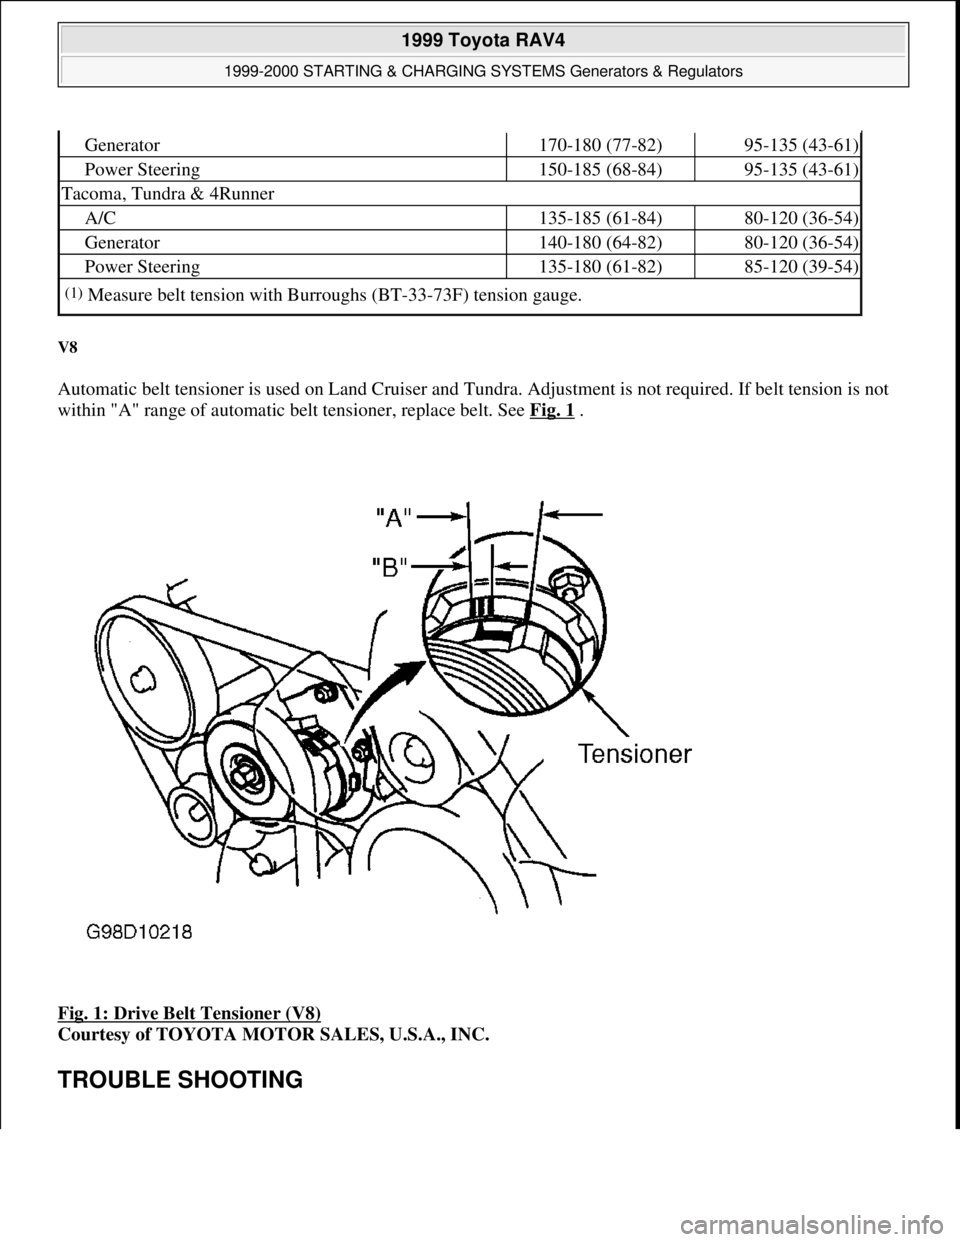
V8
Automatic belt tensioner is used on Land Cruiser and Tundra. Adjustment is not required. If belt tension is not
within "A" range of automatic belt tensioner, replace belt. See Fig. 1
.
Fig. 1: Drive Belt Tensioner (V8)
Courtesy of TOYOTA MOTOR SALES, U.S.A., INC.
TROUBLE SHOOTING
Generator170-180 (77-82)95-135 (43-61)
Power Steering150-185 (68-84)95-135 (43-61)
Tacoma, Tundra & 4Runner
A/C135-185 (61-84)80-120 (36-54)
Generator140-180 (64-82)80-120 (36-54)
Power Steering135-180 (61-82)85-120 (39-54)
(1)Measure belt tension with Burroughs (BT-33-73F) tension gauge.
1999 Toyota RAV4
1999-2000 STARTING & CHARGING SYSTEMS Generators & Regulators
Microsoft
Sunday, November 22, 2009 10:13:07 AMPage 3 © 2005 Mitchell Repair Information Company, LLC.
Page 405 of 1632
Check all fuses, fusible links, ignition switch and appropriate relays (if equipped). Check generator output. See
NO
-LOAD TEST under ON-VEHICLE TESTING.
ON-VEHICLE TESTING
NO-LOAD TEST
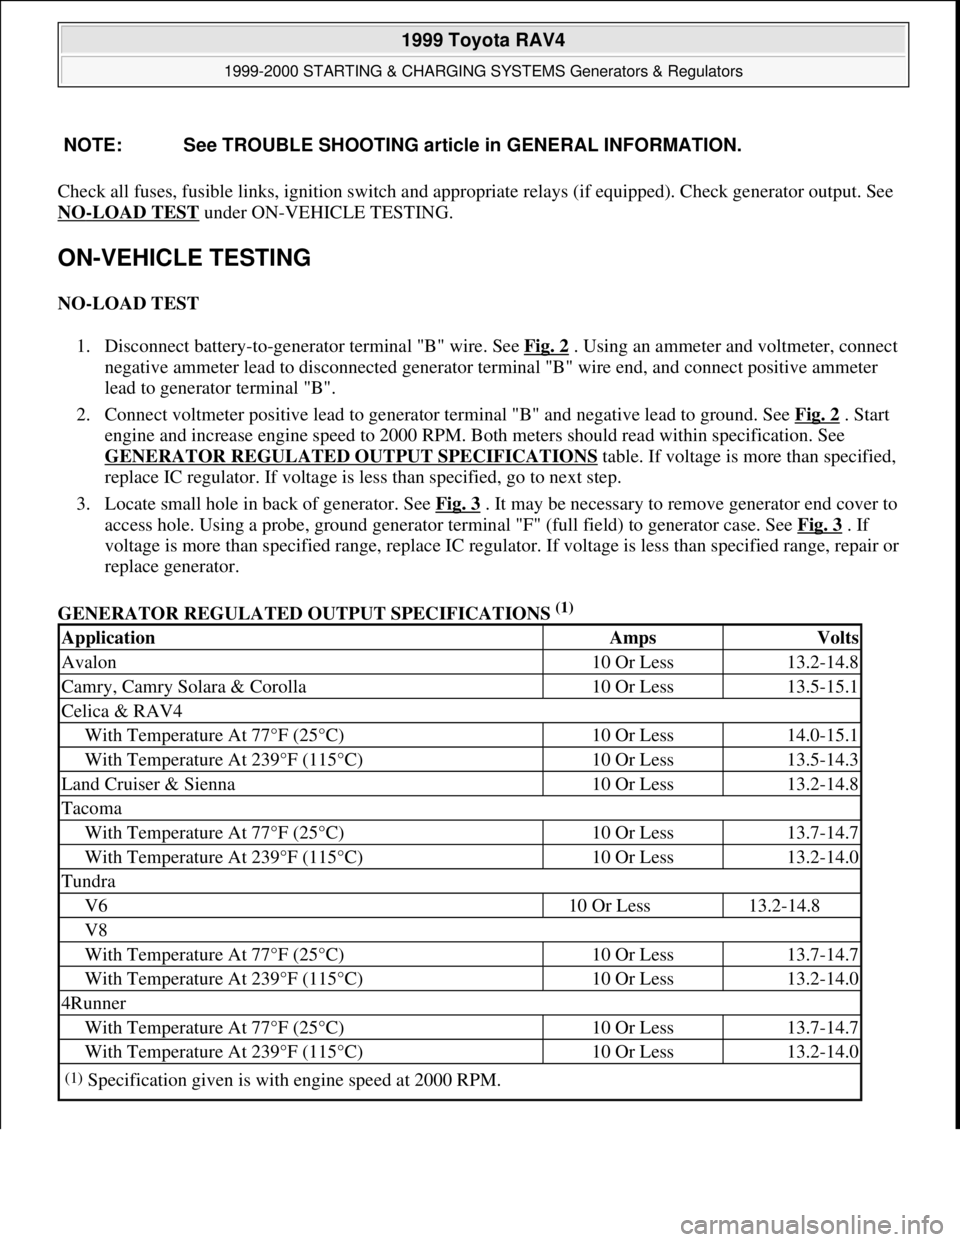
1. Disconnect battery-to-generator terminal "B" wire. See Fig. 2
. Using an ammeter and voltmeter, connect
negative ammeter lead to disconnected generator terminal "B" wire end, and connect positive ammeter
lead to generator terminal "B".
2. Connect voltmeter positive lead to generator terminal "B" and negative lead to ground. See Fig. 2
. Start
engine and increase engine speed to 2000 RPM. Both meters should read within specification. See
GENERATOR REGULATED OUTPUT SPECIFICATIONS
table. If voltage is more than specified,
replace IC regulator. If voltage is less than specified, go to next step.
3. Locate small hole in back of generator. See Fig. 3
. It may be necessary to remove generator end cover to
access hole. Using a probe, ground generator terminal "F" (full field) to generator case. See Fig. 3
. If
voltage is more than specified range, replace IC regulator. If voltage is less than specified range, repair or
replace generator.
GENERATOR REGULATED OUTPUT SPECIFICATIONS
(1) NOTE: See TROUBLE SHOOTING article in GENERAL INFORMATION.
ApplicationAmpsVolts
Avalon10 Or Less13.2-14.8
Camry, Camry Solara & Corolla10 Or Less13.5-15.1
Celica & RAV4
With Temperature At 77°F (25°C)10 Or Less14.0-15.1
With Temperature At 239°F (115°C)10 Or Less13.5-14.3
Land Cruiser & Sienna10 Or Less13.2-14.8
Tacoma
With Temperature At 77°F (25°C)10 Or Less13.7-14.7
With Temperature At 239°F (115°C)10 Or Less13.2-14.0
Tundra
V610 Or Less13.2-14.8
V8
With Temperature At 77°F (25°C)10 Or Less13.7-14.7
With Temperature At 239°F (115°C)10 Or Less13.2-14.0
4Runner
With Temperature At 77°F (25°C)10 Or Less13.7-14.7
With Temperature At 239°F (115°C)10 Or Less13.2-14.0
(1)Specification given is with engine speed at 2000 RPM.
1999 Toyota RAV4
1999-2000 STARTING & CHARGING SYSTEMS Generators & Regulators
Microsoft
Sunday, November 22, 2009 10:13:07 AMPage 4 © 2005 Mitchell Repair Information Company, LLC.
Page 406 of 1632
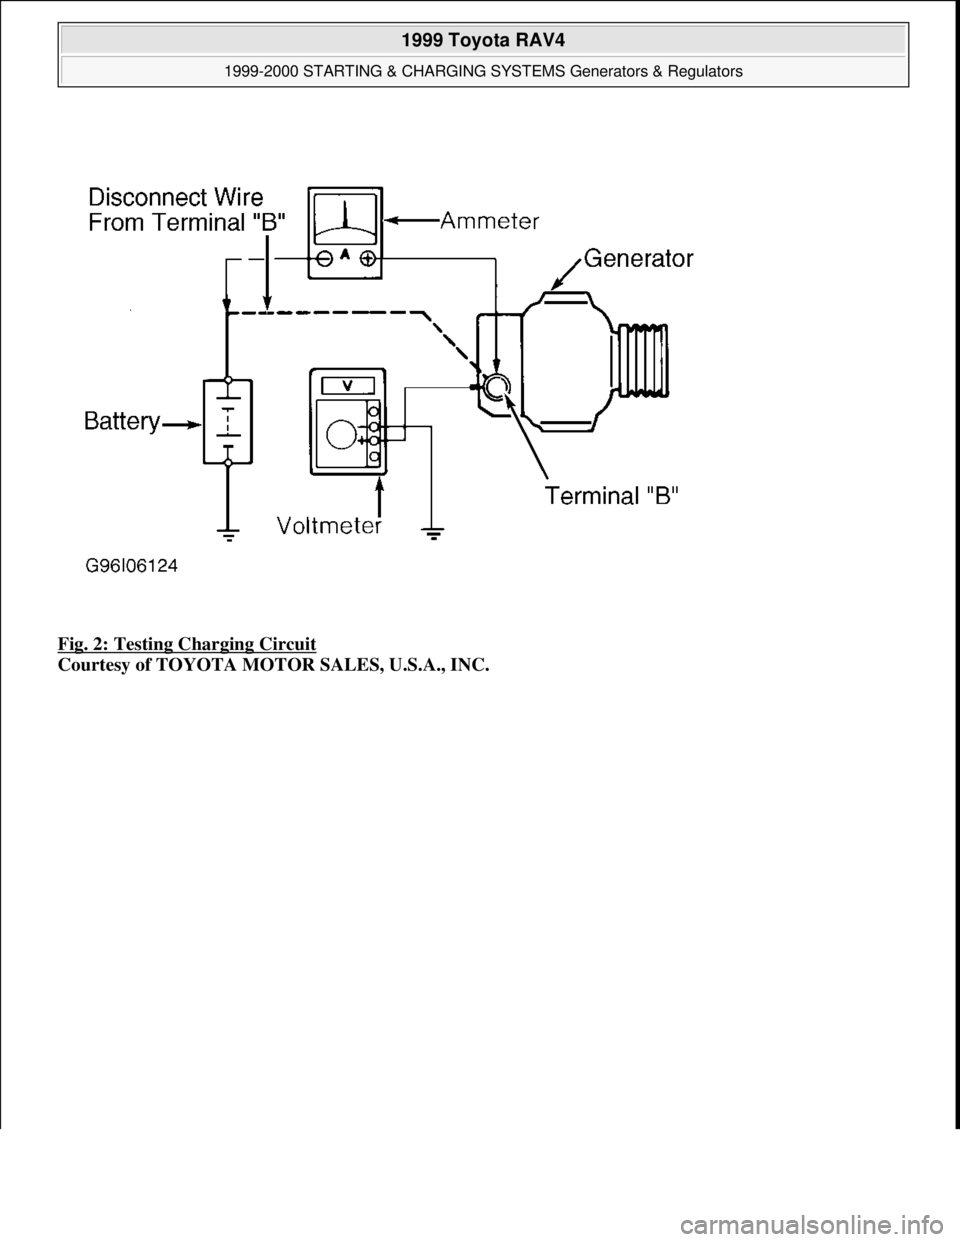
Fig. 2: Testing Charging Circuit
Courtesy of TOYOTA MOTOR SALES, U.S.A., INC.
1999 Toyota RAV4
1999-2000 STARTING & CHARGING SYSTEMS Generators & Regulators
Microsoft
Sunday, November 22, 2009 10:13:07 AMPage 5 © 2005 Mitchell Repair Information Company, LLC.
Page 407 of 1632
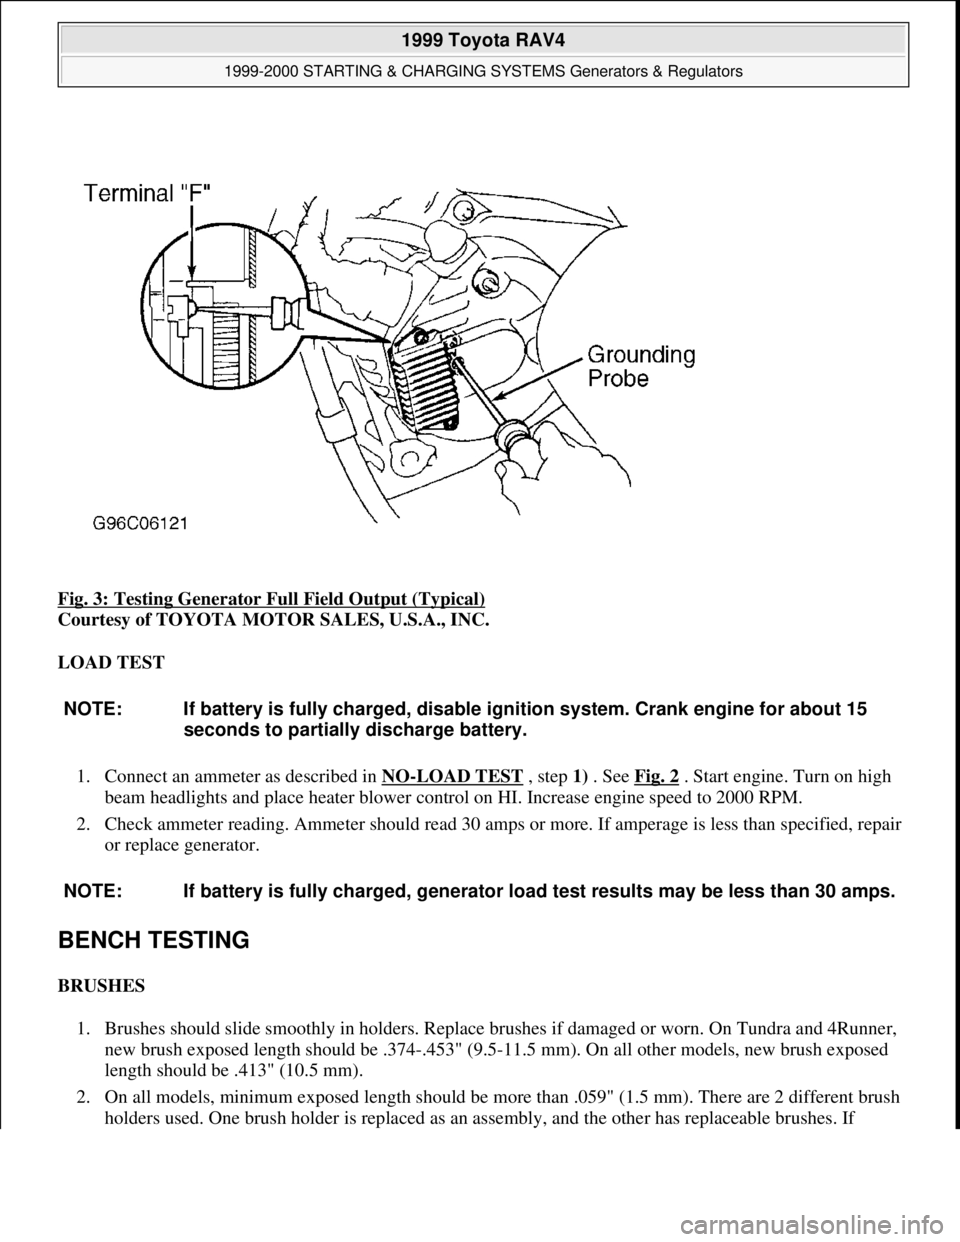
Fig. 3: Testing Generator Full Field Output (Typical)
Courtesy of TOYOTA MOTOR SALES, U.S.A., INC.
LOAD TEST
1. Connect an ammeter as described in NO
-LOAD TEST , step 1) . See Fig. 2 . Start engine. Turn on high
beam headlights and place heater blower control on HI. Increase engine speed to 2000 RPM.
2. Check ammeter reading. Ammeter should read 30 amps or more. If amperage is less than specified, repair
or replace generator.
BENCH TESTING
BRUSHES
1. Brushes should slide smoothly in holders. Replace brushes if damaged or worn. On Tundra and 4Runner,
new brush exposed length should be .374-.453" (9.5-11.5 mm). On all other models, new brush exposed
length should be .413" (10.5 mm).
2. On all models, minimum exposed length should be more than .059" (1.5 mm). There are 2 different brush
holders used. One brush holder is replaced as an assembl
y, and the other has replaceable brushes. If
NOTE: If battery is fully charged, disable ignition system. Crank engine for about 15
seconds to partially discharge battery.
NOTE: If battery is fully charged, generator load test results may be less than 30 amps.
1999 Toyota RAV4
1999-2000 STARTING & CHARGING SYSTEMS Generators & Regulators
Microsoft
Sunday, November 22, 2009 10:13:07 AMPage 6 © 2005 Mitchell Repair Information Company, LLC.
Page 408 of 1632
exposed brush length is less than minimum, replace brushes or brush holder assembly. Install new brush
springs when replacing brushes.
ROTOR
1. Check rotor for open field windings by using an ohmmeter across slip rings. Rotor resistance should be
within specification. See ROTOR RESISTANCE SPECIFICATIONS
table.
2. Check rotor for shorts to ground by connecting ohmmeter between slip ring and rotor shaft. Ohmmeter
should indicate no continuity. Check slip rings for wear or pitting. Standard slip ring diameter is .559-
.567" (14.2-14.4 mm). Turn slip rings on lathe if necessary. Minimum slip ring diameter is .504" (12.8
mm).
ROTOR RESISTANCE SPECIFICATIONS
STATOR
Connect ohmmeter between 2 stator leads. Continuity should exist between all stator leads. Connect ohmmeter
between each stator lead and metal core. Continuity should not exist. If stator does not test as indicated, replace
stator.
DIODES
1. With diode/rectifier assembly removed and on bench, contact positive diode plate terminal with one
ohmmeter probe. Using other ohmmeter probe, contact each diode lead in same plate. Note ohmmeter
reading. Reverse ohmmeter probes, and repeat tests for all diodes.
2. All diodes should show continuity in one direction and no continuity in opposite direction. If any diode is
defective, replace diode/rectifier assembly.
REMOVAL & INSTALLATION
GENERATOR
Removal & Installation (Land Cruiser)
1. Disconnect negative battery cable. Drain engine coolant. Rotate belt tensioner counterclockwise to release
tension on belt and remove drive belt. Remove splash shield from underneath en
gine. Remove radiator
Application(1) Ohms
Avalon2.1-2.5
Camry & Camry Solara
4-Cyl.2.7-3.1
V62.1-2.5
Land Cruiser, Sienna, Tacoma, Tundra & 4Runner2.1-2.5
All Other Models2.7-3.1
(1)Specification given is with temperature at 68°F (20°C).
1999 Toyota RAV4
1999-2000 STARTING & CHARGING SYSTEMS Generators & Regulators
Microsoft
Sunday, November 22, 2009 10:13:07 AMPage 7 © 2005 Mitchell Repair Information Company, LLC.
Page 409 of 1632
reservoir tank and radiator.
2. Using Spanner Wrench (09960-10010) to keep power steering pump pulley from rotating, remove power
steering pump pulley retaining nut. Remove power steering pump pulley. Remove generator mounting
bolts and generator. To install, reverse removal procedure. Tighten bolts to specifications. See TORQUE
SPECIFICATIONS .
Removal & Installation (All Others)
Disconnect negative battery cable. Removal and installation is basically an unbolt and bolt-on procedure.
Tighten generator bolts to specification. See TORQUE SPECIFICATIONS
.
OVERHAUL
GENERATOR
Disassembly
1. Remove rear end cover (if equipped). See Fig. 4 . Remove brush holder and IC regulator. Remove diode
assembly. Remove rubber insulators or seal plate (if equipped). Use generator Pulley Set Nut Wrench Set
(SST 09820-63010) to remove generator pulley.
2. To remove pulley, install SST "A" and "B" to rotor shaft and tighten SST "B" clockwise to 29 ft. lbs. (39
N.m). See Fig. 5
. Place SST "C" securely into a vise. Verify that SST "A" is secured to rotor shaft and
install SST "A" and "B" and generator into SST "C". Turn SST "A" in correct direction to loosen pulley
nut. See Fig. 5
. To prevent damage to rotor shaft, DO NOT loosen pulley nut more than 1/2 turn.
Remove SST "A" and "B" and generator from SST "C". Remove SST "A" and "B" from rotor shaft, and
remove pulley nut and pulley.
3. Remove rectifier and frame using appropriate puller. Remove generator washer (if equipped). Remove
rotor from drive end frame (stator).
Assembly
To assemble, reverse disassembly procedure. Use generator Pulley Set Nut Wrench Set (SST 09820-63010) to
install generator pulley. Place SST "C" securely into a vise. Install SST "A" and "B" and generator into SST
"C". See Fig. 5
. Tighten pulley nut to 81 ft. lbs. (110 N.m) in the opposite direction of disassembly. After
completin
g assembly, verify rotor turns smoothly.
1999 Toyota RAV4
1999-2000 STARTING & CHARGING SYSTEMS Generators & Regulators
Microsoft
Sunday, November 22, 2009 10:13:07 AMPage 8 © 2005 Mitchell Repair Information Company, LLC.
Page 410 of 1632
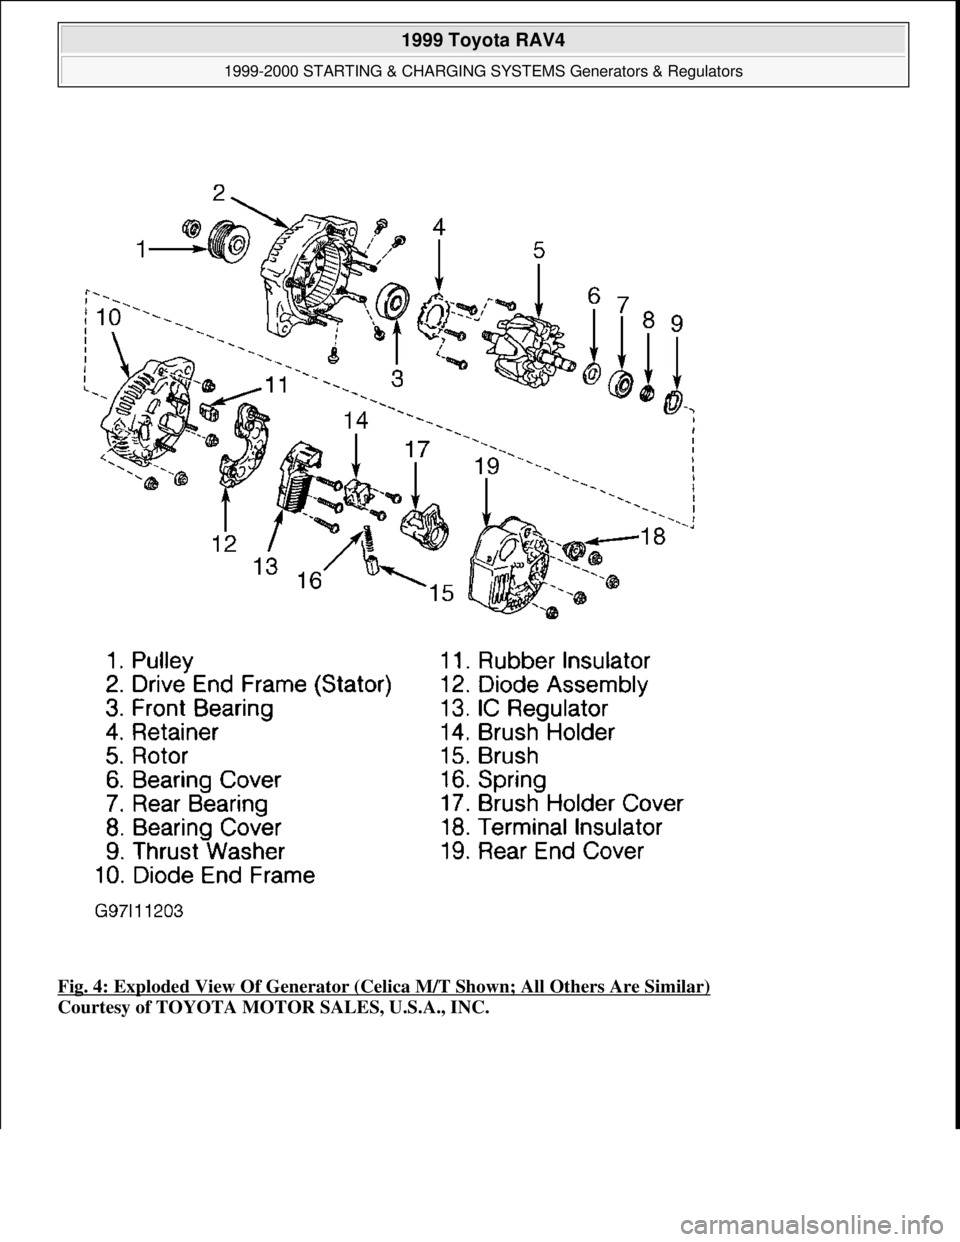
Fig. 4: Exploded View Of Generator (Celica M/T Shown; All Others Are Similar)
Courtesy of TOYOTA MOTOR SALES, U.S.A., INC.
1999 Toyota RAV4
1999-2000 STARTING & CHARGING SYSTEMS Generators & Regulators
Microsoft
Sunday, November 22, 2009 10:13:08 AMPage 9 © 2005 Mitchell Repair Information Company, LLC.