TOYOTA RAV4 1996 Service Repair Manual
Manufacturer: TOYOTA, Model Year: 1996, Model line: RAV4, Model: TOYOTA RAV4 1996Pages: 1632, PDF Size: 41.64 MB
Page 791 of 1632
4. Ensure valve lifter bore diameter in cylinder head is within specification. See VALVE LIFTERS under
ENGINE SPECIFICATIONS.
Valve Springs
Ensure valve spring free length, pressure and out-of-square are within specification. See VALVES & VALVE
SPRINGS under ENGINE SPECIFICATIONS.
Valve Stem Oil Seals
Intake valve stem oil seal is Brown and exhaust valve stem oil seal is Black. Ensure proper valve stem oil seal is
installed. Lubricate valve stem oil seal with engine oil. Install valve stem oil seal using Oil Seal Installer (SST
09201-41020).
Valve Guides
1. Ensure valve guide inside diameter is within specification. See CYLINDER HEAD under ENGINE
SPECIFICATIONS. Replace valve guide if inside diameter exceeds specification.
2. To replace valve guide, heat cylinder head to 176-212°F (80-100°C). Using a hammer and Valve Guide
Remover/Installer set (SST 09201-01060), drive valve guide from camshaft side of cylinder head.
3. Measure cylinder head valve guide bore inside diameter. If bore inside diameter is .4325-.4335" (10.985-
11.012 mm), use standard valve guide. If bore inside diameter is .4344-.4355" (11.035-11.062 mm), use
oversize valve guide.
4. If bore inside diameter exceeds .4335" (11.012 mm), machine valve guide bore to .4344-.4355" (11.035-
11.062 mm) for oversize valve guide. If bore inside diameter exceeds .4355" (11.062 mm), replace
cylinder head.
5. Intake valve guide is 1.516" (38.50 mm) long and exhaust valve guide is 1.594" (40.50 mm) long. Ensure
proper valve guide is installed.
6. To install valve guide, heat cylinder head to 176-212°F (80-100°C). Using hammer and valve guide
remover/installer, drive valve guide in from camshaft side of cylinder head until valve guide installed
height is .315-.346" (8.00-8.80 mm). Valve guide installed height is measured from top of valve guide to
cylinder head surface. See Fig. 30
.
7. On all valve guide applications, use .236" (6.00 mm) reamer to ream valve guide to obtain correct valve
stem-to-guide oil clearance. See CYLINDER HEAD
under ENGINE SPECIFICATIONS. CAUTION: Valve stems oil seals are painted a different color on top of oil seal for
specified valve application. Intake valve stem oil seal is Brown and
exhaust valve stem oil seal is Black. Ensure valve stem oil seal is installed
in proper location.
1997 Toyota RAV4
2.0L 4-CYL 1997-98 ENGINES Toyota 2.0L 4-Cylinder
Microsoft
Sunday, November 22, 2009 10:23:31 AMPage 43 © 2005 Mitchell Repair Information Company, LLC.
Page 792 of 1632
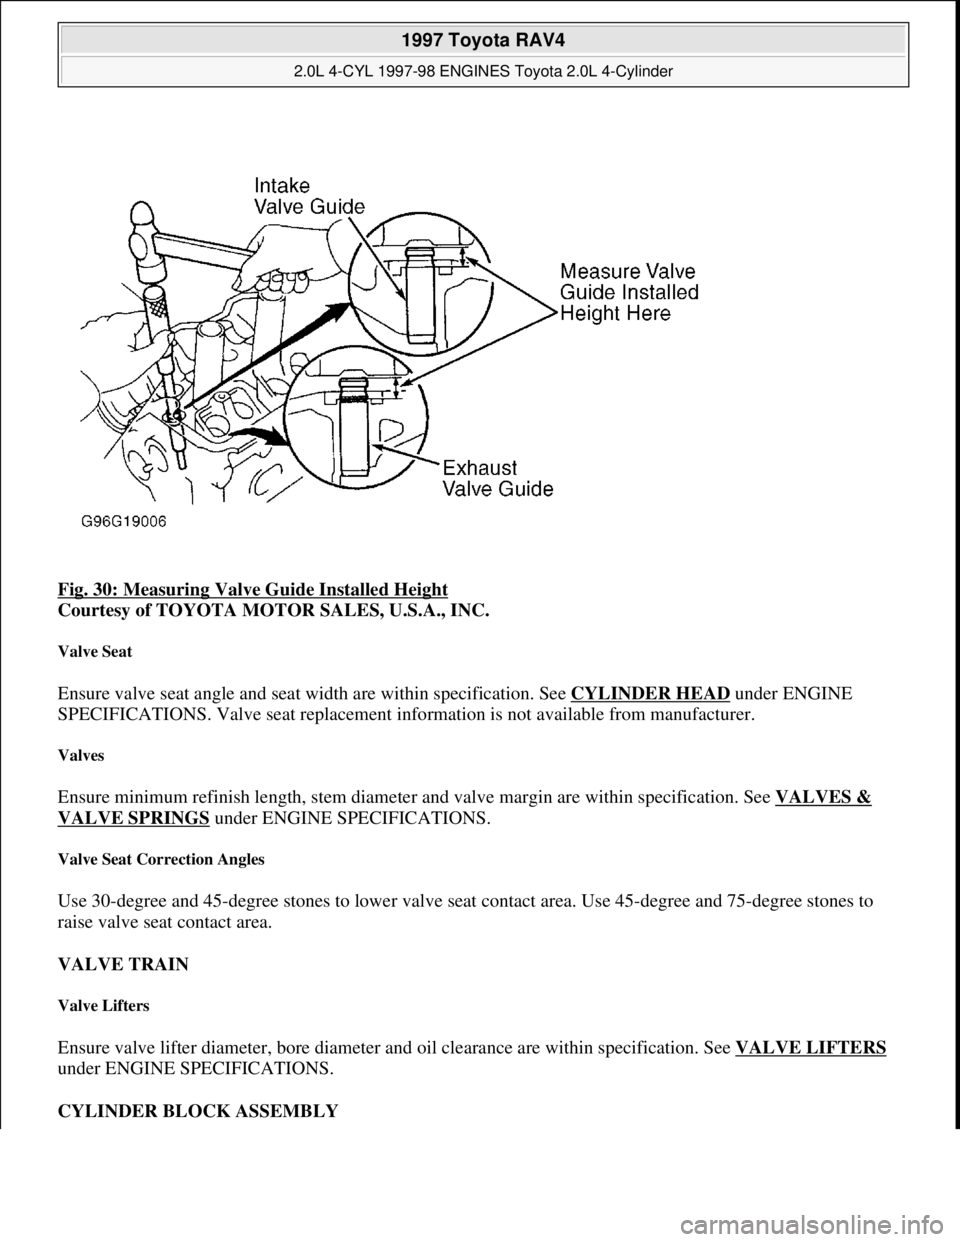
Fig. 30: Measuring Valve Guide Installed Height
Courtesy of TOYOTA MOTOR SALES, U.S.A., INC.
Valve Seat
Ensure valve seat angle and seat width are within specification. See CYLINDER HEAD under ENGINE
SPECIFICATIONS. Valve seat replacement information is not available from manufacturer.
Valves
Ensure minimum refinish length, stem diameter and valve margin are within specification. See VALVES &
VALVE SPRINGS under ENGINE SPECIFICATIONS.
Valve Seat Correction Angles
Use 30-degree and 45-degree stones to lower valve seat contact area. Use 45-degree and 75-degree stones to
raise valve seat contact area.
VALVE TRAIN
Valve Lifters
Ensure valve lifter diameter, bore diameter and oil clearance are within specification. See VALVE LIFTERS
under ENGINE SPECIFICATIONS.
CYLINDER BLOCK ASSEMBLY
1997 Toyota RAV4
2.0L 4-CYL 1997-98 ENGINES Toyota 2.0L 4-Cylinder
Microsoft
Sunday, November 22, 2009 10:23:31 AMPage 44 © 2005 Mitchell Repair Information Company, LLC.
Page 793 of 1632
Piston & Rod Assembly (1997)
1. Ensure connecting rod and connecting rod cap are marked with matching cylinder number for reassembly
reference. Piston, connecting rod and connecting rod must be installed with front mark toward timing belt
end of engine. See Fig. 31
.
2. Before disassembling piston and connecting rod, try to move piston back and forth on piston pin. Replace
piston and piston pin if any movement is felt.
3. When removing piston from connecting rod, remove snap rings from piston. Heat piston to 176-194°F
(80-90°C) in water. Remove piston pin. Separate piston from connecting rod.
4. Ensure piston pin diameter is within specification. See PISTONS, PINS & RINGS
under ENGINE
SPECIFICATIONS. Ensure connecting rod bend, twist and piston pin bushing bore diameter are within
specification. See CONNECTING RODS
under ENGINE SPECIFICATIONS.
5. Bushing in connecting rod may be replaced if bore diameter is not within specification. Ensure bushing
oil hole aligns with connecting rod oil hole. Bushing must be honed to obtain correct piston pin-to-rod
clearance. See PISTONS, PINS & RINGS
under ENGINE SPECIFICATIONS.
6. Ensure nut rotates easily on connecting rod bolt. If nut fails to rotate easily, use caliper to measure
connecting rod bolt outside diameter at .59" (15.0 mm) from end of bolt. Standard connecting rod bolt
outside diameter is .3094-.3150" (7.860-8.000 mm). Replace connecting rod bolt and nut assembly if bolt
outside diameter is less than .2992" (7.600 mm).
7. Different diameter pistons are used. Piston diameter may be identified by size mark ("1", "2" or "3")
stamped on top of piston. See Fig. 32
.
8. To determine piston diameter, measure piston skirt diameter 1.024" (26.00 mm) from top of piston at 90-
degree angle to piston pin. Ensure piston diameter is within specification. See PISTONS, PINS &
RINGS under ENGINE SPECIFICATIONS.
9. To reassemble, position piston and connecting rod so front mark (cavity) on top of piston aligns with
front mark (protrusion) on connecting rod. See Fig. 31
.
10. Install one NEW snap ring in piston. Heat piston to about 176-194°F (80-90°C) in hot water. Coat piston
pin with engine oil. Install piston pin into piston and connecting rod using thumb pressure. Install
remaining NEW snap ring. NOTE: With piston at 140°F (60°C), piston pin should be able to be pressed into
piston using thumb pressure.
1997 Toyota RAV4
2.0L 4-CYL 1997-98 ENGINES Toyota 2.0L 4-Cylinder
Microsoft
Sunday, November 22, 2009 10:23:31 AMPage 45 © 2005 Mitchell Repair Information Company, LLC.
Page 794 of 1632
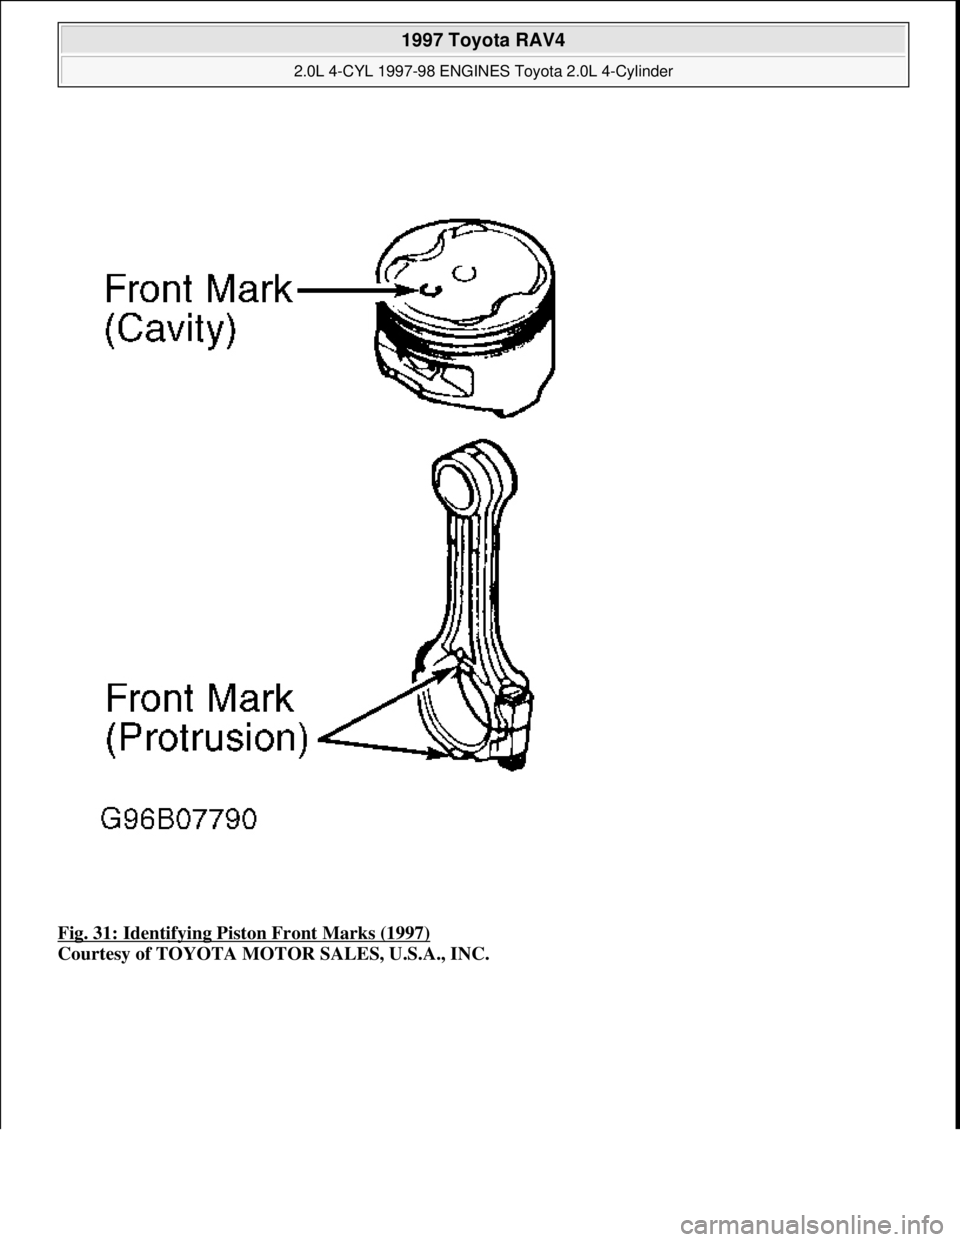
Fig. 31: Identifying Piston Front Marks (1997)
Courtesy of TOYOTA MOTOR SALES, U.S.A., INC.
1997 Toyota RAV4
2.0L 4-CYL 1997-98 ENGINES Toyota 2.0L 4-Cylinder
Microsoft
Sunday, November 22, 2009 10:23:31 AMPage 46 © 2005 Mitchell Repair Information Company, LLC.
Page 795 of 1632
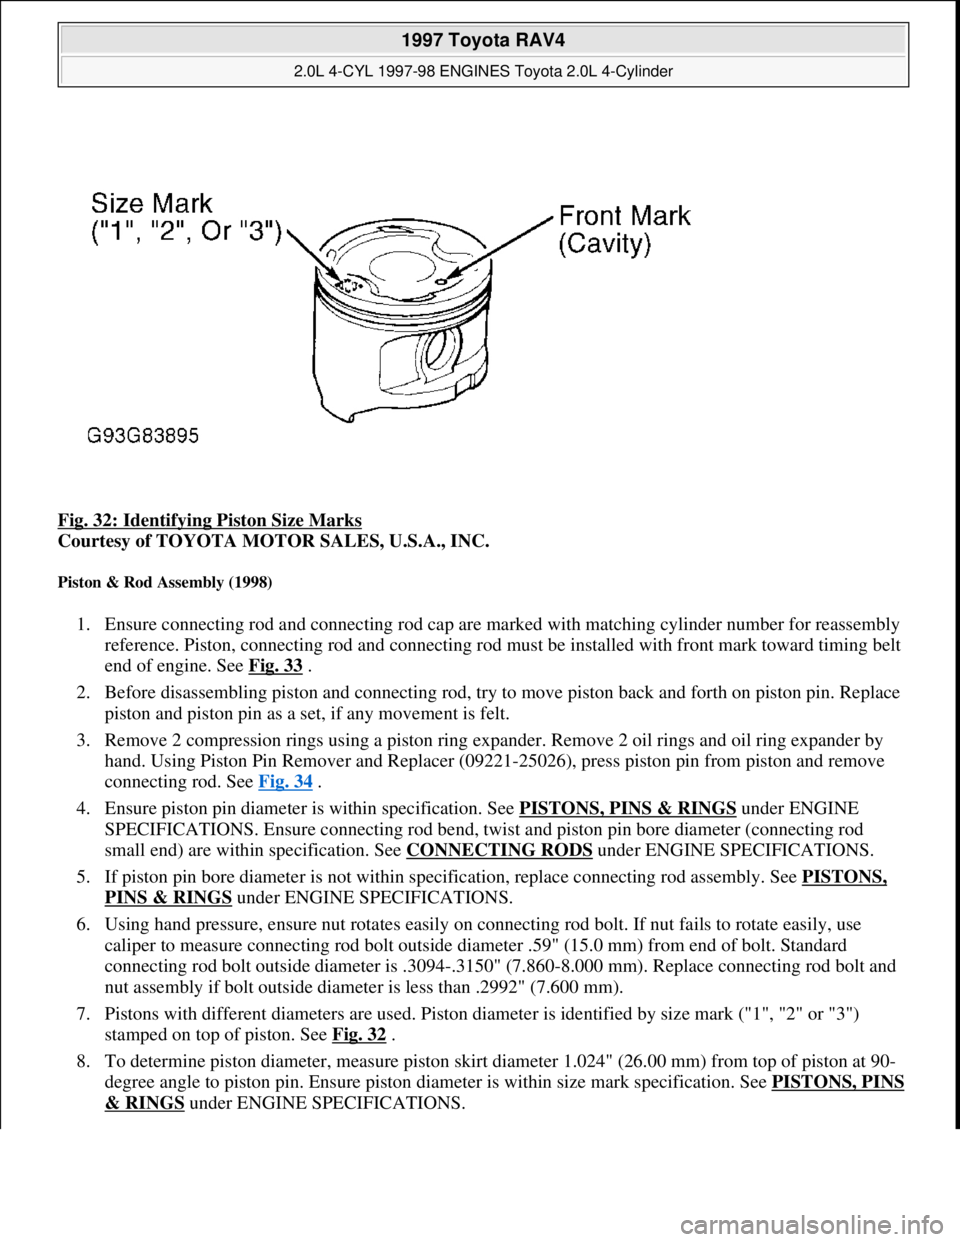
Fig. 32: Identifying Piston Size Marks
Courtesy of TOYOTA MOTOR SALES, U.S.A., INC.
Piston & Rod Assembly (1998)
1. Ensure connecting rod and connecting rod cap are marked with matching cylinder number for reassembly
reference. Piston, connecting rod and connecting rod must be installed with front mark toward timing belt
end of engine. See Fig. 33
.
2. Before disassembling piston and connecting rod, try to move piston back and forth on piston pin. Replace
piston and piston pin as a set, if any movement is felt.
3. Remove 2 compression rings using a piston ring expander. Remove 2 oil rings and oil ring expander by
hand. Using Piston Pin Remover and Replacer (09221-25026), press piston pin from piston and remove
connecting rod. See Fig. 34
.
4. Ensure piston pin diameter is within specification. See PISTONS, PINS & RINGS
under ENGINE
SPECIFICATIONS. Ensure connecting rod bend, twist and piston pin bore diameter (connecting rod
small end) are within specification. See CONNECTING RODS
under ENGINE SPECIFICATIONS.
5. If piston pin bore diameter is not within specification, replace connecting rod assembly. See PISTONS,
PINS & RINGS under ENGINE SPECIFICATIONS.
6. Using hand pressure, ensure nut rotates easily on connecting rod bolt. If nut fails to rotate easily, use
caliper to measure connecting rod bolt outside diameter .59" (15.0 mm) from end of bolt. Standard
connecting rod bolt outside diameter is .3094-.3150" (7.860-8.000 mm). Replace connecting rod bolt and
nut assembly if bolt outside diameter is less than .2992" (7.600 mm).
7. Pistons with different diameters are used. Piston diameter is identified by size mark ("1", "2" or "3")
stamped on top of piston. See Fig. 32
.
8. To determine piston diameter, measure piston skirt diameter 1.024" (26.00 mm) from top of piston at 90-
degree angle to piston pin. Ensure piston diameter is within size mark specification. See PISTONS, PINS
& RINGS under ENGINE SPECIFICATIONS.
1997 Toyota RAV4
2.0L 4-CYL 1997-98 ENGINES Toyota 2.0L 4-Cylinder
Microsoft
Sunday, November 22, 2009 10:23:31 AMPage 47 © 2005 Mitchell Repair Information Company, LLC.
Page 796 of 1632
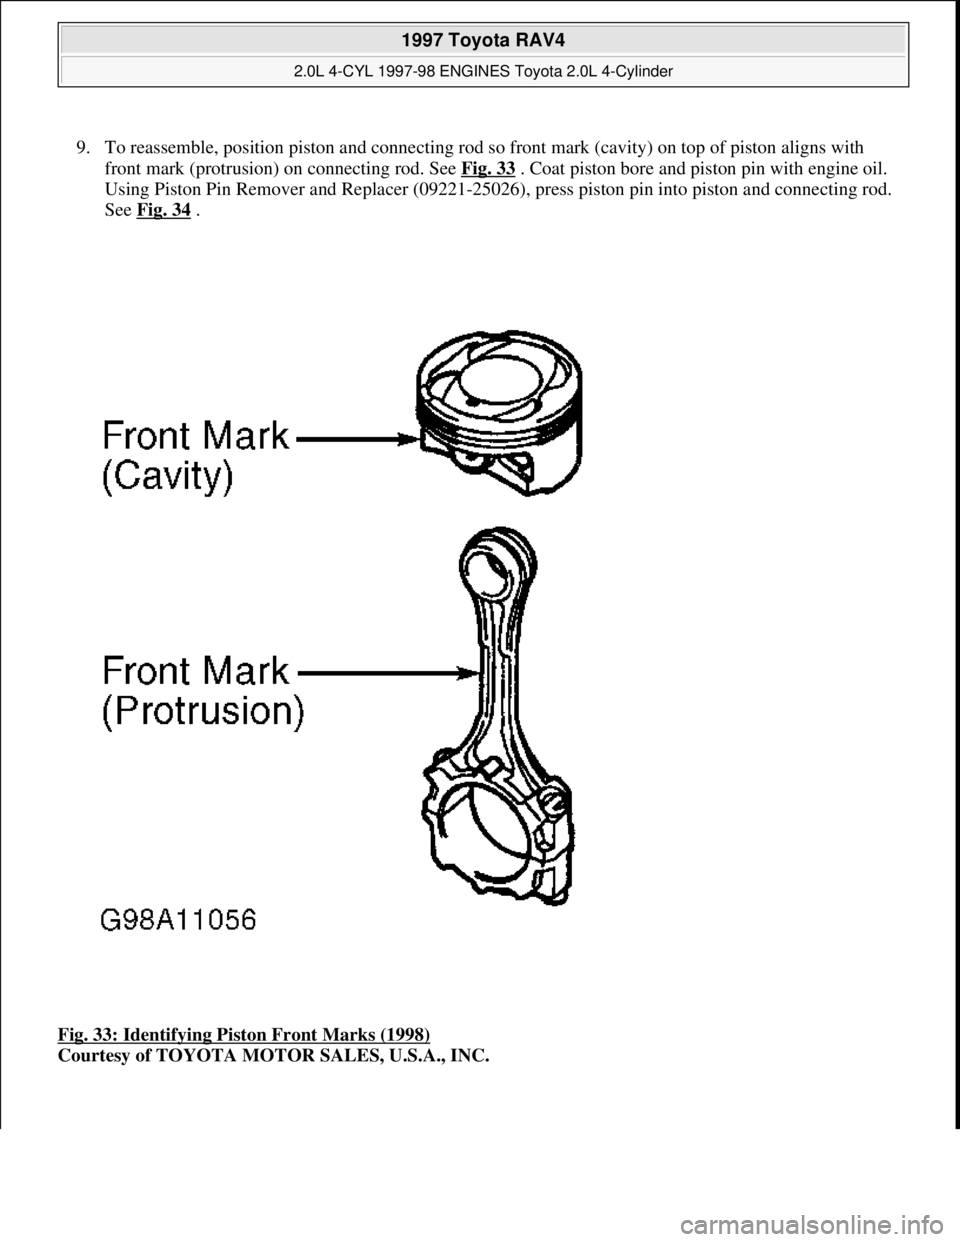
9. To reassemble, position piston and connecting rod so front mark (cavity) on top of piston aligns with
front mark (protrusion) on connecting rod. See Fig. 33
. Coat piston bore and piston pin with engine oil.
Using Piston Pin Remover and Replacer (09221-25026), press piston pin into piston and connecting rod.
See Fig. 34
.
Fig. 33: Identifying Piston Front Marks (1998)
Courtesy of TOYOTA MOTOR SALES, U.S.A., INC.
1997 Toyota RAV4
2.0L 4-CYL 1997-98 ENGINES Toyota 2.0L 4-Cylinder
Microsoft
Sunday, November 22, 2009 10:23:31 AMPage 48 © 2005 Mitchell Repair Information Company, LLC.
Page 797 of 1632
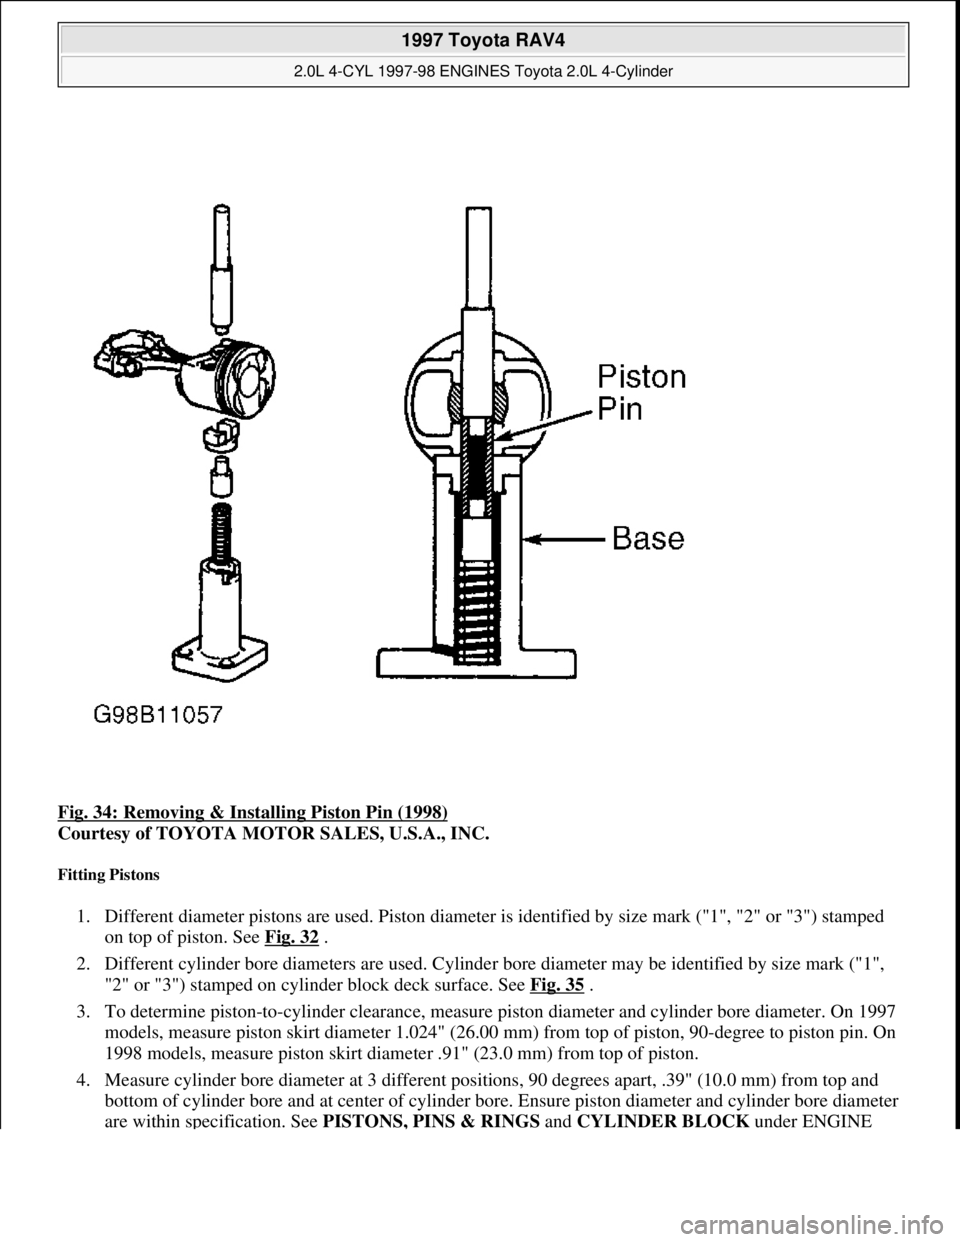
Fig. 34: Removing & Installing Piston Pin (1998)
Courtesy of TOYOTA MOTOR SALES, U.S.A., INC.
Fitting Pistons
1. Different diameter pistons are used. Piston diameter is identified by size mark ("1", "2" or "3") stamped
on top of piston. See Fig. 32
.
2. Different cylinder bore diameters are used. Cylinder bore diameter may be identified by size mark ("1",
"2" or "3") stamped on cylinder block deck surface. See Fig. 35
.
3. To determine piston-to-cylinder clearance, measure piston diameter and cylinder bore diameter. On 1997
models, measure piston skirt diameter 1.024" (26.00 mm) from top of piston, 90-degree to piston pin. On
1998 models, measure piston skirt diameter .91" (23.0 mm) from top of piston.
4. Measure cylinder bore diameter at 3 different positions, 90 degrees apart, .39" (10.0 mm) from top and
bottom of cylinder bore and at center of cylinder bore. Ensure piston diameter and cylinder bore diameter
are within specification. See PISTONS, PINS & RINGS
and CYLINDER BLOCK under ENGINE
1997 Toyota RAV4
2.0L 4-CYL 1997-98 ENGINES Toyota 2.0L 4-Cylinder
Microsoft
Sunday, November 22, 2009 10:23:31 AMPage 49 © 2005 Mitchell Repair Information Company, LLC.
Page 798 of 1632
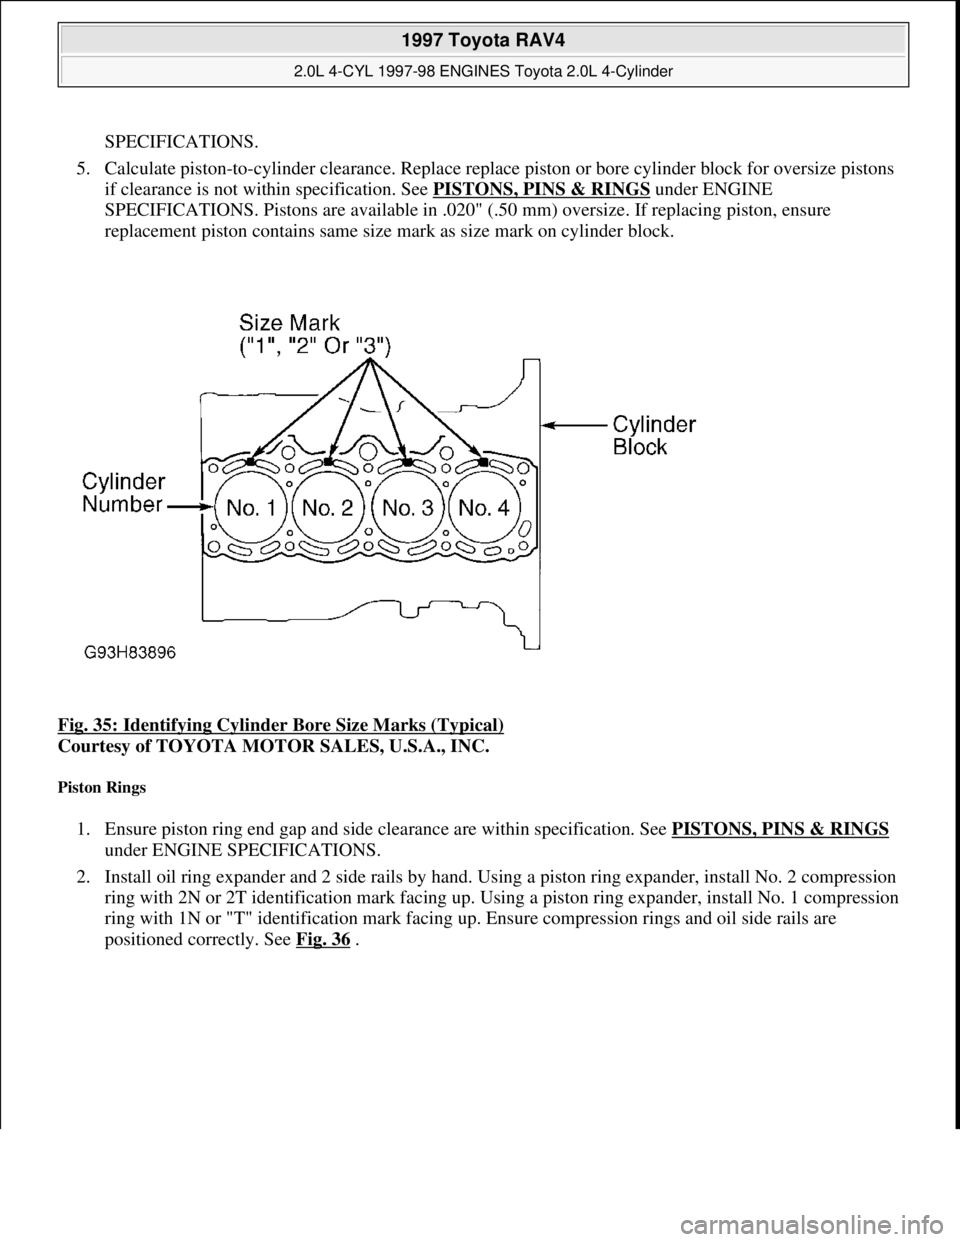
SPECIFICATIONS.
5. Calculate piston-to-cylinder clearance. Replace replace piston or bore cylinder block for oversize pistons
if clearance is not within specification. See PISTONS, PINS & RINGS
under ENGINE
SPECIFICATIONS. Pistons are available in .020" (.50 mm) oversize. If replacing piston, ensure
replacement piston contains same size mark as size mark on cylinder block.
Fig. 35: Identifying Cylinder Bore Size Marks (Typical)
Courtesy of TOYOTA MOTOR SALES, U.S.A., INC.
Piston Rings
1. Ensure piston ring end gap and side clearance are within specification. See PISTONS, PINS & RINGS
under ENGINE SPECIFICATIONS.
2. Install oil ring expander and 2 side rails by hand. Using a piston ring expander, install No. 2 compression
ring with 2N or 2T identification mark facing up. Using a piston ring expander, install No. 1 compression
ring with 1N or "T" identification mark facing up. Ensure compression rings and oil side rails are
positioned correctl
y. See Fig. 36 .
1997 Toyota RAV4
2.0L 4-CYL 1997-98 ENGINES Toyota 2.0L 4-Cylinder
Microsoft
Sunday, November 22, 2009 10:23:31 AMPage 50 © 2005 Mitchell Repair Information Company, LLC.
Page 799 of 1632
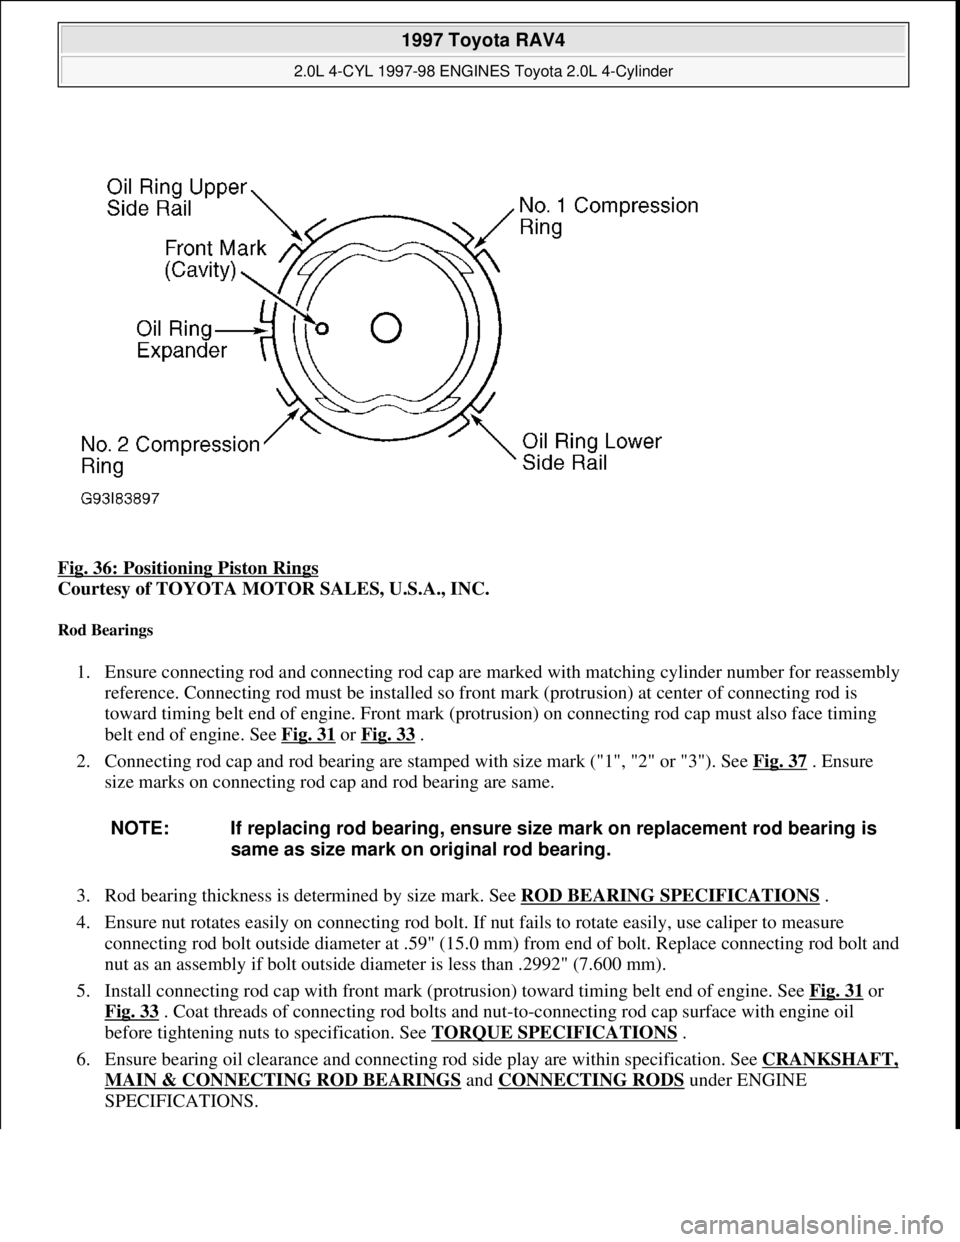
Fig. 36: Positioning Piston Rings
Courtesy of TOYOTA MOTOR SALES, U.S.A., INC.
Rod Bearings
1. Ensure connecting rod and connecting rod cap are marked with matching cylinder number for reassembly
reference. Connecting rod must be installed so front mark (protrusion) at center of connecting rod is
toward timing belt end of engine. Front mark (protrusion) on connecting rod cap must also face timing
belt end of engine. See Fig. 31
or Fig. 33 .
2. Connecting rod cap and rod bearing are stamped with size mark ("1", "2" or "3"). See Fig. 37
. Ensure
size marks on connecting rod cap and rod bearing are same.
3. Rod bearing thickness is determined by size mark. See ROD BEARING SPECIFICATIONS
.
4. Ensure nut rotates easily on connecting rod bolt. If nut fails to rotate easily, use caliper to measure
connecting rod bolt outside diameter at .59" (15.0 mm) from end of bolt. Replace connecting rod bolt and
nut as an assembly if bolt outside diameter is less than .2992" (7.600 mm).
5. Install connecting rod cap with front mark (protrusion) toward timing belt end of engine. See Fig. 31
or
Fig. 33
. Coat threads of connecting rod bolts and nut-to-connecting rod cap surface with engine oil
before tightening nuts to specification. See TORQUE SPECIFICATIONS
.
6. Ensure bearing oil clearance and connecting rod side play are within specification. See CRANKSHAFT,
MAIN & CONNECTING ROD BEARINGS and CONNECTING RODS under ENGINE
SPECIFICATIONS.
NOTE: If replacing rod bearing, ensure size mark on replacement rod bearing is
same as size mark on original rod bearing.
1997 Toyota RAV4
2.0L 4-CYL 1997-98 ENGINES Toyota 2.0L 4-Cylinder
Microsoft
Sunday, November 22, 2009 10:23:31 AMPage 51 © 2005 Mitchell Repair Information Company, LLC.
Page 800 of 1632
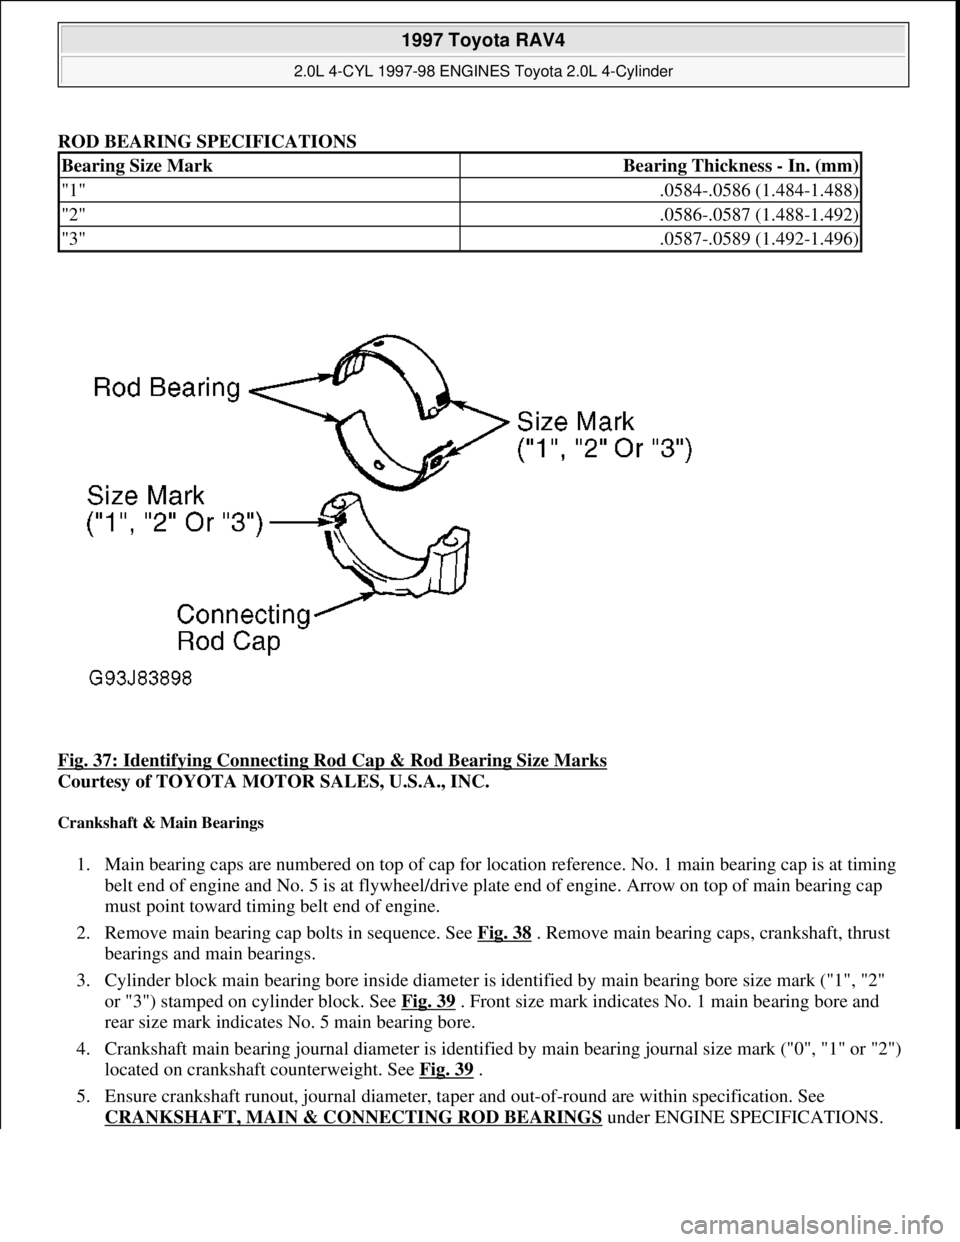
ROD BEARING SPECIFICATIONS
Fig. 37: Identifying Connecting Rod Cap & Rod Bearing Size Marks
Courtesy of TOYOTA MOTOR SALES, U.S.A., INC.
Crankshaft & Main Bearings
1. Main bearing caps are numbered on top of cap for location reference. No. 1 main bearing cap is at timing
belt end of engine and No. 5 is at flywheel/drive plate end of engine. Arrow on top of main bearing cap
must point toward timing belt end of engine.
2. Remove main bearing cap bolts in sequence. See Fig. 38
. Remove main bearing caps, crankshaft, thrust
bearings and main bearings.
3. Cylinder block main bearing bore inside diameter is identified by main bearing bore size mark ("1", "2"
or "3") stamped on cylinder block. See Fig. 39
. Front size mark indicates No. 1 main bearing bore and
rear size mark indicates No. 5 main bearing bore.
4. Crankshaft main bearing journal diameter is identified by main bearing journal size mark ("0", "1" or "2")
located on crankshaft counterweight. See Fig. 39
.
5. Ensure crankshaft runout, journal diameter, taper and out-of-round are within specification. See
CRANKSHAFT, MAIN & CONNECTING ROD BEARINGS
under ENGINE SPECIFICATIONS.
Bearing Size MarkBearing Thickness - In. (mm)
"1".0584-.0586 (1.484-1.488)
"2".0586-.0587 (1.488-1.492)
"3".0587-.0589 (1.492-1.496)
1997 Toyota RAV4
2.0L 4-CYL 1997-98 ENGINES Toyota 2.0L 4-Cylinder
Microsoft
Sunday, November 22, 2009 10:23:31 AMPage 52 © 2005 Mitchell Repair Information Company, LLC.