TOYOTA RAV4 1996 Service Repair Manual
Manufacturer: TOYOTA, Model Year: 1996, Model line: RAV4, Model: TOYOTA RAV4 1996Pages: 1632, PDF Size: 41.64 MB
Page 801 of 1632
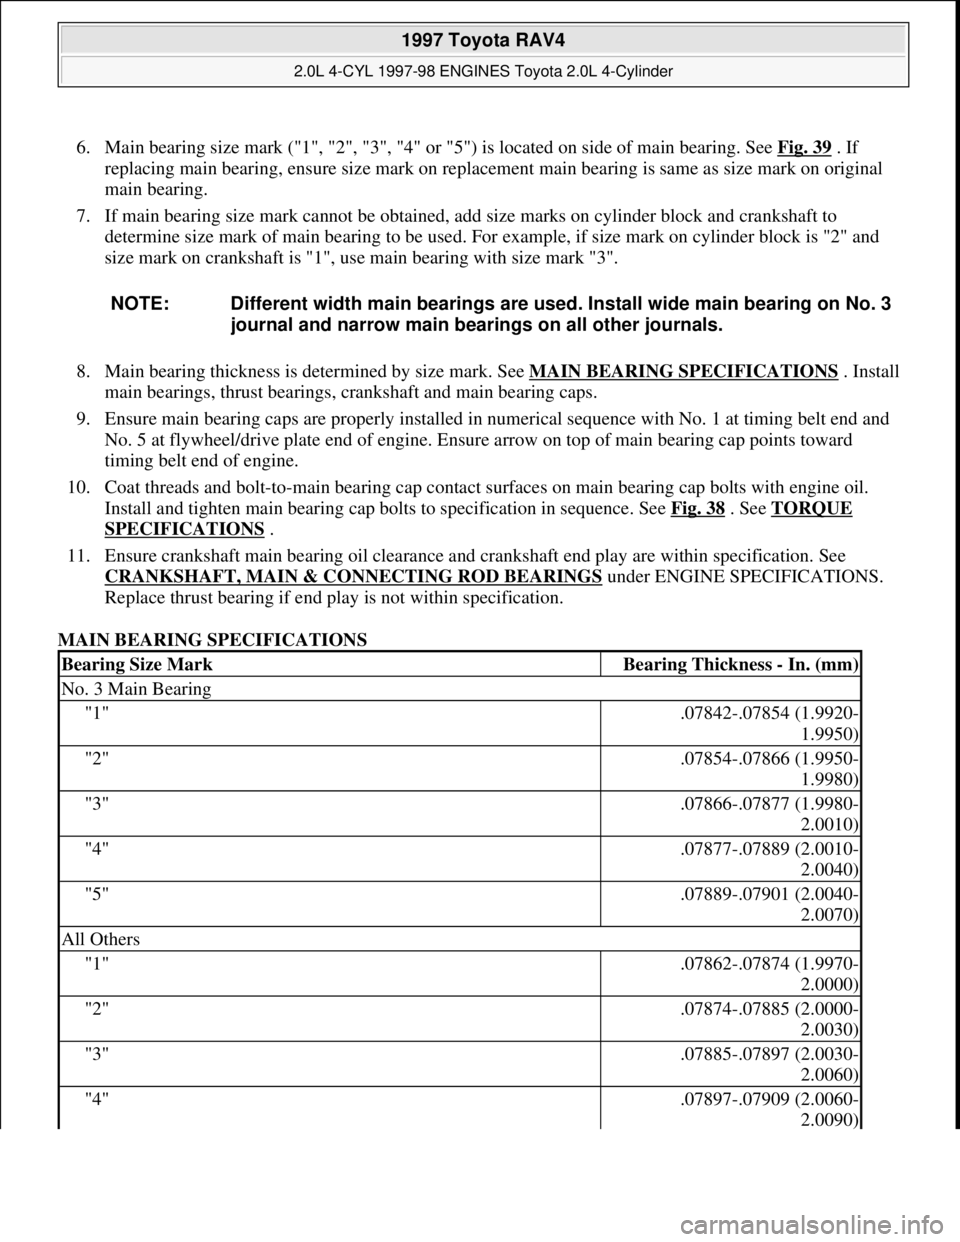
6. Main bearing size mark ("1", "2", "3", "4" or "5") is located on side of main bearing. See Fig. 39 . If
replacing main bearing, ensure size mark on replacement main bearing is same as size mark on original
main bearing.
7. If main bearing size mark cannot be obtained, add size marks on cylinder block and crankshaft to
determine size mark of main bearing to be used. For example, if size mark on cylinder block is "2" and
size mark on crankshaft is "1", use main bearing with size mark "3".
8. Main bearing thickness is determined by size mark. See MAIN BEARING SPECIFICATIONS
. Install
main bearings, thrust bearings, crankshaft and main bearing caps.
9. Ensure main bearing caps are properly installed in numerical sequence with No. 1 at timing belt end and
No. 5 at flywheel/drive plate end of engine. Ensure arrow on top of main bearing cap points toward
timing belt end of engine.
10. Coat threads and bolt-to-main bearing cap contact surfaces on main bearing cap bolts with engine oil.
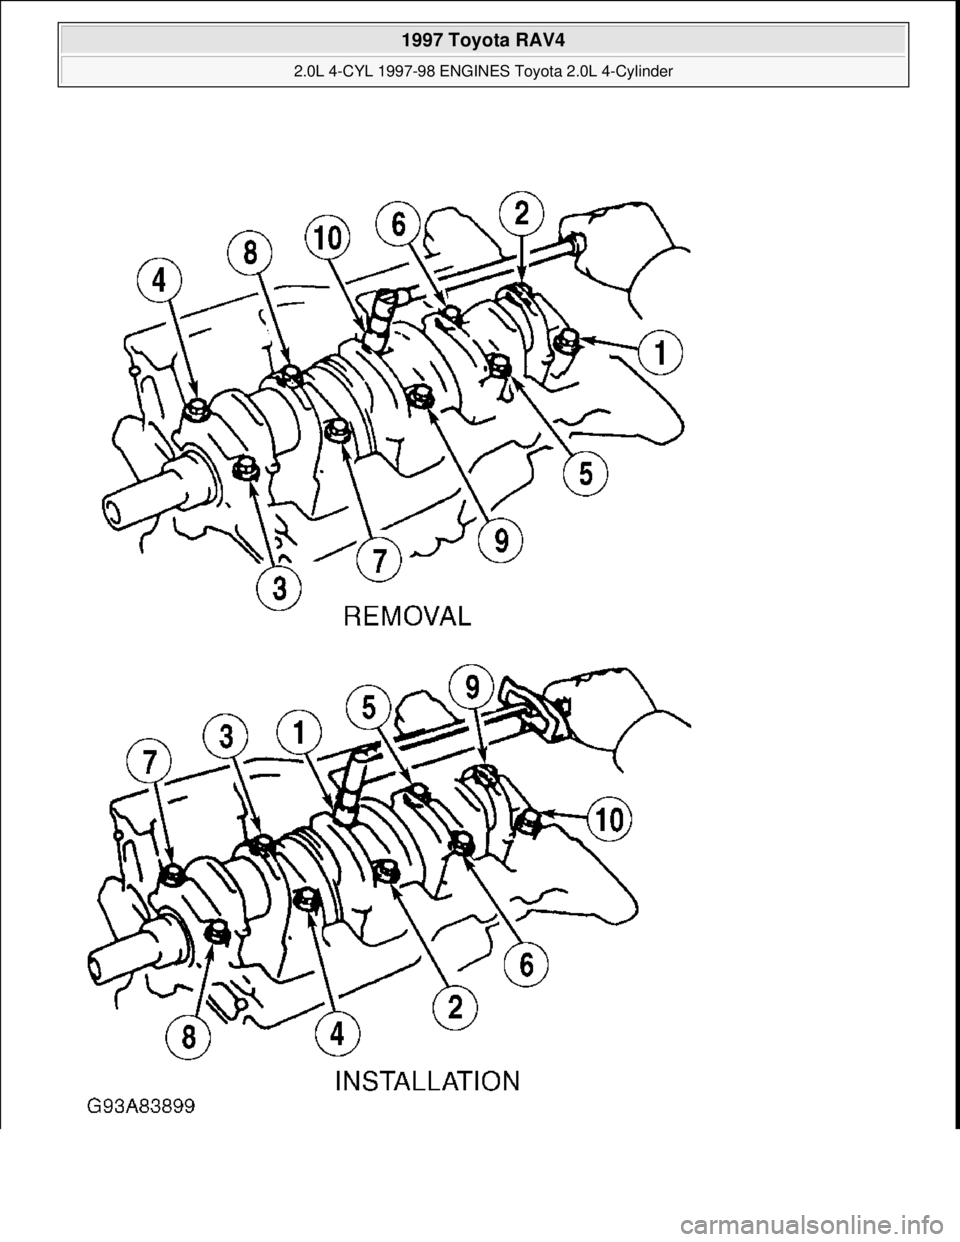
Install and tighten main bearing cap bolts to specification in sequence. See Fig. 38
. See TORQUE
SPECIFICATIONS .
11. Ensure crankshaft main bearing oil clearance and crankshaft end play are within specification. See
CRANKSHAFT, MAIN & CONNECTING ROD BEARINGS
under ENGINE SPECIFICATIONS.
Replace thrust bearing if end play is not within specification.
MAIN BEARING SPECIFICATIONS NOTE: Different width main bearings are used. Install wide main bearing on No. 3
journal and narrow main bearings on all other journals.
Bearing Size MarkBearing Thickness - In. (mm)
No. 3 Main Bearing
"1".07842-.07854 (1.9920-
1.9950)
"2".07854-.07866 (1.9950-
1.9980)
"3".07866-.07877 (1.9980-
2.0010)
"4".07877-.07889 (2.0010-
2.0040)
"5".07889-.07901 (2.0040-
2.0070)
All Others
"1".07862-.07874 (1.9970-
2.0000)
"2".07874-.07885 (2.0000-
2.0030)
"3".07885-.07897 (2.0030-
2.0060)
"4".07897-.07909 (2.0060-
2.0090)
1997 Toyota RAV4
2.0L 4-CYL 1997-98 ENGINES Toyota 2.0L 4-Cylinder
Microsoft
Sunday, November 22, 2009 10:23:31 AMPage 53 © 2005 Mitchell Repair Information Company, LLC.
Page 802 of 1632
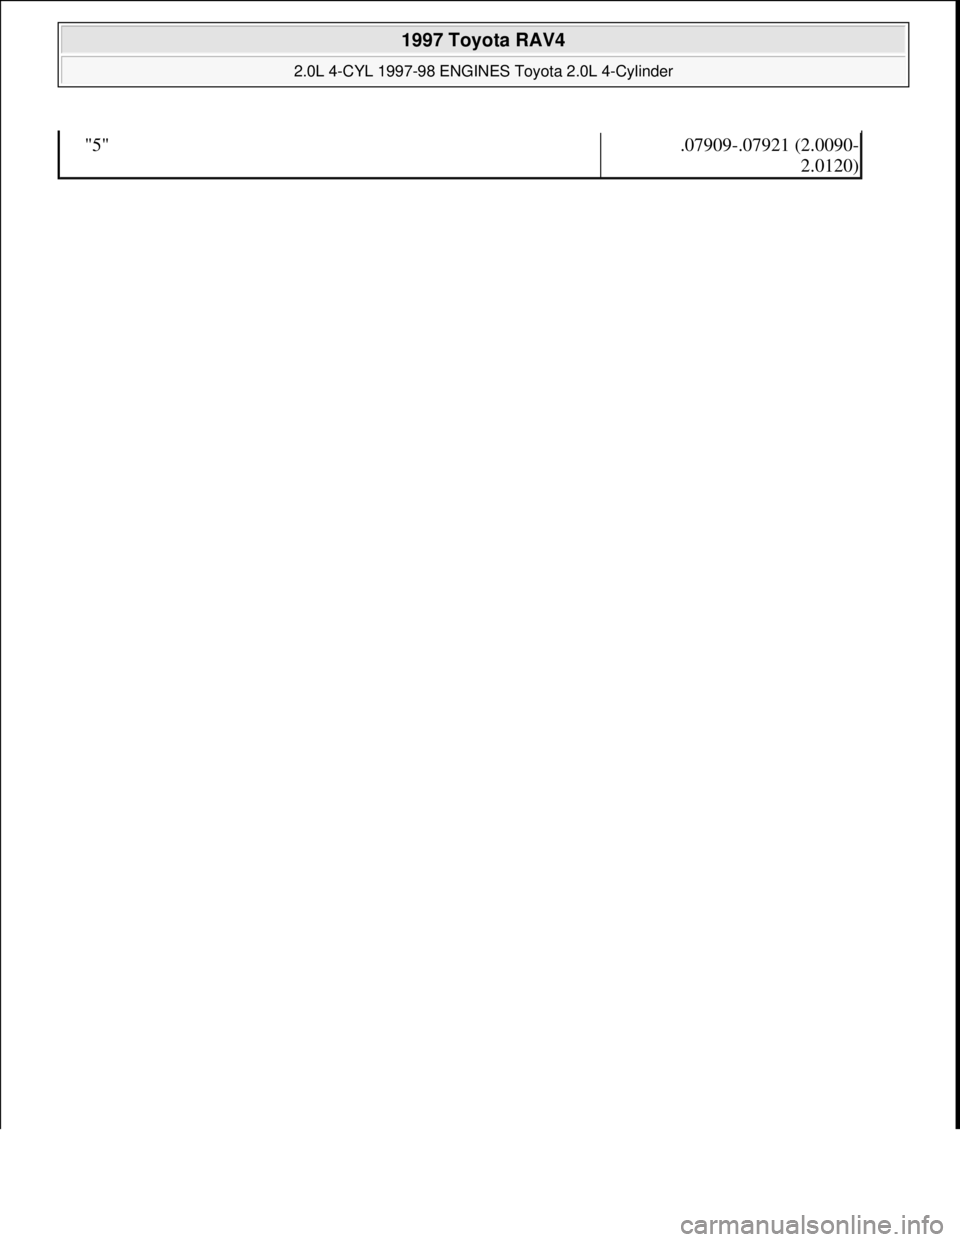
"5".07909-.07921 (2.0090-
2.0120)
1997 Toyota RAV4
2.0L 4-CYL 1997-98 ENGINES Toyota 2.0L 4-Cylinder
Microsoft
Sunday, November 22, 2009 10:23:31 AMPage 54 © 2005 Mitchell Repair Information Company, LLC.
Page 803 of 1632
1997 Toyota RAV4
2.0L 4-CYL 1997-98 ENGINES Toyota 2.0L 4-Cylinder
Microsoft
Sunday, November 22, 2009 10:23:31 AMPage 55 © 2005 Mitchell Repair Information Company, LLC.
Page 804 of 1632
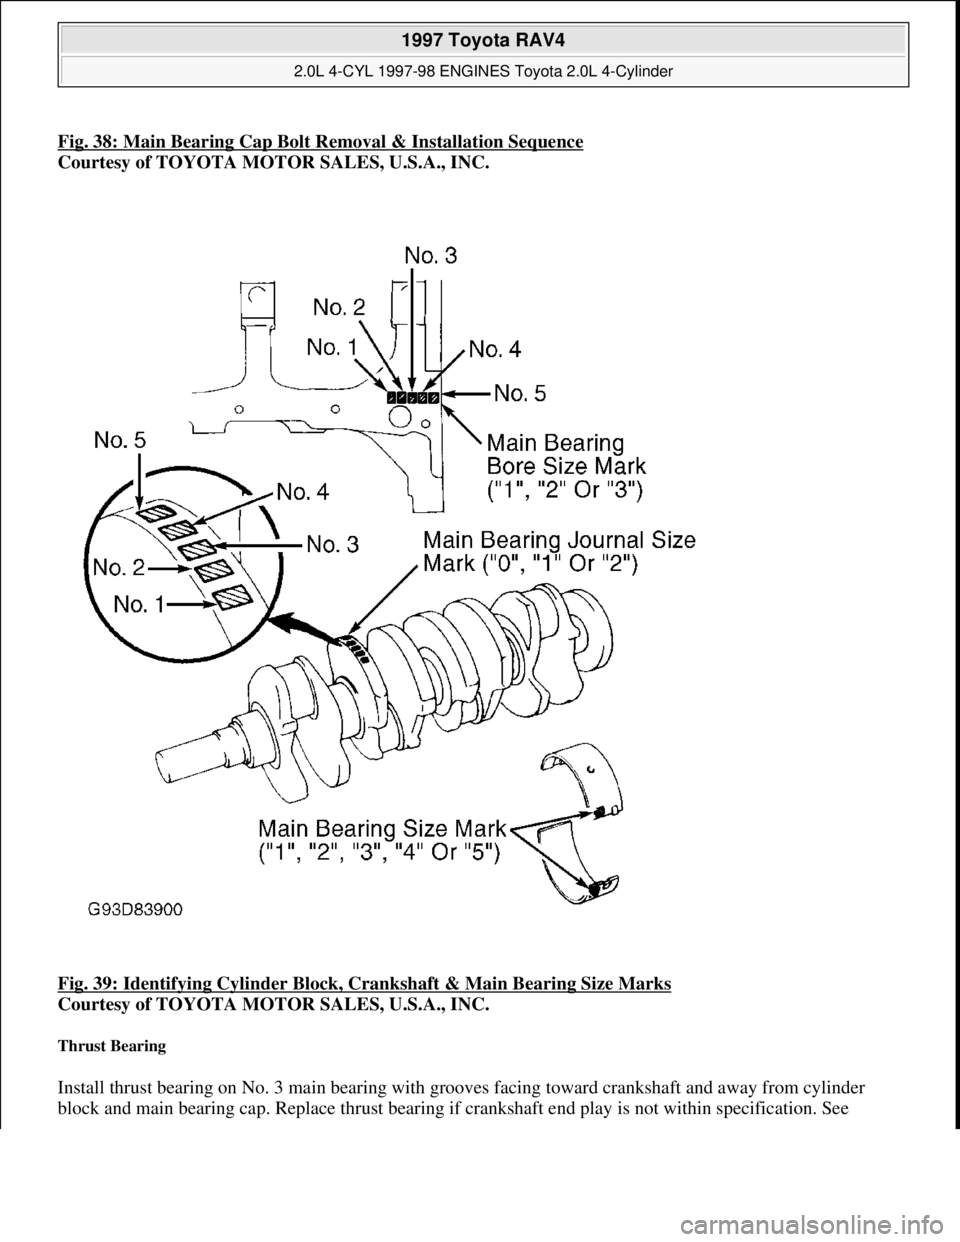
Fig. 38: Main Bearing Cap Bolt Removal & Installation Sequence
Courtesy of TOYOTA MOTOR SALES, U.S.A., INC.
Fig. 39: Identifying Cylinder Block, Crankshaft & Main Bearing Size Marks
Courtesy of TOYOTA MOTOR SALES, U.S.A., INC.
Thrust Bearing
Install thrust bearing on No. 3 main bearing with grooves facing toward crankshaft and away from cylinder
block and main bearing cap. Replace thrust bearing if crankshaft end play is not within specification. See
1997 Toyota RAV4
2.0L 4-CYL 1997-98 ENGINES Toyota 2.0L 4-Cylinder
Microsoft
Sunday, November 22, 2009 10:23:31 AMPage 56 © 2005 Mitchell Repair Information Company, LLC.
Page 805 of 1632
CRANKSHAFT, MAIN & CONNECTING ROD BEARINGSunder ENGINE SPECIFICATIONS.
Cylinder Block
1. Inspect cylinder block deck surface warpage. Replace cylinder block if deck warpage exceeds
specification. See CYLINDER BLOCK
under ENGINE SPECIFICATIONS.
2. Different cylinder bore diameters are used. Cylinder bore diameter may be identified by size mark ("1",
"2" or "3") on cylinder block deck surface. See Fig. 39
.
3. Measure cylinder bore diameter at 2 different places, 90 degrees apart at .39" (10.0 mm) from top and
bottom of cylinder bore and at center of cylinder bore. Ensure cylinder bore diameter is within
specification. See CYLINDER BLOCK
under ENGINE SPECIFICATIONS.
4. Bore cylinder block for oversize pistons if cylinder bore diameter is not within specification. Pistons are
available in .020" (.50 mm) oversize.
5. Install main bearing caps in numerical sequence with No. 1 at timing belt end and No. 5 at flywheel/drive
plate end of engine. Ensure arrow on top of main bearing cap points toward timing belt end of engine.
6. Install and tighten main bearing cap bolts to specification in sequence. See Fig. 38
. See TORQUE
SPECIFICATIONS .
7. Ensure main bearing bore inside diameter is within specification. See CYLINDER BLOCK
under
ENGINE SPECIFICATIONS.
ENGINE OILING
ENGINE LUBRICATION SYSTEM
Crankshaft driven oil pump provides pressurized engine lubrication. Oil cooler is installed between oil filter and
cylinder block.
Crankcase Capacity
On 1997 models, drain and refill capacity with oil filter is approximately 4.1 qts. (3.9L). Dry fill capacity is
approximately 4.7 qts. (4.4L). On 1998 models, drain and refill capacity with oil filter is approximately 4.3 qts.
(4.1L). Dry fill capacity is approximately 4.8 qts. (4.6L).
Oil Pressure
With engine at normal operating temperature, oil pressure should be at least 4.3 psi (0.3 kg/cm2 ) at idle and 36-
71 psi (2.5-5.0 kg/cm
2 ) at 3000 RPM.
OIL PUMP
Removal & Disassembly
NOTE: Main bearing bore inside diameter is identified by main bearing bore size mark
("1", "2" or "3") stamped on cylinder block. See Fig. 39
.
1997 Toyota RAV4
2.0L 4-CYL 1997-98 ENGINES Toyota 2.0L 4-Cylinder
Microsoft
Sunday, November 22, 2009 10:23:31 AMPage 57 © 2005 Mitchell Repair Information Company, LLC.
Page 806 of 1632
1. Remove timing belt, No. 2 idler pulley, crankshaft sprocket and oil pump sprocket. See TIMING BELT
under REMOVAL & INSTALLATION. Remove oil pan. See OIL PAN under REMOVAL &
INSTALLATION.
2. Remove oil pump pick-up tube, gasket and oil baffle plate. Disconnect electrical connector for crankshaft
position sensor located on from of oil pump housing. Remove bolt and crankshaft position sensor from
front of oil pump housing.
3. Remove oil pump-to-cylinder block bolts. Using soft-faced hammer, tap oil pump housing from cylinder
block. To disassemble oil pump, remove oil pump body cover bolts, oil pump body cover and "O" ring.
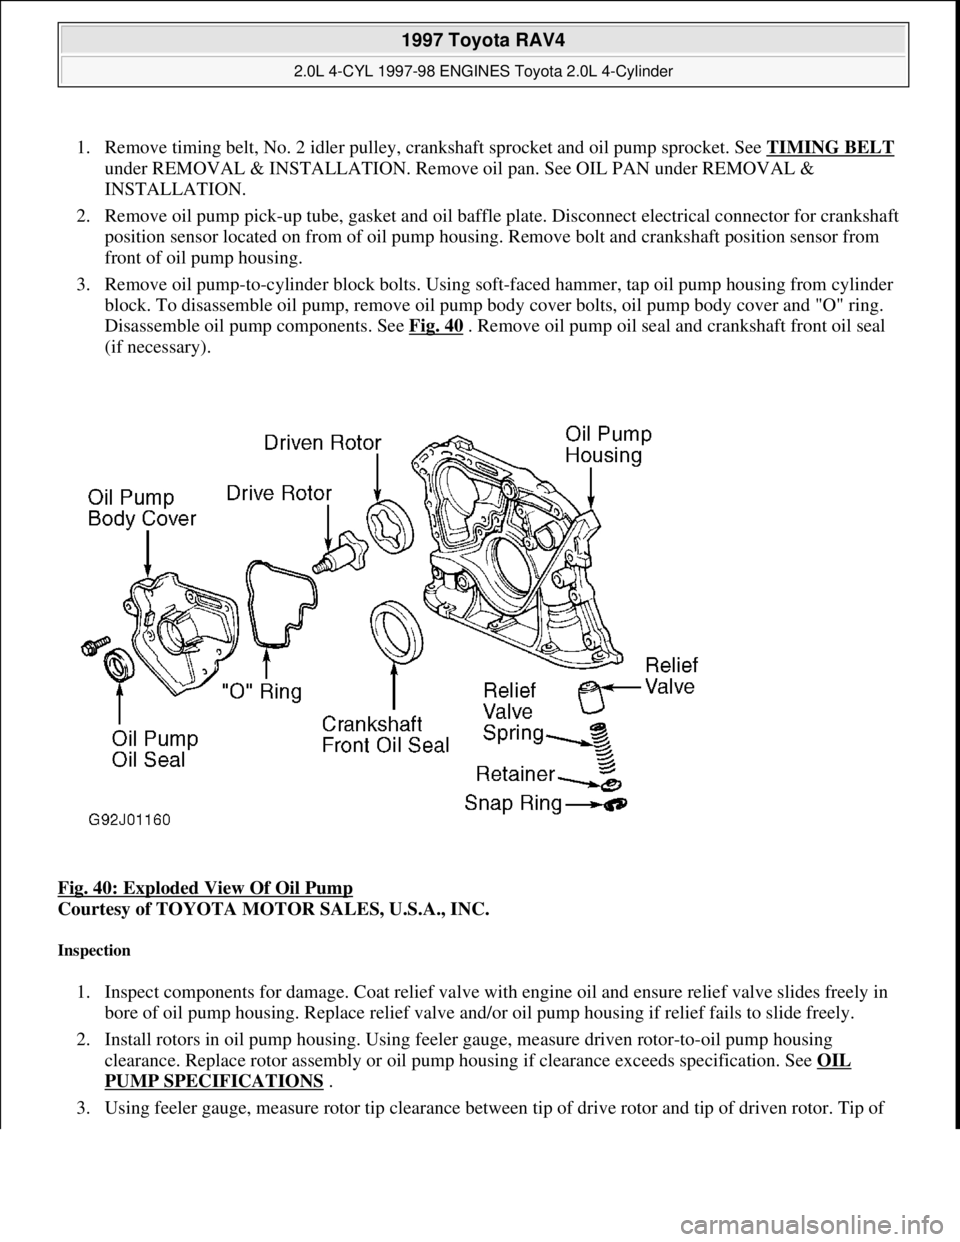
Disassemble oil pump components. See Fig. 40
. Remove oil pump oil seal and crankshaft front oil seal
(if necessary).
Fig. 40: Exploded View Of Oil Pump
Courtesy of TOYOTA MOTOR SALES, U.S.A., INC.
Inspection
1. Inspect components for damage. Coat relief valve with engine oil and ensure relief valve slides freely in
bore of oil pump housing. Replace relief valve and/or oil pump housing if relief fails to slide freely.
2. Install rotors in oil pump housing. Using feeler gauge, measure driven rotor-to-oil pump housing
clearance. Replace rotor assembly or oil pump housing if clearance exceeds specification. See OIL
PUMP SPECIFICATIONS .
3. Usin
g feeler gauge, measure rotor tip clearance between tip of drive rotor and tip of driven rotor. Tip of
1997 Toyota RAV4
2.0L 4-CYL 1997-98 ENGINES Toyota 2.0L 4-Cylinder
Microsoft
Sunday, November 22, 2009 10:23:31 AMPage 58 © 2005 Mitchell Repair Information Company, LLC.
Page 807 of 1632
drive rotor is on outside of rotor and tip of driven rotor is on inside of rotor. Replace rotor assembly if
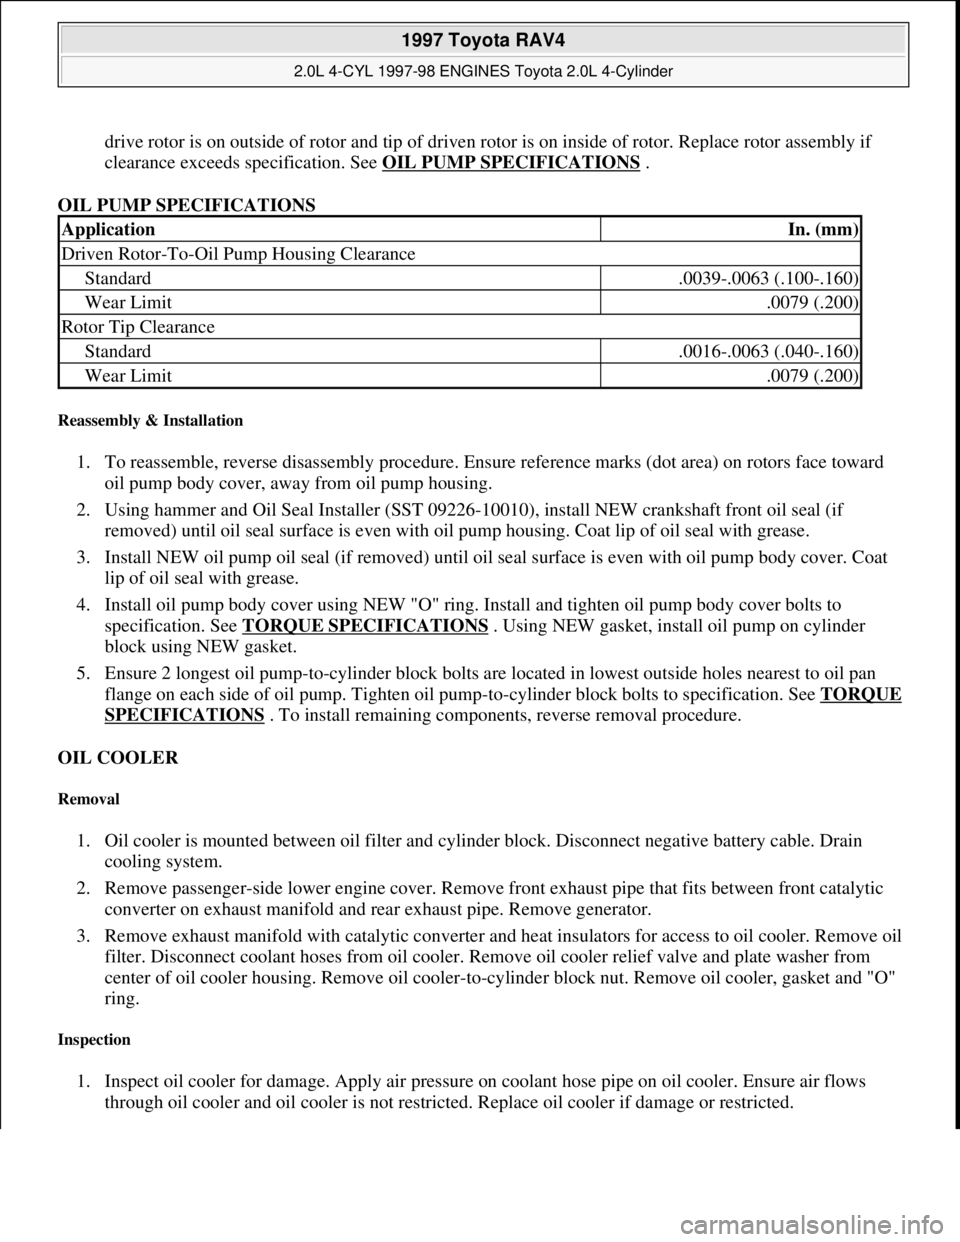
clearance exceeds specification. See OIL PUMP SPECIFICATIONS
.
OIL PUMP SPECIFICATIONS
Reassembly & Installation
1. To reassemble, reverse disassembly procedure. Ensure reference marks (dot area) on rotors face toward
oil pump body cover, away from oil pump housing.
2. Using hammer and Oil Seal Installer (SST 09226-10010), install NEW crankshaft front oil seal (if
removed) until oil seal surface is even with oil pump housing. Coat lip of oil seal with grease.
3. Install NEW oil pump oil seal (if removed) until oil seal surface is even with oil pump body cover. Coat
lip of oil seal with grease.
4. Install oil pump body cover using NEW "O" ring. Install and tighten oil pump body cover bolts to
specification. See TORQUE SPECIFICATIONS
. Using NEW gasket, install oil pump on cylinder
block using NEW gasket.
5. Ensure 2 longest oil pump-to-cylinder block bolts are located in lowest outside holes nearest to oil pan
flange on each side of oil pump. Tighten oil pump-to-cylinder block bolts to specification. See TORQUE
SPECIFICATIONS . To install remaining components, reverse removal procedure.
OIL COOLER
Removal
1. Oil cooler is mounted between oil filter and cylinder block. Disconnect negative battery cable. Drain
cooling system.
2. Remove passenger-side lower engine cover. Remove front exhaust pipe that fits between front catalytic
converter on exhaust manifold and rear exhaust pipe. Remove generator.
3. Remove exhaust manifold with catalytic converter and heat insulators for access to oil cooler. Remove oil
filter. Disconnect coolant hoses from oil cooler. Remove oil cooler relief valve and plate washer from
center of oil cooler housing. Remove oil cooler-to-cylinder block nut. Remove oil cooler, gasket and "O"
ring.
Inspection
1. Inspect oil cooler for damage. Apply air pressure on coolant hose pipe on oil cooler. Ensure air flows
through oil cooler and oil cooler is not restricted. Replace oil cooler if damage or restricted.
ApplicationIn. (mm)
Driven Rotor-To-Oil Pump Housing Clearance
Standard.0039-.0063 (.100-.160)
Wear Limit.0079 (.200)
Rotor Tip Clearance
Standard.0016-.0063 (.040-.160)
Wear Limit.0079 (.200)
1997 Toyota RAV4
2.0L 4-CYL 1997-98 ENGINES Toyota 2.0L 4-Cylinder
Microsoft
Sunday, November 22, 2009 10:23:31 AMPage 59 © 2005 Mitchell Repair Information Company, LLC.
Page 808 of 1632
2. Using wooden stick, push inward on check valve located in center of oil cooler relief valve. Push inward
from threaded end (opposite oil filter threads) on oil cooler relief valve. Replace oil cooler relief valve if
check valve fails to move.
Installation
1. To install, reverse removal procedure. Use a NEW "O" ring and gasket. Coat "O" ring with engine oil.
Coat threads and area below head of oil cooler relief valve with engine oil.
2. Install oil cooler with oil cooler-to-cylinder block nut and oil cooler relief valve loosely installed. Tighten
oil cooler relief valve and then nut to specification. See TORQUE SPECIFICATIONS
.
3. Use NEW gasket and NEW nuts when installing front exhaust pipe on catalytic converter. Ensure all
bolts/nuts are loosely installed before tightening to specification. See TORQUE SPECIFICATIONS
.
Add engine oil as needed. Fill cooling system.
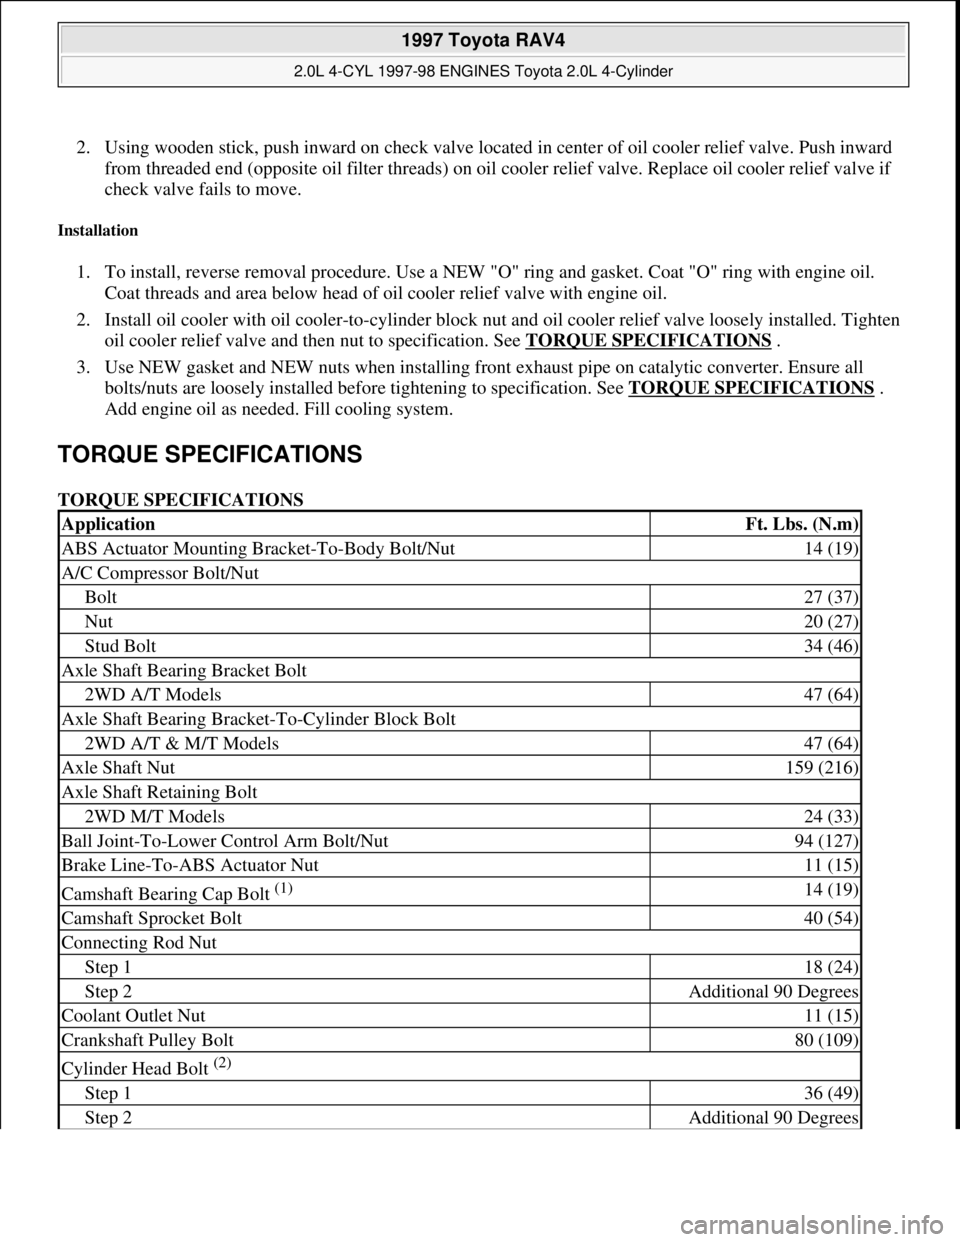
TORQUE SPECIFICATIONS
TORQUE SPECIFICATIONS
ApplicationFt. Lbs. (N.m)
ABS Actuator Mounting Bracket-To-Body Bolt/Nut14 (19)
A/C Compressor Bolt/Nut
Bolt27 (37)
Nut20 (27)
Stud Bolt34 (46)
Axle Shaft Bearing Bracket Bolt
2WD A/T Models47 (64)
Axle Shaft Bearing Bracket-To-Cylinder Block Bolt
2WD A/T & M/T Models47 (64)
Axle Shaft Nut159 (216)
Axle Shaft Retaining Bolt
2WD M/T Models24 (33)
Ball Joint-To-Lower Control Arm Bolt/Nut94 (127)
Brake Line-To-ABS Actuator Nut11 (15)
Camshaft Bearing Cap Bolt (1) 14 (19)
Camshaft Sprocket Bolt40 (54)
Connecting Rod Nut
Step 118 (24)
Step 2Additional 90 Degrees
Coolant Outlet Nut11 (15)
Crankshaft Pulley Bolt80 (109)
Cylinder Head Bolt (2)
Step 136 (49)
Step 2Additional 90 Degrees
1997 Toyota RAV4
2.0L 4-CYL 1997-98 ENGINES Toyota 2.0L 4-Cylinder
Microsoft
Sunday, November 22, 2009 10:23:31 AMPage 60 © 2005 Mitchell Repair Information Company, LLC.
Page 809 of 1632
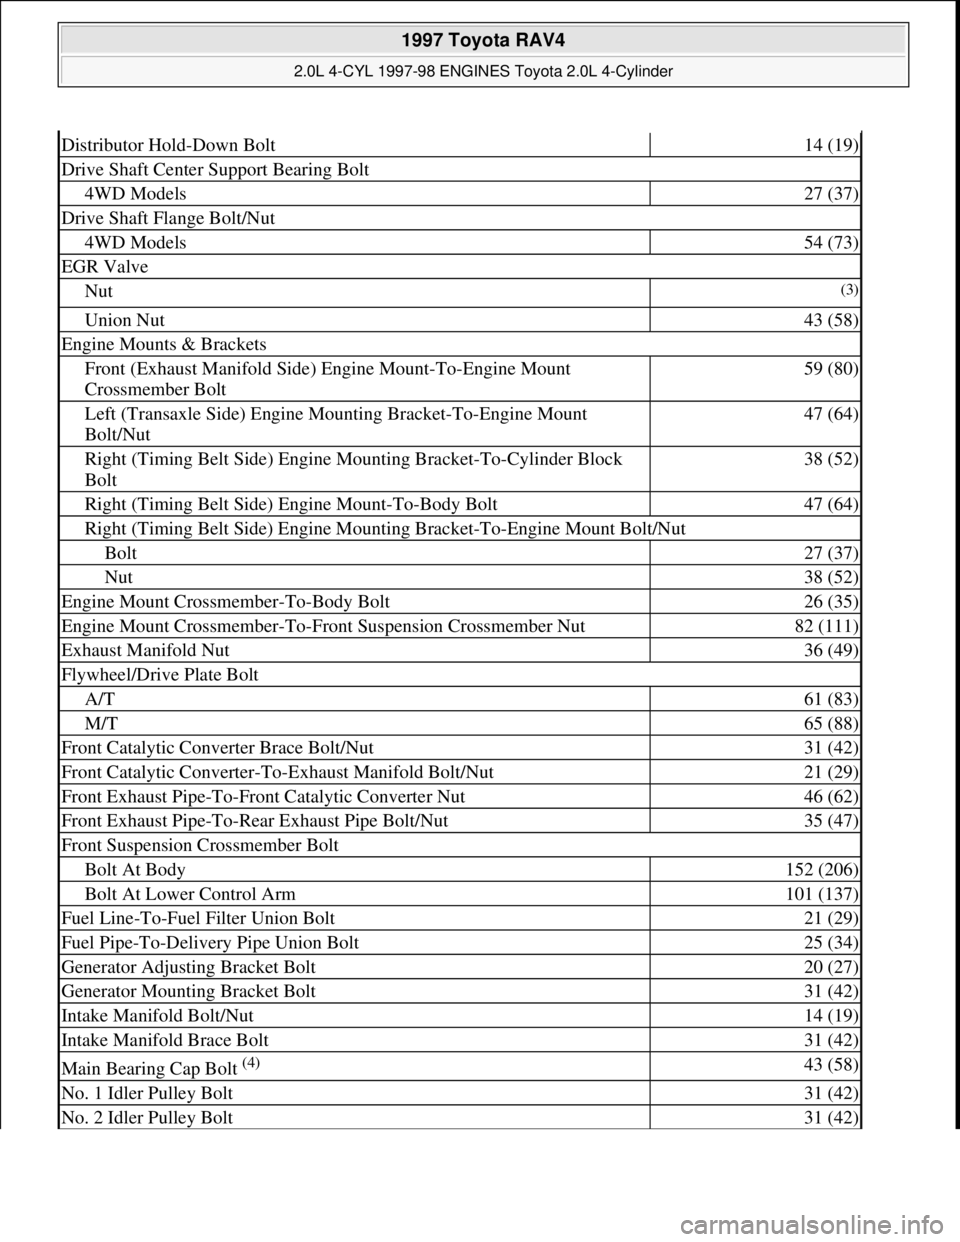
Distributor Hold-Down Bolt14 (19)
Drive Shaft Center Support Bearing Bolt
4WD Models27 (37)
Drive Shaft Flange Bolt/Nut
4WD Models54 (73)
EGR Valve
Nut(3)
Union Nut43 (58)
Engine Mounts & Brackets
Front (Exhaust Manifold Side) Engine Mount-To-Engine Mount
Crossmember Bolt59 (80)
Left (Transaxle Side) Engine Mounting Bracket-To-Engine Mount
Bolt/Nut47 (64)
Right (Timing Belt Side) Engine Mounting Bracket-To-Cylinder Block
Bolt38 (52)
Right (Timing Belt Side) Engine Mount-To-Body Bolt47 (64)
Right (Timing Belt Side) Engine Mounting Bracket-To-Engine Mount Bolt/Nut
Bolt27 (37)
Nut38 (52)
Engine Mount Crossmember-To-Body Bolt26 (35)
Engine Mount Crossmember-To-Front Suspension Crossmember Nut82 (111)
Exhaust Manifold Nut36 (49)
Flywheel/Drive Plate Bolt
A/T61 (83)
M/T65 (88)
Front Catalytic Converter Brace Bolt/Nut31 (42)
Front Catalytic Converter-To-Exhaust Manifold Bolt/Nut21 (29)
Front Exhaust Pipe-To-Front Catalytic Converter Nut46 (62)
Front Exhaust Pipe-To-Rear Exhaust Pipe Bolt/Nut35 (47)
Front Suspension Crossmember Bolt
Bolt At Body152 (206)
Bolt At Lower Control Arm101 (137)
Fuel Line-To-Fuel Filter Union Bolt21 (29)
Fuel Pipe-To-Delivery Pipe Union Bolt25 (34)
Generator Adjusting Bracket Bolt20 (27)
Generator Mounting Bracket Bolt31 (42)
Intake Manifold Bolt/Nut14 (19)
Intake Manifold Brace Bolt31 (42)
Main Bearing Cap Bolt (4) 43 (58)
No. 1 Idler Pulley Bolt31 (42)
No. 2 Idler Pulley Bolt31 (42)
1997 Toyota RAV4
2.0L 4-CYL 1997-98 ENGINES Toyota 2.0L 4-Cylinder
Microsoft
Sunday, November 22, 2009 10:23:31 AMPage 61 © 2005 Mitchell Repair Information Company, LLC.
Page 810 of 1632
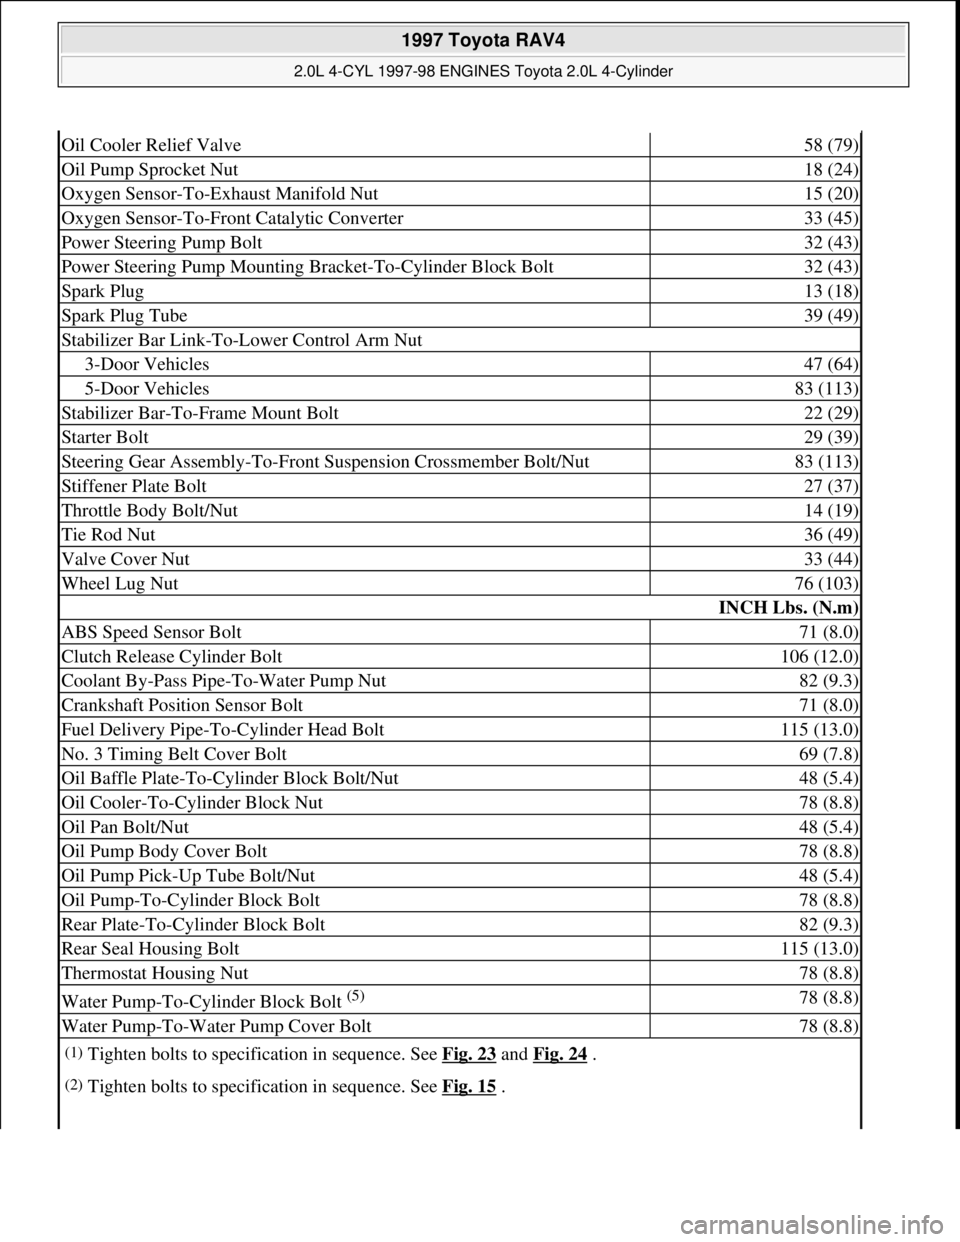
Oil Cooler Relief Valve58 (79)
Oil Pump Sprocket Nut18 (24)
Oxygen Sensor-To-Exhaust Manifold Nut15 (20)
Oxygen Sensor-To-Front Catalytic Converter33 (45)
Power Steering Pump Bolt32 (43)
Power Steering Pump Mounting Bracket-To-Cylinder Block Bolt32 (43)
Spark Plug13 (18)
Spark Plug Tube39 (49)
Stabilizer Bar Link-To-Lower Control Arm Nut
3-Door Vehicles47 (64)
5-Door Vehicles83 (113)
Stabilizer Bar-To-Frame Mount Bolt22 (29)
Starter Bolt29 (39)
Steering Gear Assembly-To-Front Suspension Crossmember Bolt/Nut83 (113)
Stiffener Plate Bolt27 (37)
Throttle Body Bolt/Nut14 (19)
Tie Rod Nut36 (49)
Valve Cover Nut33 (44)
Wheel Lug Nut76 (103)
INCH Lbs. (N.m)
ABS Speed Sensor Bolt71 (8.0)
Clutch Release Cylinder Bolt106 (12.0)
Coolant By-Pass Pipe-To-Water Pump Nut82 (9.3)
Crankshaft Position Sensor Bolt71 (8.0)
Fuel Delivery Pipe-To-Cylinder Head Bolt115 (13.0)
No. 3 Timing Belt Cover Bolt69 (7.8)
Oil Baffle Plate-To-Cylinder Block Bolt/Nut48 (5.4)
Oil Cooler-To-Cylinder Block Nut78 (8.8)
Oil Pan Bolt/Nut48 (5.4)
Oil Pump Body Cover Bolt78 (8.8)
Oil Pump Pick-Up Tube Bolt/Nut48 (5.4)
Oil Pump-To-Cylinder Block Bolt78 (8.8)
Rear Plate-To-Cylinder Block Bolt82 (9.3)
Rear Seal Housing Bolt115 (13.0)
Thermostat Housing Nut78 (8.8)
Water Pump-To-Cylinder Block Bolt (5) 78 (8.8)
Water Pump-To-Water Pump Cover Bolt78 (8.8)
(1)Tighten bolts to specification in sequence. See Fig. 23 and Fig. 24 .
(2)Tighten bolts to specification in sequence. See Fig. 15 .
1997 Toyota RAV4
2.0L 4-CYL 1997-98 ENGINES Toyota 2.0L 4-Cylinder
Microsoft
Sunday, November 22, 2009 10:23:31 AMPage 62 © 2005 Mitchell Repair Information Company, LLC.