TOYOTA RAV4 1996 Service Repair Manual
Manufacturer: TOYOTA, Model Year: 1996, Model line: RAV4, Model: TOYOTA RAV4 1996Pages: 1632, PDF Size: 41.64 MB
Page 821 of 1632
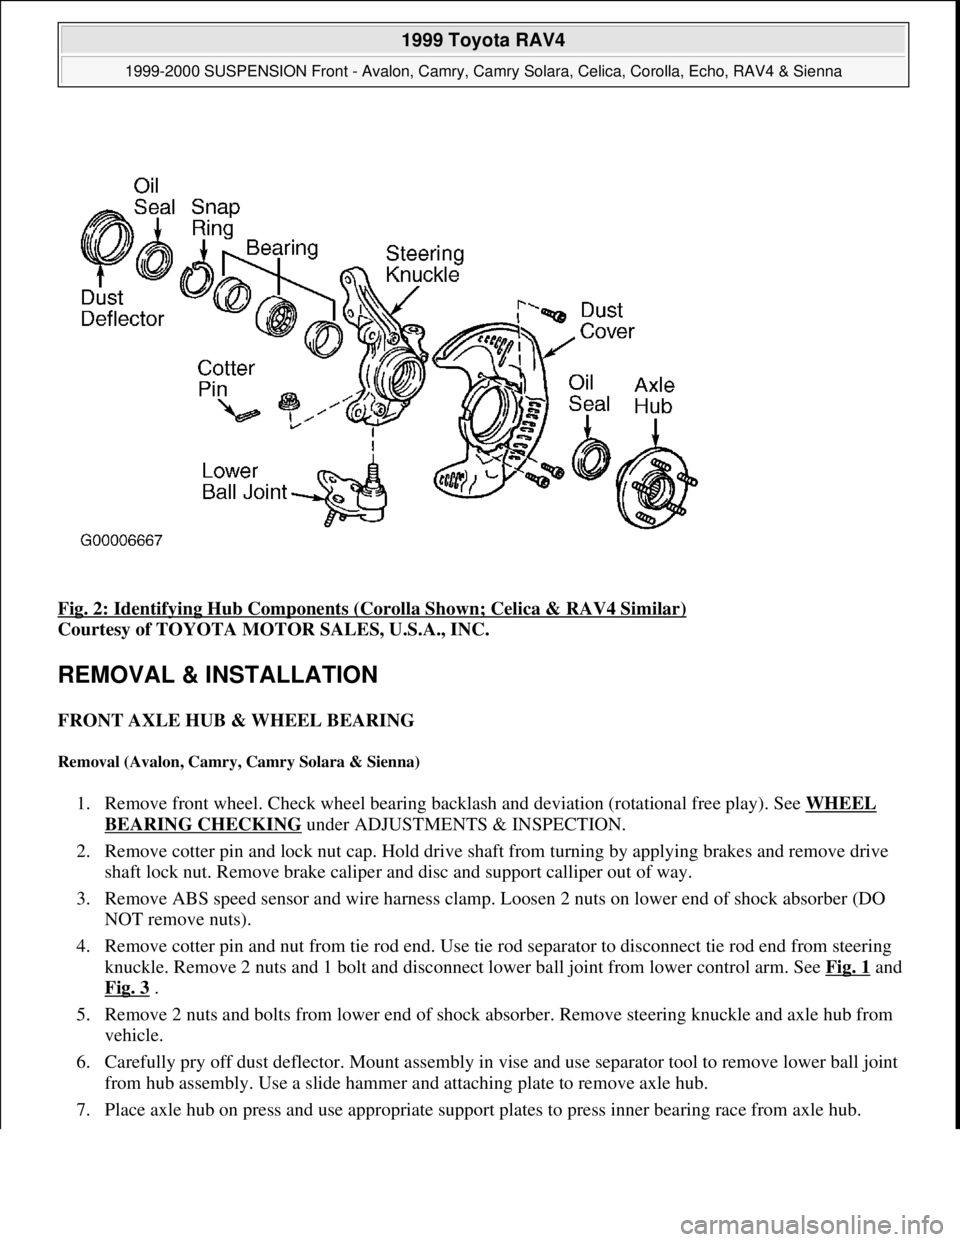
Fig. 2: Identifying Hub Components (Corolla Shown; Celica & RAV4 Similar)
Courtesy of TOYOTA MOTOR SALES, U.S.A., INC.
REMOVAL & INSTALLATION
FRONT AXLE HUB & WHEEL BEARING
Removal (Avalon, Camry, Camry Solara & Sienna)
1. Remove front wheel. Check wheel bearing backlash and deviation (rotational free play). See WHEEL
BEARING CHECKING under ADJUSTMENTS & INSPECTION.
2. Remove cotter pin and lock nut cap. Hold drive shaft from turning by applying brakes and remove drive
shaft lock nut. Remove brake caliper and disc and support calliper out of way.
3. Remove ABS speed sensor and wire harness clamp. Loosen 2 nuts on lower end of shock absorber (DO
NOT remove nuts).
4. Remove cotter pin and nut from tie rod end. Use tie rod separator to disconnect tie rod end from steering
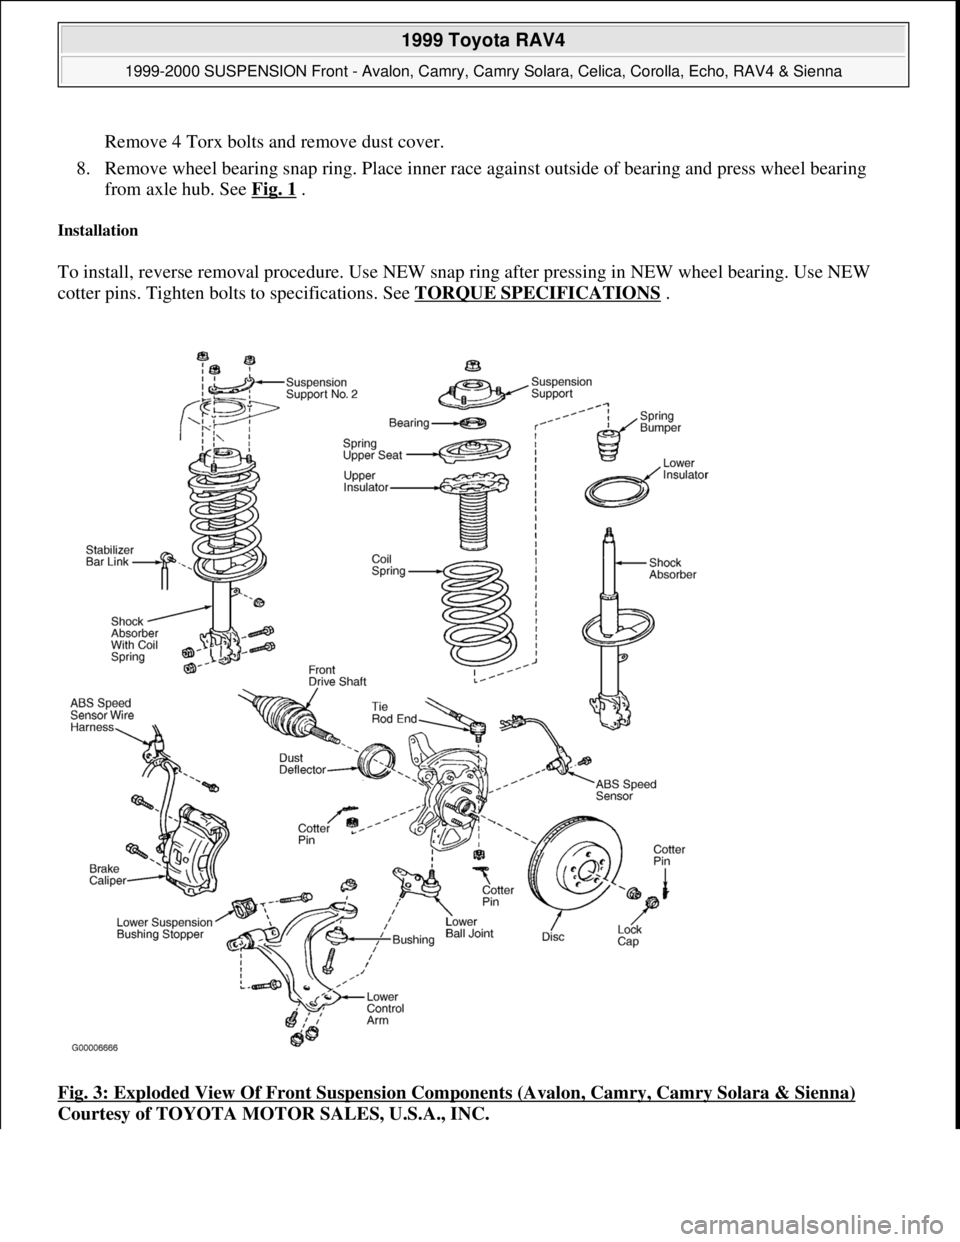
knuckle. Remove 2 nuts and 1 bolt and disconnect lower ball joint from lower control arm. See Fig. 1
and
Fig. 3
.
5. Remove 2 nuts and bolts from lower end of shock absorber. Remove steering knuckle and axle hub from
vehicle.
6. Carefully pry off dust deflector. Mount assembly in vise and use separator tool to remove lower ball joint
from hub assembly. Use a slide hammer and attaching plate to remove axle hub.
7. Place axle hub on press and use appropriate support plates to press inner bearin
g race from axle hub.
1999 Toyota RAV4
1999-2000 SUSPENSION Front - Avalon, Camry, Camry Solara, Celica, Corolla, Echo, RAV4 & Sienna
Microsoft
Sunday, November 22, 2009 10:36:34 AMPage 3 © 2005 Mitchell Repair Information Company, LLC.
Page 822 of 1632
Remove 4 Torx bolts and remove dust cover.
8. Remove wheel bearing snap ring. Place inner race against outside of bearing and press wheel bearing
from axle hub. See Fig. 1
.
Installation
To install, reverse removal procedure. Use NEW snap ring after pressing in NEW wheel bearing. Use NEW
cotter pins. Tighten bolts to specifications. See TORQUE SPECIFICATIONS
.
Fig. 3: Exploded View Of Front Suspension Components (Avalon, Camry, Camry Solara & Sienna)
Courtesy of TOYOTA MOTOR SALES, U.S.A., INC.
1999 Toyota RAV4
1999-2000 SUSPENSION Front - Avalon, Camry, Camry Solara, Celica, Corolla, Echo, RAV4 & Sienna
Microsoft
Sunday, November 22, 2009 10:36:34 AMPage 4 © 2005 Mitchell Repair Information Company, LLC.
Page 823 of 1632
Removal (Celica, Corolla & RAV4)
1. Remove front wheel. On Celica, remove ABS speed sensor. Check wheel bearing backlash and deviation
(rotational free play). See WHEEL BEARING CHECKING
under ADJUSTMENTS & INSPECTION.
2. Remove cotter pin and lock nut cap. Hold drive shaft from turning by applying brakes and remove drive
shaft lock nut. Remove brake caliper and disc and support caliper out of way.
3. On Corolla and RAV4 with ABS, remove ABS speed sensor and wire harness clamp. On Corolla, remove
brake hose from shock absorber clamp. Loosen 2 nuts on lower end of shock absorber (DO NOT
remove).
4. On all models, remove cotter pin and nut from tie rod end. Use separator tool to disconnect tie rod end
from steering knuckle. On Celica, disconnect stabilizer bar link from lower control arm.
5. On all models, remove 2 nuts and 1 bolt and disconnect lower ball joint from lower control arm. Remove
2 nuts and bolts from lower end of shock absorber. Remove steering knuckle and axle hub from vehicle.
See Fig. 2
.
6. Mount assembly in vise. Carefully pry dust deflector from hub. Remove cotter pin and nut, and use
separator tool to remove lower ball joint from hub assembly. On Celica and Corolla, remove inner oil seal
from hub. On Corolla, remove inner snap ring.
7. On all models, use slide hammer and attaching plate to remove axle hub. Place axle hub on press and use
appropriate support plates to press inner bearing race from axle hub. Remove Torx bolts and remove dust
cover.
8. On Celica and Corolla, use a suitable extractor to remove outer oil seal from hub. On RAV4, use a
suitable extractor to remove inner and outer oil seals from hub. On all models, remove wheel bearing
snap ring, if equipped. Place inner race against outside of bearing and press wheel bearing from axle hub.
See Fig. 2
.
Installation
To install, reverse removal procedure. Use NEW snap ring after pressing in NEW wheel bearing. Use NEW
cotter pins. Ti
ghten bolts to specifications. See TORQUE SPECIFICATIONS.
1999 Toyota RAV4
1999-2000 SUSPENSION Front - Avalon, Camry, Camry Solara, Celica, Corolla, Echo, RAV4 & Sienna
Microsoft
Sunday, November 22, 2009 10:36:34 AMPage 5 © 2005 Mitchell Repair Information Company, LLC.
Page 824 of 1632
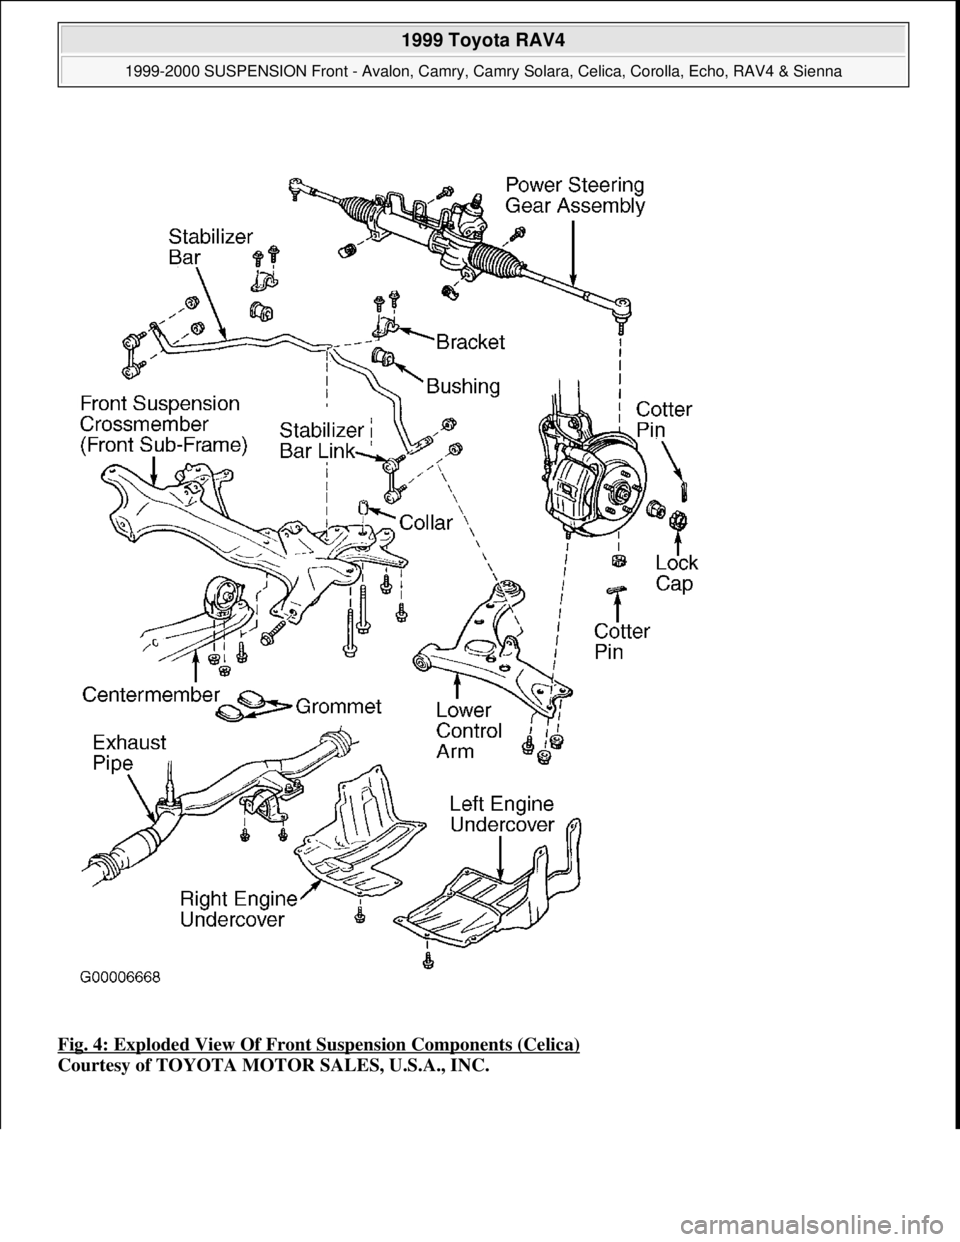
Fig. 4: Exploded View Of Front Suspension Components (Celica)
Courtesy of TOYOTA MOTOR SALES, U.S.A., INC.
1999 Toyota RAV4
1999-2000 SUSPENSION Front - Avalon, Camry, Camry Solara, Celica, Corolla, Echo, RAV4 & Sienna
Microsoft
Sunday, November 22, 2009 10:36:34 AMPage 6 © 2005 Mitchell Repair Information Company, LLC.
Page 825 of 1632
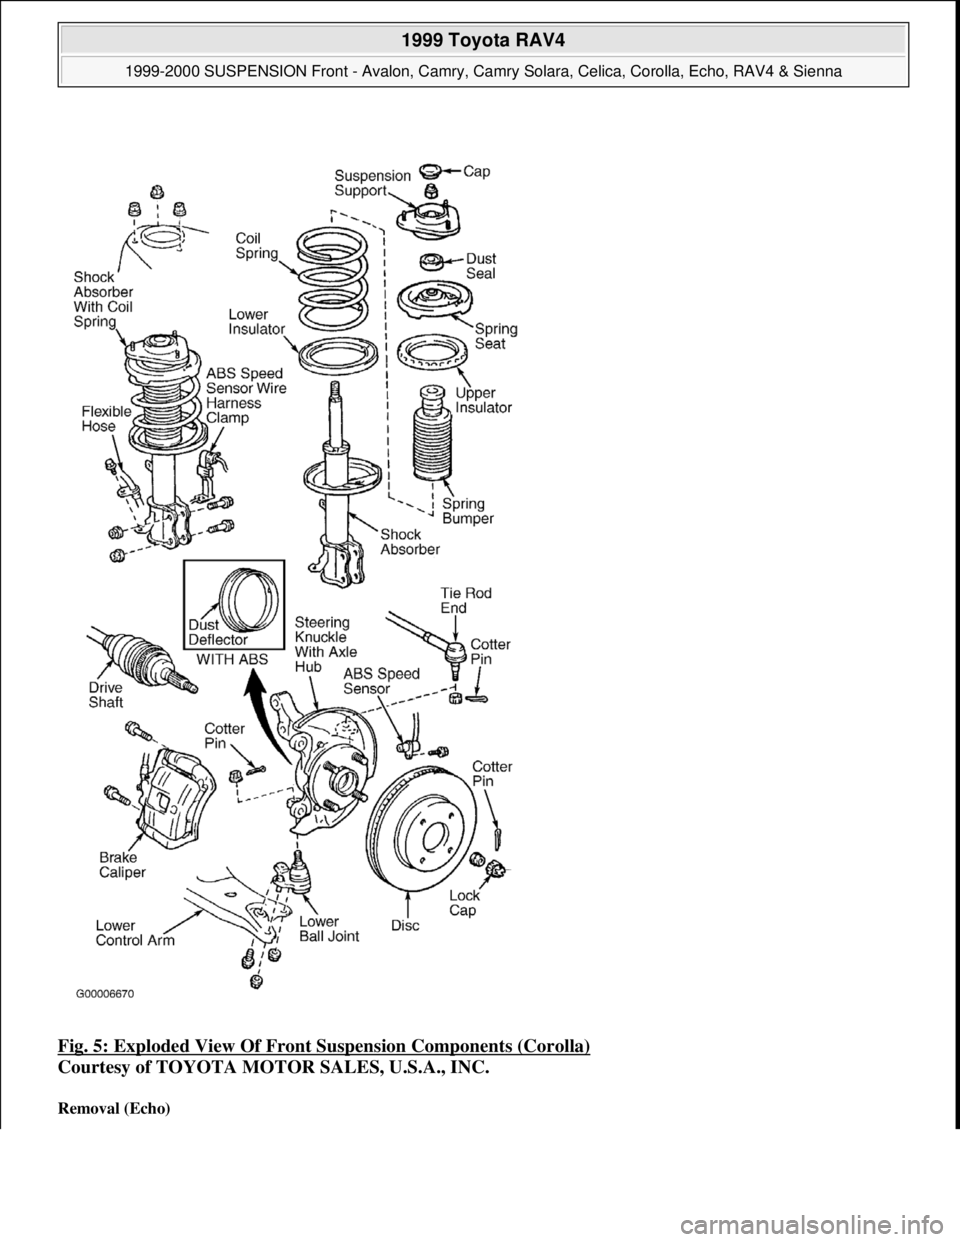
Fig. 5: Exploded View Of Front Suspension Components (Corolla)
Courtesy of TOYOTA MOTOR SALES, U.S.A., INC.
Removal (Echo)
1999 Toyota RAV4
1999-2000 SUSPENSION Front - Avalon, Camry, Camry Solara, Celica, Corolla, Echo, RAV4 & Sienna
Microsoft
Sunday, November 22, 2009 10:36:34 AMPage 7 © 2005 Mitchell Repair Information Company, LLC.
Page 826 of 1632
1. Remove front wheel. Check wheel bearing backlash and deviation (rotational free play). See WHEEL
BEARING CHECKING under ADJUSTMENTS & INSPECTION.
2. Using punch and hammer, unstake drive shaft lock nut. Apply brakes and remove lock nut. Remove 2
bolts, brake caliper and disc. Support brake caliper out of way.
3. Remove bolt, and disconnect ABS speed sensor. Remove clip and nut. Using separator, separate steering
knuckle from lower suspension arm. Remove cotter pin and nut, and using tie rod separator, disconnect
tie rod end.
4. Remove 2 nuts, bolts and steering knuckle with axle hub from shock absorber.
Installation
To install, reverse removal procedure. Use NEW snap ring after pressing in NEW wheel bearing. Use NEW
cotter pins. Tighten bolts to specifications. See TORQUE SPECIFICATIONS
.
SHOCK ABSORBER
Removal & Installation
1. Remove front wheel. Disconnect brake hose and ABS speed sensor clamp from shock absorber. On
Sienna, remove outer front cowl top panel. See Fig. 6
.
2. Remove 2 lower shock absorber nuts and bolts and disconnect shock absorber from steering knuckle.
Remove 3 upper shock absorber mounting nuts from inside engine compartment and remove shock
absorber with coil spring.
3. To install, reverse removal procedure. Tighten bolts and nuts to specification. See TORQUE
SPECIFICATIONS . NOTE: On Camry, note mounting position of curved mounting plate on shock
absorber tower. Ensure it is reinstalled in same position.
1999 Toyota RAV4
1999-2000 SUSPENSION Front - Avalon, Camry, Camry Solara, Celica, Corolla, Echo, RAV4 & Sienna
Microsoft
Sunday, November 22, 2009 10:36:34 AMPage 8 © 2005 Mitchell Repair Information Company, LLC.
Page 827 of 1632
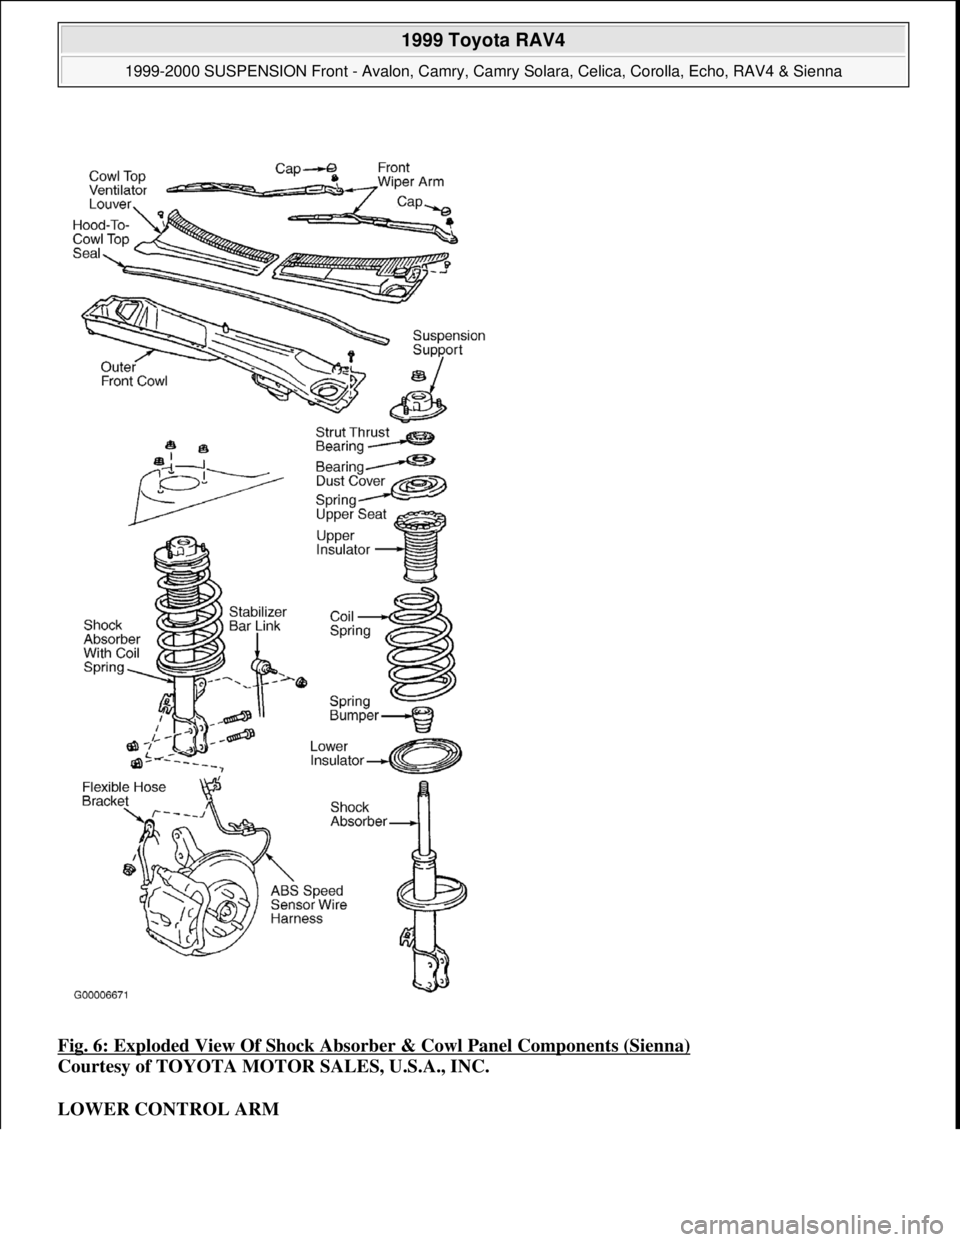
Fig. 6: Exploded View Of Shock Absorber & Cowl Panel Components (Sienna)
Courtesy of TOYOTA MOTOR SALES, U.S.A., INC.
LOWER CONTROL ARM
1999 Toyota RAV4
1999-2000 SUSPENSION Front - Avalon, Camry, Camry Solara, Celica, Corolla, Echo, RAV4 & Sienna
Microsoft
Sunday, November 22, 2009 10:36:34 AMPage 9 © 2005 Mitchell Repair Information Company, LLC.
Page 828 of 1632
Removal & Installation (Avalon, Camry, Camry Solara & Sienna)
1. Remove front wheel. Remove 2 nuts and bolt, and disconnect lower control arm from lower ball joint.
Remove 2 bolts on front side of lower control arm and bolt and nut of rear side of lower control arm.
Remove lower control arm.
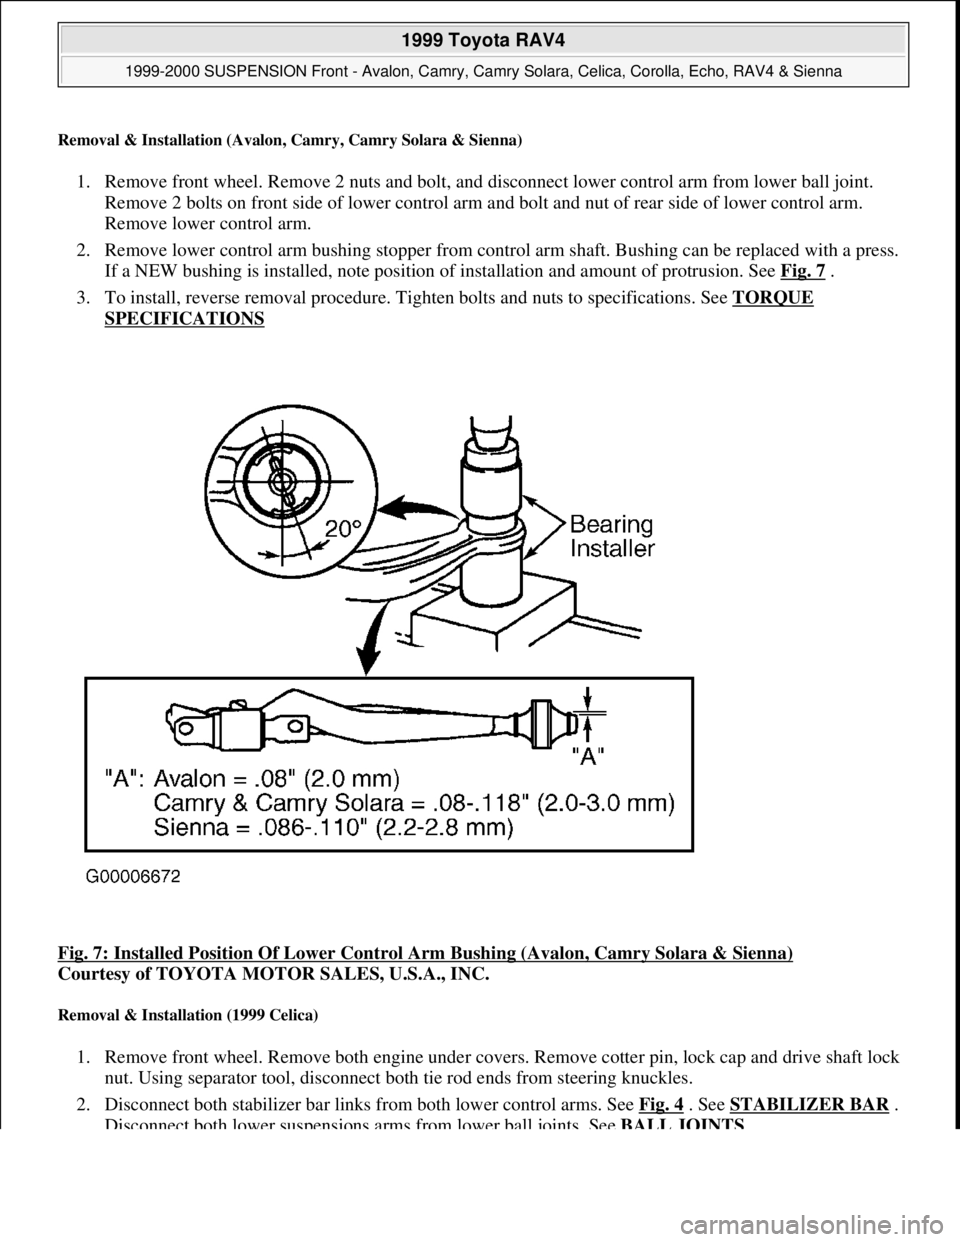
2. Remove lower control arm bushing stopper from control arm shaft. Bushing can be replaced with a press.
If a NEW bushing is installed, note position of installation and amount of protrusion. See Fig. 7
.
3. To install, reverse removal procedure. Tighten bolts and nuts to specifications. See TORQUE
SPECIFICATIONS
Fig. 7: Installed Position Of Lower Control Arm Bushing (Avalon, Camry Solara & Sienna)
Courtesy of TOYOTA MOTOR SALES, U.S.A., INC.
Removal & Installation (1999 Celica)
1. Remove front wheel. Remove both engine under covers. Remove cotter pin, lock cap and drive shaft lock
nut. Using separator tool, disconnect both tie rod ends from steering knuckles.
2. Disconnect both stabilizer bar links from both lower control arms. See Fig. 4
. See STABILIZER BAR .
Disconnect both lower suspensions arms from lower ball
joints. See BALL JOINTS .
1999 Toyota RAV4
1999-2000 SUSPENSION Front - Avalon, Camry, Camry Solara, Celica, Corolla, Echo, RAV4 & Sienna
Microsoft
Sunday, November 22, 2009 10:36:34 AMPage 10 © 2005 Mitchell Repair Information Company, LLC.
Page 829 of 1632
3. Remove 6 bolts (3 at each side) holding lower control arms to body. Support transaxle with a jack.
Remove 2 exhaust pipe support bracket set bolts in middle of suspension crossmember. Remove 2
grommets and center member set bolt and 2 nuts. Remove 2 power steering gear assembly mounting bolts
and nuts. Support suspension crossmember with a jack. Remove 2 upper inner bolts and lower suspension
crossmember from vehicle with lower control arms attached. See Fig. 4
.
4. Remove lower control arm collar. Remove control arm-to-suspension crossmember bolt and remove
lower control arm. See Fig. 4
.
5. To install, reverse removal procedure. Tighten all bolts and nut to specification. See TORQUE
SPECIFICATIONS .
Removal & Installation (2000 Celica)
1. Remove front wheel. Remove right side engine cover. Remove bolt and 2 nuts, and disconnect lower
suspension arm from lower ball joint. Remove 2 bolts, nut and lower suspension arm.
2. On models with A/T, remove left side engine covers. On all models, remove cotter pin and nut, and
disconnect tie rod ends from steering knuckle. Remove nut, and disconnect stabilizer bar link from shock
absorber. Remove bolt and 2 nuts, and disconnect lower suspension arm from lower ball joint. Loosen
lower suspension arm set bolts.
3. Remove hood. Disconnect 2 PVC hoses. Install No. 1 and No. 2 engine hangers in correct direction.
Attach engine chain hoist to engine hangers.
4. Remove 4 set bolts to disconnect power steering gear assembly from suspension member. Secure power
steering gear aside. Remove bolt "A" and 3 nuts. Disconnect engine rear mount. Remove 2 "B" bolts, and
disconnect engine front mount. See Fig. 8
.
5. Using a transmission jack, support suspension member. Remove 6 bolts ("C", "D", and "E"). Lower
suspension member. Remove 2 bolts, nut and lower suspension arm.
6. To install, reverse removal procedure. Tighten all bolts and nut to specification. See TORQUE
SPECIFICATIONS . CAUTION: DO NOT hook engine chain to any other part of vehicle.
1999 Toyota RAV4
1999-2000 SUSPENSION Front - Avalon, Camry, Camry Solara, Celica, Corolla, Echo, RAV4 & Sienna
Microsoft
Sunday, November 22, 2009 10:36:34 AMPage 11 © 2005 Mitchell Repair Information Company, LLC.
Page 830 of 1632
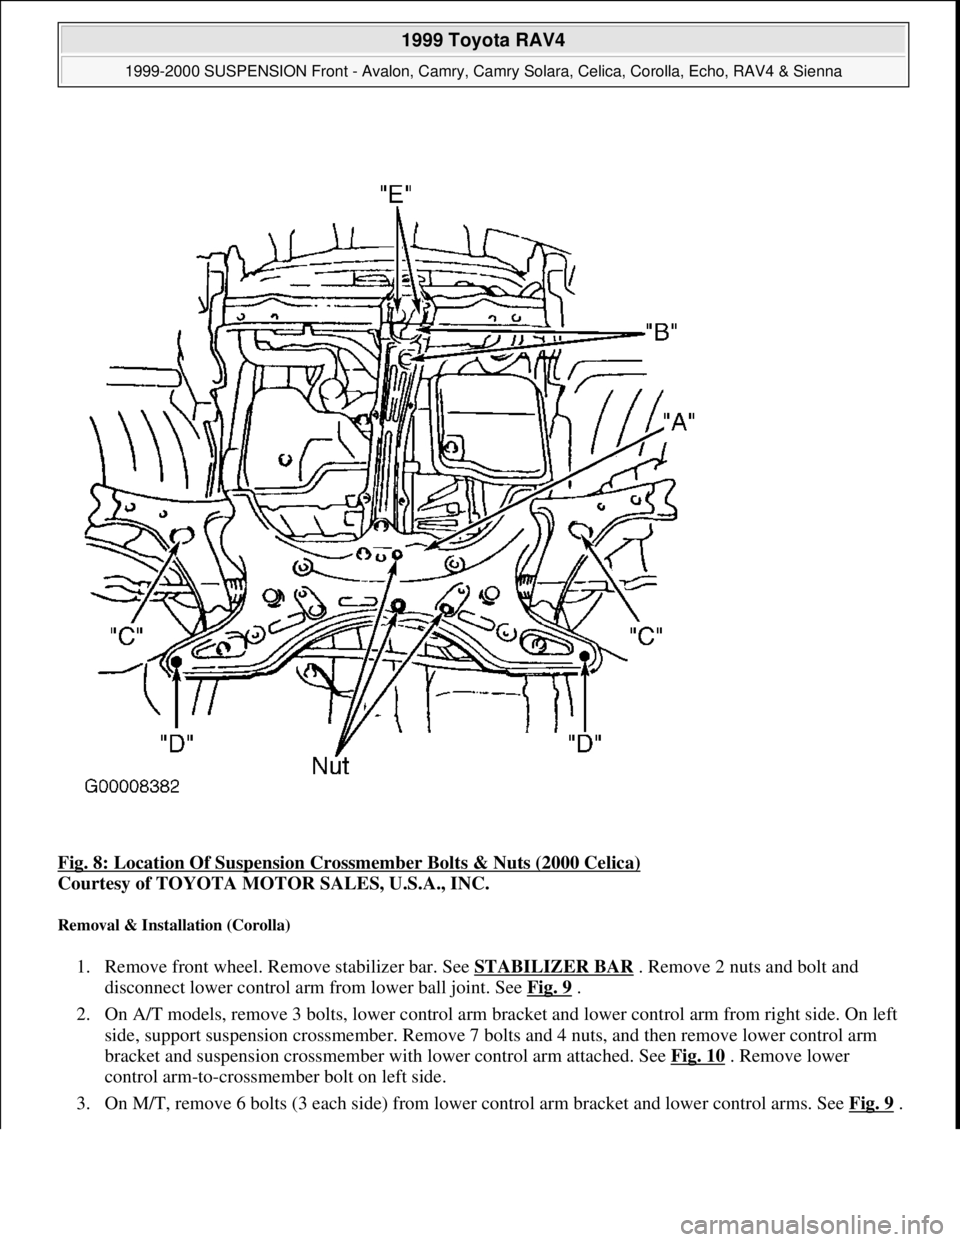
Fig. 8: Location Of Suspension Crossmember Bolts & Nuts (2000 Celica)
Courtesy of TOYOTA MOTOR SALES, U.S.A., INC.
Removal & Installation (Corolla)
1. Remove front wheel. Remove stabilizer bar. See STABILIZER BAR . Remove 2 nuts and bolt and
disconnect lower control arm from lower ball joint. See Fig. 9
.
2. On A/T models, remove 3 bolts, lower control arm bracket and lower control arm from right side. On left
side, support suspension crossmember. Remove 7 bolts and 4 nuts, and then remove lower control arm
bracket and suspension crossmember with lower control arm attached. See Fig. 10
. Remove lower
control arm-to-crossmember bolt on left side.
3. On M/T, remove 6 bolts (3 each side) from lower control arm bracket and lower control arms. See Fig. 9
.
1999 Toyota RAV4
1999-2000 SUSPENSION Front - Avalon, Camry, Camry Solara, Celica, Corolla, Echo, RAV4 & Sienna
Microsoft
Sunday, November 22, 2009 10:36:34 AMPage 12 © 2005 Mitchell Repair Information Company, LLC.