TOYOTA RAV4 1996 Service Repair Manual
Manufacturer: TOYOTA, Model Year: 1996, Model line: RAV4, Model: TOYOTA RAV4 1996Pages: 1632, PDF Size: 41.64 MB
Page 921 of 1632
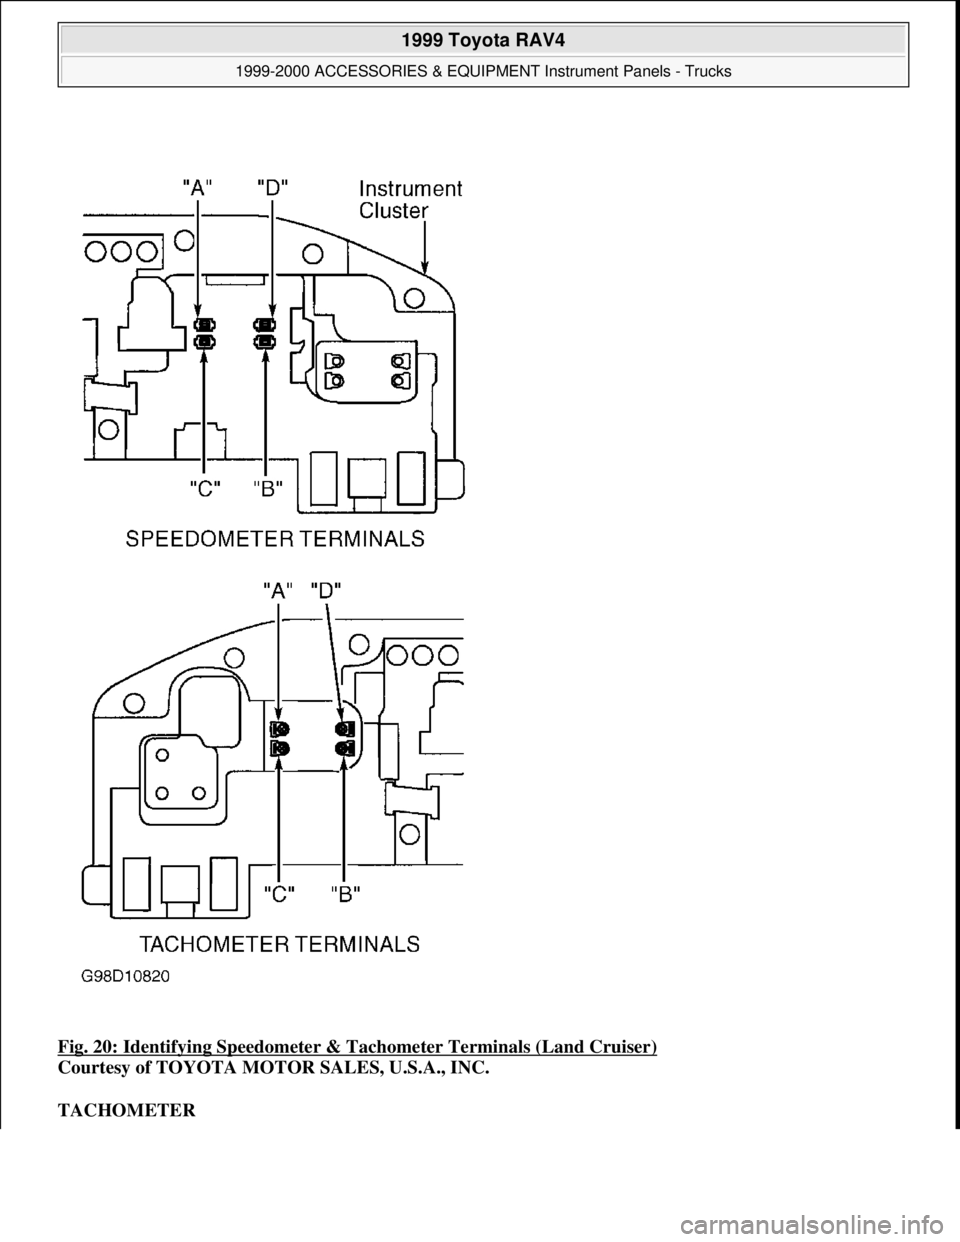
Fig. 20: Identifying Speedometer & Tachometer Terminals (Land Cruiser)
Courtesy of TOYOTA MOTOR SALES, U.S.A., INC.
TACHOMETER
1999 Toyota RAV4
1999-2000 ACCESSORIES & EQUIPMENT Instrument Panels - Trucks
Microsoft
Sunday, November 22, 2009 10:54:10 AMPage 31 © 2005 Mitchell Repair Information Company, LLC.
Page 922 of 1632
Tachometer Operational Test
Connect a tune-up test tachometer and start engine. Compare vehicle tachometer RPM reading against test
tachometer. If vehicle tachometer reading is outside allowable range, replace tachometer. See TACHOMETER
TEST table.
TACHOMETER TEST
Tachometer Resistance (Land Cruiser & Tundra)
Remove instrument cluster. See INSTRUMENT CLUSTER under REMOVAL & INSTALLATION. Using
an ohmmeter, check resistance between tachometer terminals on rear of instrument cluster. See Fig. 6
and Fig.
20 . See TACHOMETER RESISTANCE table. If resistance is not as specified, replace tachometer.
TACHOMETER RESISTANCE
VOLTMETER
Land Cruiser & Tundra
Remove instrument cluster. See INSTRUMENT CLUSTER under REMOVAL & INSTALLATION. Using
an ohmmeter, measure resistance between tachometer terminals on rear of instrument cluster. See Fig. 6
and
Vehicle RPM ReadingAllowable Range (RPM)
Land Cruiser, Sienna, RAV4, Tundra & 4Runner
700630-770
1000900-1100
20001850-2150
30002800-3200
40003800-4200
50004800-5200
60005750-6250
70006700-7300
Tacoma
700630-770
30002850-3150
50004850-5150
70006790-7210
Application & TerminalsOhms
Land Cruiser
"A" & "B"160
"C" & "D"160
Tundra
"A" & "B"140-185
"C"& "D"130-175
1999 Toyota RAV4
1999-2000 ACCESSORIES & EQUIPMENT Instrument Panels - Trucks
Microsoft
Sunday, November 22, 2009 10:54:10 AMPage 32 © 2005 Mitchell Repair Information Company, LLC.
Page 923 of 1632
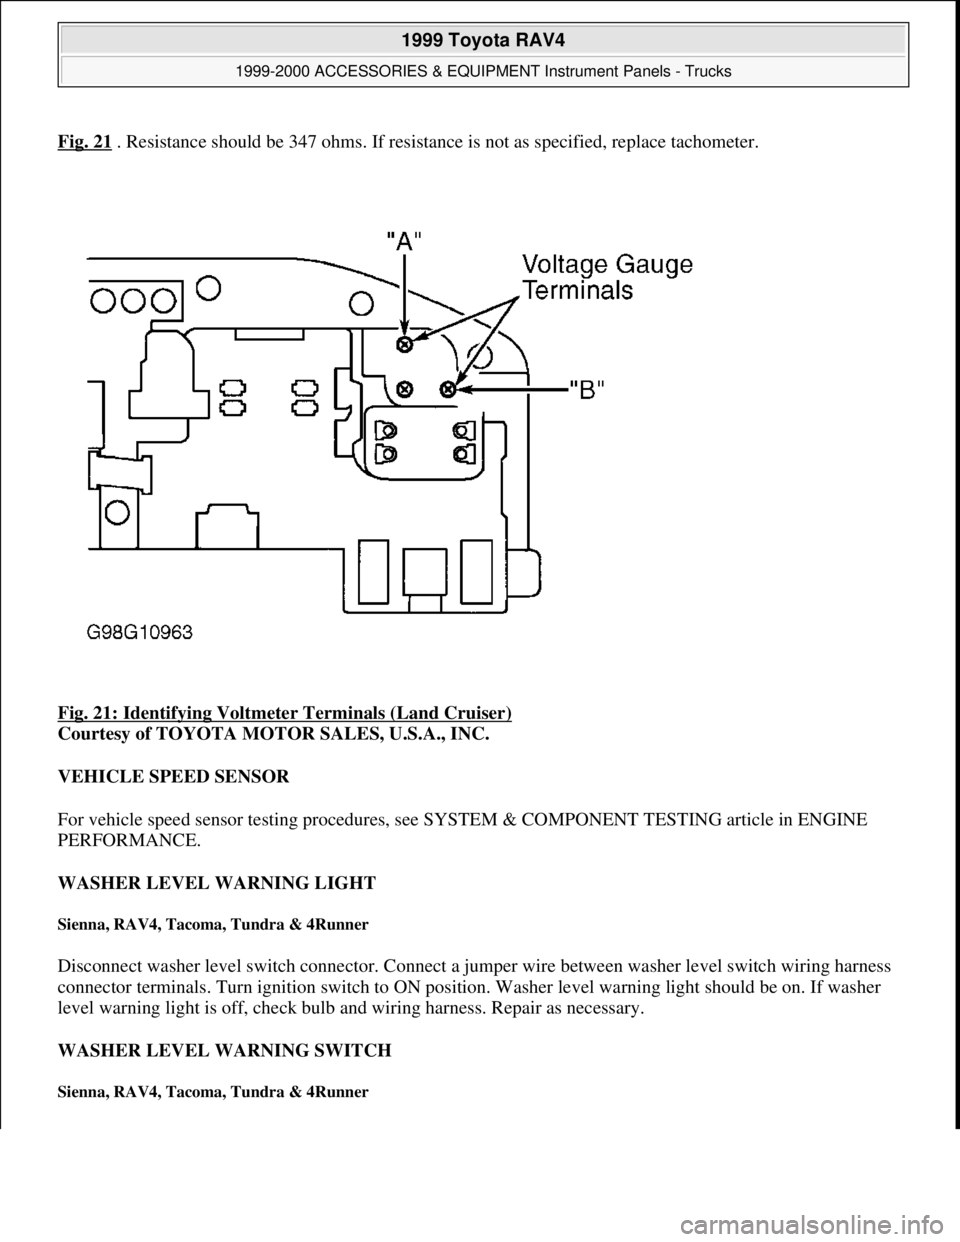
Fig. 21 . Resistance should be 347 ohms. If resistance is not as specified, replace tachometer.
Fig. 21: Identifying Voltmeter Terminals (Land Cruiser)
Courtesy of TOYOTA MOTOR SALES, U.S.A., INC.
VEHICLE SPEED SENSOR
For vehicle speed sensor testing procedures, see SYSTEM & COMPONENT TESTING article in ENGINE
PERFORMANCE.
WASHER LEVEL WARNING LIGHT
Sienna, RAV4, Tacoma, Tundra & 4Runner
Disconnect washer level switch connector. Connect a jumper wire between washer level switch wiring harness
connector terminals. Turn ignition switch to ON position. Washer level warning light should be on. If washer
level warning light is off, check bulb and wiring harness. Repair as necessary.
WASHER LEVEL WARNING SWITCH
Sienna, RAV4, Tacoma, Tundra & 4Runner
1999 Toyota RAV4
1999-2000 ACCESSORIES & EQUIPMENT Instrument Panels - Trucks
Microsoft
Sunday, November 22, 2009 10:54:10 AMPage 33 © 2005 Mitchell Repair Information Company, LLC.
Page 924 of 1632
Disconnect washer level warning switch connector. Check for continuity between washer level warning switch
connector terminals. With washer level warning switch off (float up), no continuity should exist. With washer
level warning switch on (float off), continuity should exist. If continuity is not as specified, replace washer level
warning switch.
REMOVAL & INSTALLATION
INSTRUMENT CLUSTER
Removal & Installation (Land Cruiser)
1. Disable air bag system, remove driver's air bag and steering wheel. See AIR BAG RESTRAINT
SYSTEMS article. Remove steering column covers. Remove hood release and fuel door levers. Remove
screws from instrument panel lower finish panel and remove panel.
2. Remove instrument cluster finish panel. Remove retaining screws from instrument cluster. Pull cluster
outward enough to disconnect wiring harness connectors. Remove instrument cluster. To install, reverse
removal procedure.
Removal & Installation (RAV4)
1. Disable air bag system, remove driver's air bag and steering wheel. See AIR BAG RESTRAINT
SYSTEMS article. Remove steering column covers. Remove instrument cluster finish panel.
2. Remove 4 instrument cluster retaining screws. Pull cluster outward far enough to disconnect wiring
harness connectors. Remove instrument cluster. To install, reverse removal procedure.
Removal & Installation (Sienna)
1. Disable air bag system, driver's air bag and steering wheel. See AIR BAG RESTRAINT SYSTEMS
article. Remove steering column covers. Remove hood release lever. Remove lower finish panel and
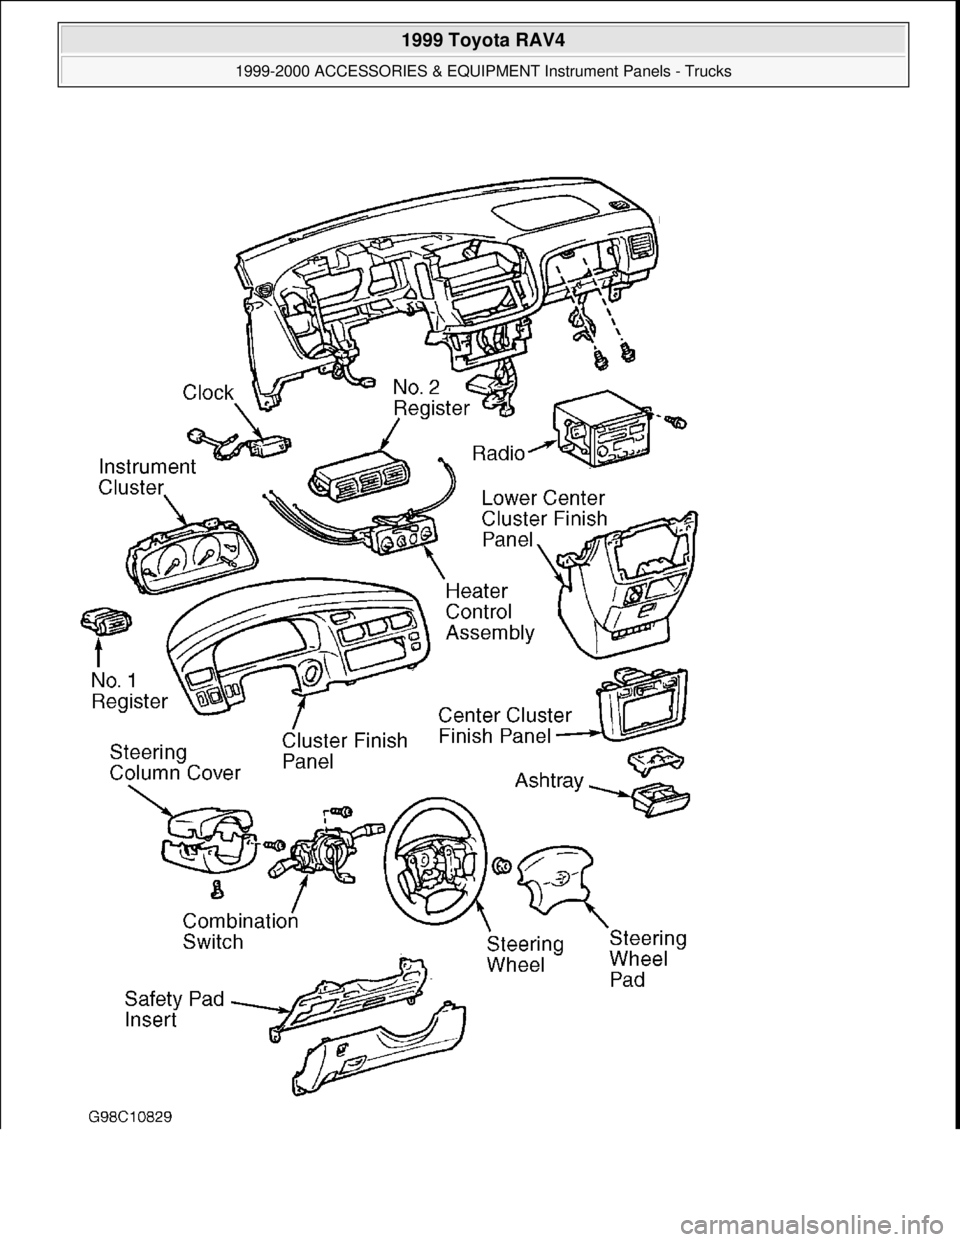
safety pad insert. See Fig. 22
.
2. Using flat-blade screwdriver, pry center cluster finish panel loose from 4 retaining clips and remove
panel. Remove ashtray. Remove lower center cluster finish panel. Remove instrument cluster finish
panel. Remove clock, No. 1 register and No. 2 register from instrument cluster finish panel. Remove
retaining screws from instrument cluster.
3. Pull cluster outward enough to disconnect wiring harness connectors. Remove instrument cluster. To
install, reverse removal procedure. WARNING:Deactivate air bag system before performing any service operation. See
AIR BAG RESTRAINT SYSTEMS article. DO NOT apply electrical power to
any component on steering column without first deactivating air bag
system. Air bag may deploy.
1999 Toyota RAV4
1999-2000 ACCESSORIES & EQUIPMENT Instrument Panels - Trucks
Microsoft
Sunday, November 22, 2009 10:54:10 AMPage 34 © 2005 Mitchell Repair Information Company, LLC.
Page 925 of 1632
1999 Toyota RAV4
1999-2000 ACCESSORIES & EQUIPMENT Instrument Panels - Trucks
Microsoft
Sunday, November 22, 2009 10:54:10 AMPage 35 © 2005 Mitchell Repair Information Company, LLC.
Page 926 of 1632
Fig. 22: Removing Instrument Panel (Sienna)
Courtesy of TOYOTA MOTOR SALES, U.S.A., INC.
Removal & Installation (Tacoma)
1. Disable air bag system, remove driver's air bag and steering wheel. See AIR BAG RESTRAINT
SYSTEMS article. Remove lower finish panel. Remove steering column covers.
2. Remove starter switch bezel (if necessary). Remove cluster finish panel retaining screws. Using flat-
blade
screwdriver, pry instrument cluster finish panel loose from 3 retaining clips.
3. Remove 4 instrument cluster retaining screws. Pull instrument cluster out far enough to disconnect wiring
harness connectors. Remove instrument cluster. To install, reverse removal procedure.
Removal & Installation (Tundra)
Disable air bag system, remove driver's air bag and steering wheel. See AIR BAG RESTRAINT SYSTEMS
article. Remove steering column covers and combination switch. Remove combination meter finish panel.
Remove combination meter. To install, reverse removal procedure.
Removal & Installation (4Runner)
1. Disable air bag system, remove driver's air bag and steering wheel. See AIR BAG RESTRAINT
SYSTEMS article. Remove steering column covers. Remove 4 lower finish panel retaining bolts. Remove
hood release and fuel tank lid release lever.
2. Using a screwdriver, carefully remove instrument panel lower finish panel. Remove ignition switch bezel.
Disconnect air registers. Remove 4 retaining screws from instrument cluster finish panel. Carefully
remove cluster finish panel. Disconnect wiring harness connectors.
3. Remove instrument cluster retaining screws. Pull cluster outward enough to disconnect wiring harness
connectors. Remove instrument cluster. To install, reverse removal procedure.
WIRING DIAGRAMS
1999 Toyota RAV4
1999-2000 ACCESSORIES & EQUIPMENT Instrument Panels - Trucks
Microsoft
Sunday, November 22, 2009 10:54:10 AMPage 36 © 2005 Mitchell Repair Information Company, LLC.
Page 927 of 1632

1999 Toyota RAV4
1999-2000 ACCESSORIES & EQUIPMENT Instrument Panels - Trucks
Microsoft
Sunday, November 22, 2009 10:54:10 AMPage 37 © 2005 Mitchell Repair Information Company, LLC.
Page 928 of 1632
Fig. 23: Instrument Panel Wiring Diagram (Land Cruiser -1 Of 2)
1999 Toyota RAV4
1999-2000 ACCESSORIES & EQUIPMENT Instrument Panels - Trucks
Microsoft
Sunday, November 22, 2009 10:54:10 AMPage 38 © 2005 Mitchell Repair Information Company, LLC.
Page 929 of 1632

1999 Toyota RAV4
1999-2000 ACCESSORIES & EQUIPMENT Instrument Panels - Trucks
Microsoft
Sunday, November 22, 2009 10:54:10 AMPage 39 © 2005 Mitchell Repair Information Company, LLC.
Page 930 of 1632
Fig. 24: Instrument Panel Wiring Diagram (Land Cruiser -2 Of 2)
1999 Toyota RAV4
1999-2000 ACCESSORIES & EQUIPMENT Instrument Panels - Trucks
Microsoft
Sunday, November 22, 2009 10:54:10 AMPage 40 © 2005 Mitchell Repair Information Company, LLC.