TOYOTA RAV4 1996 Service Repair Manual
Manufacturer: TOYOTA, Model Year: 1996, Model line: RAV4, Model: TOYOTA RAV4 1996Pages: 1632, PDF Size: 41.64 MB
Page 891 of 1632
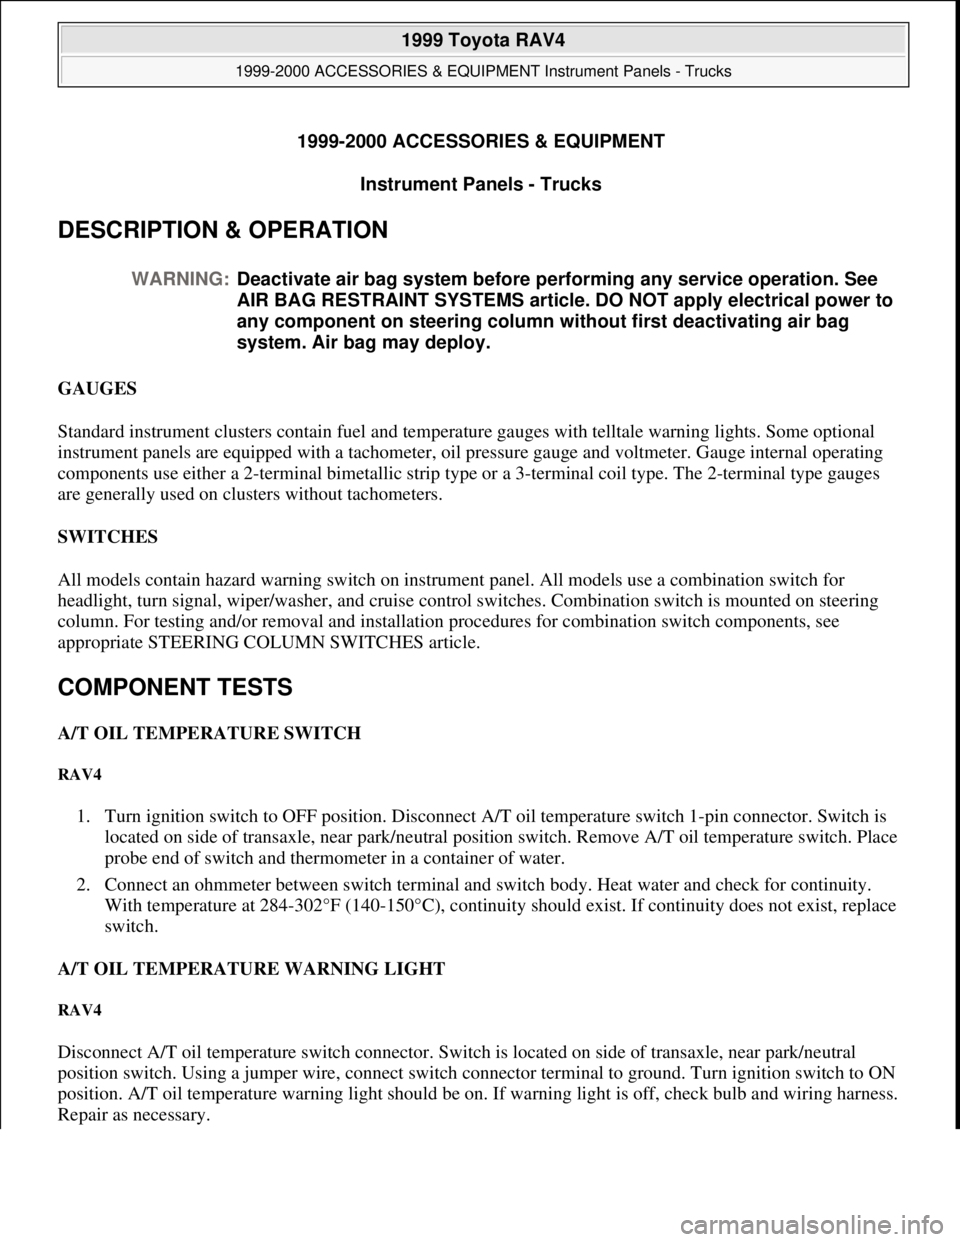
1999-2000 ACCESSORIES & EQUIPMENT
Instrument Panels - Trucks
DESCRIPTION & OPERATION
GAUGES
Standard instrument clusters contain fuel and temperature gauges with telltale warning lights. Some optional
instrument panels are equipped with a tachometer, oil pressure gauge and voltmeter. Gauge internal operating
components use either a 2-terminal bimetallic strip type or a 3-terminal coil type. The 2-terminal type gauges
are generally used on clusters without tachometers.
SWITCHES
All models contain hazard warning switch on instrument panel. All models use a combination switch for
headlight, turn signal, wiper/washer, and cruise control switches. Combination switch is mounted on steering
column. For testing and/or removal and installation procedures for combination switch components, see
appropriate STEERING COLUMN SWITCHES article.
COMPONENT TESTS
A/T OIL TEMPERATURE SWITCH
RAV4
1. Turn ignition switch to OFF position. Disconnect A/T oil temperature switch 1-pin connector. Switch is
located on side of transaxle, near park/neutral position switch. Remove A/T oil temperature switch. Place
probe end of switch and thermometer in a container of water.
2. Connect an ohmmeter between switch terminal and switch body. Heat water and check for continuity.
With temperature at 284-302°F (140-150°C), continuity should exist. If continuity does not exist, replace
switch.
A/T OIL TEMPERATURE WARNING LIGHT
RAV4
Disconnect A/T oil temperature switch connector. Switch is located on side of transaxle, near park/neutral
position switch. Using a jumper wire, connect switch connector terminal to ground. Turn ignition switch to ON
position. A/T oil temperature warning light should be on. If warning light is off, check bulb and wiring harness.
Repair as necessary. WARNING:Deactivate air bag system before performing any service operation. See
AIR BAG RESTRAINT SYSTEMS article. DO NOT apply electrical power to
any component on steering column without first deactivating air bag
system. Air bag may deploy.
1999 Toyota RAV4
1999-2000 ACCESSORIES & EQUIPMENT Instrument Panels - Trucks
1999 Toyota RAV4
1999-2000 ACCESSORIES & EQUIPMENT Instrument Panels - Trucks
Microsoft
Sunday, November 22, 2009 10:54:09 AMPage 1 © 2005 Mitchell Repair Information Company, LLC.
Microsoft
Sunday, November 22, 2009 10:54:14 AMPage 1 © 2005 Mitchell Repair Information Company, LLC.
Page 892 of 1632
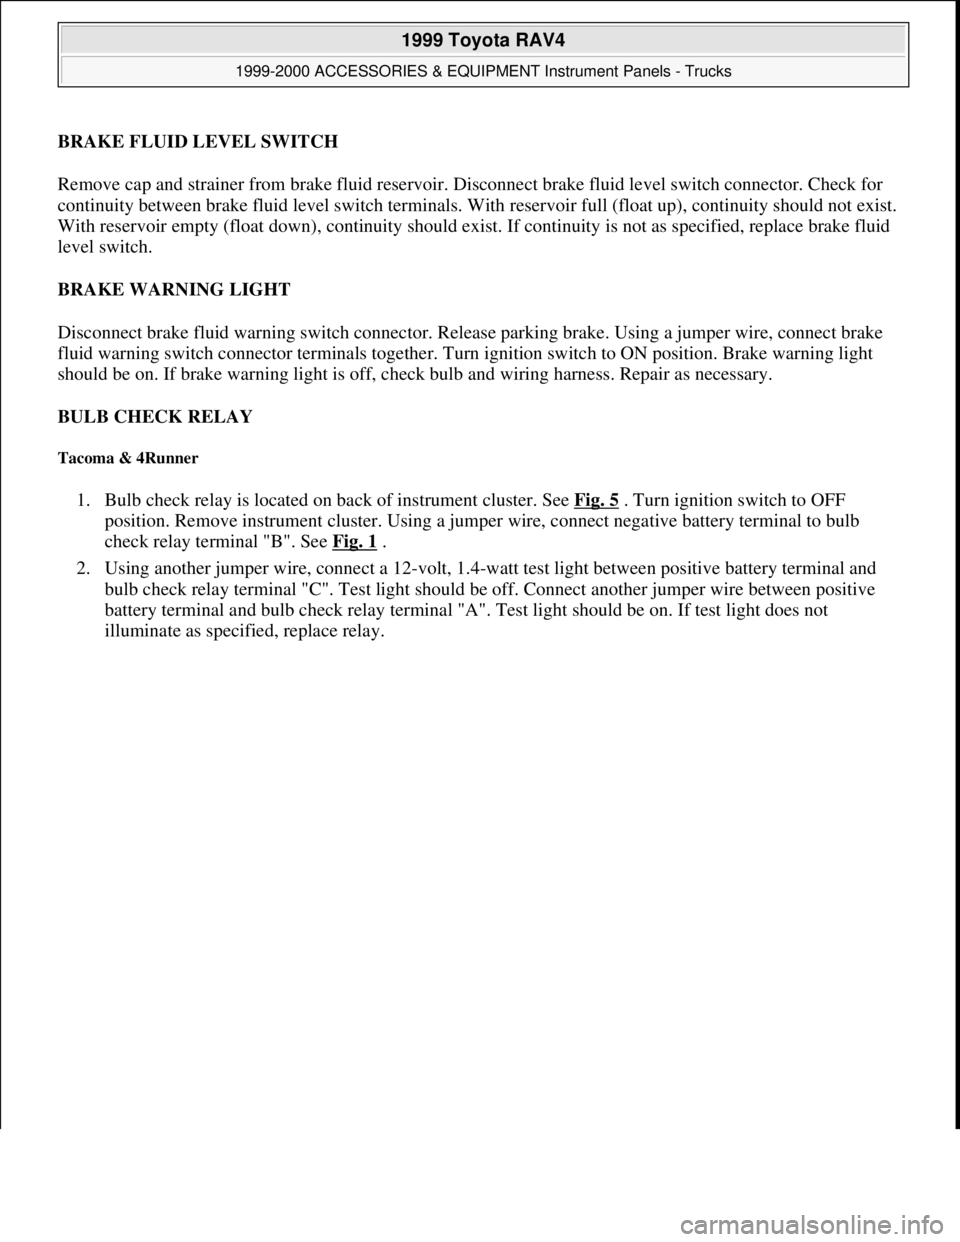
BRAKE FLUID LEVEL SWITCH
Remove cap and strainer from brake fluid reservoir. Disconnect brake fluid level switch connector. Check for
continuity between brake fluid level switch terminals. With reservoir full (float up), continuity should not exist.
With reservoir empty (float down), continuity should exist. If continuity is not as specified, replace brake fluid
level switch.
BRAKE WARNING LIGHT
Disconnect brake fluid warning switch connector. Release parking brake. Using a jumper wire, connect brake
fluid warning switch connector terminals together. Turn ignition switch to ON position. Brake warning light
should be on. If brake warning light is off, check bulb and wiring harness. Repair as necessary.
BULB CHECK RELAY
Tacoma & 4Runner
1. Bulb check relay is located on back of instrument cluster. See Fig. 5 . Turn ignition switch to OFF
position. Remove instrument cluster. Using a jumper wire, connect negative battery terminal to bulb
check relay terminal "B". See Fig. 1
.
2. Using another jumper wire, connect a 12-volt, 1.4-watt test light between positive battery terminal and
bulb check relay terminal "C". Test light should be off. Connect another jumper wire between positive
battery terminal and bulb check relay terminal "A". Test light should be on. If test light does not
illuminate as specified, replace relay.
1999 Toyota RAV4
1999-2000 ACCESSORIES & EQUIPMENT Instrument Panels - Trucks
Microsoft
Sunday, November 22, 2009 10:54:09 AMPage 2 © 2005 Mitchell Repair Information Company, LLC.
Page 893 of 1632
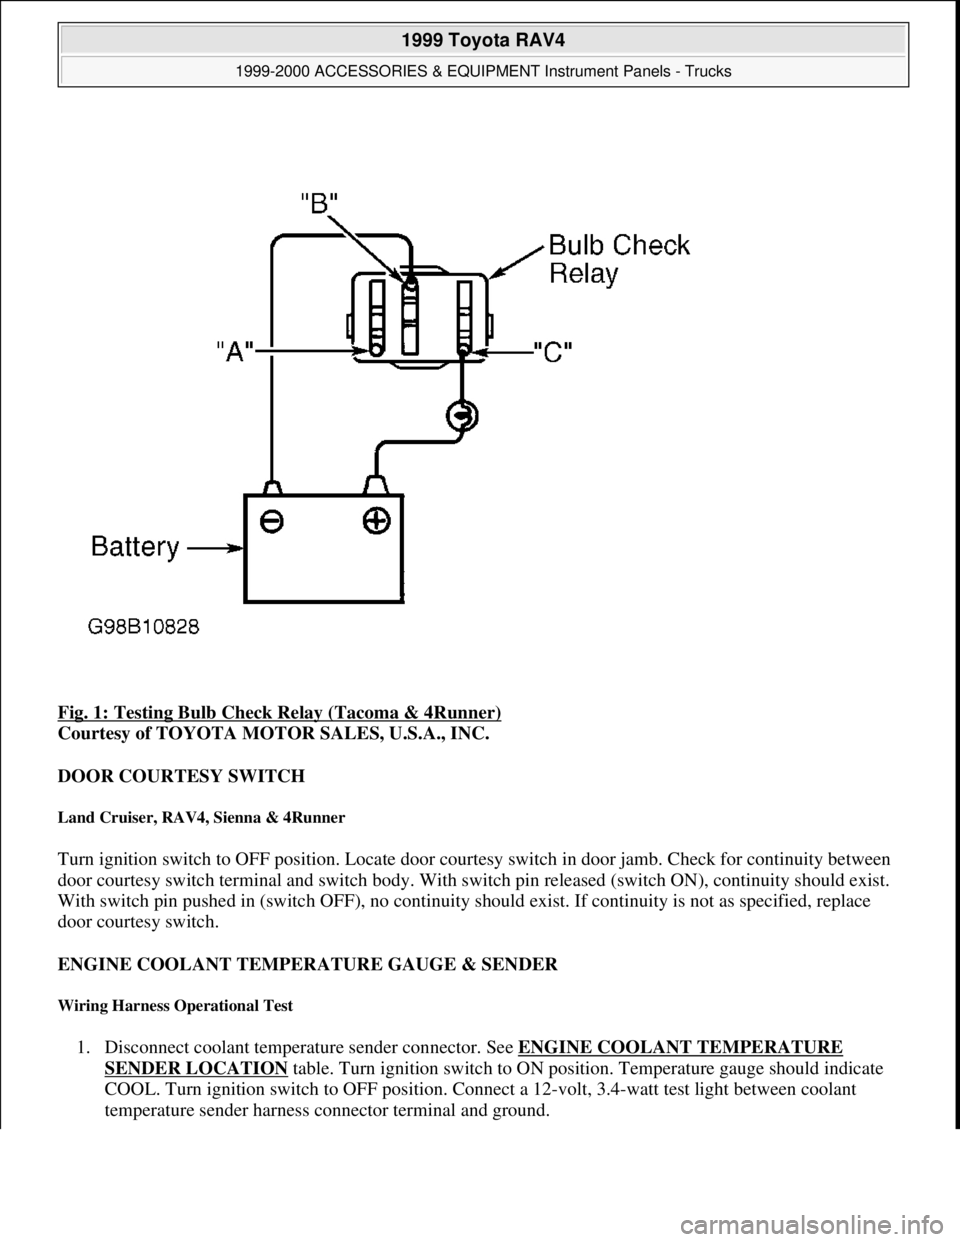
Fig. 1: Testing Bulb Check Relay (Tacoma & 4Runner)
Courtesy of TOYOTA MOTOR SALES, U.S.A., INC.
DOOR COURTESY SWITCH
Land Cruiser, RAV4, Sienna & 4Runner
Turn ignition switch to OFF position. Locate door courtesy switch in door jamb. Check for continuity between
door courtesy switch terminal and switch body. With switch pin released (switch ON), continuity should exist.
With switch pin pushed in (switch OFF), no continuity should exist. If continuity is not as specified, replace
door courtesy switch.
ENGINE COOLANT TEMPERATURE GAUGE & SENDER
Wiring Harness Operational Test
1. Disconnect coolant temperature sender connector. See ENGINE COOLANT TEMPERATURE
SENDER LOCATION table. Turn ignition switch to ON position. Temperature gauge should indicate
COOL. Turn ignition switch to OFF position. Connect a 12-volt, 3.4-watt test light between coolant
temperature sender harness connector terminal and
ground.
1999 Toyota RAV4
1999-2000 ACCESSORIES & EQUIPMENT Instrument Panels - Trucks
Microsoft
Sunday, November 22, 2009 10:54:09 AMPage 3 © 2005 Mitchell Repair Information Company, LLC.
Page 894 of 1632
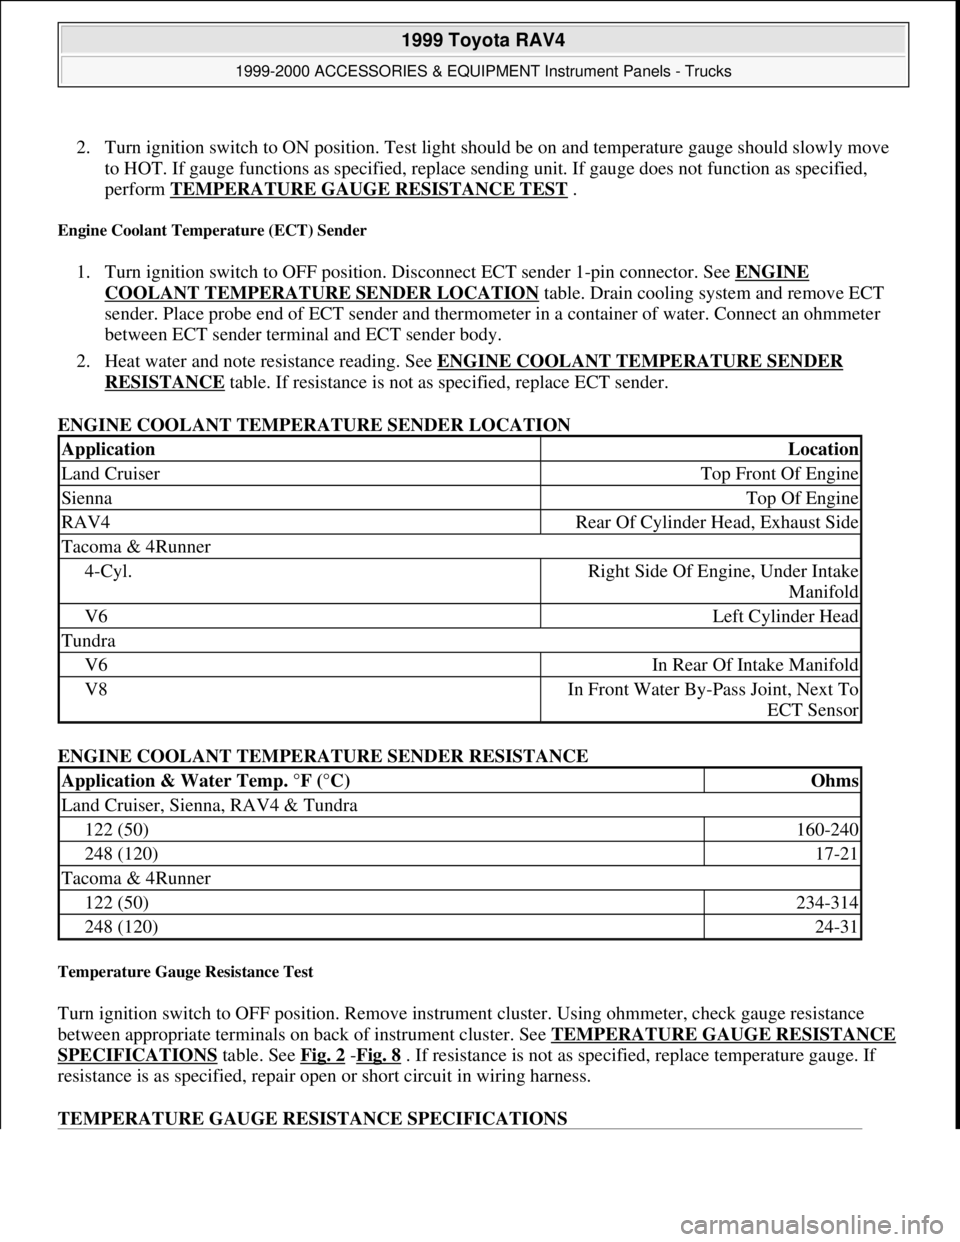
2. Turn ignition switch to ON position. Test light should be on and temperature gauge should slowly move
to HOT. If gauge functions as specified, replace sending unit. If gauge does not function as specified,
perform TEMPERATURE GAUGE RESISTANCE TEST
.
Engine Coolant Temperature (ECT) Sender
1. Turn ignition switch to OFF position. Disconnect ECT sender 1-pin connector. See ENGINE
COOLANT TEMPERATURE SENDER LOCATION table. Drain cooling system and remove ECT
sender. Place probe end of ECT sender and thermometer in a container of water. Connect an ohmmeter
between ECT sender terminal and ECT sender body.
2. Heat water and note resistance reading. See ENGINE COOLANT TEMPERATURE SENDER
RESISTANCE table. If resistance is not as specified, replace ECT sender.
ENGINE COOLANT TEMPERATURE SENDER LOCATION
ENGINE COOLANT TEMPERATURE SENDER RESISTANCE
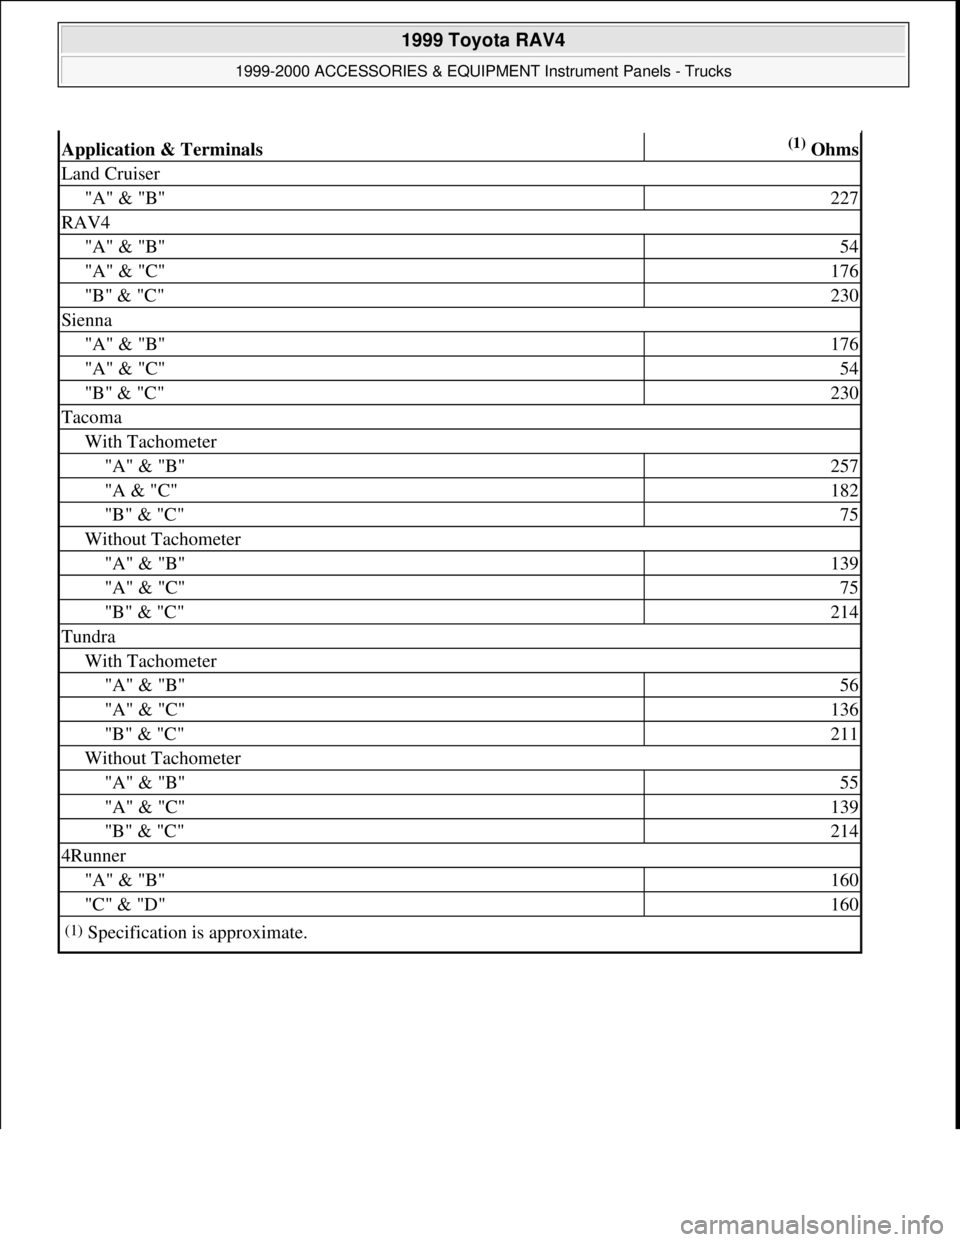
Temperature Gauge Resistance Test
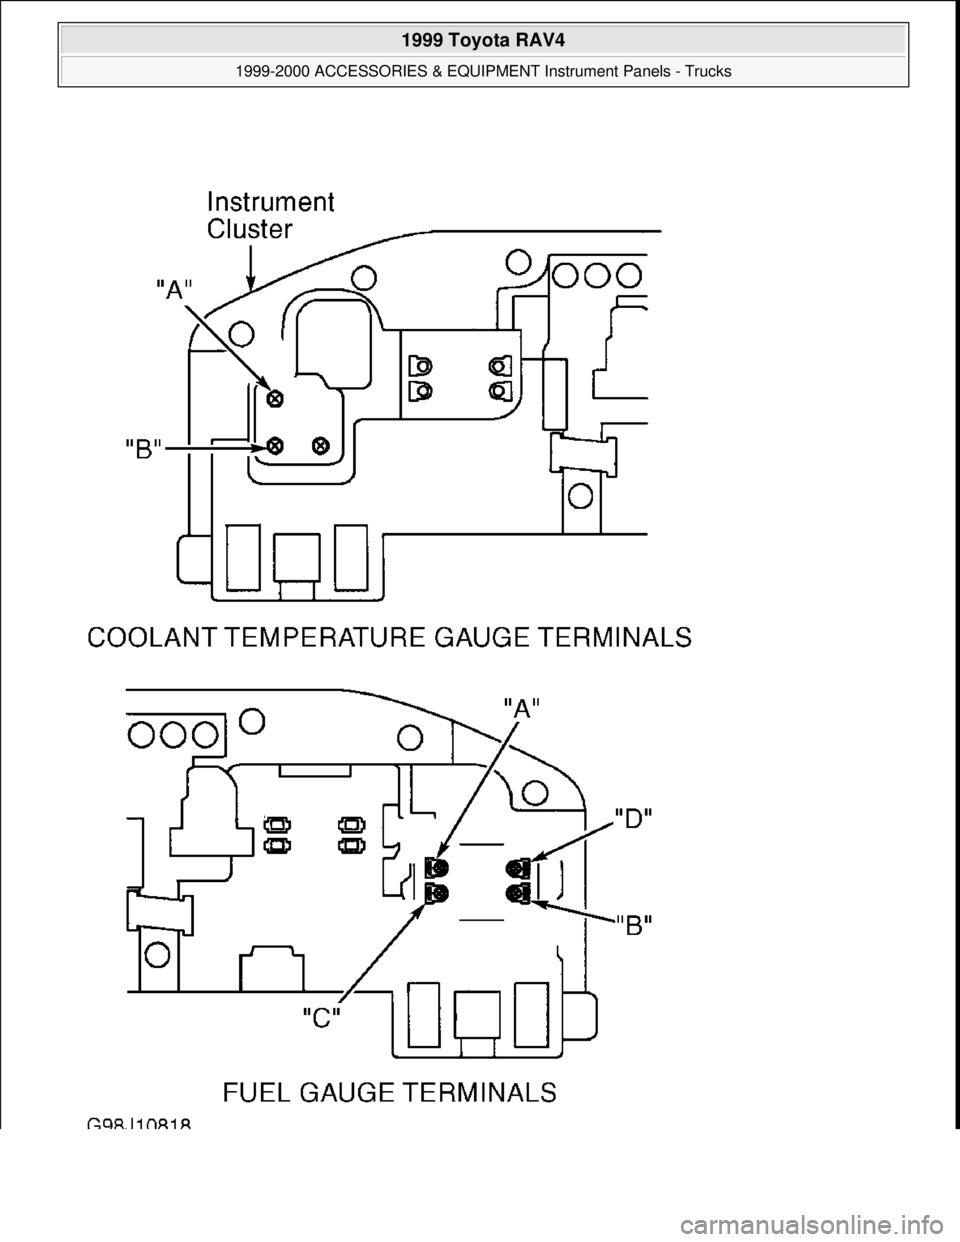
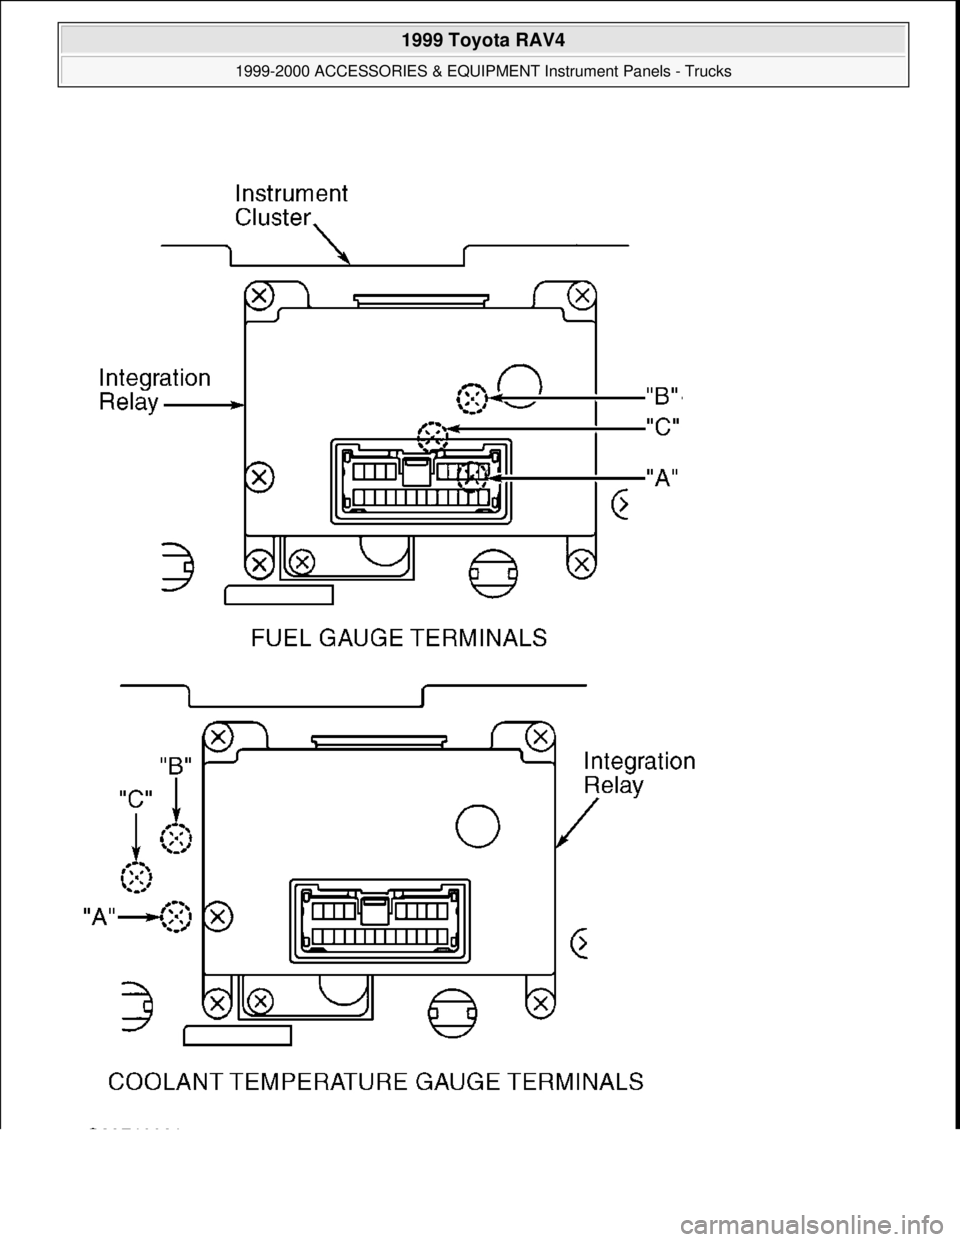
Turn ignition switch to OFF position. Remove instrument cluster. Using ohmmeter, check gauge resistance
between appropriate terminals on back of instrument cluster. See TEMPERATURE GAUGE RESISTANCE
SPECIFICATIONS table. See Fig. 2 -Fig. 8 . If resistance is not as specified, replace temperature gauge. If
resistance is as specified, repair open or short circuit in wiring harness.
TEMPERATURE GAUGE RESISTANCE SPECIFICATIONS
ApplicationLocation
Land CruiserTop Front Of Engine
SiennaTop Of Engine
RAV4Rear Of Cylinder Head, Exhaust Side
Tacoma & 4Runner
4-Cyl.Right Side Of Engine, Under Intake
Manifold
V6Left Cylinder Head
Tundra
V6In Rear Of Intake Manifold
V8In Front Water By-Pass Joint, Next To
ECT Sensor
Application & Water Temp. °F (°C)Ohms
Land Cruiser, Sienna, RAV4 & Tundra
122 (50)160-240
248 (120)17-21
Tacoma & 4Runner
122 (50)234-314
248 (120)24-31
1999 Toyota RAV4
1999-2000 ACCESSORIES & EQUIPMENT Instrument Panels - Trucks
Microsoft
Sunday, November 22, 2009 10:54:09 AMPage 4 © 2005 Mitchell Repair Information Company, LLC.
Page 895 of 1632
Application & Terminals(1) Ohms
Land Cruiser
"A" & "B"227
RAV4
"A" & "B"54
"A" & "C"176
"B" & "C"230
Sienna
"A" & "B"176
"A" & "C"54
"B" & "C"230
Tacoma
With Tachometer
"A" & "B"257
"A & "C"182
"B" & "C"75
Without Tachometer
"A" & "B"139
"A" & "C"75
"B" & "C"214
Tundra
With Tachometer
"A" & "B"56
"A" & "C"136
"B" & "C"211
Without Tachometer
"A" & "B"55
"A" & "C"139
"B" & "C"214
4Runner
"A" & "B"160
"C" & "D"160
(1)Specification is approximate.
1999 Toyota RAV4
1999-2000 ACCESSORIES & EQUIPMENT Instrument Panels - Trucks
Microsoft
Sunday, November 22, 2009 10:54:09 AMPage 5 © 2005 Mitchell Repair Information Company, LLC.
Page 896 of 1632
1999 Toyota RAV4
1999-2000 ACCESSORIES & EQUIPMENT Instrument Panels - Trucks
Microsoft
Sunday, November 22, 2009 10:54:09 AMPage 6 © 2005 Mitchell Repair Information Company, LLC.
Page 897 of 1632
Fig. 2: Identifying Fuel & Temperature Gauge Terminals (Land Cruiser)
Courtesy of TOYOTA MOTOR SALES, U.S.A., INC.
1999 Toyota RAV4
1999-2000 ACCESSORIES & EQUIPMENT Instrument Panels - Trucks
Microsoft
Sunday, November 22, 2009 10:54:09 AMPage 7 © 2005 Mitchell Repair Information Company, LLC.
Page 898 of 1632
1999 Toyota RAV4
1999-2000 ACCESSORIES & EQUIPMENT Instrument Panels - Trucks
Microsoft
Sunday, November 22, 2009 10:54:09 AMPage 8 © 2005 Mitchell Repair Information Company, LLC.
Page 899 of 1632
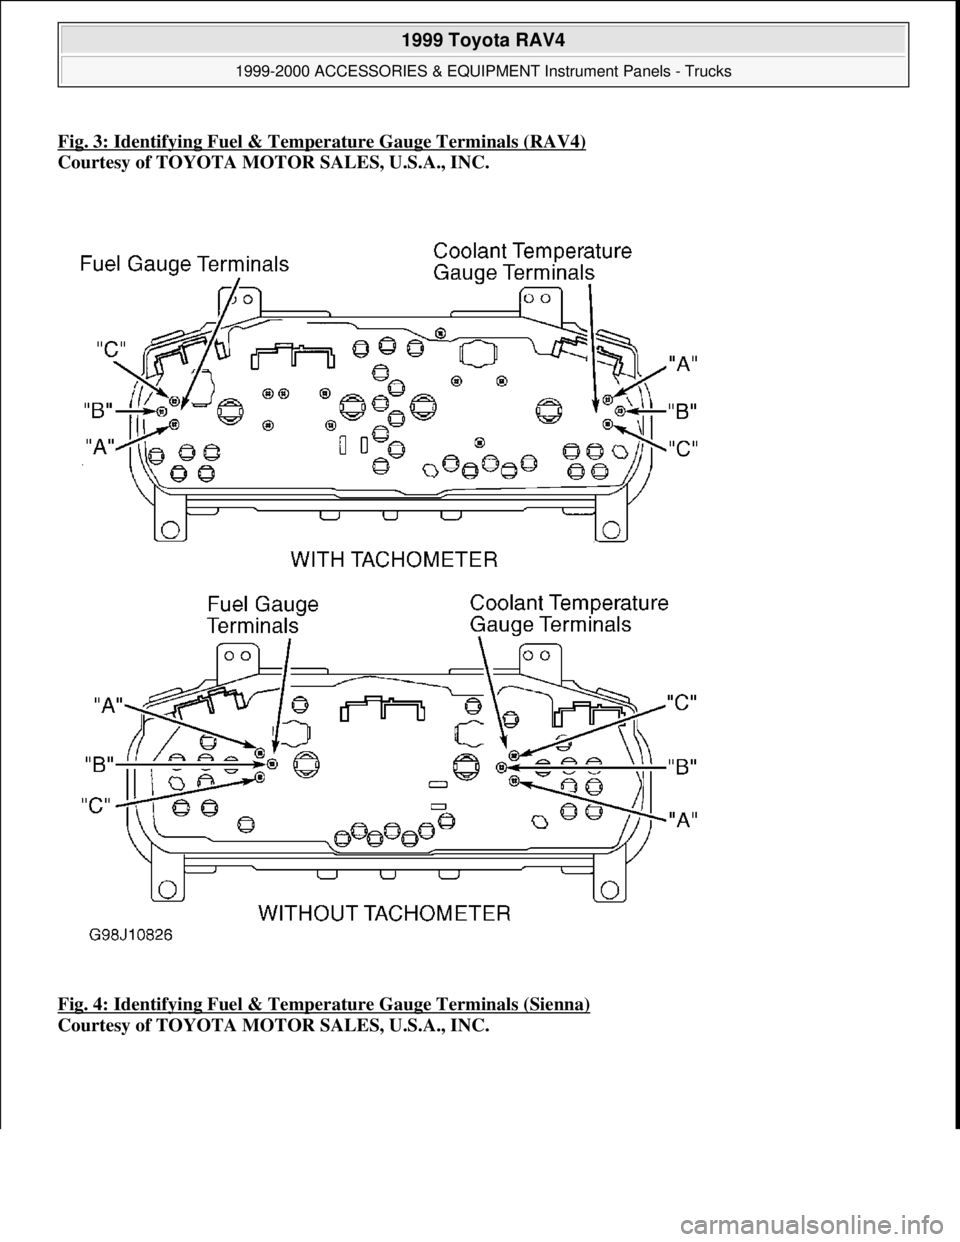
Fig. 3: Identifying Fuel & Temperature Gauge Terminals (RAV4)
Courtesy of TOYOTA MOTOR SALES, U.S.A., INC.
Fig. 4: Identifying Fuel & Temperature Gauge Terminals (Sienna)
Courtesy of TOYOTA MOTOR SALES, U.S.A., INC.
1999 Toyota RAV4
1999-2000 ACCESSORIES & EQUIPMENT Instrument Panels - Trucks
Microsoft
Sunday, November 22, 2009 10:54:09 AMPage 9 © 2005 Mitchell Repair Information Company, LLC.
Page 900 of 1632
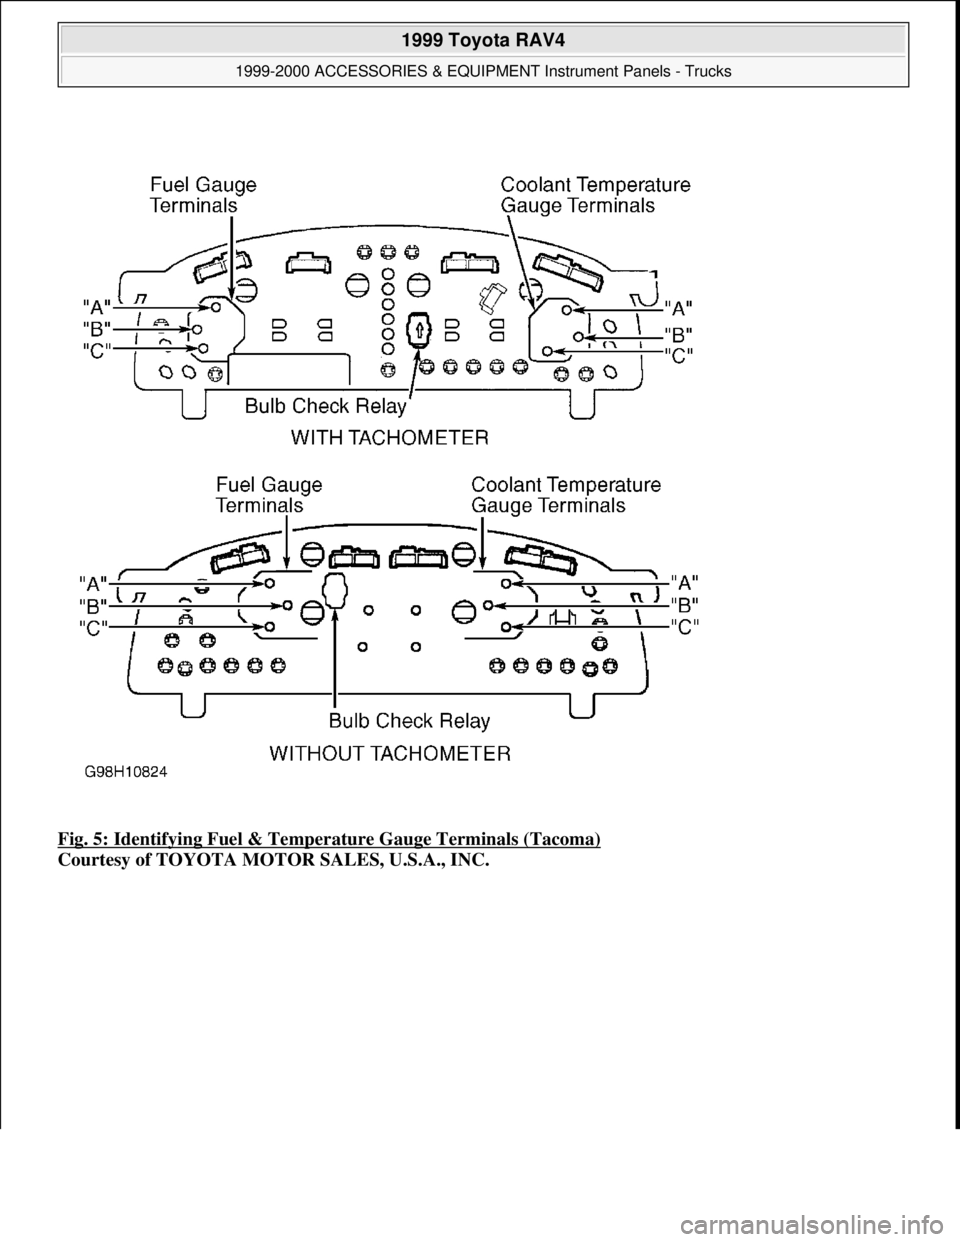
Fig. 5: Identifying Fuel & Temperature Gauge Terminals (Tacoma)
Courtesy of TOYOTA MOTOR SALES, U.S.A., INC.
1999 Toyota RAV4
1999-2000 ACCESSORIES & EQUIPMENT Instrument Panels - Trucks
Microsoft
Sunday, November 22, 2009 10:54:10 AMPage 10 © 2005 Mitchell Repair Information Company, LLC.