TOYOTA RAV4 PLUG-IN HYBRID 2023 Owners Manual
Manufacturer: TOYOTA, Model Year: 2023, Model line: RAV4 PLUG-IN HYBRID, Model: TOYOTA RAV4 PLUG-IN HYBRID 2023Pages: 718, PDF Size: 167.55 MB
Page 511 of 718
509
7
7-3. Do-it-yourself maintenance
Maintenance and care
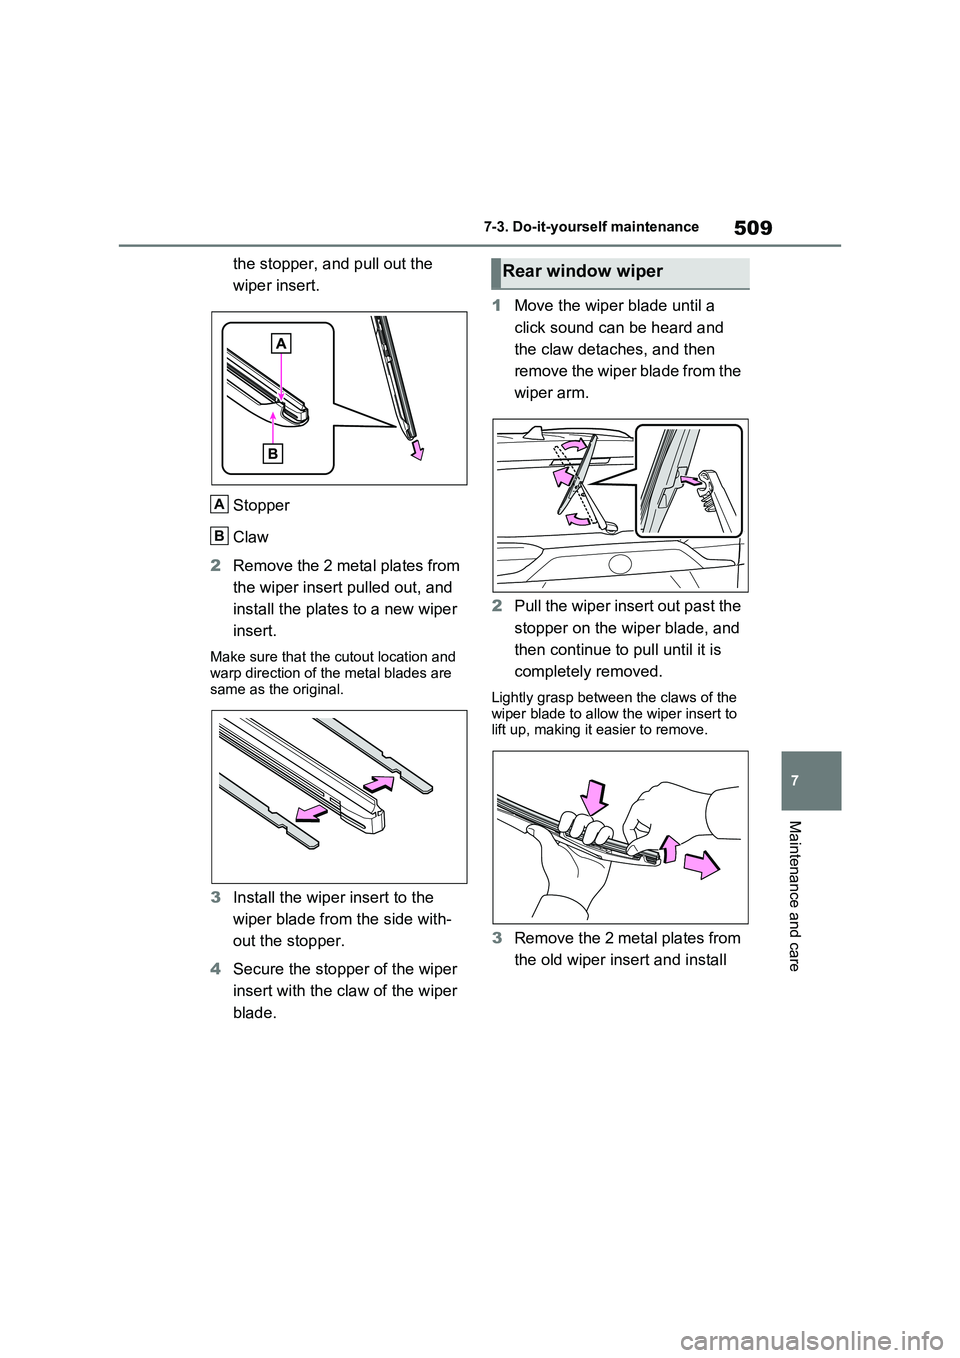
the stopper, and pull out the
wiper insert.
Stopper
Claw
2 Remove the 2 metal plates from
the wiper insert pulled out, and
install the plates to a new wiper
insert.
Make sure that the cutout location and warp direction of the metal blades are
same as the original.
3 Install the wiper insert to the
wiper blade from the side with-
out the stopper.
4 Secure the stopper of the wiper
insert with the claw of the wiper
blade.
1 Move the wiper blade until a
click sound can be heard and
the claw detaches, and then
remove the wiper blade from the
wiper arm.
2 Pull the wiper insert out past the
stopper on the wiper blade, and
then continue to pull until it is
completely removed.
Lightly grasp between the claws of the wiper blade to allow the wiper insert to lift up, making it easier to remove.
3 Remove the 2 metal plates from
the old wiper insert and install
A
B
Rear window wiper
Page 512 of 718
5107-3. Do-it-yourself maintenance
them to the replacement wiper
insert.
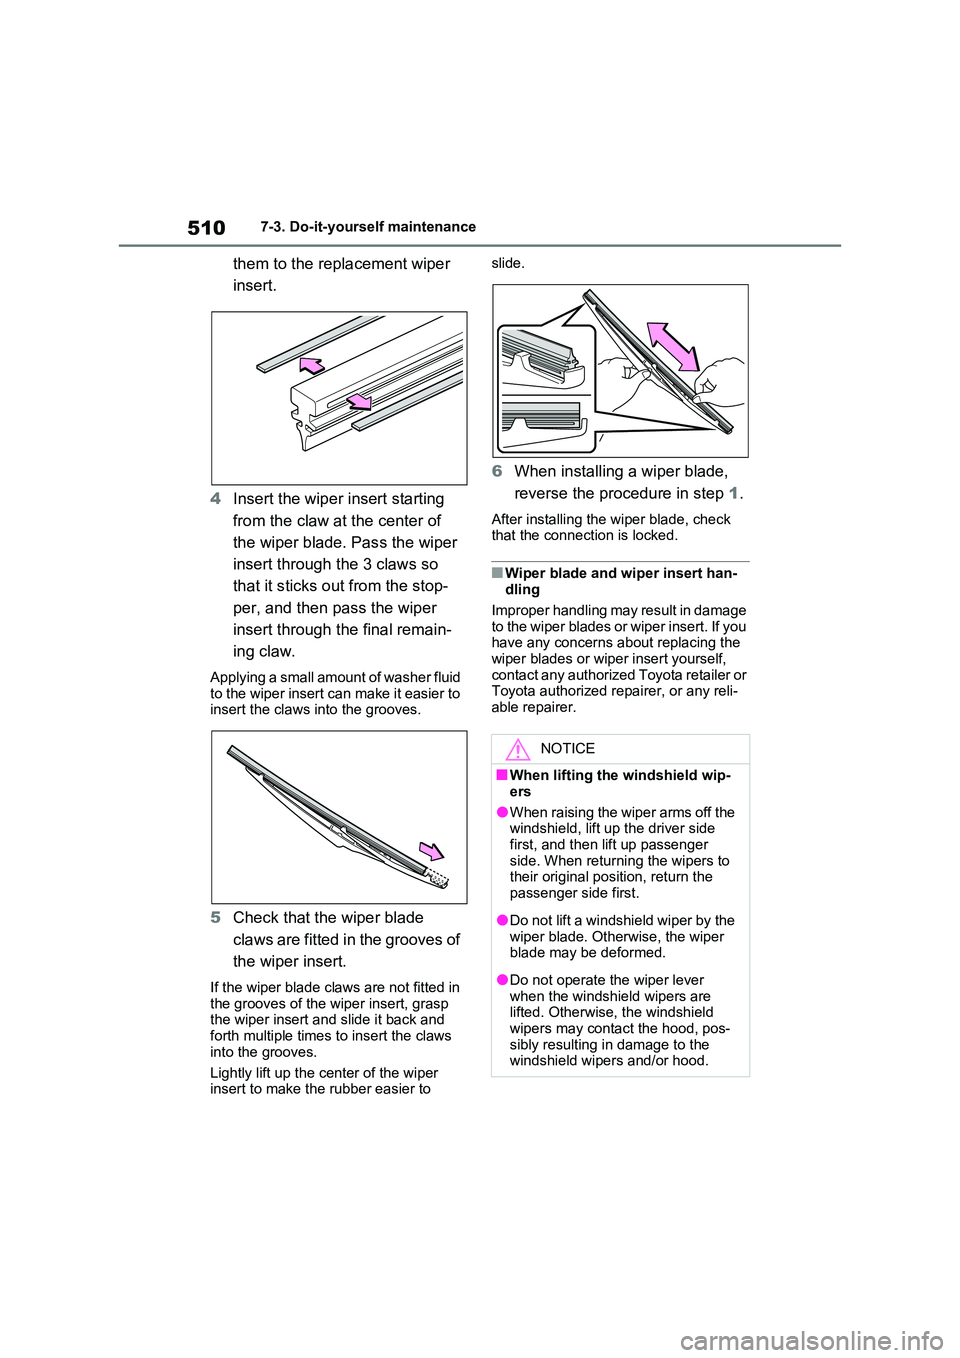
4 Insert the wiper insert starting
from the claw at the center of
the wiper blade. Pass the wiper
insert through the 3 claws so
that it sticks out from the stop-
per, and then pass the wiper
insert through the final remain-
ing claw.
Applying a small amount of washer fluid to the wiper insert can make it easier to insert the claws into the grooves.
5 Check that the wiper blade
claws are fitted in the grooves of
the wiper insert.
If the wiper blade claws are not fitted in
the grooves of the wiper insert, grasp the wiper insert and slide it back and forth multiple times to insert the claws
into the grooves.
Lightly lift up the center of the wiper insert to make the rubber easier to
slide.
6 When installing a wiper blade,
reverse the procedure in step 1.
After installing the wiper blade, check that the connection is locked.
■Wiper blade and wiper insert han-dling
Improper handling may result in damage to the wiper blades or wiper insert. If you have any concerns about replacing the
wiper blades or wiper insert yourself, contact any authorized Toyota retailer or Toyota authorized repairer, or any reli-
able repairer.
NOTICE
■When lifting the windshield wip-
ers
●When raising the wiper arms off the windshield, lift up the driver side
first, and then lift up passenger side. When returning the wipers to their original position, return the
passenger side first.
●Do not lift a windshield wiper by the
wiper blade. Otherwise, the wiper blade may be deformed.
●Do not operate the wiper lever when the windshield wipers are lifted. Otherwise, the windshield
wipers may contact the hood, pos- sibly resulting in damage to the windshield wipers and/or hood.
Page 513 of 718
511
7
7-3. Do-it-yourself maintenance
Maintenance and care
■If the key battery is depleted
The following symptoms may occur:
●The smart entry & start system and
wireless remote control will not func- tion properly.
●The operational range will be reduced.
Prepare the following before replac-
ing the battery:
Flathead screwdriver
Small flathead screwdriver
Lithium battery CR2450
■Use a CR2450 lithium battery
●Batteries can be purchased at any
authorized Toyota retailer or Toyota authorized repairer, or any reliable repairer, local electrical appliance
shops or camera stores.
●Replace only with the same or equiva-
lent type recommended by the manu- facturer.
●Dispose of used batteries according to the local laws.
NOTICE
■To prevent damage
●Be careful not to damage the claws
when replacing the wiper insert.
●After the wiper blade is removed
from the wiper arm, place a cloth, etc., between the rear window and wiper arm to prevent damage to the
rear window.
●Be sure not to pull excessively on
the wiper insert or deform its metal plates.
Electronic key battery
Replace the battery with a new
one if it is depleted.
Items to prepare
Page 514 of 718
5127-3. Do-it-yourself maintenance
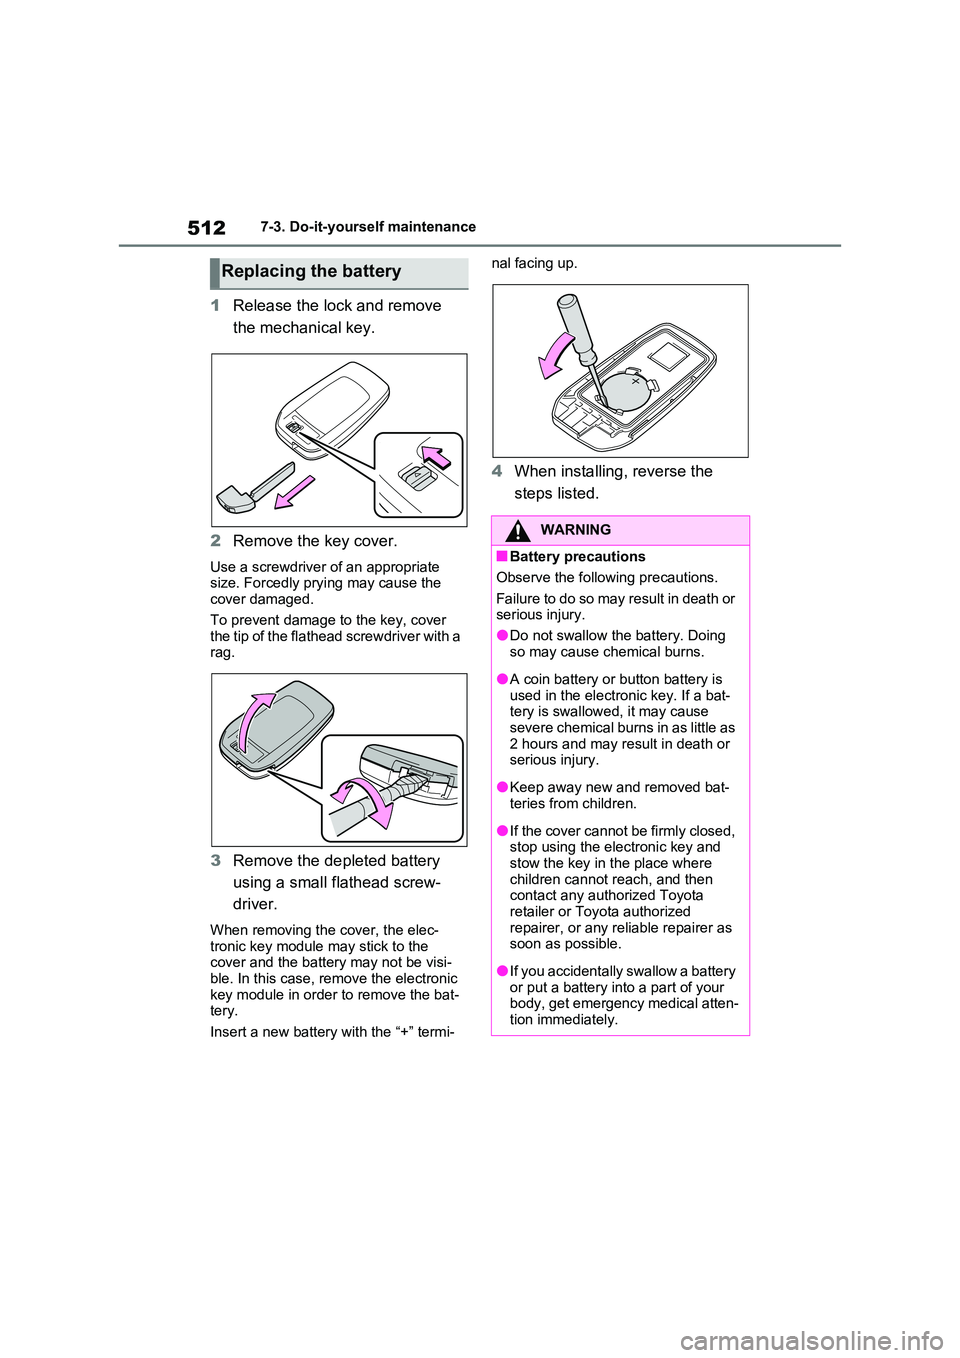
1Release the lock and remove
the mechanical key.
2 Remove the key cover.
Use a screwdriver of an appropriate size. Forcedly prying may cause the cover damaged.
To prevent damage to the key, cover the tip of the flathead screwdriver with a rag.
3 Remove the depleted battery
using a small flathead screw-
driver.
When removing the cover, the elec- tronic key module may stick to the cover and the battery may not be visi-
ble. In this case, remove the electronic key module in order to remove the bat-tery.
Insert a new battery with the “+” termi-
nal facing up.
4 When installing, reverse the
steps listed.
Replacing the battery
WARNING
■Battery precautions
Observe the following precautions.
Failure to do so may result in death or serious injury.
●Do not swallow the battery. Doing
so may cause chemical burns.
●A coin battery or button battery is
used in the electronic key. If a bat- tery is swallowed, it may cause severe chemical burns in as little as
2 hours and may result in death or serious injury.
●Keep away new and removed bat-teries from children.
●If the cover cannot be firmly closed, stop using the electronic key and stow the key in the place where
children cannot reach, and then contact any authorized Toyota retailer or Toyota authorized
repairer, or any reliable repairer as soon as possible.
●If you accidentally swallow a battery or put a battery into a part of your body, get emergency medical atten-
tion immediately.
Page 515 of 718
513
7
7-3. Do-it-yourself maintenance
Maintenance and care
1 Turn the power switch off.
Confirm that the charging connector is not connected. Also, do not use the
Remote Air Conditioning System during the procedure.
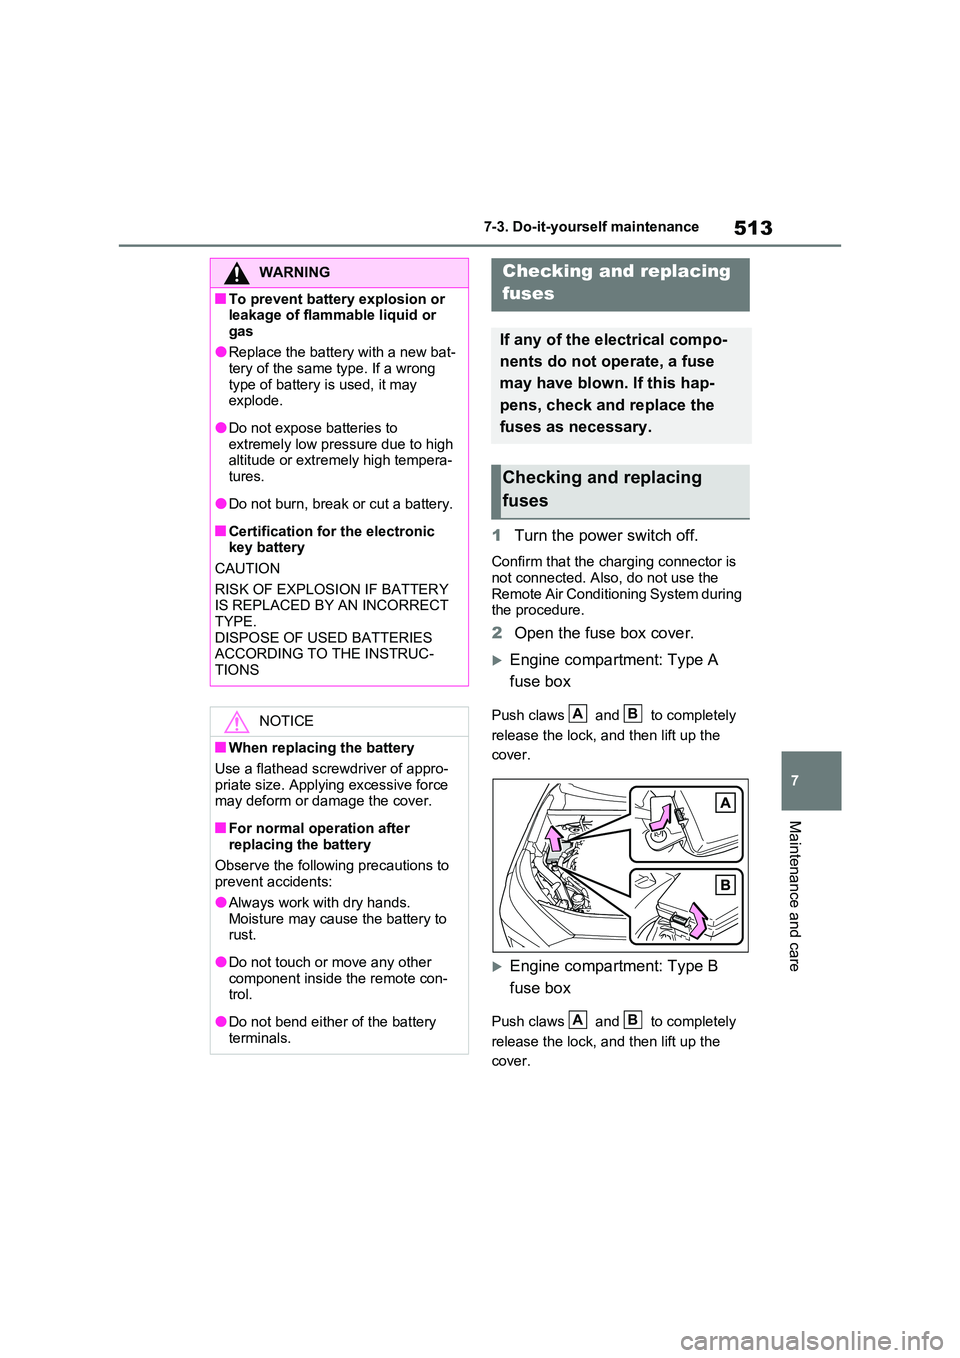
2 Open the fuse box cover.
Engine compartment: Type A
fuse box
Push claws and to completely
release the lock, and then lift up the
cover.
Engine compartment: Type B
fuse box
Push claws and to completely
release the lock, and then lift up the
cover.
WARNING
■To prevent battery explosion or leakage of flammable liquid or
gas
●Replace the battery with a new bat- tery of the same type. If a wrong
type of battery is used, it may explode.
●Do not expose batteries to extremely low pressure due to high altitude or extremely high tempera-
tures.
●Do not burn, break or cut a battery.
■Certification for the electronic key battery
CAUTION
RISK OF EXPLOSION IF BATTERY IS REPLACED BY AN INCORRECT
TYPE. DISPOSE OF USED BATTERIES ACCORDING TO THE INSTRUC-
TIONS
NOTICE
■When replacing the battery
Use a flathead screwdriver of appro- priate size. Applying excessive force may deform or damage the cover.
■For normal operation after replacing the battery
Observe the following precautions to prevent accidents:
●Always work with dry hands.
Moisture may cause the battery to rust.
●Do not touch or move any other component inside the remote con-trol.
●Do not bend either of the battery terminals.
Checking and replacing
fuses
If any of the electrical compo-
nents do not operate, a fuse
may have blown. If this hap-
pens, check and replace the
fuses as necessary.
Checking and replacing
fuses
AB
AB
Page 516 of 718
5147-3. Do-it-yourself maintenance
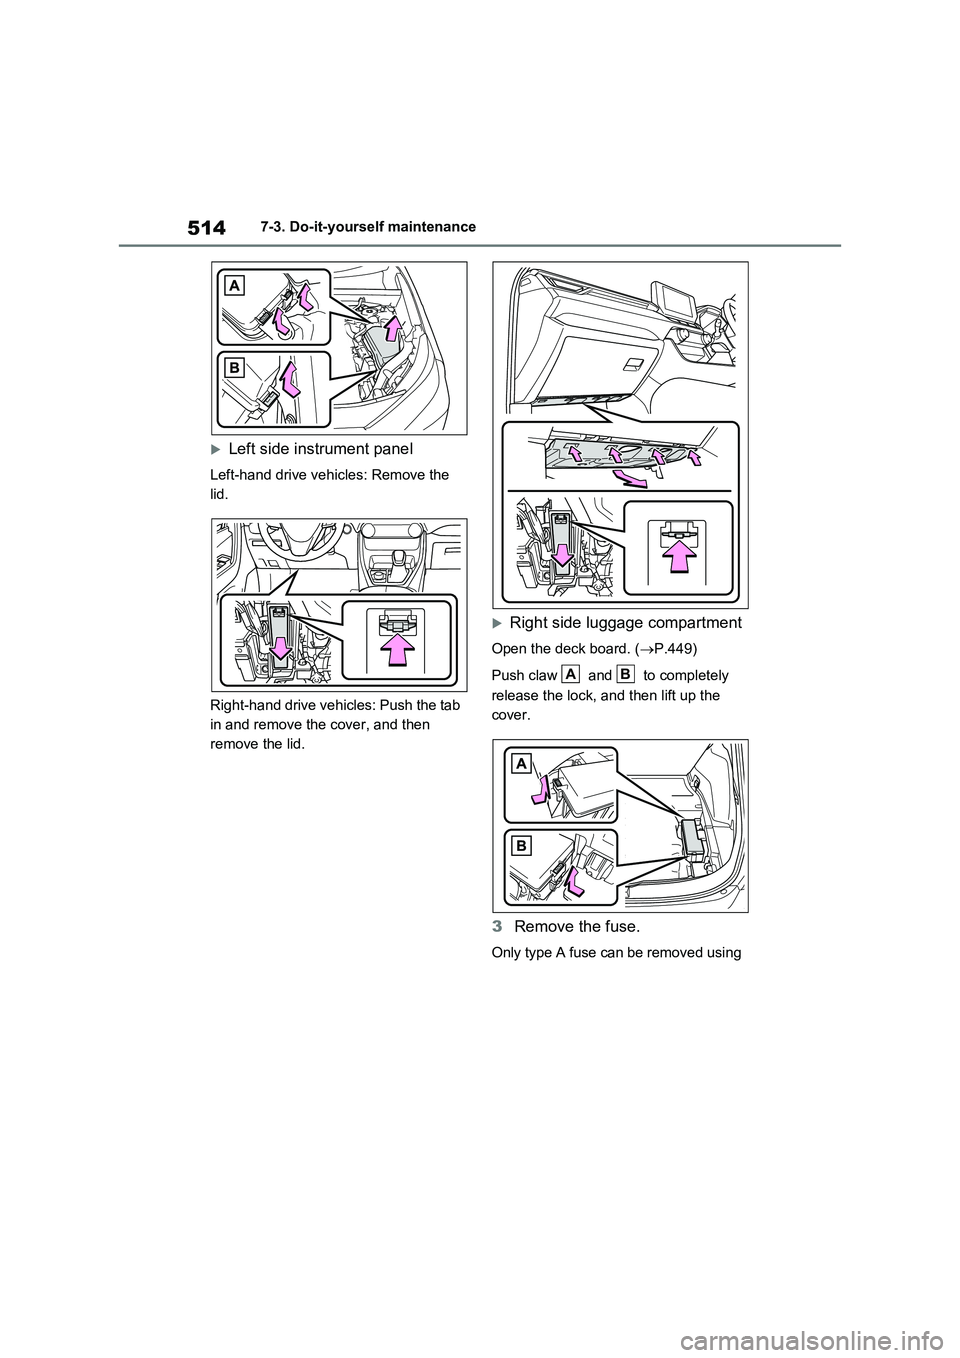
Left side instrument panel
Left-hand drive vehicles: Remove the
lid.
Right-hand drive vehicles: Push the tab
in and remove the cover, and then
remove the lid.
Right side luggage compartment
Open the deck board. (P.449)
Push claw and to completely
release the lock, and then lift up the
cover.
3Remove the fuse.
Only type A fuse can be removed using
AB
Page 517 of 718
515
7 7-3. Do-it-yourself maintenance
Maintenance and care
the pullout tool.
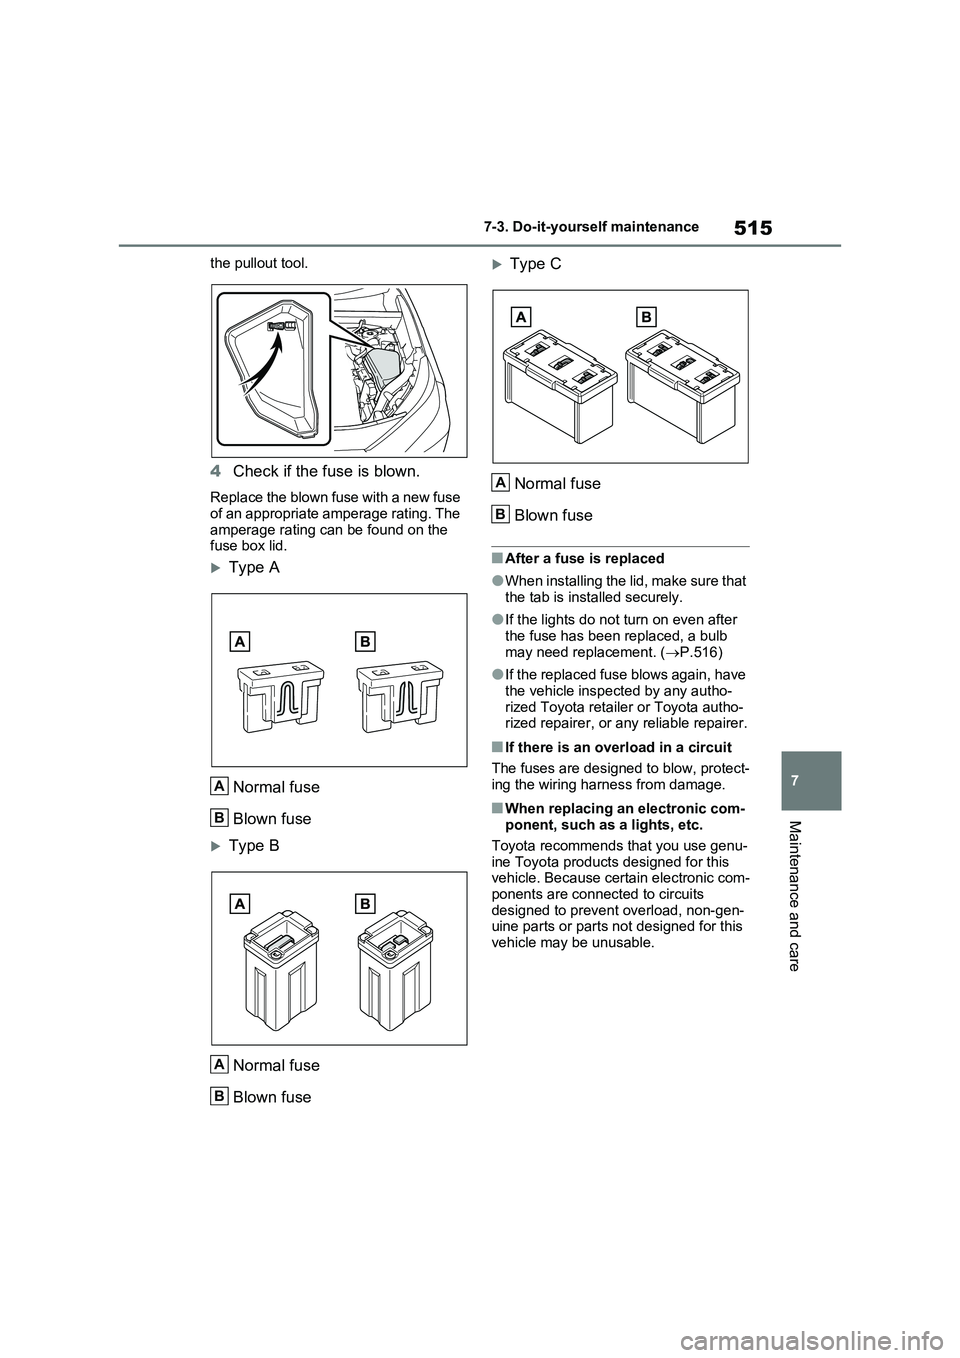
4Check if the fuse is blown.
Replace the blown fuse with a new fuse
of an appropriate amperage rating. The
amperage rating can be found on the
fuse box lid.
Type A
Normal fuse
Blown fuse
Type B
Normal fuse
Blown fuse
Type C
Normal fuse
Blown fuse
■After a fuse is replaced
●When installing the lid, make sure that
the tab is installed securely.
●If the lights do not turn on even after
the fuse has been replaced, a bulb
may need replacement. (P.516)
●If the replaced fuse blows again, have
the vehicle inspected by any autho-
rized Toyota retailer or Toyota autho-
rized repairer, or any reliable repairer.
■If there is an overload in a circuit
The fuses are designed to blow, protect-
ing the wiring harness from damage.
■When replacing an electronic com-
ponent, such as a lights, etc.
Toyota recommends that you use genu-
ine Toyota products designed for this
vehicle. Because certain electronic com-
ponents are connected to circuits
designed to prevent overload, non-gen-
uine parts or parts not designed for this
vehicle may be unusable.
A
B
A
B
A
B
Page 518 of 718
5167-3. Do-it-yourself maintenance
Check the wattage of the light bulb
to be replaced. ( P.591)
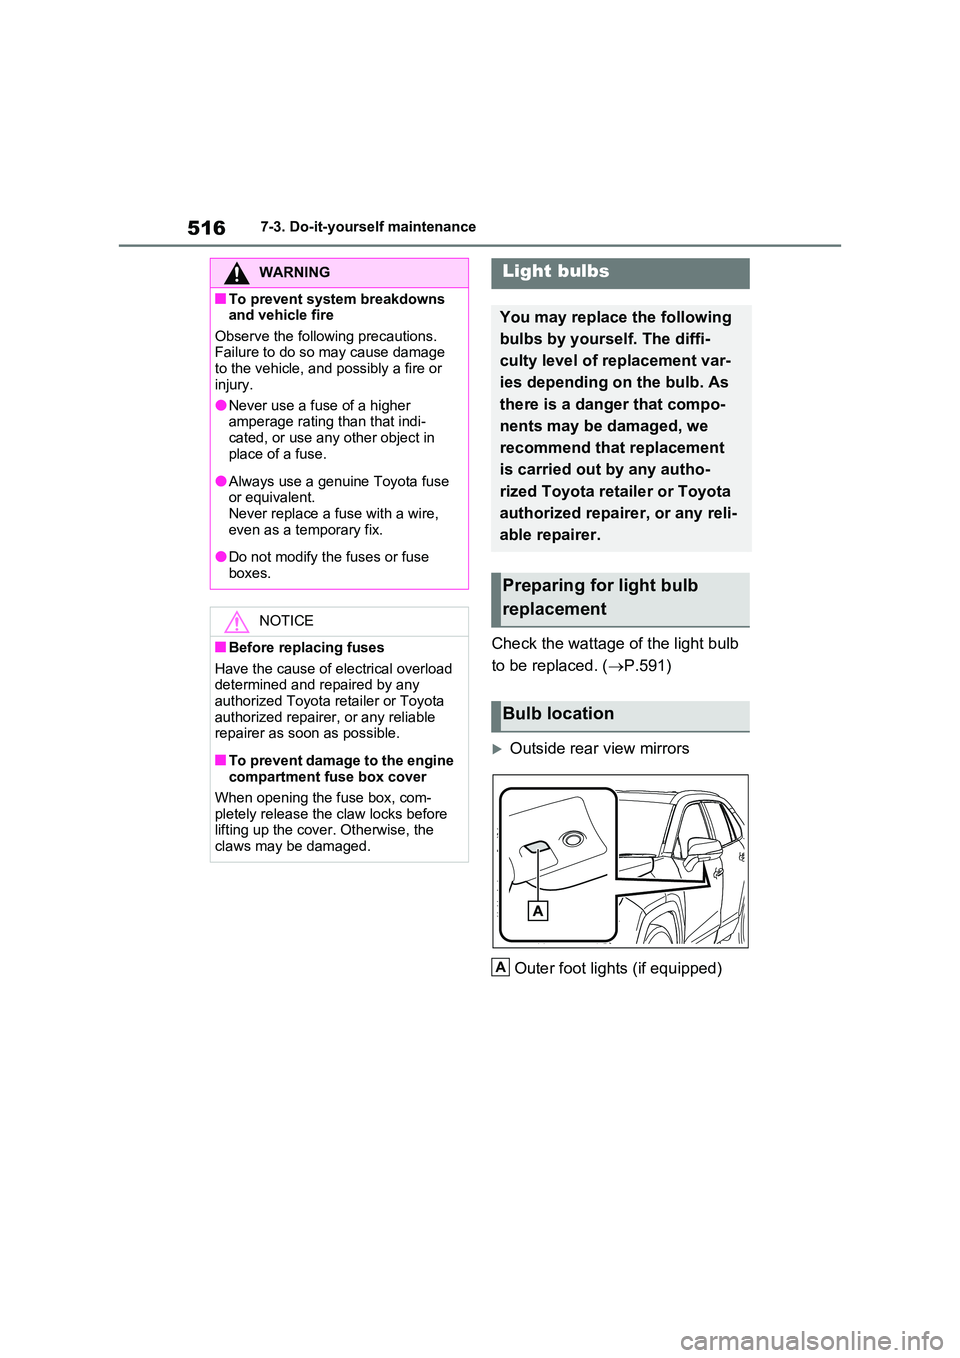
Outside rear view mirrors
Outer foot lights (if equipped)
WARNING
■To prevent system breakdowns and vehicle fire
Observe the following precautions. Failure to do so may cause damage to the vehicle, and possibly a fire or
injury.
●Never use a fuse of a higher amperage rating than that indi-
cated, or use any other object in place of a fuse.
●Always use a genuine Toyota fuse or equivalent.Never replace a fuse with a wire,
even as a temporary fix.
●Do not modify the fuses or fuse
boxes.
NOTICE
■Before replacing fuses
Have the cause of electrical overload determined and repaired by any authorized Toyota retailer or Toyota
authorized repairer, or any reliable repairer as soon as possible.
■To prevent damage to the engine compartment fuse box cover
When opening the fuse box, com- pletely release the claw locks before lifting up the cover. Otherwise, the
claws may be damaged.
Light bulbs
You may replace the following
bulbs by yourself. The diffi-
culty level of replacement var-
ies depending on the bulb. As
there is a danger that compo-
nents may be damaged, we
recommend that replacement
is carried out by any autho-
rized Toyota retailer or Toyota
authorized repairer, or any reli-
able repairer.
Preparing for light bulb
replacement
Bulb location
A
Page 519 of 718
517
7
7-3. Do-it-yourself maintenance
Maintenance and care
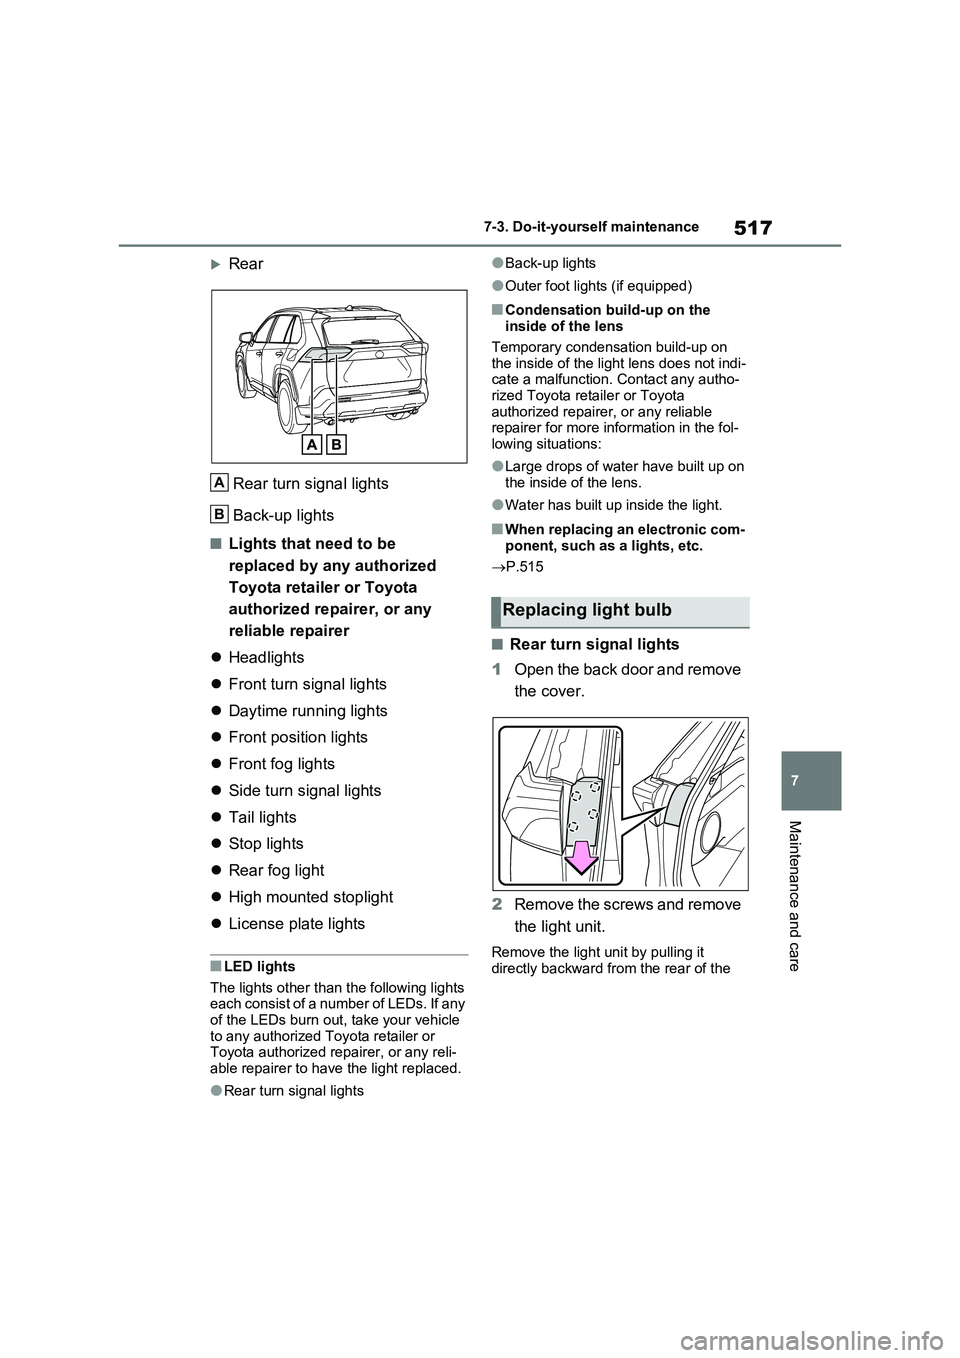
Rear
Rear turn signal lights
Back-up lights
■Lights that need to be
replaced by any authorized
Toyota retailer or Toyota
authorized repairer, or any
reliable repairer
Headlights
Front turn signal lights
Daytime running lights
Front position lights
Front fog lights
Side turn signal lights
Tail lights
Stop lights
Rear fog light
High mounted stoplight
License plate lights
■LED lights
The lights other than the following lights each consist of a number of LEDs. If any of the LEDs burn out, take your vehicle
to any authorized Toyota retailer or Toyota authorized repairer, or any reli-able repairer to have the light replaced.
●Rear turn signal lights
●Back-up lights
●Outer foot lights (if equipped)
■Condensation build-up on the inside of the lens
Temporary condensation build-up on the inside of the light lens does not indi-cate a malfunction. Contact any autho-
rized Toyota retailer or Toyota authorized repairer, or any reliable repairer for more information in the fol-
lowing situations:
●Large drops of water have built up on
the inside of the lens.
●Water has built up inside the light.
■When replacing an electronic com-
ponent, such as a lights, etc.
P.515
■Rear turn signal lights
1 Open the back door and remove
the cover.
2 Remove the screws and remove
the light unit.
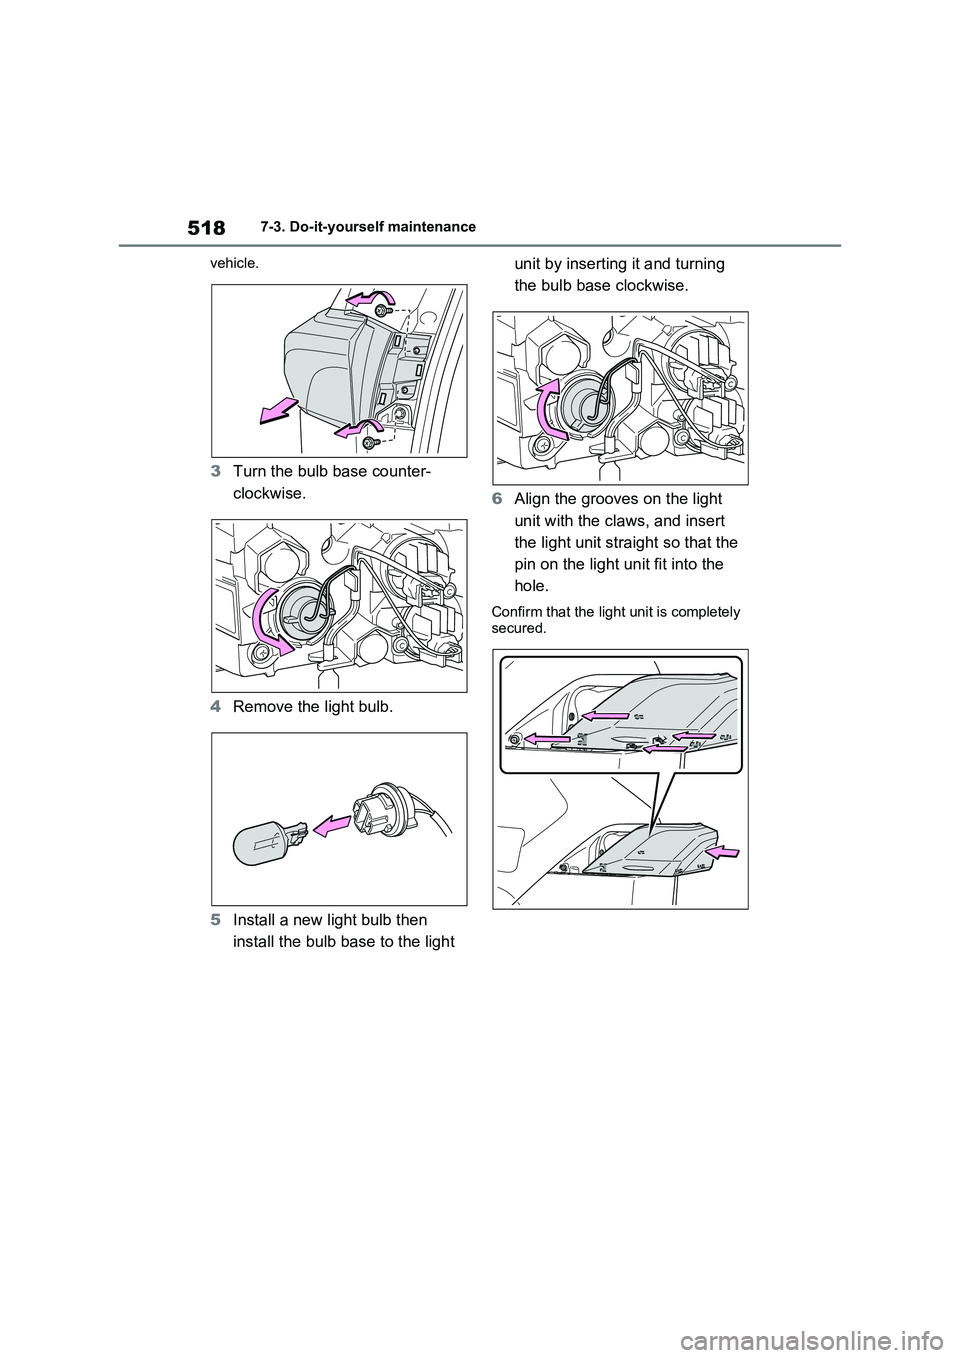
Remove the light unit by pulling it
directly backward from the rear of the
A
B
Replacing light bulb
Page 520 of 718
5187-3. Do-it-yourself maintenance
vehicle.
3Turn the bulb base counter-
clockwise.
4Remove the light bulb.
5Install a new light bulb then
install the bulb base to the light unit by inserting it and turning
the bulb base clockwise.
6Align the grooves on the light
unit with the claws, and insert
the light unit straight so that the
pin on the light unit fit into the
hole.
Confirm that the light unit is completely
secured.