TOYOTA SIENNA 2007 Service Repair Manual
SIENNA 2007
TOYOTA
TOYOTA
https://www.carmanualsonline.info/img/14/57466/w960_57466-0.png
TOYOTA SIENNA 2007 Service Repair Manual
Trending: door, battery, seat memory, open hood, throttle body, knock sensor ecu, inflation pressure
Page 301 of 3000
SE–98SEAT – REAR NO. 2 SEAT ASSEMBLY (for Power Seat Type LH Side)
SE
REMOVAL
1. DISCONNECT CABLE FROM NEGATIVE BATTERY
TERMINAL
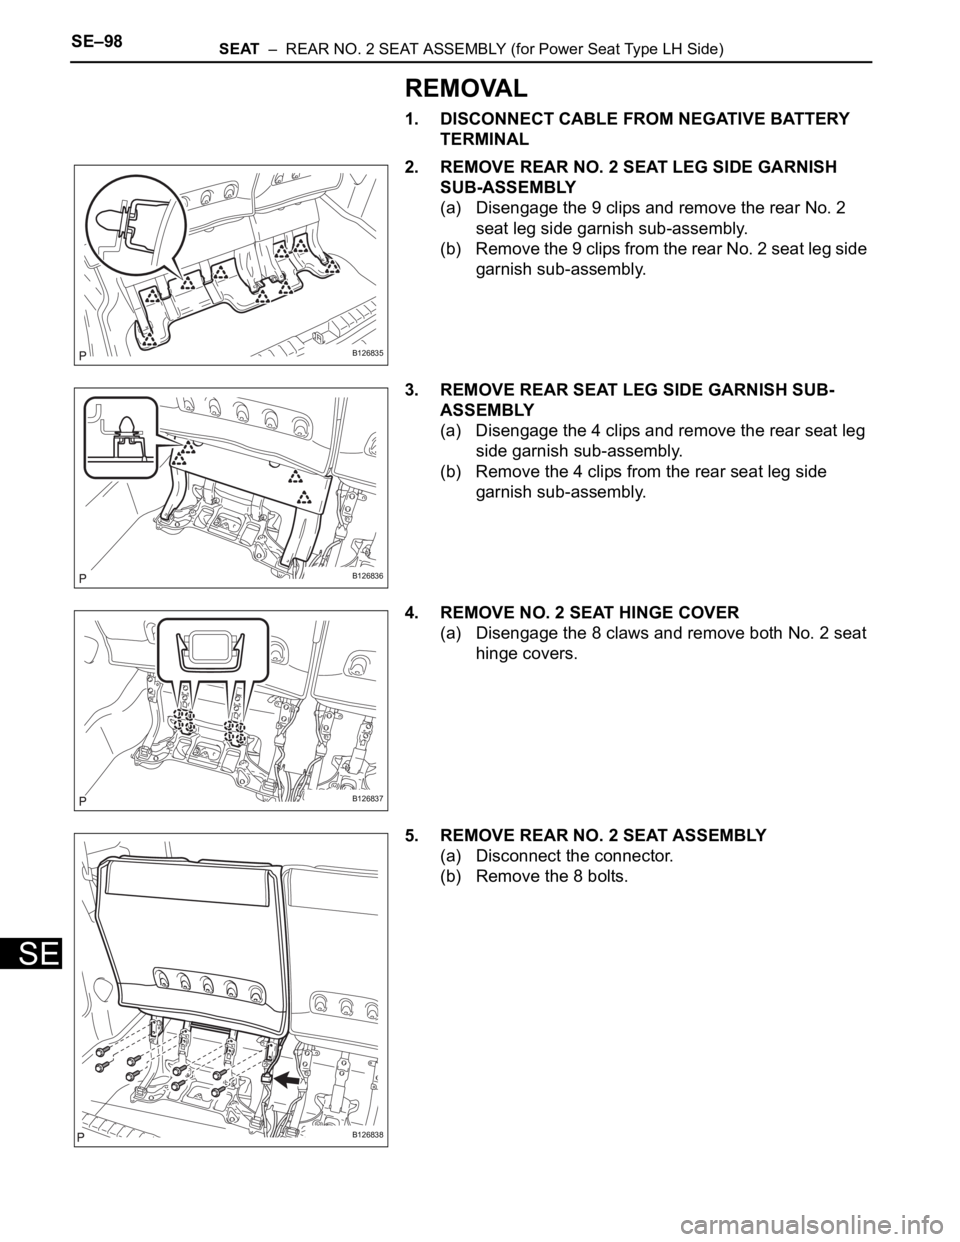
2. REMOVE REAR NO. 2 SEAT LEG SIDE GARNISH
SUB-ASSEMBLY
(a) Disengage the 9 clips and remove the rear No. 2
seat leg side garnish sub-assembly.
(b) Remove the 9 clips from the rear No. 2 seat leg side
garnish sub-assembly.
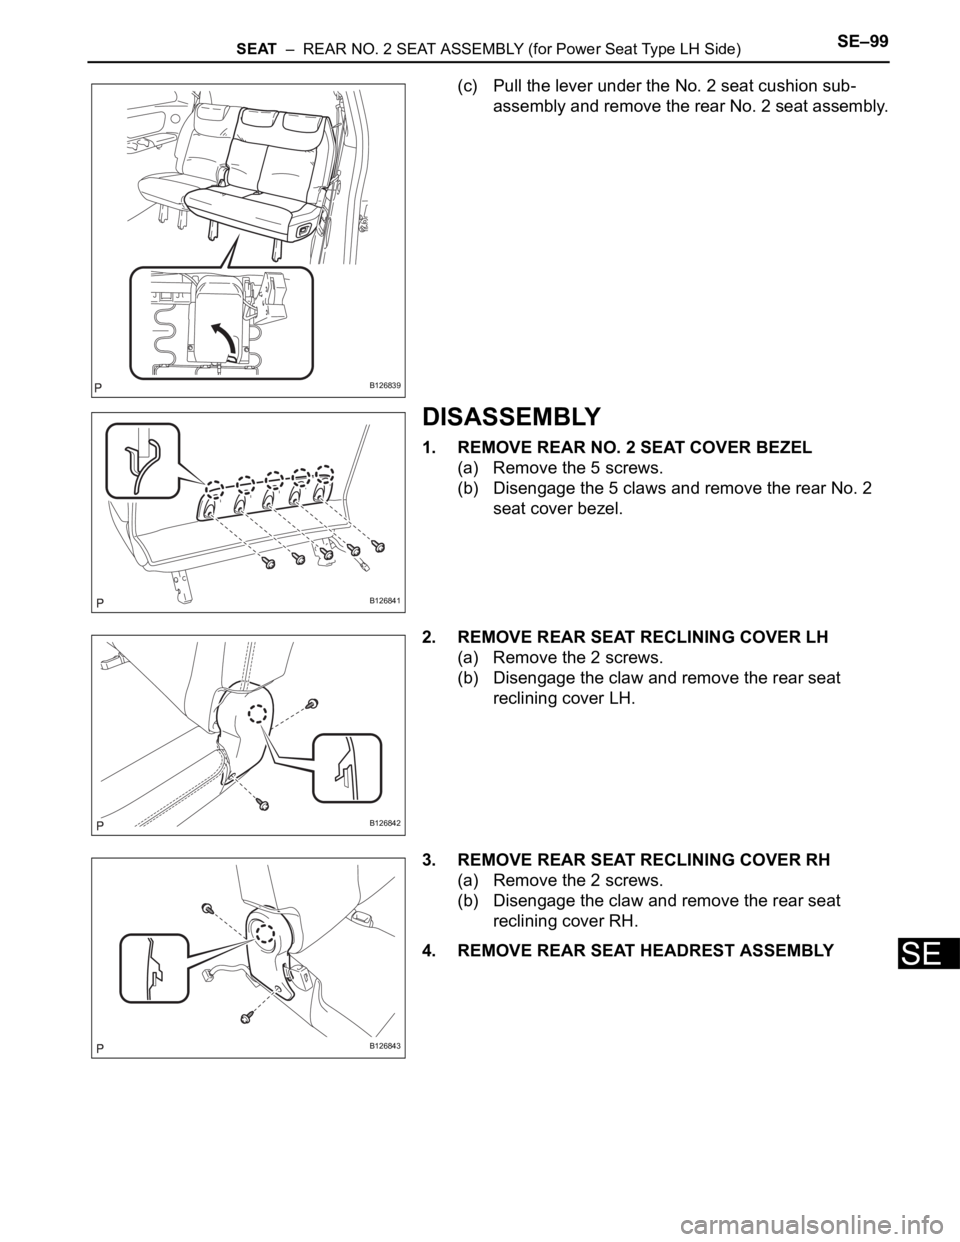
3. REMOVE REAR SEAT LEG SIDE GARNISH SUB-
ASSEMBLY
(a) Disengage the 4 clips and remove the rear seat leg
side garnish sub-assembly.
(b) Remove the 4 clips from the rear seat leg side
garnish sub-assembly.
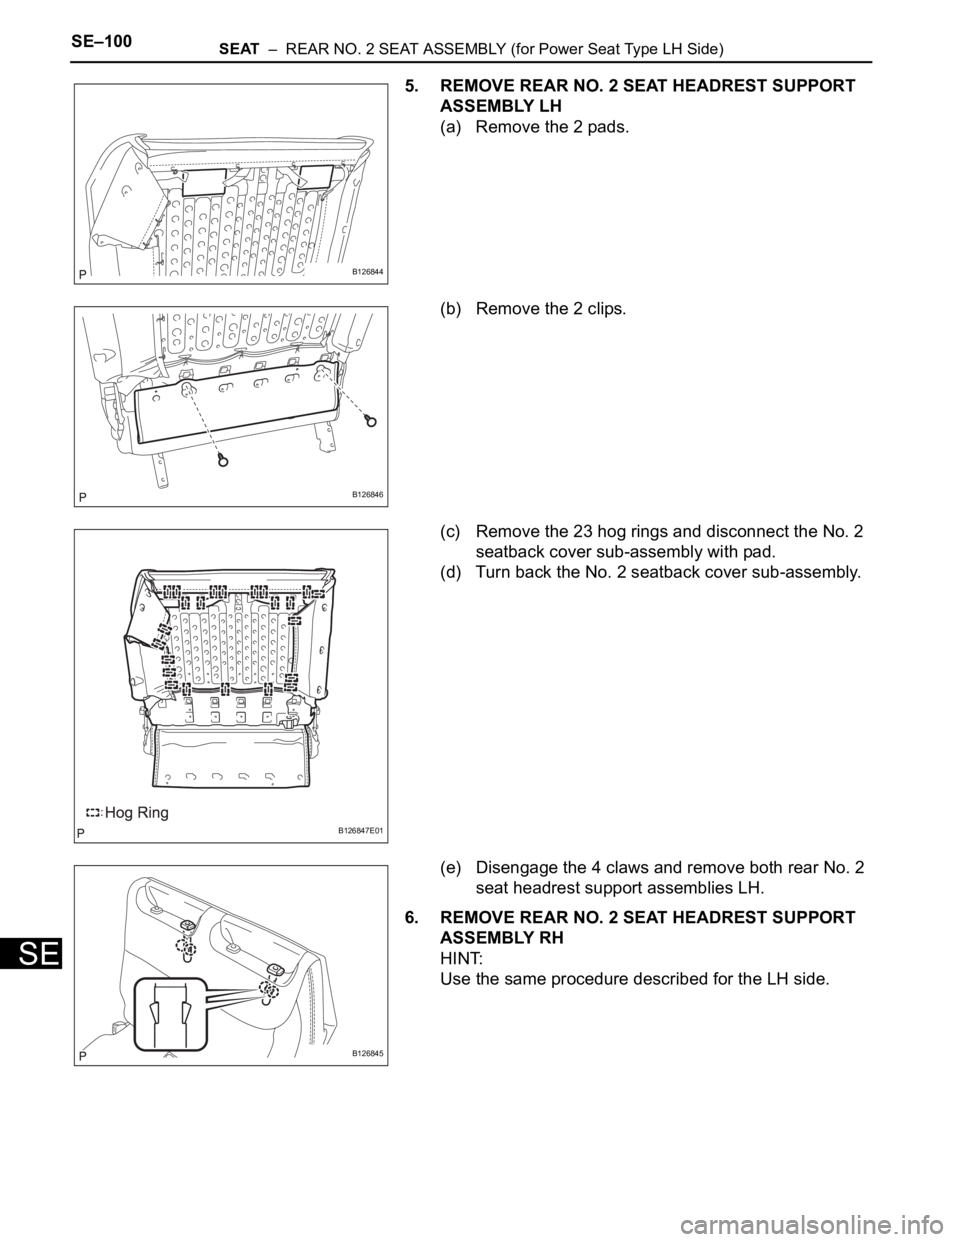
4. REMOVE NO. 2 SEAT HINGE COVER
(a) Disengage the 8 claws and remove both No. 2 seat
hinge covers.
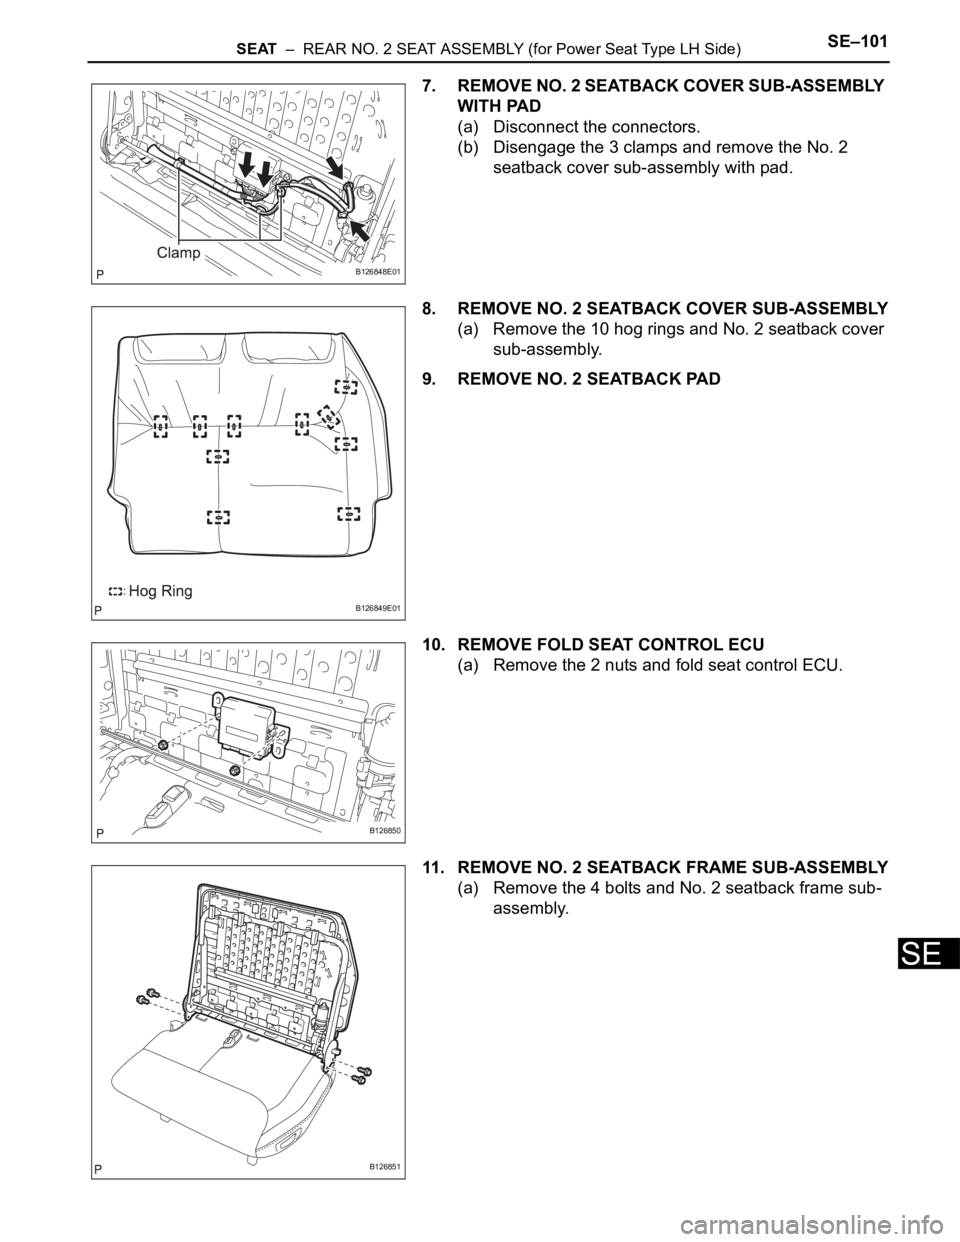
5. REMOVE REAR NO. 2 SEAT ASSEMBLY
(a) Disconnect the connector.
(b) Remove the 8 bolts.
B126835
B126836
B126837
B126838
Page 302 of 3000
SEAT – REAR NO. 2 SEAT ASSEMBLY (for Power Seat Type LH Side)SE–99
SE
(c) Pull the lever under the No. 2 seat cushion sub-
assembly and remove the rear No. 2 seat assembly.
DISASSEMBLY
1. REMOVE REAR NO. 2 SEAT COVER BEZEL
(a) Remove the 5 screws.
(b) Disengage the 5 claws and remove the rear No. 2
seat cover bezel.
2. REMOVE REAR SEAT RECLINING COVER LH
(a) Remove the 2 screws.
(b) Disengage the claw and remove the rear seat
reclining cover LH.
3. REMOVE REAR SEAT RECLINING COVER RH
(a) Remove the 2 screws.
(b) Disengage the claw and remove the rear seat
reclining cover RH.
4. REMOVE REAR SEAT HEADREST ASSEMBLY
B126839
B126841
B126842
B126843
Page 303 of 3000
SE–100SEAT – REAR NO. 2 SEAT ASSEMBLY (for Power Seat Type LH Side)
SE
5. REMOVE REAR NO. 2 SEAT HEADREST SUPPORT
ASSEMBLY LH
(a) Remove the 2 pads.
(b) Remove the 2 clips.
(c) Remove the 23 hog rings and disconnect the No. 2
seatback cover sub-assembly with pad.
(d) Turn back the No. 2 seatback cover sub-assembly.
(e) Disengage the 4 claws and remove both rear No. 2
seat headrest support assemblies LH.
6. REMOVE REAR NO. 2 SEAT HEADREST SUPPORT
ASSEMBLY RH
HINT:
Use the same procedure described for the LH side.
B126844
B126846
B126847E01
B126845
Page 304 of 3000
SEAT – REAR NO. 2 SEAT ASSEMBLY (for Power Seat Type LH Side)SE–101
SE
7. REMOVE NO. 2 SEATBACK COVER SUB-ASSEMBLY
WITH PAD
(a) Disconnect the connectors.
(b) Disengage the 3 clamps and remove the No. 2
seatback cover sub-assembly with pad.
8. REMOVE NO. 2 SEATBACK COVER SUB-ASSEMBLY
(a) Remove the 10 hog rings and No. 2 seatback cover
sub-assembly.
9. REMOVE NO. 2 SEATBACK PAD
10. REMOVE FOLD SEAT CONTROL ECU
(a) Remove the 2 nuts and fold seat control ECU.
11. REMOVE NO. 2 SEATBACK FRAME SUB-ASSEMBLY
(a) Remove the 4 bolts and No. 2 seatback frame sub-
assembly.
B126848E01
B126849E01
B126850
B126851
Page 305 of 3000
SE–102SEAT – REAR NO. 2 SEAT ASSEMBLY (for Power Seat Type LH Side)
SE
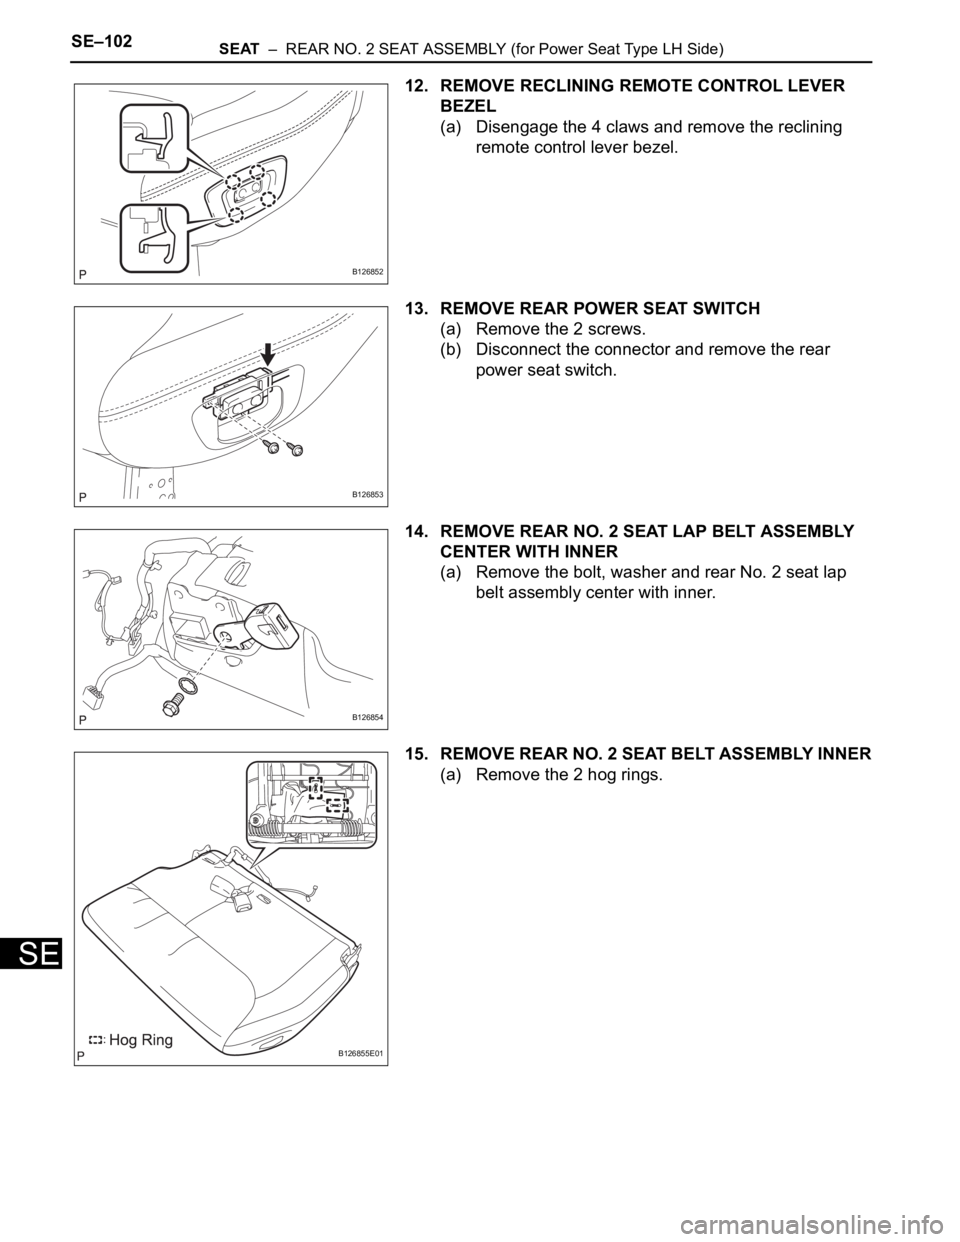
12. REMOVE RECLINING REMOTE CONTROL LEVER
BEZEL
(a) Disengage the 4 claws and remove the reclining
remote control lever bezel.
13. REMOVE REAR POWER SEAT SWITCH
(a) Remove the 2 screws.
(b) Disconnect the connector and remove the rear
power seat switch.
14. REMOVE REAR NO. 2 SEAT LAP BELT ASSEMBLY
CENTER WITH INNER
(a) Remove the bolt, washer and rear No. 2 seat lap
belt assembly center with inner.
15. REMOVE REAR NO. 2 SEAT BELT ASSEMBLY INNER
(a) Remove the 2 hog rings.
B126852
B126853
B126854
B126855E01
Page 306 of 3000
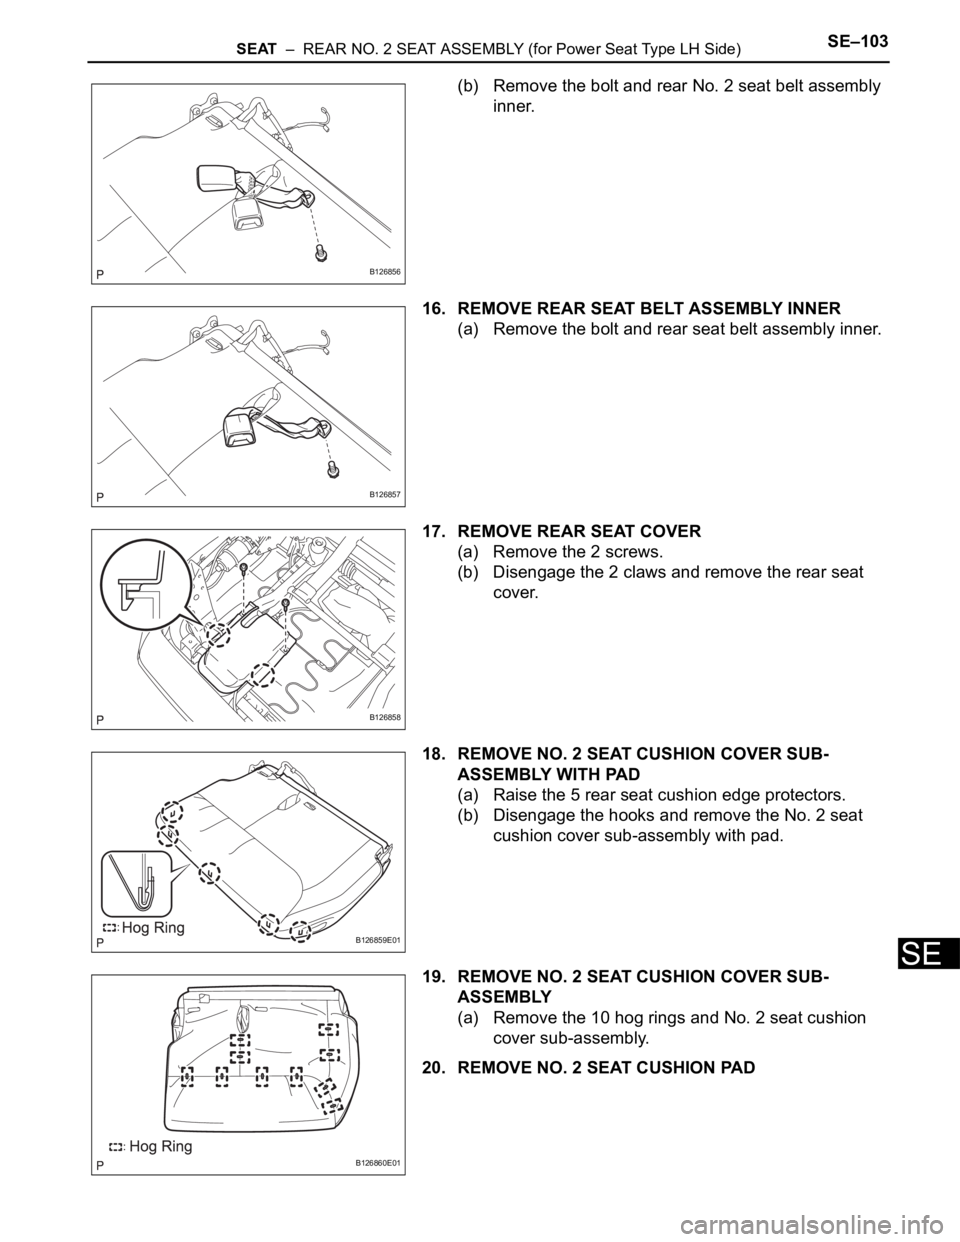
SEAT – REAR NO. 2 SEAT ASSEMBLY (for Power Seat Type LH Side)SE–103
SE
(b) Remove the bolt and rear No. 2 seat belt assembly
inner.
16. REMOVE REAR SEAT BELT ASSEMBLY INNER
(a) Remove the bolt and rear seat belt assembly inner.
17. REMOVE REAR SEAT COVER
(a) Remove the 2 screws.
(b) Disengage the 2 claws and remove the rear seat
cover.
18. REMOVE NO. 2 SEAT CUSHION COVER SUB-
ASSEMBLY WITH PAD
(a) Raise the 5 rear seat cushion edge protectors.
(b) Disengage the hooks and remove the No. 2 seat
cushion cover sub-assembly with pad.
19. REMOVE NO. 2 SEAT CUSHION COVER SUB-
ASSEMBLY
(a) Remove the 10 hog rings and No. 2 seat cushion
cover sub-assembly.
20. REMOVE NO. 2 SEAT CUSHION PAD
B126856
B126857
B126858
B126859E01
B126860E01
Page 307 of 3000
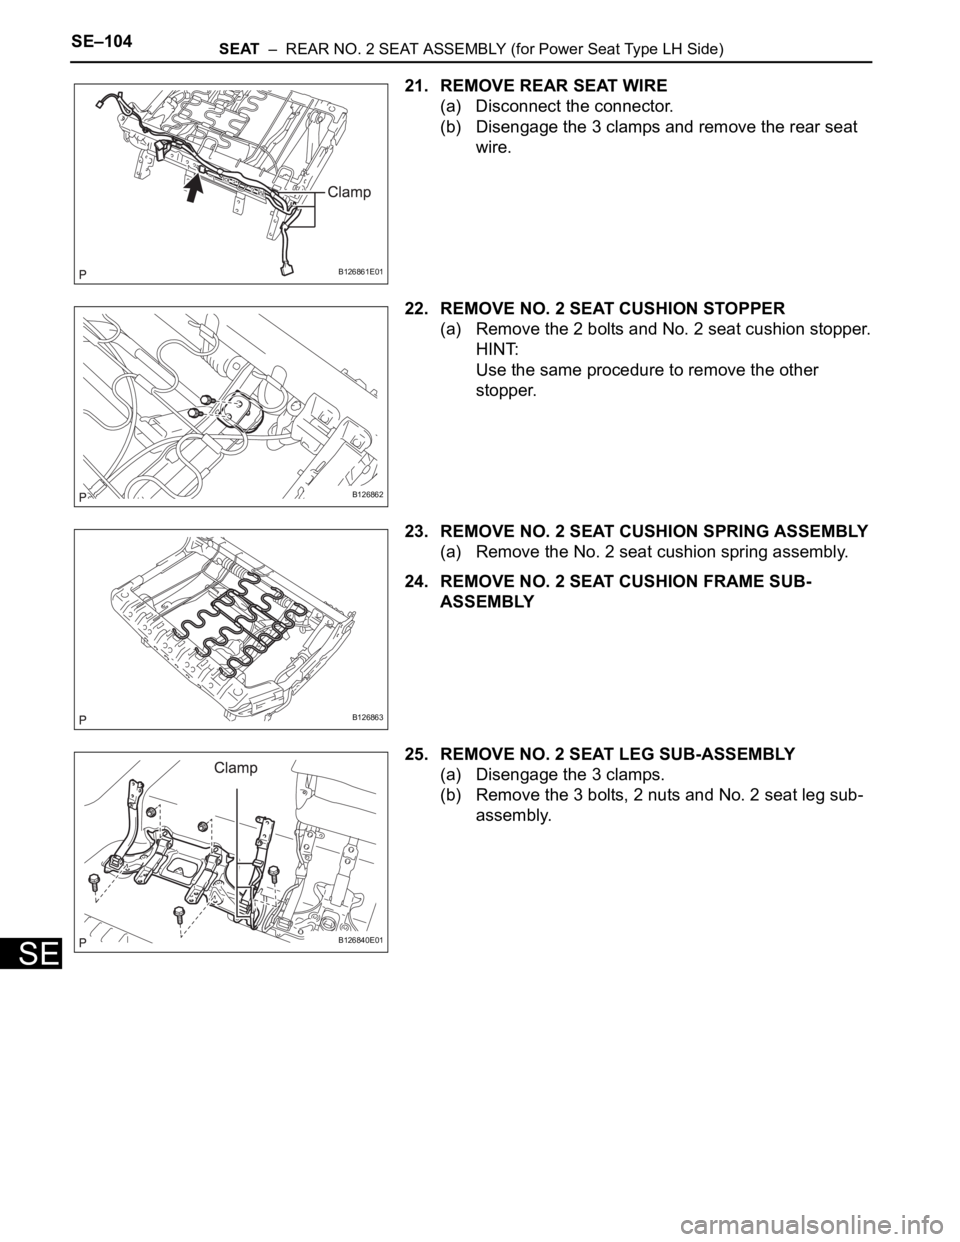
SE–104SEAT – REAR NO. 2 SEAT ASSEMBLY (for Power Seat Type LH Side)
SE
21. REMOVE REAR SEAT WIRE
(a) Disconnect the connector.
(b) Disengage the 3 clamps and remove the rear seat
wire.
22. REMOVE NO. 2 SEAT CUSHION STOPPER
(a) Remove the 2 bolts and No. 2 seat cushion stopper.
HINT:
Use the same procedure to remove the other
stopper.
23. REMOVE NO. 2 SEAT CUSHION SPRING ASSEMBLY
(a) Remove the No. 2 seat cushion spring assembly.
24. REMOVE NO. 2 SEAT CUSHION FRAME SUB-
ASSEMBLY
25. REMOVE NO. 2 SEAT LEG SUB-ASSEMBLY
(a) Disengage the 3 clamps.
(b) Remove the 3 bolts, 2 nuts and No. 2 seat leg sub-
assembly.
B126861E01
B126862
B126863
B126840E01
Page 308 of 3000
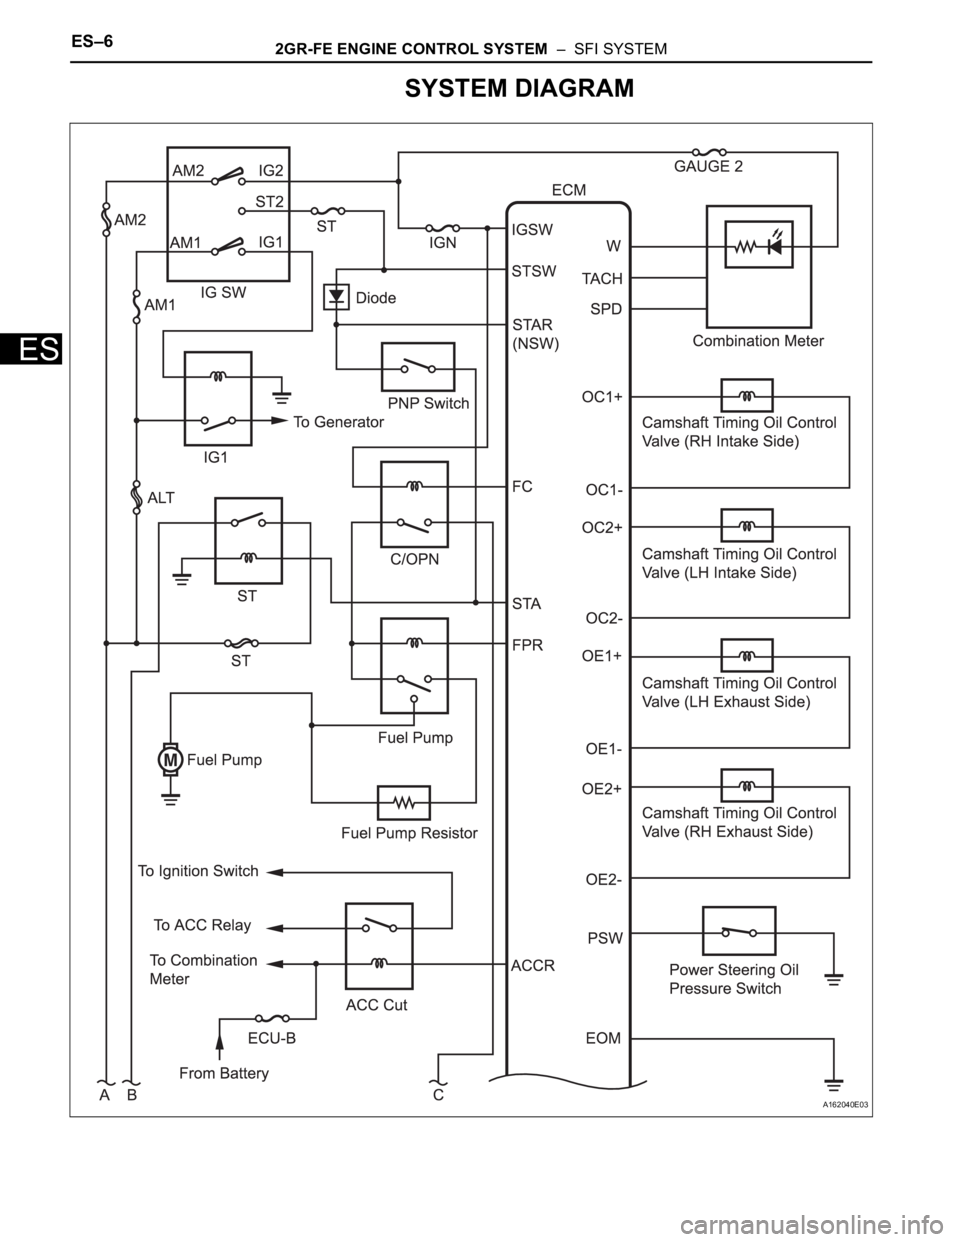
ES–62GR-FE ENGINE CONTROL SYSTEM – SFI SYSTEM
ES
SYSTEM DIAGRAM
A162040E03
Page 309 of 3000
2GR-FE ENGINE CONTROL SYSTEM – SFI SYSTEMES–7
ES
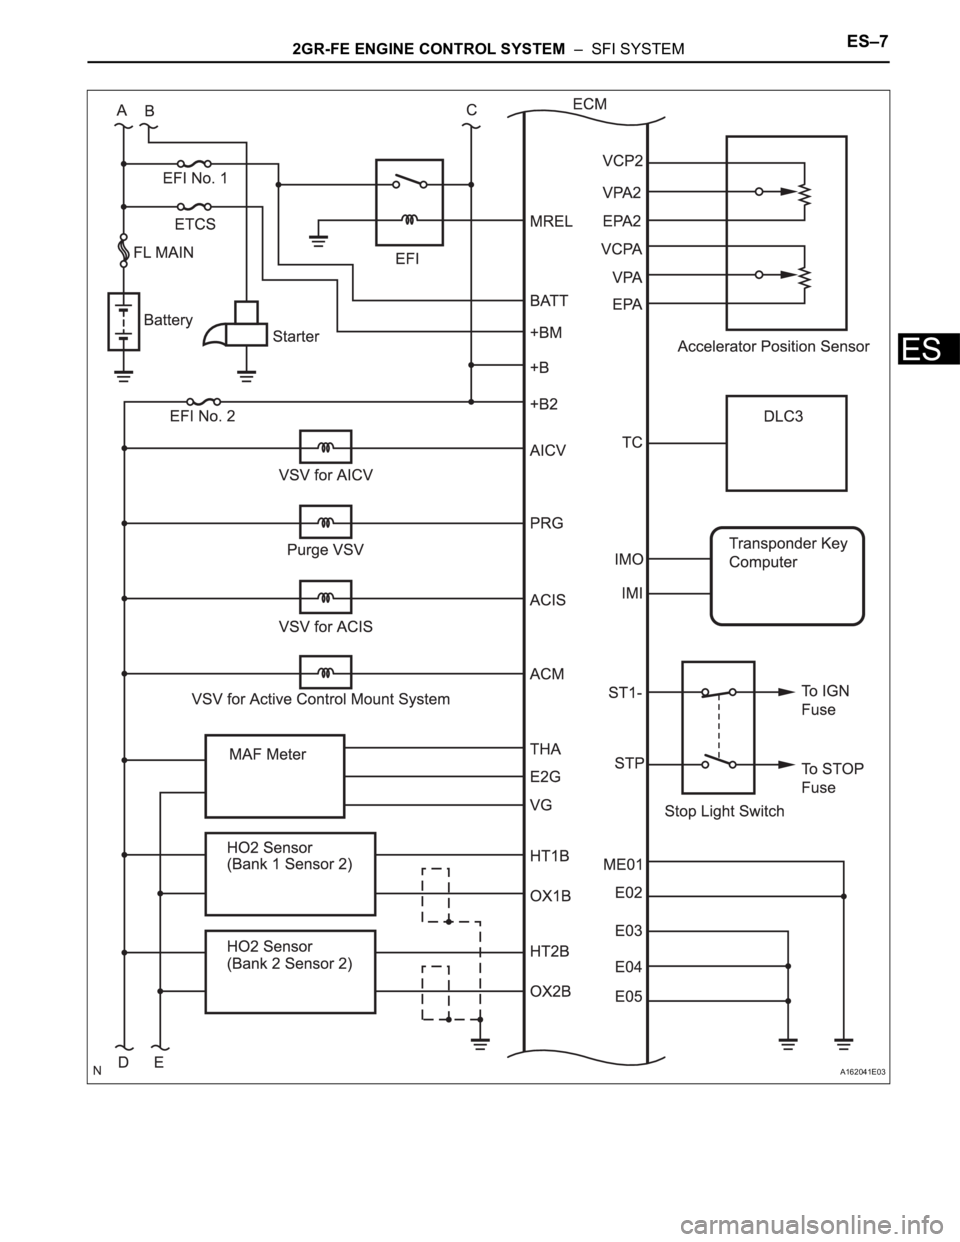
A162041E03
Page 310 of 3000
ES–82GR-FE ENGINE CONTROL SYSTEM – SFI SYSTEM
ES
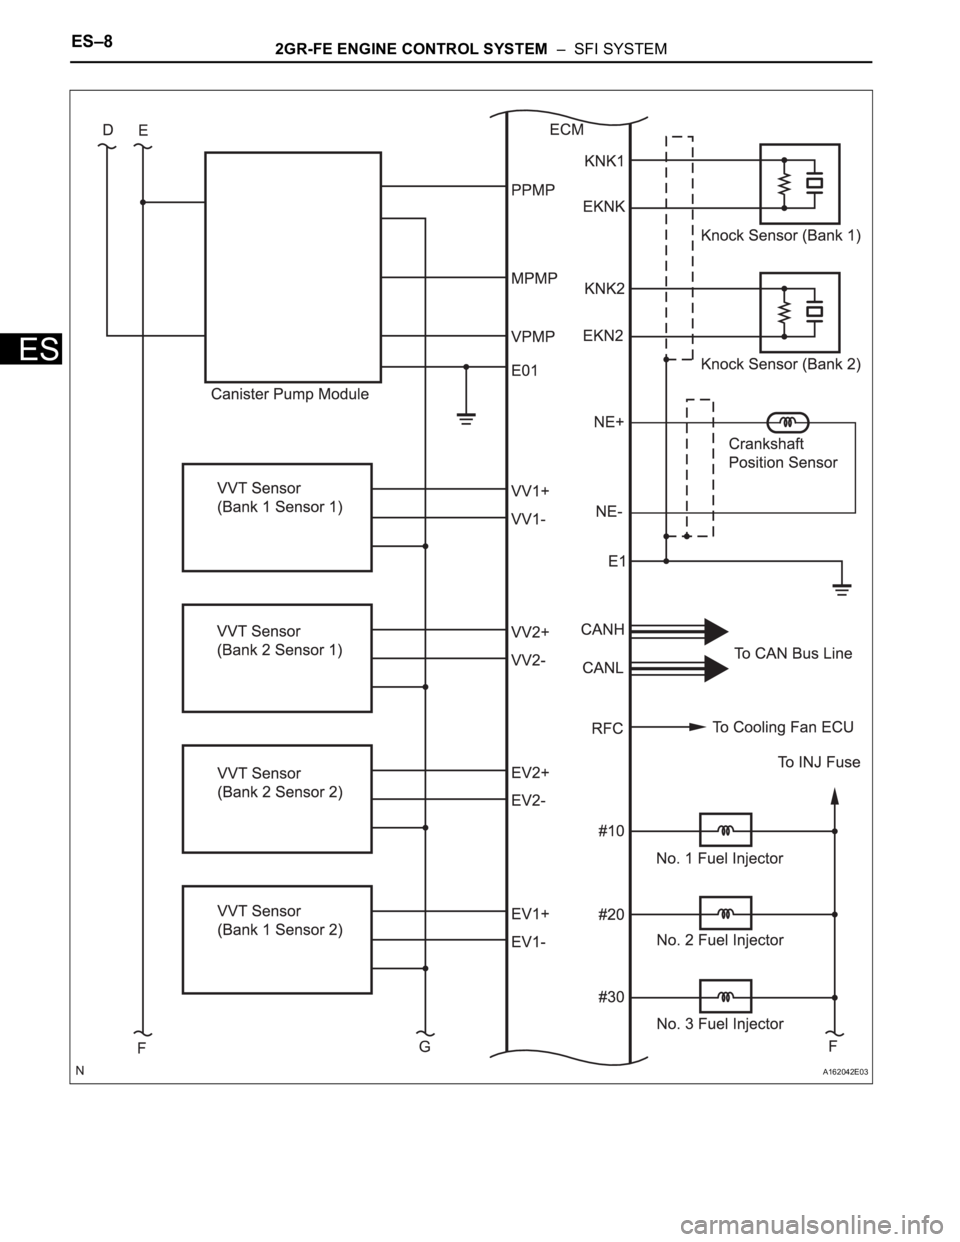
A162042E03
Trending: wheel bolt torque, spare wheel, change key battery, engine, drain bolt, Drum brake, wiring
