ACURA NSX 1997 Service Repair Manual
Manufacturer: ACURA, Model Year: 1997, Model line: NSX, Model: ACURA NSX 1997Pages: 1503, PDF Size: 57.08 MB
Page 1081 of 1503
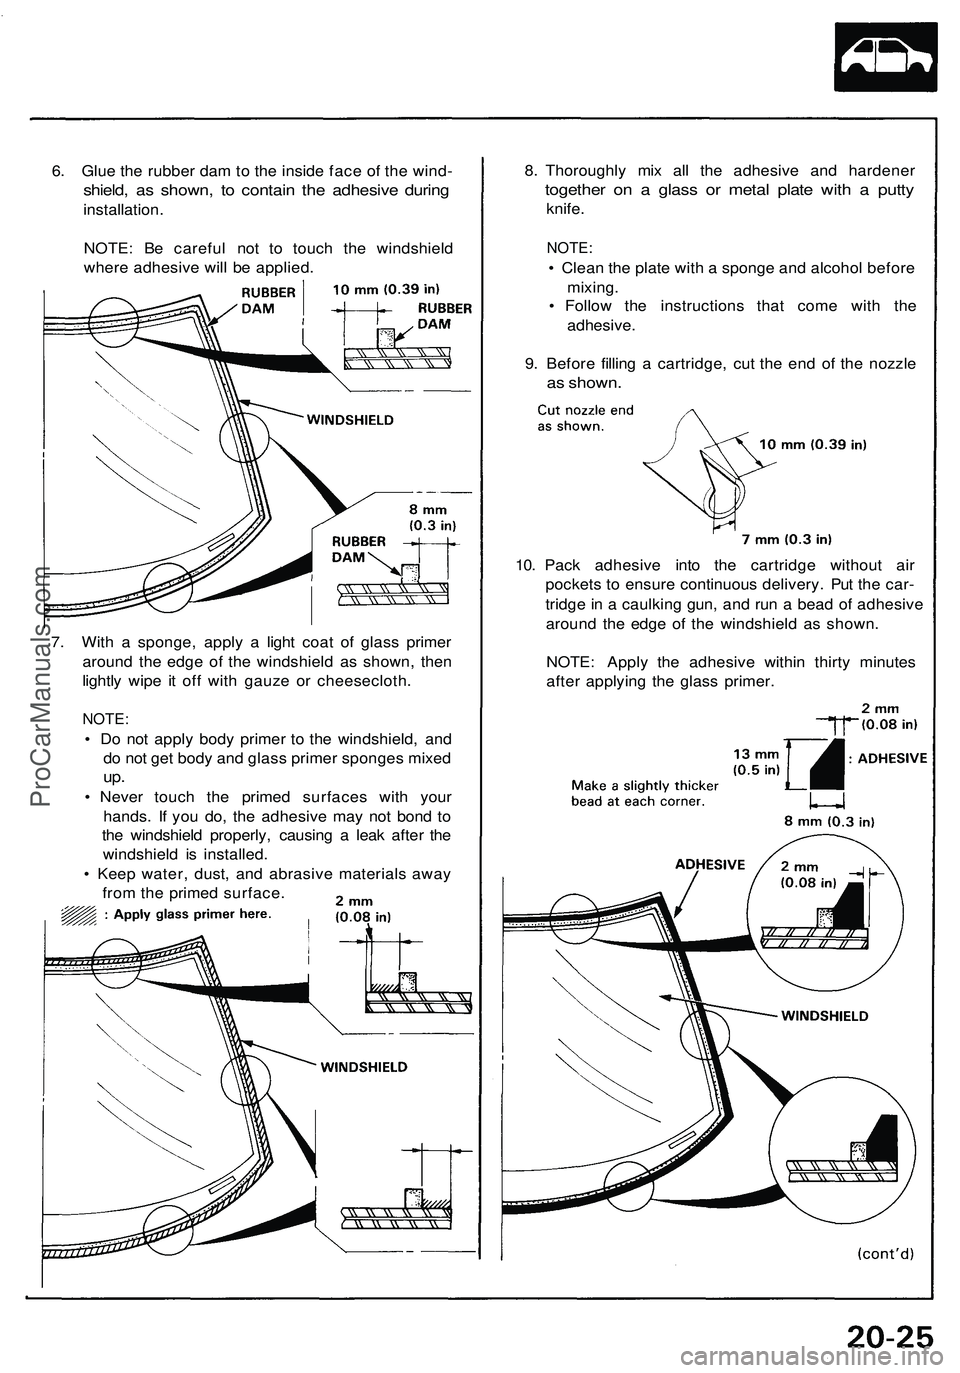
6. Glu e th e rubbe r da m to th e insid e fac e o f th e wind -
shield, a s shown , t o contai n th e adhesiv e durin g
installation .
NOTE : B e carefu l no t t o touc h th e windshiel d
wher e adhesiv e wil l b e applied .
7 . Wit h a sponge , appl y a ligh t coa t o f glas s prime r
aroun d th e edg e o f th e windshiel d a s shown , the n
lightl y wip e i t of f wit h gauz e o r cheesecloth .
NOTE:
• D o no t appl y bod y prime r t o th e windshield , an d
d o no t ge t bod y an d glas s prime r sponge s mixe d
up.
• Neve r touc h th e prime d surface s wit h you r
hands . I f yo u do , th e adhesiv e ma y no t bon d t o
th e windshiel d properly , causin g a lea k afte r th e
windshiel d i s installed .
• Kee p water , dust , an d abrasiv e material s awa y
fro m th e prime d surface . 8
. Thoroughl y mi x al l th e adhesiv e an d hardene r
together o n a glas s o r meta l plat e wit h a putt y
knife .
NOTE :
• Clea n th e plat e wit h a spong e an d alcoho l befor e
mixing .
• Follo w th e instruction s tha t com e wit h th e
adhesive .
9. Befor e fillin g a cartridge , cu t th e en d of the nozzl e
as shown .
10. Pac k adhesiv e int o th e cartridg e withou t ai r
pocket s t o ensur e continuou s delivery . Pu t th e car -
tridg e in a caulkin g gun , an d ru n a bea d o f adhesiv e
aroun d th e edg e of the windshiel d a s shown .
NOTE : Appl y th e adhesiv e withi n thirt y minute s
afte r applyin g th e glas s primer .
ProCarManuals.com
Page 1082 of 1503
Windshield
Installation (cont'd )
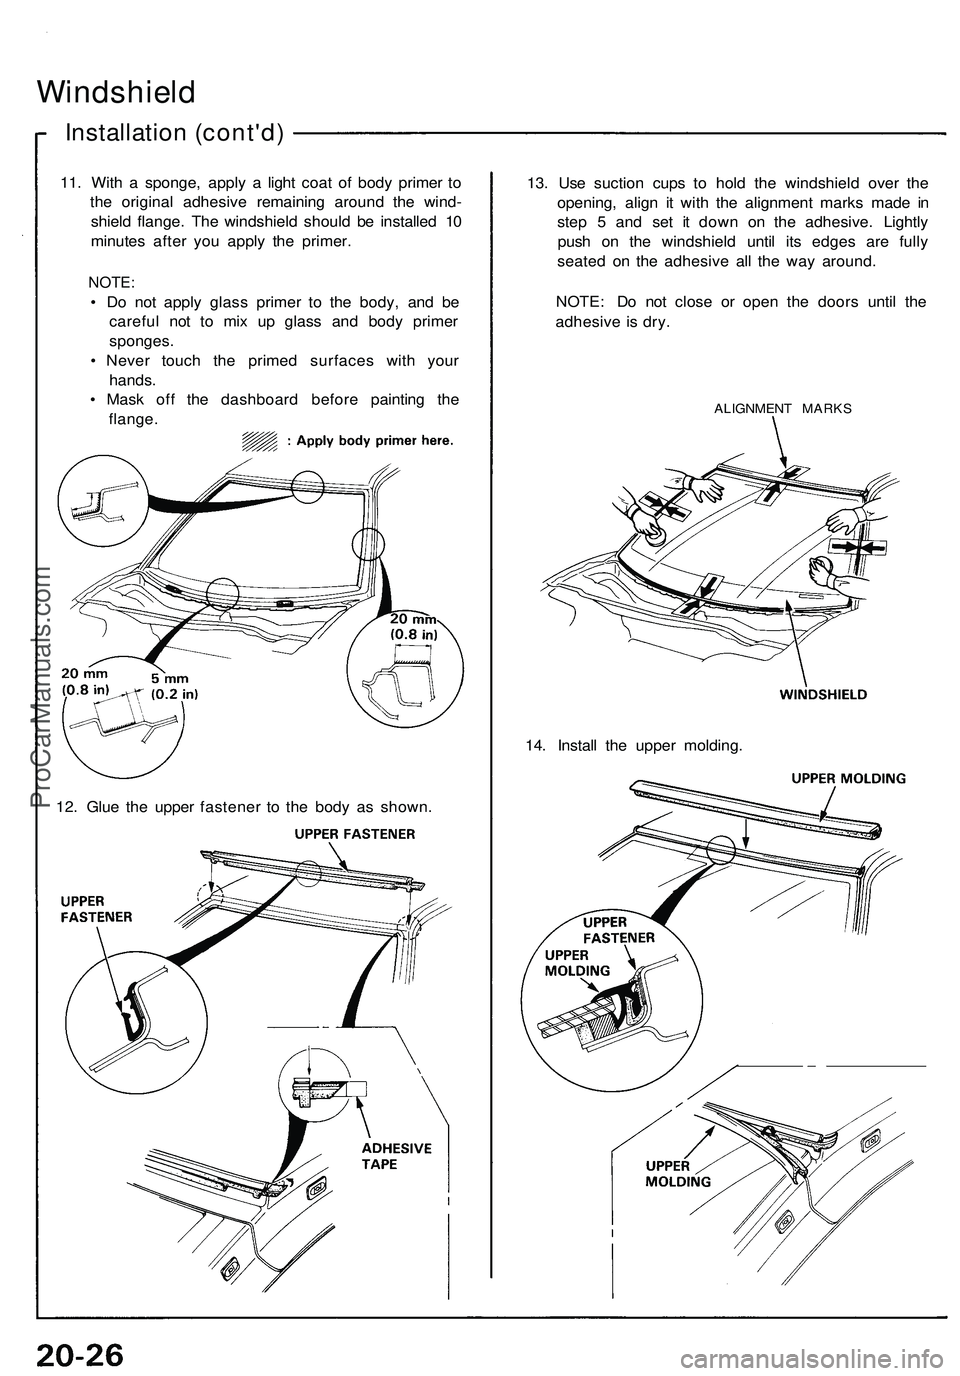
11. Wit h a sponge , appl y a ligh t coa t o f bod y prime r t o
th e origina l adhesiv e remainin g aroun d th e wind -
shiel d flange . Th e windshiel d shoul d b e installe d 1 0
minute s afte r yo u appl y th e primer .
NOTE:
• D o no t appl y glas s prime r t o th e body , an d b e
carefu l no t t o mi x u p glas s an d bod y prime r
sponges .
• Neve r touc h th e prime d surface s wit h you r
hands .
• Mas k of f th e dashboar d befor e paintin g th e
flange .
12 . Glu e th e uppe r fastene r t o th e bod y a s shown . 13
. Us e suctio n cup s t o hol d th e windshiel d ove r th e
opening , alig n i t wit h th e alignmen t mark s mad e i n
ste p 5 an d se t i t dow n o n th e adhesive . Lightl y
pus h o n th e windshiel d unti l it s edge s ar e full y
seate d o n th e adhesiv e al l th e wa y around .
NOTE : D o no t clos e o r ope n th e door s unti l th e
adhesiv e i s dry .
ALIGNMEN T MARK S
14. Instal l th e uppe r molding .
ProCarManuals.com
Page 1083 of 1503
15. Let the adhesive dry for at least one hour, then
spray water over the windshield and check for
leaks. Mark leaking areas and let the windshield
dry, then seal with urethane windshield adhesive.
NOTE:
• Let the car stand for at least four hours after
windshield installation. If the car has to be used
within the first four hours, it must be driven
slowly.
• Keep the windshield dry within the first hour
after installation.
• Check that the ends of the front pillar retainer
are set under the air scoop.
16. Reassemble all removed parts.ProCarManuals.com
Page 1084 of 1503
Rear Windo w
Remova l
CAUTION :
• Wea r glove s t o remov e an d instal l th e rea r window .
• Sinc e th e rea r windo w is doubl e glaze d glas s wit h th e
inne r glas s (interior-side ) large r tha n th e oute r glass ,
car e shoul d b e take n no t t o damag e th e edg e o f th e
inne r glas s whe n removin g th e oute r glass .
1. T o remov e th e rea r window , firs t remove :
• Seat s (se e pag e 20-39 )
• Cente r pilla r tri m pane l (se e pag e 20-38 )
• Rea r uppe r tri m pane l (se e pag e 20-38 )
• Rea r hatc h assembl y (se e pag e 20-64 )
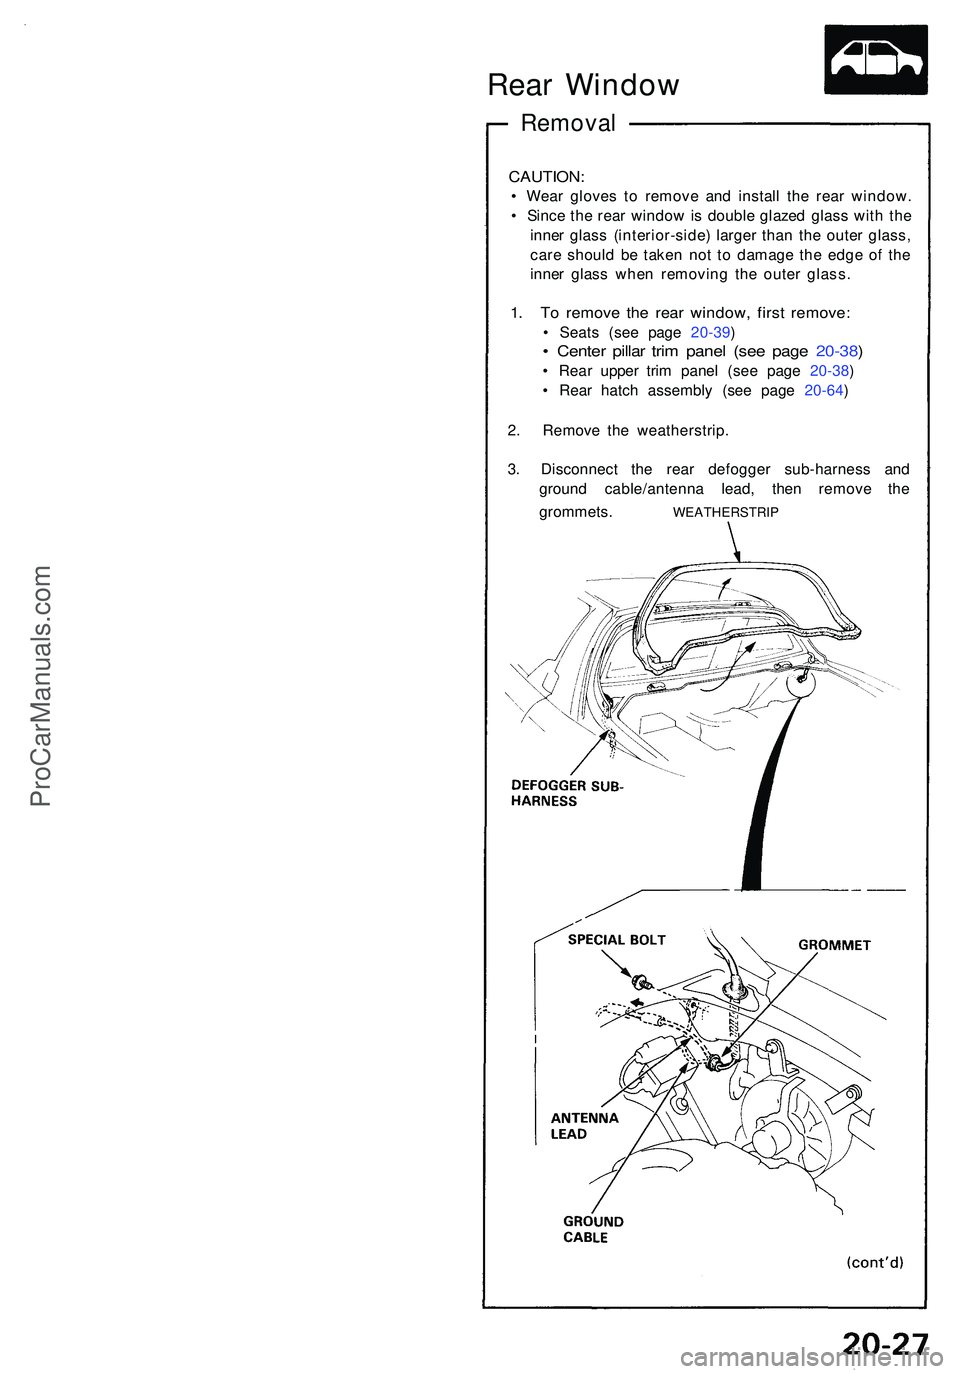
2 . Remov e th e weatherstrip .
3 . Disconnec t th e rea r defogge r sub-harnes s an d
groun d cable/antenn a lead , the n remov e th e
grommets .
WEATHERSTRI P
ProCarManuals.com
Page 1085 of 1503
Rear Windo w
Remova l (cont'd )
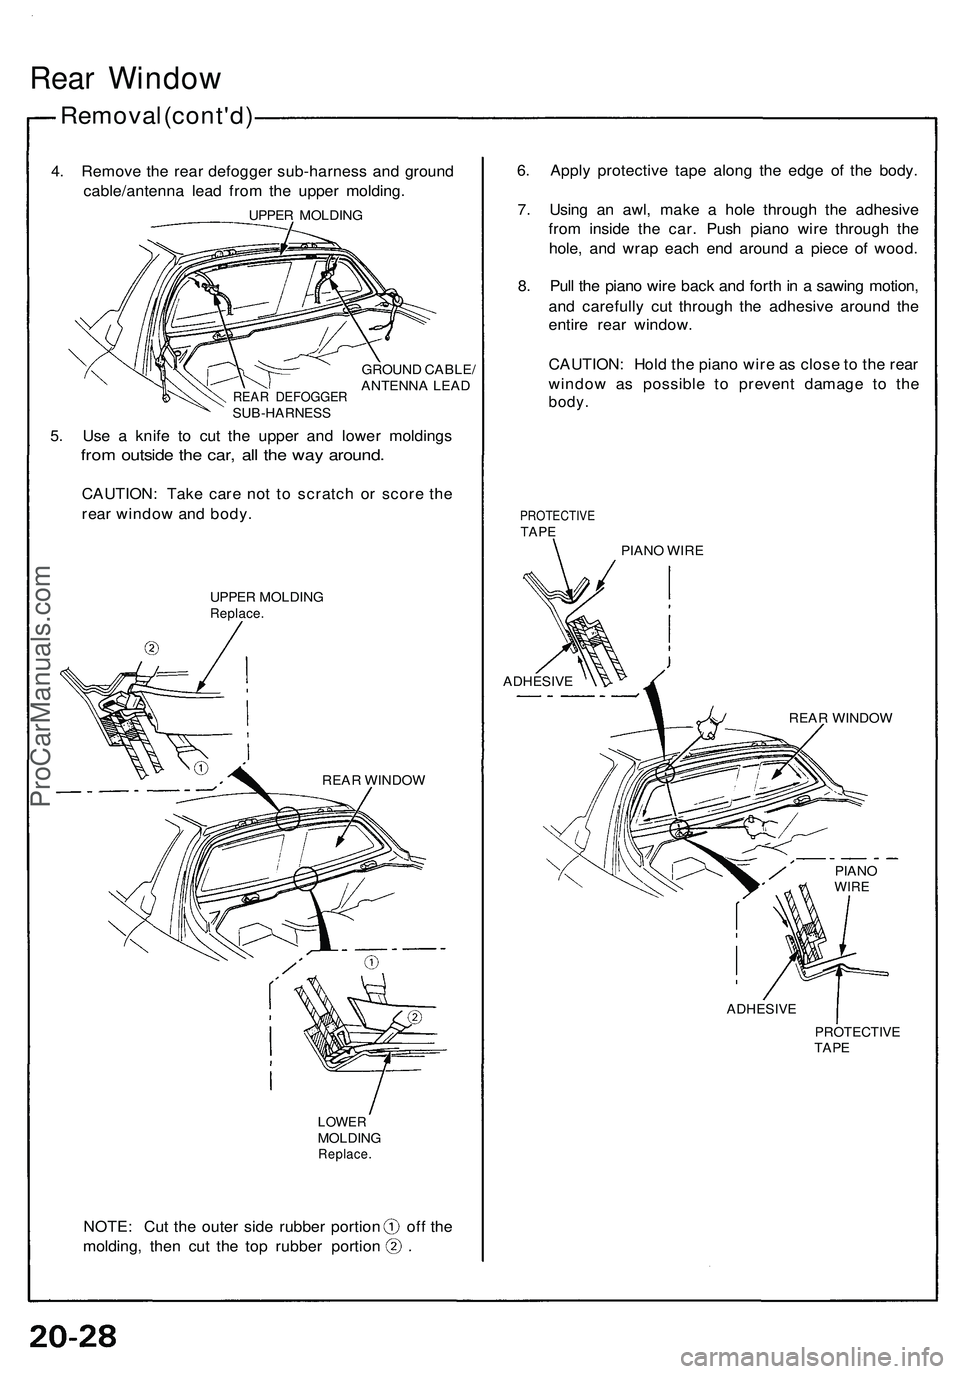
4. Remov e th e rea r defogge r sub-harnes s an d groun d
cable/antenn a lea d fro m th e uppe r molding .
REAR DEFOGGE RSUB-HARNES S
GROUND CABLE /
ANTENN A LEA D
5. Us e a knif e t o cu t th e uppe r an d lowe r molding s
from outsid e th e car , al l th e wa y around .
CAUTION : Tak e car e no t t o scratc h o r scor e th e
rea r windo w an d body .
UPPER MOLDIN GReplace.
REAR WINDO W
LOWERMOLDIN GReplace .
NOTE: Cu t th e oute r sid e rubber portion of f th e
molding , the n cu t th e to p rubbe r portio n 6
. Appl y protectiv e tap e alon g th e edg e of the body .
7 . Usin g a n awl , mak e a hol e throug h th e adhesiv e
fro m insid e th e car . Pus h pian o wir e throug h th e
hole , an d wra p eac h en d aroun d a piec e o f wood .
8 . Pul l th e pian o wir e bac k an d fort h in a sawin g motion ,
an d carefull y cu t throug h th e adhesiv e aroun d th e
entir e rea r window .
CAUTION : Hol d th e pian o wir e a s clos e t o th e rea r
windo w a s possibl e t o preven t damag e t o th e
body .
PROTECTIVETAPE
PIAN O WIR E
ADHESIV E
REAR WINDO W
ADHESIV E
PROTECTIV ETAPE
PIAN OWIRE
UPPE R MOLDIN G
ProCarManuals.com
Page 1086 of 1503
Installation
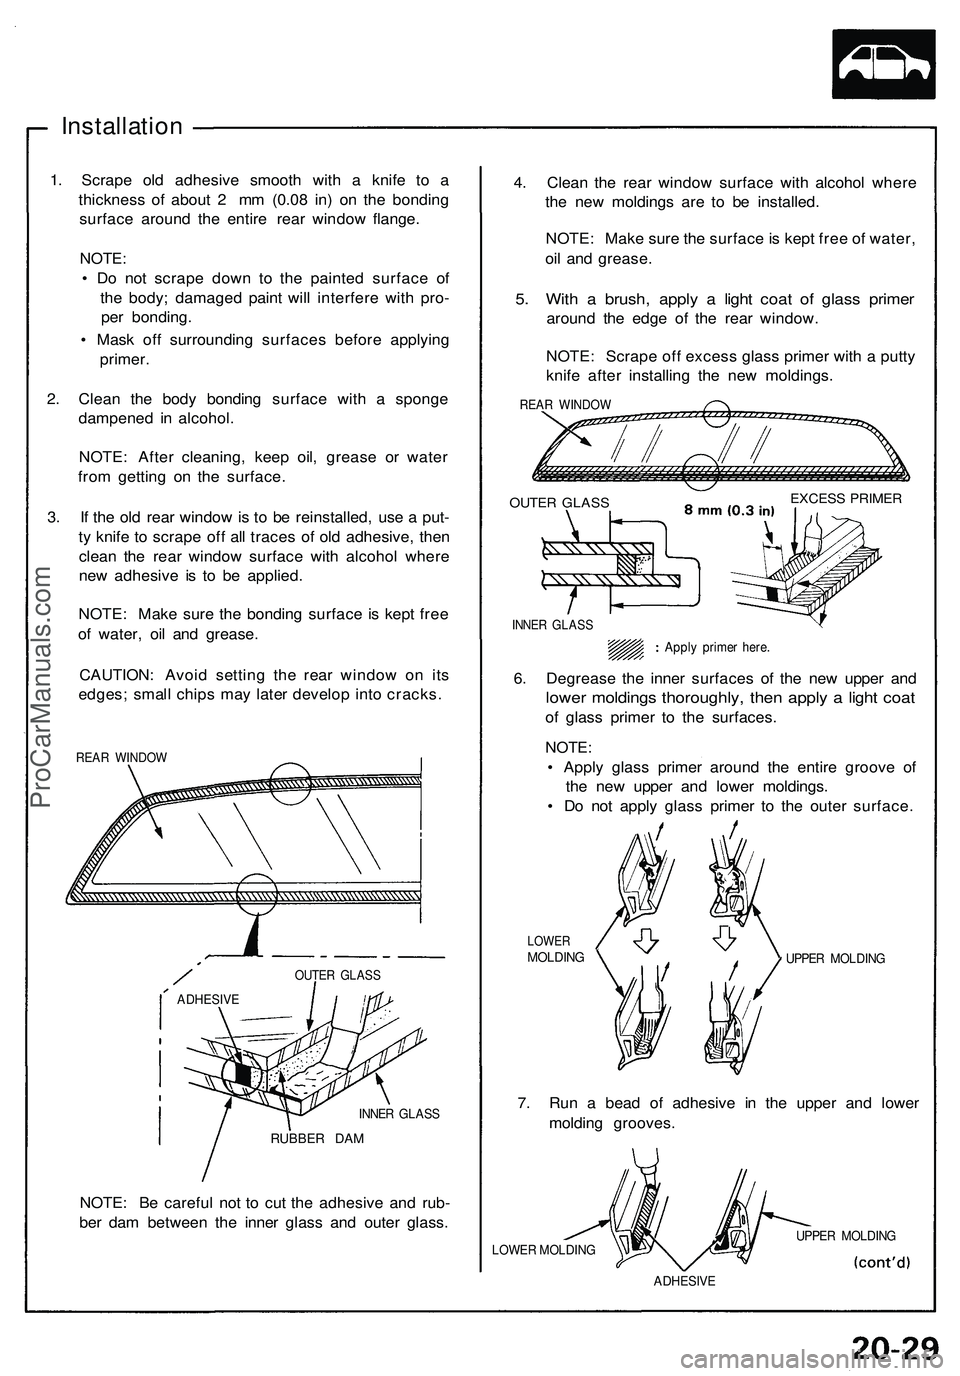
1. Scrap e ol d adhesiv e smoot h wit h a knif e t o a
thicknes s of abou t 2 m m (0.0 8 in ) o n th e bondin g
surfac e aroun d th e entir e rea r windo w flange .
NOTE:
• D o no t scrap e dow n t o th e painte d surfac e o f
th e body ; damage d pain t wil l interfer e wit h pro -
pe r bonding .
• Mas k of f surroundin g surface s befor e applyin g
primer .
2 . Clea n th e bod y bondin g surfac e wit h a spong e
dampene d i n alcohol .
NOTE : Afte r cleaning , kee p oil , greas e o r wate r
fro m gettin g o n th e surface .
3 . I f th e ol d rea r windo w is t o b e reinstalled , us e a put -
t y knif e t o scrap e of f al l trace s o f ol d adhesive , the n
clea n th e rea r windo w surfac e with alcoho l wher e
ne w adhesiv e i s t o b e applied .
NOTE : Mak e sur e th e bondin g surfac e is kep t fre e
o f water , oi l an d grease .
CAUTION : Avoi d settin g th e rea r windo w o n it s
edges ; smal l chip s ma y late r develo p int o cracks .
REAR WINDO W
INNER GLAS S
RUBBE R DA M
NOTE : B e carefu l no t t o cu t th e adhesiv e an d rub -
be r da m betwee n th e inne r glas s an d oute r glass . 4
. Clea n th e rea r windo w surfac e wit h alcoho l wher e
th e ne w molding s ar e t o b e installed .
NOTE : Mak e sur e th e surfac e is kep t fre e o f water ,
oi l an d grease .
5. Wit h a brush , appl y a ligh t coa t of glas s prime r
around th e edg e of the rea r window .
NOTE : Scrap e of f exces s glas s primer with a putt y
knif e afte r installin g th e ne w moldings .
REAR WINDO W
OUTER GLAS S
LOWERMOLDIN G UPPER MOLDIN G
7. Ru n a bea d of adhesiv e i n th e uppe r an d lowe r
moldin g grooves .
LOWER MOLDINGUPPER MOLDIN G
ADHESIV E
ADHESIV E
OUTER GLAS S
EXCES S PRIME R
INNER GLAS S
6. Degreas e th e inne r surface s of the ne w uppe r an d
lowe r molding s thoroughly , the n appl y a ligh t coa t
of glas s prime r t o th e surfaces .
NOTE:
• Appl y glas s prime r aroun d th e entir e groov e of
th e ne w uppe r an d lowe r moldings .
• D o no t appl y glas s prime r t o th e oute r surface .
Apply prime r here .
ProCarManuals.com
Page 1087 of 1503
Rear Windo w
Installatio n (cont'd )
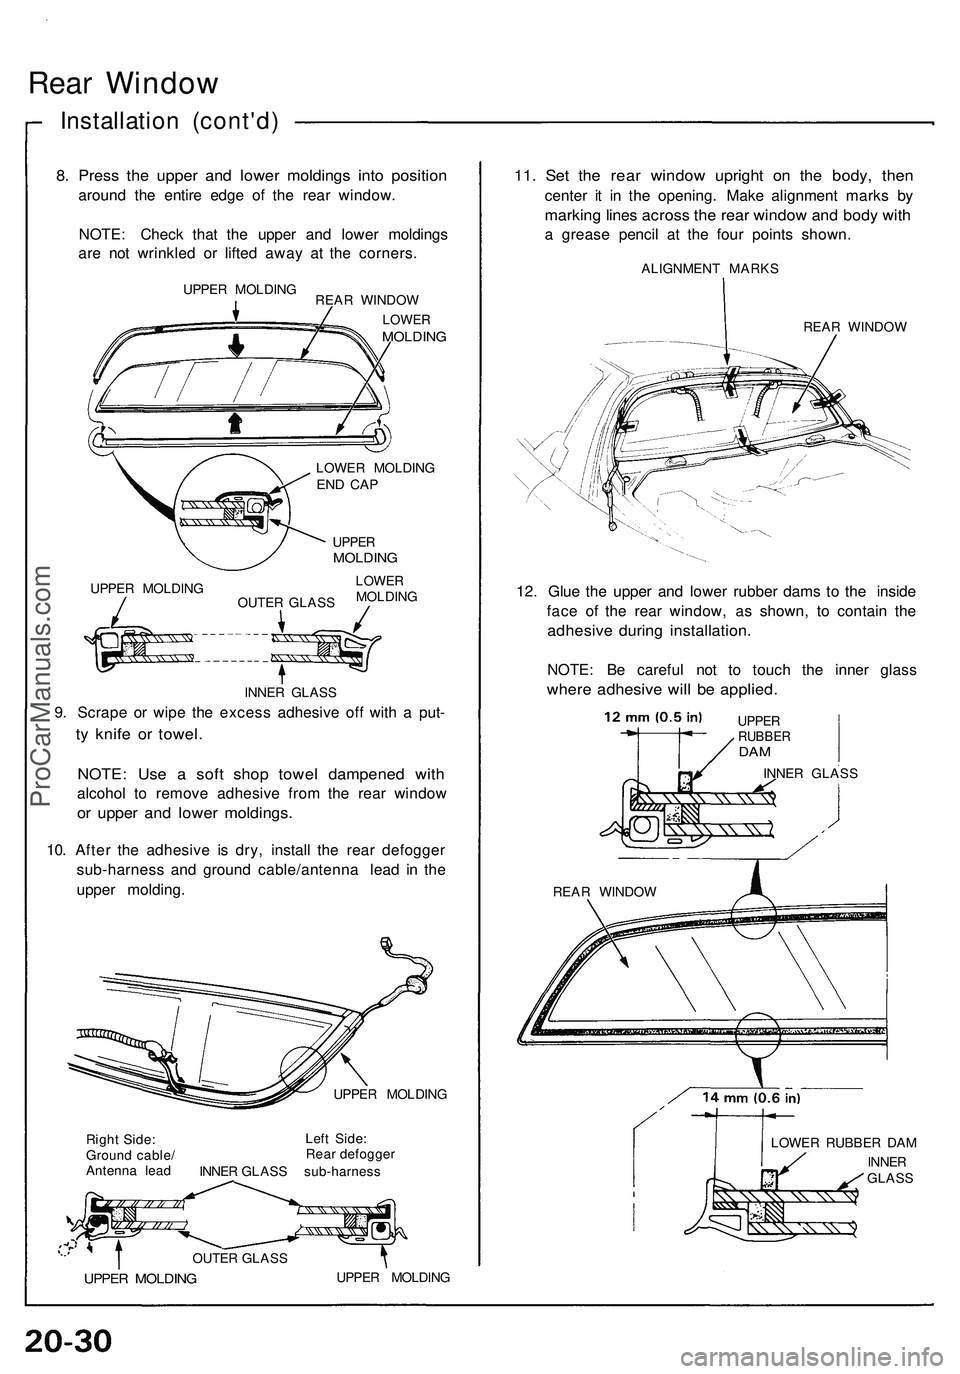
8. Pres s th e uppe r an d lowe r molding s int o positio n
around th e entir e edg e o f th e rea r window .
NOTE : Chec k tha t th e uppe r an d lowe r molding s
ar e no t wrinkle d o r lifte d awa y a t th e corners .
UPPER MOLDIN G
REAR WINDO W
LOWERMOLDIN G
UPPER MOLDIN G LOWE
R MOLDIN G
END CA P
INNE R GLAS S
9. Scrap e o r wip e th e exces s adhesiv e of f wit h a put -
ty knif e o r towel .
NOTE : Us e a sof t sho p towe l dampene d wit h
alcoho l t o remov e adhesiv e fro m th e rea r windo w
or uppe r an d lowe r moldings .
10. Afte r th e adhesiv e i s dry , instal l th e rea r defogge r
sub-harnes s an d groun d cable/antenn a lea d i n th e
uppe r molding .
UPPER MOLDIN G
Righ t Side :
Groun d cable /
Antenn a lea d Lef
t Side :
Rea r defogge r
INNE R GLAS S sub-harnes s
OUTER GLAS S
UPPER MOLDIN G UPPE R MOLDIN G
11. Se t th e rea r windo w uprigh t o n th e body , the n
cente r i t i n th e opening . Mak e alignmen t mark s b y
markin g line s acros s th e rea r windo w an d bod y wit h
a greas e penci l a t th e fou r point s shown .
ALIGNMEN T MARK S
REAR WINDO W
12. Glu e th e uppe r an d lowe r rubbe r dam s t o th e insid e
fac e o f th e rea r window , a s shown , t o contai n th e
adhesiv e durin g installation .
NOTE: B e carefu l no t t o touc h th e inne r glas s
where adhesiv e wil l b e applied .
UPPERMOLDIN G
LOWERMOLDIN G
OUTE R GLAS S
LOWER RUBBE R DA M
INNE R
GLAS S
REA
R WINDO W INNE
R GLAS S
UPPERRUBBE RDAM
ProCarManuals.com
Page 1088 of 1503
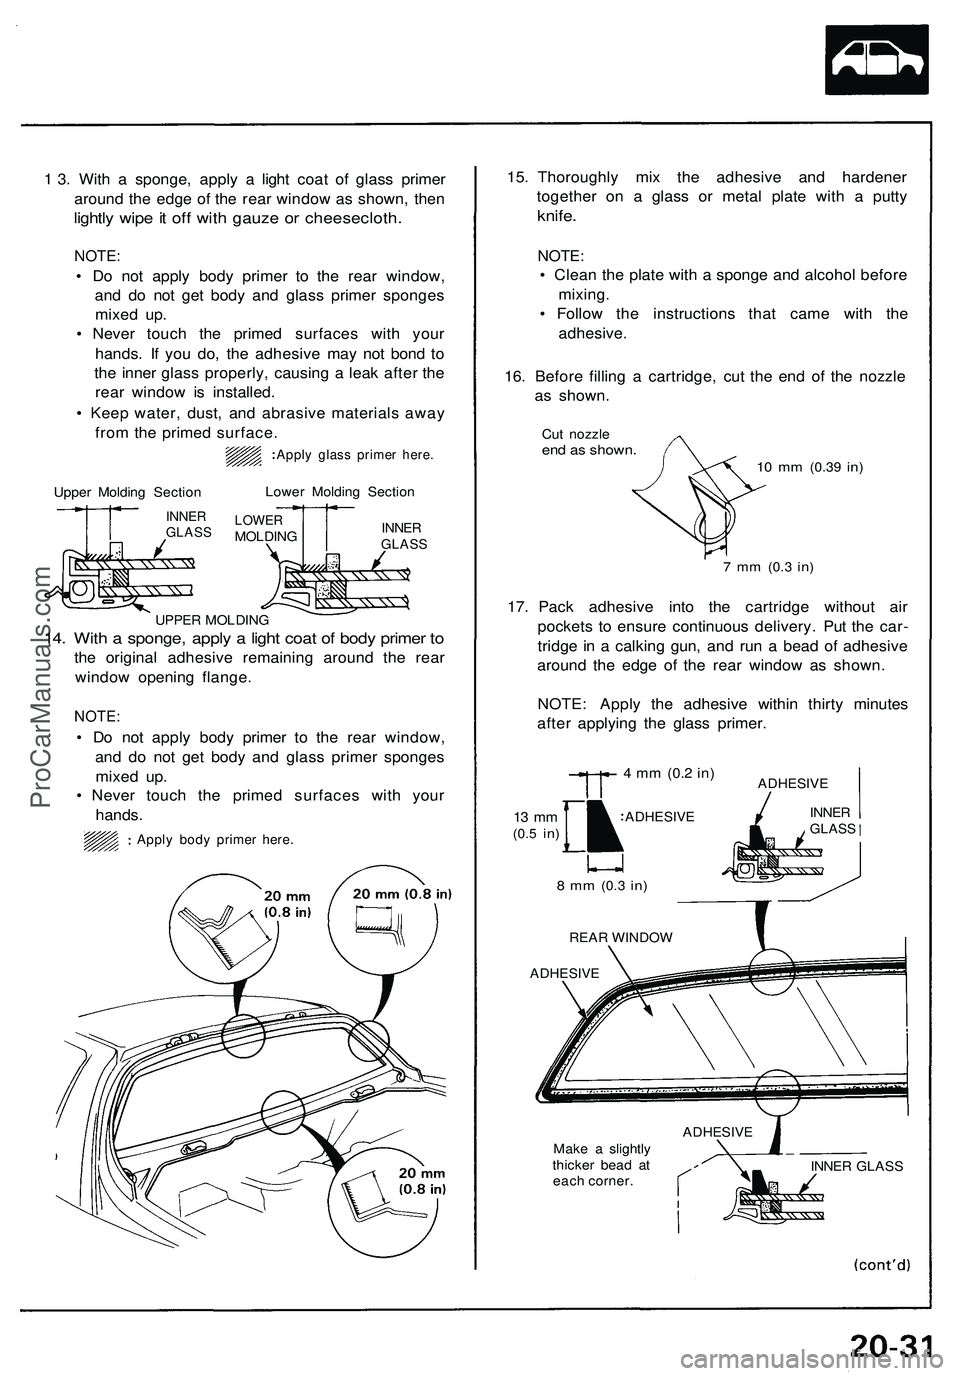
1 3. With a sponge, apply a light coat of glass primer
around the edge of the rear window as shown, then
lightly wipe it off with gauze or cheesecloth.
NOTE:
• Do not apply body primer to the rear window,
and do not get body and glass primer sponges
mixed up.
• Never touch the primed surfaces with your
hands. If you do, the adhesive may not bond to
the inner glass properly, causing a leak after the
rear window is installed.
• Keep water, dust, and abrasive materials away
from the primed surface.
Upper Molding Section
INNER
GLASS
Lower Molding Section
LOWER
MOLDING
INNER
GLASS
UPPER MOLDING
14. With a sponge, apply a light coat of body primer to
the original adhesive remaining around the rear
window opening flange.
NOTE:
• Do not apply body primer to the rear window,
and do not get body and glass primer sponges
mixed up.
• Never touch the primed surfaces with your
hands.
15. Thoroughly mix the adhesive and hardener
together on a glass or metal plate with a putty
knife.
NOTE:
• Clean the plate with a sponge and alcohol before
mixing.
• Follow the instructions that came with the
adhesive.
16. Before filling a cartridge, cut the end of the nozzle
as shown.
Cut nozzle
end as shown.
10 mm
(0.39
in)
7 mm
(0.3
in)
17. Pack adhesive into the cartridge without air
pockets to ensure continuous delivery. Put the car-
tridge in a calking gun, and run a bead of adhesive
around the edge of the rear window as shown.
NOTE: Apply the adhesive within thirty minutes
after applying the glass primer.
13 mm
(0.5
in)
4 mm
(0.2
in)
ADHESIVE
ADHESIVE
8 mm
(0.3
in)
REAR WINDOW
ADHESIVE
Make a slightly
thicker bead at
each corner.
INNER GLASS
Apply glass primer here.
Apply body primer here.
ADHESIVE
INNER
GLASSProCarManuals.com
Page 1089 of 1503
Rear Window
Installation (cont'd)
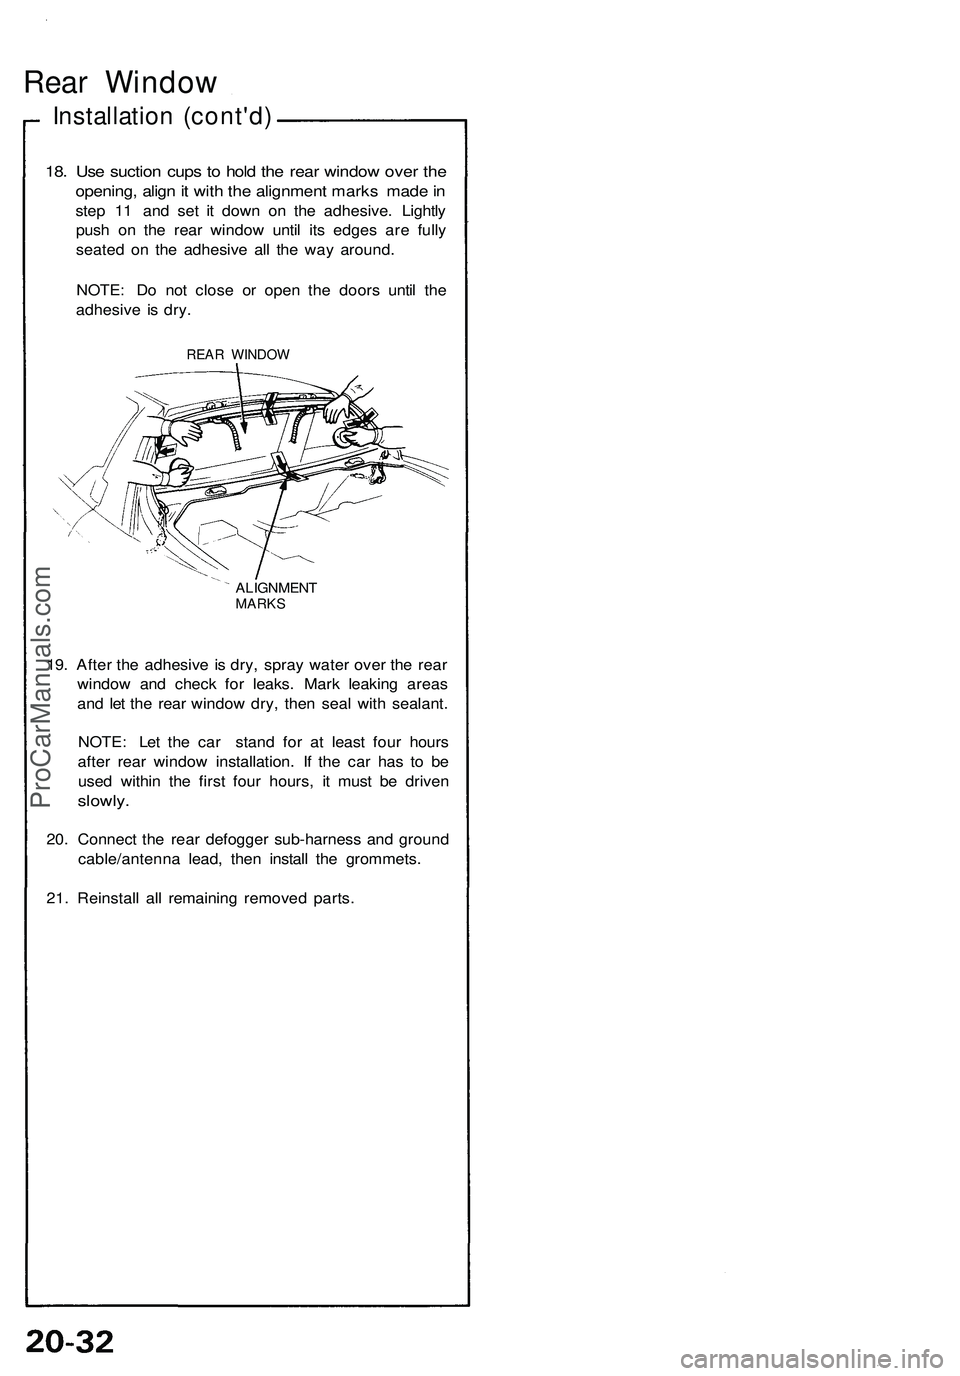
18. Use suction cups to hold the rear window over the
opening, align it with the alignment marks made in
step 11 and set it down on the adhesive. Lightly
push on the rear window until its edges are fully
seated on the adhesive all the way around.
NOTE: Do not close or open the doors until the
adhesive is dry.
REAR WINDOW
ALIGNMENT
MARKS
19. After the adhesive is dry, spray water over the rear
window and check for leaks. Mark leaking areas
and let the rear window dry, then seal with sealant.
NOTE: Let the car stand for at least four hours
after rear window installation. If the car has to be
used within the first four hours, it must be driven
slowly.
20. Connect the rear defogger sub-harness and ground
cable/antenna lead, then install the grommets.
21. Reinstall all remaining removed parts.ProCarManuals.com
Page 1090 of 1503
Rear Hatc h Glas s
Remova l
CAUTION :
• Us e cover s t o avoi d damagin g th e body .
• Wea r glove s t o remov e an d instal l th e glass .
• D o no t damag e th e defroste r gri d lines .
• Tak e car e no t scratc h o r scor e th e molding .
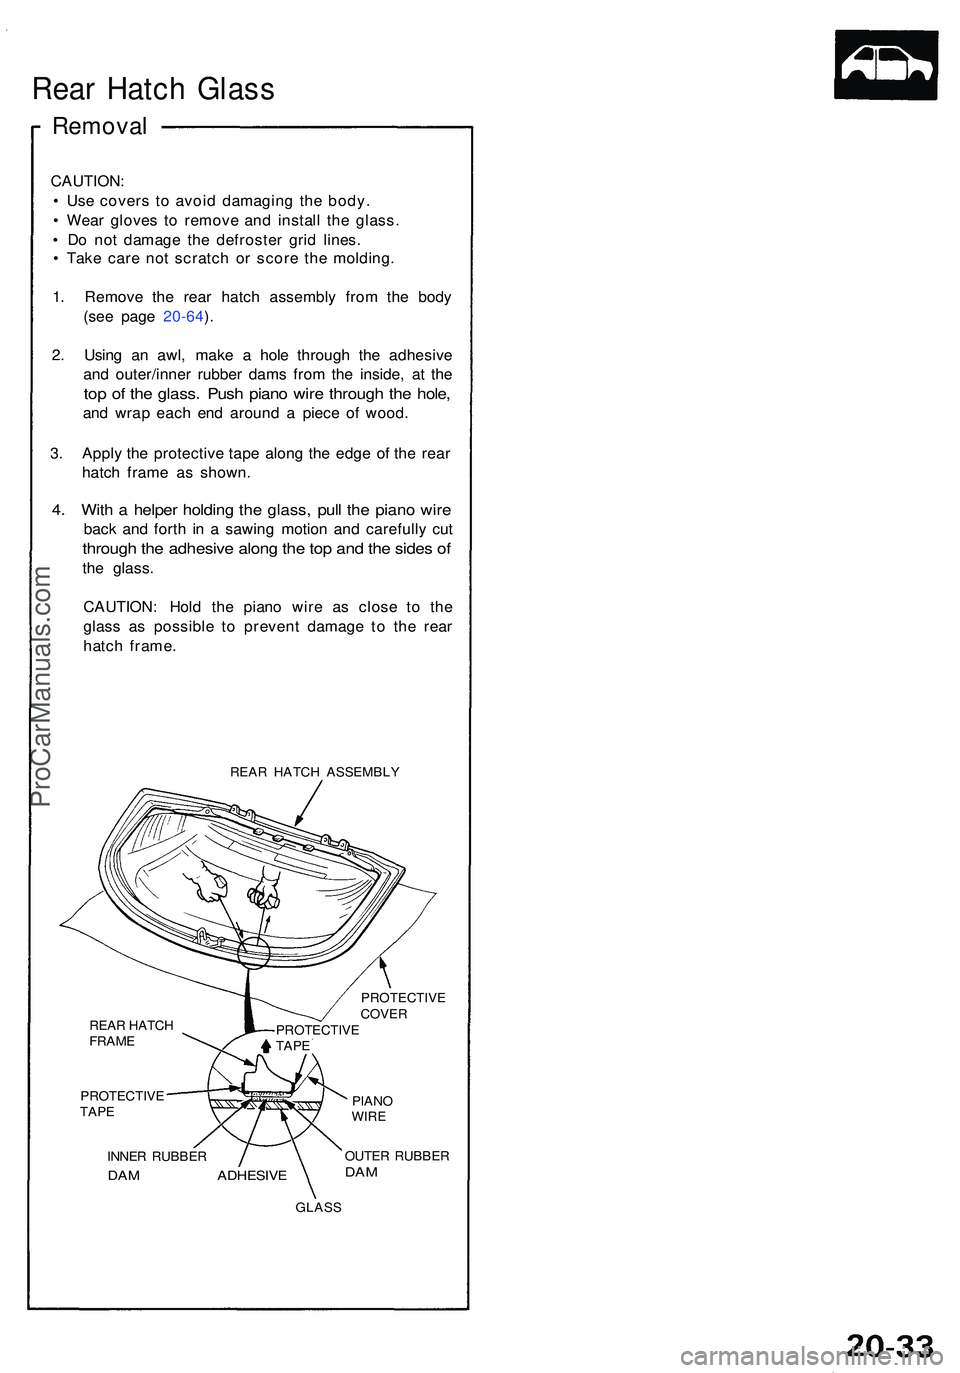
1 . Remov e th e rea r hatc h assembl y fro m th e bod y
(se e pag e 20-64 ).
2 . Usin g a n awl , mak e a hol e throug h th e adhesiv e
an d outer/inne r rubbe r dam s fro m th e inside , a t th e
top o f th e glass . Pus h pian o wir e throug h th e hole ,
and wra p eac h en d aroun d a piec e o f wood .
3 . Appl y th e protectiv e tap e alon g th e edg e o f th e rea r
hatc h fram e a s shown .
4. Wit h a helpe r holdin g th e glass , pul l th e pian o wir e
back an d fort h i n a sawin g motio n an d carefull y cu t
throug h th e adhesiv e alon g th e to p an d th e side s o f
th e glass .
CAUTION : Hol d th e pian o wir e a s clos e t o th e
glas s a s possibl e t o preven t damag e t o th e rea r
hatc h frame .
REAR HATC H ASSEMBL Y
REA R HATC H
FRAM E
PROTECTIV E
TAP E
INNE R RUBBE R
DAM ADHESIV E
PIANOWIRE
OUTE R RUBBE RDAM
GLAS SPROTECTIV
E
COVERPROTECTIV E
TAP E
ProCarManuals.com