ACURA NSX 1997 Service Repair Manual
Manufacturer: ACURA, Model Year: 1997, Model line: NSX, Model: ACURA NSX 1997Pages: 1503, PDF Size: 57.08 MB
Page 1091 of 1503
Rear Hatc h Glas s
Installatio n
NOTE:
• D o no t scrap e dow n t o th e painte d surfac e of the
hatc h frame ; damage d pain t wil l interfer e wit h pro -
per bonding .
• Mas k of f surroundin g surface s befor e painting .
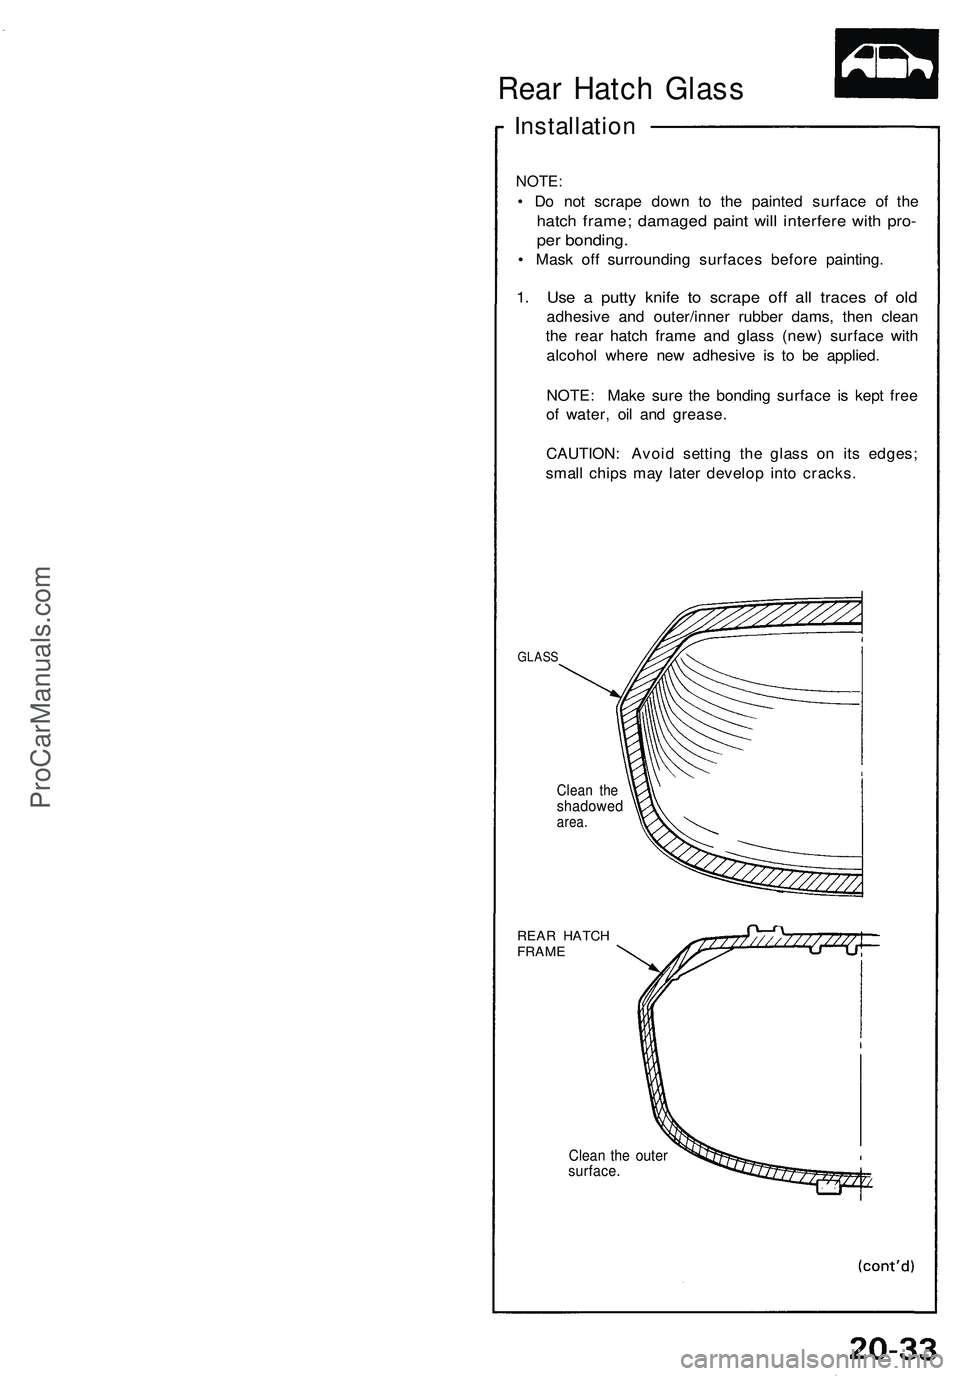
1. Us e a putt y knif e t o scrap e of f al l trace s of old
adhesiv e an d outer/inne r rubbe r dams , the n clea n
th e rea r hatc h fram e an d glas s (new ) surfac e wit h
alcoho l wher e ne w adhesiv e i s t o b e applied .
NOTE : Mak e sur e th e bondin g surfac e i s kep t fre e
o f water , oi l an d grease .
CAUTION : Avoi d settin g th e glas s o n it s edges ;
smal l chip s ma y late r develop into cracks .
GLASS
REAR HATC H
FRAM E
Clean th e oute rsurface .
Clean th eshadowe darea.
ProCarManuals.com
Page 1092 of 1503
Rear Hatc h Glas s
Installatio n (cont'd )
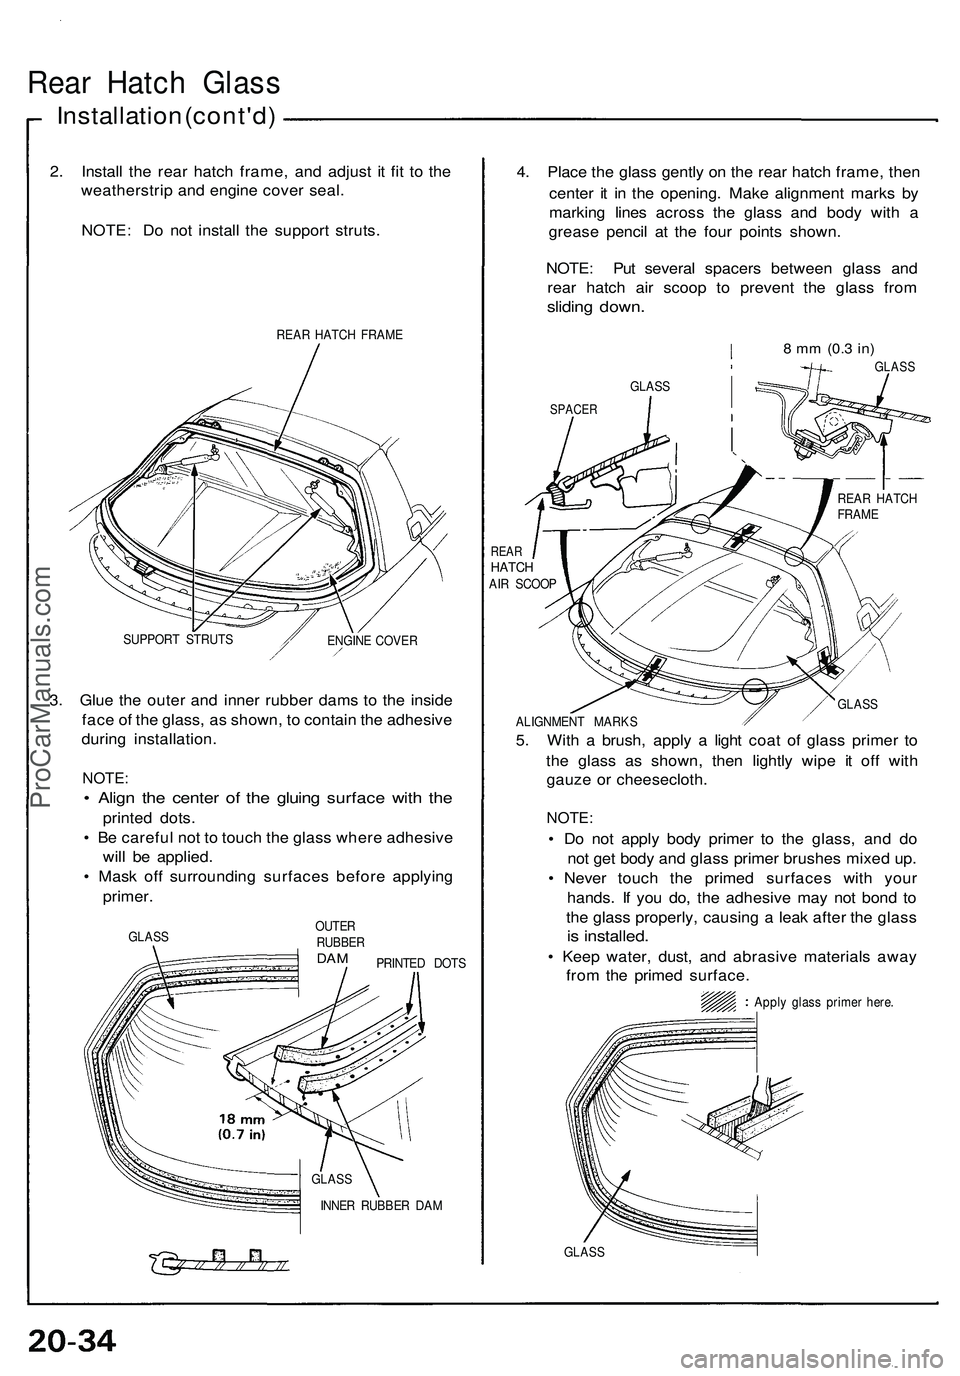
2. Instal l th e rea r hatc h frame , an d adjus t i t fi t t o th e
weatherstri p an d engin e cove r seal .
NOTE : D o no t instal l th e suppor t struts .
REAR HATC H FRAM E
SUPPOR T STRUT S
3. Glu e th e oute r an d inne r rubbe r dam s t o th e insid e
fac e o f th e glass , a s shown , t o contai n th e adhesiv e
durin g installation .
NOTE:
• Alig n th e cente r of the gluin g surfac e wit h th e
printe d dots .
• B e carefu l no t t o touc h th e glas s wher e adhesiv e
wil l b e applied .
• Mas k of f surroundin g surface s befor e applyin g
primer .
GLASS
OUTERRUBBE
RDAM
INNE R RUBBE R DA M
4. Plac e th e glas s gentl y o n th e rea r hatc h frame , the n
cente r i t i n th e opening . Mak e alignmen t mark s b y
markin g line s acros s th e glas s an d bod y wit h a
greas e penci l a t th e fou r point s shown .
NOTE : Pu t severa l spacer s betwee n glas s an d
rea r hatc h ai r scoo p t o preven t th e glas s fro m
slidin g down .
8 m m (0. 3 in)
GLAS S
SPACE R
REARHATC HAIR SCOO P
Apply glas s prime r here .
GLAS S
ENGIN
E COVE R
GLAS SPRINTE
D DOT S GLAS
S
ALIGNMEN T MARK S
5. Wit h a brush , appl y a ligh t coa t of glas s prime r t o
th e glas s a s shown , the n lightl y wip e i t of f wit h
gauz e o r cheesecloth .
NOTE:
• D o no t appl y bod y prime r t o th e glass , an d d o
no t ge t bod y an d glas s prime r brushe s mixe d up .
• Neve r touc h th e prime d surface s wit h you r
hands . I f yo u do , th e adhesiv e ma y no t bon d t o
th e glas s properly , causin g a lea k afte r th e glas s
is installed .
• Kee p water , dust , an d abrasiv e material s awa y
fro m th e prime d surface .
REAR HATC H
FRAM E
GLAS
S
ProCarManuals.com
Page 1093 of 1503
REAR HATCH
FRAME
INSIDE
7. Thoroughly mix the adhesive and hardener
together on a glass or metal plate.
NOTE:
• Clean the plate with a sponge and alcohol before
mixing.
• Follow the instructions that came with the
adhesive.
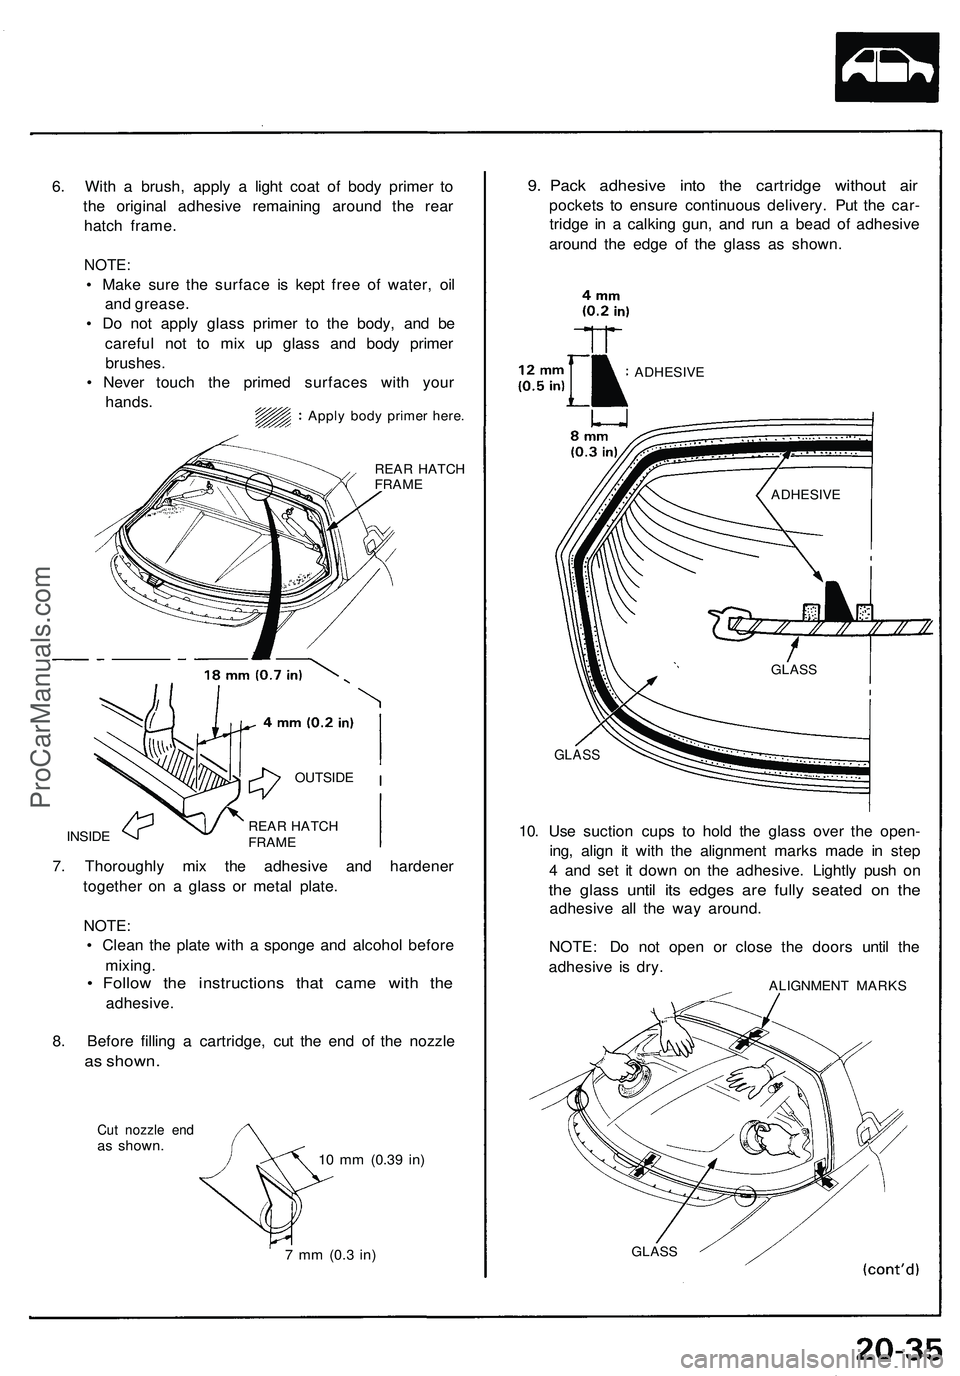
8. Before filling a cartridge, cut the end of the nozzle
as shown.
Cut nozzle end
as shown.
10 mm
(0.39
in)
7 mm
(0.3
in)
9. Pack adhesive into the cartridge without air
pockets to ensure continuous delivery. Put the car-
tridge in a calking gun, and run a bead of adhesive
around the edge of the glass as shown.
GLASS
10. Use suction cups to hold the glass over the open-
ing, align it with the alignment marks made in step
4 and set it down on the adhesive. Lightly push on
the glass until its edges are fully seated on the
adhesive all the way around.
NOTE: Do not open or close the doors until the
adhesive is dry.
ALIGNMENT MARKS
GLASS
6. With a brush, apply a light coat of body primer to
the original adhesive remaining around the rear
hatch frame.
NOTE:
• Make sure the surface is kept free of water, oil
and grease.
• Do not apply glass primer to the body, and be
careful not to mix up glass and body primer
brushes.
• Never touch the primed surfaces with your
hands.
Apply body primer here.
ADHESIVE
ADHESIVE
GLASS
REAR HATCH
FRAME
OUTSIDEProCarManuals.com
Page 1094 of 1503
Rear Hatch Glass
Installation (cont'd)
11. Scrape or wipe the excess adhesive off with a put-
ty knife or towel.
NOTE: Use a soft shop towel dampened with
alcohol to remove adhesive from a painted surface
or glass.
1 2. After the adhesive is dry, spray water over the
glass and check for leaks. Mark leaking areas and
let the glass dry, then seal with sealant.
NOTE: Let the car stand for at least four hours
after glass installation. If the car has to be used
within the first four hours, it must be driven slowly.
13. Remove the spacers.
14. Install the support struts.ProCarManuals.com
Page 1095 of 1503
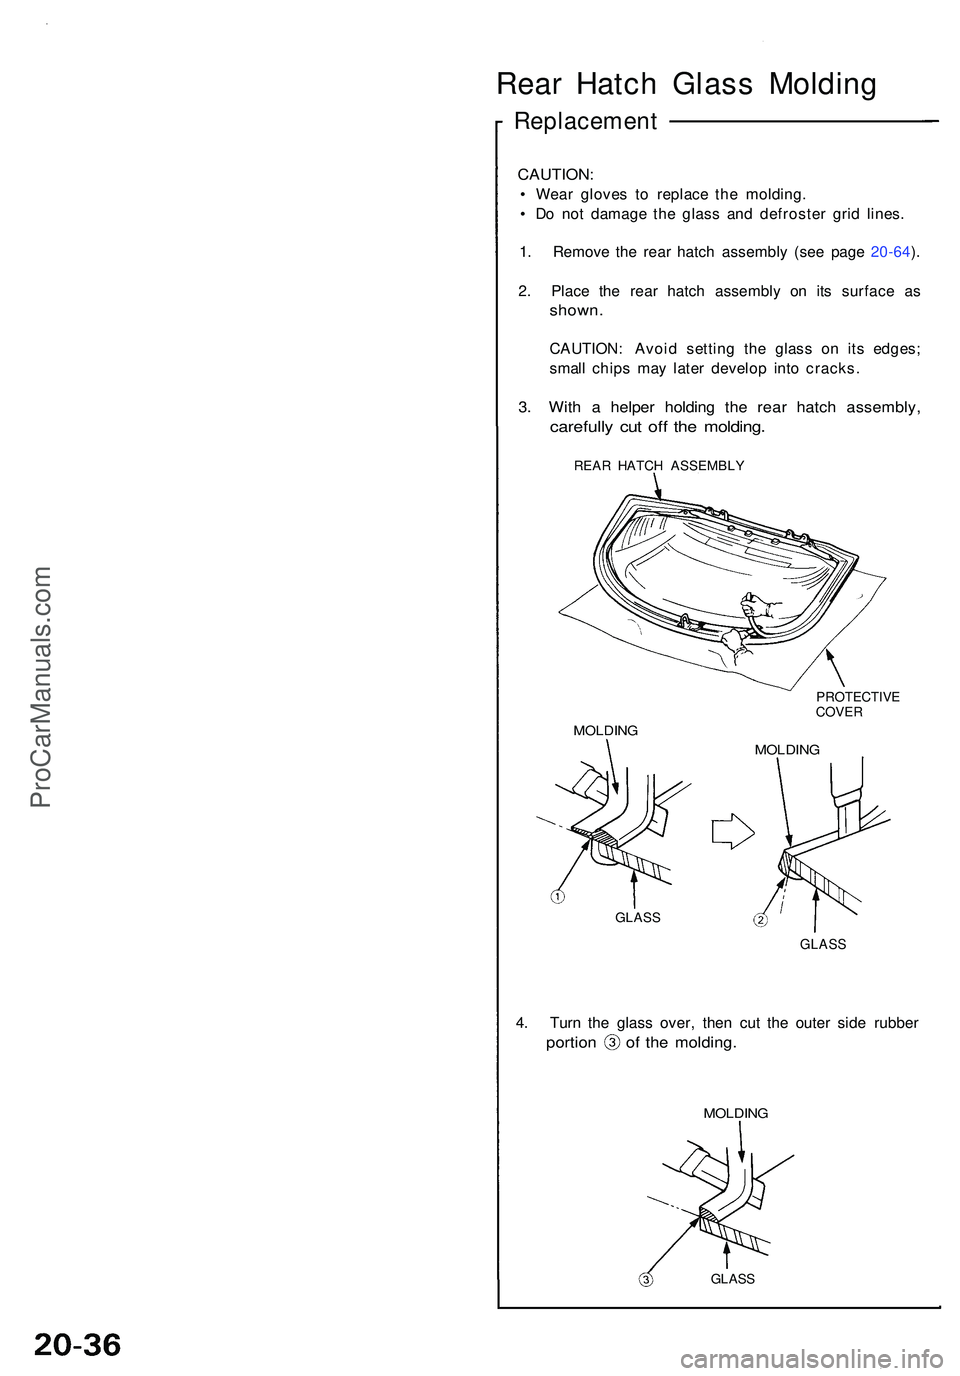
Rear Hatc h Glas s Moldin g
Replacemen t
CAUTION:
• Wea r glove s t o replac e th e molding .
• D o no t damag e th e glas s an d defroste r gri d lines .
1 . Remov e th e rea r hatc h assembl y (se e pag e 20-64 ).
2 . Plac e th e rea r hatc h assembl y o n it s surfac e a s
shown .
CAUTION : Avoi d settin g th e glas s o n it s edges ;
smal l chip s ma y late r develo p int o cracks .
3. Wit h a helpe r holdin g th e rea r hatc h assembly ,
carefully cu t of f th e molding .
REAR HATC H ASSEMBLY
PROTECTIVE
COVE R
MOLDIN G
MOLDING
GLASS
GLAS S
4. Tur n th e glas s over , the n cu t th e oute r sid e rubbe r
portion o f th e molding .
MOLDING
GLASS
ProCarManuals.com
Page 1096 of 1503
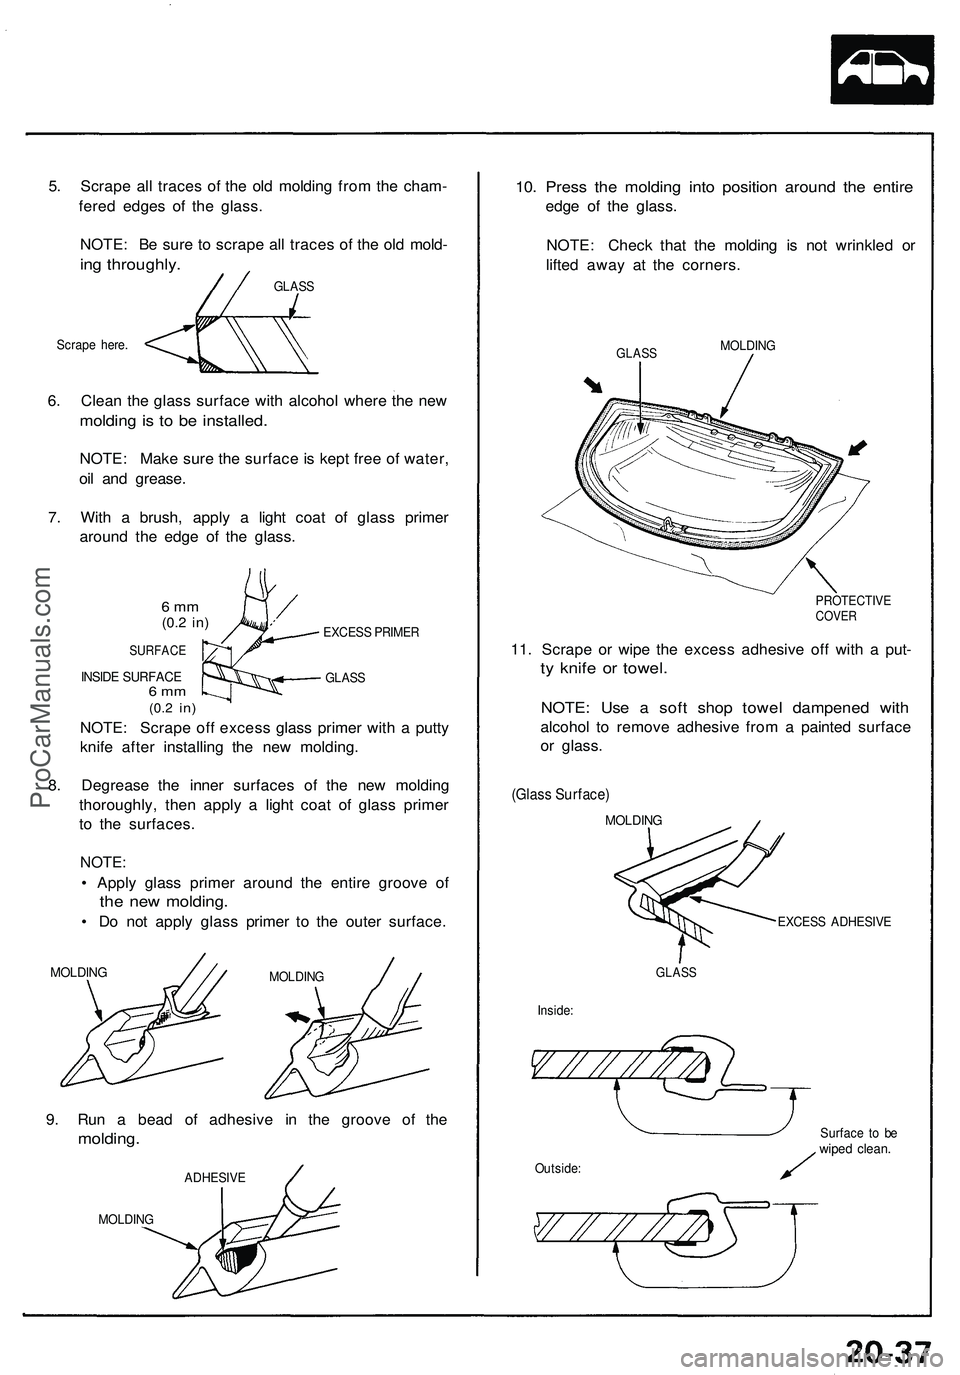
6. Clea n th e glas s surfac e wit h alcoho l wher e th e ne w
moldin g is t o b e installed .
NOTE: Mak e sur e th e surfac e is kep t fre e o f water ,
oi l an d grease .
7 . Wit h a brush , appl y a ligh t coa t o f glas s prime r
aroun d th e edg e of the glass .
6 m m(0. 2 in )
SURFAC E
INSIDE SURFAC E6 m m(0. 2 in )
EXCES S PRIME R
GLAS S
NOTE : Scrap e of f exces s glas s prime r wit h a putt y
knif e afte r installin g th e ne w molding .
8 . Degreas e th e inne r surface s o f th e ne w moldin g
thoroughly , the n appl y a ligh t coa t o f glas s prime r
t o th e surfaces .
NOTE:
• Appl y glas s prime r aroun d th e entir e groov e o f
the ne w molding .
• D o no t appl y glas s prime r t o th e oute r surface .
MOLDINGMOLDIN G
9. Ru n a bea d of adhesiv e i n th e groov e o f th e
molding .
ADHESIV E
MOLDIN G
10. Pres s th e moldin g int o positio n aroun d th e entir e
edge of the glass .
NOTE : Chec k tha t th e moldin g i s no t wrinkle d o r
lifte d awa y a t th e corners .
GLASS MOLDIN G
PROTECTIV ECOVER
11. Scrap e o r wip e th e exces s adhesiv e of f wit h a put -
ty knif e o r towel .
NOTE: Us e a sof t sho p towe l dampene d wit h
alcoho l t o remov e adhesiv e fro m a painte d surfac e
o r glass .
(Glass Surface )
MOLDING
EXCESS ADHESIV E
GLASS
Inside:
Surface t o b e
wipe d clean .
5. Scrap e al l trace s o f th e ol d moldin g fro m th e cham -
fere d edge s o f th e glass .
NOTE : B e sur e t o scrap e al l trace s o f th e ol d mold -
ing throughly .
Scrape here . GLAS
S
Outside:
ProCarManuals.com
Page 1097 of 1503
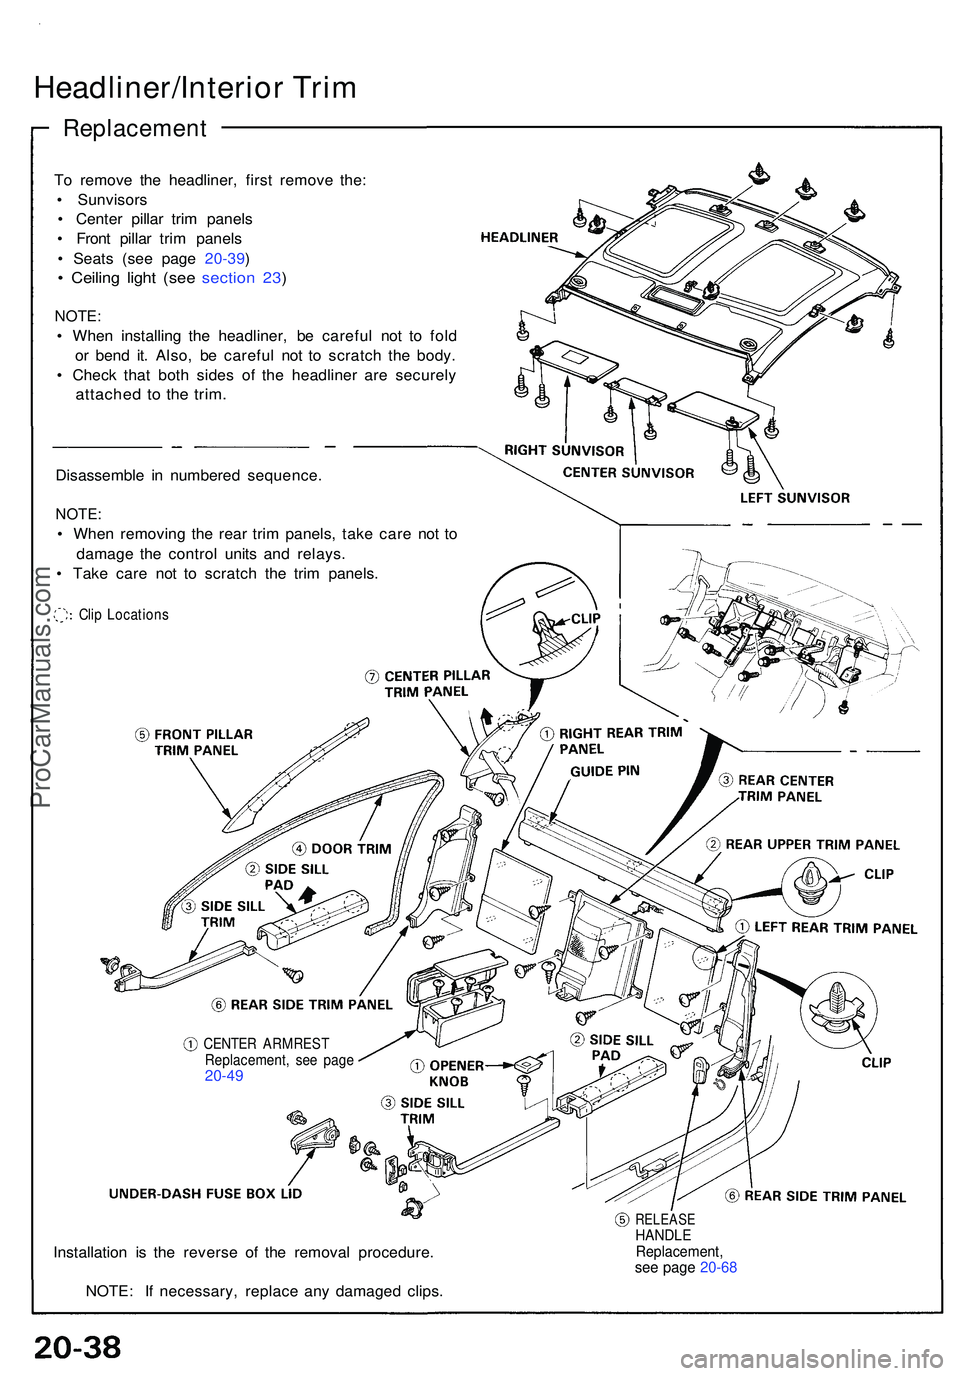
Headliner/Interior Tri m
Replacemen t
To remov e th e headliner , firs t remov e the :
• Sunvisor s
• Cente r pilla r tri m panel s
• Fron t pilla r tri m panel s
• Seat s (se e pag e 20-39 )
• Ceilin g ligh t (se e sectio n 23 )
NOTE :
• Whe n installin g th e headliner , b e carefu l no t t o fol d
o r ben d it . Also , b e carefu l no t t o scratc h th e body .
• Chec k tha t bot h side s o f th e headline r ar e securel y
attached t o th e trim .
Disassembl e i n numbere d sequence .
NOTE:
• Whe n removin g th e rea r tri m panels , tak e car e no t t o
damag e th e contro l unit s an d relays .
• Tak e car e no t t o scratc h th e tri m panels .
Installatio n i s th e revers e of the remova l procedure .
NOTE : I f necessary , replac e an y damage d clips .
Clip Location s
CENTER ARMRES TReplacement , se e pag e20-49
RELEAS EHANDLEReplacement ,see pag e 20-6 8
ProCarManuals.com
Page 1098 of 1503
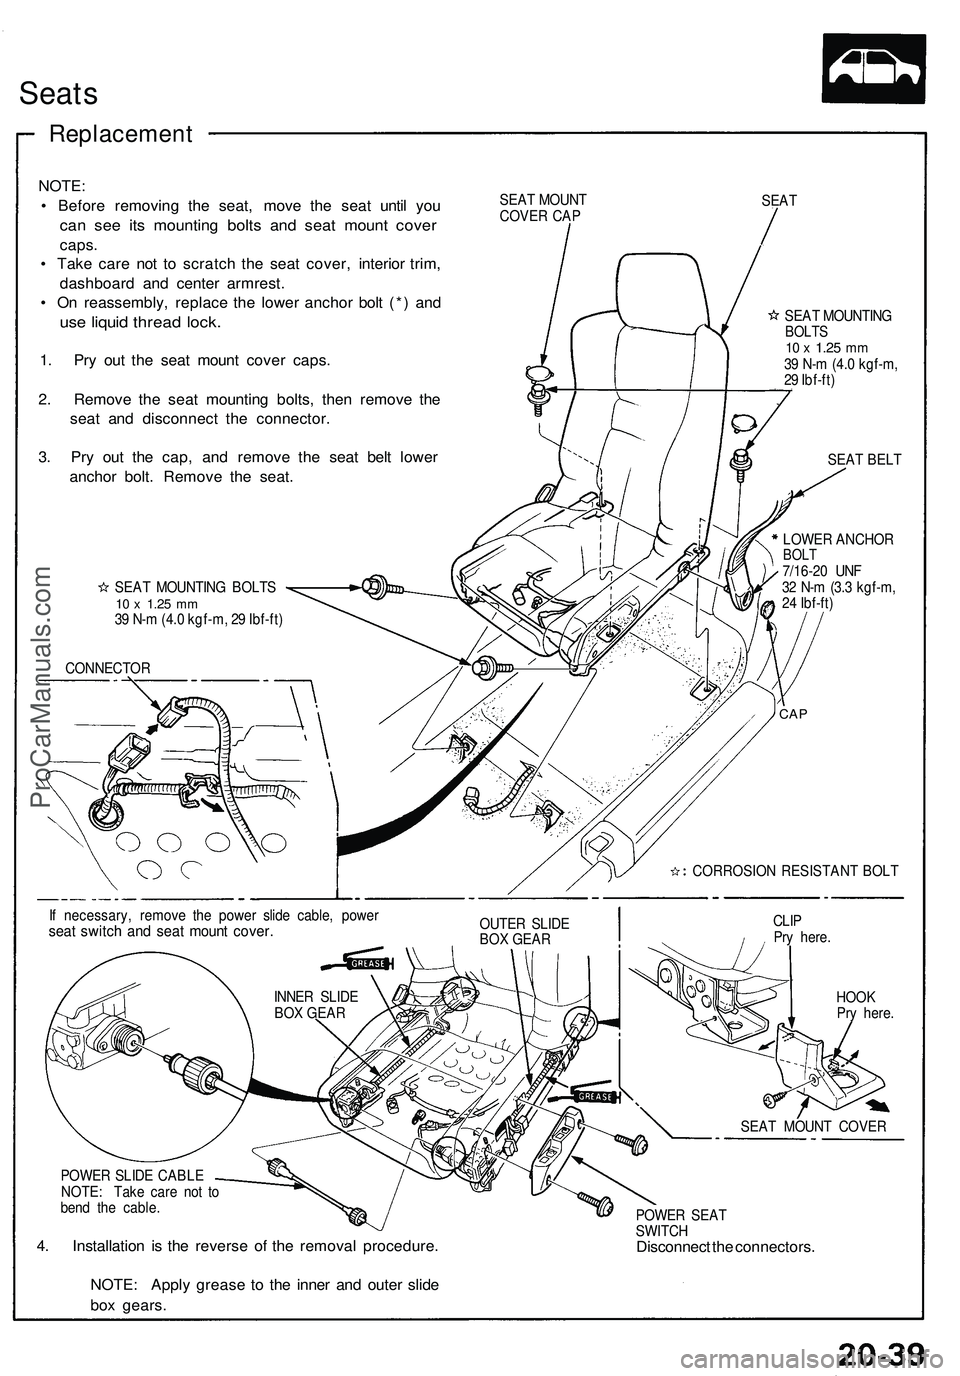
Seats
Replacemen t
NOTE:
• Befor e removin g th e seat , mov e th e sea t unti l yo u
can se e it s mountin g bolt s an d sea t moun t cove r
caps.
• Tak e car e no t t o scratc h th e sea t cover , interio r trim ,
dashboar d an d cente r armrest .
• O n reassembly , replac e th e lowe r ancho r bol t (* ) an d
use liqui d threa d lock .
1. Pr y ou t th e seat moun t cove r caps .
2 . Remov e th e sea t mountin g bolts , the n remov e th e
sea t an d disconnec t th e connector .
3 . Pr y ou t th e cap , an d remov e th e sea t bel t lowe r
ancho r bolt . Remov e th e seat .
SEAT MOUN T
COVE R CA P SEA
T
SEA T MOUNTIN G BOLT S
10 x 1.2 5 mm39 N- m (4. 0 kgf-m , 2 9 Ibf-ft )
CONNECTO R SEA
T MOUNTIN G
BOLTS10 x 1.2 5 mm39 N- m (4. 0 kgf-m ,
2 9 Ibf-ft )
SEA T BEL T
LOWE R ANCHO R
BOLT7/16-2 0 UN F
3 2 N- m (3. 3 kgf-m ,
2 4 Ibf-ft )
I f necessary , remov e th e powe r slid e cable , powe r
seat switc h an d sea t moun t cover .OUTER SLID E
BO X GEA R CLI
P
Pr y here .
HOO K
Pr y here .
POWE R SLID E CABL E
NOTE : Tak e car e no t t o
ben d th e cable .
4. Installatio n i s th e revers e o f th e remova l procedure .
POWER SEA T
SWITC H
Disconnec t th e connectors .
NOTE : Appl y greas e t o th e inne r an d oute r slid e
bo x gears .
SEAT MOUN T COVE R
CORROSIO
N RESISTAN T BOL T
CAP
INNE R SLID E
BO X GEA R
ProCarManuals.com
Page 1099 of 1503
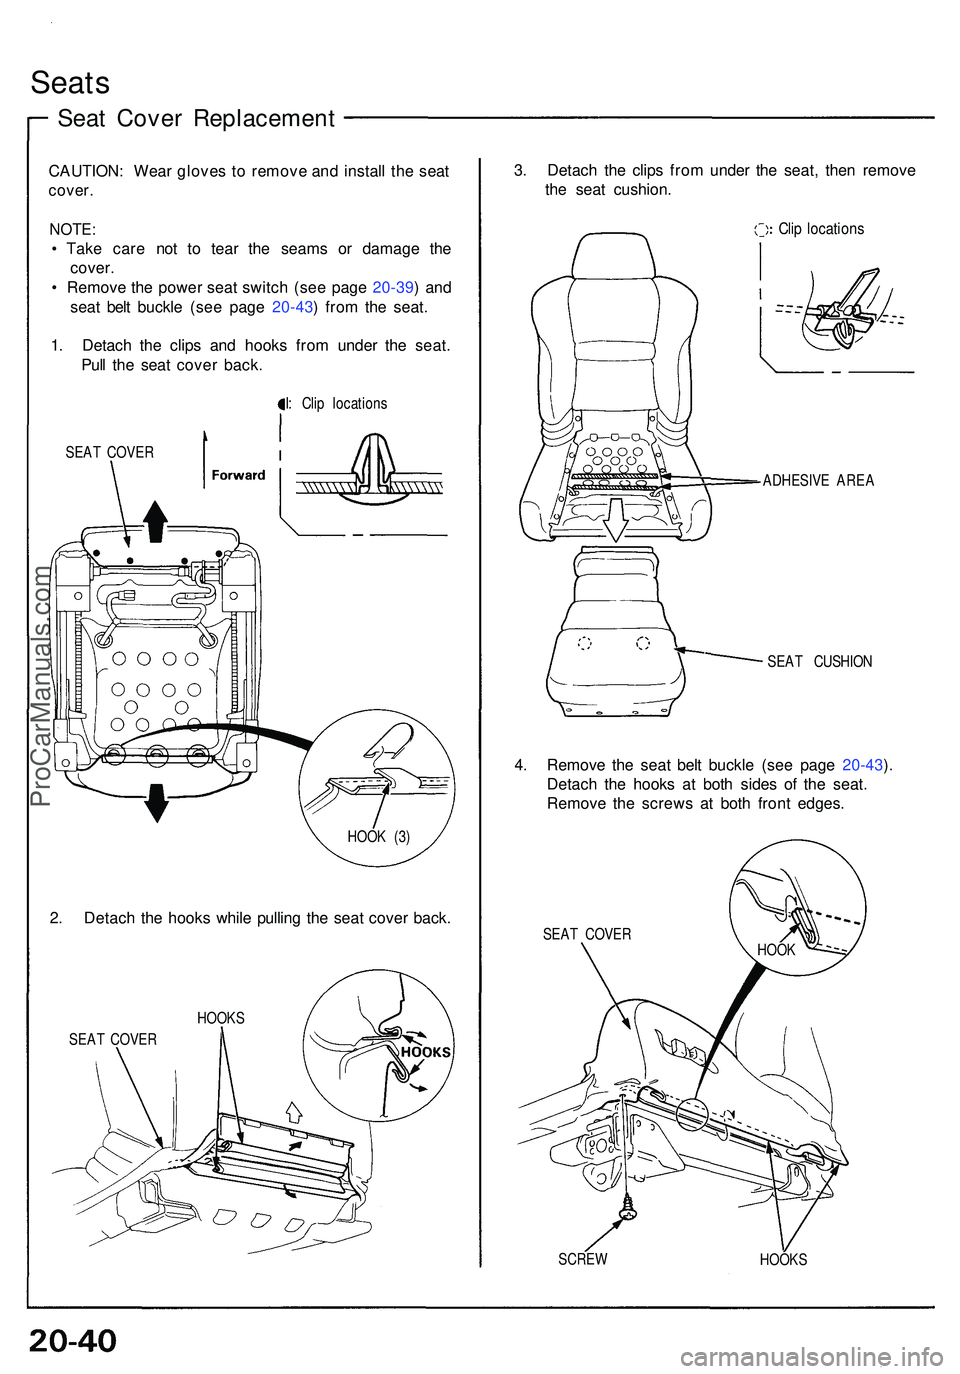
Seats
Seat Cove r Replacemen t
CAUTION: Wea r glove s t o remov e an d instal l th e sea t
cover .
NOTE :
• Tak e car e no t t o tea r th e seam s o r damag e th e
cover .
• Remov e th e powe r sea t switc h (se e pag e 20-39 ) an d
sea t bel t buckl e (se e pag e 20-43 ) fro m th e seat .
1 . Detac h th e clip s an d hook s fro m unde r th e seat .
Pul l th e sea t cove r back .
I: Cli p location s
SEA T COVE R
2. Detac h th e hook s whil e pullin g th e sea t cove r back .
SEAT COVE R
3. Detac h th e clip s fro m unde r th e seat , the n remov e
th e sea t cushion .
Clip location s
SEAT CUSHIO N
4. Remov e th e sea t bel t buckl e (se e pag e 20-43 ).
Detac h th e hook s a t bot h side s o f th e seat .
Remov e th e screw s a t bot h fron t edges .
SEAT COVE R
SCRE W
HOOKS
ADHESIV
E ARE A
HOOK S HOO
K (3 )
HOOK
ProCarManuals.com
Page 1100 of 1503
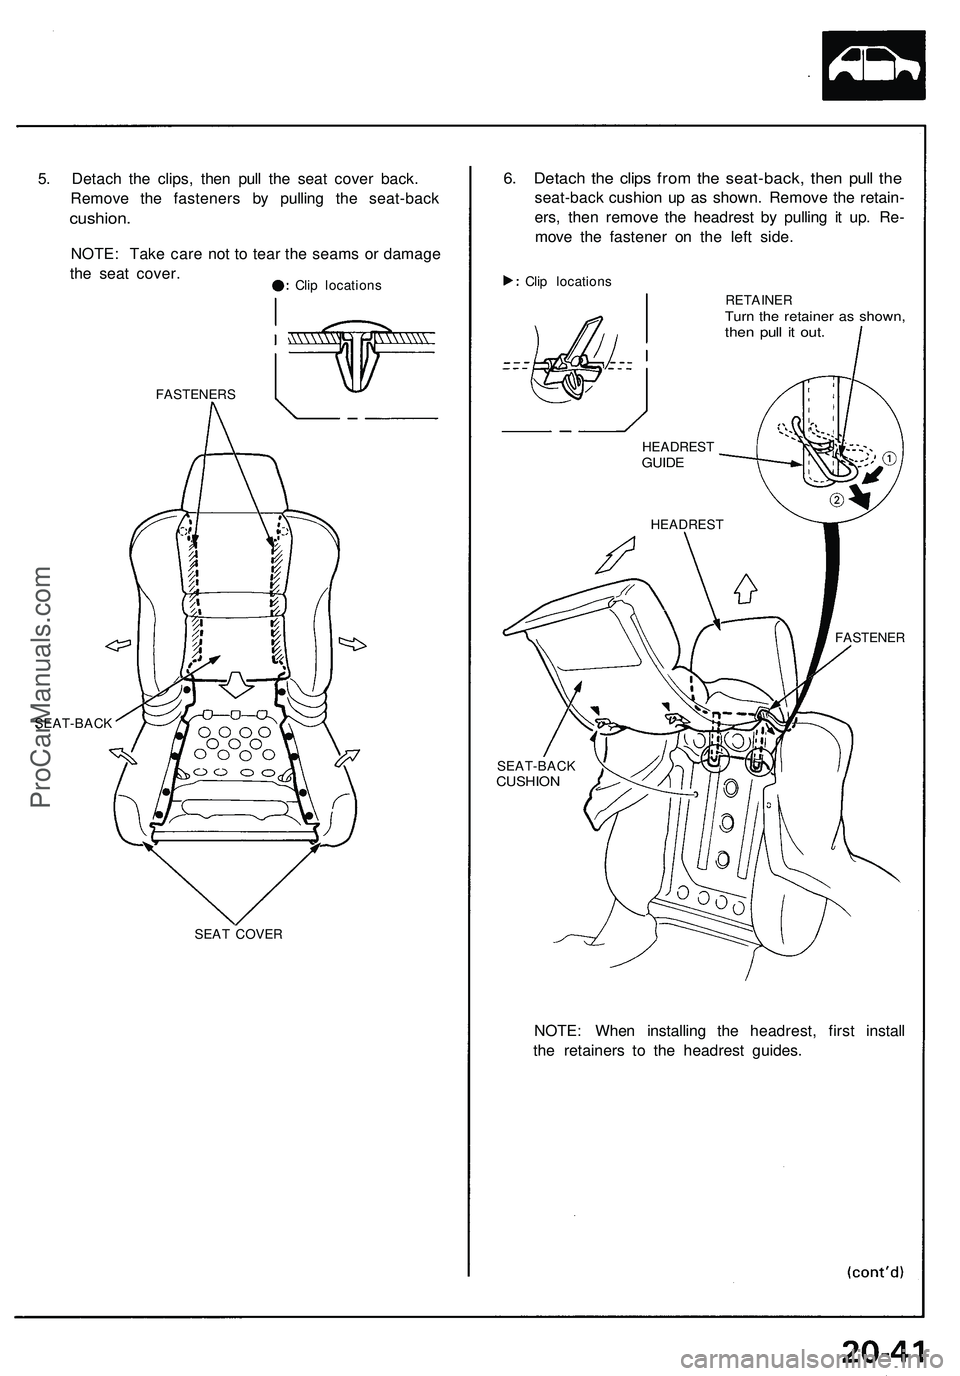
5. Detach the clips, then pull the seat cover back.
Remove the fasteners by pulling the seat-back
cushion.
NOTE: Take care not to tear the seams or damage
the seat cover.
Clip locations
FASTENERS
SEAT-BACK
SEAT COVER
6. Detach the clips from the seat-back, then pull the
seat-back cushion up as shown. Remove the retain-
ers, then remove the headrest by pulling it up. Re-
move the fastener on the left side.
Clip locations
RETAINER
Turn the retainer as shown,
then pull it out.
NOTE: When installing the headrest, first install
the retainers to the headrest guides.
HEADREST
GUIDE
HEADREST
FASTENER
SEAT-BACK
CUSHIONProCarManuals.com