DODGE NEON 1999 Service Repair Manual
Manufacturer: DODGE, Model Year: 1999, Model line: NEON, Model: DODGE NEON 1999Pages: 1200, PDF Size: 35.29 MB
Page 371 of 1200
(3) Connect one lead of test light to a ground ter-
minal. Touch other test light lead to Red Wire termi-
nal.
(a) If test light comes on, the wiring circuit
between the battery and switch is functional.
(b) If test light does not come on, check fuse 3 in
the fuse block or for a open circuit.
(4) If test light comes on, the wiring circuit
between the battery and switch is functional.
REMOVAL AND INSTALLATION
DOOR LOCK MOTOR
REMOVAL
(1) Remove door trim panel, refer to Group 23,
Body for removal procedures.
(2) Disconnect all door linkages at the latch/lock
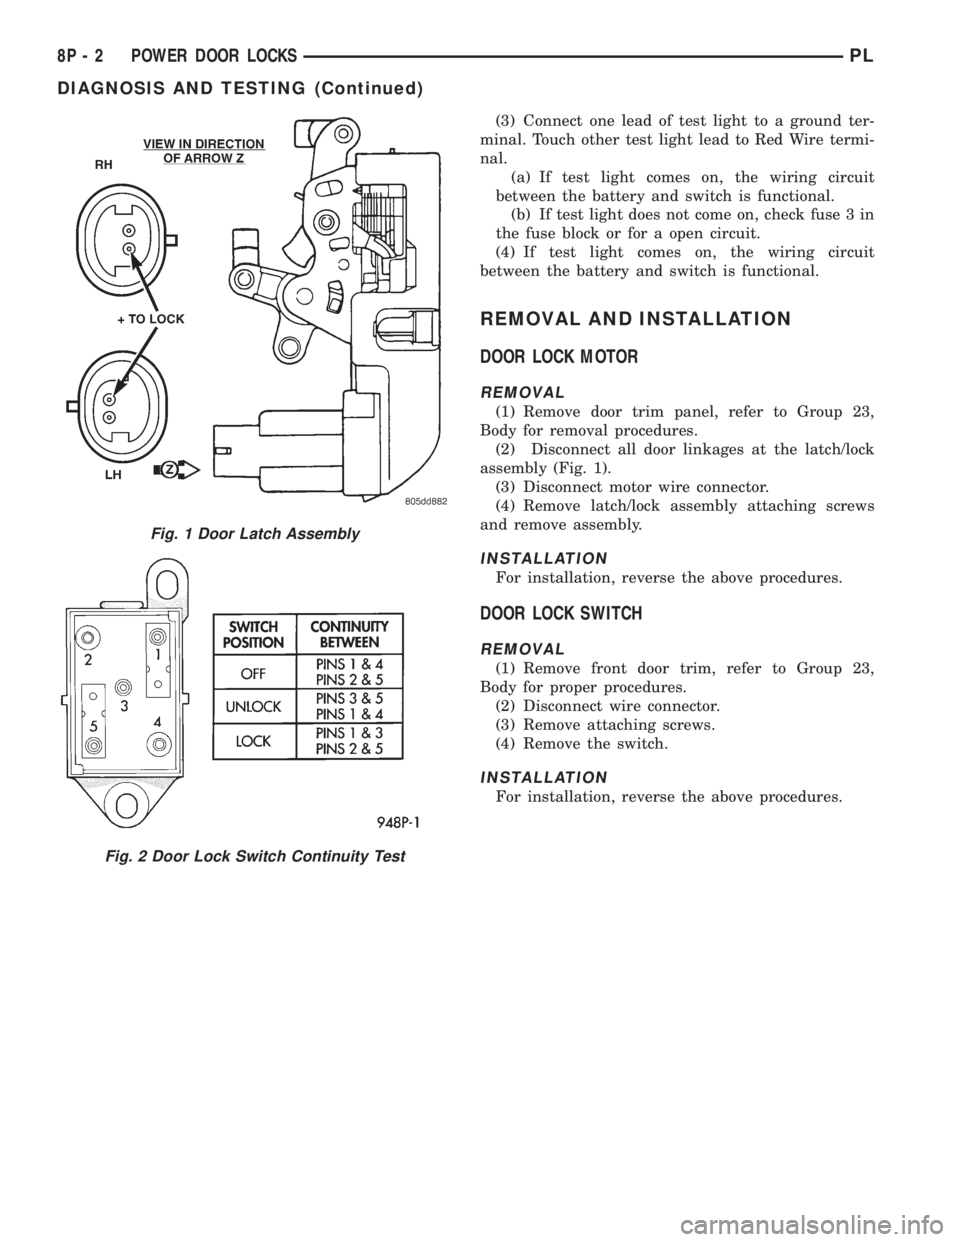
assembly (Fig. 1).
(3) Disconnect motor wire connector.
(4) Remove latch/lock assembly attaching screws
and remove assembly.
INSTALLATION
For installation, reverse the above procedures.
DOOR LOCK SWITCH
REMOVAL
(1) Remove front door trim, refer to Group 23,
Body for proper procedures.
(2) Disconnect wire connector.
(3) Remove attaching screws.
(4) Remove the switch.
INSTALLATION
For installation, reverse the above procedures.
Fig. 1 Door Latch Assembly
Fig. 2 Door Lock Switch Continuity Test
8P - 2 POWER DOOR LOCKSPL
DIAGNOSIS AND TESTING (Continued)
Page 372 of 1200
REMOTE KEYLESS ENTRY
INDEX
page page
GENERAL INFORMATION
INTRODUCTION......................... 3
DESCRIPTION AND OPERATION
VEHICLE ACCESS CODE (VAC)
PROGRAMMING........................ 3
DIAGNOSIS AND TESTING
REMOTE KEYLESS ENTRY CONDITION....... 4
REMOTE KEYLESS ENTRY SYSTEM......... 5
SERVICE PROCEDURES
HORN CHIRP CANCELLATION.............. 5PANIC FUNCTION CANCELLATION........... 5
PROGRAM REMOTE KEYLESS ENTRY
MODULE.............................. 5
REMOVAL AND INSTALLATION
REMOTE KEYLESS ENTRY MODULE......... 6
SPECIFICATIONS
RKE TRANSMITTER BATTERY.............. 6
RKE TRANSMITTER RANGE................ 6
GENERAL INFORMATION
INTRODUCTION
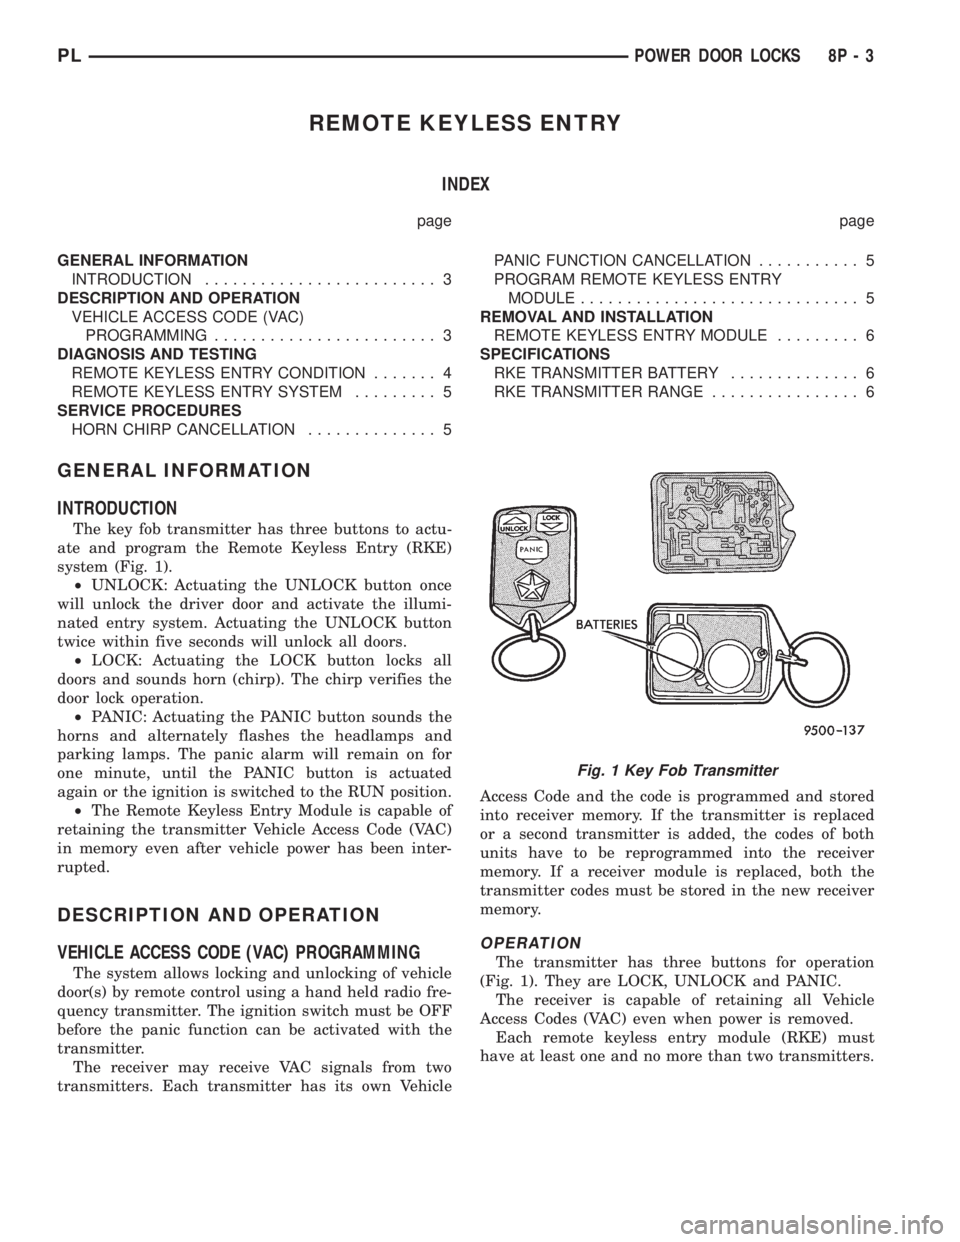
The key fob transmitter has three buttons to actu-
ate and program the Remote Keyless Entry (RKE)
system (Fig. 1).
²UNLOCK: Actuating the UNLOCK button once
will unlock the driver door and activate the illumi-
nated entry system. Actuating the UNLOCK button
twice within five seconds will unlock all doors.
²LOCK: Actuating the LOCK button locks all
doors and sounds horn (chirp). The chirp verifies the
door lock operation.
²PANIC: Actuating the PANIC button sounds the
horns and alternately flashes the headlamps and
parking lamps. The panic alarm will remain on for
one minute, until the PANIC button is actuated
again or the ignition is switched to the RUN position.
²The Remote Keyless Entry Module is capable of
retaining the transmitter Vehicle Access Code (VAC)
in memory even after vehicle power has been inter-
rupted.
DESCRIPTION AND OPERATION
VEHICLE ACCESS CODE (VAC) PROGRAMMING
The system allows locking and unlocking of vehicle
door(s) by remote control using a hand held radio fre-
quency transmitter. The ignition switch must be OFF
before the panic function can be activated with the
transmitter.
The receiver may receive VAC signals from two
transmitters. Each transmitter has its own VehicleAccess Code and the code is programmed and stored
into receiver memory. If the transmitter is replaced
or a second transmitter is added, the codes of both
units have to be reprogrammed into the receiver
memory. If a receiver module is replaced, both the
transmitter codes must be stored in the new receiver
memory.
OPERATION
The transmitter has three buttons for operation
(Fig. 1). They are LOCK, UNLOCK and PANIC.
The receiver is capable of retaining all Vehicle
Access Codes (VAC) even when power is removed.
Each remote keyless entry module (RKE) must
have at least one and no more than two transmitters.
Fig. 1 Key Fob Transmitter
PLPOWER DOOR LOCKS 8P - 3
Page 373 of 1200
DIAGNOSIS AND TESTING
REMOTE KEYLESS ENTRY CONDITION
Use an analog voltmeter for the following test.
REMOTE KEYLESS ENTRY GENERAL CHECKS
BEFORE OTHER CHECKS.
(1) Check if door locks operate properly. If not OK,
repair as necessary.
(2) Disconnect the wire connectors at the RKE
module Using a ohmmeter check for continuity
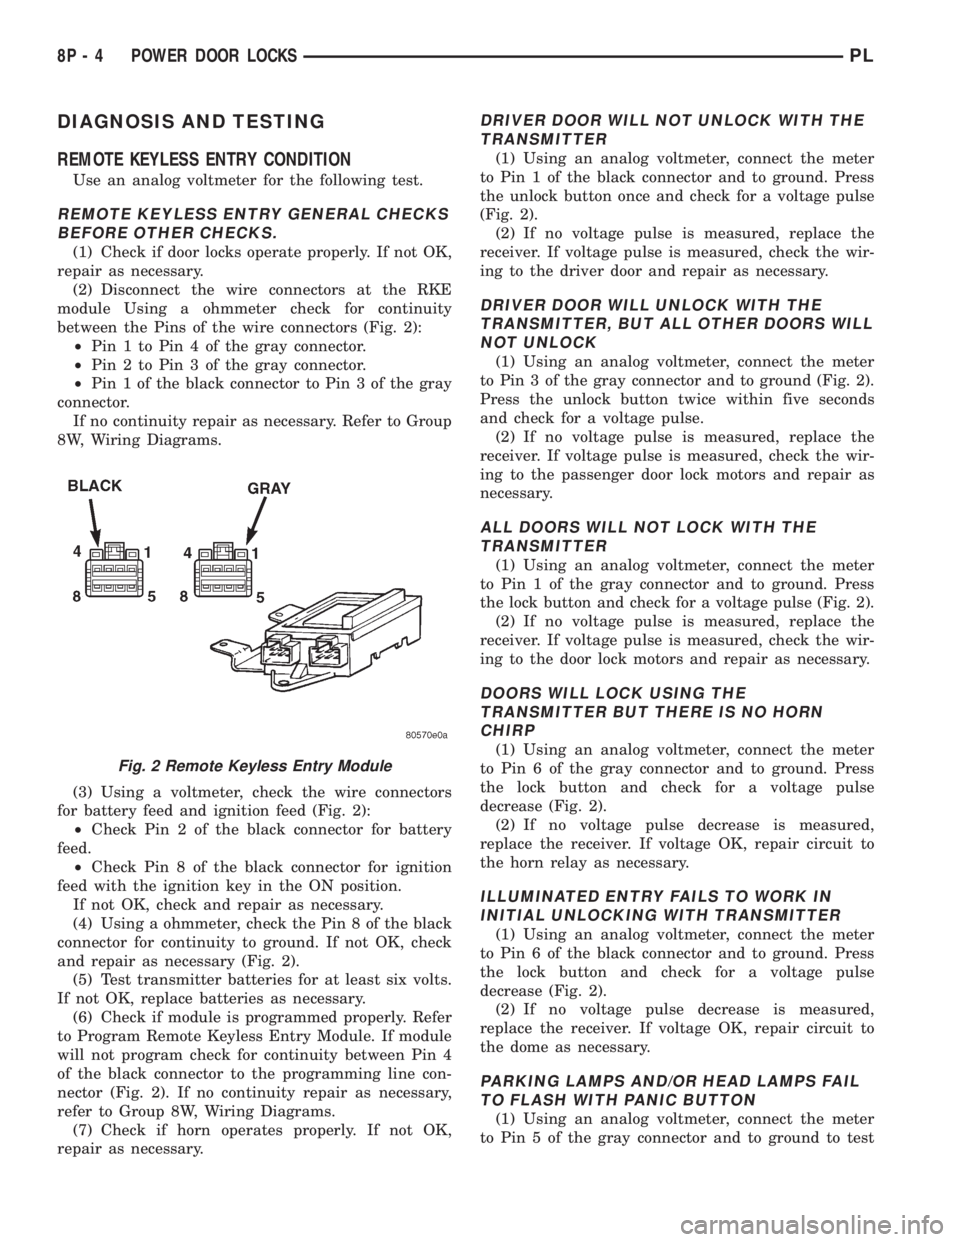
between the Pins of the wire connectors (Fig. 2):
²Pin 1 to Pin 4 of the gray connector.
²Pin 2 to Pin 3 of the gray connector.
²Pin 1 of the black connector to Pin 3 of the gray
connector.
If no continuity repair as necessary. Refer to Group
8W, Wiring Diagrams.
(3) Using a voltmeter, check the wire connectors
for battery feed and ignition feed (Fig. 2):
²Check Pin 2 of the black connector for battery
feed.
²Check Pin 8 of the black connector for ignition
feed with the ignition key in the ON position.
If not OK, check and repair as necessary.
(4) Using a ohmmeter, check the Pin 8 of the black
connector for continuity to ground. If not OK, check
and repair as necessary (Fig. 2).
(5) Test transmitter batteries for at least six volts.
If not OK, replace batteries as necessary.
(6) Check if module is programmed properly. Refer
to Program Remote Keyless Entry Module. If module
will not program check for continuity between Pin 4
of the black connector to the programming line con-
nector (Fig. 2). If no continuity repair as necessary,
refer to Group 8W, Wiring Diagrams.
(7) Check if horn operates properly. If not OK,
repair as necessary.
DRIVER DOOR WILL NOT UNLOCK WITH THE
TRANSMITTER
(1) Using an analog voltmeter, connect the meter
to Pin 1 of the black connector and to ground. Press
the unlock button once and check for a voltage pulse
(Fig. 2).
(2) If no voltage pulse is measured, replace the
receiver. If voltage pulse is measured, check the wir-
ing to the driver door and repair as necessary.
DRIVER DOOR WILL UNLOCK WITH THE
TRANSMITTER, BUT ALL OTHER DOORS WILL
NOT UNLOCK
(1) Using an analog voltmeter, connect the meter
to Pin 3 of the gray connector and to ground (Fig. 2).
Press the unlock button twice within five seconds
and check for a voltage pulse.
(2) If no voltage pulse is measured, replace the
receiver. If voltage pulse is measured, check the wir-
ing to the passenger door lock motors and repair as
necessary.
ALL DOORS WILL NOT LOCK WITH THE
TRANSMITTER
(1) Using an analog voltmeter, connect the meter
to Pin 1 of the gray connector and to ground. Press
the lock button and check for a voltage pulse (Fig. 2).
(2) If no voltage pulse is measured, replace the
receiver. If voltage pulse is measured, check the wir-
ing to the door lock motors and repair as necessary.
DOORS WILL LOCK USING THE
TRANSMITTER BUT THERE IS NO HORN
CHIRP
(1) Using an analog voltmeter, connect the meter
to Pin 6 of the gray connector and to ground. Press
the lock button and check for a voltage pulse
decrease (Fig. 2).
(2) If no voltage pulse decrease is measured,
replace the receiver. If voltage OK, repair circuit to
the horn relay as necessary.
ILLUMINATED ENTRY FAILS TO WORK IN
INITIAL UNLOCKING WITH TRANSMITTER
(1) Using an analog voltmeter, connect the meter
to Pin 6 of the black connector and to ground. Press
the lock button and check for a voltage pulse
decrease (Fig. 2).
(2) If no voltage pulse decrease is measured,
replace the receiver. If voltage OK, repair circuit to
the dome as necessary.
PARKING LAMPS AND/OR HEAD LAMPS FAIL
TO FLASH WITH PANIC BUTTON
(1) Using an analog voltmeter, connect the meter
to Pin 5 of the gray connector and to ground to test
Fig. 2 Remote Keyless Entry Module
8P - 4 POWER DOOR LOCKSPL
Page 374 of 1200

parking lamps out put. Press the panic button and
check for a voltage pulse (Fig. 2).
(2) If no voltage pulse is measured, replace the
receiver. If voltage OK, repair circuit to the parking
lamps as necessary.
(3) Connect the meter to Pin 5 of the black connec-
tor and to ground to test head lamps out put. Press
the panic button and check for a voltage pulse (Fig.
2).
(4) If no voltage pulse is measured, replace the
receiver. If voltage OK, repair circuit to the head
lamps as necessary.
REMOTE KEYLESS ENTRY SYSTEM
When trouble shooting problems with the Remote
Keyless Entry System, always verify that the power
door lock/unlock switches are functional. If the doors
do not lock/unlock refer to Group 8W, Wiring Dia-
gram for Pin and wiring locations.
If the following items do not work:
²Remote keyless entry system
²Radio/clock
²Door lock switches
A blown fuse is the probable cause. Check fuses 2,
3 and 11 in the fuse block. To check for a blown fuse,
pull the fuse out slightly, but maintain contact
between the fuse terminals and the terminals in fuse
block. Using the voltmeter probe, check both termi-
nals for 12 volts. If only one terminal measures bat-
tery voltage, the circuit breaker is defective and must
be replaced. If neither terminal measures battery
voltage, check the high current fuses 3 and 11 in the
Power Distribution Center (PDC). The PDC is located
in the engine compartment. If fuse(s) are NOT OK,
replace fuse(s) or repair as necessary. If fuses are
OK, check for an open or shorted circuit to the Power
Distribution Center, repair as needed.
SERVICE PROCEDURES
HORN CHIRP CANCELLATION
During the programming operation the horn chirp
can be disabled or enable using the following proce-
dure. One or both transmitters can be program to be
disabled or enable.
(1) Retrieve the programming line from the upper
edge of the passenger side cowl trim panel upper
edge. The RKE Programming Line is a green wire
with a red bullet connector.
(2) Using a jumper wire, ground the RKE pro-
gramming line.
(3) Turn ignition switch to the ON position.
(4) Press any button on the transmitter. The locks
will cycle to confirm programming,
(5) To disable or enable horn chirp press the lock
button on the transmitter four times and the hornwill sound to confirm programming. Press the lock
button on the second transmitter four times and the
horn will sound to confirm programming.
(6) Disconnect the programming line from ground.
This returns the system to its normal operation
mode.
(7) Replace any removed components. Return pro-
gramming line chirpto its original position. Check for
system operation.
PANIC FUNCTION CANCELLATION
During the programming operation the panic func-
tion can be disabled or enable using the following
procedure. One or both transmitters can be program
to be disabled or enable.
(1) Retrieve the programming line from the upper
edge of the passenger side cowl trim panel. The RKE
Program Line is a green wire with a red bullet con-
nector.
(2) Using a jumper wire, ground the RKE Pro-
gramming Line.
(3) Turn ignition switch to the ON position.
(4) Press any button on the transmitter. The locks
will cycle to confirm programming,
(5) To disable or enable panic function press the
panic button on the transmitter four times and the
horn will sound to confirm programming. Press the
panic button on the second transmitter four times
and the horn will sound to confirm programming.
(6) Disconnect the programming line from ground.
This returns the system to its normal operation
mode.
(7) Replace any removed components. Return the
programming line to its original position. Check for
system operation.
PROGRAM REMOTE KEYLESS ENTRY MODULE
(1) Retrieve the programming line from the upper
edge of the passenger side cowl trim panel. The RKE
Programming Line is a green wire with a red bullet
connector.
(2) Using a jumper wire, ground the RKE pro-
gramming line.
(3) Turn ignition switch to the ON position.
(4) Press any button on the transmitter to set
code. The locks will cycle to confirm programming. If
there is a second transmitter it must be set at this
time. Press any button on the second transmitter and
wait for the locks to cycle to confirm programming.
(5) Disconnect the programming line from ground.
This returns the system to its normal operation
mode.
(6) Replace all removed components. Return pro-
gramming line to its original position. Check for sys-
tem operation.
PLPOWER DOOR LOCKS 8P - 5
DIAGNOSIS AND TESTING (Continued)
Page 375 of 1200
REMOVAL AND INSTALLATION
REMOTE KEYLESS ENTRY MODULE
REMOVAL
(1) Remove the right trim panel, refer to Group
8E, Instrument Panel and Systems for proper
removal procedures.
(2) Disconnect wire connector from RKE module.
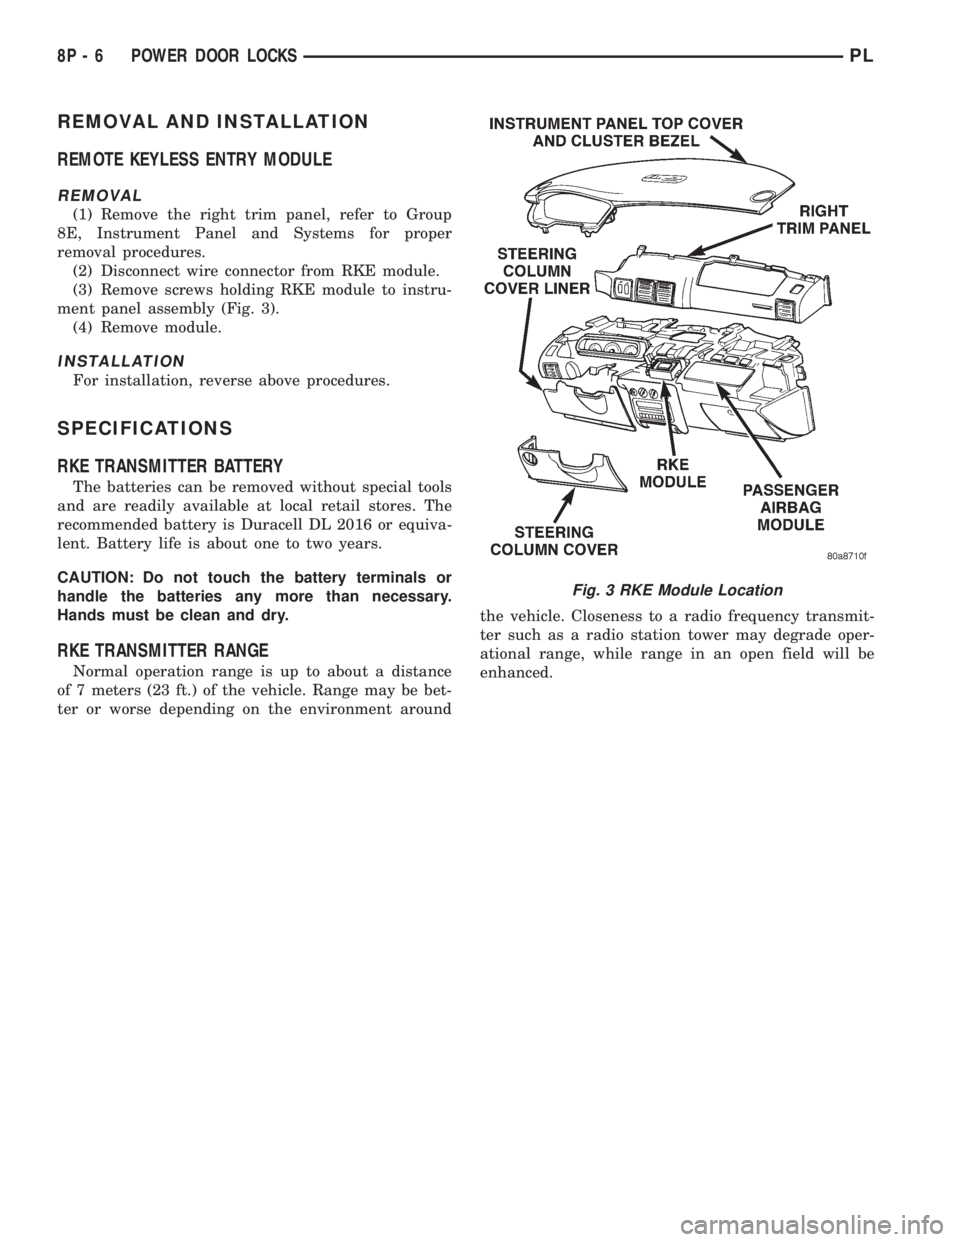
(3) Remove screws holding RKE module to instru-
ment panel assembly (Fig. 3).
(4) Remove module.
INSTALLATION
For installation, reverse above procedures.
SPECIFICATIONS
RKE TRANSMITTER BATTERY
The batteries can be removed without special tools
and are readily available at local retail stores. The
recommended battery is Duracell DL 2016 or equiva-
lent. Battery life is about one to two years.
CAUTION: Do not touch the battery terminals or
handle the batteries any more than necessary.
Hands must be clean and dry.
RKE TRANSMITTER RANGE
Normal operation range is up to about a distance
of 7 meters (23 ft.) of the vehicle. Range may be bet-
ter or worse depending on the environment aroundthe vehicle. Closeness to a radio frequency transmit-
ter such as a radio station tower may degrade oper-
ational range, while range in an open field will be
enhanced.
Fig. 3 RKE Module Location
8P - 6 POWER DOOR LOCKSPL
Page 376 of 1200
IMMOBILIZER SYSTEM
CONTENTS
page page
DESCRIPTION AND OPERATION
IMMOBILIZER RECEIVER................ 1
IMMOBILIZER SYSTEM.................. 1
IMMOBILIZER TRANSMITTER............. 2
POWER-UP MODE...................... 2
DIAGNOSIS AND TESTING
IMMOBILIZER DIAGNOSIS............... 2SERVICE PROCEDURES
VEHICLE IMMOBILIZER SYSTEM.......... 3
REMOVAL AND INSTALLATION
IMMOBILIZER RECEIVER................ 3
DESCRIPTION AND OPERATION
IMMOBILIZER SYSTEM
The Immobilizer system includes the following
unique items:
²An immobilizer module receiver that controls
system operation and also controls the RKE and Illu-
minated entry systems, if equipped.
²An encoded Crankshaft Position Sensor for the
ignition system. The Immobilizer module decodes the
signal from the crankshaft so the PCM can recognize
it as a valid Crankshaft Position Sensor signal, and
allow the engine to run.
²A wiring harness that interconnects the crank-
shaft sensor, the immobilizer receiver, and the PCM.
²Two key fob transmitters.
The Immobilizer System prevents unauthorized
operation of the vehicle by disabling the engine and
starter. The system will NOT allow the vehicle to
start unless the UNLOCK button on the RKE trans-
mitter is pressed. The system will be activated after
turning the ignition switch to the OFF position and
using one of the following methods.
(1) Press the LOCK button on the RKE transmit-
ter.
(2) LOCK the doors by pressing a power lock but-
ton switch.
(3) LOCK the driver or passenger door using the
key.
²The Security light will flash, for about 16 sec-
onds, indicating that the engine and starter will be
disabled.
²The Security light remaining on, indicates the
system is not operational.
²The Immobilizer will activate automatically
within 10 minutes of the ignition switch being in the
OFF position, whether the vehicle has been locked or
unlocked.²An attempt to start the vehicle without pressing
the UNLOCK button on the RKE transmitter will
result in a warning chime and the Security light
flashing.
NOTE: The ignition switch must be in the OFF posi-
tion in order for the system to be activated, whether
the doors are closed or not.
IMMOBILIZER RECEIVER
The immobilizer receiver is programmed to
respond to the Lock and Unlock radio signals issued
by the immobilizer transmitters. The receiver will
only respond to the radio signals of transmitters (up
to four) whose vehicle access codes have been stored
in the receiver's electronic memory. The receiver is
programmed at the assembly plant with the vehicle
access codes of the two transmitters that are shipped
with the vehicle.
The immobilizer receiver also has a central pro-
cessing unit, which contains the immobilizer system
logic. The programming in the immobilizer receiver
allows the system to learn and retain transmitter
vehicle access codes, as well as to communicate with
the Powertrain Control Module (PCM) and/or the
DRB scan tool on the Chrysler Collision Detection
(CCD) data bus network.
The CCD data bus network allows the sharing of
sensor information. This helps to reduce wiring har-
ness complexity, reduce internal controller hardware,
and reduce component sensor current loads. At the
same time, the CCD data bus network provides
increased reliability and enhanced diagnostic capabil-
ities.
Each immobilizer transmitter has a different vehi-
cle access code, which must be programmed into the
memory of the immobilizer receiver in the vehicle in
order to operate the immobilizer system. A DRB scan
tool must be used to program new or additional
PLIMMOBILIZER SYSTEM 8Q - 1
Page 377 of 1200
transmitter vehicle access codes into the memory of
the immobilizer receiver. Refer to the Vehicle Theft
Security System menu item on the DRB scan tool for
the procedures.
The immobilizer receiver recognizes the Lock and
Unlock signals received from the programmed immo-
bilizer transmitters. If the code sent by the key fob
transmitter is recognized as valid by the Immobilizer
module, it will decode the Crankshaft Position Sensor
signal, enable the starter circuit, and allow the
engine to run.
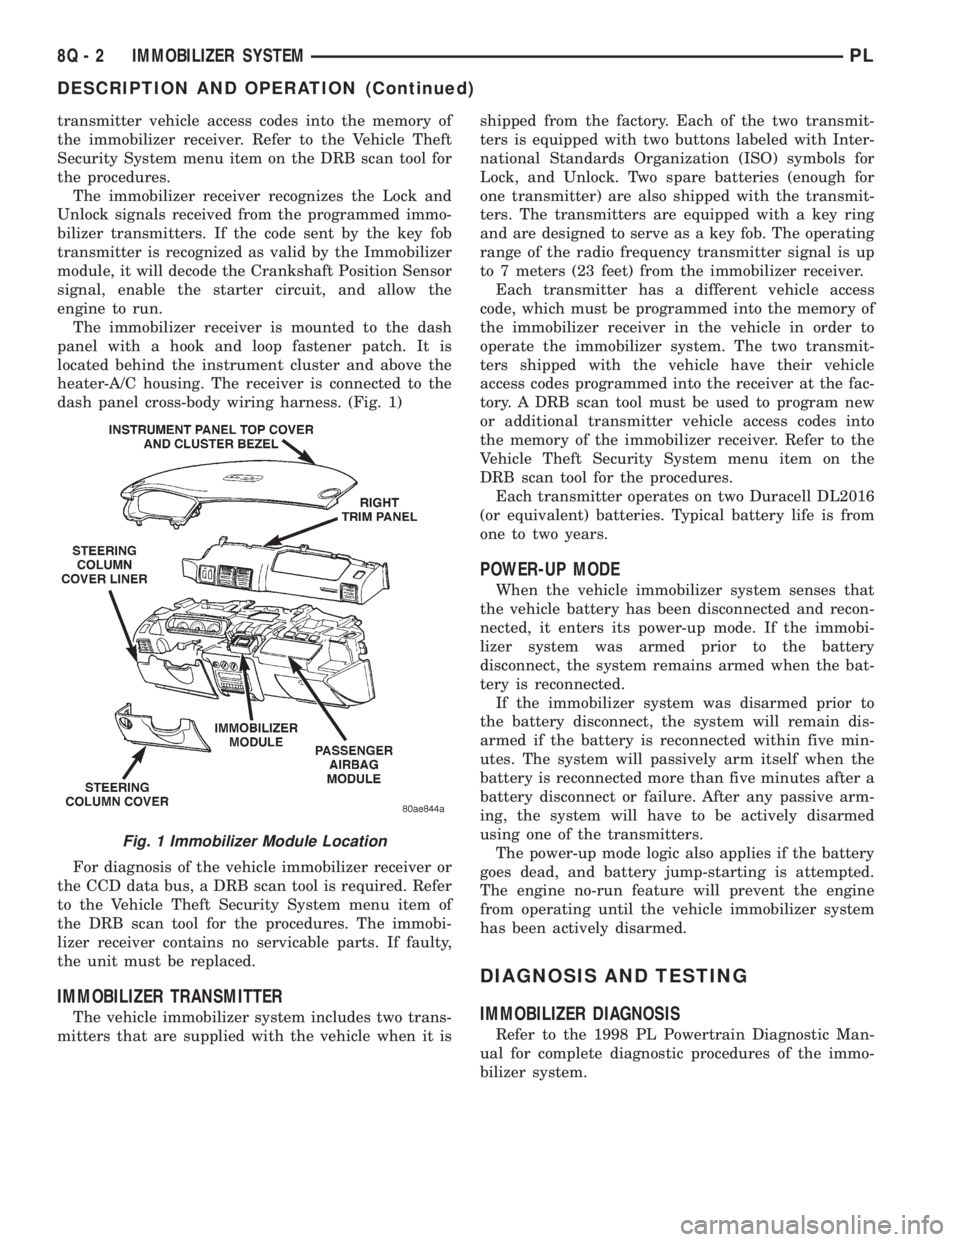
The immobilizer receiver is mounted to the dash
panel with a hook and loop fastener patch. It is
located behind the instrument cluster and above the
heater-A/C housing. The receiver is connected to the
dash panel cross-body wiring harness. (Fig. 1)
For diagnosis of the vehicle immobilizer receiver or
the CCD data bus, a DRB scan tool is required. Refer
to the Vehicle Theft Security System menu item of
the DRB scan tool for the procedures. The immobi-
lizer receiver contains no servicable parts. If faulty,
the unit must be replaced.
IMMOBILIZER TRANSMITTER
The vehicle immobilizer system includes two trans-
mitters that are supplied with the vehicle when it isshipped from the factory. Each of the two transmit-
ters is equipped with two buttons labeled with Inter-
national Standards Organization (ISO) symbols for
Lock, and Unlock. Two spare batteries (enough for
one transmitter) are also shipped with the transmit-
ters. The transmitters are equipped with a key ring
and are designed to serve as a key fob. The operating
range of the radio frequency transmitter signal is up
to 7 meters (23 feet) from the immobilizer receiver.
Each transmitter has a different vehicle access
code, which must be programmed into the memory of
the immobilizer receiver in the vehicle in order to
operate the immobilizer system. The two transmit-
ters shipped with the vehicle have their vehicle
access codes programmed into the receiver at the fac-
tory. A DRB scan tool must be used to program new
or additional transmitter vehicle access codes into
the memory of the immobilizer receiver. Refer to the
Vehicle Theft Security System menu item on the
DRB scan tool for the procedures.
Each transmitter operates on two Duracell DL2016
(or equivalent) batteries. Typical battery life is from
one to two years.
POWER-UP MODE
When the vehicle immobilizer system senses that
the vehicle battery has been disconnected and recon-
nected, it enters its power-up mode. If the immobi-
lizer system was armed prior to the battery
disconnect, the system remains armed when the bat-
tery is reconnected.
If the immobilizer system was disarmed prior to
the battery disconnect, the system will remain dis-
armed if the battery is reconnected within five min-
utes. The system will passively arm itself when the
battery is reconnected more than five minutes after a
battery disconnect or failure. After any passive arm-
ing, the system will have to be actively disarmed
using one of the transmitters.
The power-up mode logic also applies if the battery
goes dead, and battery jump-starting is attempted.
The engine no-run feature will prevent the engine
from operating until the vehicle immobilizer system
has been actively disarmed.
DIAGNOSIS AND TESTING
IMMOBILIZER DIAGNOSIS
Refer to the 1998 PL Powertrain Diagnostic Man-
ual for complete diagnostic procedures of the immo-
bilizer system.
Fig. 1 Immobilizer Module Location
8Q - 2 IMMOBILIZER SYSTEMPL
DESCRIPTION AND OPERATION (Continued)
Page 378 of 1200

SERVICE PROCEDURES
VEHICLE IMMOBILIZER SYSTEM
WARNING: ON VEHICLES EQUIPPED WITH AIR-
BAGS, REFER TO GROUP 8M - PASSIVE
RESTRAINT SYSTEMS BEFORE ATTEMPTING ANY
STEERING WHEEL, STEERING COLUMN, OR
INSTRUMENT PANEL COMPONENT DIAGNOSIS OR
SERVICE. FAILURE TO TAKE THE PROPER PRE-
CAUTIONS COULD RESULT IN ACCIDENTAL AIR-
BAG DEPLOYMENT AND POSSIBLE PERSONAL
INJURY.
NOTE: The following tests may not prove conclu-
sive in the diagnosis of this system. The most reli-
able, efficient, and accurate means to diagnose the
Vehicle Immobilizer System involves the use of a
DRB scan tool. Refer to the Vehicle Theft Security
System menu item on the DRB scan tool for the
procedures.
The vehicle immobilizer system and the Chrysler
Collision Detection (CCD) data bus network should
be diagnosed using the DRB scan tool. The DRB will
allow confirmation that the CCD data bus is func-
tional, that the immobilizer receiver is placing the
proper messages on the CCD data bus, and that the
Powertrain Control Module (PCM) is receiving the
CCD data bus messages. Refer to the Vehicle Theft
Security System menu item on the DRB scan tool for
the procedures. Refer to 8W-39 - Vehicle Theft Secu-
rity System in Group 8W - Wiring Diagrams for com-
plete circuit descriptions and diagrams.
(1) With the ignition switch in the Off position,
depress the Lock or Unlock button of the immobilizer
transmitter. Listen for the immobilizer receiver to
issue an audible chirp (Unlock) or chirps (Lock). If
OK, go to Step 2. If not OK, replace the transmitter
batteries with known good units and repeat Step 1. If
still not OK, go to Step 2.
(2) Check the fuse in the Power Distribution Cen-
ter (PDC). If OK, go to Step 3. If not OK, repair the
shorted circuit or component as required and replace
the faulty fuse.
(3) Disconnect and isolate the battery negative
cable. Unplug the wire harness connector at the
immobilizer receiver. Check for continuity between
the ground circuit cavity of the immobilizer receiver
wire harness connector and a good ground. There
should be continuity. If OK, go to Step 4. If not OK,
repair the open circuit to ground as required.
(4) Connect the battery negative cable. Check for
battery voltage at the fused B(+) circuit cavity of the
immobilizer receiver wire harness connector. If OK,
refer to the Vehicle Theft Security System menu itemon the DRB scan tool for further diagnosis. If not
OK, repair the open circuit to the PDC fuse as
required.REMOVAL AND INSTALLATION
IMMOBILIZER RECEIVER
WARNING: ON VEHICLES EQUIPPED WITH AIR-
BAGS, REFER TO GROUP 8M - PASSIVE
RESTRAINT SYSTEMS BEFORE ATTEMPTING ANY
STEERING WHEEL, STEERING COLUMN, OR
INSTRUMENT PANEL COMPONENT DIAGNOSIS OR
SERVICE. FAILURE TO TAKE THE PROPER PRE-
CAUTIONS COULD RESULT IN ACCIDENTAL AIR-
BAG DEPLOYMENT AND POSSIBLE PERSONAL
INJURY.
(1) Disconnect and isolate the battery negative
cable.
(2) Remove the Instrument Panel Top Cover and
Cluster Bezel and Right Trim panel. Remove the
receiver from the dash panel above the heater-A/C
housing (Fig. 2).
(3) Unplug the immobilizer receiver from the wire
harness connector.
(4) Reverse the removal procedures to install.
(5) Refer to the Vehicle Theft Security System
menu item on the DRB scan tool for the procedures
to program transmitter vehicle access codes into the
memory of the new immobilizer receiver.
Fig. 2 Immobilizer Receiver Remove/Install
PLIMMOBILIZER SYSTEM 8Q - 3
Page 379 of 1200

Page 380 of 1200
POWER WINDOWS
CONTENTS
page page
GENERAL INFORMATION
INTRODUCTION......................... 1
DIAGNOSIS AND TESTING
WINDOW MOTOR TEST................... 1
WINDOW SWITCH TEST.................. 1WIRING TEST........................... 1
REMOVAL AND INSTALLATION
2 DOOR WINDOW MOTOR................ 2
4 DOOR WINDOW MOTOR................ 3
WINDOW SWITCH....................... 2
GENERAL INFORMATION
INTRODUCTION
The window lift motors are of the permanent mag-
net type. A battery positive and negative connection
to either of the two motor terminals will cause the
motor to rotate in one direction. Reversing current
through these same two connections will cause the
motor to rotate in the opposite direction.
Each individual motor is grounded through the
master switch.
DIAGNOSIS AND TESTING
WIRING TEST
The following wiring test determines whether or
not voltage is continuous through the body harness
to switch.
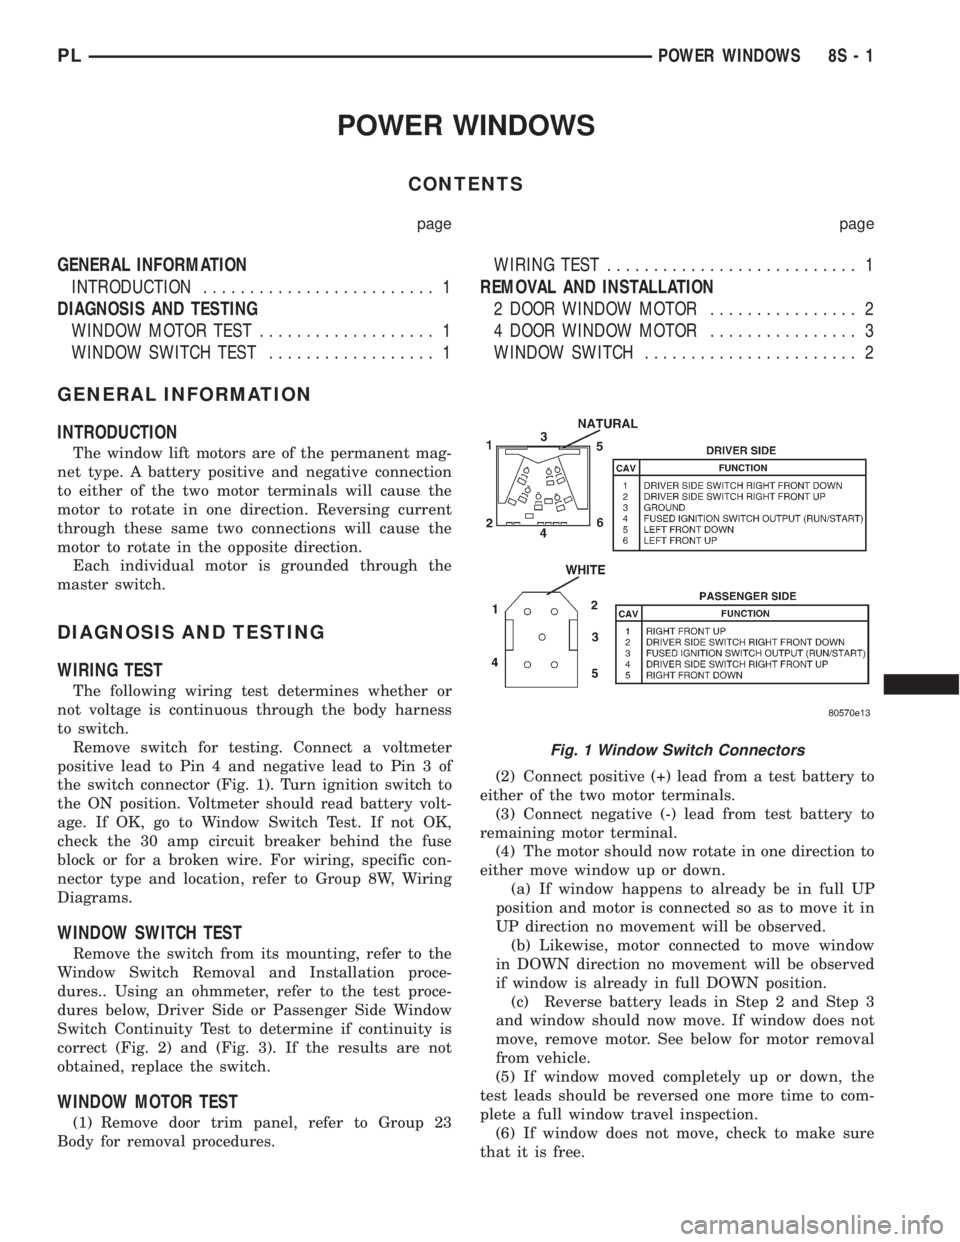
Remove switch for testing. Connect a voltmeter
positive lead to Pin 4 and negative lead to Pin 3 of
the switch connector (Fig. 1). Turn ignition switch to
the ON position. Voltmeter should read battery volt-
age. If OK, go to Window Switch Test. If not OK,
check the 30 amp circuit breaker behind the fuse
block or for a broken wire. For wiring, specific con-
nector type and location, refer to Group 8W, Wiring
Diagrams.
WINDOW SWITCH TEST
Remove the switch from its mounting, refer to the
Window Switch Removal and Installation proce-
dures.. Using an ohmmeter, refer to the test proce-
dures below, Driver Side or Passenger Side Window
Switch Continuity Test to determine if continuity is
correct (Fig. 2) and (Fig. 3). If the results are not
obtained, replace the switch.
WINDOW MOTOR TEST
(1) Remove door trim panel, refer to Group 23
Body for removal procedures.(2) Connect positive (+) lead from a test battery to
either of the two motor terminals.
(3) Connect negative (-) lead from test battery to
remaining motor terminal.
(4) The motor should now rotate in one direction to
either move window up or down.
(a) If window happens to already be in full UP
position and motor is connected so as to move it in
UP direction no movement will be observed.
(b) Likewise, motor connected to move window
in DOWN direction no movement will be observed
if window is already in full DOWN position.
(c) Reverse battery leads in Step 2 and Step 3
and window should now move. If window does not
move, remove motor. See below for motor removal
from vehicle.
(5) If window moved completely up or down, the
test leads should be reversed one more time to com-
plete a full window travel inspection.
(6) If window does not move, check to make sure
that it is free.
Fig. 1 Window Switch Connectors
PLPOWER WINDOWS 8S - 1