DODGE TRUCK 1993 Service Repair Manual
Manufacturer: DODGE, Model Year: 1993, Model line: TRUCK, Model: DODGE TRUCK 1993Pages: 1502, PDF Size: 80.97 MB
Page 1171 of 1502
21
- 170
TRANSMISSION OVERHAUL—32RH
•
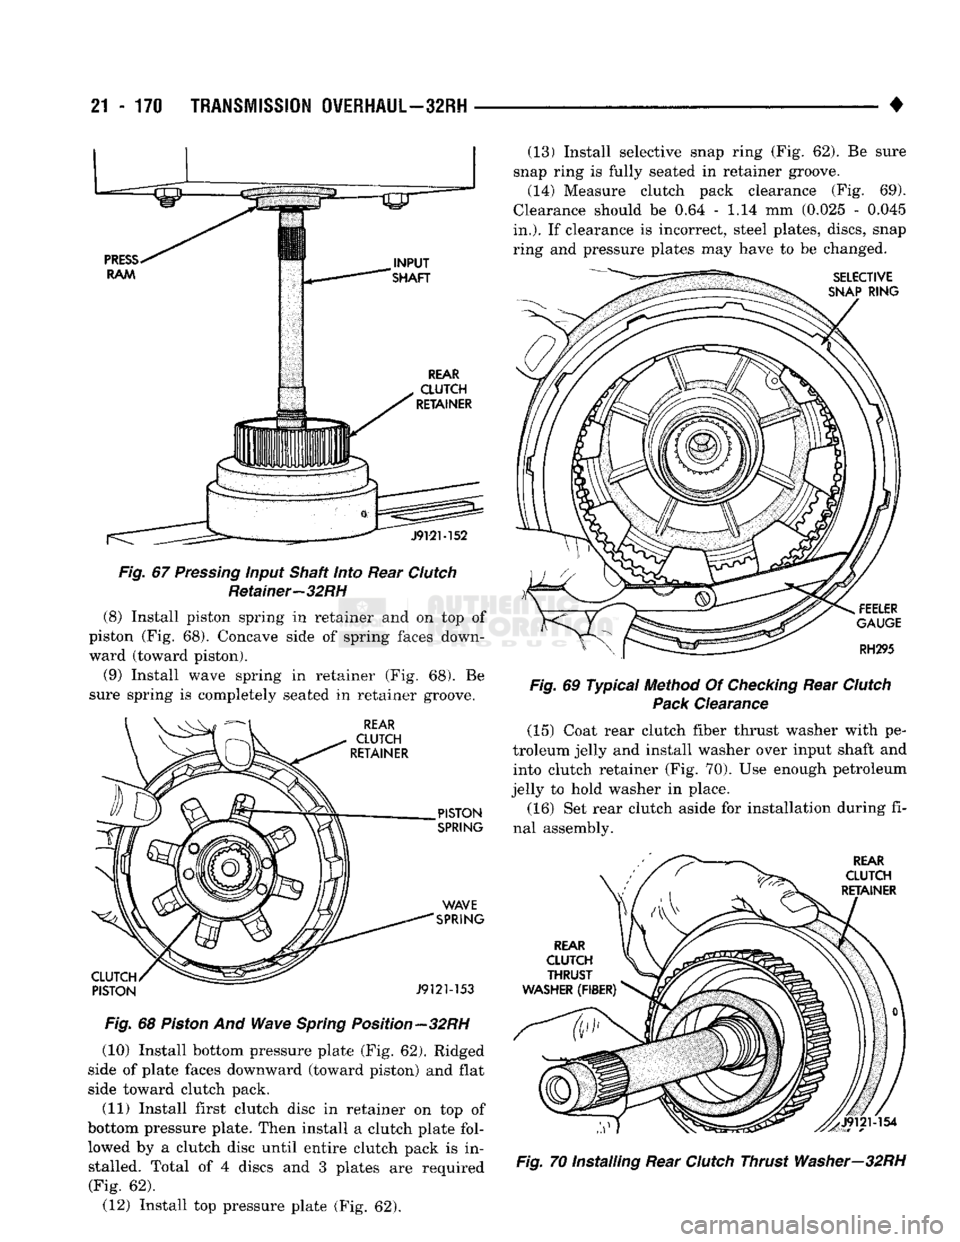
Fig.
67
Pressing
input Shaft
into
Rear
Clutch
Retainer—32RH (8) Install piston spring in retainer and on top of
piston (Fig. 68). Concave side of spring faces down ward (toward piston).
(9) Install wave spring in retainer (Fig. 68). Be
sure spring is completely seated in retainer groove.
Fig.
68
Piston
And Wave
Spring
Position—32RH
(10) Install bottom pressure plate (Fig. 62). Ridged
side of plate faces downward (toward piston) and flat
side toward clutch pack.
(11) Install first clutch disc in retainer on top of
bottom pressure plate. Then install a clutch plate fol lowed by a clutch disc until entire clutch pack is installed. Total of 4 discs and 3 plates are required (Fig. 62). (12) Install top pressure plate (Fig. 62). (13) Install selective snap ring (Fig. 62). Be sure
snap ring is fully seated in retainer groove. (14) Measure clutch pack clearance (Fig. 69).
Clearance should be 0.64 - 1.14 mm (0.025 - 0.045
in.).
If clearance is incorrect, steel plates, discs, snap
ring and pressure plates may have to be changed.
Fig.
69 Typical Method Of
Checking
Rear
Clutch
Pack
Clearance (15) Coat rear clutch fiber thrust washer with pe
troleum jelly and install washer over input shaft and into clutch retainer (Fig. 70). Use enough petroleum
jelly to hold washer in place.
(16) Set rear clutch aside for installation during fi
nal assembly.
Fig.
70 Installing Rear
Clutch
Thrust Washer—32RH
Page 1172 of 1502
TRANSMISSION
OVERHAUL—32RH
21 - 171
PLANETARY GEAR TRAIN
OVERHAUL
•OUTPUT
SHAFT
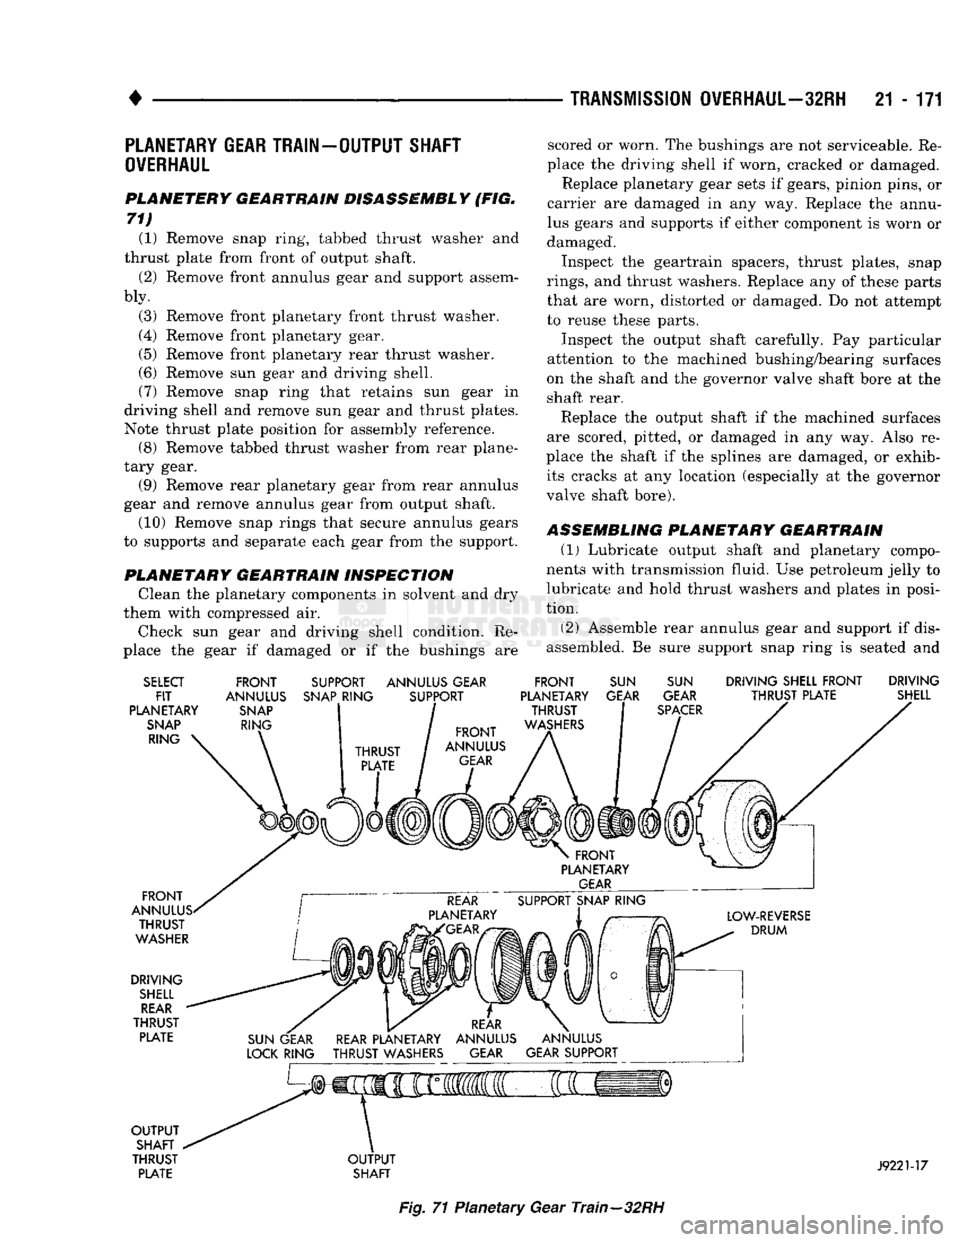
PLANETERY GEARTRAIN DISASSEMBLY (FIG.
71) (1) Remove snap ring, tabbed thrust washer and
thrust plate from front of output shaft.
(2) Remove front annulus gear and support assem
bly.
(3) Remove front planetary front thrust washer.
(4) Remove front planetary gear.
(5) Remove front planetary rear thrust washer.
(6) Remove sun gear and driving shell.
(7) Remove snap ring that retains sun gear in
driving shell and remove sun gear and thrust plates.
Note thrust plate position for assembly reference. (8) Remove tabbed thrust washer from rear plane
tary gear. (9) Remove rear planetary gear from rear annulus
gear and remove annulus gear from output shaft. (10) Remove snap rings that secure annulus gears
to supports and separate each gear from the support.
PLANETARY GEARTRAIN INSPECTION Clean the planetary components in solvent and dry
them with compressed air.
Check sun gear and driving shell condition. Re
place the gear if damaged or if the bushings are scored or worn. The bushings are not serviceable. Re
place the driving shell if worn, cracked or damaged. Replace planetary gear sets if gears, pinion pins, or
carrier are damaged in any way. Replace the annu
lus gears and supports if either component is worn or
damaged.
Inspect the geartrain spacers, thrust plates, snap
rings,
and thrust washers. Replace any of these parts
that are worn, distorted or damaged. Do not attempt
to reuse these parts.
Inspect the output shaft carefully. Pay particular
attention to the machined bushing/bearing surfaces
on the shaft and the governor valve shaft bore at the
shaft rear.
Replace the output shaft if the machined surfaces
are scored, pitted, or damaged in any way. Also re
place the shaft if the splines are damaged, or exhib its cracks at any location (especially at the governor
valve shaft bore).
ASSEMBLING PLANETARY GEARTRAIN
(1)
Lubricate output shaft and planetary compo
nents with transmission fluid. Use petroleum jelly to
lubricate and hold thrust washers and plates in posi
tion.
(2) Assemble rear annulus gear and support if dis
assembled. Be sure support snap ring is seated and
SELECT
FIT
PLANETARY
SNAP
RING FRONT
ANNULUS
SNAP
RING SUPPORT ANNULUS GEAR
SNAP
RING SUPPORT FRONT
PLANETARY THRUST
WASHERS
SUN
GEAR
SUN
GEAR
SPACER
DRIVING SHELL FRONT DRIVING
THRUST PLATE SHELL
FRONT
ANNULUS. THRUST
WASHER
DRIVING
SHELL
REAR
THRUST PLATE
OUTPUT
SHAFT
THRUST PLATE
OUTPUT
SHAFT
J9221-17
Fig.
71 Planetary Gear Train—32RH
Page 1173 of 1502
21
- 172
TRANSMISSION OVERHAUL—32RH
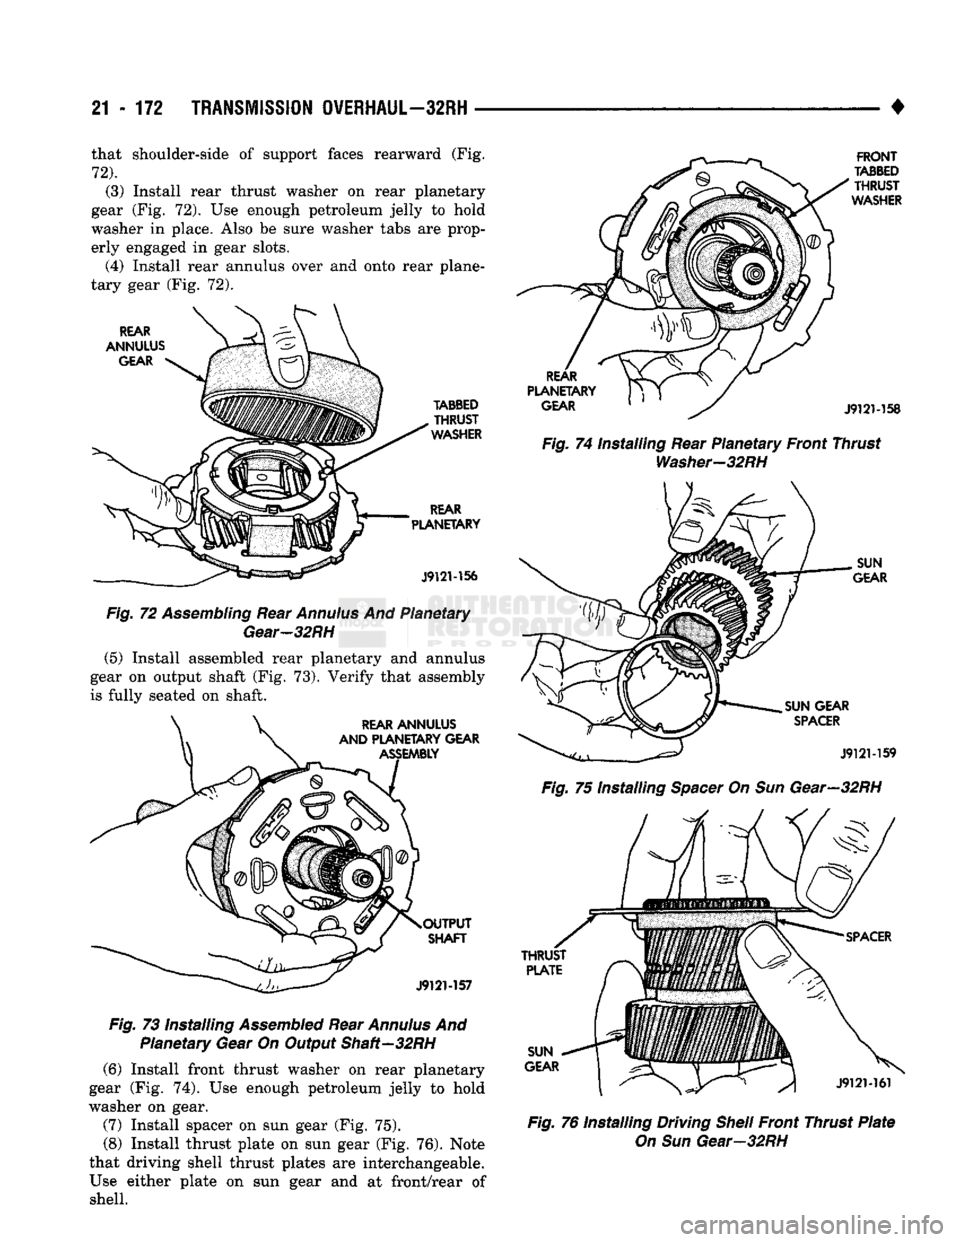
• that shoulder-side of support faces rearward (Fig.
72).
(3) Install rear thrust washer on rear planetary
gear (Fig. 72). Use enough petroleum jelly to hold
washer in place. Also be sure washer tabs are prop
erly engaged in gear slots.
(4) Install rear annulus over and onto rear plane
tary gear (Fig. 72).
Fig. 72
Assembling
Rear
Annulus
And Planetary
Gear-32RH
(5) Install assembled rear planetary and annulus
gear on output shaft (Fig. 73). Verify that assembly
is fully seated on shaft.
Fig.
73 installing Assembled Rear Annulus And Planetary Gear On Output Shaft-32RH
(6) Install front thrust washer on rear planetary
gear (Fig. 74). Use enough petroleum jelly to hold
washer on gear.
(7) Install spacer on sun gear (Fig. 75). (8) Install thrust plate on sun gear (Fig. 76). Note
that driving shell thrust plates are interchangeable. Use either plate on sun gear and at front/rear of shell. Fig. 74 installing Rear Planetary Front Thrust
Washer-32RH
Fig. 75 Installing Spacer On Sun Gear—32RH
Fig. 76 Installing Driving Shell Front Thrust Plate On Sun Gear-32RH
Page 1174 of 1502
•
TRANSMISSION
OVERHAUL—32RH
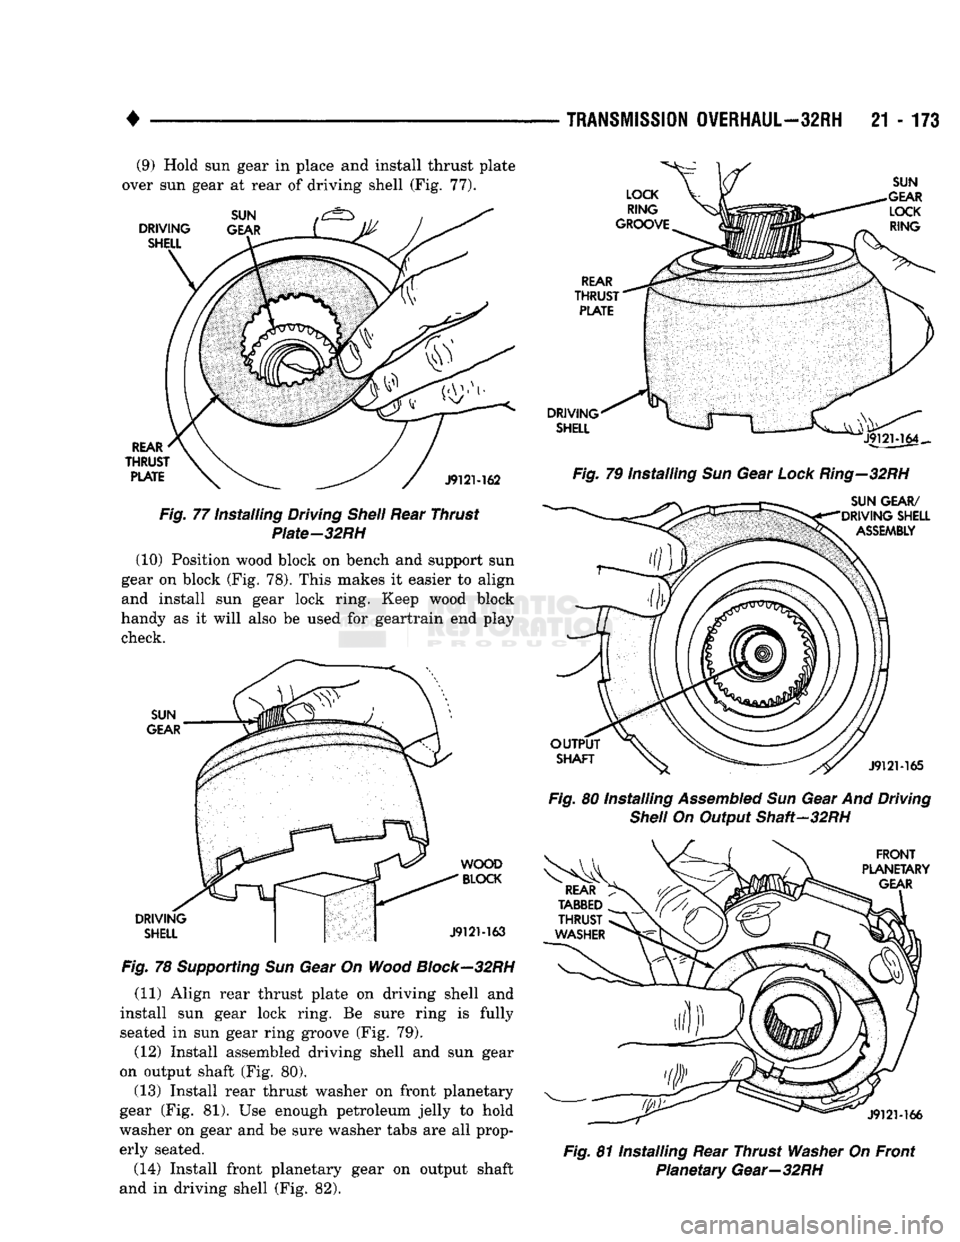
21 - 173 (9) Hold sun gear in place and install thrust plate
over sun gear at rear of driving shell (Fig. 77).
DRIVING
SHELL SUN
GEAR
REAR
THRUST
PLATE
J912M62
Fig.
77 Installing Driving
Shell
Rear Thrust Piate-32RH
(10) Position wood block on bench and support sun
gear on block (Fig. 78). This makes it easier to align
and install sun gear lock ring. Keep wood block
handy as it will also be used for geartrain end play check.
SUN
GEAR
DRIVING SHELL WOOD
BLOCK
J912M63
Fig.
78
Supporting
Sun Gear On
Wood
Block—32RH
(11) Align rear thrust plate on driving shell and
install sun gear lock ring. Be sure ring is fully seated in sun gear ring groove (Fig. 79).
(12) Install assembled driving shell and sun gear
on output shaft (Fig. 80).
(13) Install rear thrust washer on front planetary
gear (Fig. 81). Use enough petroleum jelly to hold
washer on gear and be sure washer tabs are all prop erly seated.
(14) Install front planetary gear on output shaft
and in driving shell (Fig. 82).
LOCK
RING
GROOVE SUN
GEAR LOCK RING
REAR
THRUST
PLATE
DRIVING SHELL
Fig.
79 Installing Sun Gear
Lock
Ring—32RH
SUN GEAR/
DRIVING SHELL
ASSEMBLY
OUTPUT
SHAFT
J912M65
Fig.
80 Installing
Assembled
Sun Gear And Driving
Shell
On Output Shaft-32RH
REAR
TABBED
THRUST
WASHER
FRONT
PLANETARY GEAR
J912M66
Fig.
81 Installing Rear Thrust
Washer
On Front Planetary Gear—32RH
Page 1175 of 1502
21
- 174
TRANSMISSION
OVERHAUL—32RH
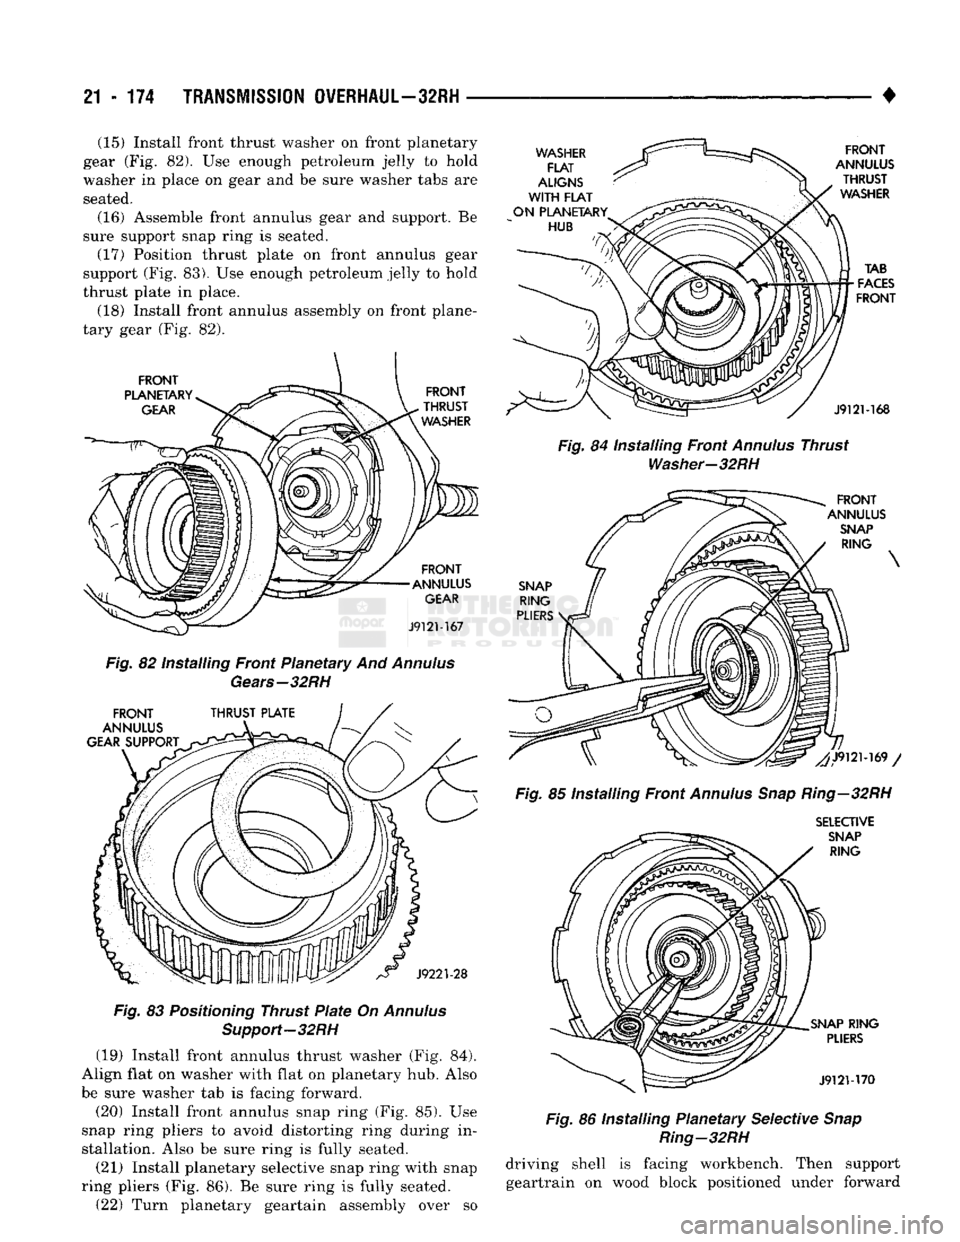
• (15) Install front thrust washer on front planetary
gear (Fig. 82). Use enough petroleum jelly to hold
washer in place on gear and be sure washer tabs are seated.
(16) Assemble front annulus gear and support. Be
sure support snap ring is seated. (17) Position thrust plate on front annulus gear
support (Fig. 83). Use enough petroleum jelly to hold
thrust plate in place. (18) Install front annulus assembly on front plane
tary gear (Fig. 82).
Fig.
82 Installing Front Planetary And
Annulus
Gears—32RH
Fig.
83
Positioning
Thrust
Plate
On
Annulus
Support—32RH
(19) Install front annulus thrust washer (Fig. 84).
Align flat on washer with flat on planetary hub. Also
be sure washer tab is facing forward.
(20) Install front annulus snap ring (Fig. 85). Use
snap ring pliers to avoid distorting ring during in
stallation. Also be sure ring is fully seated. (21) Install planetary selective snap ring with snap
ring pliers (Fig. 86). Be sure ring is fully seated.
(22) Turn planetary geartain assembly over so
Fig.
84 installing Front
Annulus
Thrust
Washer-32RH
Fig.
85 Installing Front
Annulus Snap
Ring—32RH
SELECTIVE
Fig.
86 Installing Planetary Selective
Snap
Ring—32
RH
driving shell is facing workbench. Then support geartrain on wood block positioned under forward
Page 1176 of 1502
•
TRANSMISSION
OVERHAUL—32RH
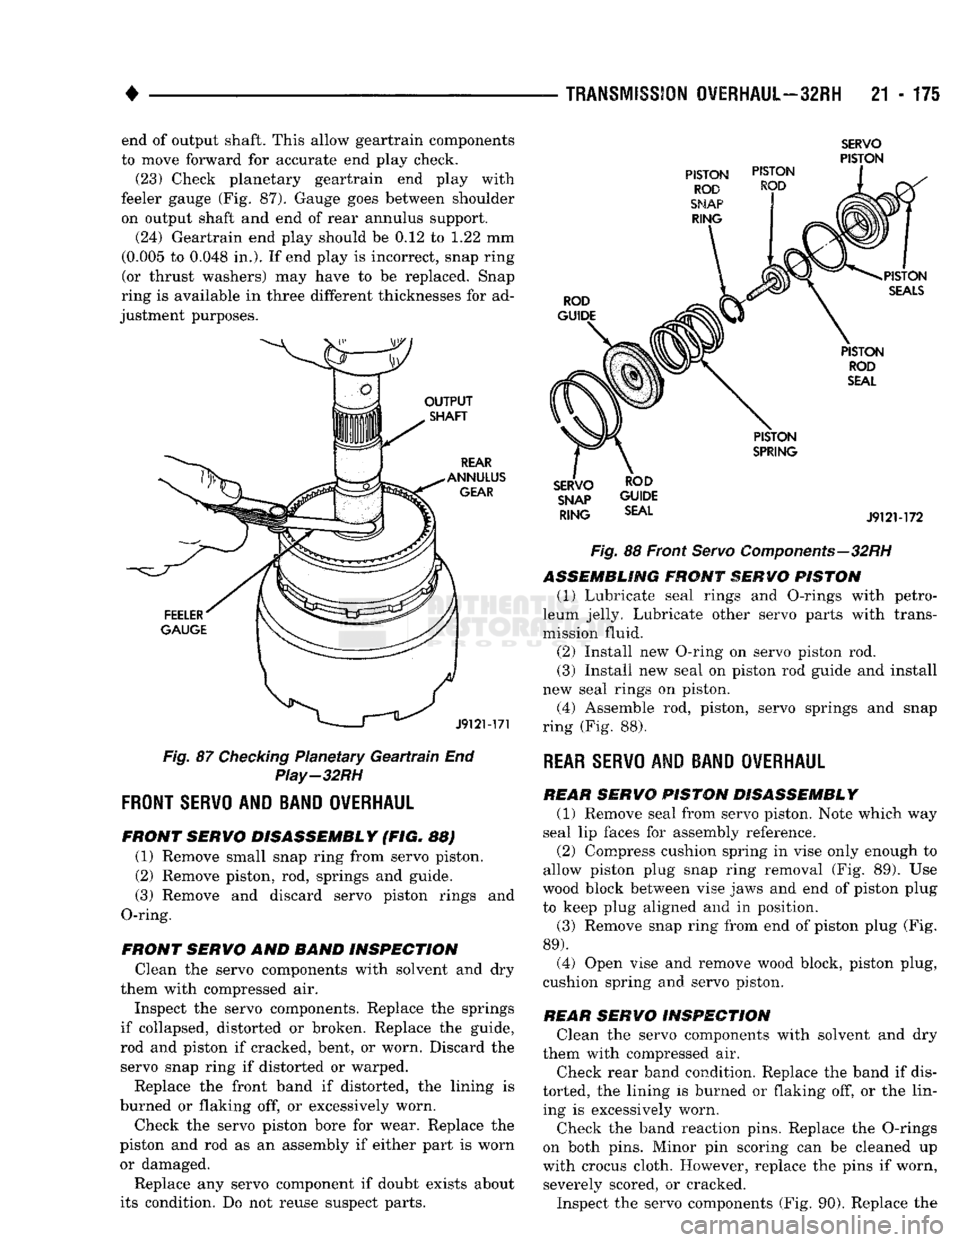
21 - 175 end of output shaft. This allow geartrain components
to move forward for accurate end play check. (23) Check planetary geartrain end play with
feeler gauge (Fig. 87). Gauge goes between shoulder on output shaft and end of rear annulus support.
(24) Geartrain end play should be 0.12 to 1.22 mm
(0.005 to 0.048 in.). If end play is incorrect, snap ring (or thrust washers) may have to be replaced. Snap
ring is available in three different thicknesses for ad
justment purposes.
Fig.
87
Checking
Planetary
Geartrain
End
Play-32RH
FRONT
SERVO
AND BAND OVERHAUL
FRONT
SERWO DISASSEMBLY
(FIG. 88) (1) Remove small snap ring from servo piston.
(2) Remove piston, rod, springs and guide.
(3) Remove and discard servo piston rings and
O-ring.
FRONT
SERWO
AND
BAND
INSPECTION
Clean the servo components with solvent and dry
them with compressed air.
Inspect the servo components. Replace the springs
if collapsed, distorted or broken. Replace the guide,
rod and piston if cracked, bent, or worn. Discard the servo snap ring if distorted or warped.
Replace the front band if distorted, the lining is
burned or flaking off, or excessively worn.
Check the servo piston bore for wear. Replace the
piston and rod as an assembly if either part is worn
or damaged.
Replace any servo component if doubt exists about
its condition. Do not reuse suspect parts.
SERVO
PISTON
SNAP GUIDE RING
SEAL J912M72
Fig.
88 Front
Servo
Components—32RH
ASSEMBLING
FRONT
SERVO
PISTON
(1) Lubricate seal rings and O-rings with petro
leum jelly. Lubricate other servo parts with trans
mission fluid.
(2) Install new O-ring on servo piston rod.
(3) Install new seal on piston rod guide and install
new seal rings on piston. (4) Assemble rod, piston, servo springs and snap
ring (Fig. 88).
REAR
SERVO
AND BAND OVERHAUL
REAR SERVO
PISTON
DISASSEMBLY
(1) Remove seal from servo piston. Note which way
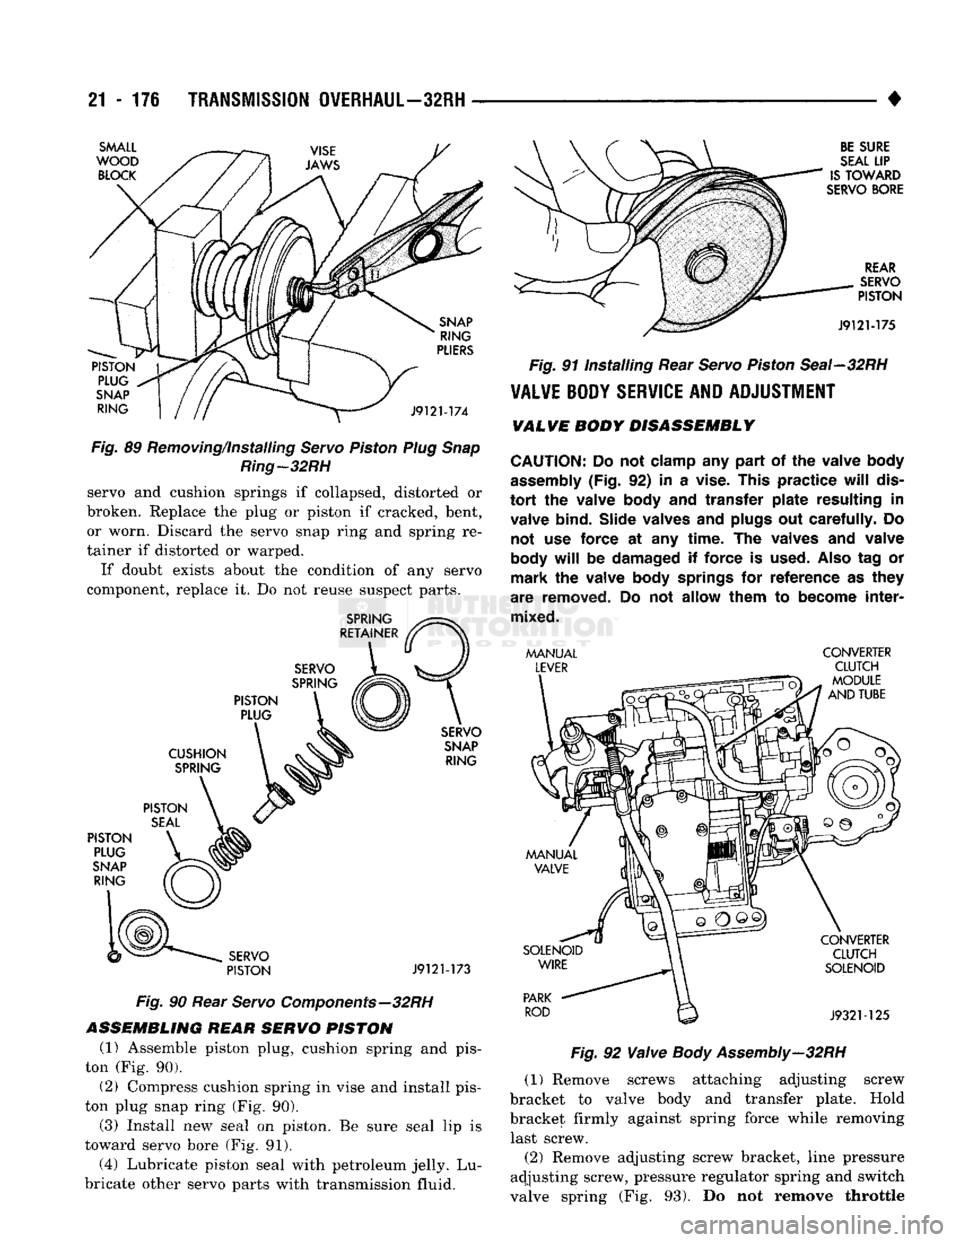
seal lip faces for assembly reference. (2) Compress cushion spring in vise only enough to
allow piston plug snap ring removal (Fig. 89). Use
wood block between vise jaws and end of piston plug
to keep plug aligned and in position.
(3) Remove snap ring from end of piston plug (Fig.
89).
(4) Open vise and remove wood block, piston plug,
cushion spring and servo piston.
REAR SERVO
INSPECTION
Clean the servo components with solvent and dry
them with compressed air.
Check rear band condition. Replace the band if dis
torted, the lining is burned or flaking off, or the lin ing is excessively worn.
Check the band reaction pins. Replace the O-rings
on both pins. Minor pin scoring can be cleaned up
with crocus cloth. However, replace the pins if worn, severely scored, or cracked.
Inspect the servo components (Fig. 90). Replace the
Page 1177 of 1502
21
- 176
TRANSMISSION
OVERHAUL—32RH
•
SMALL
WOOD
BLOCK
PISTON PLUG
SNAP
RING
SNAP
RING
PLIERS
J912M74
Fig.
89 Removing/installing
Servo
Piston
Plug Snap
Ring-32
RH
servo and cushion springs if collapsed, distorted or
broken. Replace the plug or piston if cracked, bent, or worn. Discard the servo snap ring and spring re
tainer if distorted or warped.
If doubt exists about the condition of any servo
component, replace it. Do not reuse suspect parts.
SPRING
RETAINER
SERVO
SPRING
PISTON PLUG
CUSHION
SPRING
SERVO
SNAP
RING
PISTON
SEAL
PISTON
PLUG
SNAP
RING
SERVO
PISTON
J9121-173
Fig.
90 Rear
Servo
Components—32RH
ASSEMBLING
REAR SERVO PISTON
(1) Assemble piston plug, cushion spring and pis
ton (Fig. 90). (2) Compress cushion spring in vise and install pis
ton plug snap ring (Fig. 90).
(3) Install new seal on piston. Be sure seal lip is
toward servo bore (Fig. 91).
(4) Lubricate piston seal with petroleum jelly. Lu
bricate other servo parts with transmission fluid.
BE
SURE
SEAL
LIP
IS
TOWARD
SERVO
BORE
REAR
SERVO
PISTON
J9121-175
Fig.
91 Installing Rear
Servo
Piston
Seal—32RH
VALVE
BODY
SERVICE
AND ADJUSTMENT
VALVE BODY DISASSEMBLY
CAUTION:
Do not
clamp
any
part
of the
valve body
assembly
(Fig.
92) in a
vise.
This practice
will
dis
tort
the
valve body
and
transfer plate resulting
in
valve bind. Slide valves
and
plugs
out
carefully.
Do
not
use
force
at any
time.
The
valves
and
valve
body
will
be
damaged
if
force
is
used.
Also
tag or
mark
the
valve body
springs
for
reference
as
they
are removed.
Do not
allow them
to
become
inter
mixed.
MANUAL
LEVER
CONVERTER
CLUTCH
MODULE
AND TUBE MANUAL
VALVE
SOLENOID WIRE
PARK
ROD
CONVERTER
CLUTCH
SOLENOID
J9321-125
Fig.
92 Valve
Body
Assembly—32RH
(1) Remove screws attaching adjusting screw
bracket to valve body and transfer plate. Hold
bracket firmly against spring force while removing last screw.
(2) Remove adjusting screw bracket, line pressure
adjusting screw, pressure regulator spring and switch
valve spring (Fig. 93). Do not remove throttle
Page 1178 of 1502
•
TRANSMISSION
OVERHAUL—32RH
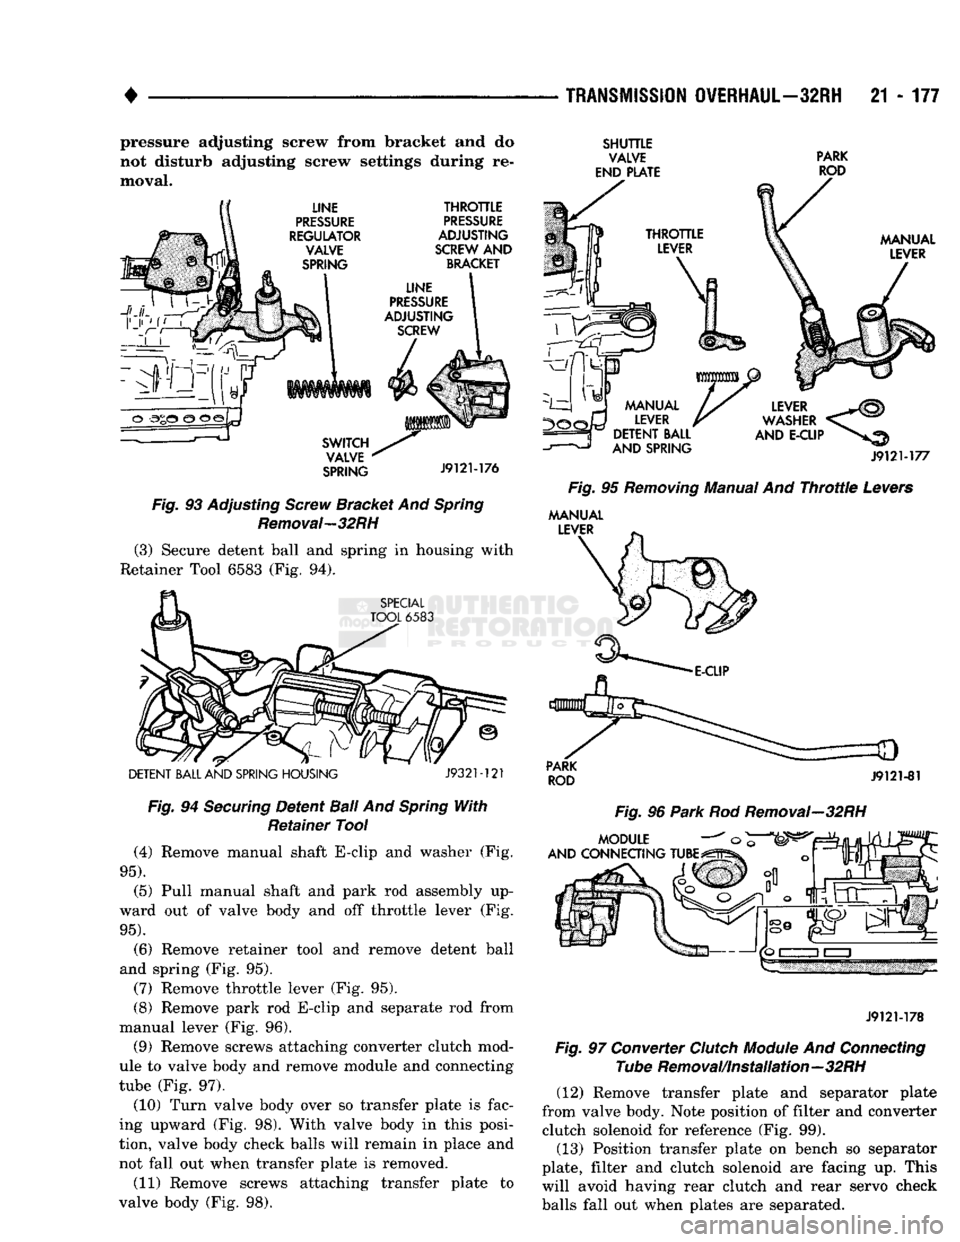
21 - 177 pressure adjusting screw from bracket and do
not disturb adjusting screw settings during re
moval.
SPRING
J912M76
Fig.
93 Adjusting
Screw
Bracket And
Spring
Removal—32RH
(3) Secure detent ball and spring in housing with
Retainer Tool 6583 (Fig. 94).
DETENT BALL
AND
SPRING
HOUSING
J9321-121
Fig.
94
Securing
Detent
Ball
And
Spring
With
Retainer Tool (4) Remove manual shaft E-clip and washer (Fig.
95).
(5) Pull manual shaft and park rod assembly up
ward out of valve body and off throttle lever (Fig.
95).
(6) Remove retainer tool and remove detent ball
and spring (Fig. 95).
(7) Remove throttle lever (Fig. 95).
(8) Remove park rod E-clip and separate rod from
manual lever (Fig. 96). (9) Remove screws attaching converter clutch mod
ule to valve body and remove module and connecting
tube (Fig. 97).
(10) Turn valve body over so transfer plate is fac
ing upward (Fig. 98). With valve body in this posi
tion, valve body check balls will remain in place and
not fall out when transfer plate is removed.
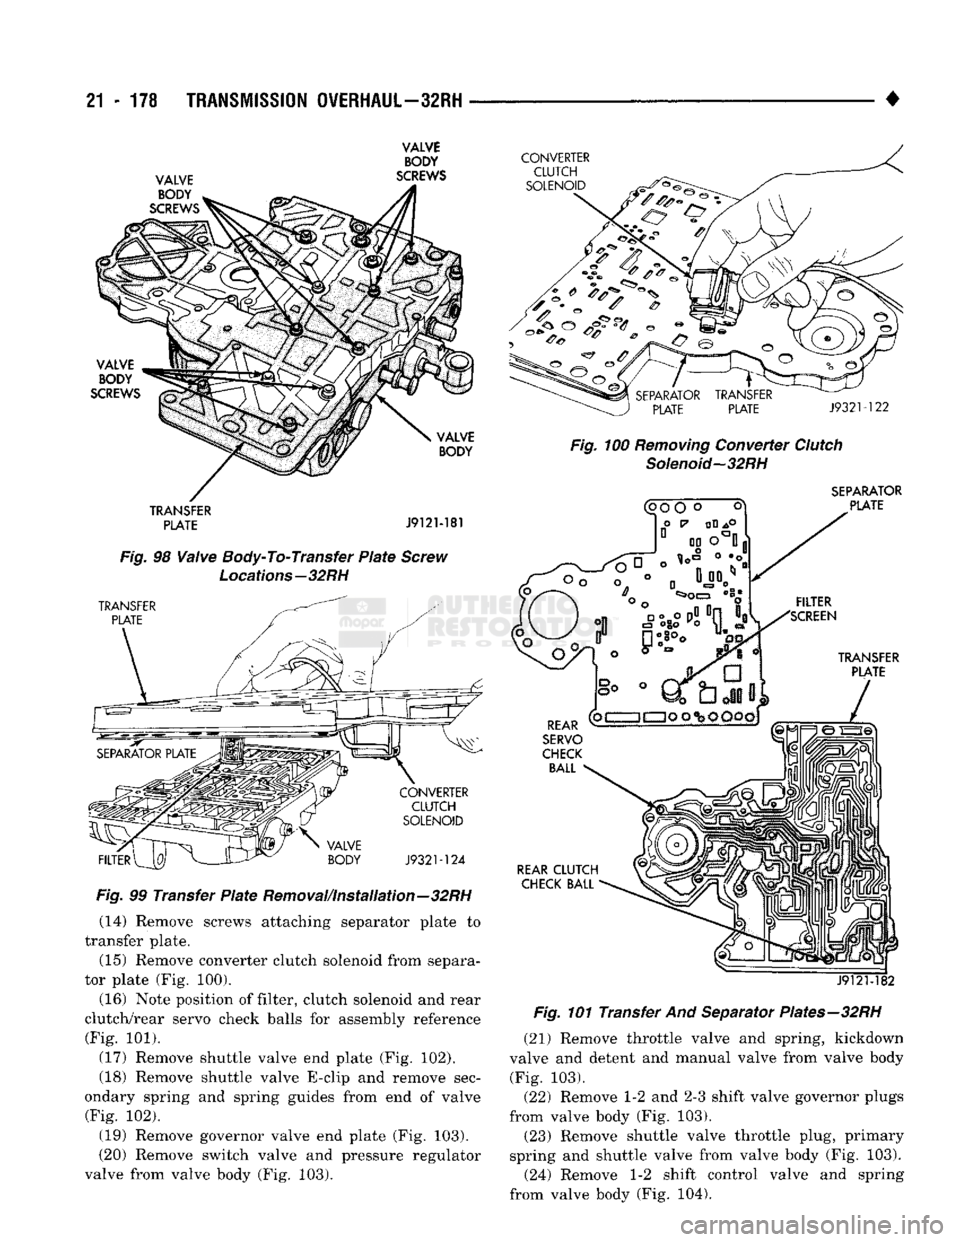
(11) Remove screws attaching transfer plate to
valve body (Fig. 98).
SHUTTLE
VALVE PARK
END PLATE
ROD
Fig.
95
Removing
Manual And
Throttle
Levers
MANUAL
Fig.
96
Park
Rod Removal—32RH J912M78
Fig.
97 Converter
Clutch
Module
And
Connecting
Tube Removal/Installation—32RH (12) Remove transfer plate and separator plate
from valve body. Note position of filter and converter clutch solenoid for reference (Fig. 99).
(13) Position transfer plate on bench so separator
plate, filter and clutch solenoid are facing up. This
will avoid having rear clutch and rear servo check
balls fall out when plates are separated.
Page 1179 of 1502
21
- 178
TRANSMISSION OVERHAUL—32RH
•
VALVE
BODY
TRANSFER
PLATE
J9121-181
Fig.
98
Valve
Body-
To- Transfer
Plate
Screw
Locations—32RH
Fig.
99 Transfer
Plate
Removal/Installation—32RH
(14) Remove screws attaching separator plate to
transfer plate.
(15) Remove converter clutch solenoid from separa
tor plate (Fig. 100).
(16) Note position of filter, clutch solenoid and rear
clutch/rear servo check balls for assembly reference (Fig. 101).
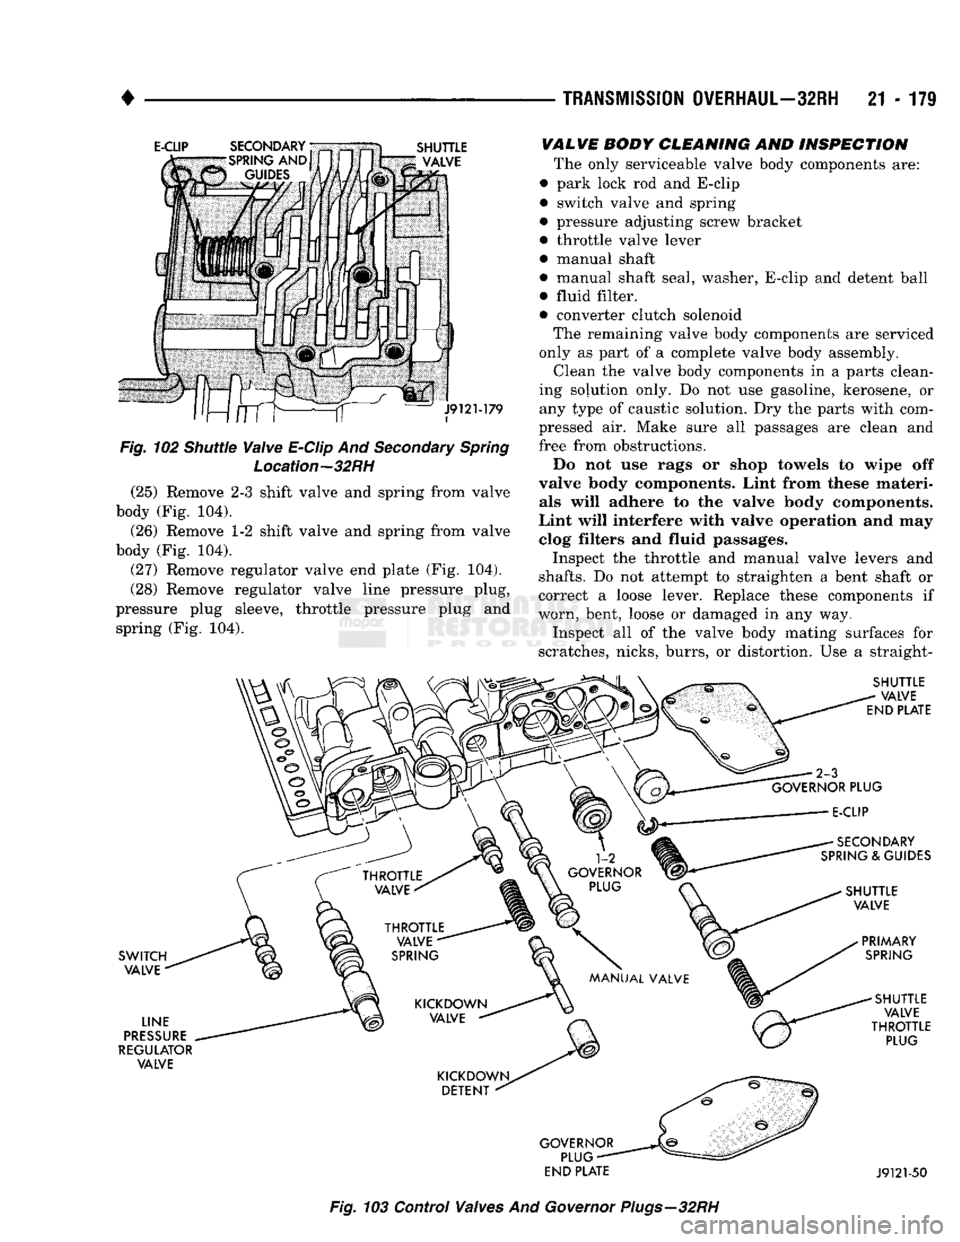
(17) Remove shuttle valve end plate (Fig. 102).
(18) Remove shuttle valve E-clip and remove sec
ondary spring and spring guides from end of valve (Fig. 102).
(19) Remove governor valve end plate (Fig. 103).
(20) Remove switch valve and pressure regulator
valve from valve body (Fig. 103).
Fig.
100
Removing
Converter
Clutch
Solenoid—32RH
SEPARATOR
J9121-
Fig.
101 Transfer And Separator Plates—32RH
(21) Remove throttle valve and spring, kickdown
valve and detent and manual valve from valve body (Fig. 103).
(22) Remove 1-2 and 2-3 shift valve governor plugs
from valve body (Fig. 103).
(23) Remove shuttle valve throttle plug, primary
spring and shuttle valve from valve body (Fig. 103).
(24) Remove 1-2 shift control valve and spring
from valve body (Fig. 104).
Page 1180 of 1502
TRANSMISSION
OVERHAUL—32RH
21 - 171
E-CLIP
SHUTTLE
VALVE
Fig.
102 Shuttle
Valve
E-Clip
And
Secondary
Spring
Location—32RH
(25) Remove
2-3
shift valve
and
spring from valve
body
(Fig. 104).
(26) Remove
1-2
shift valve
and
spring from valve
body
(Fig. 104).
(27) Remove regulator valve
end
plate
(Fig. 104).
(28) Remove regulator valve line pressure plug,
pressure plug sleeve, throttle pressure plug
and
spring
(Fig. 104).
VALVE
BODY
CLEANING
AND
INSPECTION
The only serviceable valve body components
are:
• park lock
rod and
E-clip
• switch valve
and
spring
• pressure adjusting screw bracket • throttle valve lever
• manual shaft
• manual shaft seal, washer, E-clip
and
detent ball • fluid filter.
• converter clutch solenoid
The remaining valve body components
are
serviced
only
as
part
of a
complete valve body assembly.
Clean
the
valve body components
in a
parts clean
ing solution only.
Do not use
gasoline, kerosene,
or
any type
of
caustic solution.
Dry the
parts with com
pressed
air.
Make sure
all
passages
are
clean
and
free from obstructions.
Do
not use
rags
or
shop towels
to
wipe
off
valve body components. Lint from these materi als will adhere
to the
valve body components.
Lint will interfere with valve operation
and may
clog filters
and
fluid passages.
Inspect
the
throttle
and
manual valve levers
and
shafts.
Do not
attempt
to
straighten
a
bent shaft
or
correct
a
loose lever. Replace these components
if
worn, bent, loose
or
damaged
in any way.
Inspect
all of the
valve body mating surfaces
for
scratches, nicks, burrs,
or
distortion.
Use a
straight-
SHUTTLE
VALVE
END
PLATE
SWITCH
VALVE
LINE
PRESSURE
REGULATOR
VALVE
SECONDARY
SPRING
&
GUIDES
SHUTTLE
VALVE
PRIMARY
SPRING
SHUTTLE
VALVE
THROTTLE
PLUG
GOVERNOR
PLUG-
END
PLATE
J9121-50
Fig.
103
Control Valves
And
Governor
Plugs—32RH