GEELY CK 2008 Workshop Manual
Manufacturer: GEELY, Model Year: 2008, Model line: CK, Model: GEELY CK 2008Pages: 392, PDF Size: 38.86 MB
Page 131 of 392

124Section 7 No. 1 Transverse Arm AssemblyComponents
Replacement1. Remove transverse arm assembly No. 1
(1) Remove the bolt connecting the No. 1 transverse arm assembly and rear brake assembly
(2) Remove the bolt connecting the No. 1 transverse arm assembly and vehicle body
2. Install the No. 1 transverse arm assembly
(1) The torque of the thread attaching the transverse arm to the body: 81~ 96N.m
(2) The torque of the thread attaching the transverse arm to the rear brake assembly: 81~96N.m
3. Check the rear wheel alignment, replace it as necessary.Pivot bracket
No. 1 Transverse arm
welding components
No. 1 Trailing arm bushing
Page 132 of 392
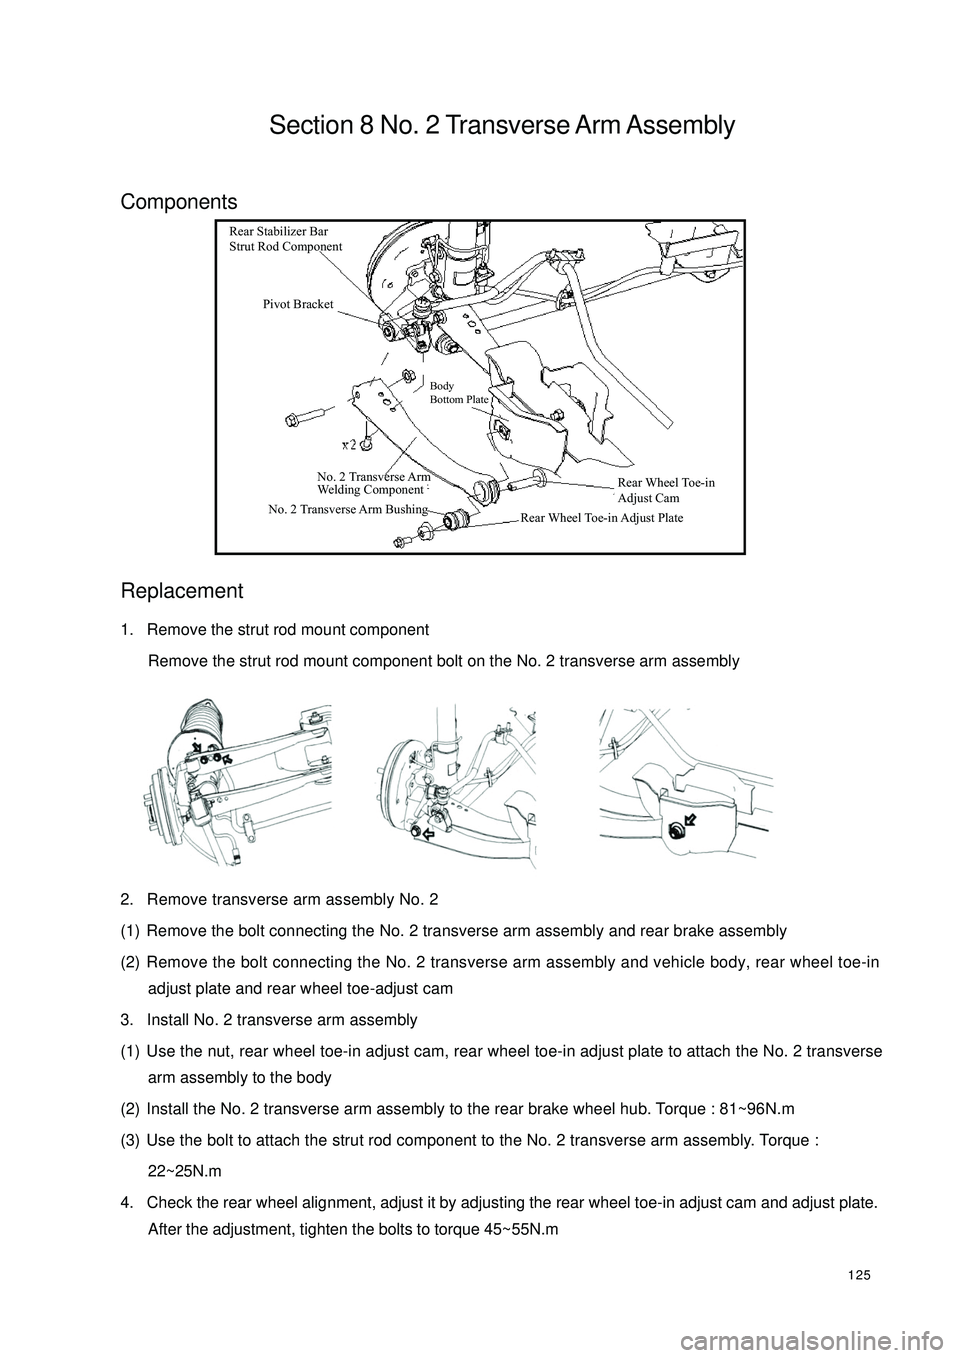
125Section 8 No. 2 Transverse Arm AssemblyComponents
Replacement1. Remove the strut rod mount component
Remove the strut rod mount component bolt on the No. 2 transverse arm assembly
2. Remove transverse arm assembly No. 2
(1) Remove the bolt connecting the No. 2 transverse arm assembly and rear brake assembly
(2) Remove the bolt connecting the No. 2 transverse arm assembly and vehicle body, rear wheel toe-in
adjust plate and rear wheel toe-adjust cam
3. Install No. 2 transverse arm assembly
(1) Use the nut, rear wheel toe-in adjust cam, rear wheel toe-in adjust plate to attach the No. 2 transverse
arm assembly to the body
(2) Install the No. 2 transverse arm assembly to the rear brake wheel hub. Torque : 81~96N.m
(3) Use the bolt to attach the strut rod component to the No. 2 transverse arm assembly. Torque :
22~25N.m
4. Check the rear wheel alignment, adjust it by adjusting the rear wheel toe-in adjust cam and adjust plate.
After the adjustment, tighten the bolts to torque 45~55N.mRear Stabilizer Bar
Strut Rod ComponentPivot BracketBody
Bottom PlateNo. 2 Transverse Arm
Welding Component
No. 2 Transverse Arm BushingRear Wheel Toe-in Adjust PlateRear Wheel Toe-in
Adjust Cam
Page 133 of 392

126Chapter 7 WheelSection 1 Tire InspectionInspection1. Check the tires for appearance and proper inflation pressure.
Check for inflation pressure after the vehicle stops for over 15min.
2. Using a dial gauge, check the runout of tire.
The tire runout should be no more than 3.0mm
Notice
(1) You must use specified tire and special wheel rim provided by the authorized service
center, otherwise it may affect the normal safe running of the vehicle and even result in
accidents!
(2) If the wheel rim is damaged, you must go to the authorized service center for service and
replacement! Never use the wheel rim of any other model!
3. Changing tire position
It is recommended to change the tire for each 10000km driving. See the figure for where to change each
tire
4. Inspect wheel dynamic balance
The imbalance should be no more than 8.0g. Otherwise, there will be extra vibration and noise when
driving.Tire module Tire inflationpressure
(Kpa
)
175/65 R14 82H 220Front
Page 134 of 392
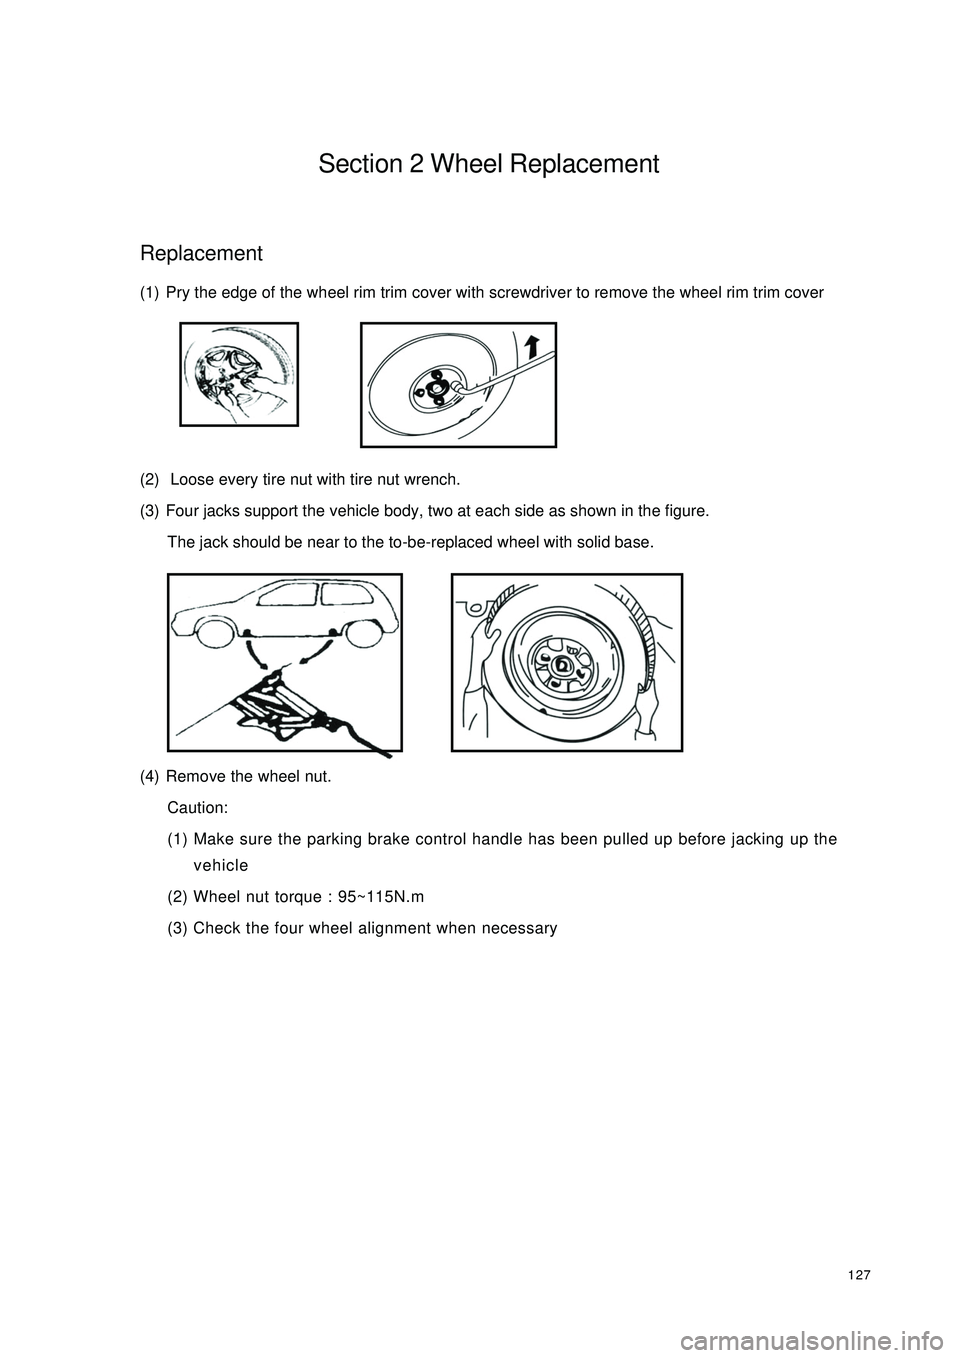
127Section 2 Wheel ReplacementReplacement(1) Pry the edge of the wheel rim trim cover with screwdriver to remove the wheel rim trim cover
(2) Loose every tire nut with tire nut wrench.
(3) Four jacks support the vehicle body, two at each side as shown in the figure.
The jack should be near to the to-be-replaced wheel with solid base.
(4) Remove the wheel nut.
Caution:
(1) Make sure the parking brake control handle has been pulled up before jacking up the
vehicle
(2) Wheel nut torque : 95~115N.m
(3) Check the four wheel alignment when necessary
Page 135 of 392

128Chapter 8 Power Steering SystemSection 1 Power Steering SystemPower Steering System DescriptionPower Steering System consists of the steering wheel, steering transmit device, power steering fixed device
and steering pipelines. The steering gear is rack and pinion type.
Major parameters for steering system:
Cautions:
1. Cautions for steering system
Make sure of the correct replacement of parts, incorrect replacement might affect the performance of
the steering system and lead to driving accidents.
2. Cautions for SRS System
This vehicle is equipped with SRS (Supplemental Restraint System), driver side air bag and front passenger
side air bag.
Failure to carry out service operations in the correct sequence could cause the unexpected deployment of
the air bag during servicing, possibly leading to a serious accident.Parameter
3.26
Inner 37.6°
Outer 33.3°
≤
10.5m Item
Steering Wheel total revolutions
Ma ximum Front
Wheel Turn Angle
Minimum Turning Dia me ter
Page 136 of 392
129Symptom TableThe table below is helpful to find the cause of the problem. The numbers indicate the priority of the likely
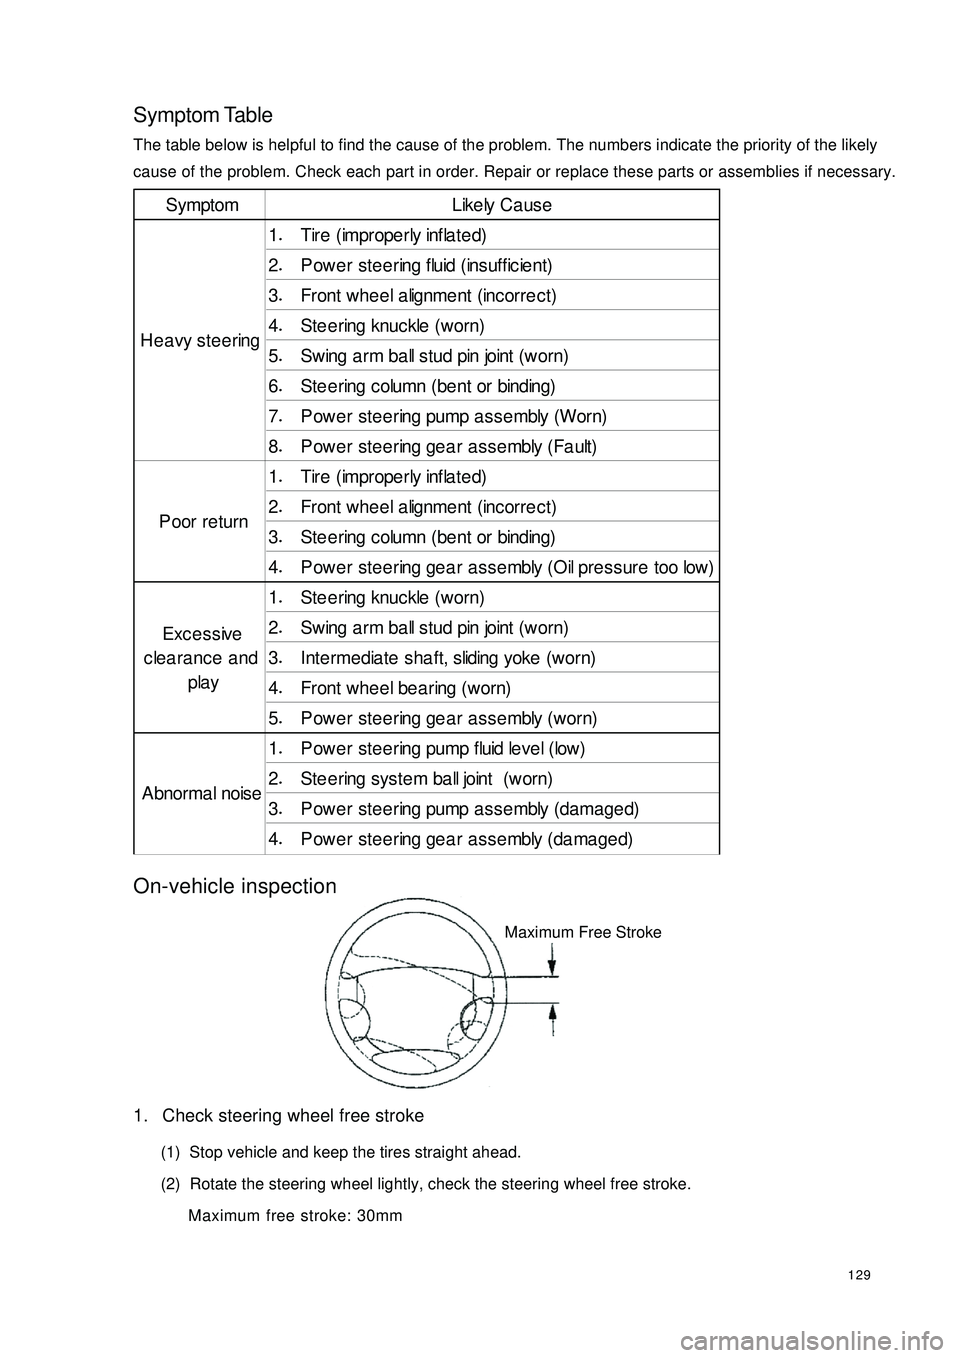
cause of the problem. Check each part in order. Repair or replace these parts or assemblies if necessary.On-vehicle inspection1. Check steering wheel free stroke
(1) Stop vehicle and keep the tires straight ahead.
(2) Rotate the steering wheel lightly, check the steering wheel free stroke.
Maximum free stroke: 30mmSymptom Like ly Ca us e
1.
Tire (imprope rly infla te d)
2.
P owe r ste ering fluid (insuffic ie nt)
3.
Front whe e l a lignme nt (inc orre c t)
4.
Ste e ring knuckle (worn)
5.
Swing a rm ba ll stud pin joint (worn)
6.
St e e r ing c olumn ( be nt or binding)
7.
P owe r ste ering pump a ssembly (Worn)
8.
Power steering gear assembly (Fault)
1.
Tire (imprope rly infla te d)
2.
Front whe e l a lignme nt (inc orre c t)
3.
St e e r ing c olumn ( be nt or binding)
4.
Power steering gear assembly (Oil pressure too low)
1.
Ste e ring knuckle (worn)
2.
Swing a rm ba ll stud pin joint (worn)
3.
Inte rmediate sha ft, sliding yoke (worn)
4.
Front whe e l be a ring (w orn)
5.
P owe r ste ering ge a r asse mbly (worn)
1.
P owe r ste ering pump fluid leve l (low)
2.
St e e r ing s ys t e m ba ll joint ( w or n)
3.
Power steering pump assembly (damaged)
4.
Power steering gear assembly (damaged) He avy ste eringPoor returnExcessive
clearance and
play
A bnor ma l nois eMaximum Free Stroke
Page 137 of 392

130Section 2 Steering Drive and Control MechanismComponentsSteering Wheel AssemblyAir Bag Assembly
Lower Cover Upper CoverHead Light
Dimmer SwitchCombined Switch Bracket
Nut
Dust CoverSteering Column AssemblyWiper Switch Assembly
Press Plate of Dustcover
Universal JointIntermediate Shaft
Page 138 of 392

131Replacement1. Cautions (refer to Steering System Cautions)
2. Make sure the wheels are placed straight ahead
3. disconnect the battery negative terminals
4. Remove the air bag assembly
Remove two screws on both sides and pull out the wiring harness connector
Notice: Do not pull air bag wire harness when removing the air bag assembly!
Warning:
�‹ �‹�‹ �‹
�‹Make sure the upper surface of the air bag assembly is kept upward when placing it!
�‹ �‹�‹ �‹
�‹Do not disassemble the air bag assembly!
5. Remove steering wheel assembly
(1) Remove the nut.
(2) Remove the steering wheel cover set bolt.
(3) place the matchmarks on the steering wheel and main shaft assembly.
(4) Use special tool to remove the steering wheel assembly.
6. Remove the steering column upper and lower cover
(1) Remove 3 screws.
(2) Remove the steering column upper and lower cover.Use Inner
Hex Socket
Wrench
Page 139 of 392
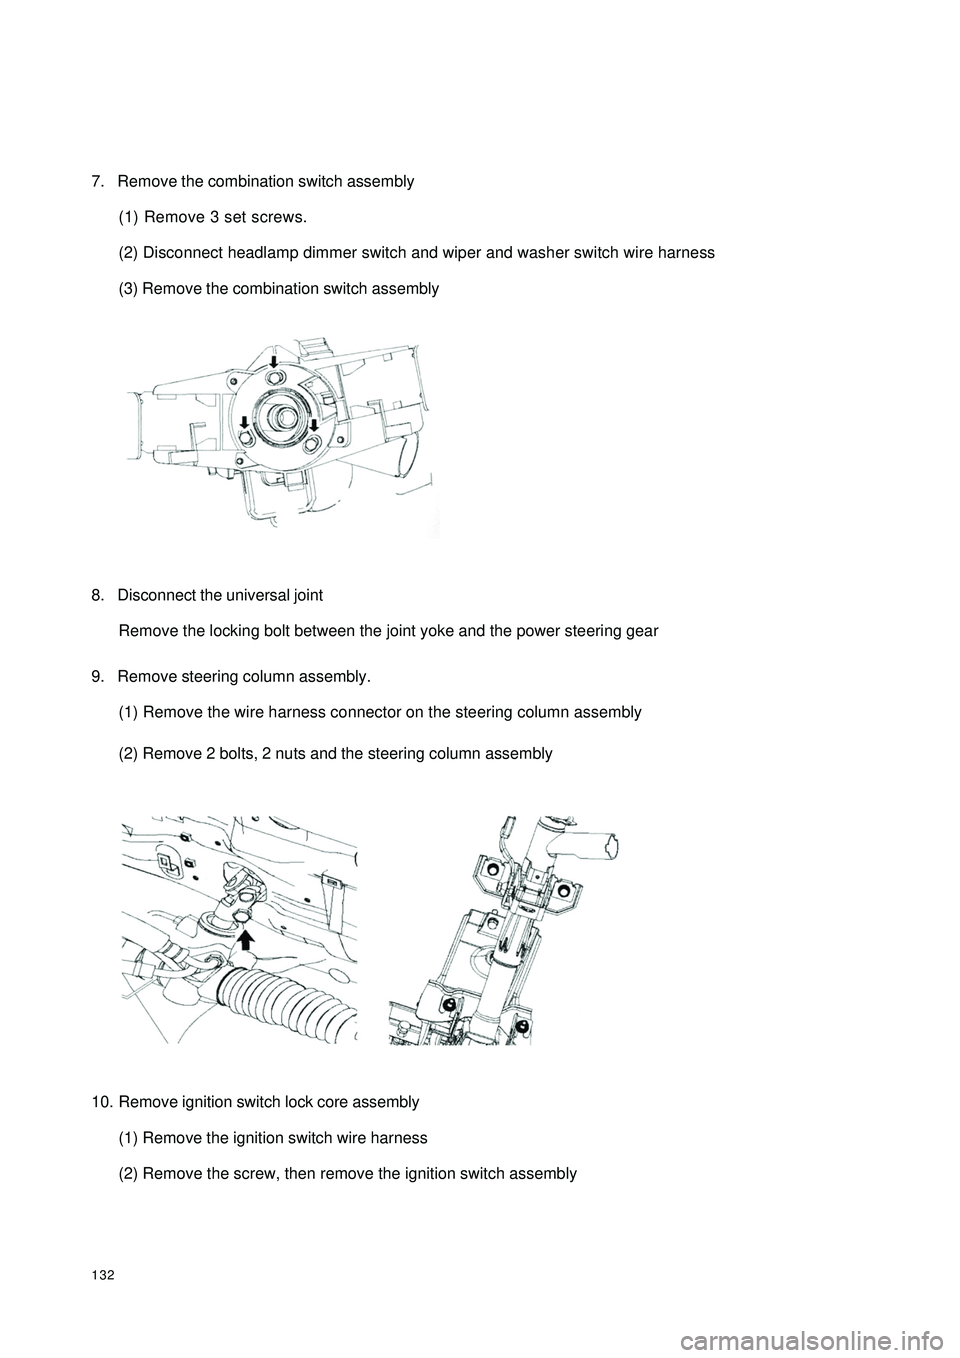
1327. Remove the combination switch assembly
(1) Remove 3 set screws.
(2) Disconnect headlamp dimmer switch and wiper and washer switch wire harness
(3) Remove the combination switch assembly
8. Disconnect the universal joint
Remove the locking bolt between the joint yoke and the power steering gear
9. Remove steering column assembly.
(1) Remove the wire harness connector on the steering column assembly
(2) Remove 2 bolts, 2 nuts and the steering column assembly
10. Remove ignition switch lock core assembly
(1) Remove the ignition switch wire harness
(2) Remove the screw, then remove the ignition switch assembly
Page 140 of 392
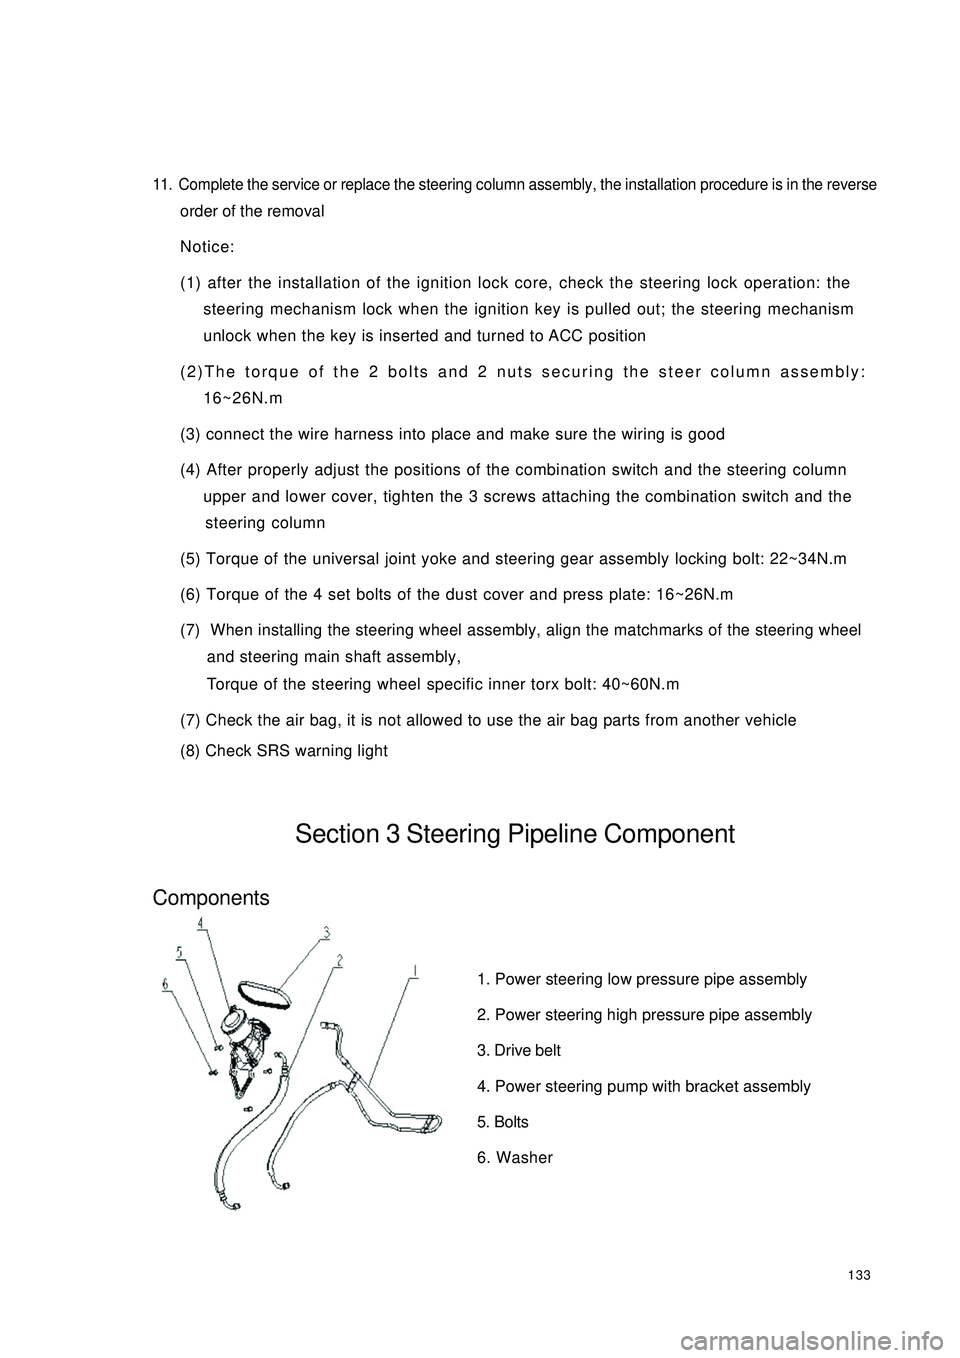
13311. Complete the service or replace the steering column assembly, the installation procedure is in the reverseorder of the removal
Notice:
(1) after the installation of the ignition lock core, check the steering lock operation: the
steering mechanism lock when the ignition key is pulled out; the steering mechanism
unlock when the key is inserted and turned to ACC position
(2)The torque of the 2 bolts and 2 nuts securing the steer column assembly:
16~26N.m
(3) connect the wire harness into place and make sure the wiring is good
(4) After properly adjust the positions of the combination switch and the steering column
upper and lower cover, tighten the 3 screws attaching the combination switch and the
steering column
(5) Torque of the universal joint yoke and steering gear assembly locking bolt: 22~34N.m
(6) Torque of the 4 set bolts of the dust cover and press plate: 16~26N.m
(7) When installing the steering wheel assembly, align the matchmarks of the steering wheel
and steering main shaft assembly,
Torque of the steering wheel specific inner torx bolt: 40~60N.m
(7) Check the air bag, it is not allowed to use the air bag parts from another vehicle
(8) Check SRS warning lightSection 3 Steering Pipeline ComponentComponents1. Power steering low pressure pipe assembly
2. Power steering high pressure pipe assembly
3. Drive belt
4. Power steering pump with bracket assembly
5. Bolts
6. Washer