lock INFINITI QX4 2001 Factory Workshop Manual
[x] Cancel search | Manufacturer: INFINITI, Model Year: 2001, Model line: QX4, Model: INFINITI QX4 2001Pages: 2395, PDF Size: 43.2 MB
Page 270 of 2395

DescriptionNBAT0093IThe mechanical key interlock mechanism also operates as a
shift lock:
With the key switch turned to ªONº, the selector lever cannot
be shifted from ªPº (parking) to any other position unless the
brake pedal is depressed.
With the key removed, the selector lever cannot be shifted
from ªPº to any other position.
The key cannot be removed unless the selector lever is placed
in ªPº.
IThe shift lock and key interlock mechanisms are controlled by
the ON-OFF operation of the shift lock solenoid and by the
operation of the rotator and slider located inside the key
cylinder, respectively.
SAT145K
GI
MA
EM
LC
EC
FE
TF
PD
AX
SU
BR
ST
RS
BT
HA
SC
EL
IDX
A/T SHIFT LOCK SYSTEM
Description
AT-265
Page 271 of 2395

Wiring Diagram Ð SHIFT ÐNBAT0094
MAT921A
A/T SHIFT LOCK SYSTEM
Wiring Diagram Ð SHIFT Ð
AT-266
Page 272 of 2395

Diagnostic ProcedureNBAT0095SYMPTOM 1:
ISelector lever cannot be moved from ªPº position with key
in ªONº position and brake pedal applied.
ISelector lever can be moved from ªPº position with key in
ªONº position and brake pedal released.
ISelector lever can be moved from ªPº position when key
is removed from key cylinder.
SYMPTOM 2:
Ignition key cannot be removed when selector lever is set to
ªPº position. It can be removed when selector lever is set to
any position except ªPº.
1 CHECK KEY INTERLOCK CABLE
Check key interlock cable for damage.
OK or NG
OK©GO TO 2.
NG©Repair key interlock cable. Refer to ªKey Interlock Cableº, AT-271.
2 CHECK SELECTOR LEVER POSITION
Check selector lever position for damage.
OK or NG
OK©GO TO 3.
NG©Check selector lever. Refer to ªON-VEHICLE SERVICE Ð PNP Switch and Manual Con-
trol Linkage Adjustmentº, AT-276 and AT-276.
3 CHECK POWER SOURCE
1. Turn ignition switch to ON position. (Do not start engine.)
2. Check voltage between A/T device harness terminal 5 and ground.
SAT758JA
OK or NG
OK©GO TO 5.
NG©GO TO 4.
GI
MA
EM
LC
EC
FE
TF
PD
AX
SU
BR
ST
RS
BT
HA
SC
EL
IDX
A/T SHIFT LOCK SYSTEM
Diagnostic Procedure
AT-267
Page 273 of 2395
![INFINITI QX4 2001 Factory Workshop Manual 4 DETECT MALFUNCTIONING ITEM
Check the following items:
1. Harness for short or open between ignition switch and A/T device harness terminal 5
2. 7.5A fuse [No. 11, located in the fuse block (J/B)]
3. INFINITI QX4 2001 Factory Workshop Manual 4 DETECT MALFUNCTIONING ITEM
Check the following items:
1. Harness for short or open between ignition switch and A/T device harness terminal 5
2. 7.5A fuse [No. 11, located in the fuse block (J/B)]
3.](/img/42/57027/w960_57027-272.png)
4 DETECT MALFUNCTIONING ITEM
Check the following items:
1. Harness for short or open between ignition switch and A/T device harness terminal 5
2. 7.5A fuse [No. 11, located in the fuse block (J/B)]
3. Ignition switch (Refer to EL-9, ªSchematicº.)
OK or NG
OK©GO TO 5.
NG©Repair or replace damaged parts.
5 CHECK INPUT SIGNAL A/T DEVICE
Turn ignition switch to OFF position.
ICheck voltage between A/T device harness terminal 7 and ground.
SAT179K
OK or NG
OK©GO TO 7.
NG©GO TO 6.
6 DETECT MALFUNCTIONING ITEM
Check the following items:
1. Harness for short or open between battery and stop lamp switch harness connector 1
2. Harness for short or open between stop lamp switch harness connector 2 and A/T device harness connector 7
3. Diode
4. 10A fuse [No. 14, located in the fuse block (J/B)]
5. Stop lamp switch
a. Check continuity between terminals 1 and 2.
SAT146K
Check stop lamp switch after adjusting brake pedal Ð refer to BR-14, ªAdjustmentº.
OK or NG
OK©GO TO 7.
NG©Repair or replace damaged parts.
A/T SHIFT LOCK SYSTEM
Diagnostic Procedure (Cont'd)
AT-268
Page 274 of 2395

7 CHECK GROUND CIRCUIT
1. Turn ignition switch to OFF position.
2. Disconnect A/T device harness connector.
3. Check continuity between A/T device harness terminal 6 and ground. Refer to wiring diagram Ð SHIFT Ð.
Continuity should exist.
If OK, check harness for short to ground and short to power.
OK or NG
OK©GO TO 8.
NG©Repair open circuit or short to ground or short to power in harness or connectors.
8 CHECK RELAY CIRCUIT
1. Turn ignition switch to ON and OFF position.
ICheck continuity between terminals 1, 2, 3 and 5.
SAT775J
YesorNo
Ye s©GO TO 9.
No©Replace relay.
9 CHECK PARK POSITION SWITCH
ICheck continuity between A/T device harness terminal 6 and relay (park position switch) harness terminal 1.
SAT180K
OK or NG
OK©GO TO 10.
NG©Replace park position switch.
GI
MA
EM
LC
EC
FE
TF
PD
AX
SU
BR
ST
RS
BT
HA
SC
EL
IDX
A/T SHIFT LOCK SYSTEM
Diagnostic Procedure (Cont'd)
AT-269
Page 275 of 2395

10 CHECK SHIFT LOCK SOLENOID
ICheck operation by applying battery voltage shift lock solenoid harness terminals 1 and 3.
SAT762J
OK or NG
OK©GO TO 11.
NG©Replace shift lock solenoid.
11 CHECK SHIFT LOCK OPERATION
1. Reconnect shift lock harness connector.
2. Turn ignition switch from OFF to ON position. (Do not start engine.)
3. Recheck shift lock operation.
OK or NG
OK©INSPECTION END
NG©GO TO 12.
12 CHECK A/T DEVICE INSPECTION
1. Perform A/T device input/output signal inspection test.
2. If NG, recheck harness connector connection.
OK or NG
OK©INSPECTION END
NG©Repair or replace damaged parts.
A/T SHIFT LOCK SYSTEM
Diagnostic Procedure (Cont'd)
AT-270
Page 276 of 2395

ComponentsNBAT0097
SAT147K
CAUTION:
IInstall key interlock cable in such a way that it will not be
damaged by sharp bends, twists or interference with adja-
cent parts.
IAfter installing key interlock cable to control device, make
sure that casing cap and bracket are firmly secured in
their positions. If casing cap can be removed with an
external load of less than 39.2 N (4.0 kg, 8.8 lb), replace
key interlock cable with new one.
SAT353I
RemovalNBAT0098Unlock slider from adjuster holder and remove rod from cable.
GI
MA
EM
LC
EC
FE
TF
PD
AX
SU
BR
ST
RS
BT
HA
SC
EL
IDX
KEY INTERLOCK CABLE
Components
AT-271
Page 277 of 2395

SAT354I
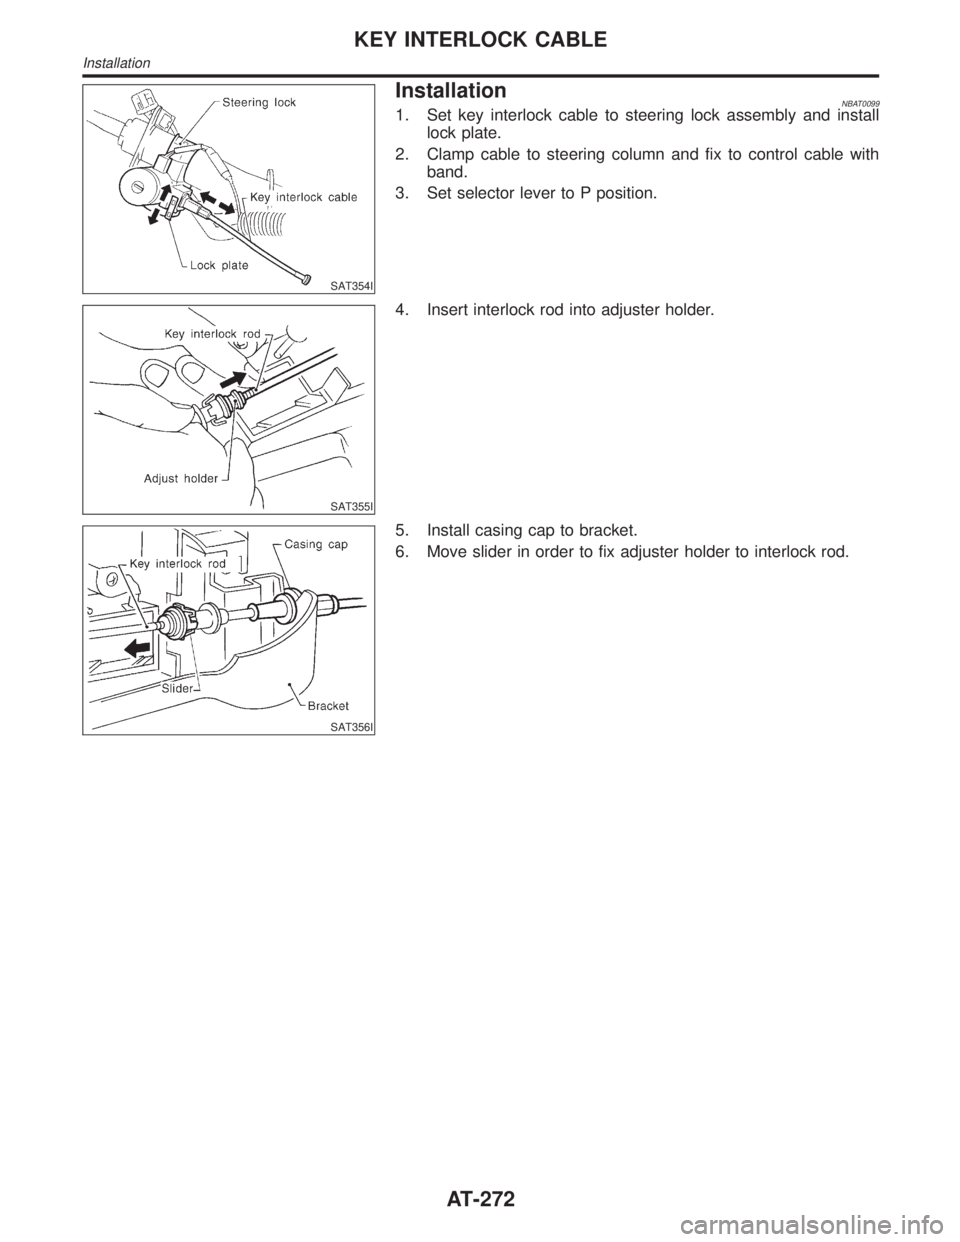
InstallationNBAT00991. Set key interlock cable to steering lock assembly and install
lock plate.
2. Clamp cable to steering column and fix to control cable with
band.
3. Set selector lever to P position.
SAT355I
4. Insert interlock rod into adjuster holder.
SAT356I
5. Install casing cap to bracket.
6. Move slider in order to fix adjuster holder to interlock rod.
KEY INTERLOCK CABLE
Installation
AT-272
Page 281 of 2395

SAT551J
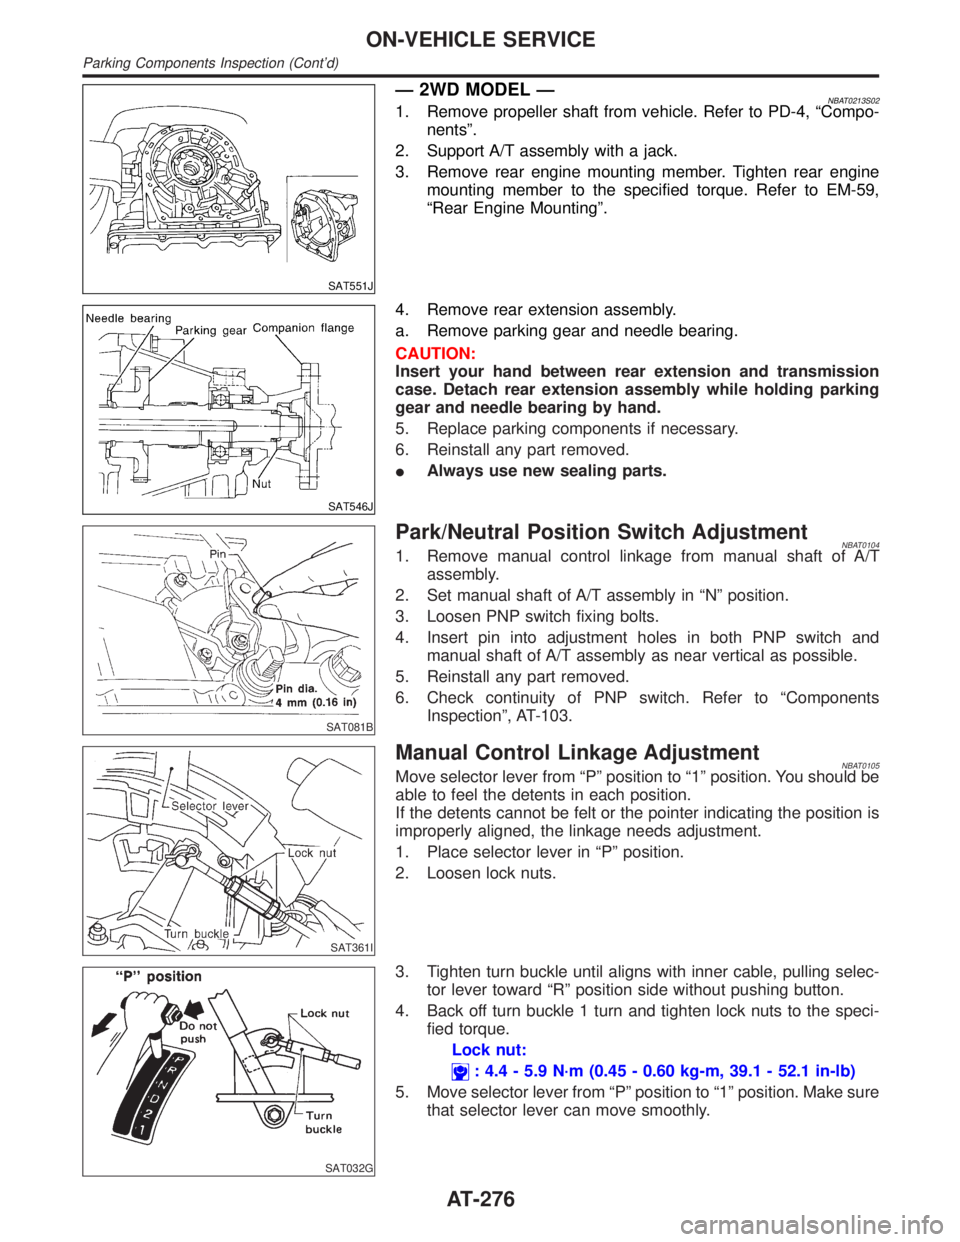
Ð 2WD MODEL ÐNBAT0213S021. Remove propeller shaft from vehicle. Refer to PD-4, ªCompo-
nentsº.
2. Support A/T assembly with a jack.
3. Remove rear engine mounting member. Tighten rear engine
mounting member to the specified torque. Refer to EM-59,
ªRear Engine Mountingº.
SAT546J
4. Remove rear extension assembly.
a. Remove parking gear and needle bearing.
CAUTION:
Insert your hand between rear extension and transmission
case. Detach rear extension assembly while holding parking
gear and needle bearing by hand.
5. Replace parking components if necessary.
6. Reinstall any part removed.
IAlways use new sealing parts.
SAT081B
Park/Neutral Position Switch AdjustmentNBAT01041. Remove manual control linkage from manual shaft of A/T
assembly.
2. Set manual shaft of A/T assembly in ªNº position.
3. Loosen PNP switch fixing bolts.
4. Insert pin into adjustment holes in both PNP switch and
manual shaft of A/T assembly as near vertical as possible.
5. Reinstall any part removed.
6. Check continuity of PNP switch. Refer to ªComponents
Inspectionº, AT-103.
SAT361I
Manual Control Linkage AdjustmentNBAT0105Move selector lever from ªPº position to ª1º position. You should be
able to feel the detents in each position.
If the detents cannot be felt or the pointer indicating the position is
improperly aligned, the linkage needs adjustment.
1. Place selector lever in ªPº position.
2. Loosen lock nuts.
SAT032G
3. Tighten turn buckle until aligns with inner cable, pulling selec-
tor lever toward ªRº position side without pushing button.
4. Back off turn buckle 1 turn and tighten lock nuts to the speci-
fied torque.
Lock nut:
: 4.4 - 5.9 N´m (0.45 - 0.60 kg-m, 39.1 - 52.1 in-lb)
5. Move selector lever from ªPº position to ª1º position. Make sure
that selector lever can move smoothly.
ON-VEHICLE SERVICE
Parking Components Inspection (Cont'd)
AT-276
Page 291 of 2395

NBAT0111
SAT018B
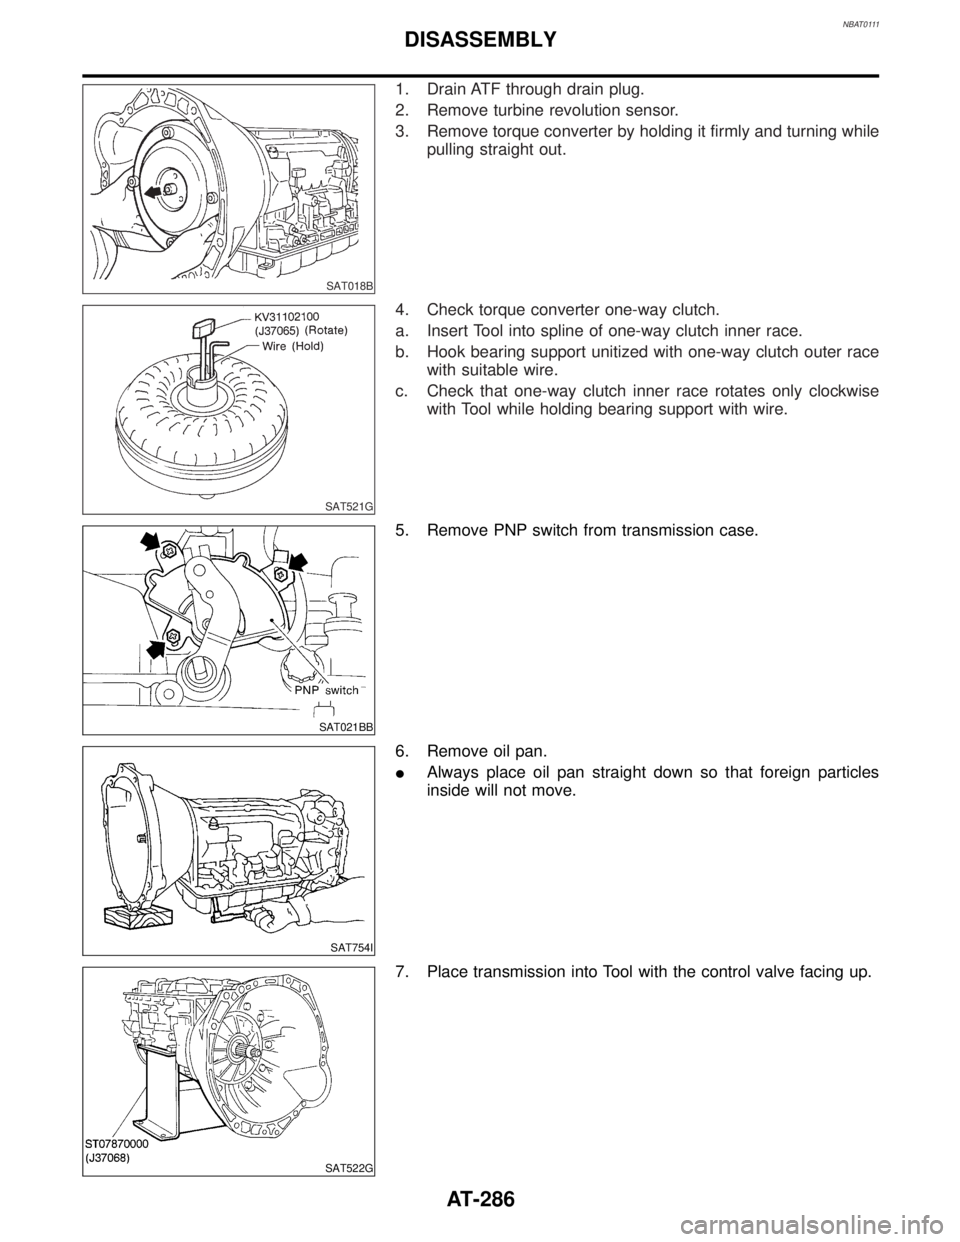
1. Drain ATF through drain plug.
2. Remove turbine revolution sensor.
3. Remove torque converter by holding it firmly and turning while
pulling straight out.
SAT521G
4. Check torque converter one-way clutch.
a. Insert Tool into spline of one-way clutch inner race.
b. Hook bearing support unitized with one-way clutch outer race
with suitable wire.
c. Check that one-way clutch inner race rotates only clockwise
with Tool while holding bearing support with wire.
SAT021BB
5. Remove PNP switch from transmission case.
SAT754I
6. Remove oil pan.
IAlways place oil pan straight down so that foreign particles
inside will not move.
SAT522G
7. Place transmission into Tool with the control valve facing up.
DISASSEMBLY
AT-286