ISUZU KB P190 2007 Workshop Repair Manual
Manufacturer: ISUZU, Model Year: 2007, Model line: KB P190, Model: ISUZU KB P190 2007Pages: 6020, PDF Size: 70.23 MB
Page 5171 of 6020

ELECTRICAL-BODY AND CHASSIS 8A-233
HORN
1. Both sides of horn do not sound
Checkpoint Trouble Cause Countermeasure
Repair the grounding point
Poor ground contact
NG
Horn relay
Grounding point
Reinstall or replace fuse No.
EB15 (10A)
Fuse No EB15 (10A, Relay
and fuse box)
Poor fuse contact or blown
fuse
NG
OK
OK
Reinstall or replace the horn
relay
Poor relay contact or faulty
horn relay
NG
Voltage between connector
3
X3 - ground or 1 X3
- ground (Should be battery
v oltage present) OK
Repair open circuit or
reconnect the connector
Open circuit or poor connector
contact between fuse No.
EB15 (10A) and horn relay
NG
Remov e steering pad and
steering wheel
OK
Horn switch continuity
OK
Repair or replace the horn
switch
Poor switch point contact or
faulty switch
NG
Continuity between
5
X3 - 10 B60
2
X3 - 1 C20 (1 C21 )
OK
Repair open circuit or
connector contact
Open circuit or poor connector
contact
NG
BACK TO CHAPTER INDEX
TO MODEL INDEXISUZU KB P190 2007
Page 5172 of 6020

8A-234 ELECTRICAL-BODY AND CHASSIS
2. One side of horn does not blow
Checkpoint Trouble Cause Countermeasure
Repair open circuit or
reconnect the connector
Open circuit or poor connector
contact
NG Voltage between 1
C20
(1
C21 ) - ground with
horn switch depressed
(Should be battery voltage
present)
Replace the horn assembly
Horn continuity between
connectors
Faulty horn assembly
NG
OK
3. Insufficient horn volume
Clfean and/or remove the
foreign materialStain foreign material in the
horn
NGHorn
Recharge or replace the
batteryBattery conditionDischarged battery
NG
OK
BACK TO CHAPTER INDEX
TO MODEL INDEXISUZU KB P190 2007
Page 5173 of 6020

ELECTRICAL-BODY AND CHASSIS 8A-235
REMOVAL AND INSTALLATION
A Type
RTW 780SH002101
REAR COMBINATION LIGHT
Stoplight
Removal
1. Open the tail gate.
2. Remove the screws of rear combination light.
3. Remove the rear combination light assembly.
B Type
RTW 580SH000401
A Type
RTW 780SH001201
4. Turn the bulb (1) counterclockwise to remove it.
B Type
RTW 580SH000501
Installation
Follow the removal procedure in the reverse order to install the
rear combination light.
Pay close attention to the important points mentioned in the
following paragraphs.
Bulb
Be absolutely sure that each bulb is correctly installed.
This will prevent a poor contact and an open circuit.
BACK TO CHAPTER INDEX TO MODEL INDEXISUZU KB P190 2007
Page 5174 of 6020

8A-236 ELECTRICAL-BODY AND CHASSIS
HIGH MOUNTED STOPLIGHT
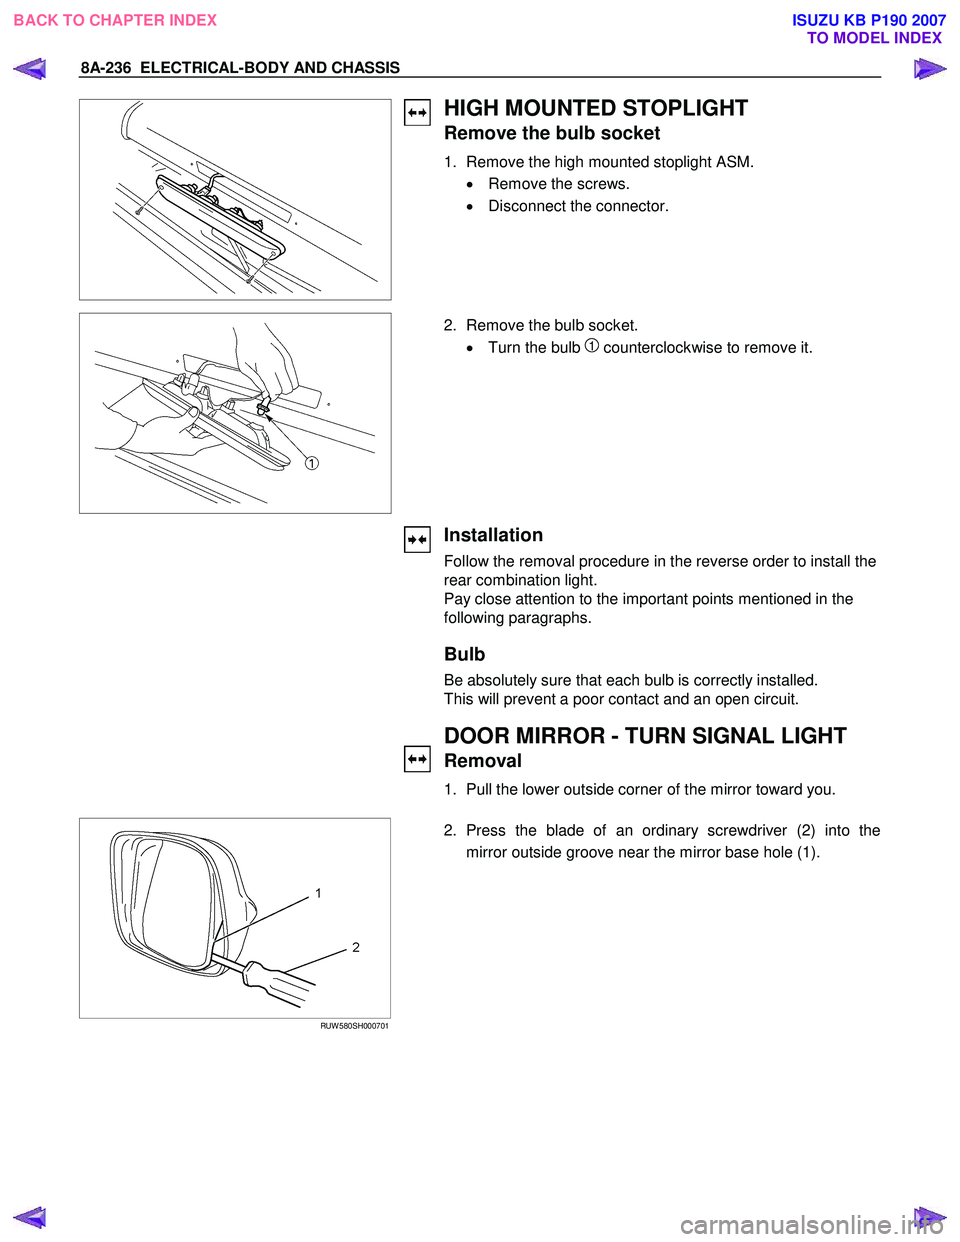
Remove the bulb socket
1. Remove the high mounted stoplight ASM. • Remove the screws.
• Disconnect the connector.
2. Remove the bulb socket.
• Turn the bulb
1 counterclockwise to remove it.
Installation
Follow the removal procedure in the reverse order to install the
rear combination light.
Pay close attention to the important points mentioned in the
following paragraphs.
Bulb
Be absolutely sure that each bulb is correctly installed.
This will prevent a poor contact and an open circuit.
DOOR MIRROR - TURN SIGNAL LIGHT
Removal
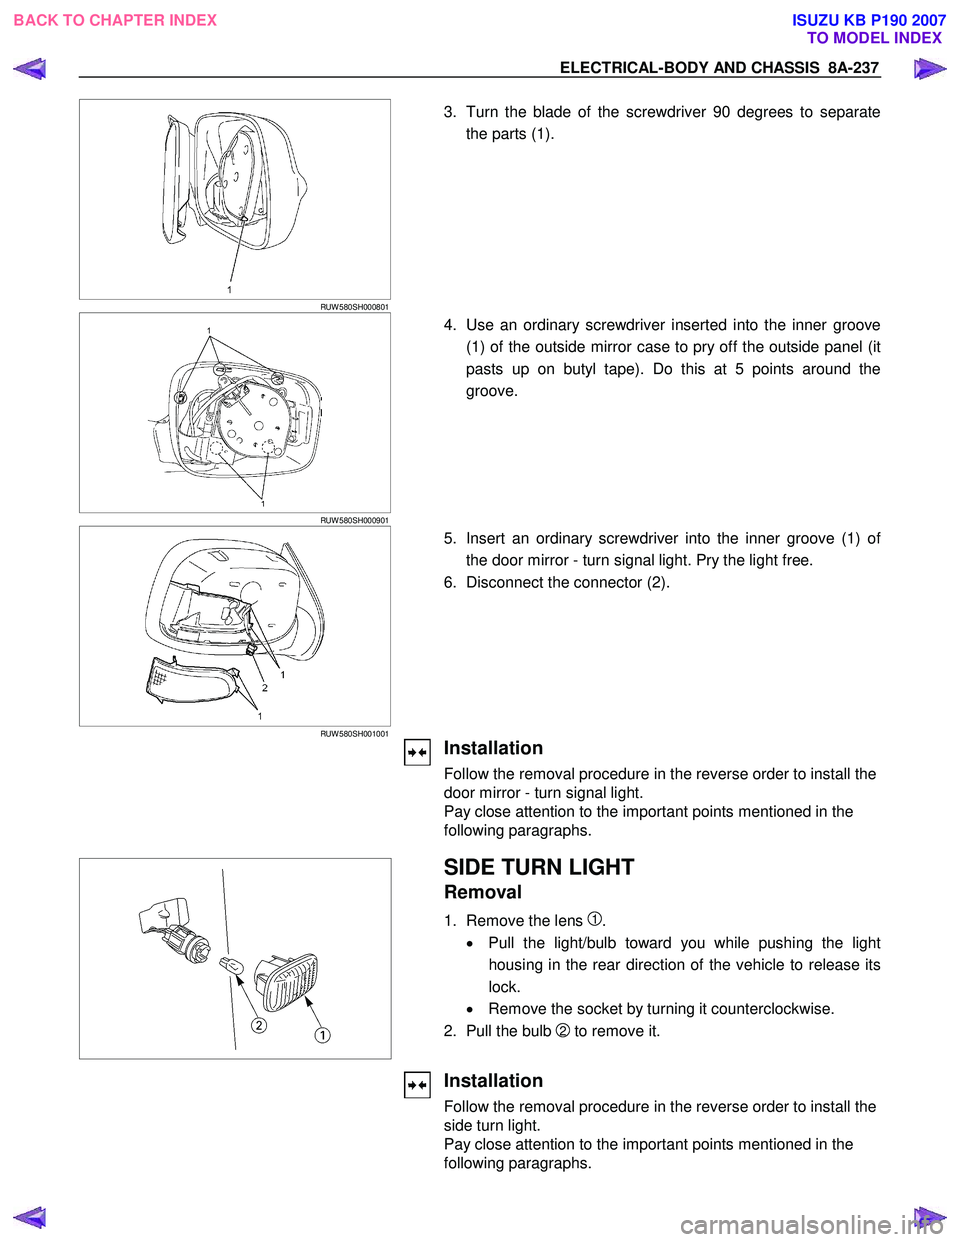
1. Pull the lower outside corner of the mirror toward you.
RUW 580SH000701
2. Press the blade of an ordinary screwdriver (2) into the
mirror outside groove near the mirror base hole (1).
BACK TO CHAPTER INDEX TO MODEL INDEXISUZU KB P190 2007
Page 5175 of 6020

ELECTRICAL-BODY AND CHASSIS 8A-237
RUW 580SH000801
3. Turn the blade of the screwdriver 90 degrees to separate
the parts (1).
RUW 580SH000901
4. Use an ordinary screwdriver inserted into the inner groove
(1) of the outside mirror case to pry off the outside panel (it
pasts up on butyl tape). Do this at 5 points around the
groove.
RUW 580SH001001
5. Insert an ordinary screwdriver into the inner groove (1) of
the door mirror - turn signal light. Pry the light free.
6. Disconnect the connector (2).
Installation
Follow the removal procedure in the reverse order to install the
door mirror - turn signal light.
Pay close attention to the important points mentioned in the
following paragraphs.
SIDE TURN LIGHT
Removal
1. Remove the lens 1.
• Pull the light/bulb toward you while pushing the light
housing in the rear direction of the vehicle to release its
lock.
• Remove the socket by turning it counterclockwise.
2. Pull the bulb
2 to remove it.
Installation
Follow the removal procedure in the reverse order to install the
side turn light.
Pay close attention to the important points mentioned in the
following paragraphs.
BACK TO CHAPTER INDEX TO MODEL INDEXISUZU KB P190 2007
Page 5176 of 6020

8A-238 ELECTRICAL-BODY AND CHASSIS
Bulb
Be absolutely sure that the side turn light bulb is correctly
installed.
This will prevent a poor contact and an open circuit.
A Type
RTW 780SH002101
REAR COMBINATION LIGHT
Turn Signal Light
Removal
1. Open the tail gate.
2. Remove the screws.
3. Remove the rear combination light assembly.
B Type
RTW 580SH000401
A Type
RTW 780SH001301
4. Turn the bulb 1 counterclockwise to remove it.
B Type
RTW 78ASH002501
Installation
Follow the removal procedure in the reverse order to install the
rear combination light.
Pay close attention to the important points mentioned in the
following paragraphs.
BACK TO CHAPTER INDEX TO MODEL INDEXISUZU KB P190 2007
Page 5177 of 6020

ELECTRICAL-BODY AND CHASSIS 8A-239
Bulb
Be absolutely sure that the rear combination light bulb is
correctly installed.
This will prevent a poor contact and an open circuit.
RTW 780SH000901
This illustration is based on RHD model
TURN SIGNAL LIGHT SWITCH
Removal
1. Disconnect the battery ground cable.
2. Remove the steering wheel
1.
Refer to the “STEERING” Section of this Manual.
3. Remove the instruments panel lower cover
2.
4. Remove the steering column cover
3.
RTW 780SH001001
This illustration is based on RHD model
5. Disconnect the connector.
6. Remove the turn signal switch from the steering shaft.
Installation
Follow the removal procedure in the reverse order to install the
turn signal switch (lever).
Pay close attention to the important points mentioned in the
following paragraphs.
Connector
Be absolutely sure that the turn signal switch connector is
securely connected.
This will prevent a poor contact and at an open circuit.
A Type
RTW 780SH002101
REAR COMBINATION LIGHT
Backup Light
Removal
1. Open the rear gate.
2. Remove the screws.
3. Remove the rear combination light assembly.
BACK TO CHAPTER INDEX TO MODEL INDEXISUZU KB P190 2007
Page 5178 of 6020

8A-240 ELECTRICAL-BODY AND CHASSIS
B Type
RTW 580SH000401
A Type
RTW 780SH001401
4. Turn the bulb 1 counterclockwise to remove it.
B Type
RTW 78ASH002601
Installation
Follow the removal procedure in the reverse order to install the
rear combination light.
Pay close attention to the important points mentioned in the
following paragraphs.
Bulbs
Be absolutely sure that each bulb is correctly installed.
This will prevent a poor contact and an open circuit.
RTW 780SH001501
This illustration is based on RHD model
HAZARD WARNING FLASHER SWITCH
Removal
1. Disconnect the battery ground cable.
2. Instrument Panel Cluster Assembly • Refer to Section 10 “BODY” for instrument panel cluste
r
assembly removal steps.
3. Hazard W arning Switch • Disconnect the switch connector.
• To remove the switch, push the lock from the back side
of the cluster assembly.
BACK TO CHAPTER INDEX TO MODEL INDEXISUZU KB P190 2007
Page 5179 of 6020

ELECTRICAL-BODY AND CHASSIS 8A-241
Installation
To install, follow the removal procedure in the reverse order.
Connector
Be absolutely sure that the hazard warning flasher switch
connector is securely connected.
This will prevent a poor contact and an open circuit.
BACKUP LIGHT SWITCH
Removal
1. Disconnect the battery ground cable.
2. Disconnect the connector
1.
3. Remove the backup light switch from the transmission
2.
Installation
Follow the removal procedure in the reverse order to install the
backup light switch.
Pay close attention to the important points mentioned in the
following paragraphs.
Backup Light Switch Threads
Apply liquid gasket to the threaded portion and install the
backup light switch.
Connector
Be absolutely sure that the backup light connector is securely
connected.
This will prevent a poor contact and an open circuit.
HORN
Removal
1. Remove the radiator grille.
Refer to the “HEADLIGHT” removal procedure.
2. Loosen the horn bolt.
3. Disconnect the horn connector.
Installation
Follow the removal procedure in the reverse order to install the
horn.
Pay close attention to the important point mentioned in the
following paragraphs.
Connector
Be absolutely sure the horn connector is securely connected.
This will prevent a poor contact and open circuit.
BACK TO CHAPTER INDEX TO MODEL INDEXISUZU KB P190 2007
Page 5180 of 6020

8A-242 ELECTRICAL-BODY AND CHASSIS
HORN SWITCH
Removal
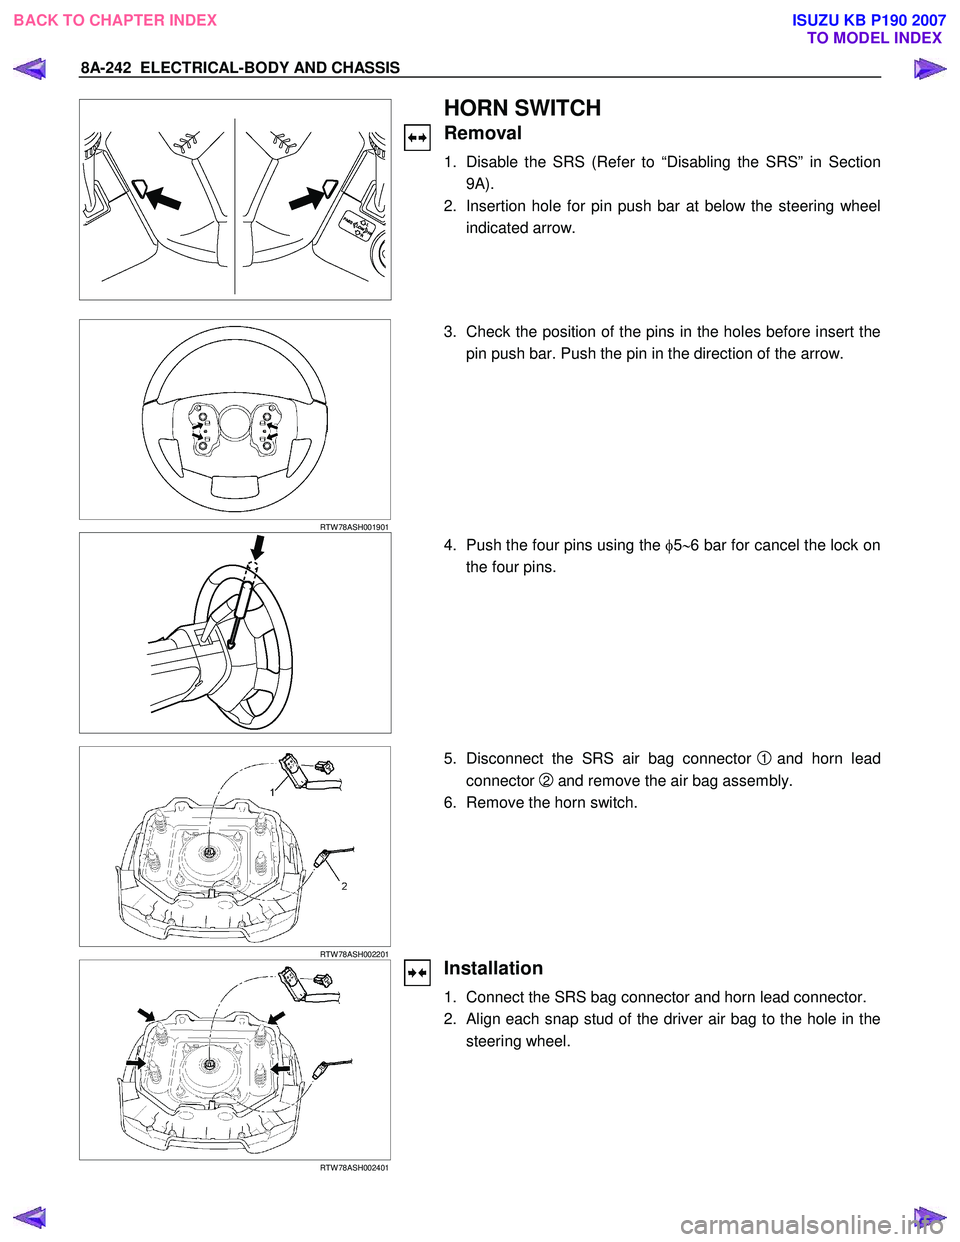
1. Disable the SRS (Refer to “Disabling the SRS” in Section
9A).
2. Insertion hole for pin push bar at below the steering wheel indicated arrow.
RTW 78ASH001901
3. Check the position of the pins in the holes before insert the
pin push bar. Push the pin in the direction of the arrow.
4. Push the four pins using the φ5 ∼6 bar for cancel the lock on
the four pins.
RTW 78ASH002201
5. Disconnect the SRS air bag connector 1 and horn lead
connector
2 and remove the air bag assembly.
6. Remove the horn switch.
RTW 78ASH002401
Installation
1. Connect the SRS bag connector and horn lead connector.
2. Align each snap stud of the driver air bag to the hole in the steering wheel.
BACK TO CHAPTER INDEX TO MODEL INDEXISUZU KB P190 2007