engine JAGUAR X308 1998 2.G Repair Manual
[x] Cancel search | Manufacturer: JAGUAR, Model Year: 1998, Model line: X308, Model: JAGUAR X308 1998 2.GPages: 2490, PDF Size: 69.81 MB
Page 389 of 2490
Install brake pads.
1
. Install pads.
2. Position anti-rattle spring.
3. Install pins - make sure pin collets are fully engaged
into caliper.
4. Repeat above procedure to install opposite side brake pads.
5. Fit wheels.
For additional information, refer to: Wheel and Tire
(20
4-04
Wheels and Tires, Remo val and Installation).
6. Remove stands an d lower vehicle.
For additional information, refer to: Using the Workshop Jack
(10
0-02 Jacking and Lifting, General Procedures).
7. CAUTI
ON: Remove brake flui
d spillage immediately from
paint work, with clean water.
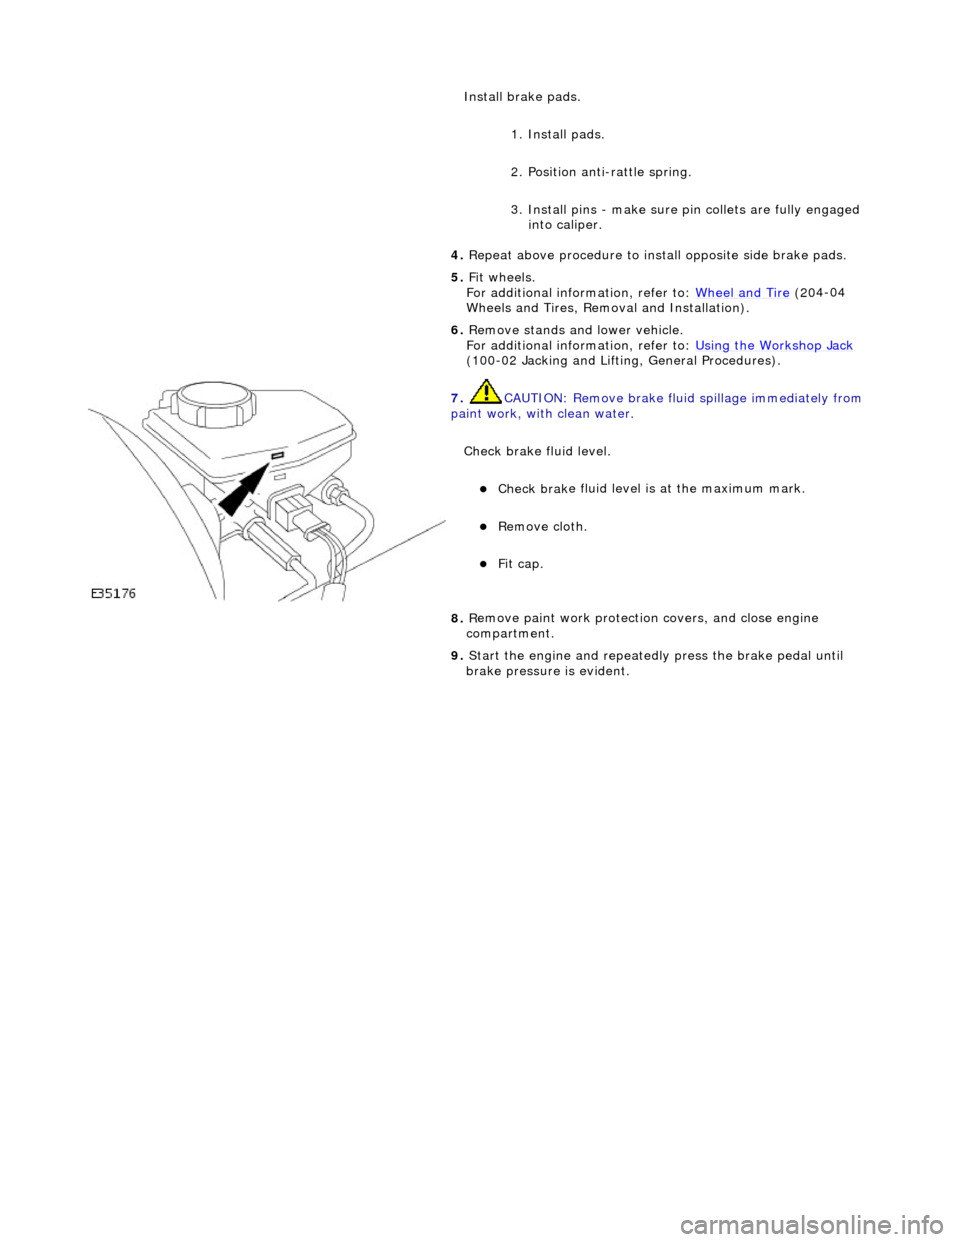
Check brake fluid level.
пЃ¬Check brak
e fluid level is
at the maximum mark.
пЃ¬Re
move cloth.
пЃ¬Fi
t cap.
8.
R
emove paint work protection
covers, and close engine
compartment.
9. Start the engine and repeatedly press the brake pedal until
brake pressure is evident.
Page 408 of 2490
Hydraulic Br
ake Actuation
- Brake Fluid Reservoir
Remo
val and Installation
Remov
a
l
• C
A
UTIONS:
Replacement of nuts and bolts: Various thread-locking de vices are used on nuts and bolts throughout the vehicle.
These devices restrict the number of times a nut or bolt can be used. See section 100-00 for information.
Remove brake fluid spilla ge immediately from paint work, with clean water.
1. Position vehicl
e on a four-post lift.
2. Open engine compartment and fit paint work protection covers
to fenders.
3. Disconnect battery ground cable (IMPORTANT, see operation
86.15.19 for further information).
4. Remove engine compartment rear cover. Refer to operation
76.11.35.
5. Remove pedal housing, brake booster and master cylinder
assembly. Refer to operation 70.35.39.
6. Remove reservoir filler cap and empty residual brake fluid into
a container. Refit cap.
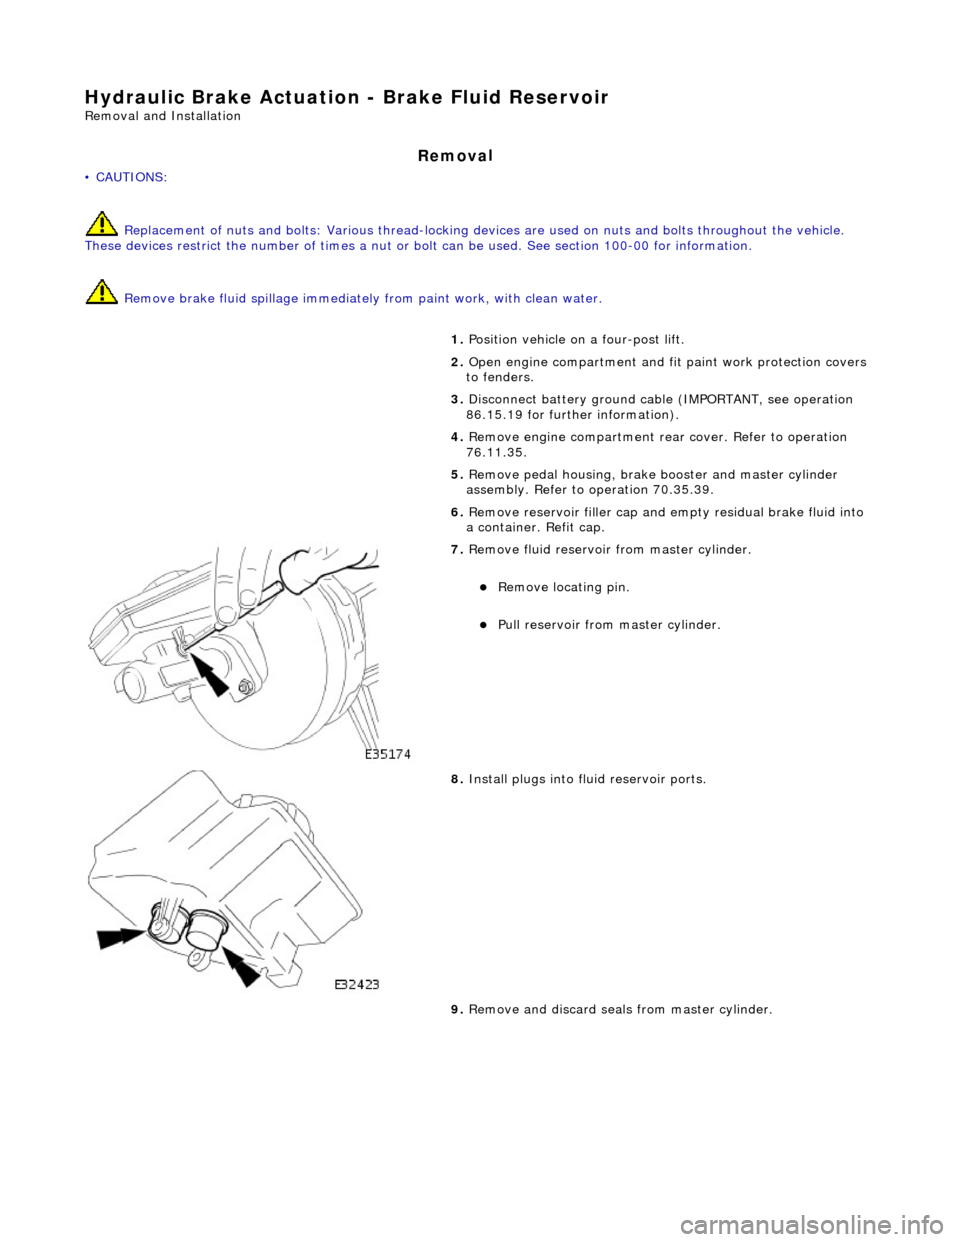
7. Re
move fluid reservoir from master cylinder.
пЃ¬R
e
move locating pin.
пЃ¬Pull reservoir
from master cylinder.
8. Install plugs into f
luid reservoir ports.
9. Remove and discard seal s from master cylinder.
Page 409 of 2490

I
nstallation
10
.
Install plugs into master cylinder ports.
11. Clean components and mating surfaces.
1. Inst
all seals into master cylinder.
пЃ¬Re
move plugs.
пЃ¬Lubricate seals with
cl
ean brake fluid.
пЃ¬Inst
all seals.
2. Install
reservoir to master cylinder.
пЃ¬Re
move plugs.
пЃ¬Install
reservoir, making sure
reservoir is fully seated.
пЃ¬Inst
all locating pin.
3. Install pedal housing, brake booster and master cylinder
assembly. Refer to operation 70.35.39.
4. Install engine compartment rear cover. Refer to operation
76.11.35.
5. Reconnect battery ground cable (IMPORTANT, see operation
Page 410 of 2490

8
6
.15.15 for further information).
6. Bleed brake system. Refer to operation 70.25.03.
7. Remove paint-work protection covers and close engine
compartment.
Page 411 of 2490
Hydraulic B
rake Actuation
- Brake Master Cylinder
Re
moval and Installation
Remov
al
• C
AUTIONS:
Replacement of nuts and bolts: Various thread-locking de vices are used on nuts and bolts throughout the vehicle.
These devices restrict the number of times a nut or bolt can be used. See section 100-00 for information.
Remove brake fluid spilla ge immediately from paint work, with clean water.
1. Position vehi
cle on a four-post lift.
2. Open engine compartment and fit paint work protection covers
to fenders.
3. Disconnect battery ground cable (IMPORTANT, refer to
operation 86.15.19 for fu rther information).
4. Remove engine compartment rear cover. Refer to operation
76.11.35.
5. Remove pedal housing, brake booster and master cylinder
assembly. Refer to operation 70.35.39.
6. Place assembly on a work bench.
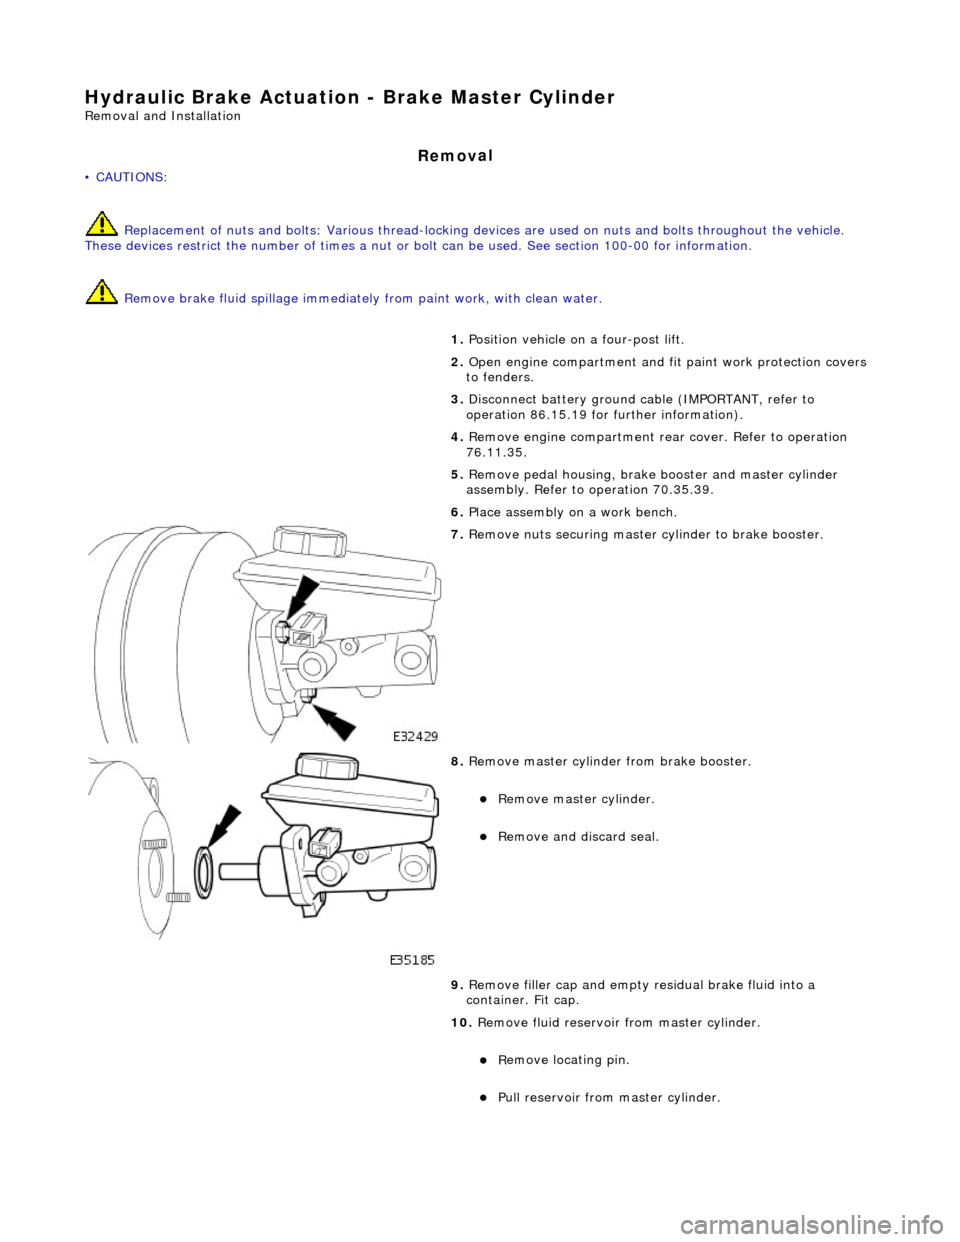
7. R
emove nuts securing master cylinder to brake booster.
8. R
emove master cylinder from brake booster.
пЃ¬Re
move master cylinder.
пЃ¬Remove an
d discard seal.
9. Remove filler cap and empty residual brake fluid into a
container. Fit cap.
10. Remove fluid reservoir from master cylinder.
пЃ¬R
emove locating pin.
пЃ¬Pull
reservoir from master cylinder.
Page 413 of 2490

пЃ¬Lubricate seals with cl
ean brake fluid.
пЃ¬Inst
all seals.
2. Install
fluid reservoir to master cylinder.
пЃ¬R
emove plugs from reservoir
пЃ¬Install
reservoir, making sure
reservoir is fully seated.
пЃ¬Inst
all locating pin.
3. Inst
all master cylinder to brake booster.
пЃ¬Inst
all seal.
пЃ¬Inst
all master cylinder, make sure master cylinder rod
locates brake booster rod.
4. Inst
all and tighten nuts to 21-29 Nm.
5. Install pedal housing, brake booster and master cylinder
assembly. Refer to operation 70.35.39.
6. Install engine compartment rear cover. Refer to operation
76.11.35.
7. Connect battery ground cable (IMPORTANT, see operation
86.15.15 for further information).
8. Bleed brake system. Refer to operation 70.25.03.
9. Remove paint-work protection covers and close engine
com
partment.
Page 414 of 2490
Hydrau
lic Brake Actuation - Brake Pedal and Bracket
Re
mo
val and Installation
Remov
a
l
• C
A
UTIONS:
Replacement of nuts and bolts: Various thread-locking de vices are used on nuts and bolts throughout the vehicle.
These devices restrict the number of times a nut or bolt can be used. See section 100-00 for information.
Remove brake fluid spilla ge immediately from paint work, with clean water.
In
stallation
1.
Position vehicl
e on a four-post lift.
2. Open hood and fit suitable pa intwork protection equipment.
3. Disconnect battery ground cabl e. (IMPORTANT, see 86.15.19
for further information).
4. Remove engine compartment rear cover. Refer to operation
76.11.35.
5. Remove pedal housing, brake booster and master cylinder
assembly. Refer to operation 70.35.39.
6. Remove brake booster and master cylinder assembly. Refer to
operation 70.50.18.
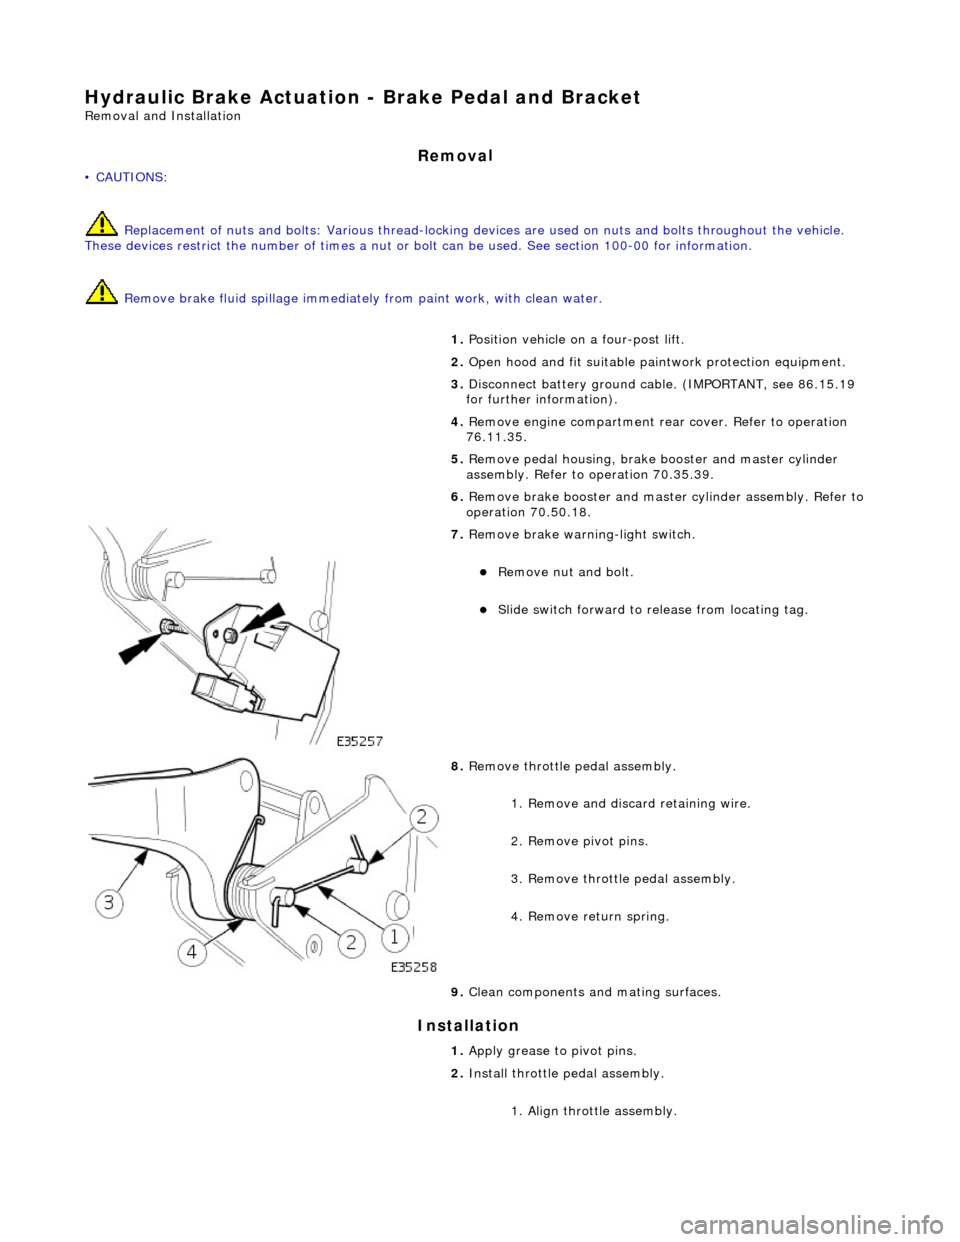
7. Remove brake wa
rning-light switch.
пЃ¬Remove n
u
t and bolt.
пЃ¬Slide sw
itch forward to release from locating tag.
8. Re
move throttle pedal assembly.
1. Remove and discard retaining wire.
2. Remove pivot pins.
3. Remove throttle pedal assembly.
4. Remove return spring.
9. Clean components and mating surfaces.
1. Apply grease to pivot pins.
2. Install throttle pedal assembly.
1. Align throttle assembly.
Page 415 of 2490
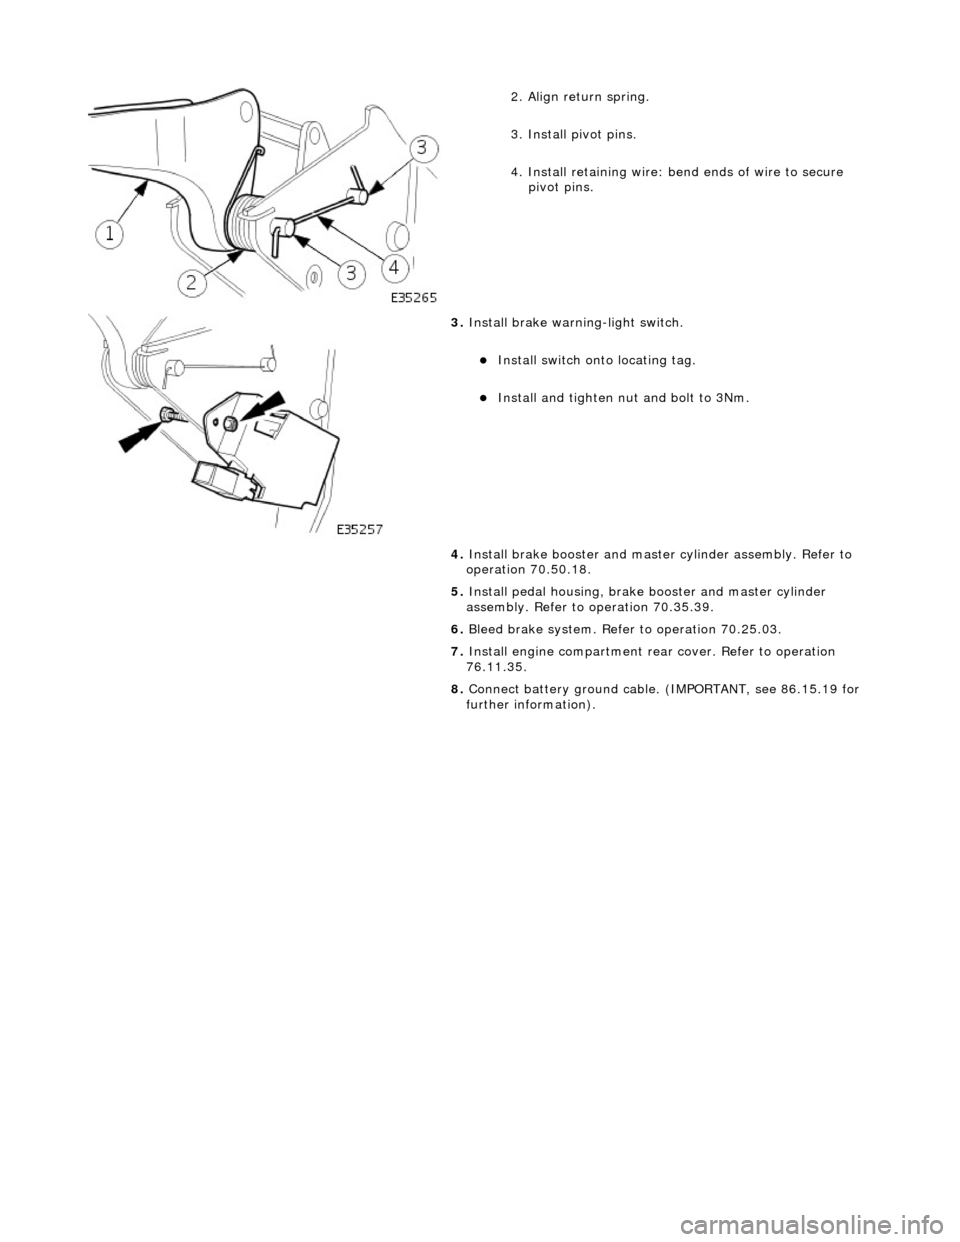
2
. Align return spring.
3. Install pivot pins.
4. Install retaining wire: bend ends of wire to secure
pivot pins.
3. Inst
all brake warning-light switch.
пЃ¬Inst
all switch onto locating tag.
пЃ¬Install and tigh
ten nut and bolt to 3Nm.
4. Install brake booster and master cylinder assembly. Refer to
operation 70.50.18.
5. Install pedal housing, brake booster and master cylinder
assembly. Refer to operation 70.35.39.
6. Bleed brake system. Refer to operation 70.25.03.
7. Install engine compartment rear cover. Refer to operation
76.11.35.
8. Connect battery ground cable. (IMPORTANT, see 86.15.19 for
further information).
Page 416 of 2490
Hydrau
lic Brake Actuation - Brake Pedal and Bracket, Brake Booster and
Brake Master Cylinder
Re mo
val and Installation
Remova
l
• C
A
UTIONS:
Replacement of nuts and bolts: Various thread-locking de vices are used on nuts and bolts throughout the vehicle.
These devices restrict the number of times a nut or bolt can be used. See section 100-00 for information.
Remove brake fluid spilla ge immediately from paint work, with clean water.
1. Position vehi cl
e on a four-post lift.
2. Open engine compartment and fit paint work protection covers
to fenders.
3. Disconnect battery ground cable (IMPORTANT, refer to
operation 86.15.19 for fu rther information).
4. Remove engine compartment rear cover. Refer to operation
76.11.35.
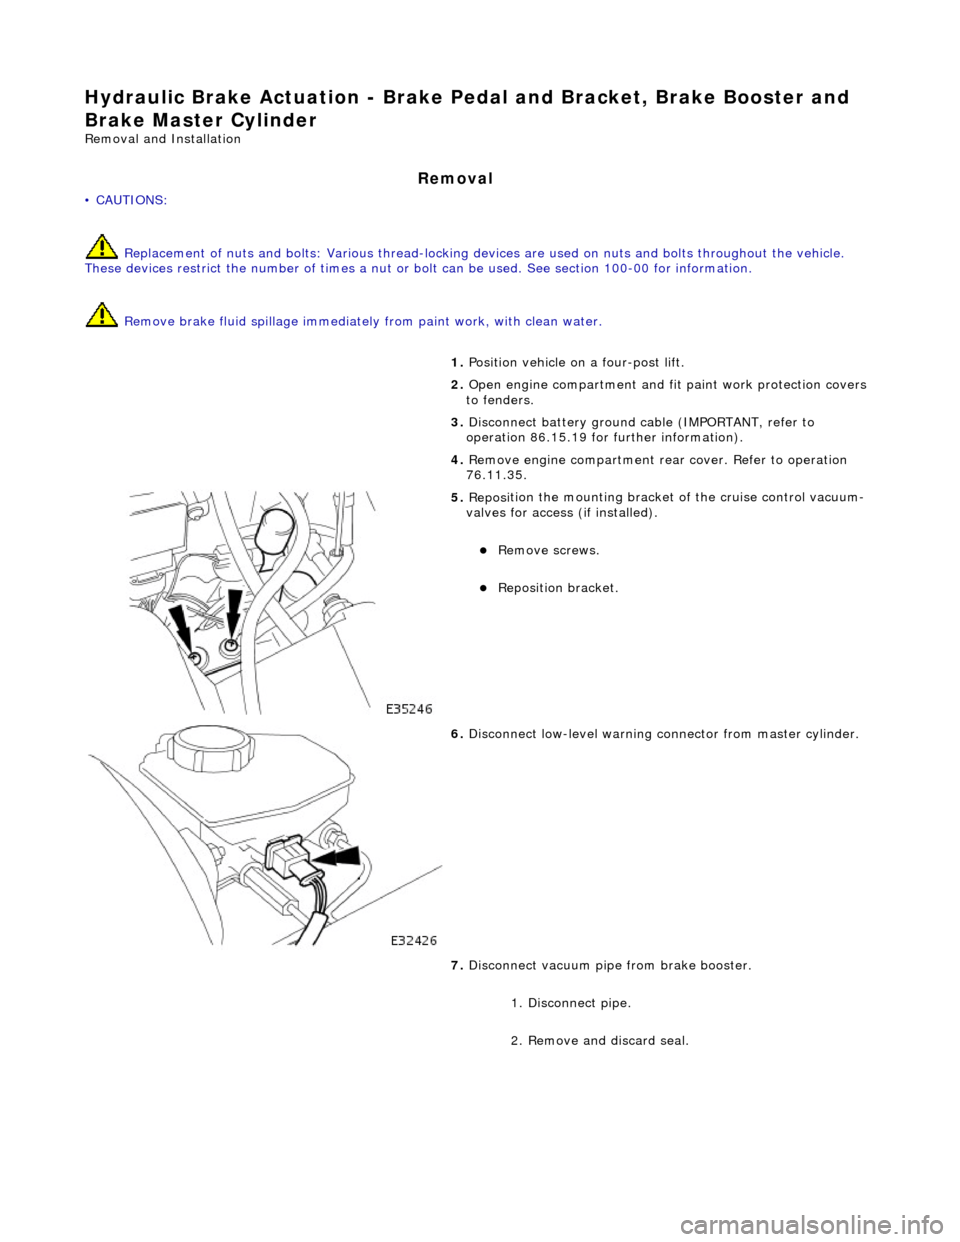
5. Reposi
tion the mounting bracket of the cruise control vacuum-
valves for access (if installed).
пЃ¬R e
move screws.
пЃ¬Reposition bracket.
6. Disc
onnect low-level warning connector from master cylinder.
7. Disconnect vacuum pipe from brake booster.
1. Disconnect pipe.
2. Remove and discard seal.
Page 417 of 2490
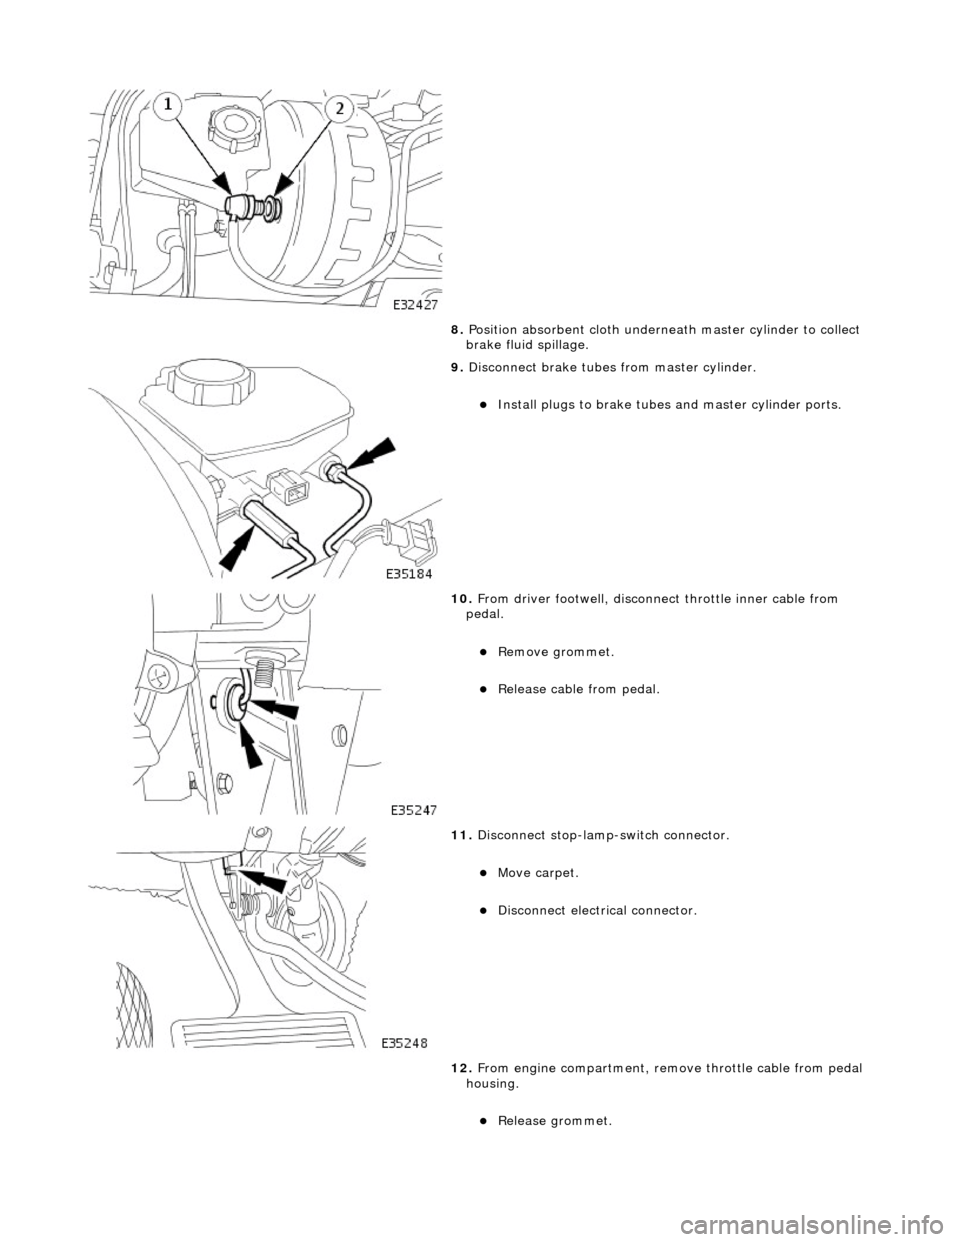
8. Posi
tion absorbent cloth underneath master cylinder to collect
brake fluid spillage.
9. Di
sconnect brake tubes from master cylinder.
пЃ¬Install plugs to brake tu
bes an
d master cylinder ports.
10
.
From driver footwell, disconne ct throttle inner cable from
pedal.
пЃ¬Re
move grommet.
пЃ¬Relea
se cable from pedal.
11
.
Disconnect stop-lamp-switch connector.
пЃ¬Move carpet.
пЃ¬Disc
onnect electrical connector.
12. From engine compartment, remo ve throttle cable from pedal
housing.
пЃ¬Re
lease grommet.