LAND ROVER FREELANDER 2001 Workshop Manual
Manufacturer: LAND ROVER, Model Year: 2001, Model line: FREELANDER, Model: LAND ROVER FREELANDER 2001Pages: 1007, PDF Size: 23.47 MB
Page 661 of 1007

Page 662 of 1007
INTERIOR TRIM COMPONENTS
REPAIRS 76-3-1
INTERIOR TRIM COMPONENTS REPAIRS
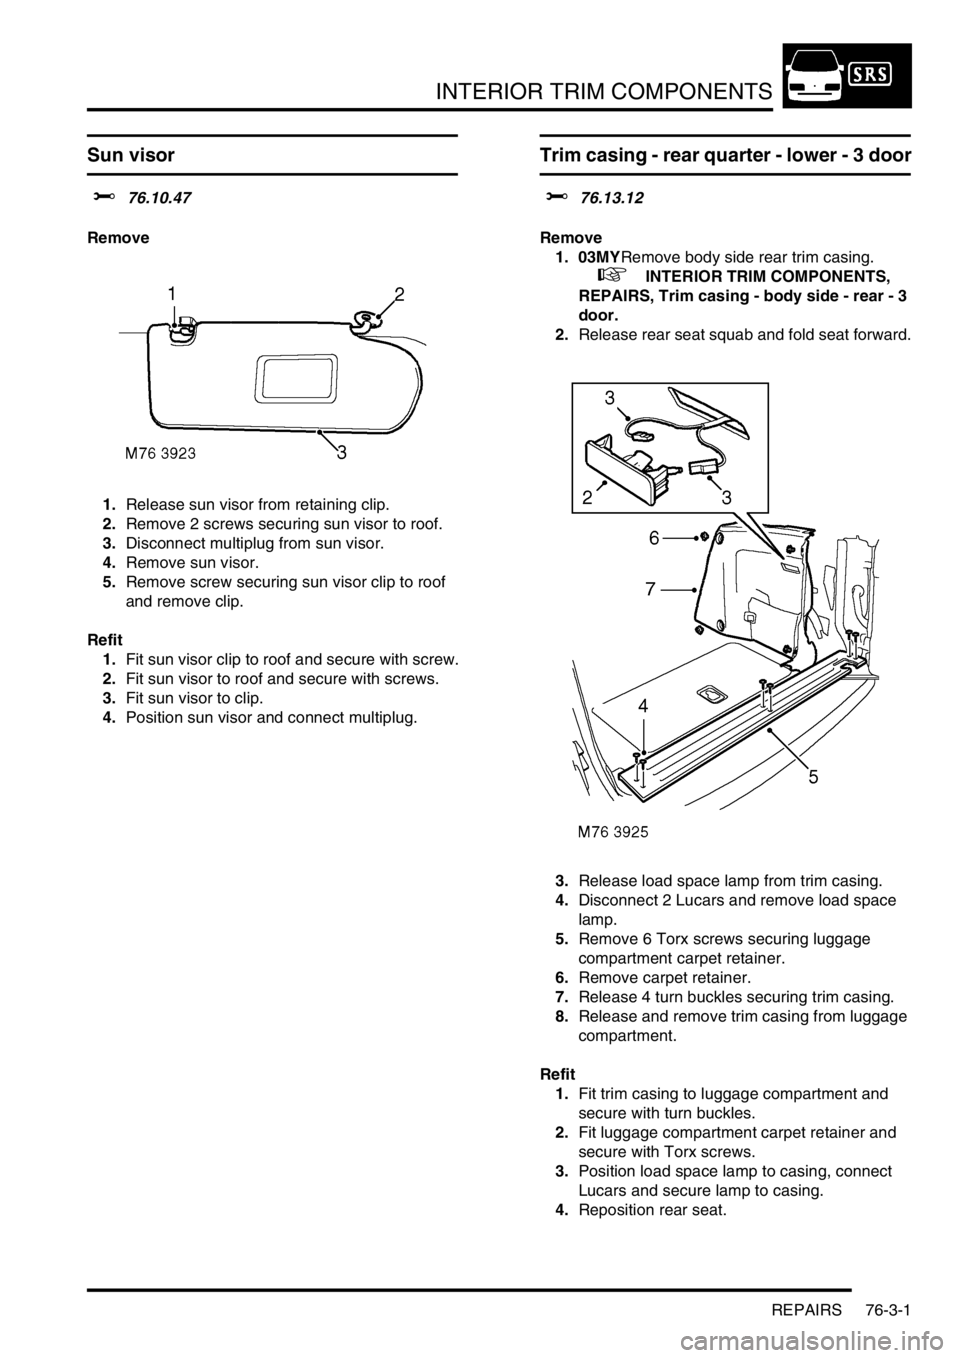
Sun visor
$% 76.10.47
Remove
1.Release sun visor from retaining clip.
2.Remove 2 screws securing sun visor to roof.
3.Disconnect multiplug from sun visor.
4.Remove sun visor.
5.Remove screw securing sun visor clip to roof
and remove clip.
Refit
1.Fit sun visor clip to roof and secure with screw.
2.Fit sun visor to roof and secure with screws.
3.Fit sun visor to clip.
4.Position sun visor and connect multiplug.
Trim casing - rear quarter - lower - 3 door
$% 76.13.12
Remove
1. 03MYRemove body side rear trim casing.
+ INTERIOR TRIM COMPONENTS,
REPAIRS, Trim casing - body side - rear - 3
door.
2.Release rear seat squab and fold seat forward.
3.Release load space lamp from trim casing.
4.Disconnect 2 Lucars and remove load space
lamp.
5.Remove 6 Torx screws securing luggage
compartment carpet retainer.
6.Remove carpet retainer.
7.Release 4 turn buckles securing trim casing.
8.Release and remove trim casing from luggage
compartment.
Refit
1.Fit trim casing to luggage compartment and
secure with turn buckles.
2.Fit luggage compartment carpet retainer and
secure with Torx screws.
3.Position load space lamp to casing, connect
Lucars and secure lamp to casing.
4.Reposition rear seat.
Page 663 of 1007
INTERIOR TRIM COMPONENTS
76-3-2 REPAIRS
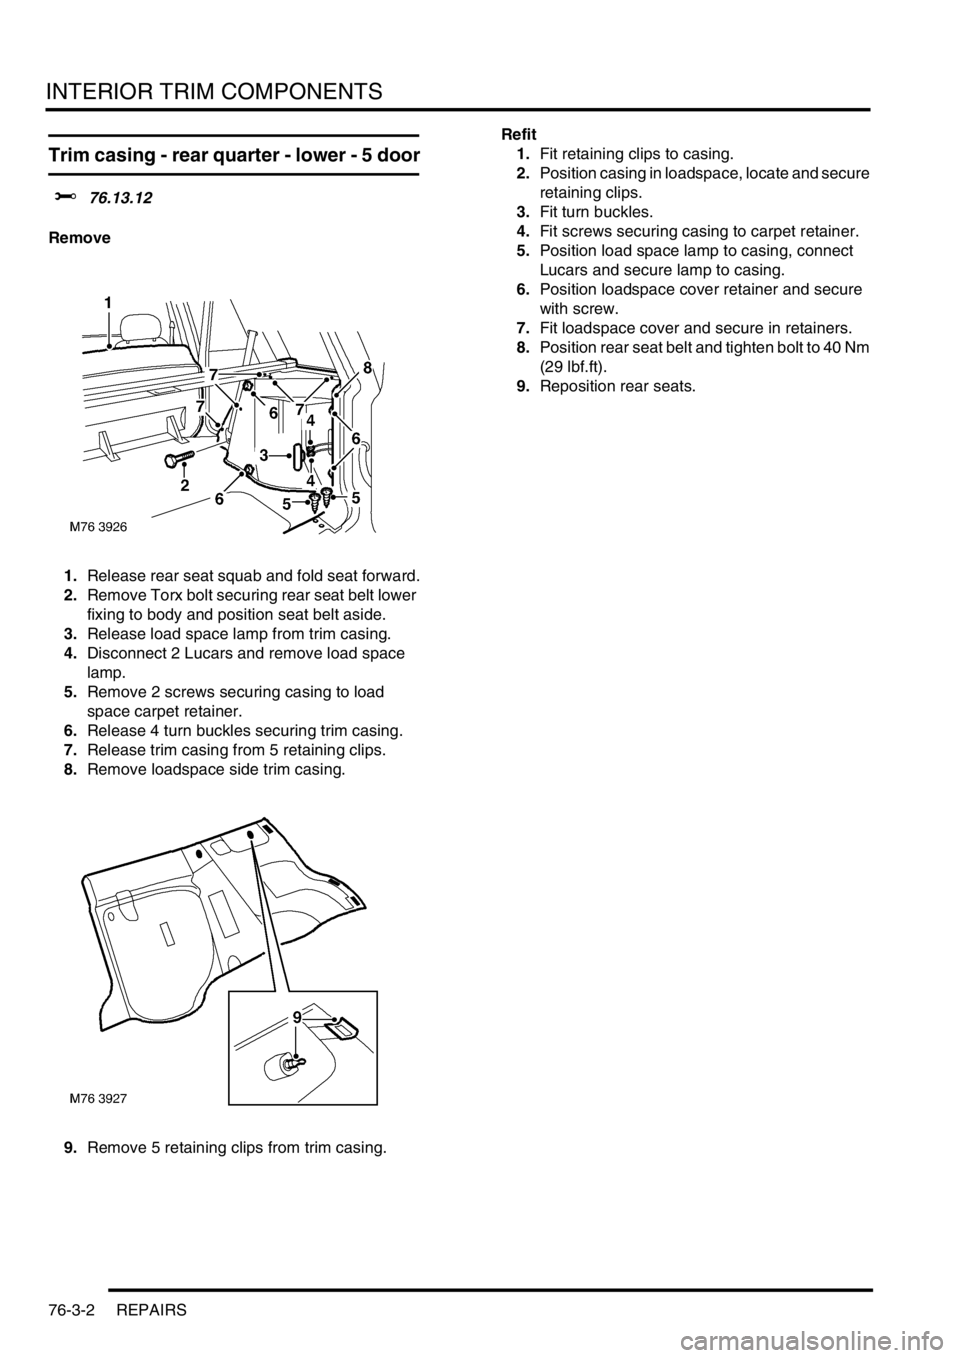
Trim casing - rear quarter - lower - 5 door
$% 76.13.12
Remove
1.Release rear seat squab and fold seat forward.
2.Remove Torx bolt securing rear seat belt lower
fixing to body and position seat belt aside.
3.Release load space lamp from trim casing.
4.Disconnect 2 Lucars and remove load space
lamp.
5.Remove 2 screws securing casing to load
space carpet retainer.
6.Release 4 turn buckles securing trim casing.
7.Release trim casing from 5 retaining clips.
8.Remove loadspace side trim casing.
9.Remove 5 retaining clips from trim casing.Refit
1.Fit retaining clips to casing.
2.Position casing in loadspace, locate and secure
retaining clips.
3.Fit turn buckles.
4.Fit screws securing casing to carpet retainer.
5.Position load space lamp to casing, connect
Lucars and secure lamp to casing.
6.Position loadspace cover retainer and secure
with screw.
7.Fit loadspace cover and secure in retainers.
8.Position rear seat belt and tighten bolt to 40 Nm
(29 lbf.ft).
9.Reposition rear seats.
Page 664 of 1007
INTERIOR TRIM COMPONENTS
REPAIRS 76-3-3
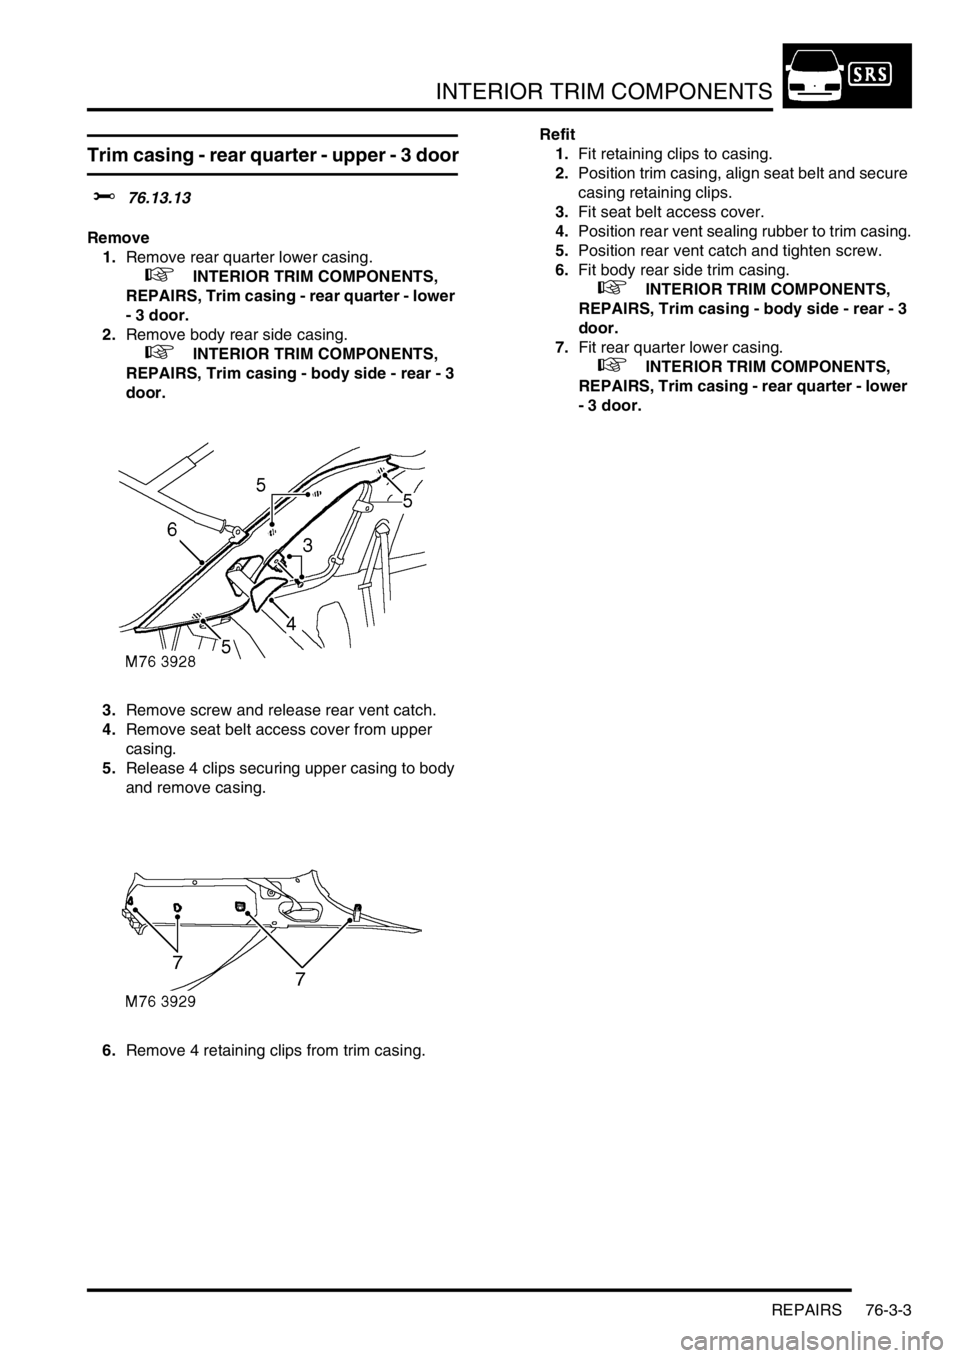
Trim casing - rear quarter - upper - 3 door
$% 76.13.13
Remove
1.Remove rear quarter lower casing.
+ INTERIOR TRIM COMPONENTS,
REPAIRS, Trim casing - rear quarter - lower
- 3 door.
2.Remove body rear side casing.
+ INTERIOR TRIM COMPONENTS,
REPAIRS, Trim casing - body side - rear - 3
door.
3.Remove screw and release rear vent catch.
4.Remove seat belt access cover from upper
casing.
5.Release 4 clips securing upper casing to body
and remove casing.
6.Remove 4 retaining clips from trim casing.Refit
1.Fit retaining clips to casing.
2.Position trim casing, align seat belt and secure
casing retaining clips.
3.Fit seat belt access cover.
4.Position rear vent sealing rubber to trim casing.
5.Position rear vent catch and tighten screw.
6.Fit body rear side trim casing.
+ INTERIOR TRIM COMPONENTS,
REPAIRS, Trim casing - body side - rear - 3
door.
7.Fit rear quarter lower casing.
+ INTERIOR TRIM COMPONENTS,
REPAIRS, Trim casing - rear quarter - lower
- 3 door.
Page 665 of 1007
INTERIOR TRIM COMPONENTS
76-3-4 REPAIRS
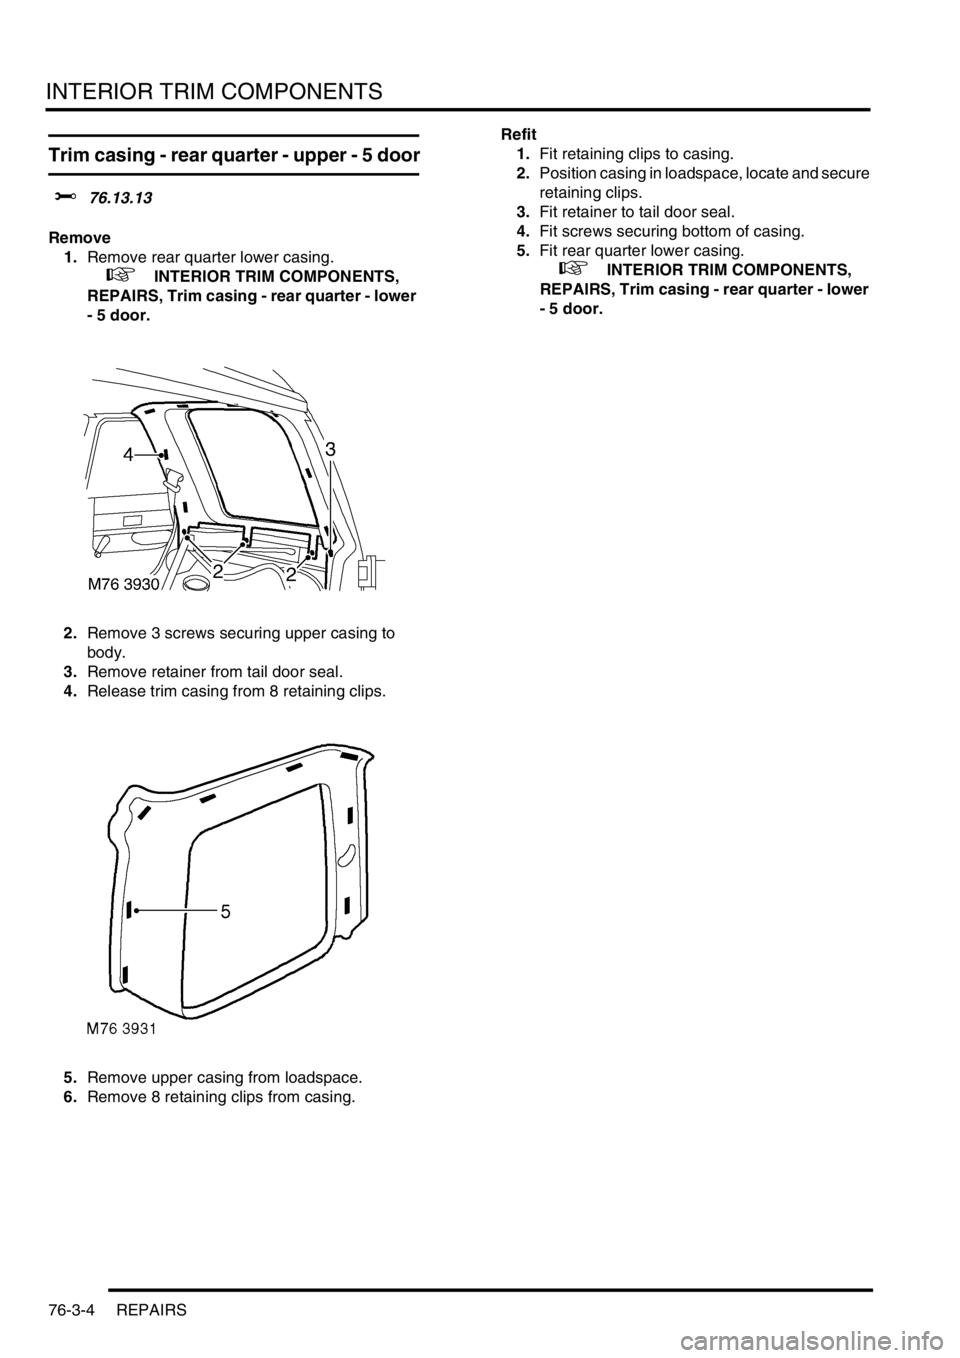
Trim casing - rear quarter - upper - 5 door
$% 76.13.13
Remove
1.Remove rear quarter lower casing.
+ INTERIOR TRIM COMPONENTS,
REPAIRS, Trim casing - rear quarter - lower
- 5 door.
2.Remove 3 screws securing upper casing to
body.
3.Remove retainer from tail door seal.
4.Release trim casing from 8 retaining clips.
5.Remove upper casing from loadspace.
6.Remove 8 retaining clips from casing.Refit
1.Fit retaining clips to casing.
2.Position casing in loadspace, locate and secure
retaining clips.
3.Fit retainer to tail door seal.
4.Fit screws securing bottom of casing.
5.Fit rear quarter lower casing.
+ INTERIOR TRIM COMPONENTS,
REPAIRS, Trim casing - rear quarter - lower
- 5 door.
Page 666 of 1007
INTERIOR TRIM COMPONENTS
REPAIRS 76-3-5
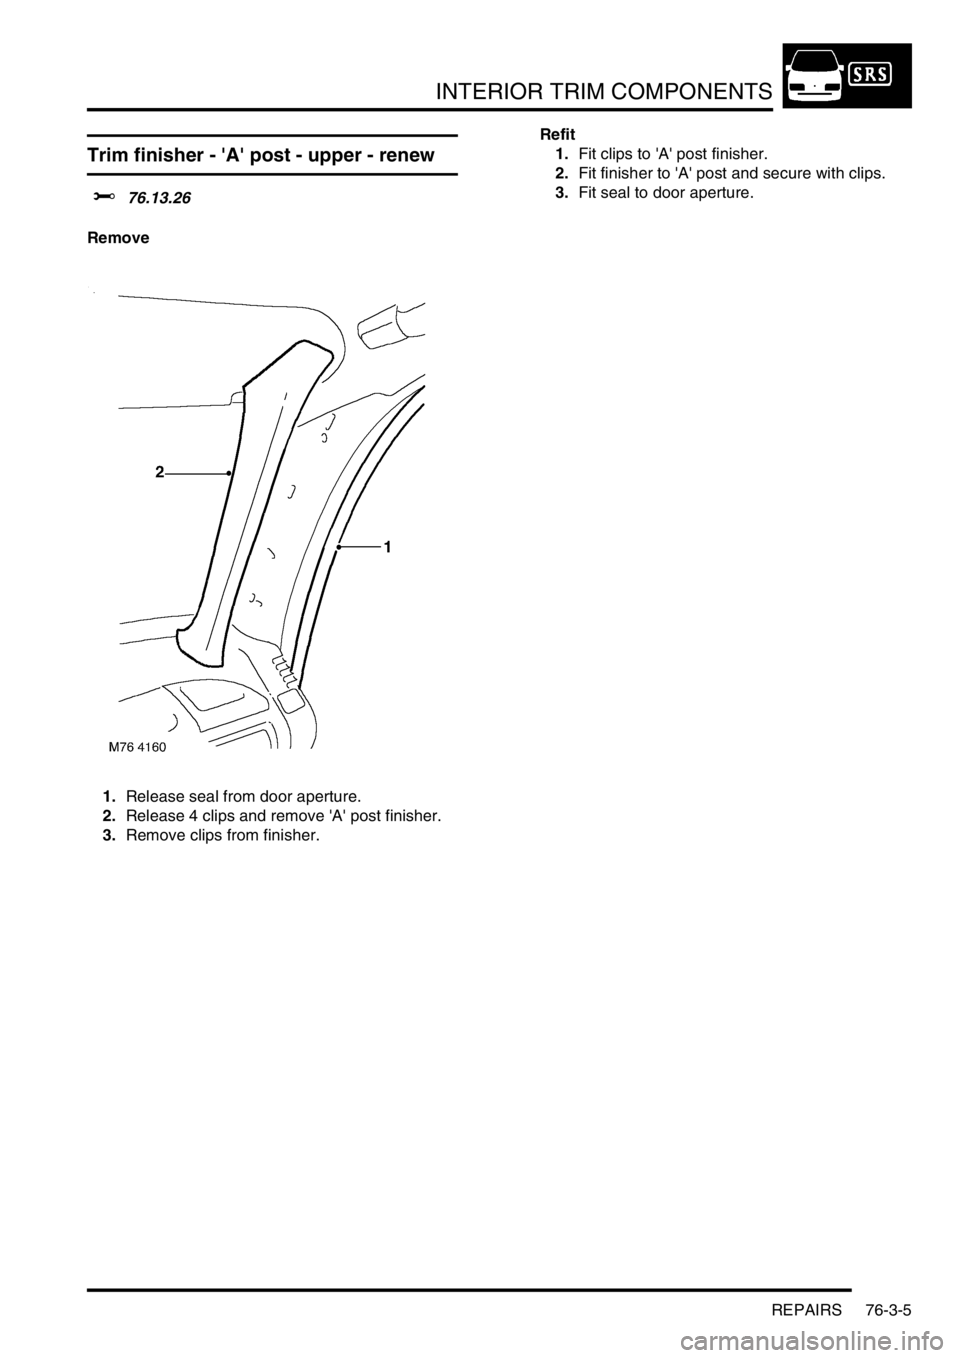
Trim finisher - 'A' post - upper - renew
$% 76.13.26
Remove
1.Release seal from door aperture.
2.Release 4 clips and remove 'A' post finisher.
3.Remove clips from finisher.Refit
1.Fit clips to 'A' post finisher.
2.Fit finisher to 'A' post and secure with clips.
3.Fit seal to door aperture.
Page 667 of 1007
INTERIOR TRIM COMPONENTS
76-3-6 REPAIRS
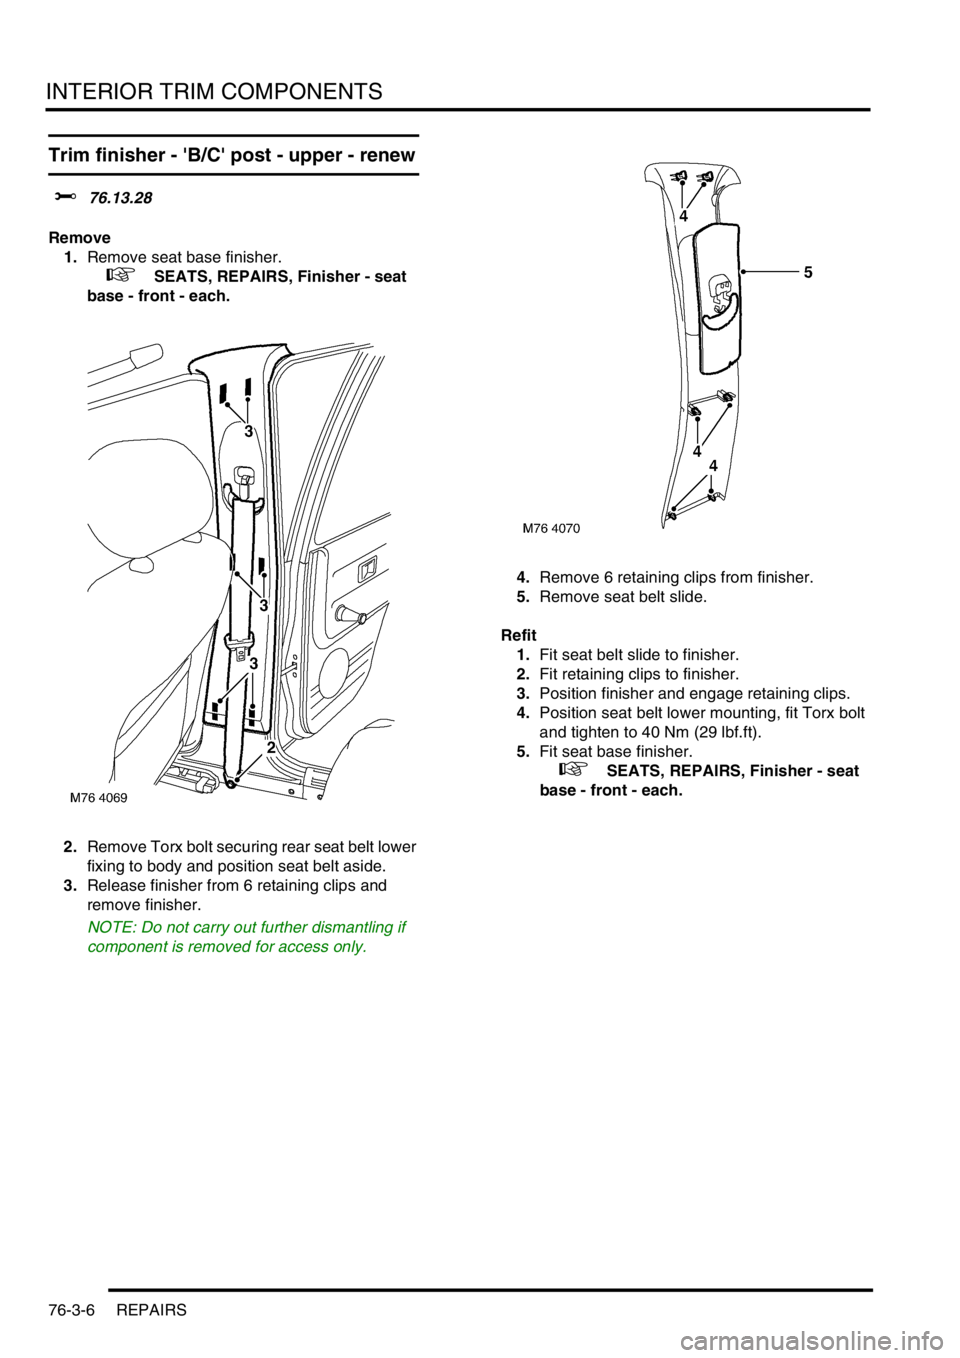
Trim finisher - 'B/C' post - upper - renew
$% 76.13.28
Remove
1.Remove seat base finisher.
+ SEATS, REPAIRS, Finisher - seat
base - front - each.
2.Remove Torx bolt securing rear seat belt lower
fixing to body and position seat belt aside.
3.Release finisher from 6 retaining clips and
remove finisher.
NOTE: Do not carry out further dismantling if
component is removed for access only.4.Remove 6 retaining clips from finisher.
5.Remove seat belt slide.
Refit
1.Fit seat belt slide to finisher.
2.Fit retaining clips to finisher.
3.Position finisher and engage retaining clips.
4.Position seat belt lower mounting, fit Torx bolt
and tighten to 40 Nm (29 lbf.ft).
5.Fit seat base finisher.
+ SEATS, REPAIRS, Finisher - seat
base - front - each.
Page 668 of 1007
INTERIOR TRIM COMPONENTS
REPAIRS 76-3-7
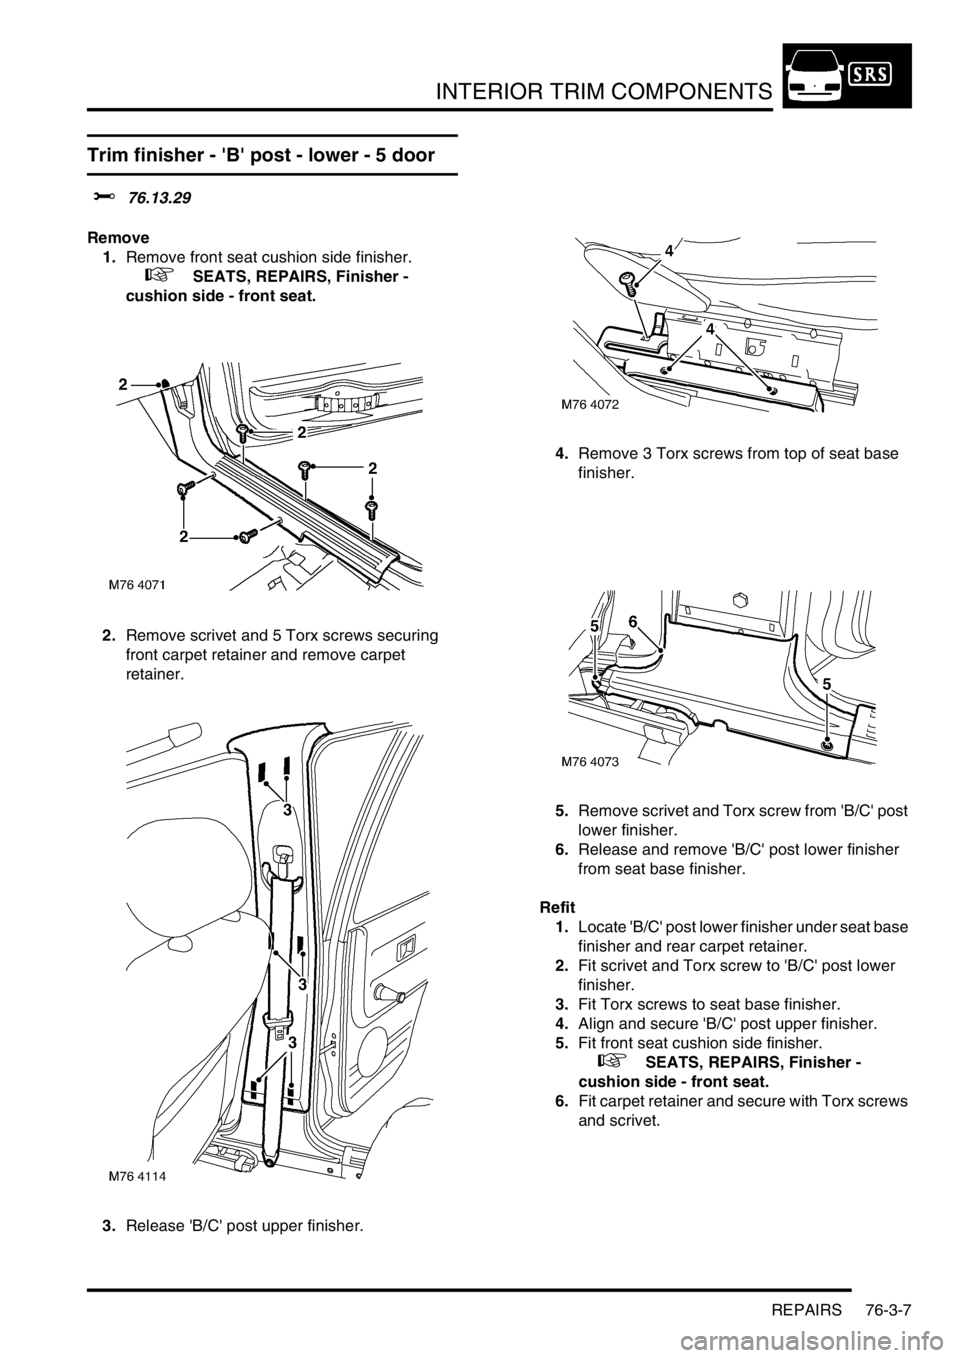
Trim finisher - 'B' post - lower - 5 door
$% 76.13.29
Remove
1.Remove front seat cushion side finisher.
+ SEATS, REPAIRS, Finisher -
cushion side - front seat.
2.Remove scrivet and 5 Torx screws securing
front carpet retainer and remove carpet
retainer.
3.Release 'B/C' post upper finisher.4.Remove 3 Torx screws from top of seat base
finisher.
5.Remove scrivet and Torx screw from 'B/C' post
lower finisher.
6.Release and remove 'B/C' post lower finisher
from seat base finisher.
Refit
1.Locate 'B/C' post lower finisher under seat base
finisher and rear carpet retainer.
2.Fit scrivet and Torx screw to 'B/C' post lower
finisher.
3.Fit Torx screws to seat base finisher.
4.Align and secure 'B/C' post upper finisher.
5.Fit front seat cushion side finisher.
+ SEATS, REPAIRS, Finisher -
cushion side - front seat.
6.Fit carpet retainer and secure with Torx screws
and scrivet.
Page 669 of 1007
INTERIOR TRIM COMPONENTS
76-3-8 REPAIRS
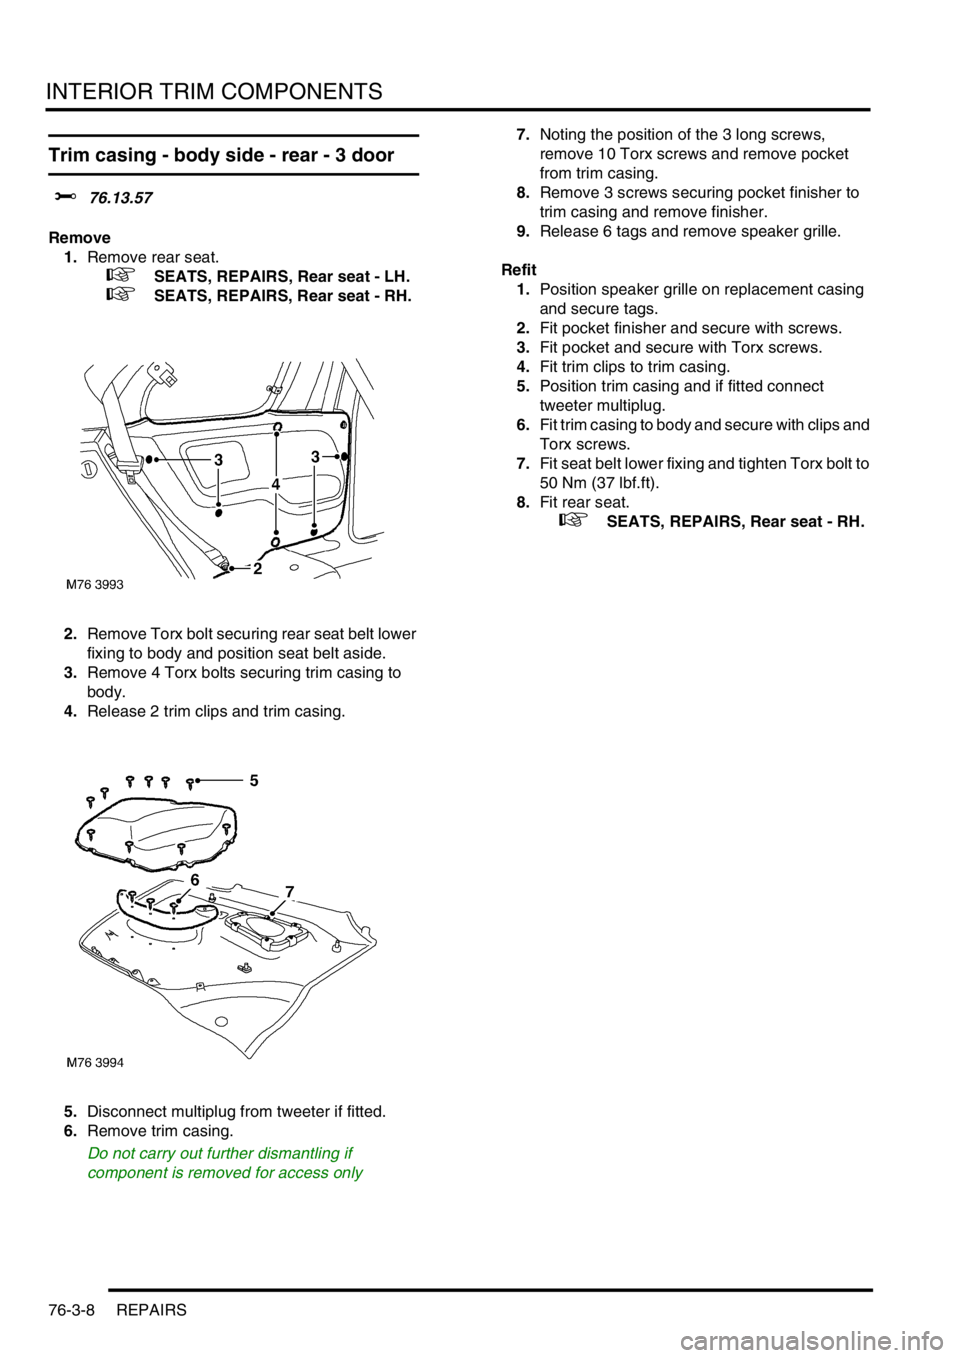
Trim casing - body side - rear - 3 door
$% 76.13.57
Remove
1.Remove rear seat.
+ SEATS, REPAIRS, Rear seat - LH.
+ SEATS, REPAIRS, Rear seat - RH.
2.Remove Torx bolt securing rear seat belt lower
fixing to body and position seat belt aside.
3.Remove 4 Torx bolts securing trim casing to
body.
4.Release 2 trim clips and trim casing.
5.Disconnect multiplug from tweeter if fitted.
6.Remove trim casing.
Do not carry out further dismantling if
component is removed for access only7.Noting the position of the 3 long screws,
remove 10 Torx screws and remove pocket
from trim casing.
8.Remove 3 screws securing pocket finisher to
trim casing and remove finisher.
9.Release 6 tags and remove speaker grille.
Refit
1.Position speaker grille on replacement casing
and secure tags.
2.Fit pocket finisher and secure with screws.
3.Fit pocket and secure with Torx screws.
4.Fit trim clips to trim casing.
5.Position trim casing and if fitted connect
tweeter multiplug.
6.Fit trim casing to body and secure with clips and
Torx screws.
7.Fit seat belt lower fixing and tighten Torx bolt to
50 Nm (37 lbf.ft).
8.Fit rear seat.
+ SEATS, REPAIRS, Rear seat - RH.
Page 670 of 1007
INTERIOR TRIM COMPONENTS
REPAIRS 76-3-9
Console - front - up to 04MY
$% 76.25.01
Remove
1.Remove rear console.
+ INTERIOR TRIM COMPONENTS,
REPAIRS, Console - rear.
2.Remove radio.
+ IN CAR ENTERTAINMENT,
REPAIRS, Radio - up to 04MY.
3.Remove gear lever knob.
4. Manual gearbox only: Remove descent
selector.
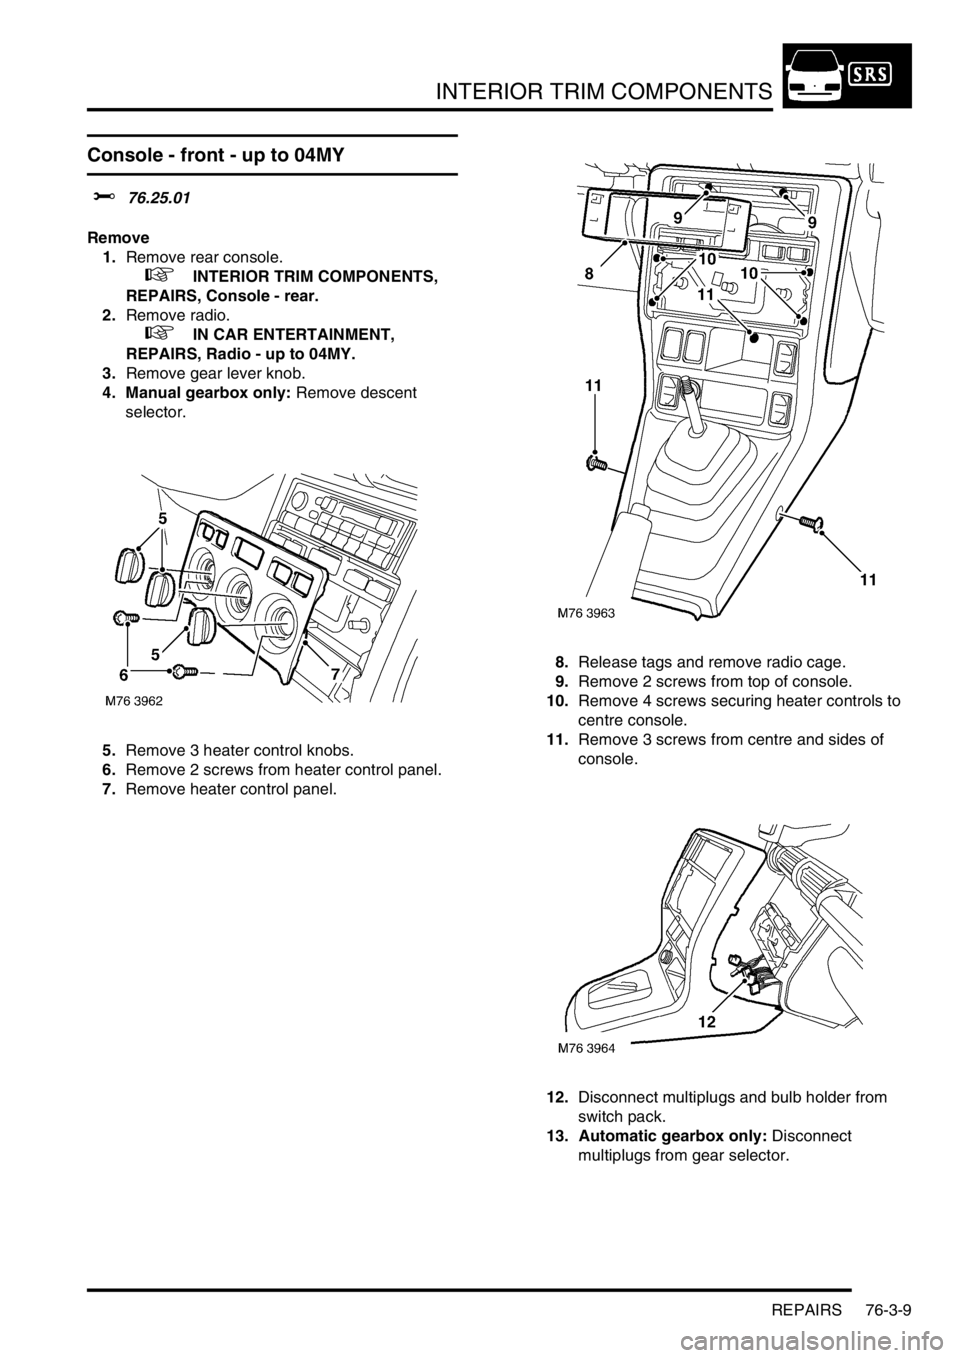
5.Remove 3 heater control knobs.
6.Remove 2 screws from heater control panel.
7.Remove heater control panel.8.Release tags and remove radio cage.
9.Remove 2 screws from top of console.
10.Remove 4 screws securing heater controls to
centre console.
11.Remove 3 screws from centre and sides of
console.
12.Disconnect multiplugs and bulb holder from
switch pack.
13. Automatic gearbox only: Disconnect
multiplugs from gear selector.