LAND ROVER FREELANDER 2001 Workshop Manual
Manufacturer: LAND ROVER, Model Year: 2001, Model line: FREELANDER, Model: LAND ROVER FREELANDER 2001Pages: 1007, PDF Size: 23.47 MB
Page 651 of 1007
EXTERIOR FITTINGS
76-2-10 REPAIRS
Bumper - assembly - front - up to 04MY
$% 76.22.72
Remove
1.Open bonnet.
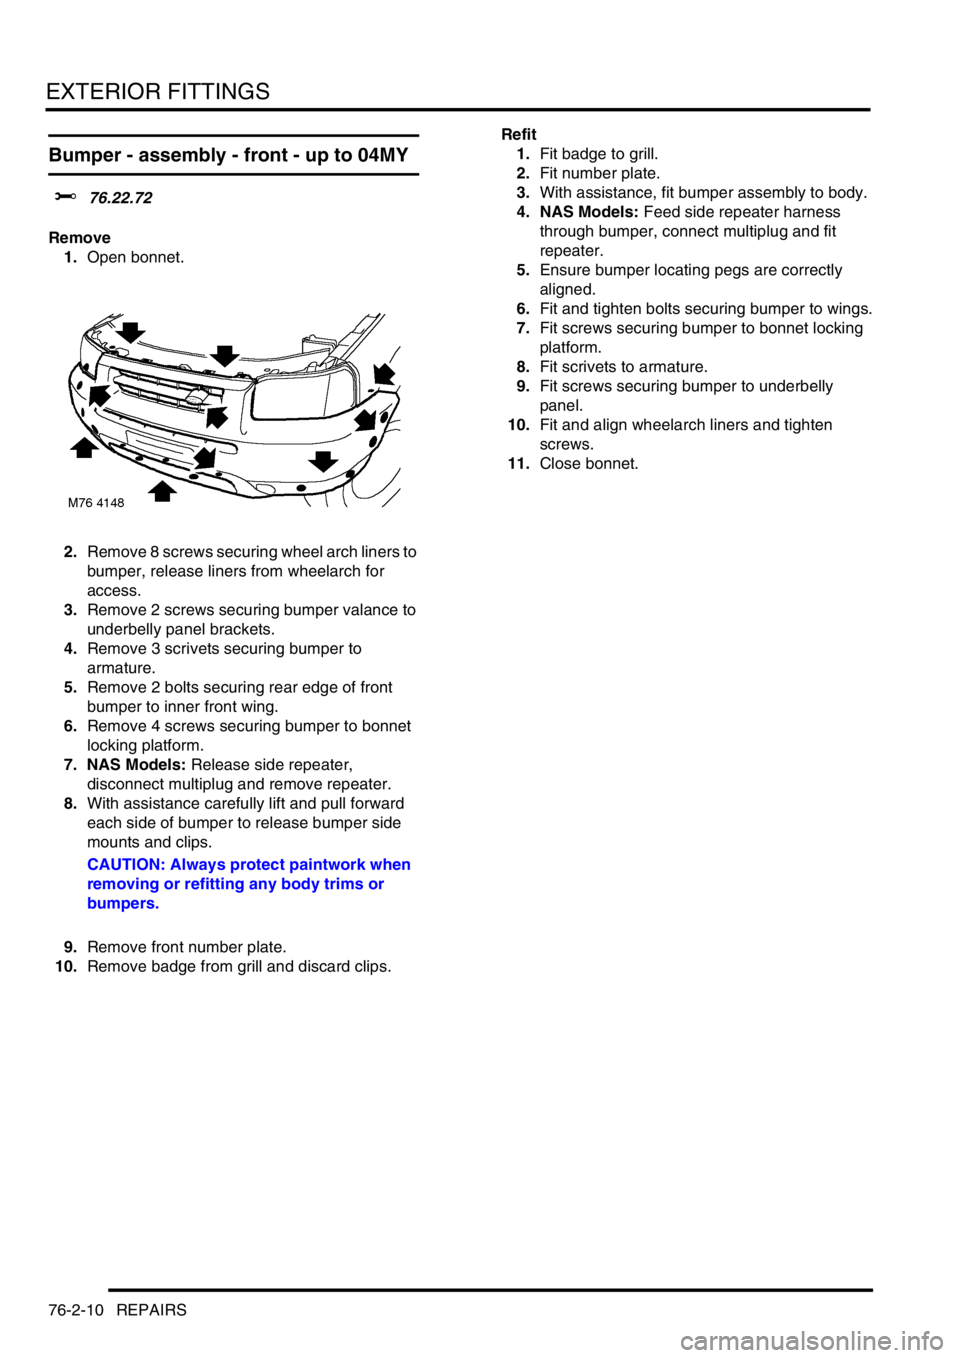
2.Remove 8 screws securing wheel arch liners to
bumper, release liners from wheelarch for
access.
3.Remove 2 screws securing bumper valance to
underbelly panel brackets.
4.Remove 3 scrivets securing bumper to
armature.
5.Remove 2 bolts securing rear edge of front
bumper to inner front wing.
6.Remove 4 screws securing bumper to bonnet
locking platform.
7. NAS Models: Release side repeater,
disconnect multiplug and remove repeater.
8.With assistance carefully lift and pull forward
each side of bumper to release bumper side
mounts and clips.
CAUTION: Always protect paintwork when
removing or refitting any body trims or
bumpers.
9.Remove front number plate.
10.Remove badge from grill and discard clips.Refit
1.Fit badge to grill.
2.Fit number plate.
3.With assistance, fit bumper assembly to body.
4. NAS Models: Feed side repeater harness
through bumper, connect multiplug and fit
repeater.
5.Ensure bumper locating pegs are correctly
aligned.
6.Fit and tighten bolts securing bumper to wings.
7.Fit screws securing bumper to bonnet locking
platform.
8.Fit scrivets to armature.
9.Fit screws securing bumper to underbelly
panel.
10.Fit and align wheelarch liners and tighten
screws.
11.Close bonnet.
Page 652 of 1007
EXTERIOR FITTINGS
REPAIRS 76-2-11
Bumper - assembly - front - from 04MY
$% 76.22.72
Remove
1.Open bonnet.
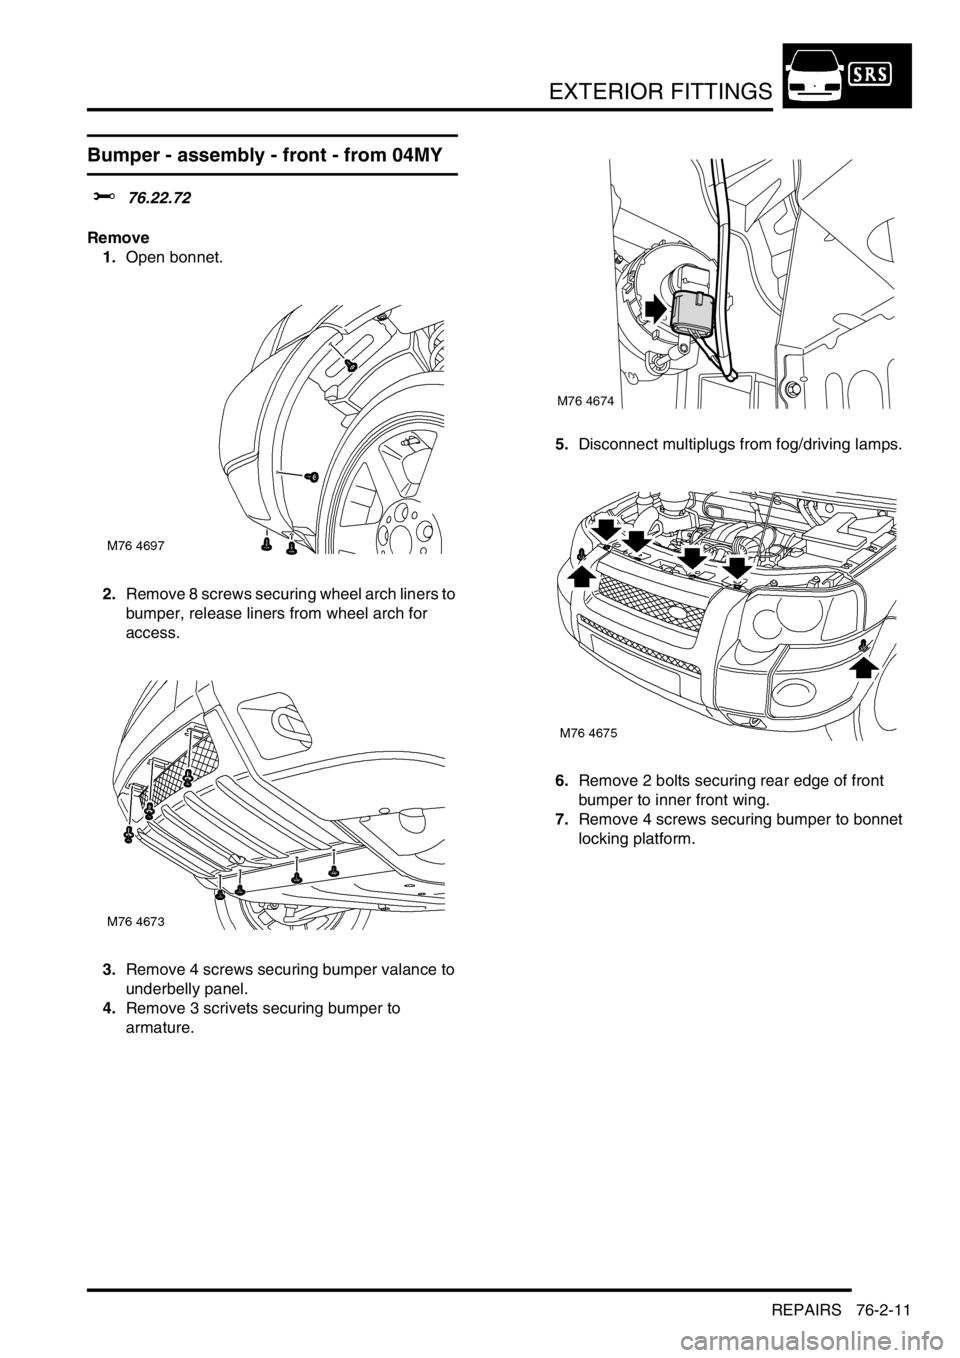
2.Remove 8 screws securing wheel arch liners to
bumper, release liners from wheel arch for
access.
3.Remove 4 screws securing bumper valance to
underbelly panel.
4.Remove 3 scrivets securing bumper to
armature.5.Disconnect multiplugs from fog/driving lamps.
6.Remove 2 bolts securing rear edge of front
bumper to inner front wing.
7.Remove 4 screws securing bumper to bonnet
locking platform.
M76 4674
Page 653 of 1007
EXTERIOR FITTINGS
76-2-12 REPAIRS
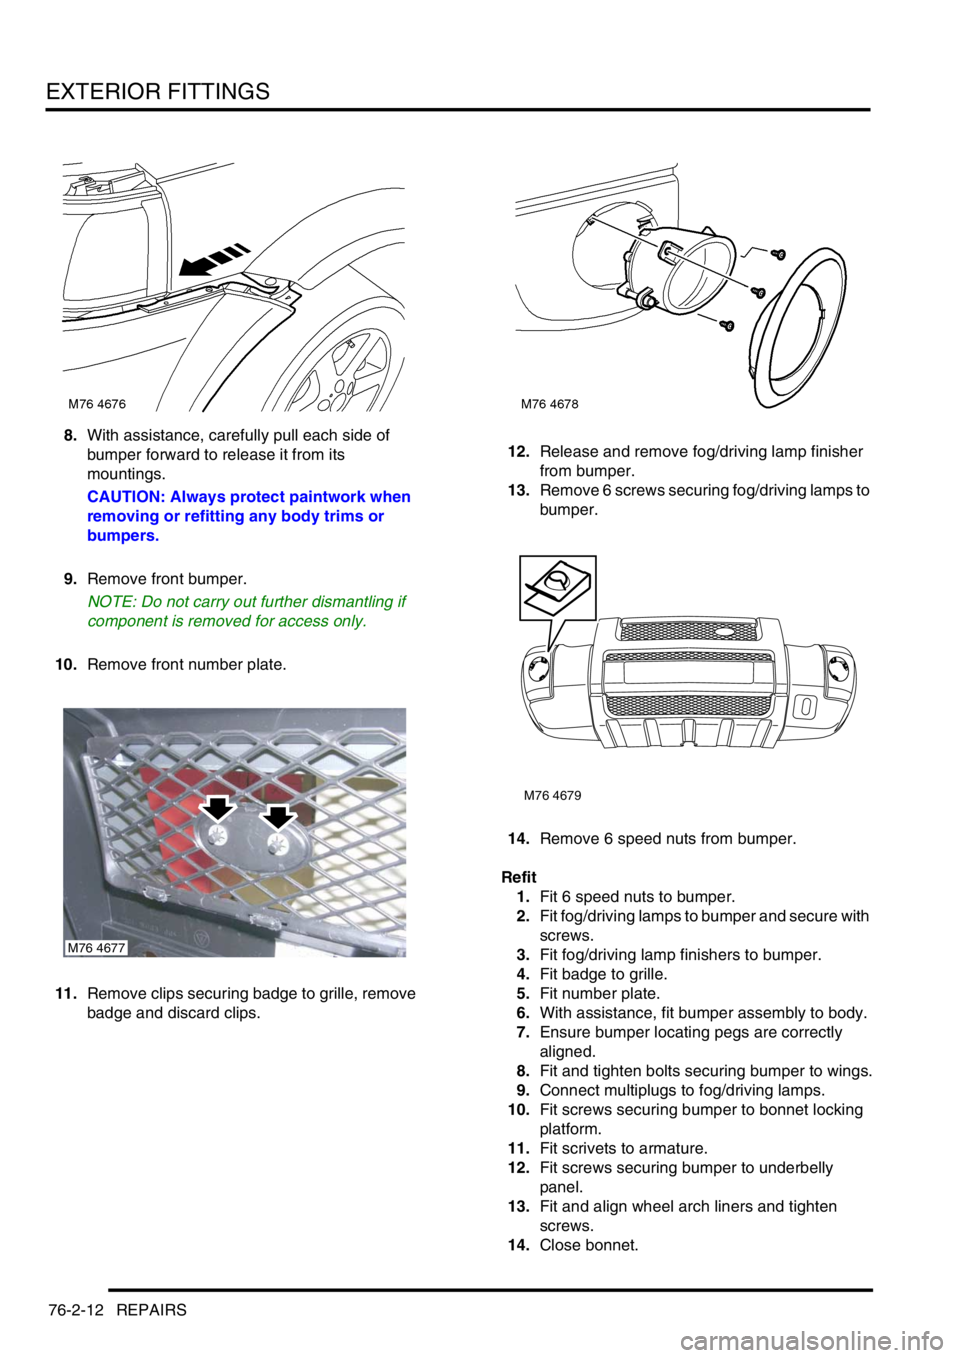
8.With assistance, carefully pull each side of
bumper forward to release it from its
mountings.
CAUTION: Always protect paintwork when
removing or refitting any body trims or
bumpers.
9.Remove front bumper.
NOTE: Do not carry out further dismantling if
component is removed for access only.
10.Remove front number plate.
11.Remove clips securing badge to grille, remove
badge and discard clips.12.Release and remove fog/driving lamp finisher
from bumper.
13.Remove 6 screws securing fog/driving lamps to
bumper.
14.Remove 6 speed nuts from bumper.
Refit
1.Fit 6 speed nuts to bumper.
2.Fit fog/driving lamps to bumper and secure with
screws.
3.Fit fog/driving lamp finishers to bumper.
4.Fit badge to grille.
5.Fit number plate.
6.With assistance, fit bumper assembly to body.
7.Ensure bumper locating pegs are correctly
aligned.
8.Fit and tighten bolts securing bumper to wings.
9.Connect multiplugs to fog/driving lamps.
10.Fit screws securing bumper to bonnet locking
platform.
11.Fit scrivets to armature.
12.Fit screws securing bumper to underbelly
panel.
13.Fit and align wheel arch liners and tighten
screws.
14.Close bonnet.
M76 4677
M76 4679
Page 654 of 1007
EXTERIOR FITTINGS
REPAIRS 76-2-13
Bumper valance - rear - up to 04MY
$% 76.22.74
Remove
1.Remove rear mud flaps.
+ EXTERIOR FITTINGS, REPAIRS,
Mud flap - rear.
2.Remove both rear tail lamps.
+ LIGHTING, REPAIRS, Lamp
assembly - tail.
3.Remove rear wheel arch extensions.
+ EXTERIOR FITTINGS, REPAIRS,
Wheelarch extension - rear wing part.
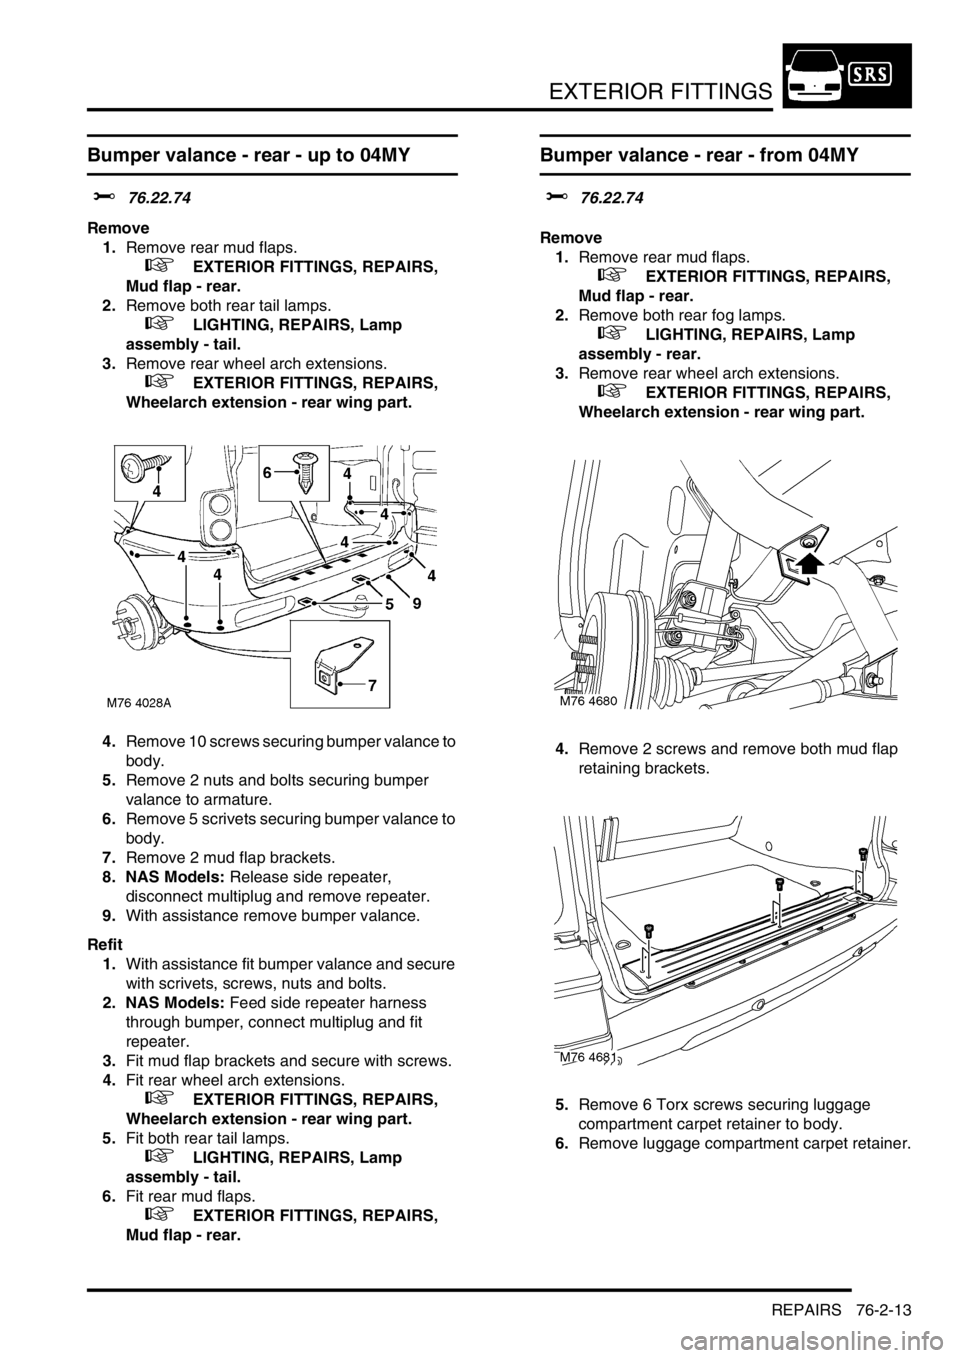
4.Remove 10 screws securing bumper valance to
body.
5.Remove 2 nuts and bolts securing bumper
valance to armature.
6.Remove 5 scrivets securing bumper valance to
body.
7.Remove 2 mud flap brackets.
8. NAS Models: Release side repeater,
disconnect multiplug and remove repeater.
9.With assistance remove bumper valance.
Refit
1.With assistance fit bumper valance and secure
with scrivets, screws, nuts and bolts.
2. NAS Models: Feed side repeater harness
through bumper, connect multiplug and fit
repeater.
3.Fit mud flap brackets and secure with screws.
4.Fit rear wheel arch extensions.
+ EXTERIOR FITTINGS, REPAIRS,
Wheelarch extension - rear wing part.
5.Fit both rear tail lamps.
+ LIGHTING, REPAIRS, Lamp
assembly - tail.
6.Fit rear mud flaps.
+ EXTERIOR FITTINGS, REPAIRS,
Mud flap - rear.
Bumper valance - rear - from 04MY
$% 76.22.74
Remove
1.Remove rear mud flaps.
+ EXTERIOR FITTINGS, REPAIRS,
Mud flap - rear.
2.Remove both rear fog lamps.
+ LIGHTING, REPAIRS, Lamp
assembly - rear.
3.Remove rear wheel arch extensions.
+ EXTERIOR FITTINGS, REPAIRS,
Wheelarch extension - rear wing part.
4.Remove 2 screws and remove both mud flap
retaining brackets.
5.Remove 6 Torx screws securing luggage
compartment carpet retainer to body.
6.Remove luggage compartment carpet retainer.
Page 655 of 1007

EXTERIOR FITTINGS
76-2-14 REPAIRS
7.Release tailgate aperture seal to access
bumper valance to body retaining scrivets.
8.Remove 5 scrivets securing bumper valance to
body.
9.Remove 4 screws securing bumper valance to
body.
10.Remove 2 Torx bolts securing bumper valance
to bumper armature.11.With assistance, release bumper valance and
parking aid sensor harness from body.
12.Remove parking aid sensor harness retaining
clip and disconnect multiplug.
13.Remove bumper valance.
NOTE: Do not carry out further dismantling if
component is removed for access only.
14.Remove both rear tail lamps.
+ LIGHTING, REPAIRS, Lamp
assembly - tail.
15.Disconnect multiplugs from 4 parking aid
sensors and release harness from 9 retaining
clips.
16.Remove parking aid harness from bumper
valance.
M76 4682
Page 656 of 1007

EXTERIOR FITTINGS
REPAIRS 76-2-15
17.Release 2 retaining clips and remove parking
aid sensor from finisher.
18.Remove parking aid sensor finisher from
bumper valance.
19.Repeat above procedure for remaining 3
parking aid sensors.
20.Remove tail lamp speed nuts from bumper
valance.Refit
1.Fit tail lamp speed nuts to bumper valance.
2.Fit and secure parking aid finishers and
sensors to bumper valance.
3.Fit and secure parking aid harness to sensors
and bumpers valance.
4.Fit both rear tail lamps.
+ LIGHTING, REPAIRS, Lamp
assembly - tail.
5.With assistance, position bumper valance to
body.
6.Connect parking aid harness multiplug, fit
retaining clip and secure to body.
7.Align bumper valance to body and secure with
retaining screws and scrivets.
8.Fit Torx screws securing bumper valance to
bumper armature and tighten to 5 Nm (3.7
lbf.ft).
9.Fit tailgate aperture seal to body.
10.Fit luggage compartment carpet retainer and
secure with Torx screws.
11.Fit both mud flap retaining brackets and secure
with screws.
12.Fit rear wheel arch extensions.
+ EXTERIOR FITTINGS, REPAIRS,
Wheelarch extension - rear wing part.
13.Fit both rear fog lamps.
+ LIGHTING, REPAIRS, Lamp
assembly - rear.
14.Fit rear mud flaps.
+ EXTERIOR FITTINGS, REPAIRS,
Mud flap - rear.
Page 657 of 1007

EXTERIOR FITTINGS
76-2-16 REPAIRS
Finisher - sill - lower
$% 76.43.28
Remove
1.Raise front of vehicle.
WARNING: Do not work on or under a
vehicle supported only by a jack. Always
support the vehicle on safety stands.
2.Remove both jacking point covers.
3.Remove 7 scrivets securing sill finisher to body.
4.Release and remove finisher from sill.Refit
1.Clean mating faces of finisher.
2.Position finisher to sill, locate over jacking
points and secure with scrivets.
3.Fit jacking point covers.
4.Remove stands and lower vehicle.
Page 658 of 1007
EXTERIOR FITTINGS
REPAIRS 76-2-17
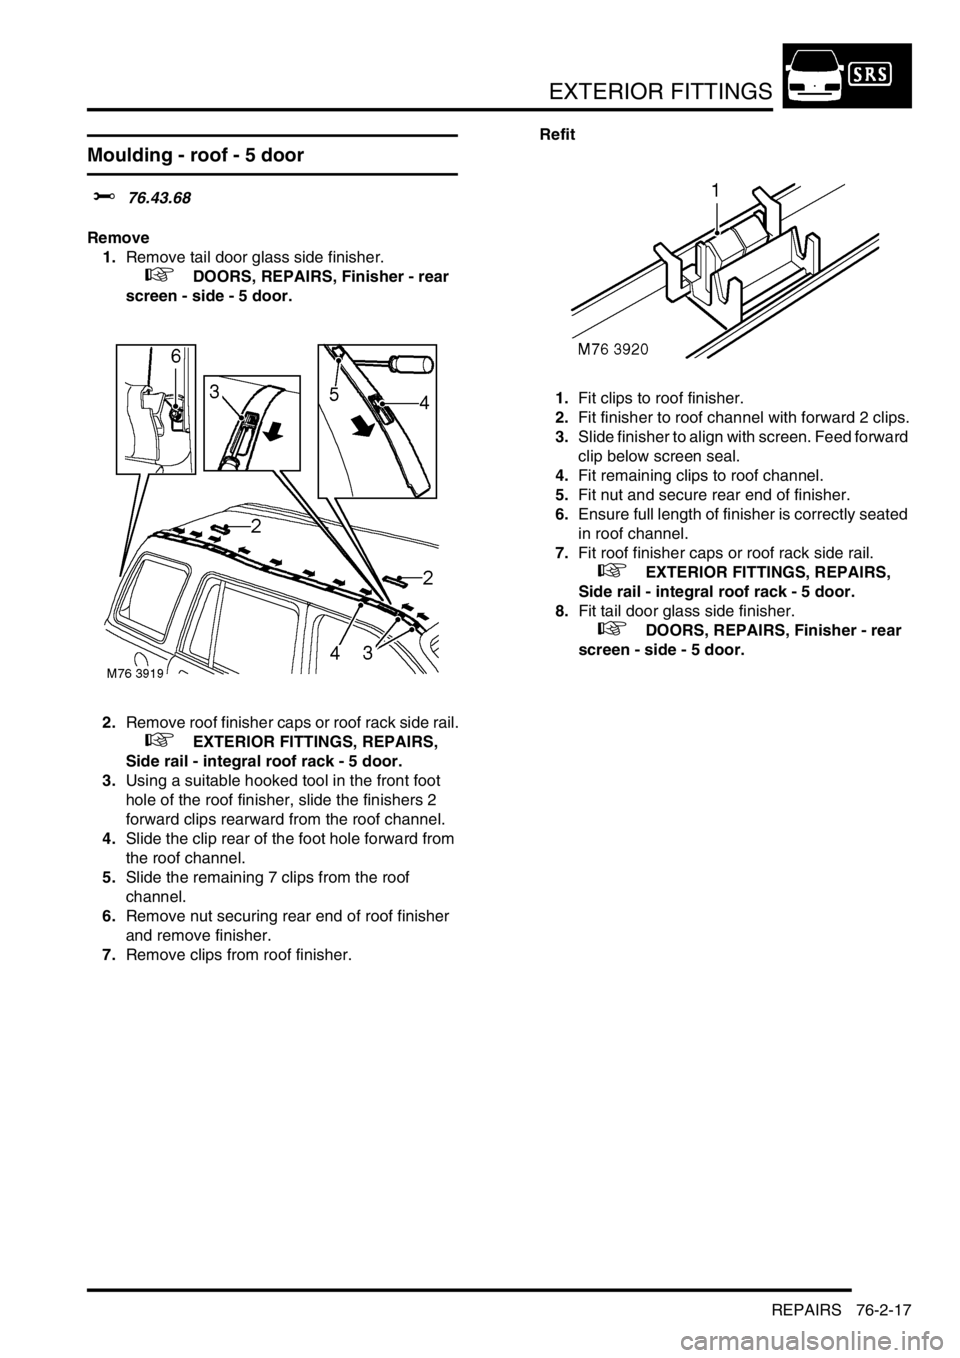
Moulding - roof - 5 door
$% 76.43.68
Remove
1.Remove tail door glass side finisher.
+ DOORS, REPAIRS, Finisher - rear
screen - side - 5 door.
2.Remove roof finisher caps or roof rack side rail.
+ EXTERIOR FITTINGS, REPAIRS,
Side rail - integral roof rack - 5 door.
3.Using a suitable hooked tool in the front foot
hole of the roof finisher, slide the finishers 2
forward clips rearward from the roof channel.
4.Slide the clip rear of the foot hole forward from
the roof channel.
5.Slide the remaining 7 clips from the roof
channel.
6.Remove nut securing rear end of roof finisher
and remove finisher.
7.Remove clips from roof finisher.Refit
1.Fit clips to roof finisher.
2.Fit finisher to roof channel with forward 2 clips.
3.Slide finisher to align with screen. Feed forward
clip below screen seal.
4.Fit remaining clips to roof channel.
5.Fit nut and secure rear end of finisher.
6.Ensure full length of finisher is correctly seated
in roof channel.
7.Fit roof finisher caps or roof rack side rail.
+ EXTERIOR FITTINGS, REPAIRS,
Side rail - integral roof rack - 5 door.
8.Fit tail door glass side finisher.
+ DOORS, REPAIRS, Finisher - rear
screen - side - 5 door.
Page 659 of 1007
EXTERIOR FITTINGS
76-2-18 REPAIRS
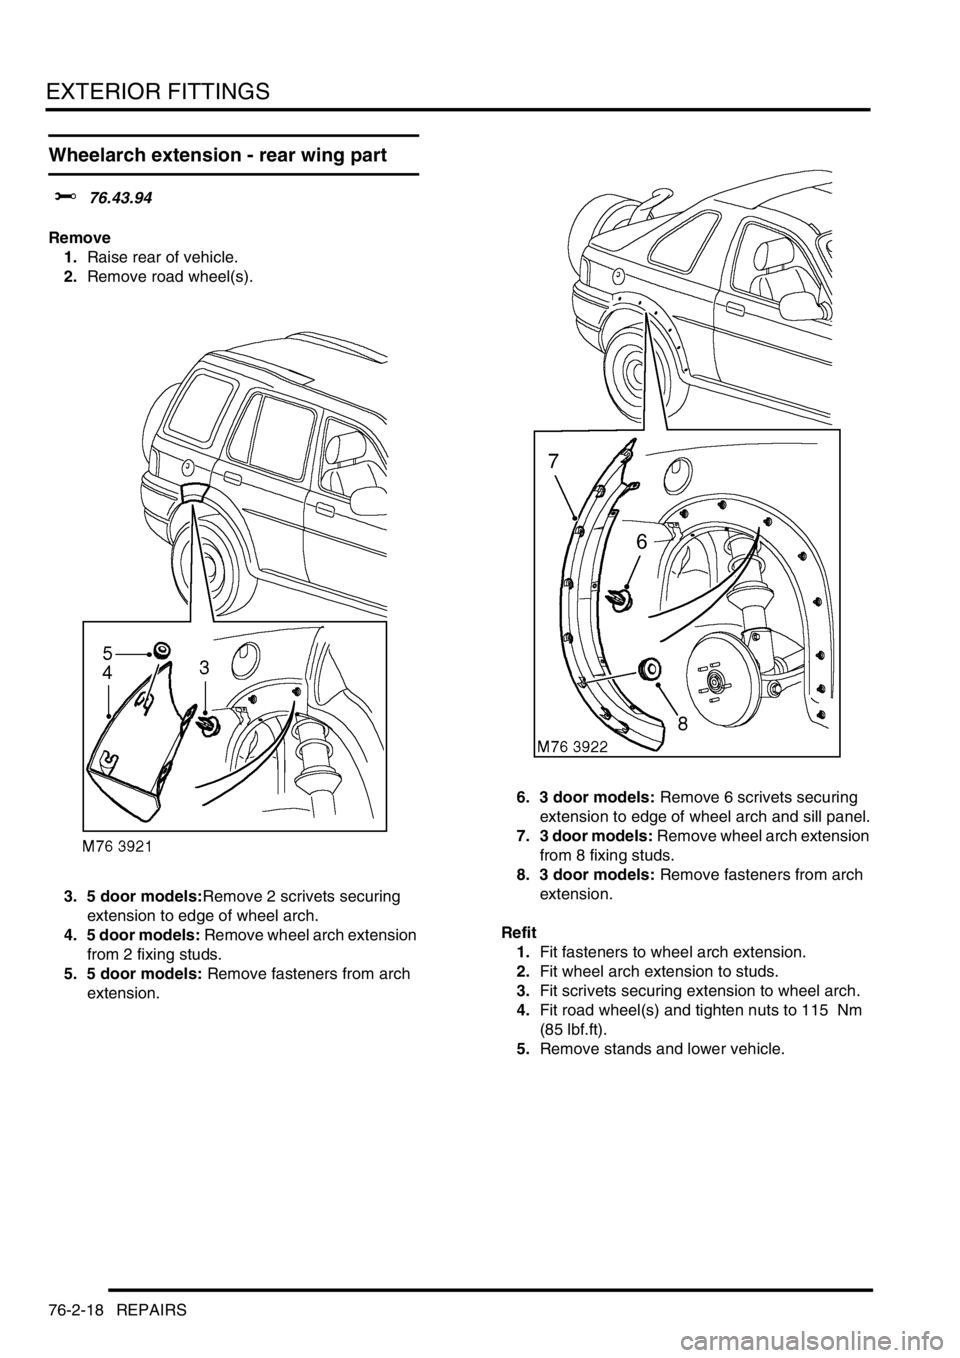
Wheelarch extension - rear wing part
$% 76.43.94
Remove
1.Raise rear of vehicle.
2.Remove road wheel(s).
3. 5 door models:Remove 2 scrivets securing
extension to edge of wheel arch.
4. 5 door models: Remove wheel arch extension
from 2 fixing studs.
5. 5 door models: Remove fasteners from arch
extension.6. 3 door models: Remove 6 scrivets securing
extension to edge of wheel arch and sill panel.
7. 3 door models: Remove wheel arch extension
from 8 fixing studs.
8. 3 door models: Remove fasteners from arch
extension.
Refit
1.Fit fasteners to wheel arch extension.
2.Fit wheel arch extension to studs.
3.Fit scrivets securing extension to wheel arch.
4.Fit road wheel(s) and tighten nuts to 115 Nm
(85 lbf.ft).
5.Remove stands and lower vehicle.
Page 660 of 1007
EXTERIOR FITTINGS
REPAIRS 76-2-19
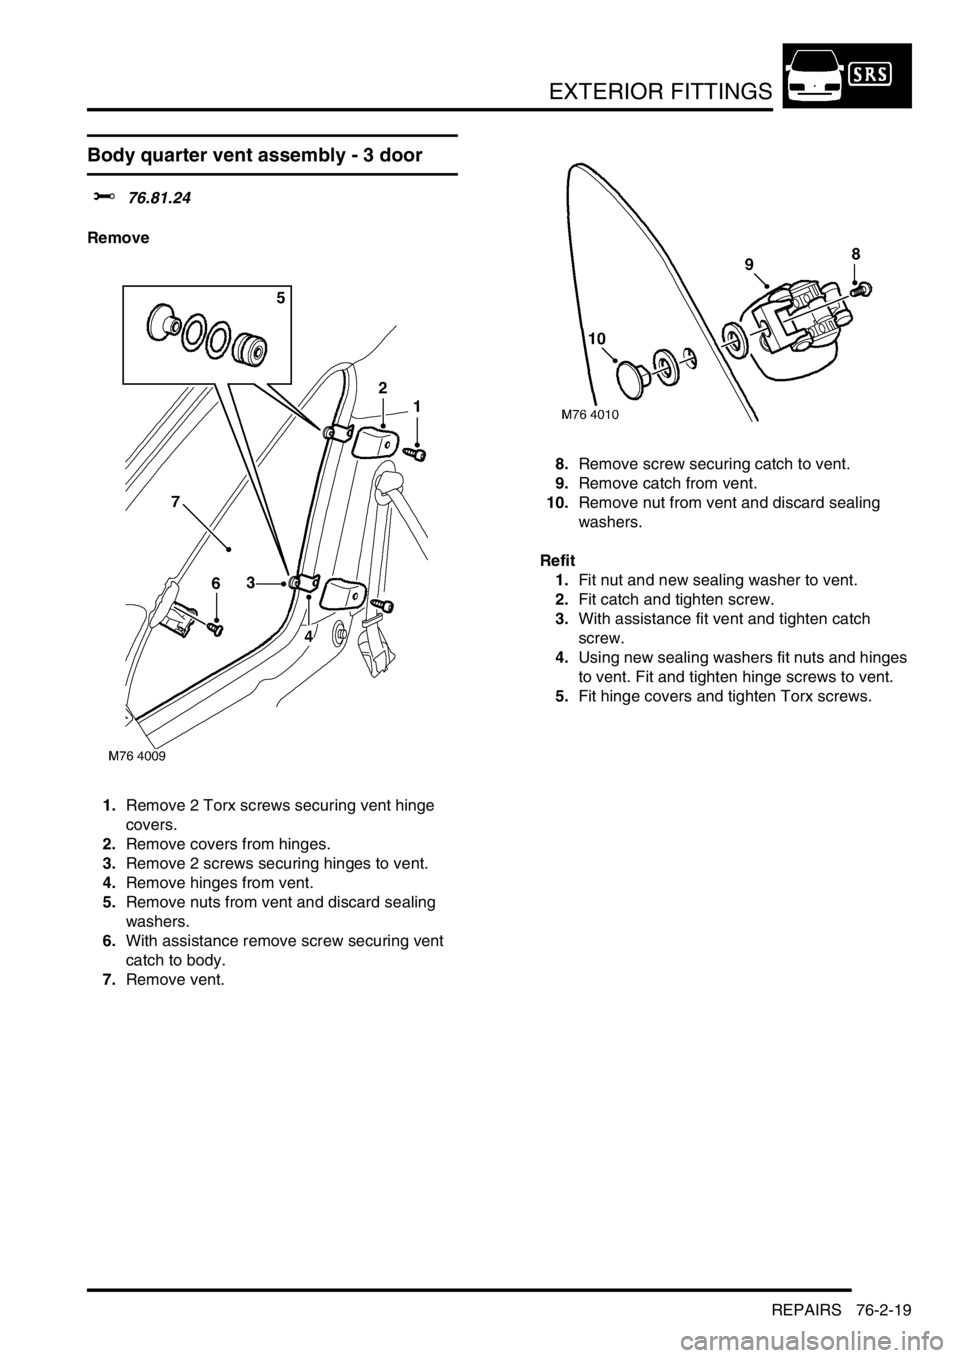
Body quarter vent assembly - 3 door
$% 76.81.24
Remove
1.Remove 2 Torx screws securing vent hinge
covers.
2.Remove covers from hinges.
3.Remove 2 screws securing hinges to vent.
4.Remove hinges from vent.
5.Remove nuts from vent and discard sealing
washers.
6.With assistance remove screw securing vent
catch to body.
7.Remove vent.8.Remove screw securing catch to vent.
9.Remove catch from vent.
10.Remove nut from vent and discard sealing
washers.
Refit
1.Fit nut and new sealing washer to vent.
2.Fit catch and tighten screw.
3.With assistance fit vent and tighten catch
screw.
4.Using new sealing washers fit nuts and hinges
to vent. Fit and tighten hinge screws to vent.
5.Fit hinge covers and tighten Torx screws.