LAND ROVER FRELANDER 2 2006 Repair Manual
FRELANDER 2 2006
LAND ROVER
LAND ROVER
https://www.carmanualsonline.info/img/64/57251/w960_57251-0.png
LAND ROVER FRELANDER 2 2006 Repair Manual
Trending: check transmission fluid, gas type, brake pads replacement, oil type, engine oil, run flat, low beam
Page 2681 of 3229
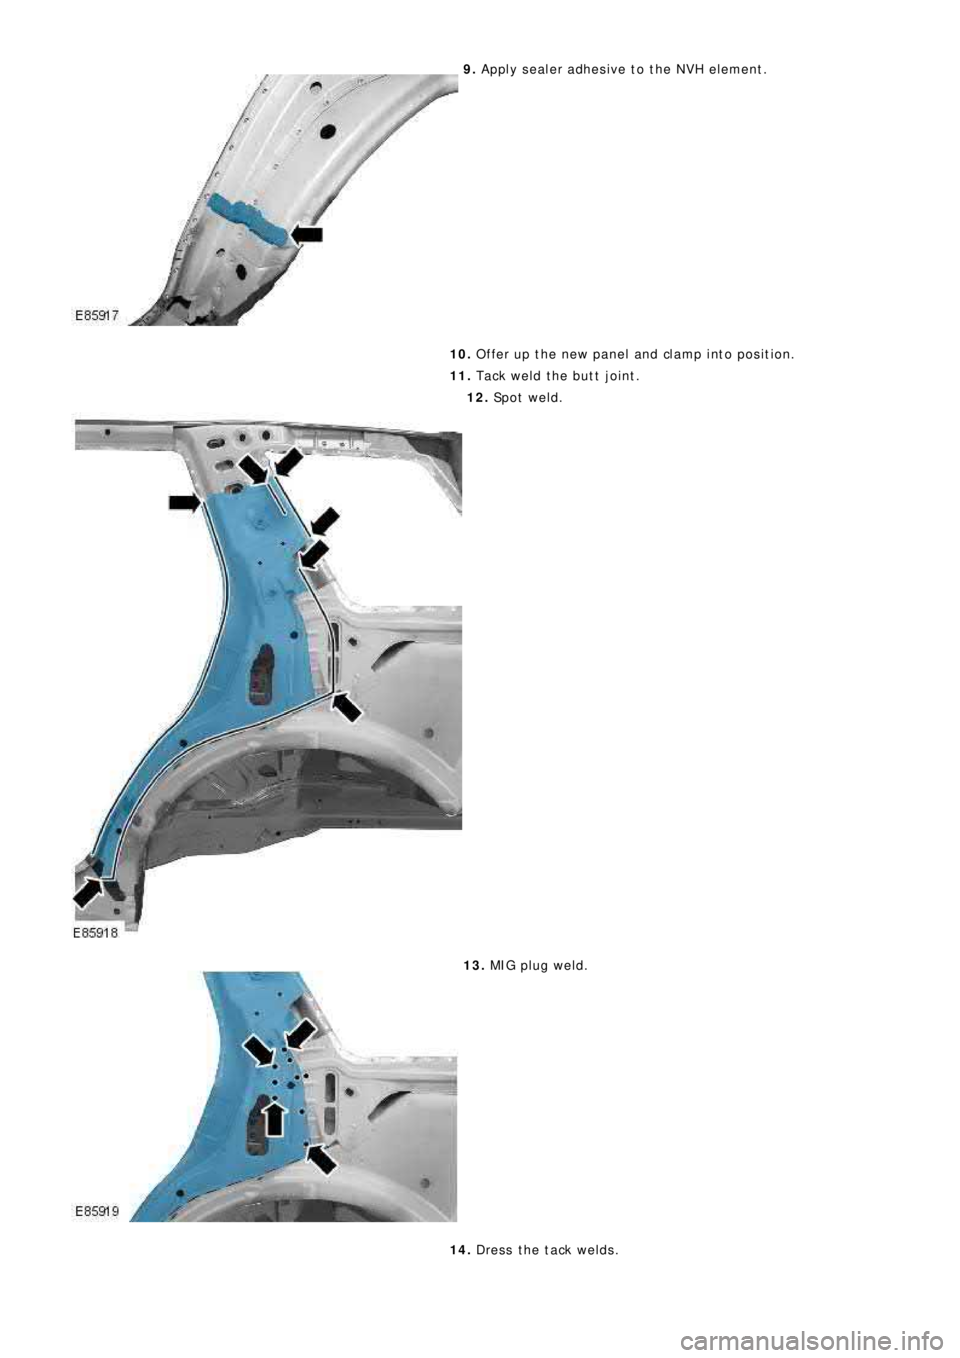
9. Apply sealer adhesive to the NVH element.
10. Offer up the new panel and clamp into position.
11. Tack weld the butt joint.
12. Sp o t w e l d .
13. MIG pl ug we l d.
14. Dress the tack welds.
Page 2682 of 3229
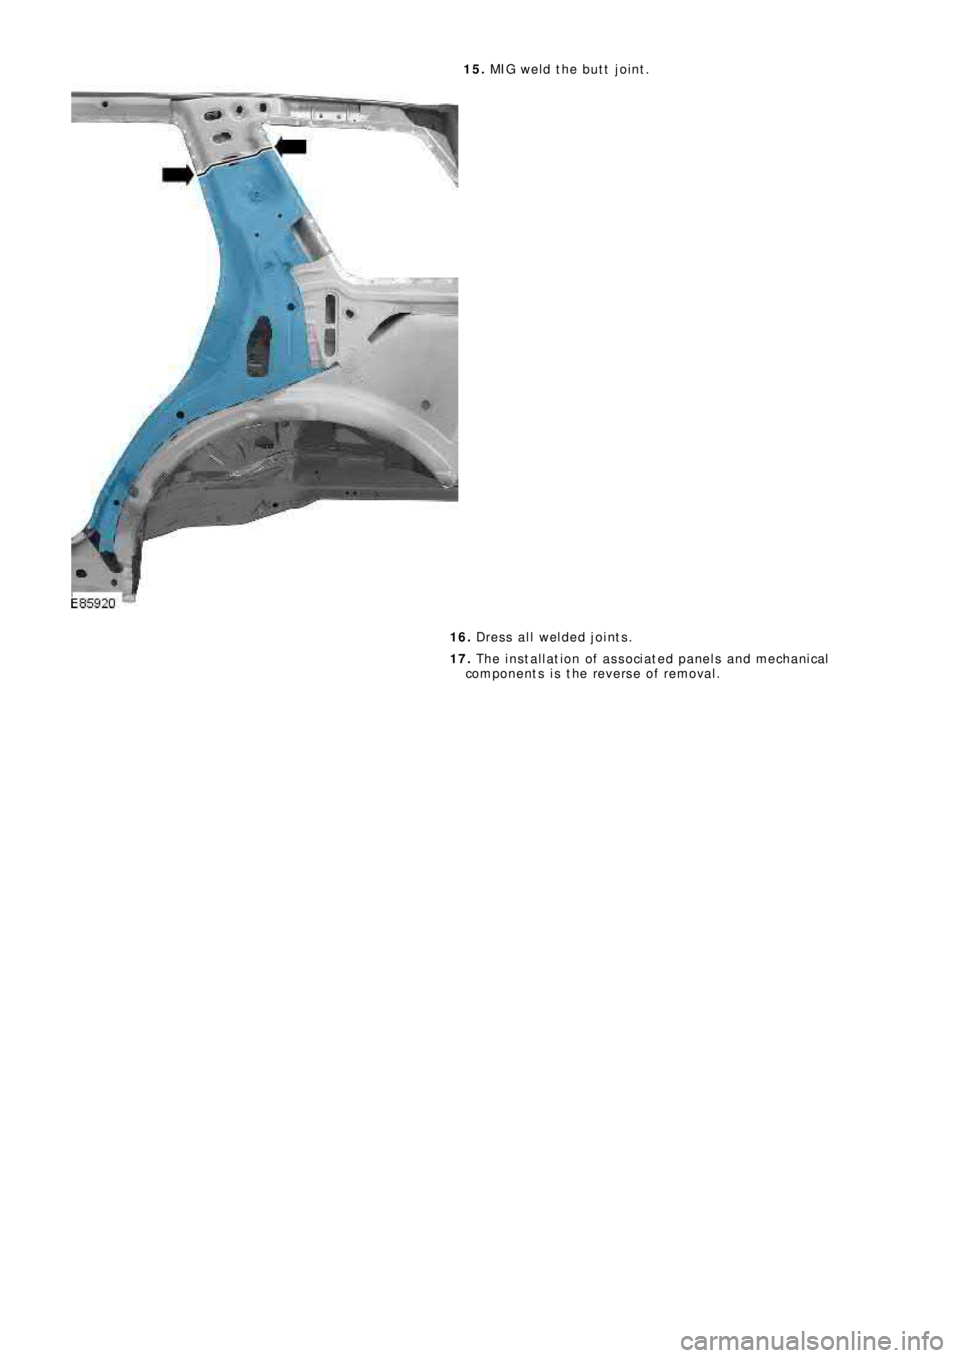
15. MIG weld the butt joint.
16. Dress all welded joints.
17. The installation of associated panels and mechanical
components is the reverse of removal.
Page 2683 of 3229
Publ is hed: 11-May-2011
Rear End Sheet Metal Repairs - Rear Inner Quarter Panel
Removal and Installation
Removal
• N O T E: T he re a r i nne r q ua rt e r p a ne l i s t o b e unp i cke d f ro m t he i nne r q ua rt e r p a ne l , i t i s no t s e rvi ce d s e p a ra t e l y.
1. The rear inner quart er panel is replaced in conjunct ion wit h:
Rear bumper cover
Quarter panel
Rear door
Quarter glass
2. Fo r a d d i t i o na l i nf o rma t i o n re l a t i ng t o t hi s re p a i r p ro ce d ure
please see the following:
Fo r a d d i t i o na l i nf o rma t i o n, re f e r t o : Body and Frame
(501-26
Body Repairs - Vehicle Specific Information and Tolerance
Checks, Description and Operation) /
St a nd a rd W o rks ho p P ra ct i ce s
(100-00 Ge ne ra l I nf o rma t i o n,
Description and Operation).
3. Remove the quarter panel.
Fo r a d d i t i o na l i nf o rma t i o n, re f e r t o : Quarter Panel
(501-30
Rear End Sheet Metal Repairs, Removal and Installation).
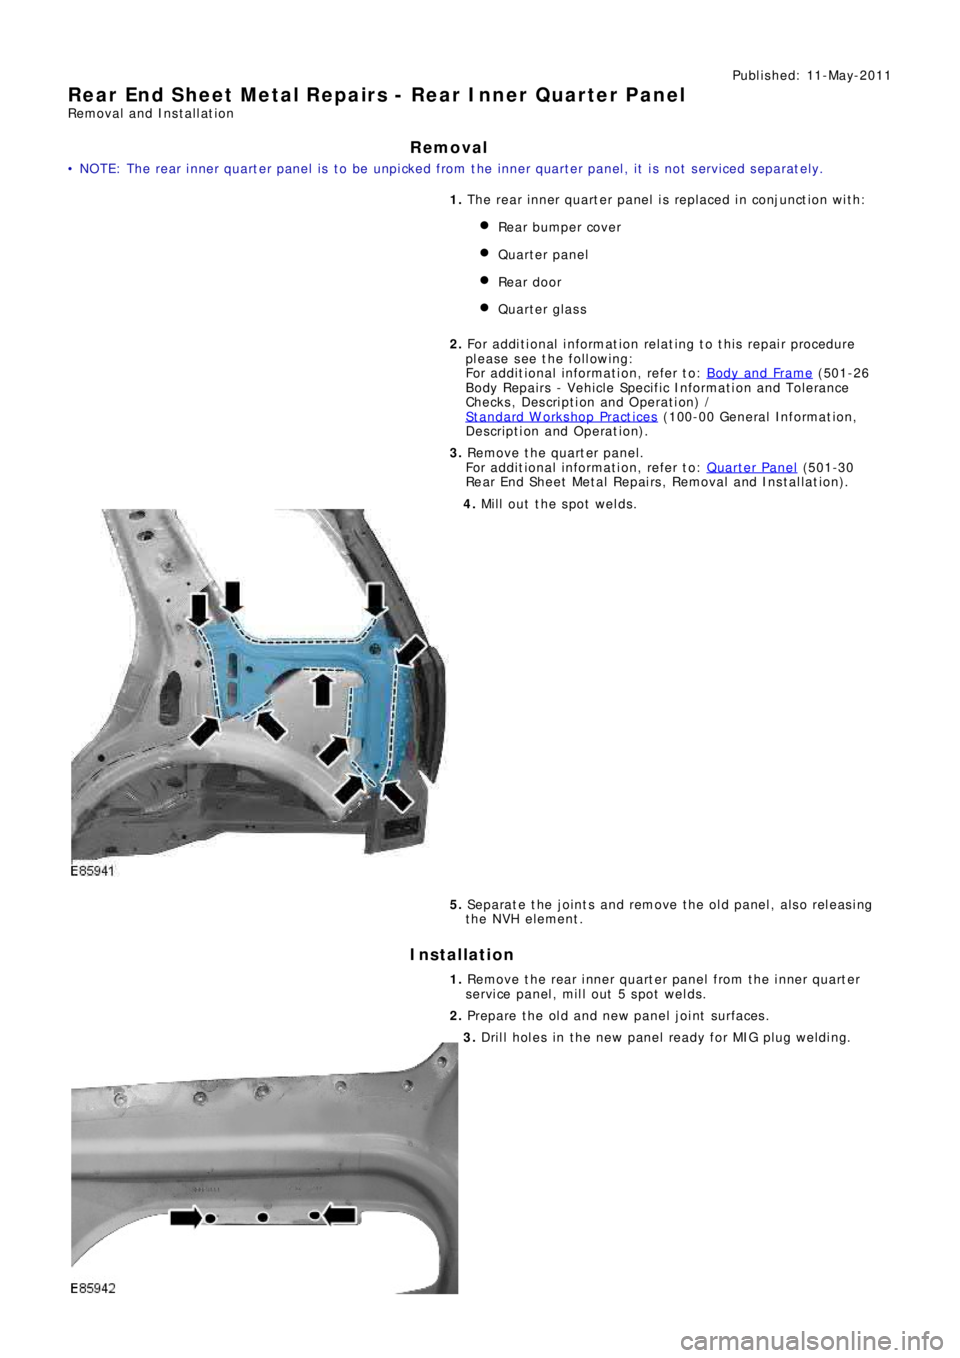
4. Mill out the spot welds.
5. Separate the joints and remove the old panel, also releasing
the NVH element.
Installation
1. Re mo ve t he re a r i nne r q ua rt e r p a ne l f ro m t he i nne r q ua rt e r
service panel, mill out 5 spot welds.
2. Prepare the old and new panel joint surfaces.
3. Drill holes in the new panel ready for MIG plug welding.
Page 2684 of 3229
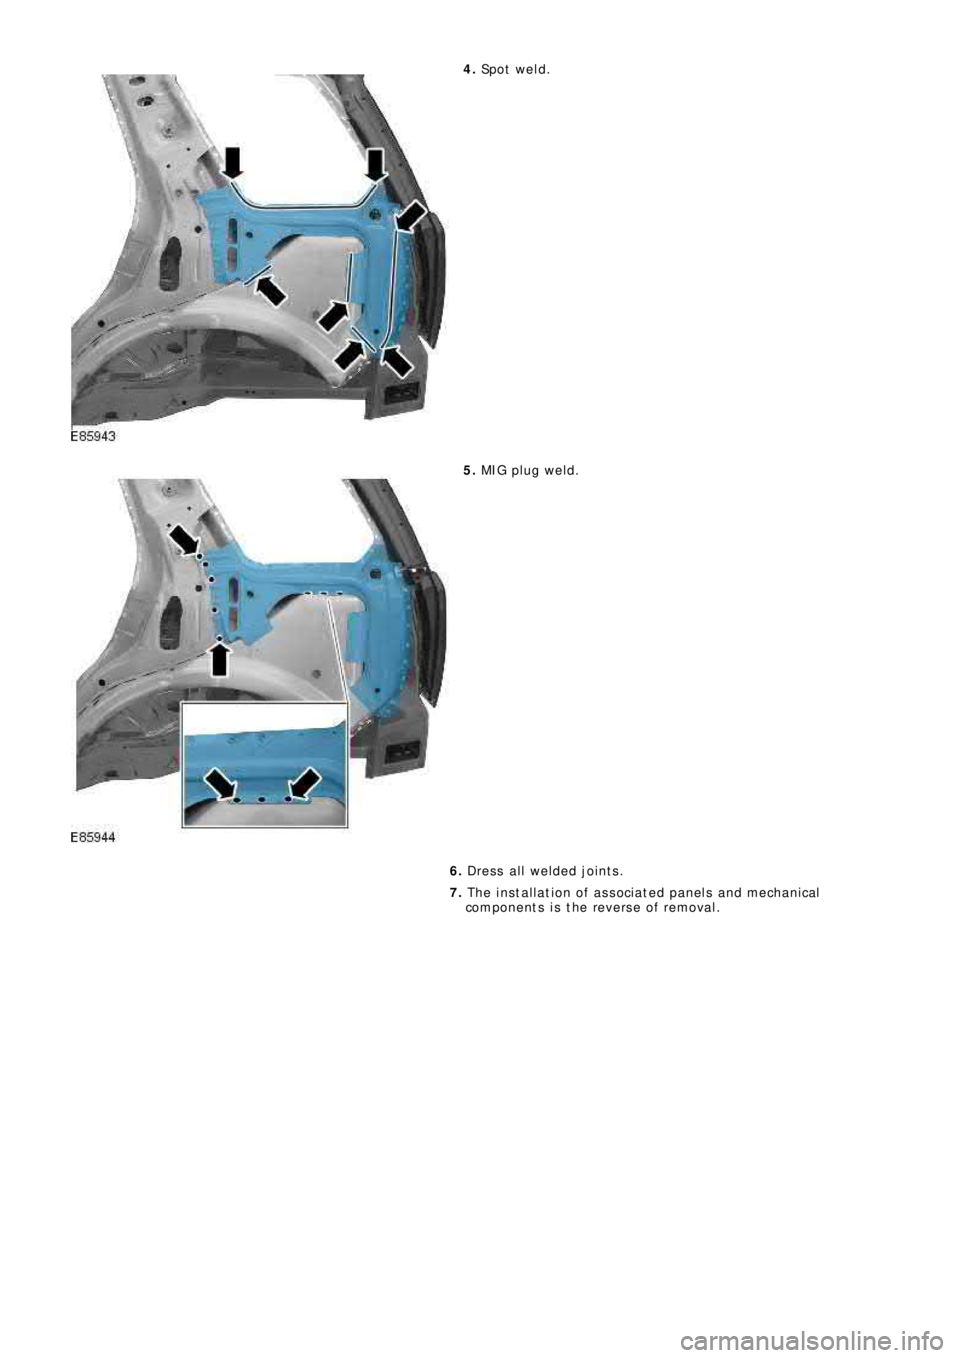
4. Sp o t w e l d .
5. MIG pl ug we l d.
6. Dress all welded joints.
7. The installation of associated panels and mechanical
components is the reverse of removal.
Page 2685 of 3229
Publ is hed: 11-May-2011
Rear End Sheet Metal Repairs - Inner Quarter Panel and Wheelhouse
Removal and Installation
Removal
• NOTE: The inner quarter panel and wheelhouse is an assembly of the inner quarter panel, rear wheelhouse inner, rear
wheelhous e out er and t he rear lamp mount ing panel.
• NOTE: The service panel is not fully welded.
• NOTE: The panel is sectioned to avoid disturbing the roof panel.
1. The inner quarter panel and wheelhouse is replaced in
conjunct ion wit h:
Rear bumper cover
Rear bumper
Quarter panel
Rear door
Quarter glass
Rear subframe and suspension assembly
2. Fo r a d d i t i o na l i nf o rma t i o n re l a t i ng t o t hi s re p a i r p ro ce d ure
please see the following:
Fo r a d d i t i o na l i nf o rma t i o n, re f e r t o : Body and Frame
(501-26
Body Repairs - Vehicle Specific Information and Tolerance
Checks, Description and Operation) /
St a nd a rd W o rks ho p P ra ct i ce s
(100-00 Ge ne ra l I nf o rma t i o n,
Description and Operation).
3. Remove the quarter panel.
Fo r a d d i t i o na l i nf o rma t i o n, re f e r t o : Quarter Panel
(501-30
Rear End Sheet Metal Repairs, Removal and Installation).
4. Remove the rear subframe / suspension as an assembly.
5. Remove the brake pipe.
6. RH Only: Release and lay aside the fuel vent hose.
7. Remove the rear seat backrest.
Fo r a d d i t i o na l i nf o rma t i o n, re f e r t o : Front Seat Backres t Heat er
Ma t (501-10 Seating, Removal and Installation).
8. Release and lay aside the wiring harness.
Page 2686 of 3229
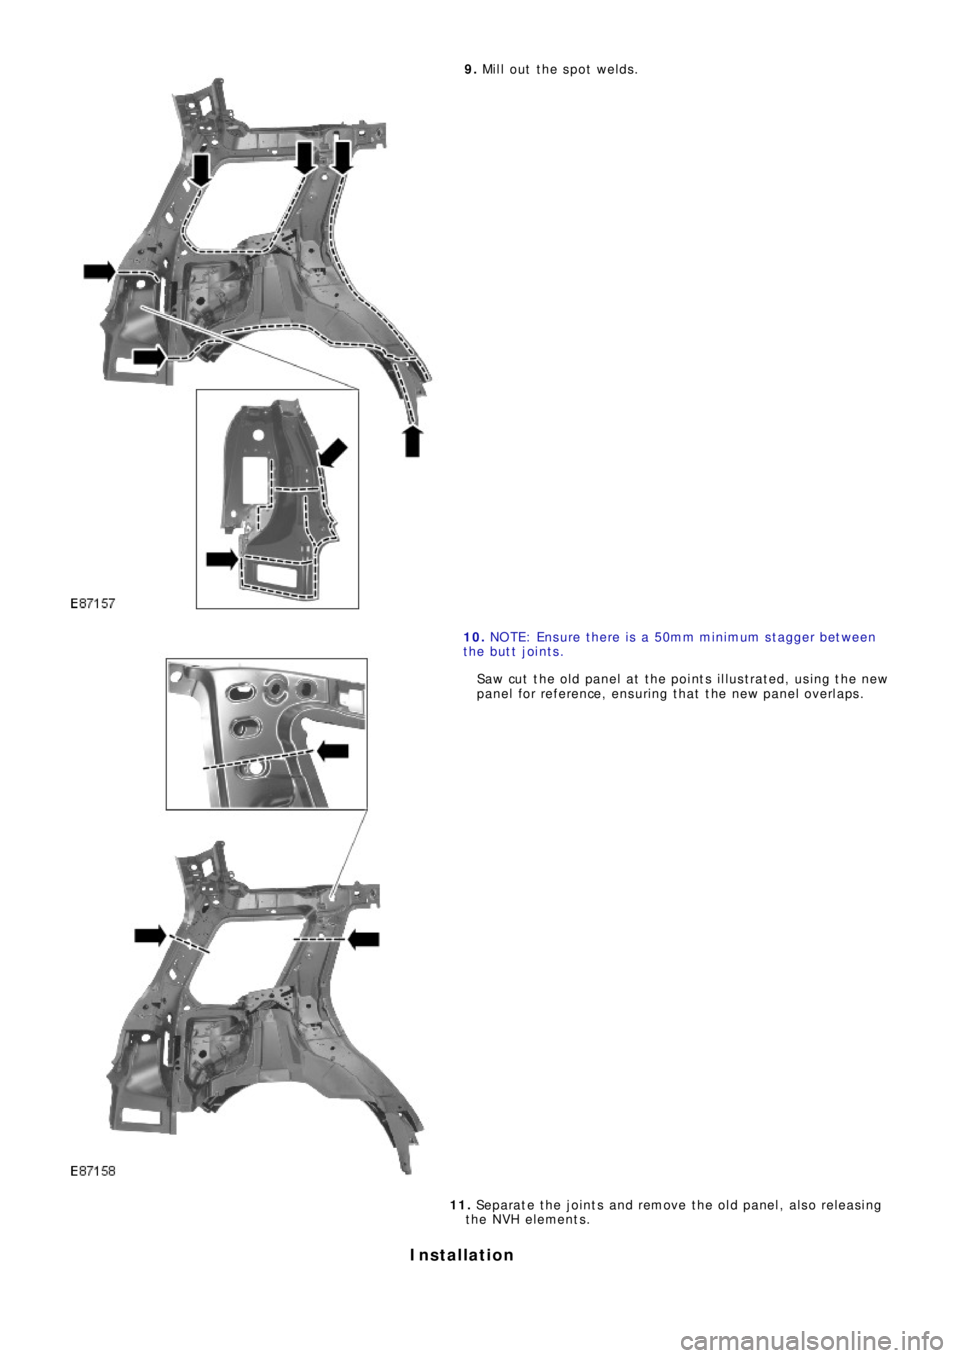
9. Mill out the spot welds.
10. NO TE: Ens ure t he re i s a 50mm mi ni mum s t a gge r be t we e n
the butt joints.
Saw cut the old panel at the points illustrated, using the new
p a ne l f o r re f e re nce , e ns uri ng t ha t t he ne w p a ne l o ve rl a p s .
11. Se p a ra t e t he j o i nt s a nd re mo ve t he o l d p a ne l , a l s o re l e a s i ng
the NVH elements.
Installation
Page 2687 of 3229
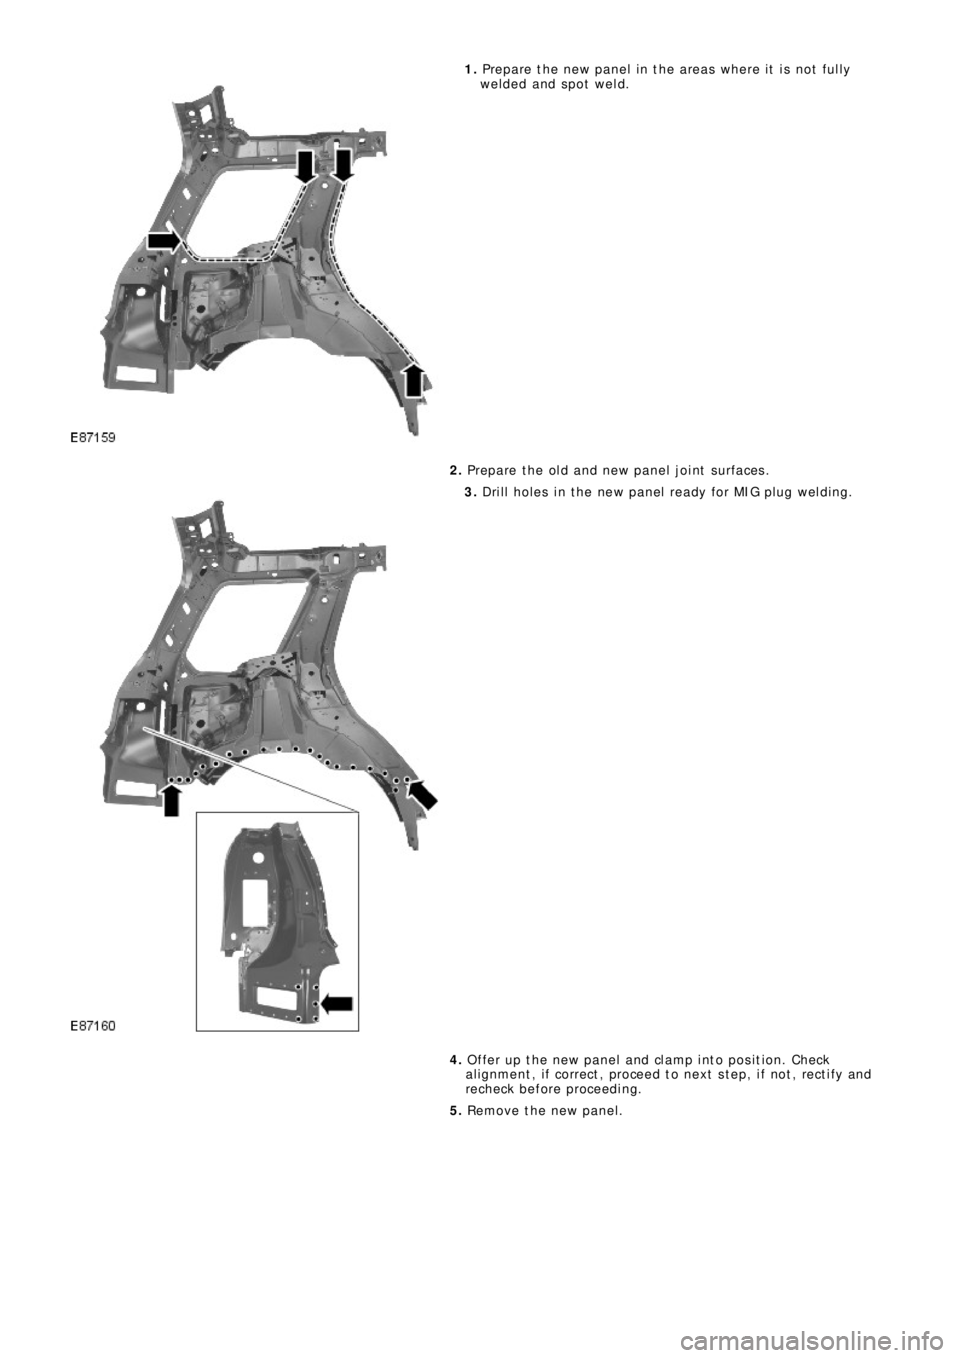
1. Prepare the new panel in the areas where it is not fully
welded and spot weld.
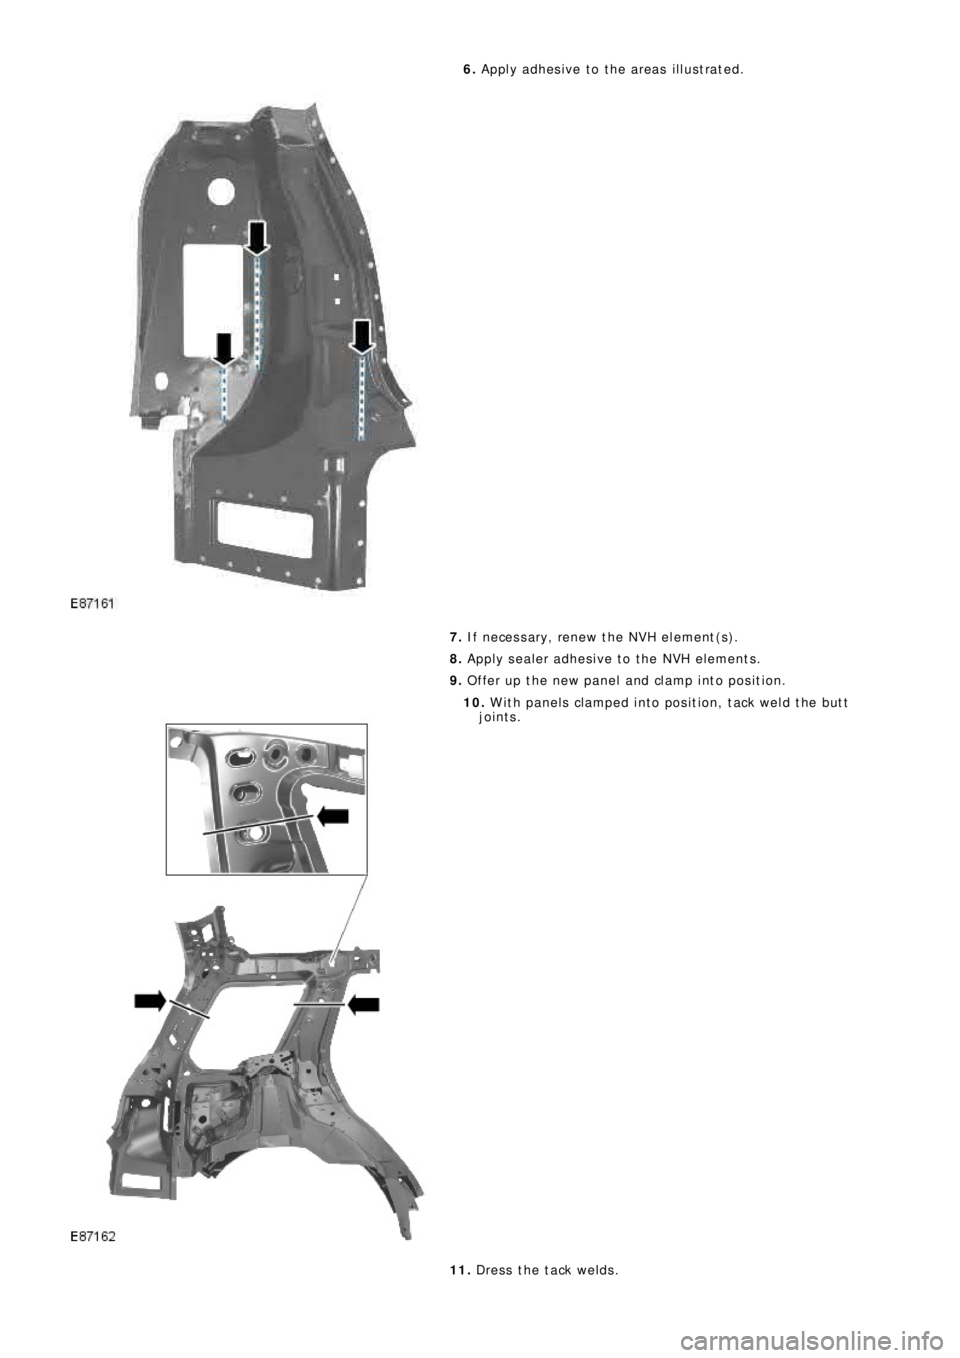
2. Prepare the old and new panel joint surfaces.
3. Drill holes in the new panel ready for MIG plug welding.
4. Offer up the new panel and clamp into position. Check
al ignment , i f correct , proceed t o next s t ep, i f not , rect i fy and
recheck before proceeding.
5. Remove the new panel.
Page 2688 of 3229
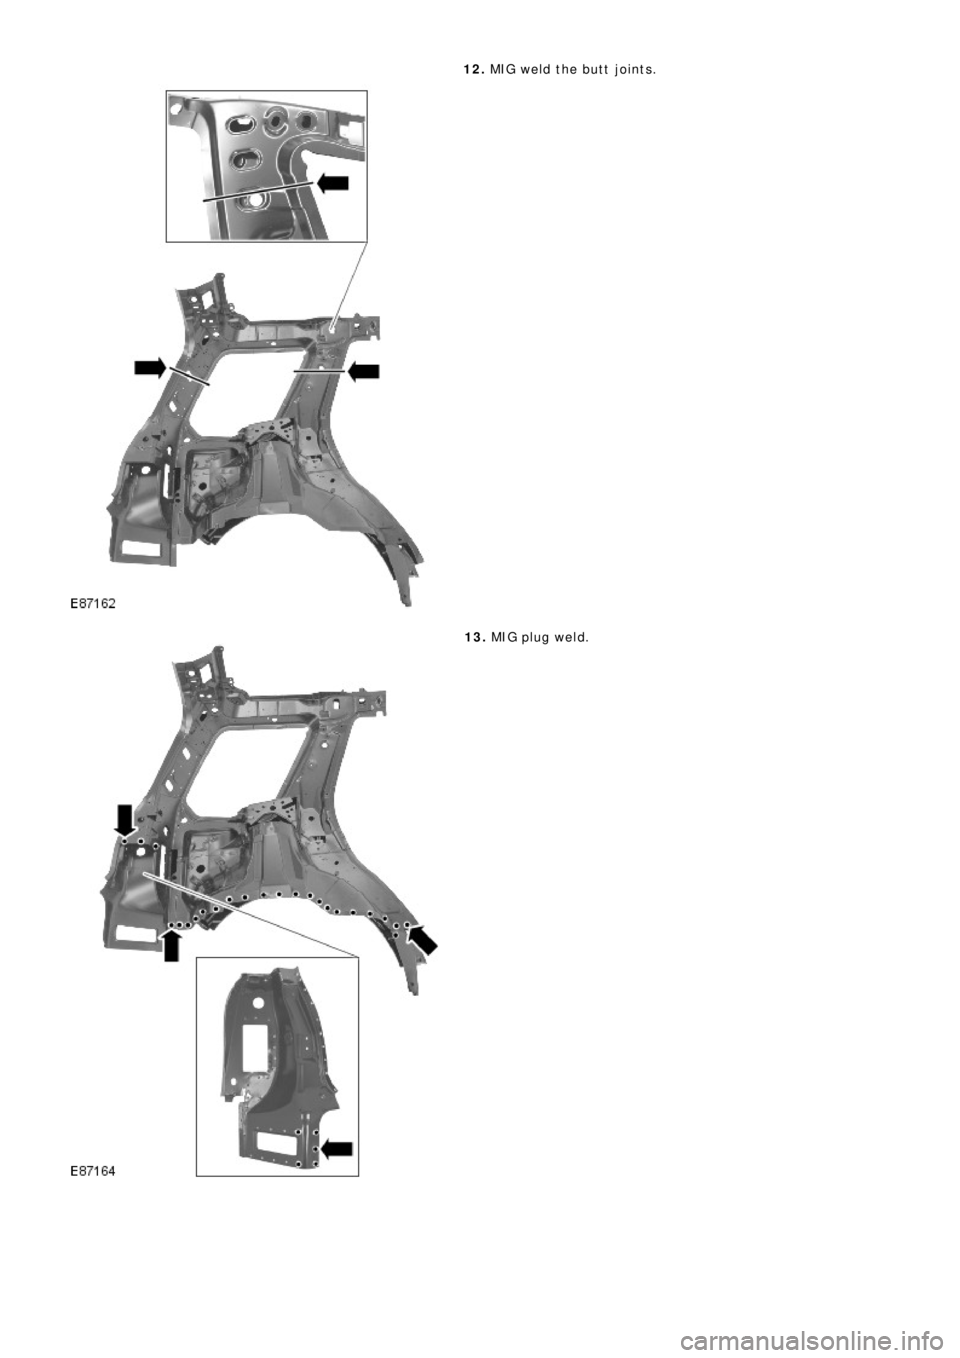
6. Apply adhesive to the areas illustrated.
7. If necessary, renew the NVH element(s).
8. Apply sealer adhesive to the NVH elements.
9. Offer up the new panel and clamp into position.
10. With panels clamped into position, tack weld the butt
joints.
11. Dress the tack welds.
Page 2689 of 3229
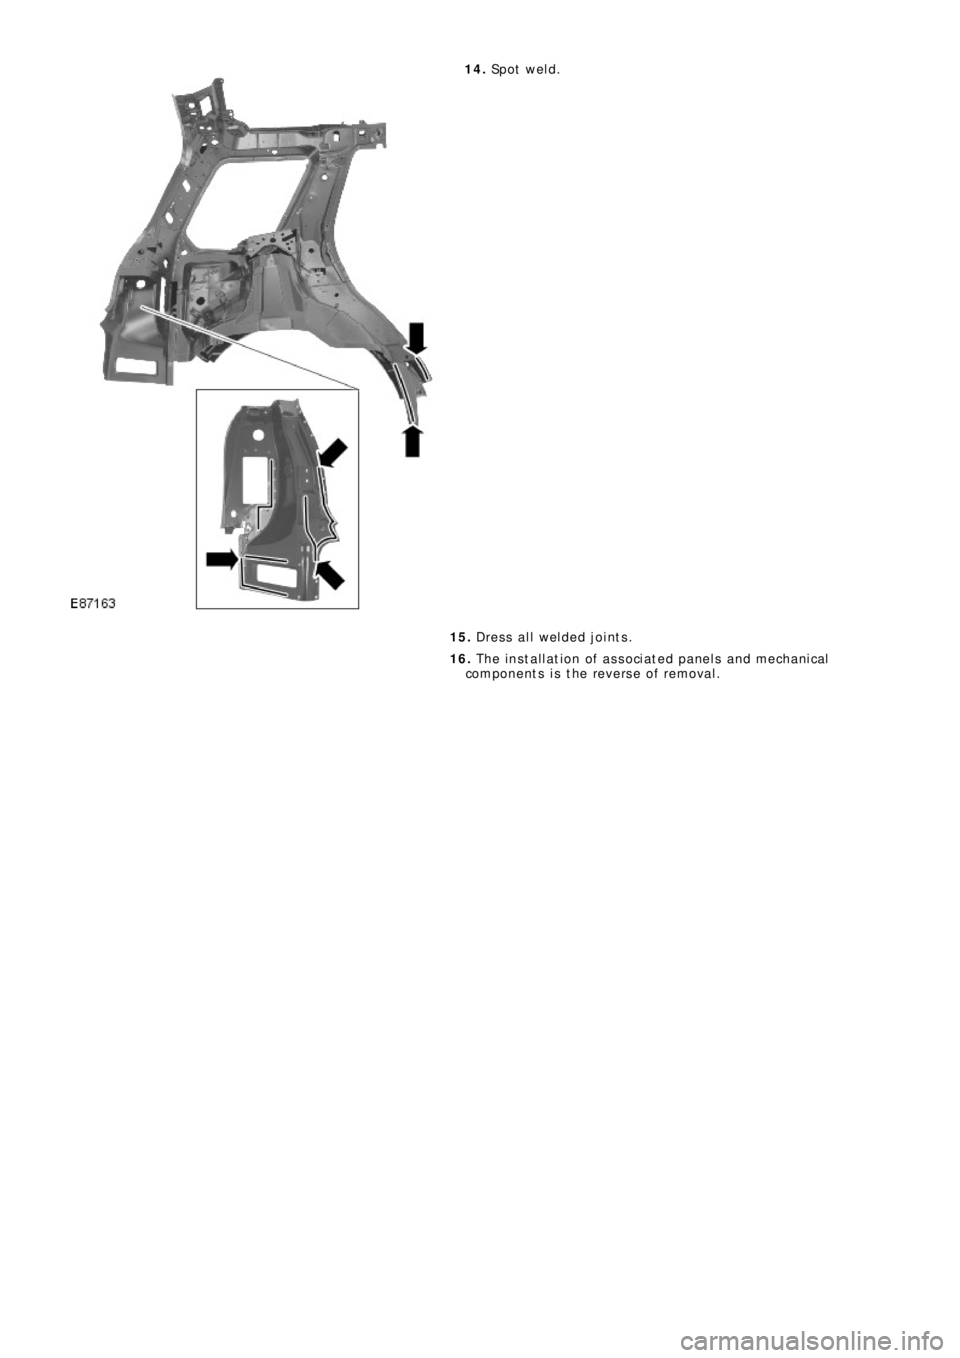
12. MIG weld the butt joints.
13. MI G pl ug we l d.
Page 2690 of 3229
14. Sp o t w e l d .
15. Dress all welded joints.
16. The installation of associated panels and mechanical
components is the reverse of removal.
Trending: fuel cap, timing belt, ad blue, fuel reserve, brake fluid, climate control, sport mode
