LAND ROVER FRELANDER 2 2006 Repair Manual
FRELANDER 2 2006
LAND ROVER
LAND ROVER
https://www.carmanualsonline.info/img/64/57251/w960_57251-0.png
LAND ROVER FRELANDER 2 2006 Repair Manual
Trending: oil change, door lock, sport mode, CD player, oil dipstick, jacking, deactivate passenger airbag
Page 2701 of 3229
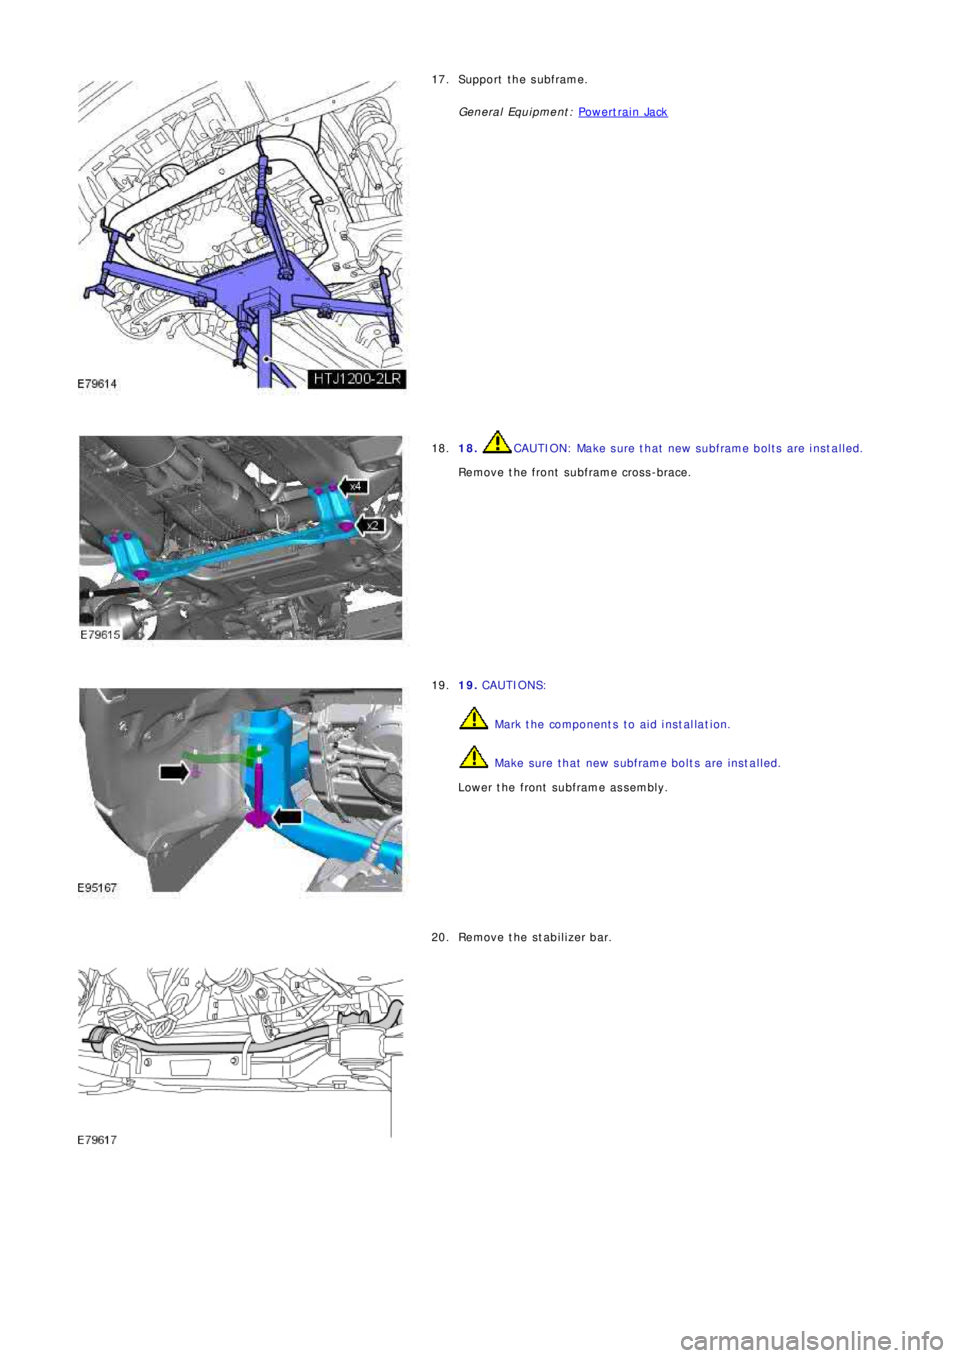
Support the subframe.
Ge ne ral Equi pme nt : P o we rt ra i n Ja ck17.
18. CAUTION: Make sure that new subframe bolts are installed.
Remove the front subframe cross-brace. 18.
19. CAUTIONS:
Mark the components to aid installation.
Make sure that new subframe bolts are installed.
Lower the front subframe assembly. 19.
Remove the stabilizer bar. 20.
Page 2702 of 3229
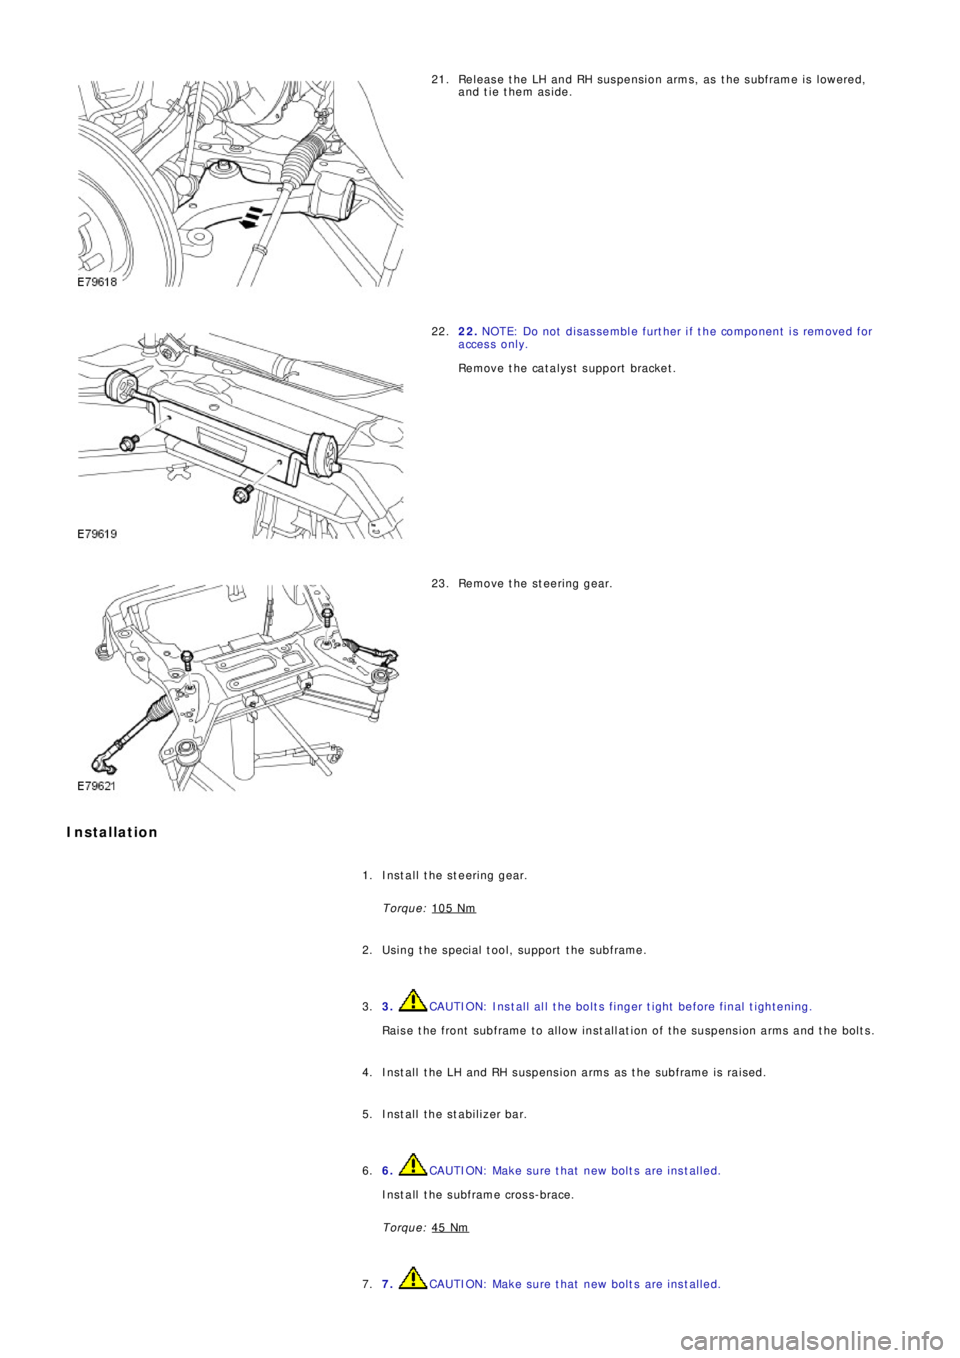
Release the LH and RH suspension arms, as the subframe is lowered,
and tie them aside. 21.
22. NOTE: Do not disassemble further if the component is removed for
access only.
Remove the catalyst support bracket. 22.
Remove the steering gear. 23.
Installation
Install the steering gear.
Torque: 105 Nm1.
Using the special tool, support the subframe. 2.
3.
CAUTION: Install all the bolts finger tight before final tightening.
Raise the front subframe to allow installation of the suspension arms and the bolts. 3.
Install the LH and RH suspension arms as the subframe is raised. 4.
Install the stabilizer bar. 5.
6.
CAUTION: Make sure that new bolts are installed.
Install the subframe cross-brace.
Torque: 45 Nm6.
7.
CAUTION: Make sure that new bolts are installed. 7.
Page 2703 of 3229
St a g e
1:
St a g e
2:
St a g e 1:
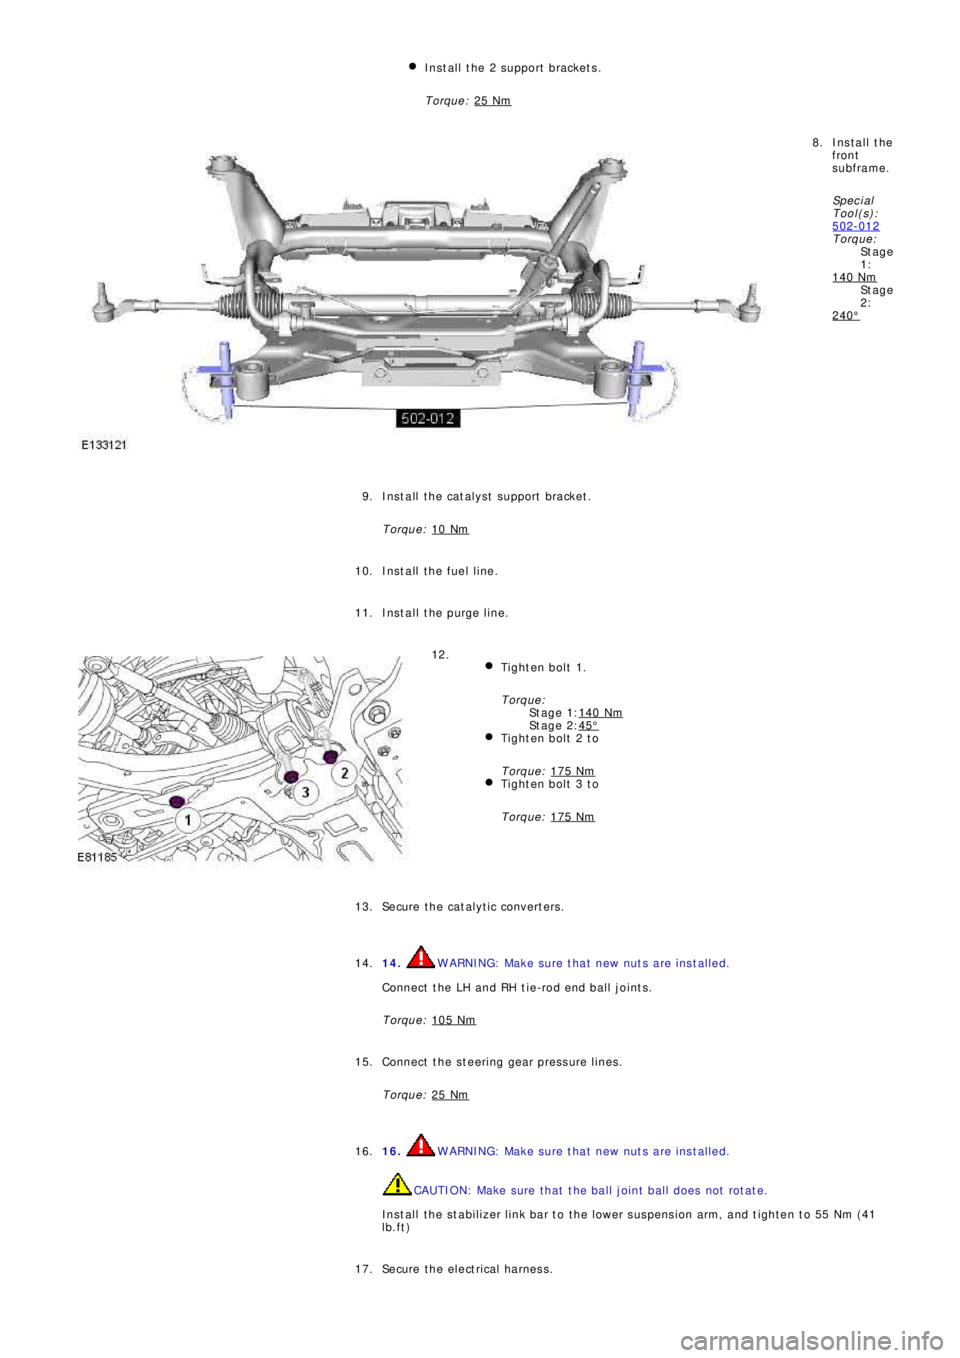
St a g e 2: Install the 2 support brackets.
Torque: 25 Nm
Install the
front
subframe.
Sp e c i a l
T ool (s ):
502-012
Torque:
140 Nm
240°
8.
Install the catalyst support bracket.
Torque: 10 Nm
9.
Install the fuel line. 10.
Install the purge line. 11.
Tighten bolt 1.
Torque:
140 Nm
45°Tighten bolt 2 to
Torque: 175 Nm
Tighten bolt 3 to
Torque: 175 Nm
12.
Secure the catalytic converters. 13.
14.
WARNING: Make sure that new nuts are installed.
Connect the LH and RH tie-rod end ball joints.
Torque: 105 Nm14.
Connect the steering gear pressure lines.
Torque: 25 Nm
15.
16.
WARNING: Make sure that new nuts are installed.
CAUTION: Make sure that the ball joint ball does not rotate.
Install the stabilizer link bar to the lower suspension arm, and tighten to 55 Nm (41
lb.ft) 16.
Secure the electrical harness. 17.
Page 2704 of 3229
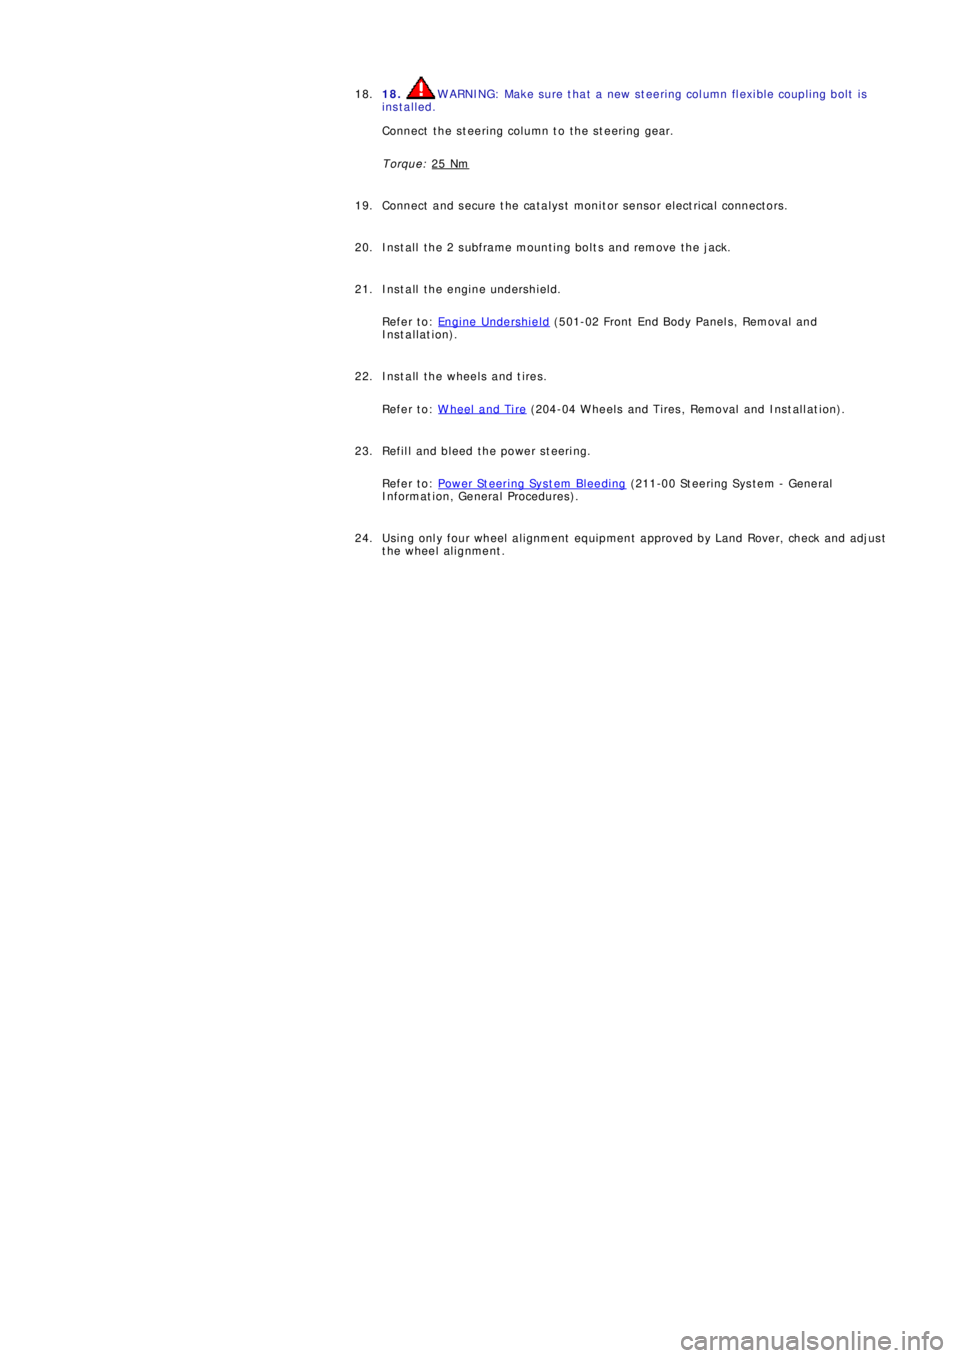
18. WARNING: Make sure that a new steering column flexible coupling bolt is
installed.
Connect the steering column to the steering gear.
Torque: 25 Nm18.
Connect and s ecure t he cat alys t moni t or s ens or el ect ri cal connect ors . 19.
Install the 2 subframe mounting bolts and remove the jack. 20.
Install the engine undershield.
Refer to: Engine Undershield
(501-02 Front End Body Panel s, Removal and
Installation). 21.
Install the wheels and tires.
Refer to: W heel and Tire
(204-04 W heels and Tires , Removal and Ins t all at i on). 22.
Refill and bleed the power steering.
Refer to: Power Steering System Bleeding
(211-00 St eeri ng Sys t em - General
Informat ion, General Procedures). 23.
Using only four wheel alignment equipment approved by Land Rover, check and adjust
the wheel alignment. 24.
Page 2705 of 3229
Publ is hed: 11-May-2011
Uni-Body, Subframe and Mounting System - Front Subframe Front Bushing
Removal and Installation
S p e c ia l T o o l( s )
204-598
Hydraulic Cylinder 10t
204-598-01
Re mo ve r/I ns t a l l e r, Sub f ra me B us hi ng Gui d e
Removal
Remove the cover and disconnect the battery ground cable.
Refer to: Specifications
(414-00 Battery and Charging System -
General Information, Specifications). 1.
2.
WARNING: Make sure to support the vehicle with axle
stands.
Raise and support the vehicle. 2.
Re mo ve t he f ront s ubf ra me a s s e mbl y.
Refer to: Front Subframe
(502-00 Uni-Body, Subframe and Mounting
System, Removal and Installation). 3.
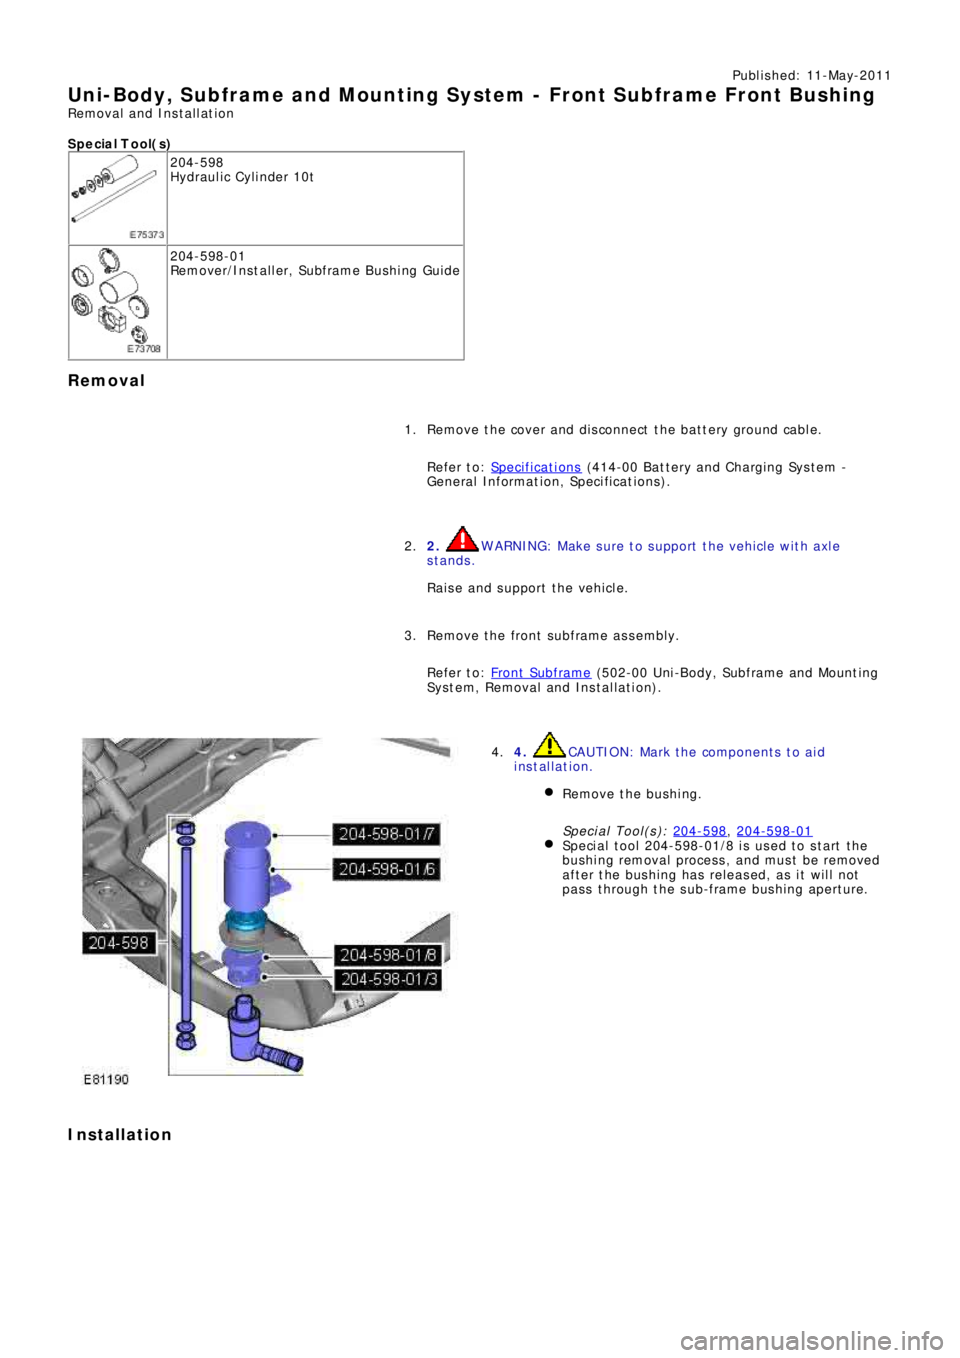
4. CAUTION: Mark the components to aid
installation.
Remove the bushing.
Special Tool(s): 204-598
, 204-598-01Speci al t ool 204-598-01/8 i s us ed t o s t art t he
bushing removal process, and must be removed
after the bushing has released, as it will not
pass through the sub-frame bushing aperture.
4.
Installation
Page 2706 of 3229
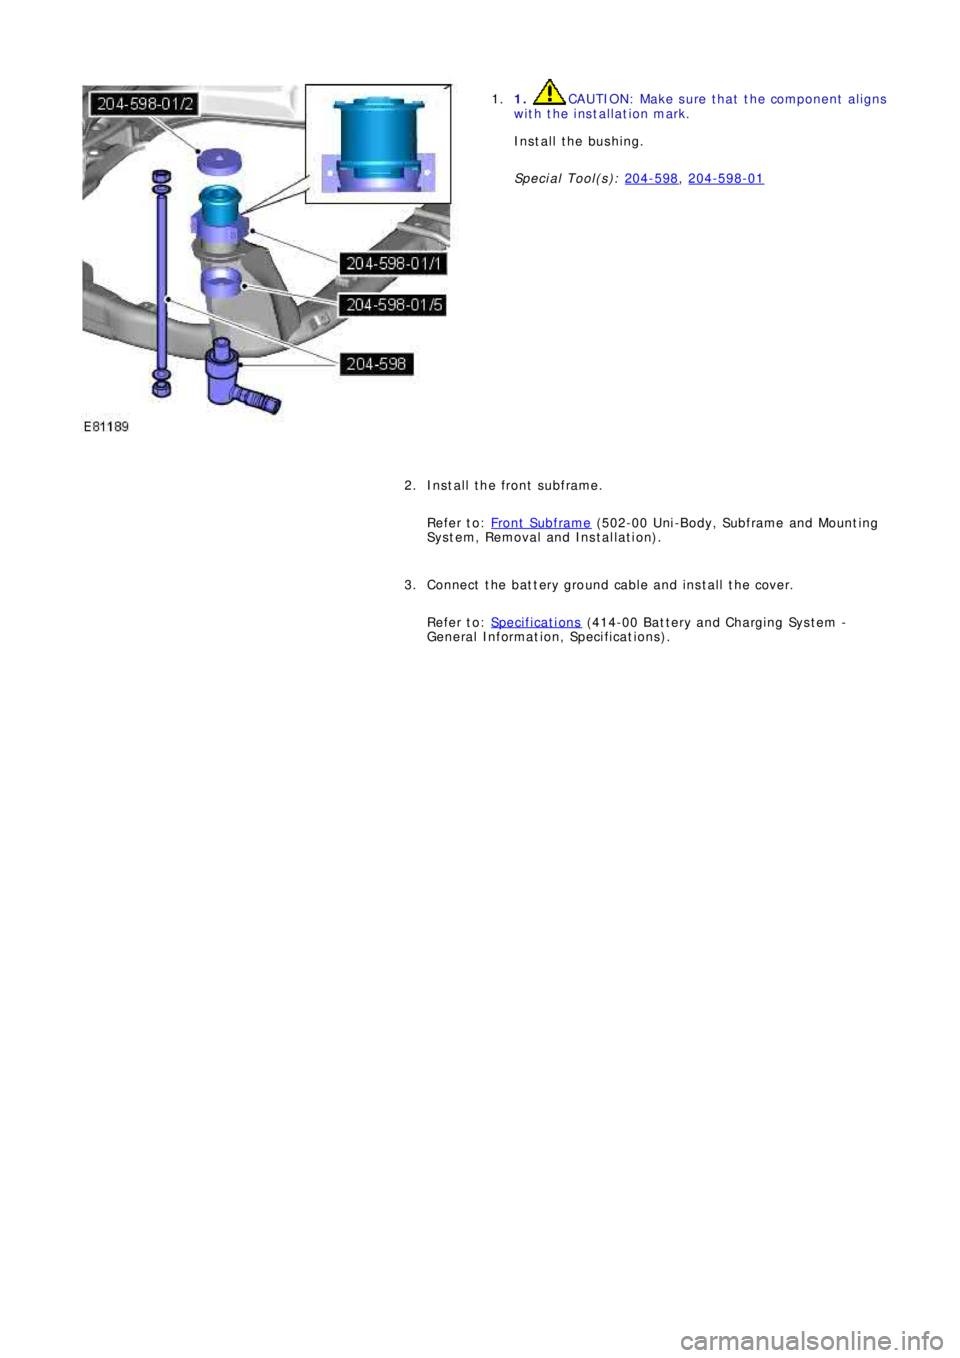
1. CAUTION: Make sure that the component aligns
with the installation mark.
Install the bushing.
Special Tool(s): 204-598
, 204-598-01
1.
Install the front subframe.
Refer to: Front Subframe
(502-00 Uni-Body, Subframe and Mounting
System, Removal and Installation). 2.
Connect the battery ground cable and install the cover.
Refer to: Specifications
(414-00 Battery and Charging System -
General Information, Specifications). 3.
Page 2707 of 3229
Publ is hed: 11-May-2011
Uni-Body, Subframe and Mounting Syst em - Front Subframe Rear Bushing
Removal and Installation
S p e c ia l T o o l( s )
204-598
Hydraulic Cylinder 10t
204-598-01
Re mo ve r/I ns t a l l e r, Sub f ra me B us hi ng Gui d e
Removal
Remove the cover and disconnect the battery ground cable.
Refer to: Specifications
(414-00 Battery and Charging System -
General Information, Specifications).
1.
2.
WARNING: Make sure to support the vehicle with axle
stands.
Raise and support the vehicle.
2.
Re mo ve t he f ront s ubf ra me a s s e mbl y.
Refer to: Front Subframe
(502-00 Uni-Body, Subframe and Mounting
System, Removal and Installation).
3.
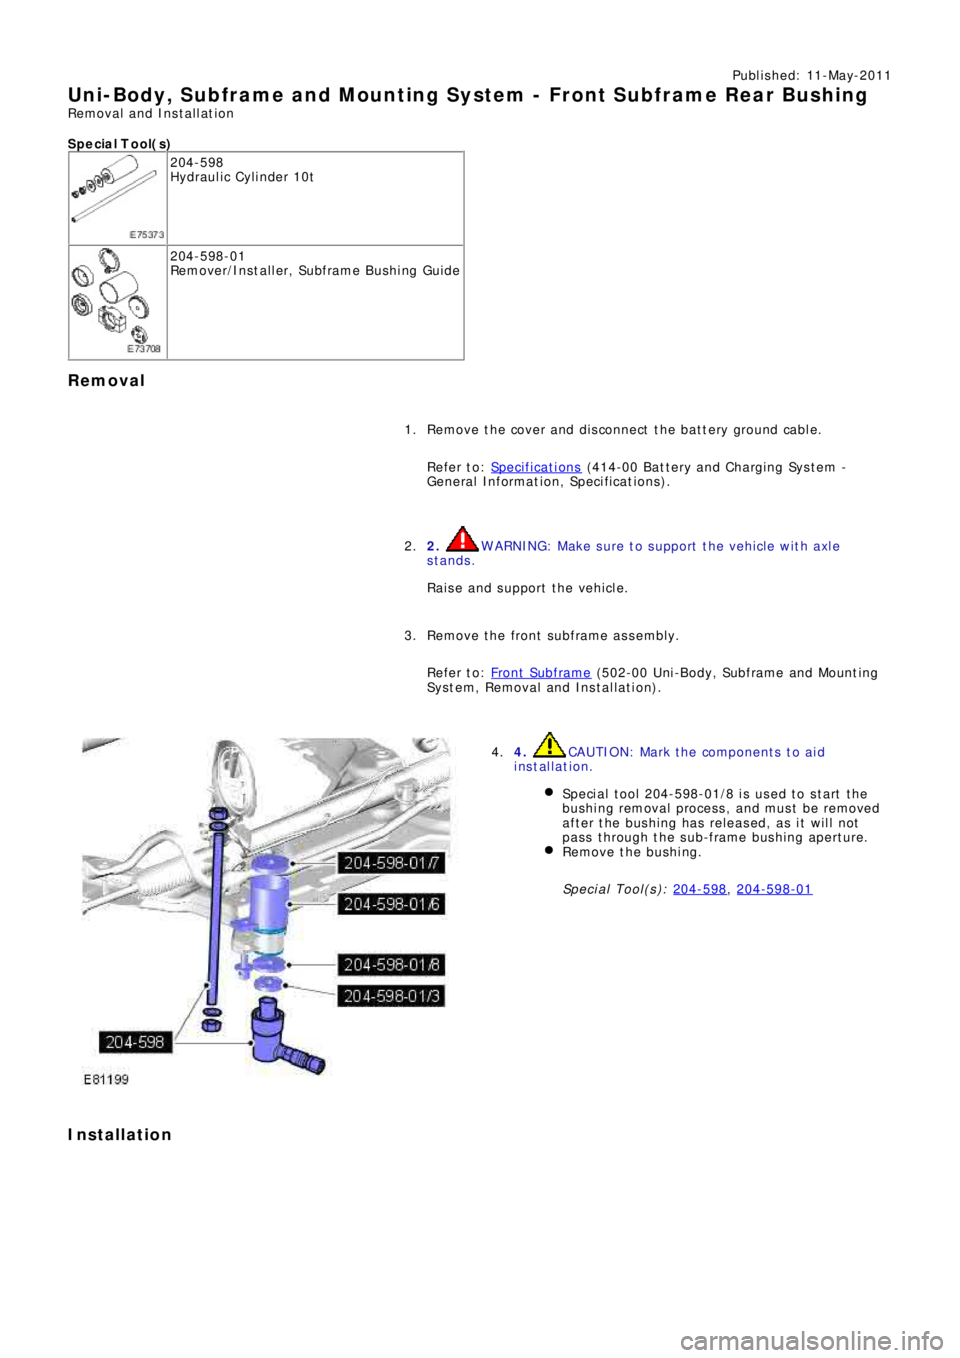
4. CAUTION: Mark the components to aid
installation.
Speci al t ool 204-598-01/8 i s us ed t o s t art t he
bushing removal process, and must be removed
after the bushing has released, as it will not
pass through the sub-frame bushing aperture.
Remove the bushing.
Special Tool(s): 204-598
, 204-598-01
4.
Installation
Page 2708 of 3229
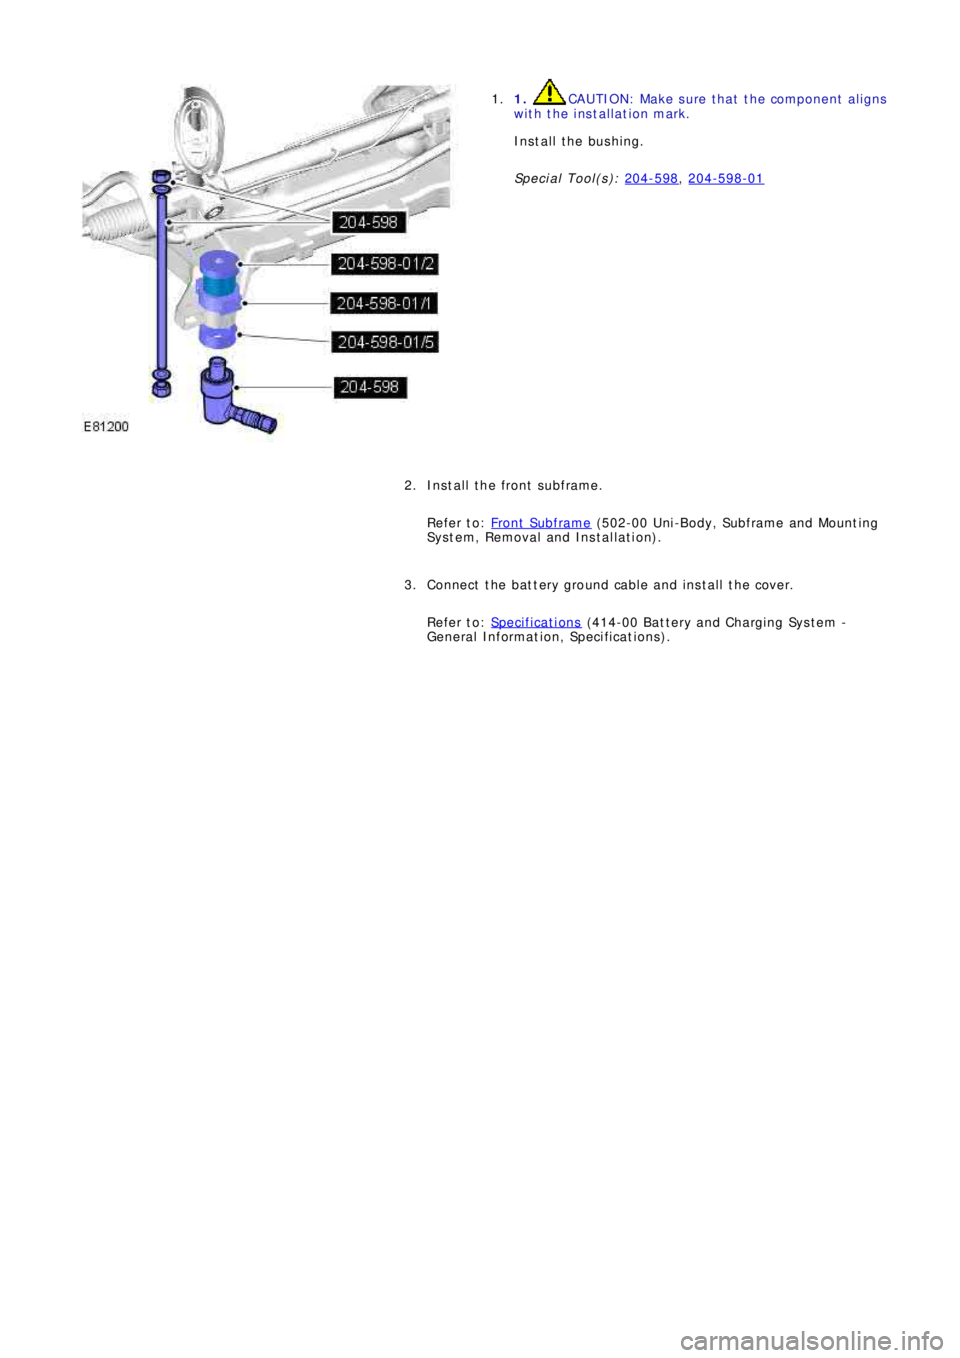
1. CAUTION: Make sure that the component aligns
with the installation mark.
Install the bushing.
Special Tool(s): 204-598
, 204-598-01
1.
Install the front subframe.
Refer to: Front Subframe
(502-00 Uni-Body, Subframe and Mounting
System, Removal and Installation).
2.
Connect the battery ground cable and install the cover.
Refer to: Specifications
(414-00 Battery and Charging System -
General Information, Specifications).
3.
Page 2709 of 3229
Publ is hed: 11-May-2011
Uni-Body, Subframe and Mounting System - Rear Subframe
Removal and Installation
General Equipment
P o we rt ra i n Ja ck
Removal
1.
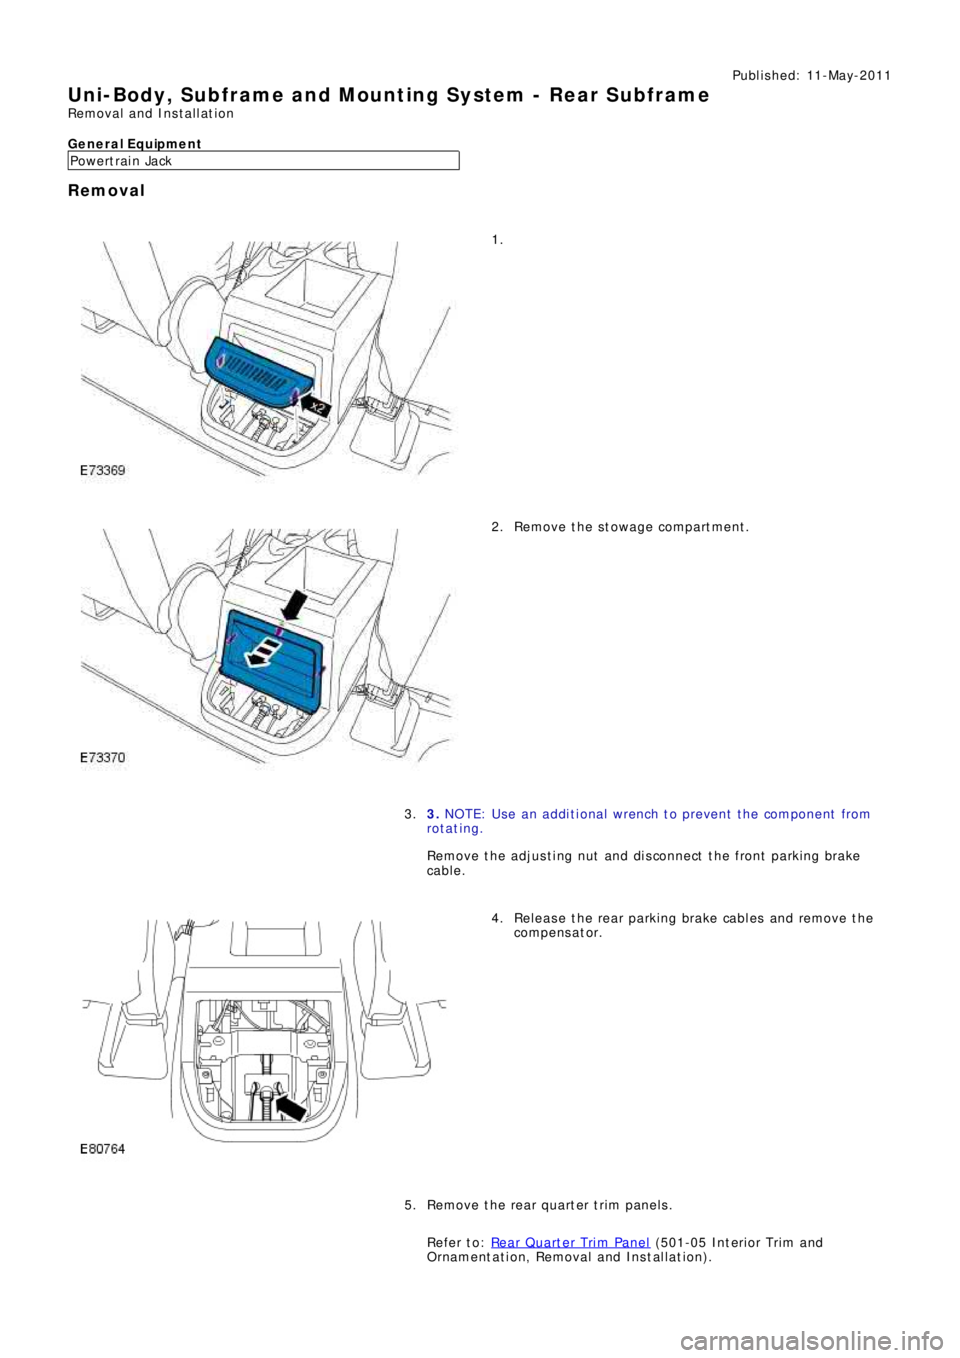
Remove the stowage compartment. 2.
3. NOTE: Use an additional wrench to prevent the component from
ro t a t i ng .
Remove t he adjus t i ng nut and di s connect t he front parki ng brake
cabl e . 3.
Release the rear parking brake cables and remove the
compens at or. 4.
Remove the rear quarter trim panels.
Refer to: Rear Quarter Trim Panel
(501-05 Int eri or Tri m and
Ornament at i on, Removal and Ins t al lat i on). 5.
Page 2710 of 3229
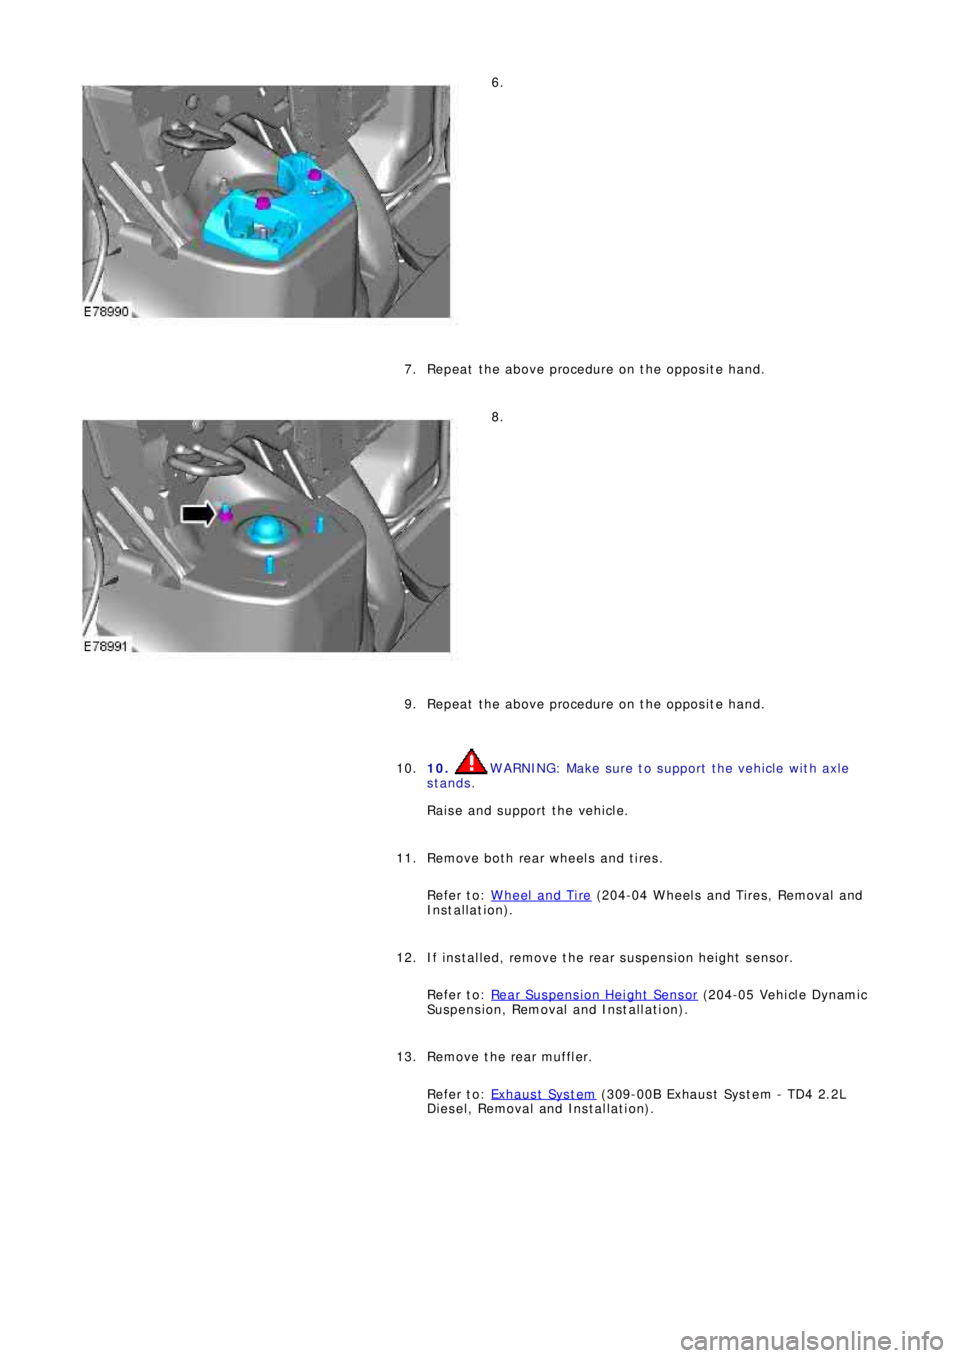
6.
Repeat the above procedure on the opposite hand. 7.
8.
Repeat the above procedure on the opposite hand. 9.
10.
WARNING: Make sure to support the vehicle with axle
stands.
Raise and support the vehicle. 10.
Remove both rear wheels and tires.
Refer to: Wheel and Tire
(204-04 Wheels and Tires, Removal and
Installation). 11.
If installed, remove the rear suspension height sensor.
Refer to: Rear Suspension Height Sensor
(204-05 Vehi cl e Dynami c
Suspension, Removal and Installation). 12.
Remove the rear muffler.
Refer to: Exhaus t Sys t em
(309-00B Exhaus t Sys t em - TD4 2.2L
Diesel, Removal and Installation). 13.
Trending: jacking points, wiring diagram, wiper fluid, battery capacity, key, water pump, gas type
