LEXUS LS430 2003 Factory Repair Manual
Manufacturer: LEXUS, Model Year: 2003,
Model line: LS430,
Model: LEXUS LS430 2003
Pages: 4500, PDF Size: 87.45 MB
LEXUS LS430 2003 Factory Repair Manual
LS430 2003
LEXUS
LEXUS
https://www.carmanualsonline.info/img/36/57050/w960_57050-0.png
LEXUS LS430 2003 Factory Repair Manual
Trending: odometer, exhaust manifold, driver seat adjustment, checking oil, fuel consumption, compressor pressure, change wheel
Page 3441 of 4500
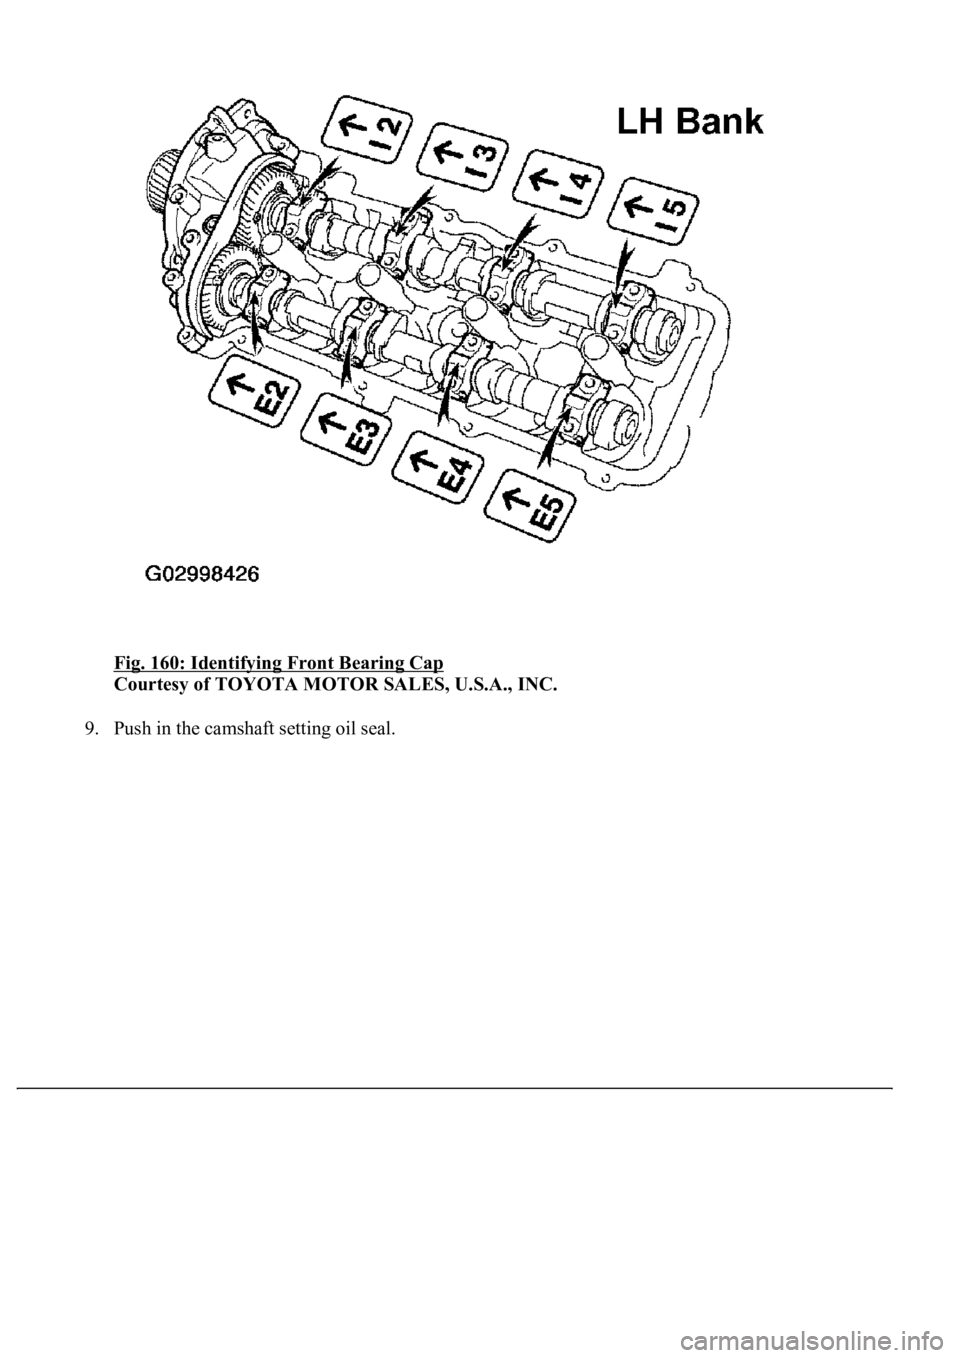
Fig. 160: Identifying Front Bearing Cap
Courtesy of TOYOTA MOTOR SALES, U.S.A., INC.
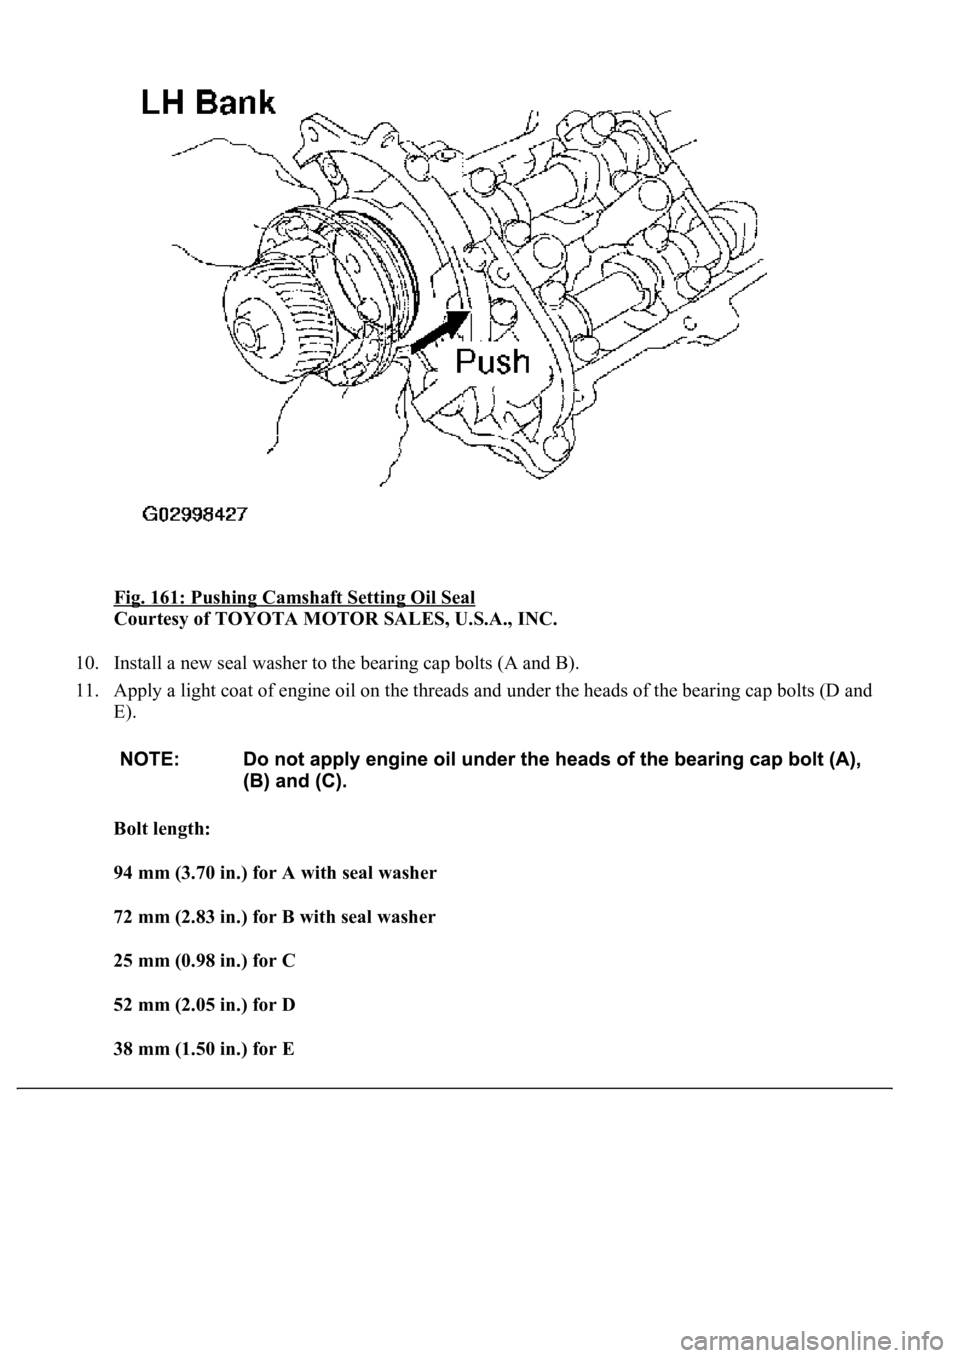
9. Push in the camshaft settin
g oil seal.
Page 3442 of 4500
Fig. 161: Pushing Camshaft Setting Oil Seal
Courtesy of TOYOTA MOTOR SALES, U.S.A., INC.
10. Install a new seal washer to the bearing cap bolts (A and B).
11. Apply a light coat of engine oil on the threads and under the heads of the bearing cap bolts (D and
E).
Bolt length:
94 mm (3.70 in.) for A with seal washer
72 mm (2.83 in.) for B with seal washer
25 mm (0.98 in.) for C
52 mm (2.05 in.) for D
38 mm (1.50 in.) for E
Page 3443 of 4500
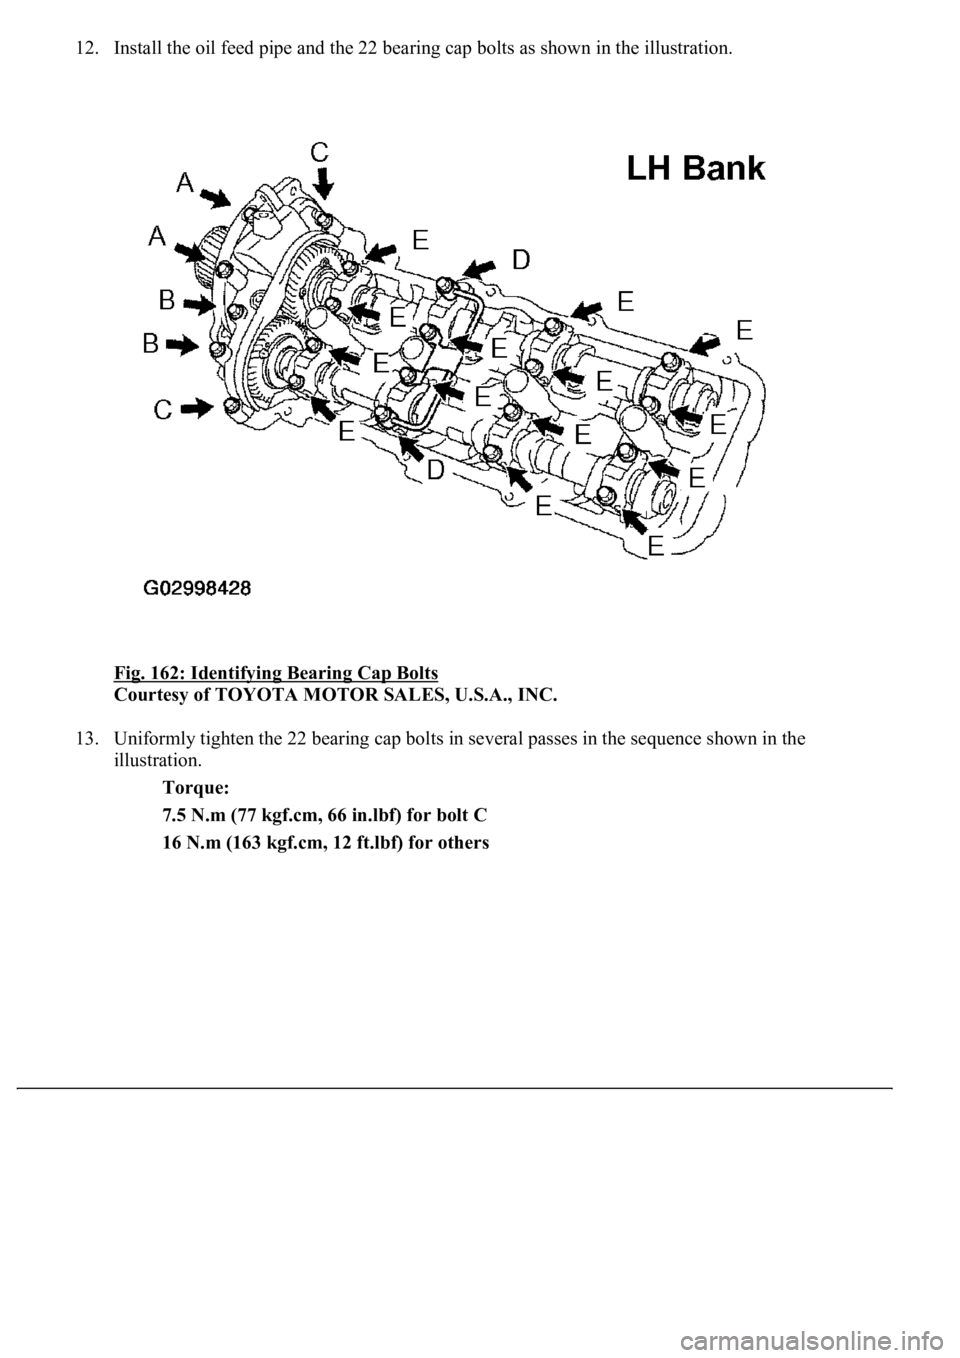
12. Install the oil feed pipe and the 22 bearing cap bolts as shown in the illustration.
Fig. 162: Identifying Bearing Cap Bolts
Courtesy of TOYOTA MOTOR SALES, U.S.A., INC.
13. Uniformly tighten the 22 bearing cap bolts in several passes in the sequence shown in the
illustration.
Torque:
7.5 N.m (77 kgf.cm, 66 in.lbf) for bolt C
16 N.m (163 kgf.cm, 12 ft.lbf) for others
Page 3444 of 4500
Fig. 163: Tightening Bearing Cap Bolts
Courtesy of TOYOTA MOTOR SALES, U.S.A., INC.
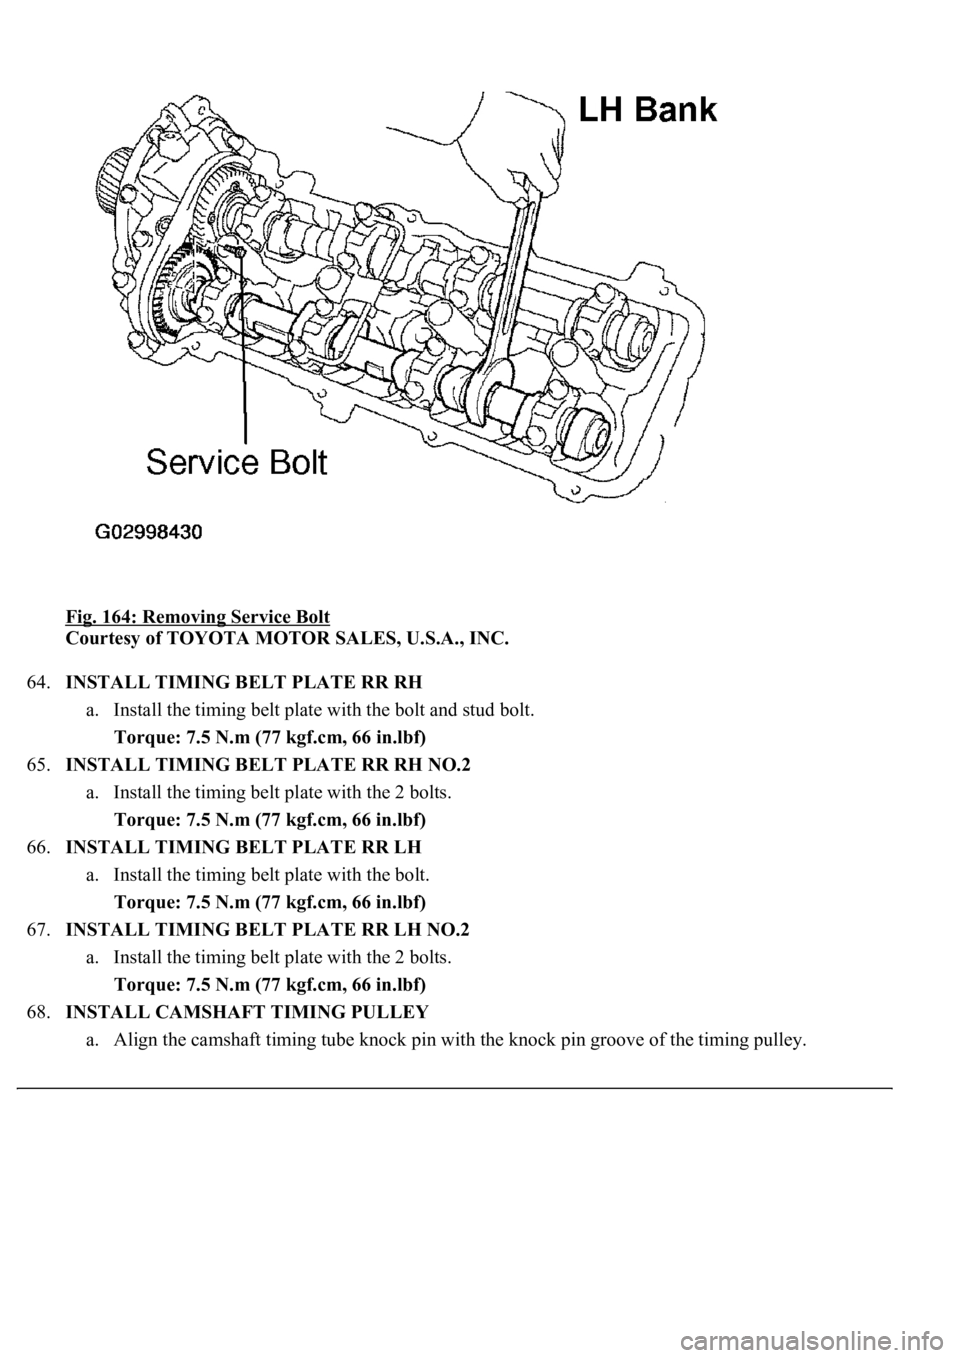
14. Remove the service bolt.
Page 3445 of 4500
Fig. 164: Removing Service Bolt
Courtesy of TOYOTA MOTOR SALES, U.S.A., INC.
64.INSTALL TIMING BELT PLATE RR RH
a. Install the timing belt plate with the bolt and stud bolt.
Torque: 7.5 N.m (77 kgf.cm, 66 in.lbf)
65.INSTALL TIMING BELT PLATE RR RH NO.2
a. Install the timing belt plate with the 2 bolts.
Torque: 7.5 N.m (77 kgf.cm, 66 in.lbf)
66.INSTALL TIMING BELT PLATE RR LH
a. Install the timing belt plate with the bolt.
Torque: 7.5 N.m (77 kgf.cm, 66 in.lbf)
67.INSTALL TIMING BELT PLATE RR LH NO.2
a. Install the timing belt plate with the 2 bolts.
Torque: 7.5 N.m (77 kgf.cm, 66 in.lbf)
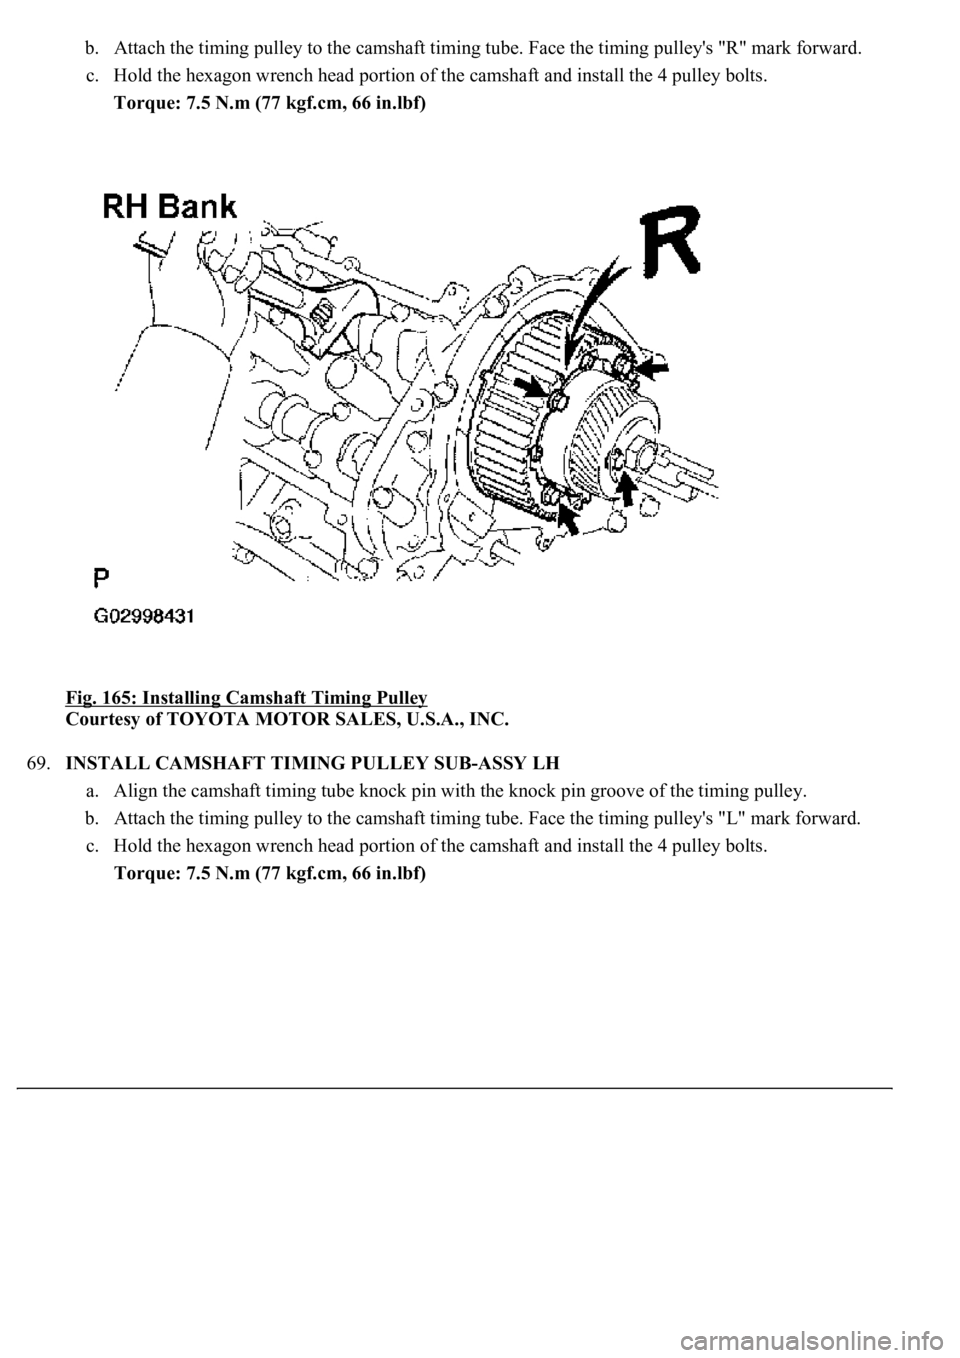
68.INSTALL CAMSHAFT TIMING PULLEY
a. Ali
gn the camshaft timing tube knock pin with the knock pin groove of the timing pulley.
Page 3446 of 4500
b. Attach the timing pulley to the camshaft timing tube. Face the timing pulley's "R" mark forward.
c. Hold the hexagon wrench head portion of the camshaft and install the 4 pulley bolts.
Torque: 7.5 N.m (77 kgf.cm, 66 in.lbf)
Fig. 165: Installing Camshaft Timing Pulley
Courtesy of TOYOTA MOTOR SALES, U.S.A., INC.
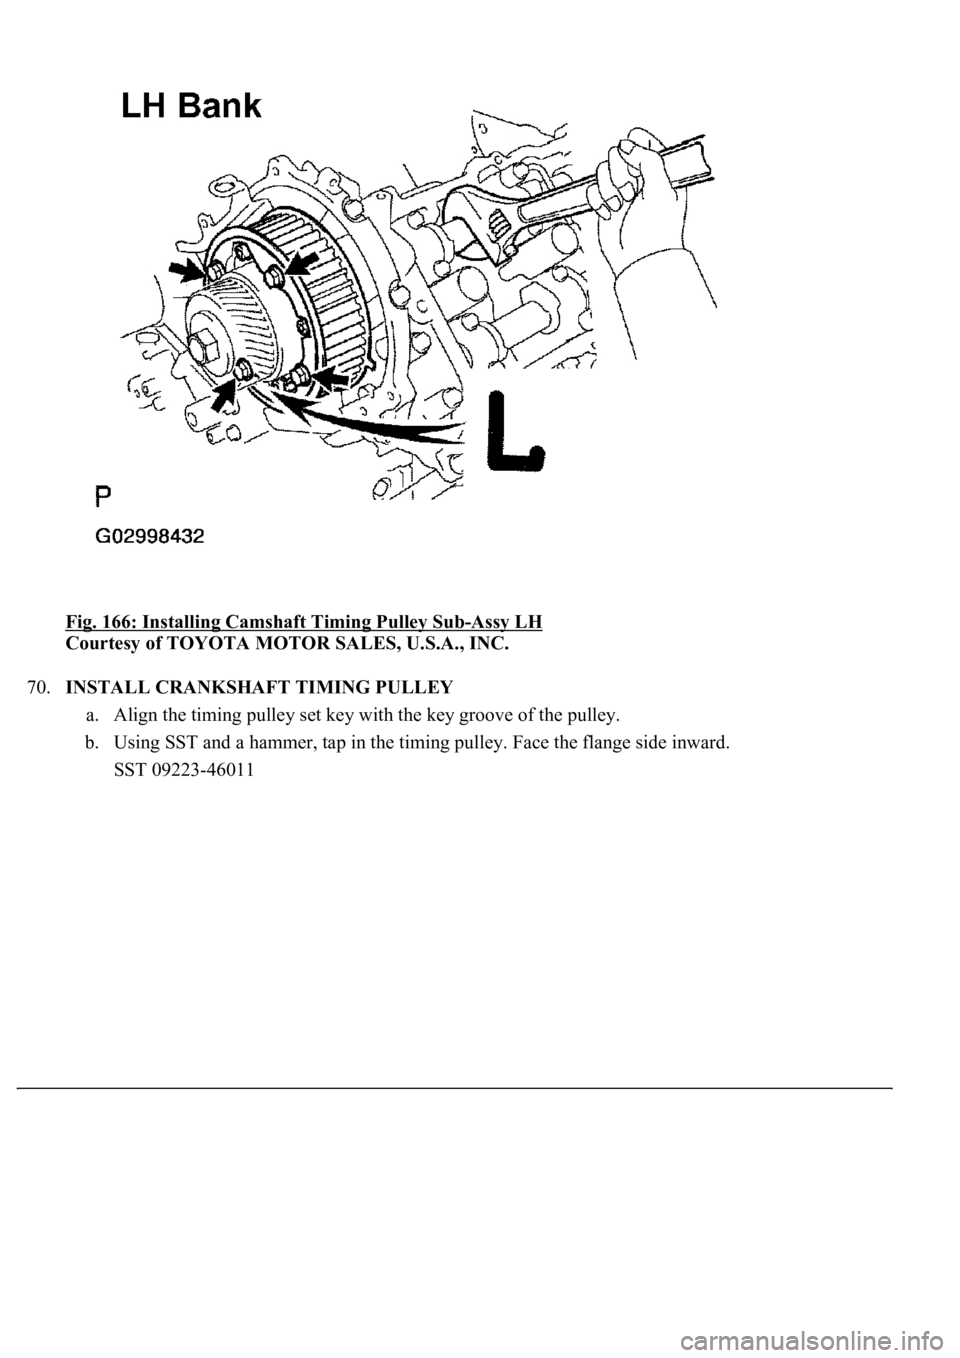
69.INSTALL CAMSHAFT TIMING PULLEY SUB-ASSY LH
a. Align the camshaft timing tube knock pin with the knock pin groove of the timing pulley.
b. Attach the timing pulley to the camshaft timing tube. Face the timing pulley's "L" mark forward.
c. Hold the hexagon wrench head portion of the camshaft and install the 4 pulley bolts.
Torque: 7.5 N.m (77 kgf.cm, 66 in.lbf)
Page 3447 of 4500
Fig. 166: Installing Camshaft Timing Pulley Sub-Assy LH
Courtesy of TOYOTA MOTOR SALES, U.S.A., INC.
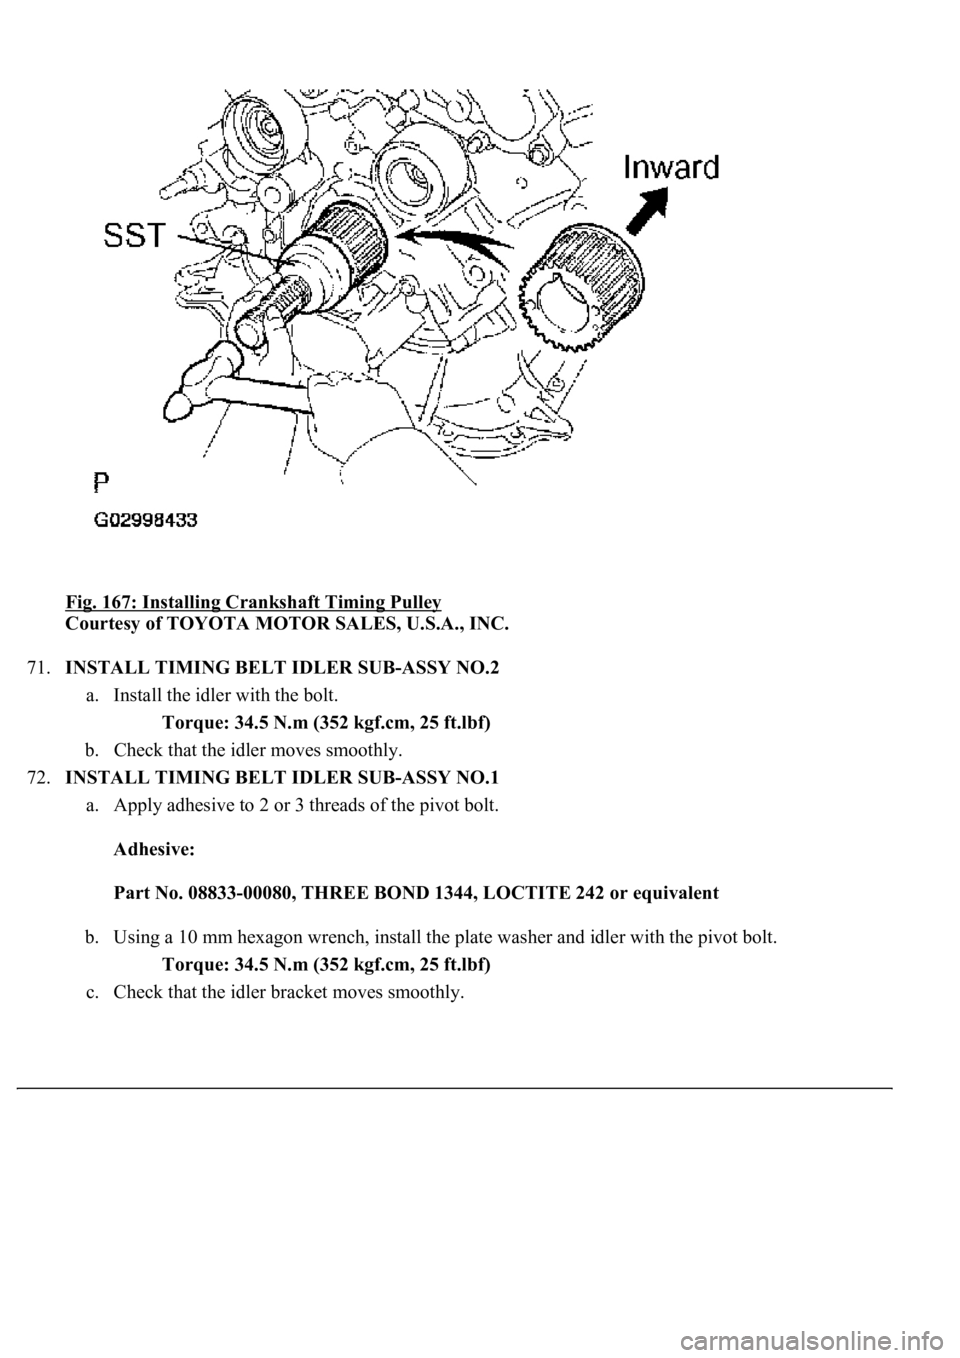
70.INSTALL CRANKSHAFT TIMING PULLEY
a. Align the timing pulley set key with the key groove of the pulley.
b. Using SST and a hammer, tap in the timing pulley. Face the flange side inward.
SST 09223-46011
Page 3448 of 4500
Fig. 167: Installing Crankshaft Timing Pulley
Courtesy of TOYOTA MOTOR SALES, U.S.A., INC.
71.INSTALL TIMING BELT IDLER SUB-ASSY NO.2
a. Install the idler with the bolt.
Torque: 34.5 N.m (352 kgf.cm, 25 ft.lbf)
b. Check that the idler moves smoothly.
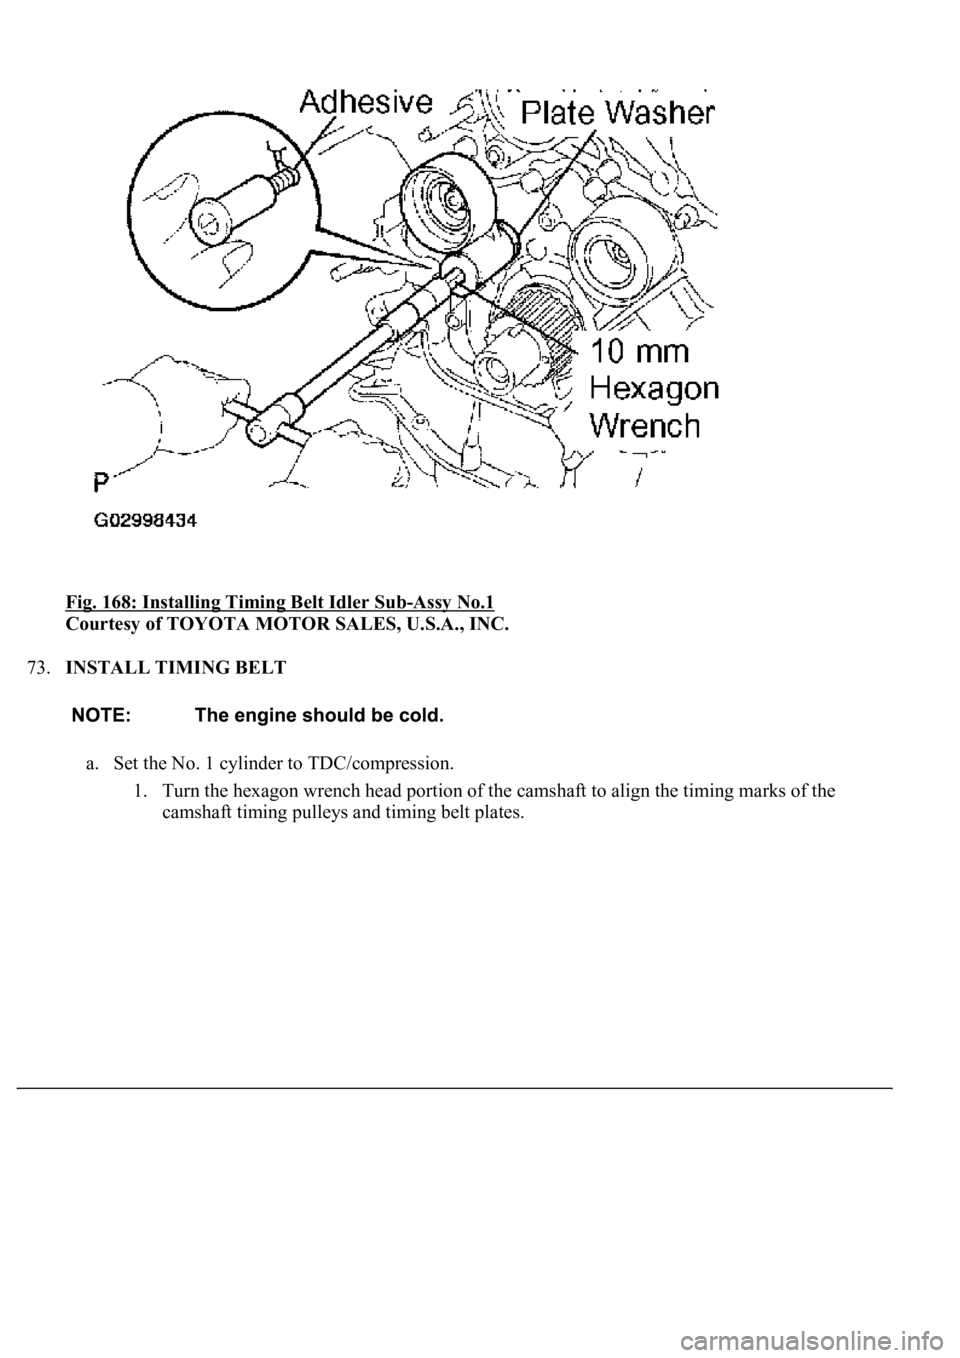
72.INSTALL TIMING BELT IDLER SUB-ASSY NO.1
a. Apply adhesive to 2 or 3 threads of the pivot bolt.
Adhesive:
Part No. 08833-00080, THREE BOND 1344, LOCTITE 242 or equivalent
b. Using a 10 mm hexagon wrench, install the plate washer and idler with the pivot bolt.
Torque: 34.5 N.m (352 kgf.cm, 25 ft.lbf)
c. Check that the idler bracket moves smoothl
y.
Page 3449 of 4500
Fig. 168: Installing Timing Belt Idler Sub-Assy No.1
Courtesy of TOYOTA MOTOR SALES, U.S.A., INC.
73.INSTALL TIMING BELT
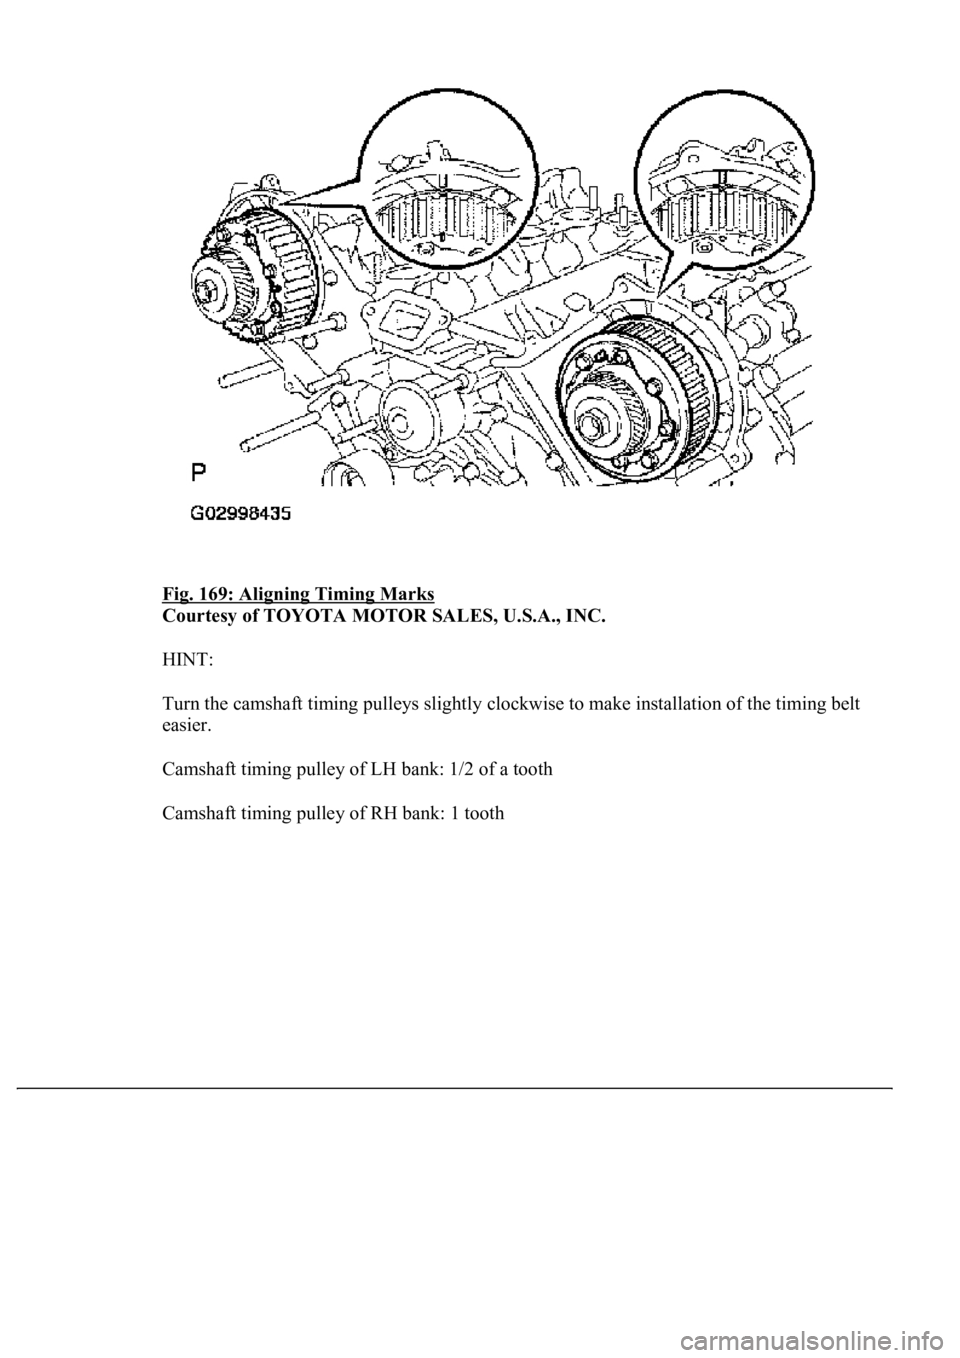
a. Set the No. 1 cylinder to TDC/compression.
1. Turn the hexagon wrench head portion of the camshaft to align the timing marks of the
camshaft timin
g pulleys and timing belt plates.
Page 3450 of 4500
Fig. 169: Aligning Timing Marks
Courtesy of TOYOTA MOTOR SALES, U.S.A., INC.
HINT:
Turn the camshaft timing pulleys slightly clockwise to make installation of the timing belt
easier.
Camshaft timing pulley of LH bank: 1/2 of a tooth
Camshaft timin
g pulley of RH bank: 1 tooth
Trending: fuses, brake, ground clearance, check engine light, change key battery, immobilizer, radio antenna
