LEXUS LS430 2003 Factory Repair Manual
Manufacturer: LEXUS, Model Year: 2003,
Model line: LS430,
Model: LEXUS LS430 2003
Pages: 4500, PDF Size: 87.45 MB
LEXUS LS430 2003 Factory Repair Manual
LS430 2003
LEXUS
LEXUS
https://www.carmanualsonline.info/img/36/57050/w960_57050-0.png
LEXUS LS430 2003 Factory Repair Manual
Trending: maintenance, automatic transmission, cylinder head, Spark plug, automatic transmission fluid, height, battery replacement
Page 3471 of 4500
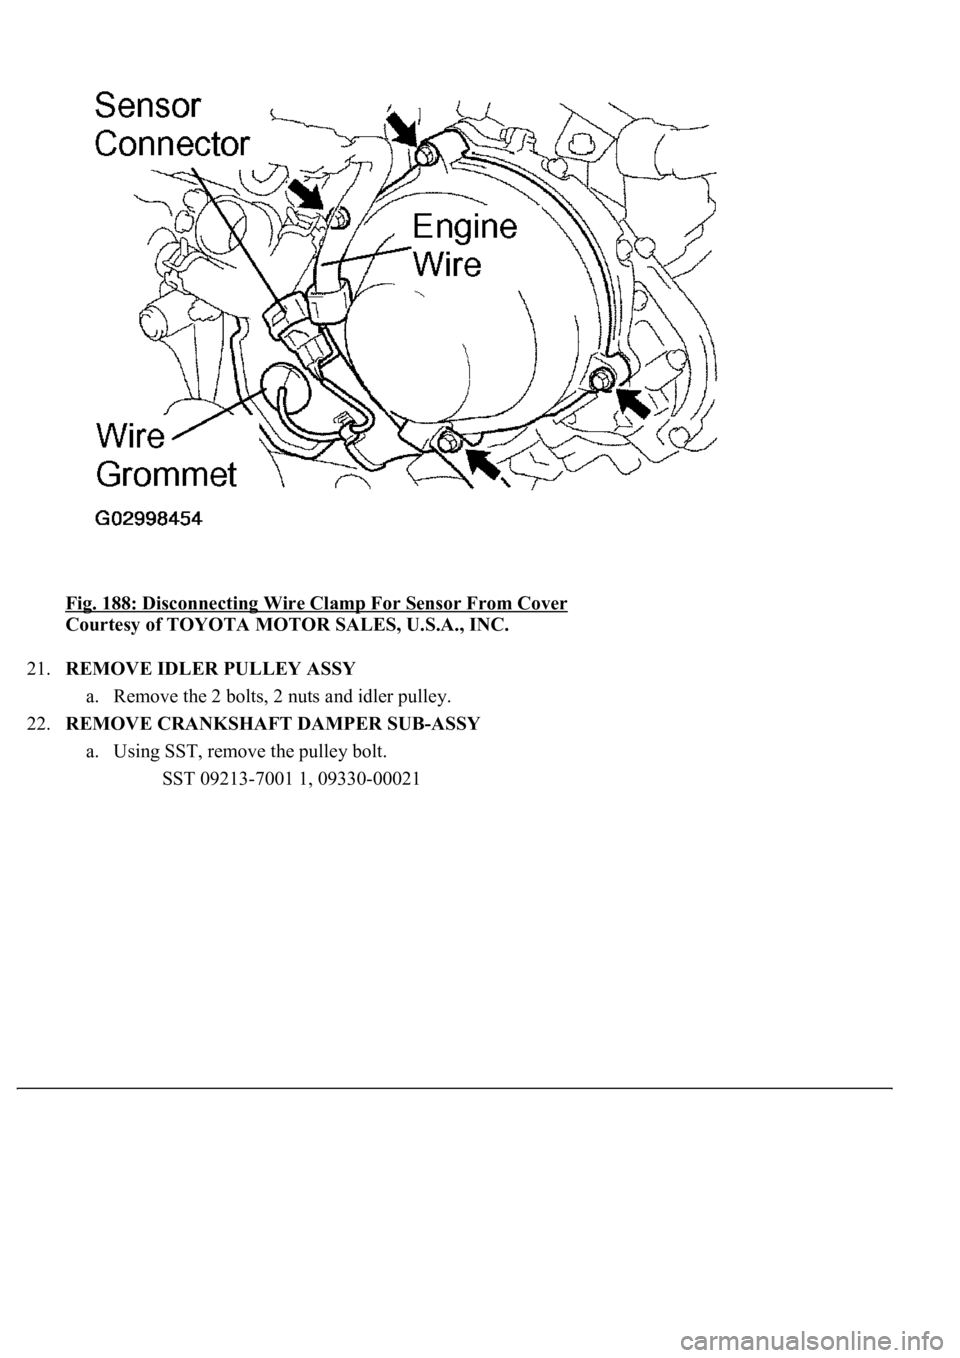
Fig. 188: Disconnecting Wire Clamp For Sensor From Cover
Courtesy of TOYOTA MOTOR SALES, U.S.A., INC.
21.REMOVE IDLER PULLEY ASSY
a. Remove the 2 bolts, 2 nuts and idler pulley.
22.REMOVE CRANKSHAFT DAMPER SUB-ASSY
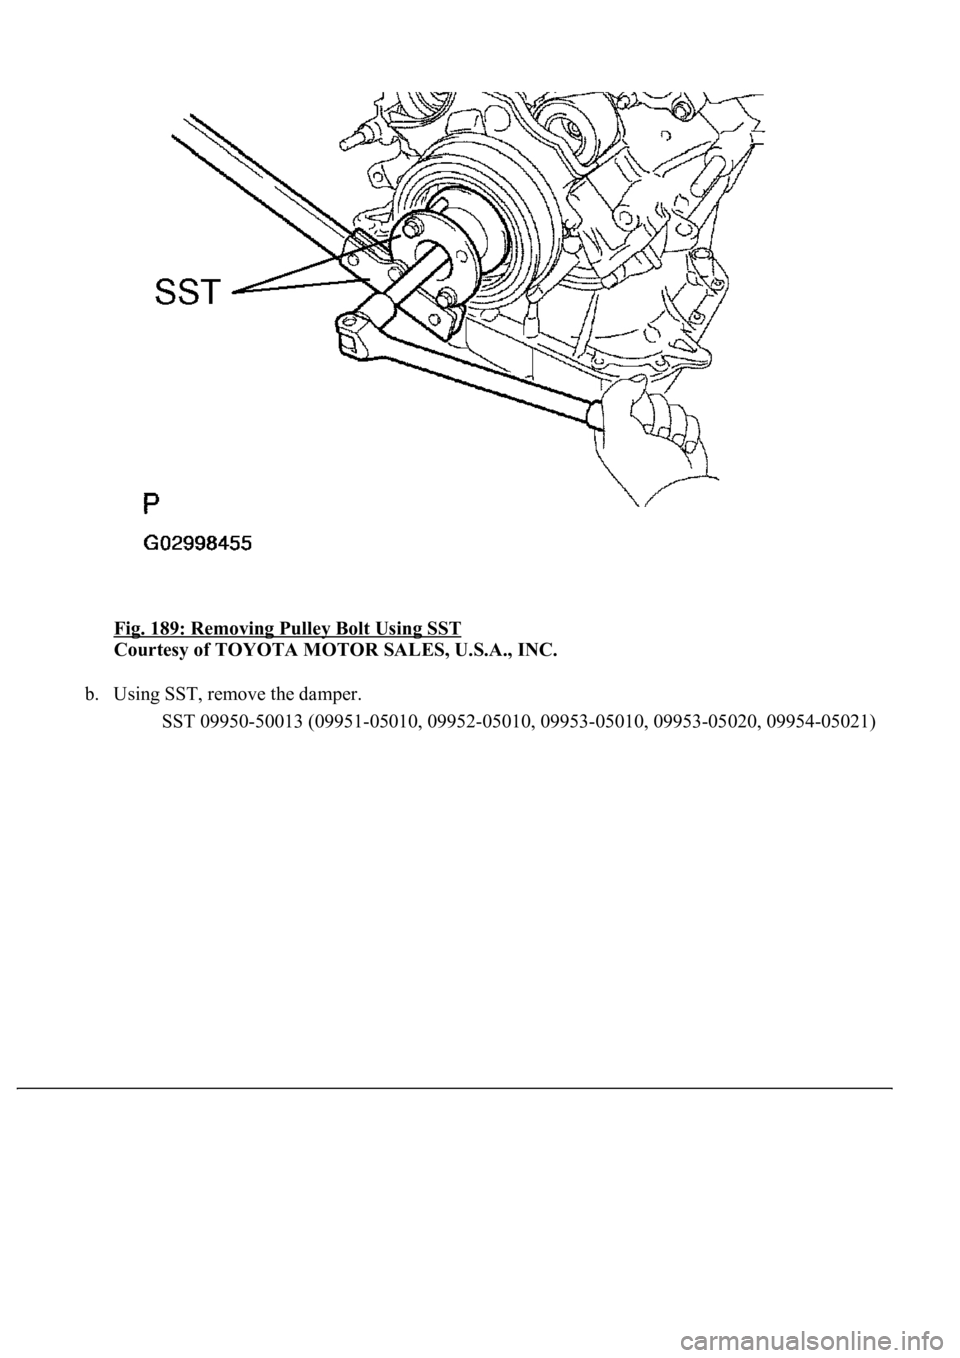
a. Using SST, remove the pulley bolt.
SST 09213-7001 1, 09330-00021
Page 3472 of 4500
Fig. 189: Removing Pulley Bolt Using SST
Courtesy of TOYOTA MOTOR SALES, U.S.A., INC.
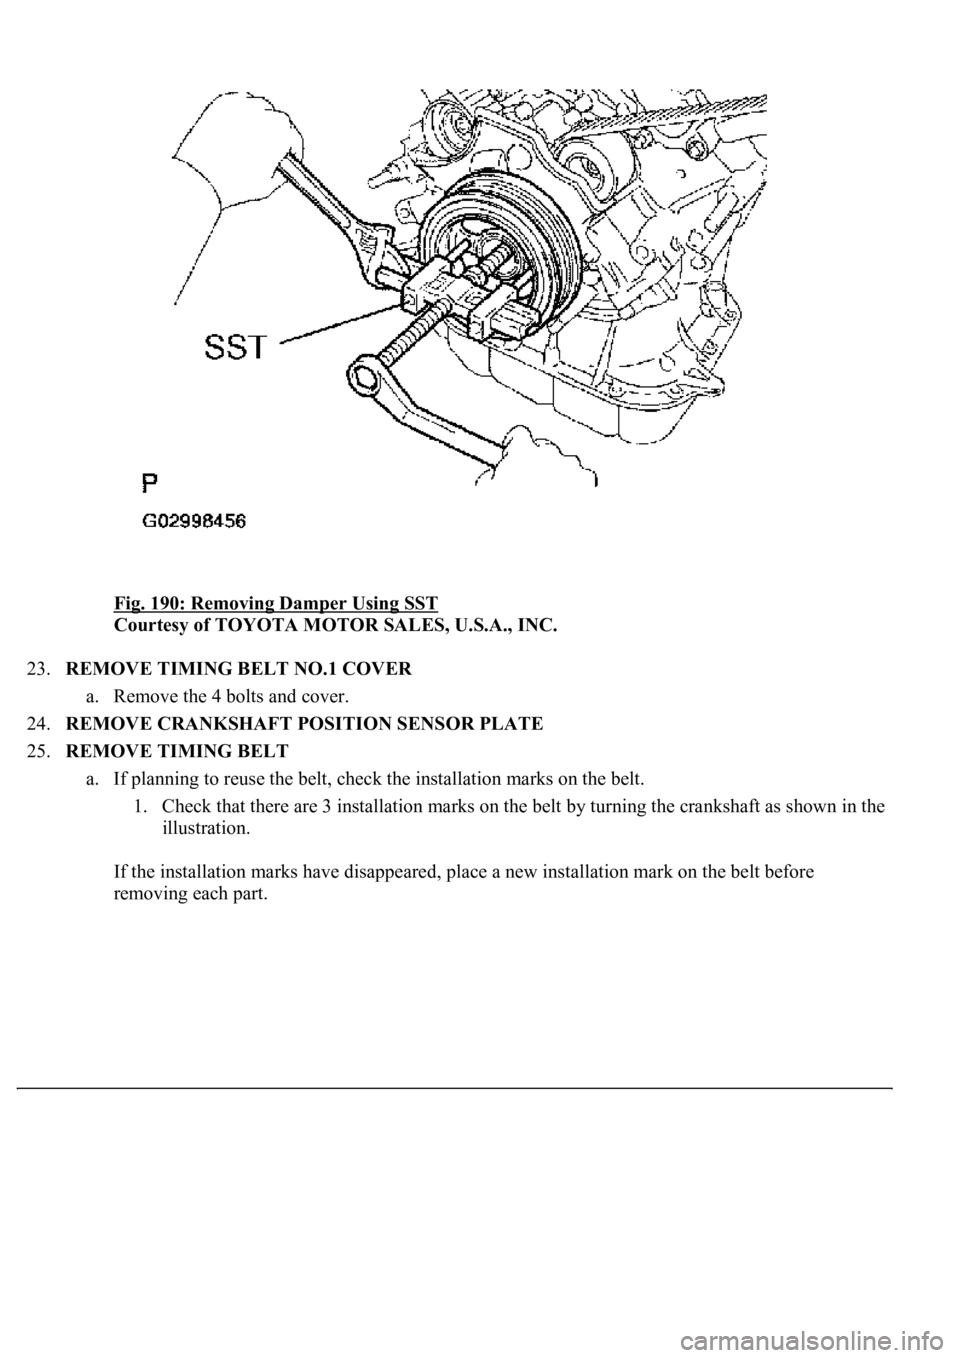
b. Using SST, remove the damper.
<00360036003700030013001c001c001800130010001800130013001400160003000b0013001c001c00180014001000130018001300140013000f00030013001c001c00180015001000130018001300140013000f00030013001c001c001800160010001300
18001300140013000f00030013001c001c0018001600100013[5020, 09954-05021)
Page 3473 of 4500
Fig. 190: Removing Damper Using SST
Courtesy of TOYOTA MOTOR SALES, U.S.A., INC.
23.REMOVE TIMING BELT NO.1 COVER
a. Remove the 4 bolts and cover.
24.REMOVE CRANKSHAFT POSITION SENSOR PLATE
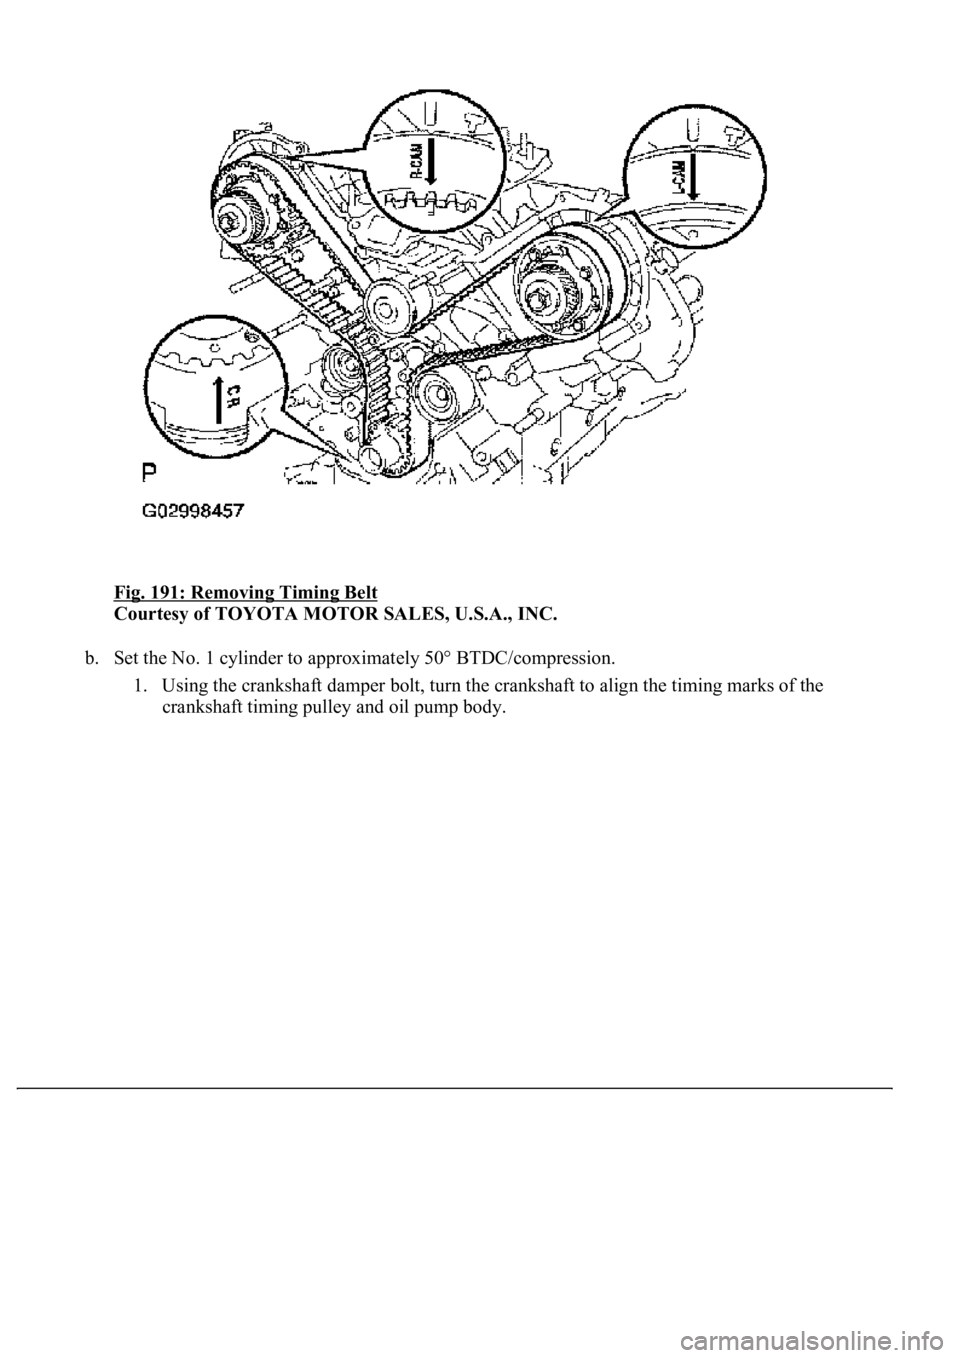
25.REMOVE TIMING BELT
a. If planning to reuse the belt, check the installation marks on the belt.
1. Check that there are 3 installation marks on the belt by turning the crankshaft as shown in the
illustration.
If the installation marks have disappeared, place a new installation mark on the belt before
removing each part.
Page 3474 of 4500
Fig. 191: Removing Timing Belt
Courtesy of TOYOTA MOTOR SALES, U.S.A., INC.
b. Set the No. 1 cylinder to approximately 50° BTDC/compression.
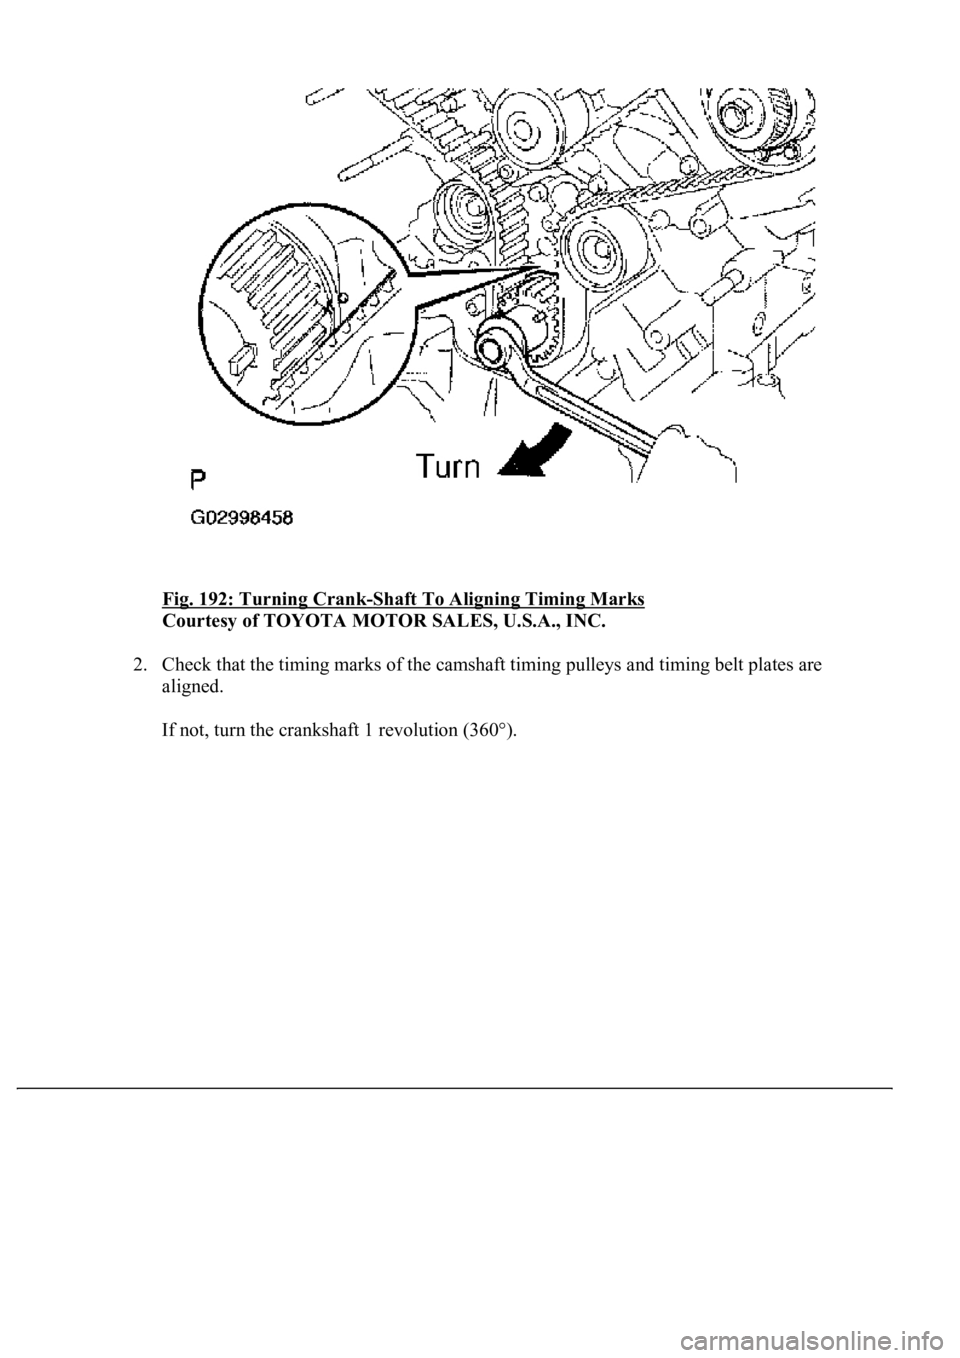
1. Using the crankshaft damper bolt, turn the crankshaft to align the timing marks of the
crankshaft timing pulley and oil pump body.
Page 3475 of 4500
Fig. 192: Turning Crank-Shaft To Aligning Timing Marks
Courtesy of TOYOTA MOTOR SALES, U.S.A., INC.
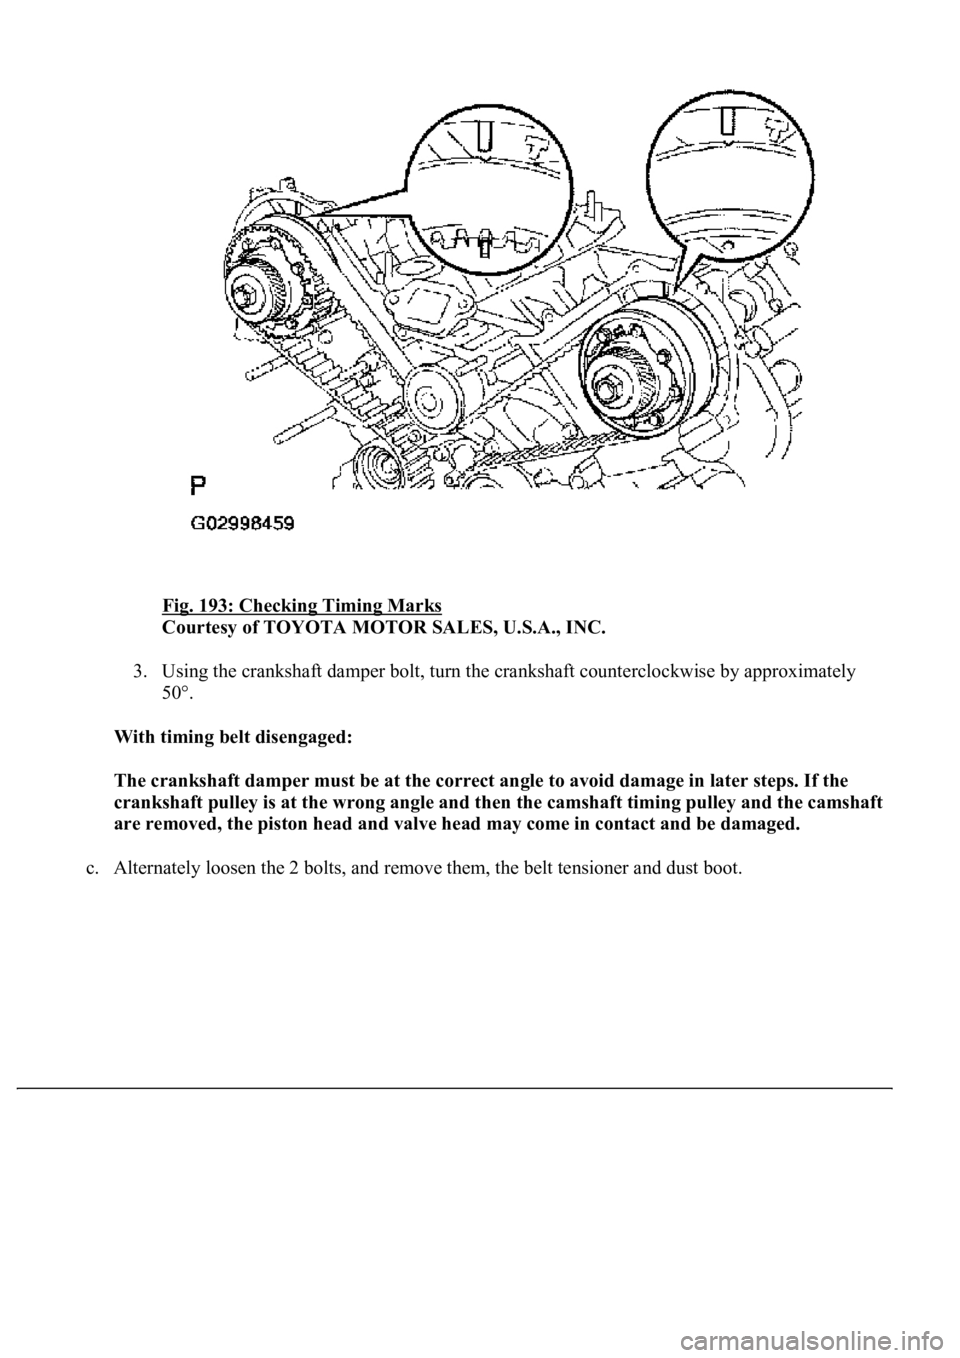
2. Check that the timing marks of the camshaft timing pulleys and timing belt plates are
aligned.
If not, turn the crankshaft 1 revolution (360°).
Page 3476 of 4500
Fig. 193: Checking Timing Marks
Courtesy of TOYOTA MOTOR SALES, U.S.A., INC.
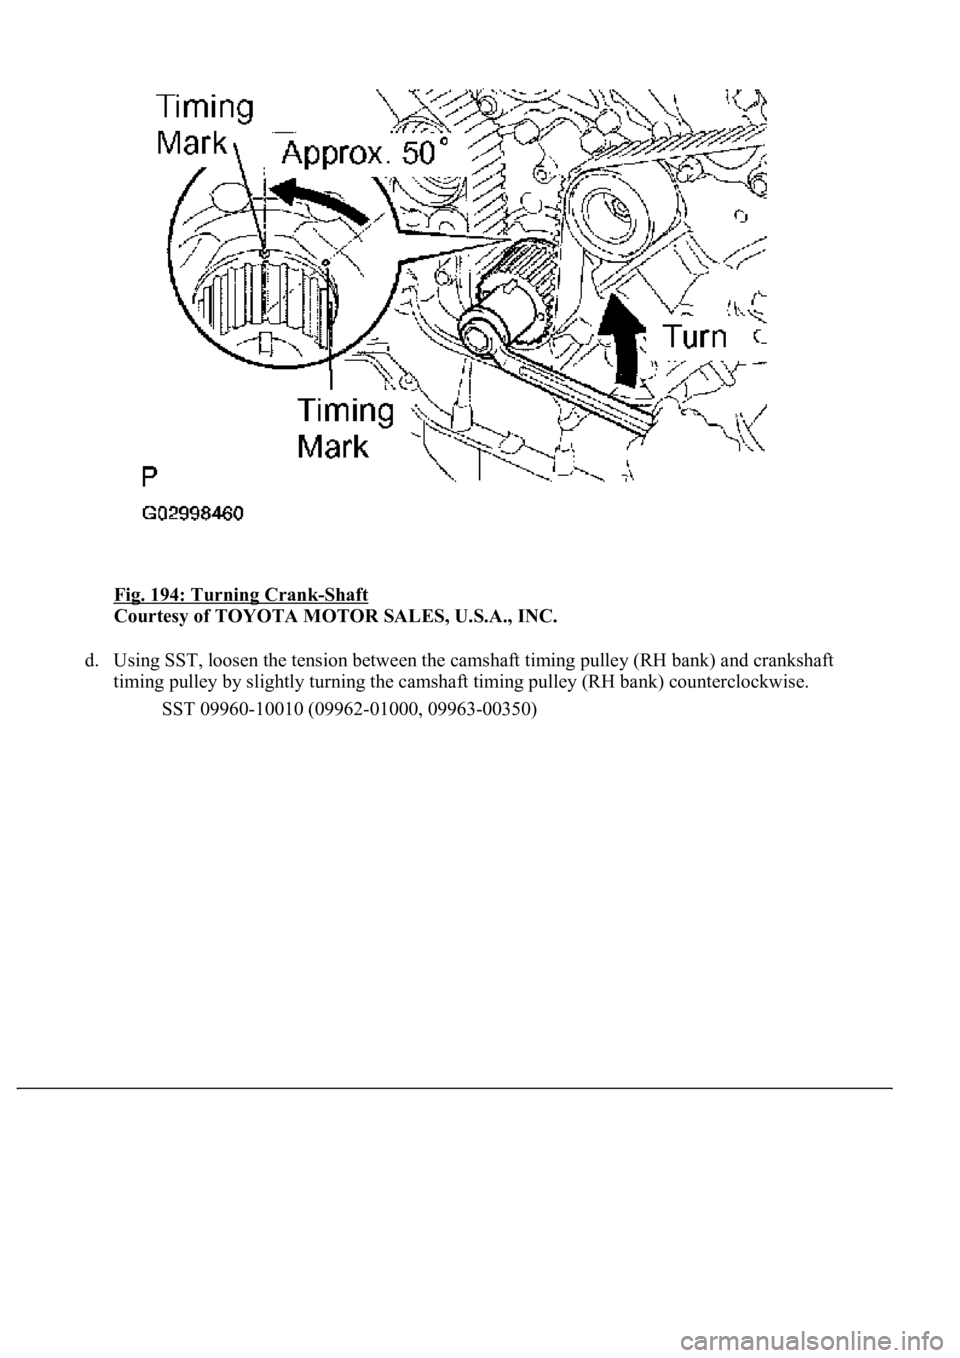
3. Using the crankshaft damper bolt, turn the crankshaft counterclockwise by approximately
50°.
With timing belt disengaged:
The crankshaft damper must be at the correct angle to avoid damage in later steps. If the
crankshaft pulley is at the wrong angle and then the camshaft timing pulley and the camshaft
are removed, the piston head and valve head may come in contact and be damaged.
c. Alternatel
y loosen the 2 bolts, and remove them, the belt tensioner and dust boot.
Page 3477 of 4500
Fig. 194: Turning Crank-Shaft
Courtesy of TOYOTA MOTOR SALES, U.S.A., INC.
d. Using SST, loosen the tension between the camshaft timing pulley (RH bank) and crankshaft
timing pulley by slightly turning the camshaft timing pulley (RH bank) counterclockwise.
SST 09960-10010 (09962-01000, 09963-00350)
Page 3478 of 4500
Fig. 195: Turning Camshaft Timing Pulley (RH Bank) Using SST
Courtesy of TOYOTA MOTOR SALES, U.S.A., INC.
e. Disconnect the belt from the timing belt idler No. 1, and remove the belt.
26.INSTALL TIMING BELT
a. Check the belt idler No. 1 and No. 2.
1. Visually check the seal portion of the idler pulley for oil leakage.
If leakage is found, replace the idler.
2. Check that the idler turns smoothly.
If necessary, replace the idler.
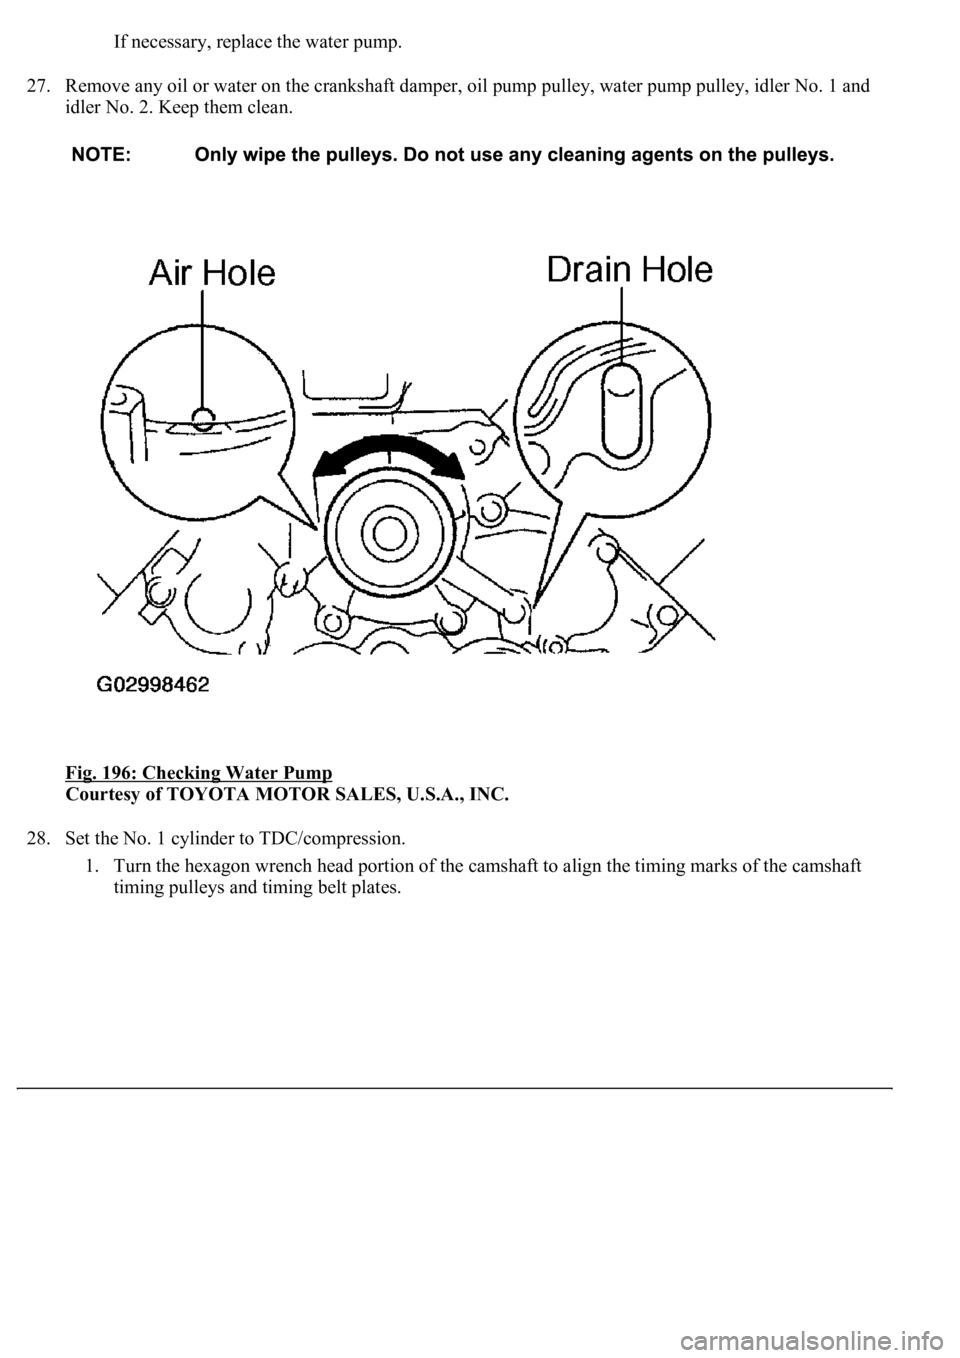
b. Check the water pump.
1. Visually check the air hole and water hole for coolant leakage.
If leakage is found, replace the water pump and belt.
2. Turn the pulle
y, and check that the water pump bearing moves smoothly and quietly.
Page 3479 of 4500
If necessary, replace the water pump.
27. Remove any oil or water on the crankshaft damper, oil pump pulley, water pump pulley, idler No. 1 and
idler No. 2. Keep them clean.
Fig. 196: Checking Water Pump
Courtesy of TOYOTA MOTOR SALES, U.S.A., INC.
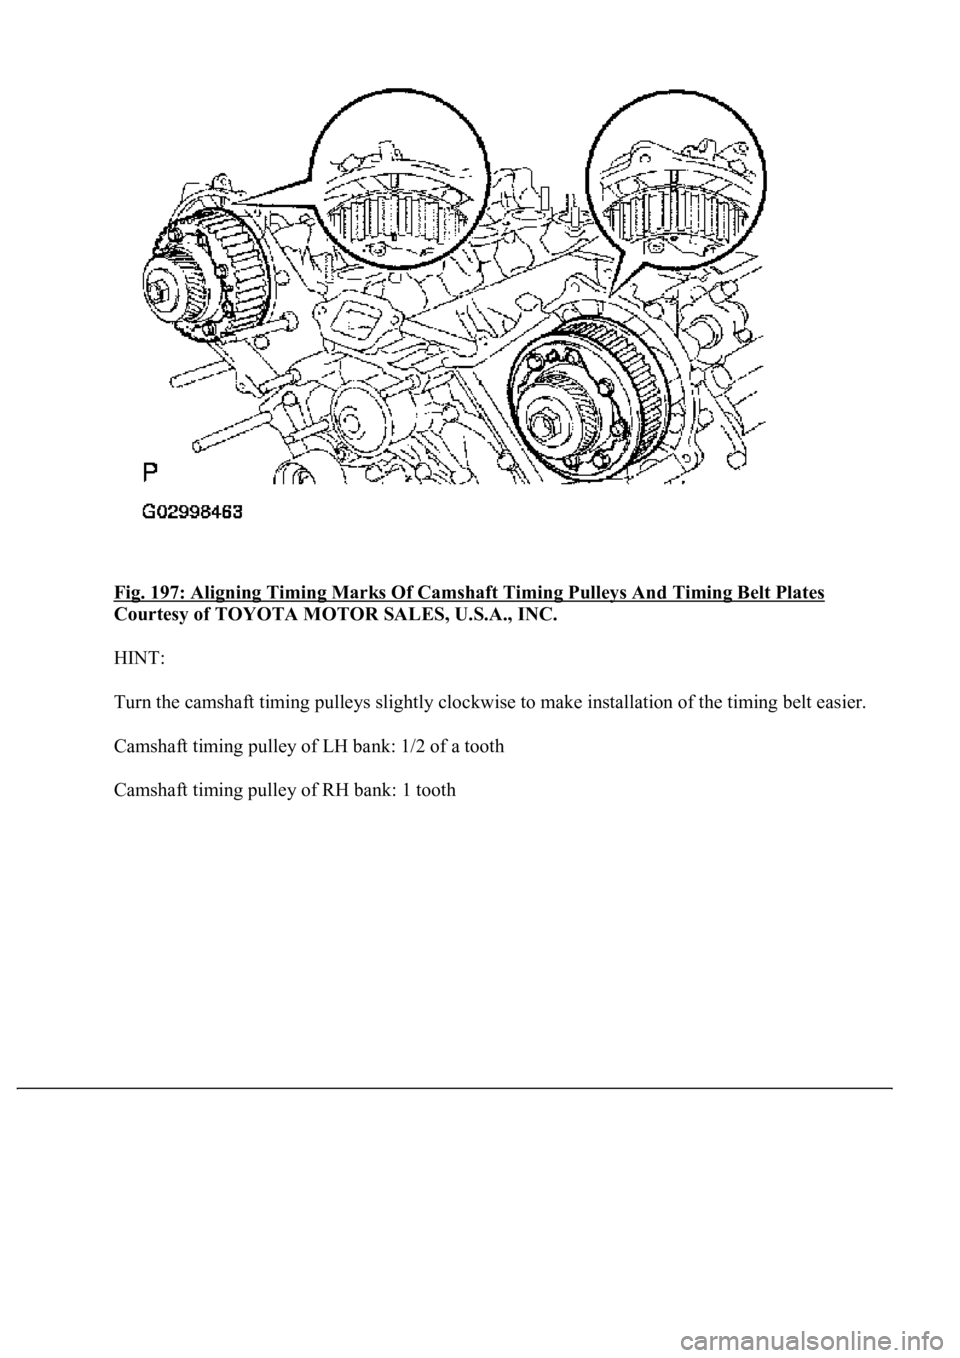
28. Set the No. 1 cylinder to TDC/compression.
1. Turn the hexagon wrench head portion of the camshaft to align the timing marks of the camshaft
timing pulleys and timing belt plates.
Page 3480 of 4500
Fig. 197: Aligning Timing Marks Of Camshaft Timing Pulleys And Timing Belt Plates
Courtesy of TOYOTA MOTOR SALES, U.S.A., INC.
HINT:
Turn the camshaft timing pulleys slightly clockwise to make installation of the timing belt easier.
Camshaft timing pulley of LH bank: 1/2 of a tooth
Camshaft timin
g pulley of RH bank: 1 tooth
Trending: oil capacity, vacuum switching valve, warning lights, heater, check engine, remove seats, On vehicle inspection
