Side MITSUBISHI LANCER 2005 Manual PDF
[x] Cancel search | Manufacturer: MITSUBISHI, Model Year: 2005, Model line: LANCER, Model: MITSUBISHI LANCER 2005Pages: 788, PDF Size: 45.98 MB
Page 284 of 788
FENDER
BODY42-6
FENDER
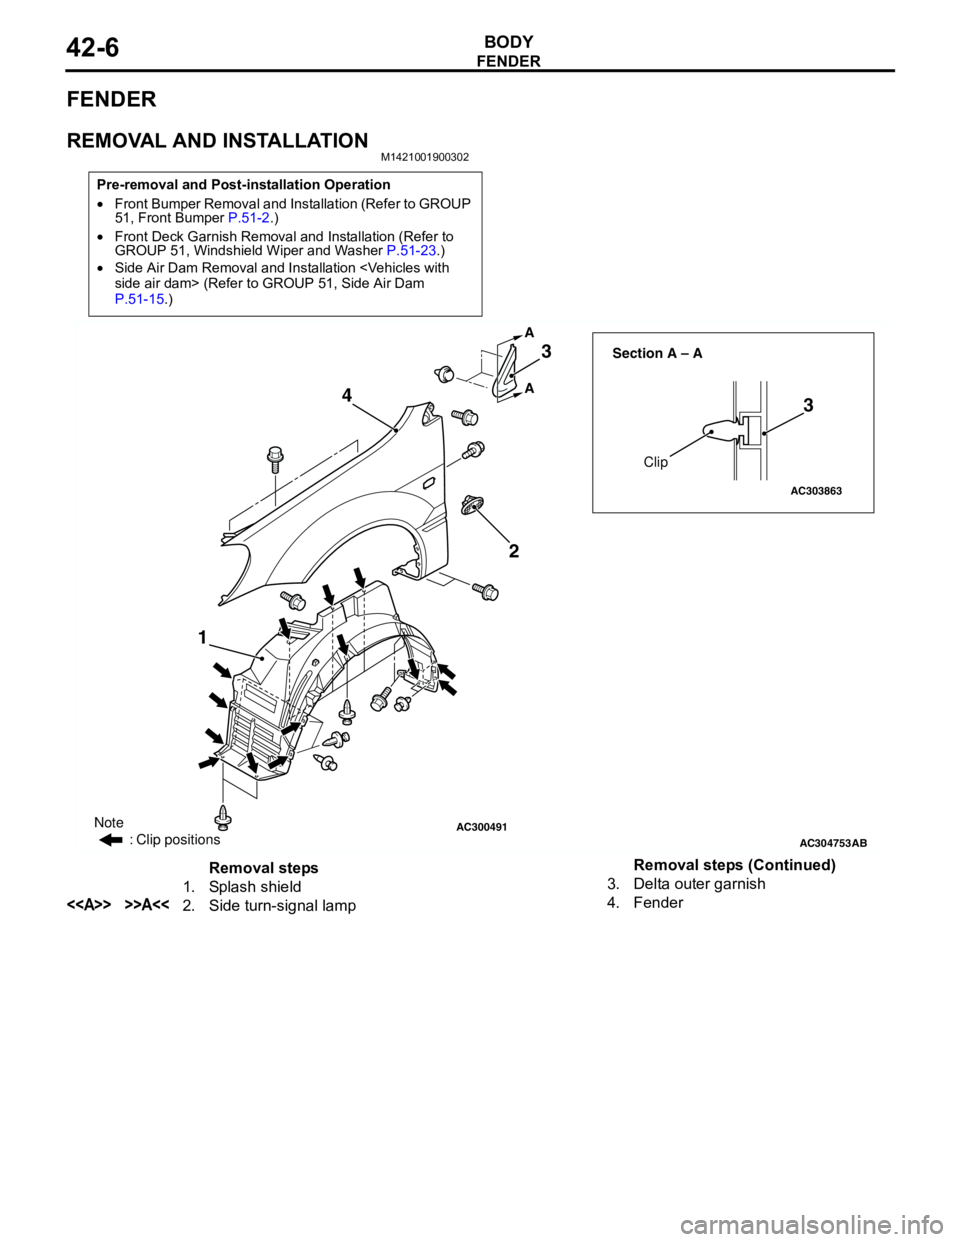
REMOVAL AND INSTALLATIONM1421001900302
Pre-removal and Post-installation Operation
•Front Bumper Removal and Installation (Refer to GROUP
51, Front Bumper P.51-2.)
•Front Deck Garnish Removal and Installation (Refer to
GROUP 51, Windshield Wiper and Washer P.51-23.)
•Side Air Dam Removal and Installation
P.51-15.)
AC300491
AC304753
AC303863
Clip Section A – A
AB
A A
123
3 4
Note
: Clip positions
Removal steps
1. Splash shield
<> >>A<<2. Side turn-signal lamp3. Delta outer garnish
4. FenderRemoval steps (Continued)
Page 285 of 788
Page 286 of 788
FUEL FILLER LID
BODY42-8
FUEL FILLER LID
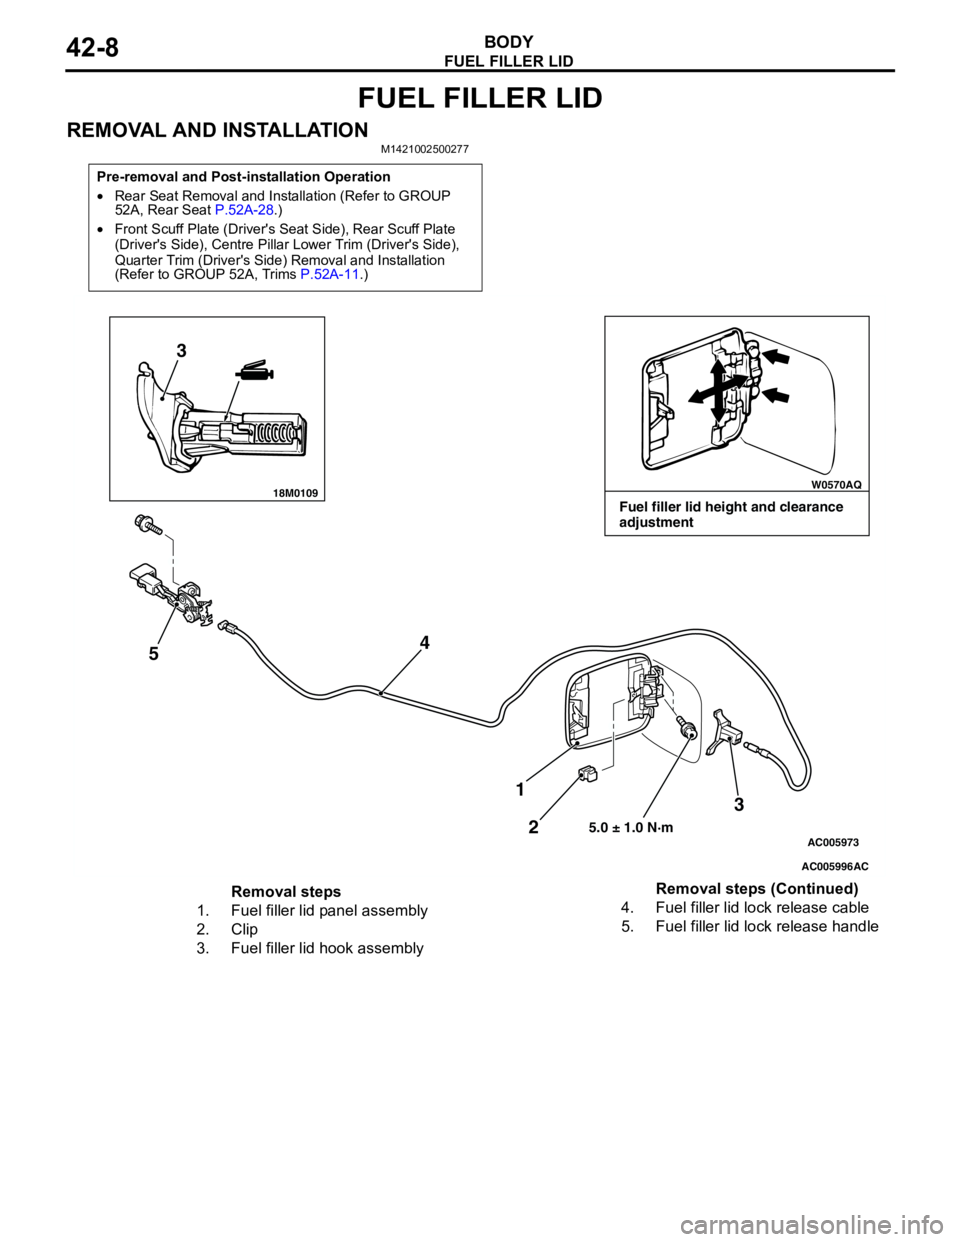
REMOVAL AND INSTALLATIONM1421002500277
Pre-removal and Post-installation Operation
•Rear Seat Removal and Installation (Refer to GROUP
52A, Rear Seat P.52A-28.)
•Front Scuff Plate (Driver's Seat Side), Rear Scuff Plate
(Driver's Side), Centre Pillar Lower Trim (Driver's Side),
Quarter Trim (Driver's Side) Removal and Installation
(Refer to GROUP 52A, Trims P.52A-11.)
18M0109W0570AQ
AC005996
AC005973
3
54
3
2 1
5.0 ± 1.0 N·m
AC
Fuel filler lid height and clearance
adjustment
Removal steps
1. Fuel filler lid panel assembly
2. Clip
3. Fuel filler lid hook assembly4. Fuel filler lid lock release cable
5. Fuel filler lid lock release handleRemoval steps (Continued)
Page 289 of 788
WINDOW GLASS
BODY42-11
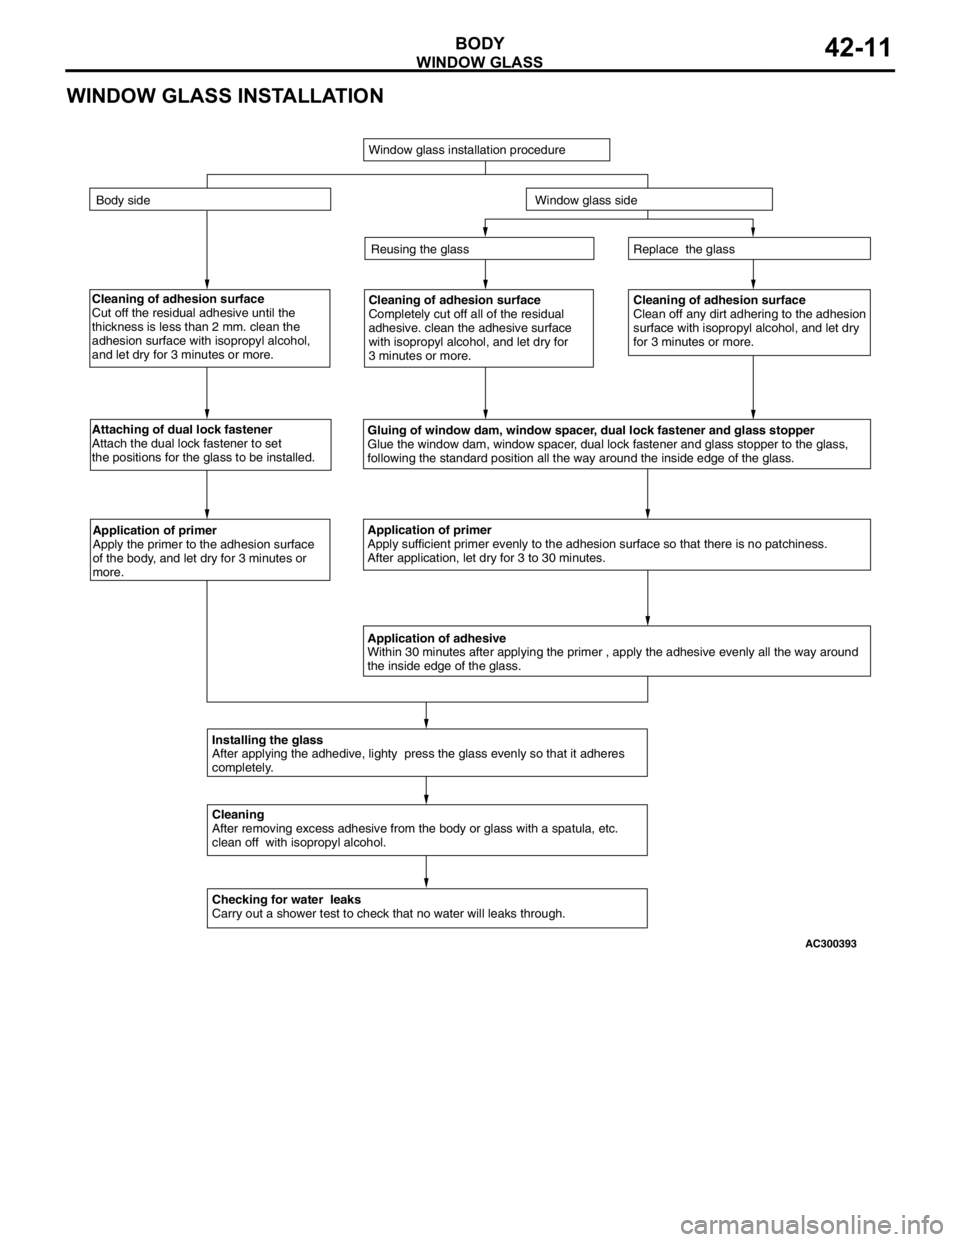
WINDOW GLASS INSTALLATION
Cleaning of adhesion surface
Cut off the residual adhesive until the
thickness is less than 2 mm. clean the
adhesion surface with isopropyl alcohol,
and let dry for 3 minutes or more.Cleaning of adhesion surface
Completely cut off all of the residual
adhesive. clean the adhesive surface
with isopropyl alcohol, and let dry for
3 minutes or more.Cleaning of adhesion surface
Clean off any dirt adhering to the adhesion
surface with isopropyl alcohol, and let dry
for 3 minutes or more.
Attaching of dual lock fastener
Attach the dual lock fastener to set
the positions for the glass to be installed.
Gluing of window dam, window spacer, dual lock fastener and glass stopper
Glue the window dam, window spacer, dual lock fastener and glass stopper to the glass,
following the standard position all the way around the inside edge of the glass.
Application of primer
Apply the primer to the adhesion surface
of the body, and let dry for 3 minutes or
more.Application of primer
Apply sufficient primer evenly to the adhesion surface so that there is no patchiness.
After application, let dry for 3 to 30 minutes.
Application of adhesive
Within 30 minutes after applying the primer , apply the adhesive evenly all the way around
the inside edge of the glass.
Installing the glass
After applying the adhedive, lighty press the glass evenly so that it adheres
completely.
Cleaning
After removing excess adhesive from the body or glass with a spatula, etc.
clean off with isopropyl alcohol.
Checking for water leaks
Carry out a shower test to check that no water will leaks through.Replace the glass
Reusing the glass
Window glass installation procedure
Body side
Window glass side
AC300393
Page 290 of 788
WINDOW GLASS
BODY42-12
WINDSHIELD
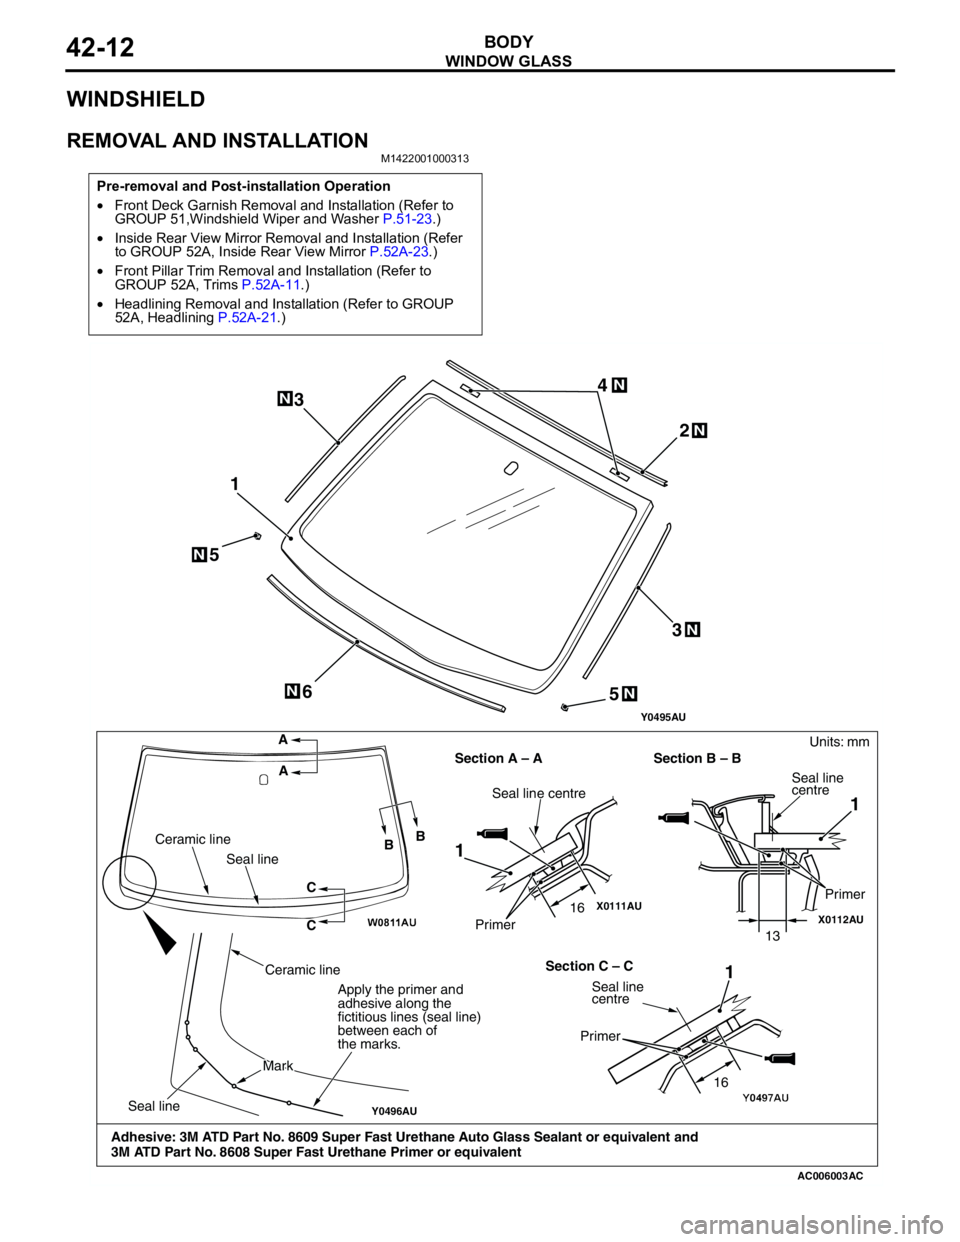
REMOVAL AND INSTALLATIONM1422001000313
Pre-removal and Post-installation Operation
•Front Deck Garnish Removal and Installation (Refer to
GROUP 51,Windshield Wiper and Washer P.51-23.)
•Inside Rear View Mirror Removal and Installation (Refer
to GROUP 52A, Inside Rear View Mirror P.52A-23.)
•Front Pillar Trim Removal and Installation (Refer to
GROUP 52A, Trims P.52A-11.)
•Headlining Removal and Installation (Refer to GROUP
52A, Headlining P.52A-21.)
AC006003
X0111AUX0112AU
Y0496AU
12
3 4
6
1 11 3
N
N
N
N
N
AC Y0495AU
A
A
BB
C
C Ceramic line
Seal line
Seal line
Ceramic line
MarkMark
Apply the primer and
adhesive along the
fictitious lines (seal line)
between each of
the marks.
Seal line centre
Primer Section A – A Section B – BSeal line
centre
Primer
Section C – C
Seal line
centre
Primer
5N
5N
Units: mm
Adhesive: 3M ATD Part No. 8609 Super Fast Urethane Auto Glass Sealant or equivalent and
3M ATD Part No. 8608 Super Fast Urethane Primer or equivalent
16
1613
Page 291 of 788
WINDOW GLASS
BODY42-13
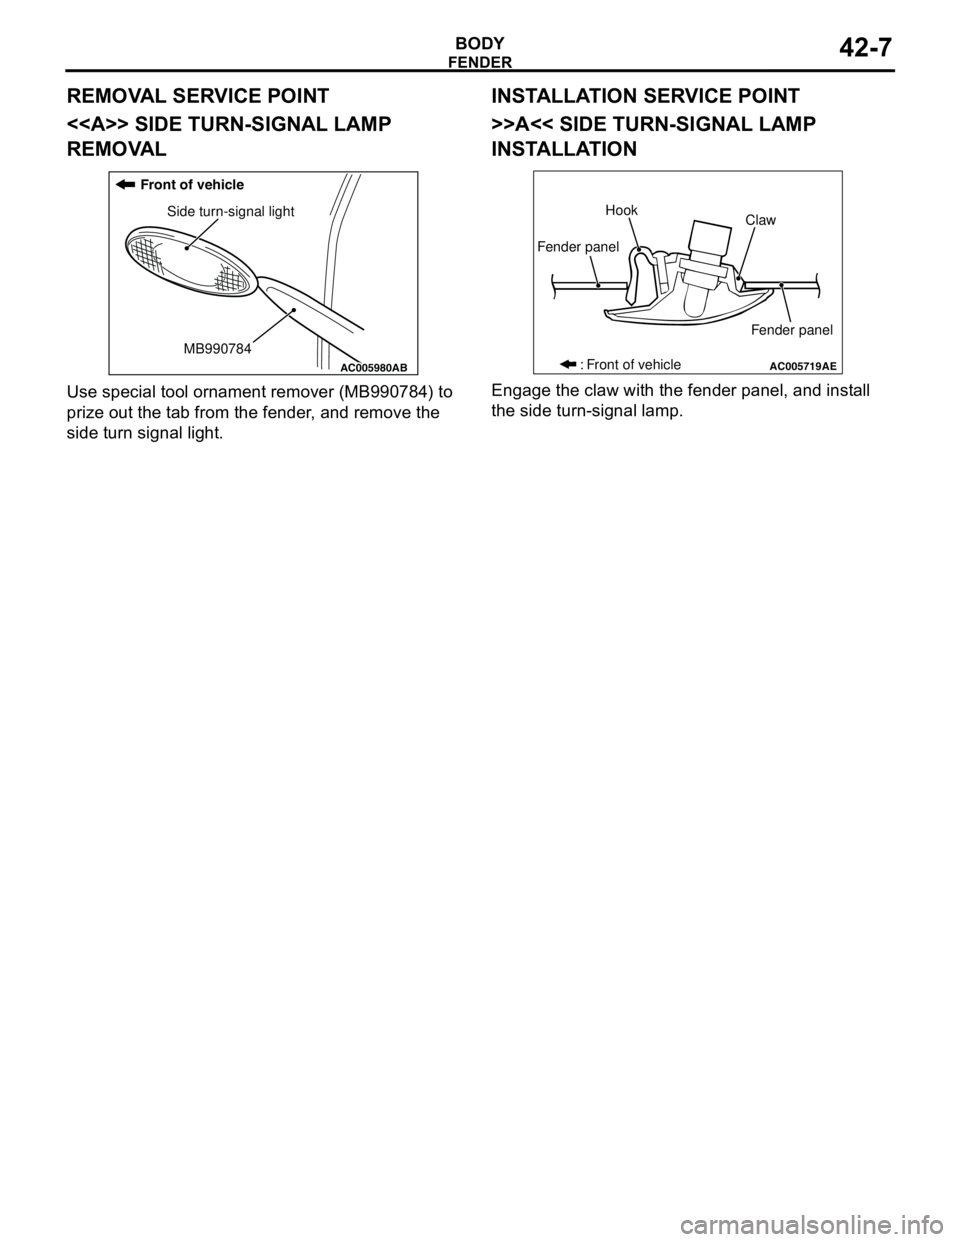
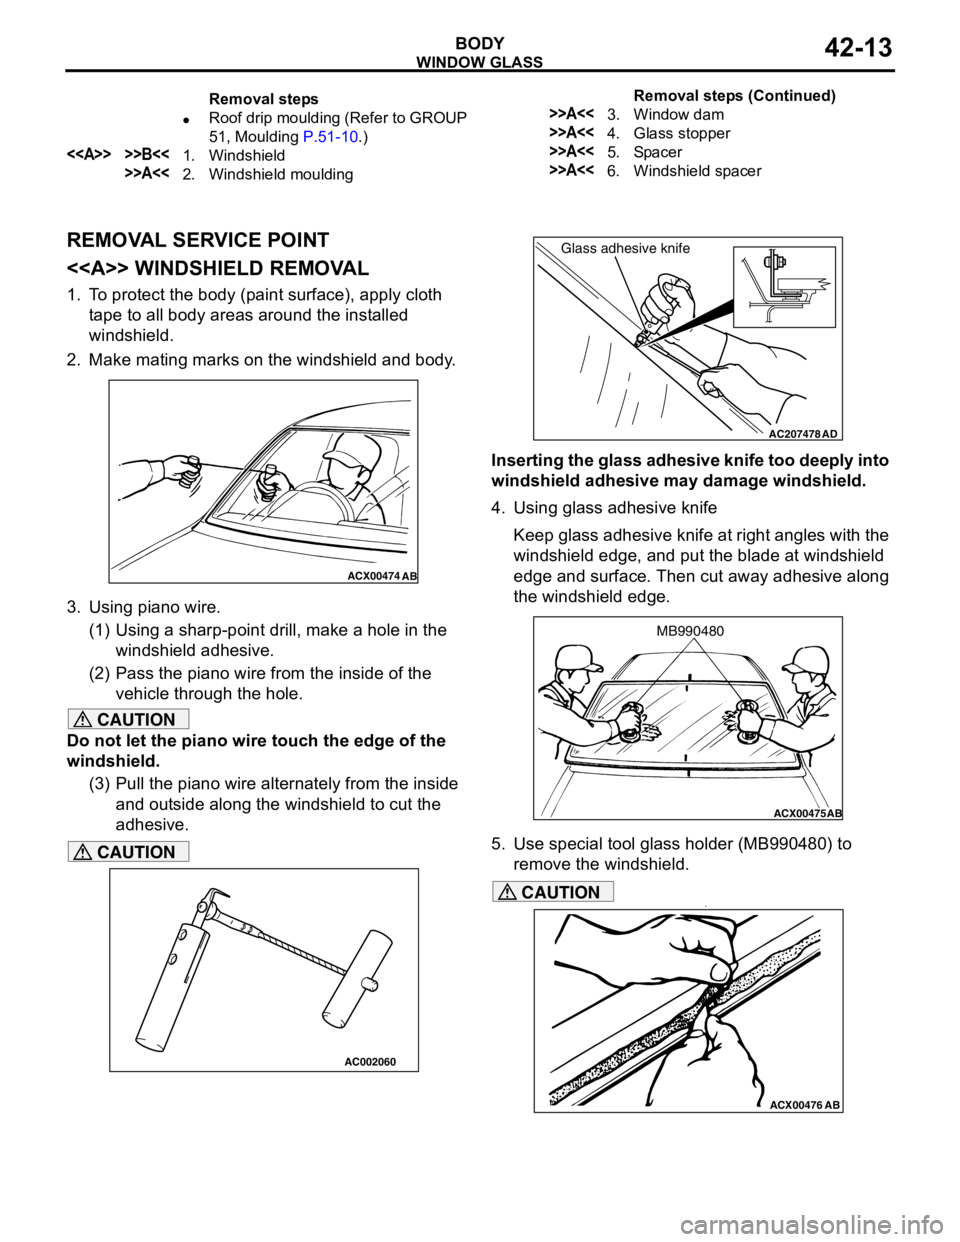
REMOVAL SERVICE POINT
<> WINDSHIELD REMOVAL
1. To protect the body (paint surface), apply cloth
tape to all body areas around the installed
windshield.
2. Make mating marks on the windshield and body.
3. Using piano wire.
(1) Using a sharp-point drill, make a hole in the
windshield adhesive.
(2) Pass the piano wire from the inside of the
vehicle through the hole.
CAUTION
Do not let the piano wire touch the edge of the
windshield.
(3) Pull the piano wire alternately from the inside
and outside along the windshield to cut the
adhesive.
CAUTION
Inserting the glass adhesive knife too deeply into
windshield adhesive may damage windshield.
4. Using glass adhesive knife
Keep glass adhesive knife at right angles with the
windshield edge, and put the blade at windshield
edge and surface. Then cut away adhesive along
the windshield edge.
5. Use special tool glass holder (MB990480) to
remove the windshield.
CAUTION•
Removal steps
•Roof drip moulding (Refer to GROUP
51, Moulding P.51-10.)
<> >>B<<1. Windshield
>>A<<2. Windshield moulding
>>A<<3. Window dam
>>A<<4. Glass stopper
>>A<<5. Spacer
>>A<<6. Windshield spacerRemoval steps (Continued)
ACX00474
AB
AC002060
AC207478
Glass adhesive knife
AD
ACX00475
AB
MB990480
ACX00476
AB
Page 292 of 788
WINDOW GLASS
BODY42-14
Be careful not to remove more adhesive than is
necessary.
•Be careful also not to damage the paintwork
on the body surface with the knife. If the
paintwork is damaged, repair the damaged
area with repair paint or anti-rust agent.
6. Use a knife to cut away the remaining adhesive so
that the thickness is within 2 mm around the entire
circumference of the body flange.
7. Finish the flange surfaces so that they are
smooth.
CAUTION
Allow the cleaned area to dry for at least three
minutes. Do not touch any surface that has been
cleaned.8. When reusing the windshield, remove the
adhesive still adhering to the windshield, and
clean with isopropyl alcohol.
9. Clean the body side in the same way.
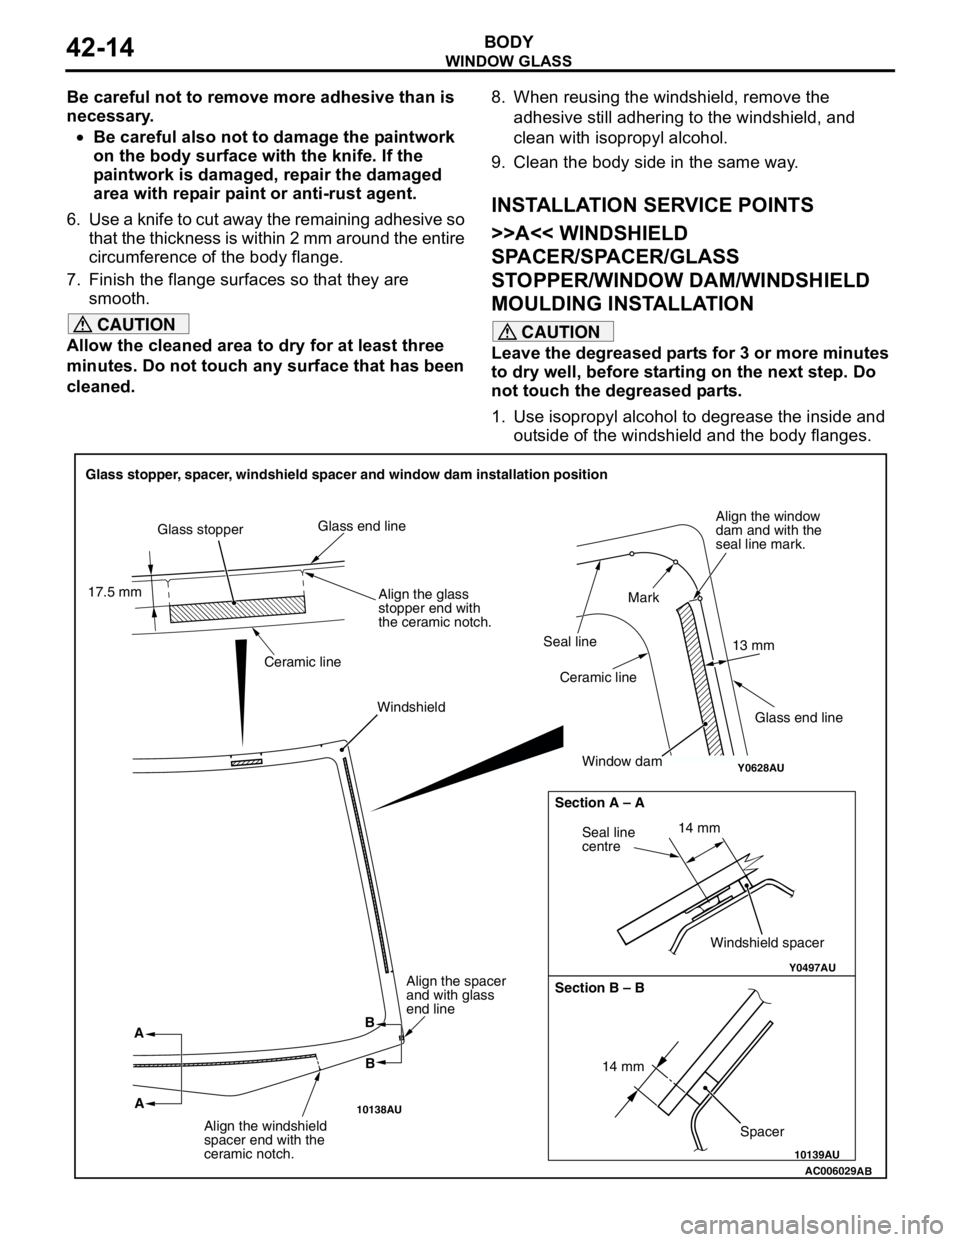
INSTALLATION SERVICE POINTS
>>A<< WINDSHIELD
SPACER/SPACER/GLASS
STOPPER/WINDOW DAM/WINDSHIELD
MOULDING INSTALLATION
CAUTION
Leave the degreased parts for 3 or more minutes
to dry well, before starting on the next step. Do
not touch the degreased parts.
1. Use isopropyl alcohol to degrease the inside and
outside of the windshield and the body flanges.
Y0628AU
AC006029
10138AU
10139AU
Y0497AU
Glass stopper, spacer, windshield spacer and window dam installation position
17.5 mmGlass stopper
Glass end line
Ceramic line
Align the glass
stopper end with
the ceramic notch.
Align the window
dam and with the
seal line mark.
13 mm
Glass end line
Mark
Seal line
Ceramic line
Window dam
AB
A
AWindshield
Seal line
centre14 mm
Windshield spacer Section A – A
Section B – B
B
B
14 mm
Spacer
Align the spacer
and with glass
end line
Align the windshield
spacer end with the
ceramic notch.
Page 293 of 788
WINDOW GLASS
BODY42-15
2. The inner side of the windshield is curved,
therefore, make a point to assemble the glass
stopper and windshield spacer without any lifting
and assemble in the position shown in the Figure
of the instructions.
3. Install the windshield moulding.
>>B<
the windshield against the body, and place a
mating mark on the windshield and body.
CAUTION
•The primer strengthens the adhesive, so be
sure to apply it evenly around the entire
circumference. However, a too thick
application will weaken the adhesive.
•Do not touch the coated surface.
•Do not apply the primer on the remaining
adhesive because of weakening the adhesive.
2. Soak a sponge in the primer, and apply evenly to
the windshield in the specified places. If the
adhesive does not remain on the body flange
surface because of the panel replacement on the
body side, apply evenly to the body side in the
specified places.
3. Allow the windshield to dry for at least three
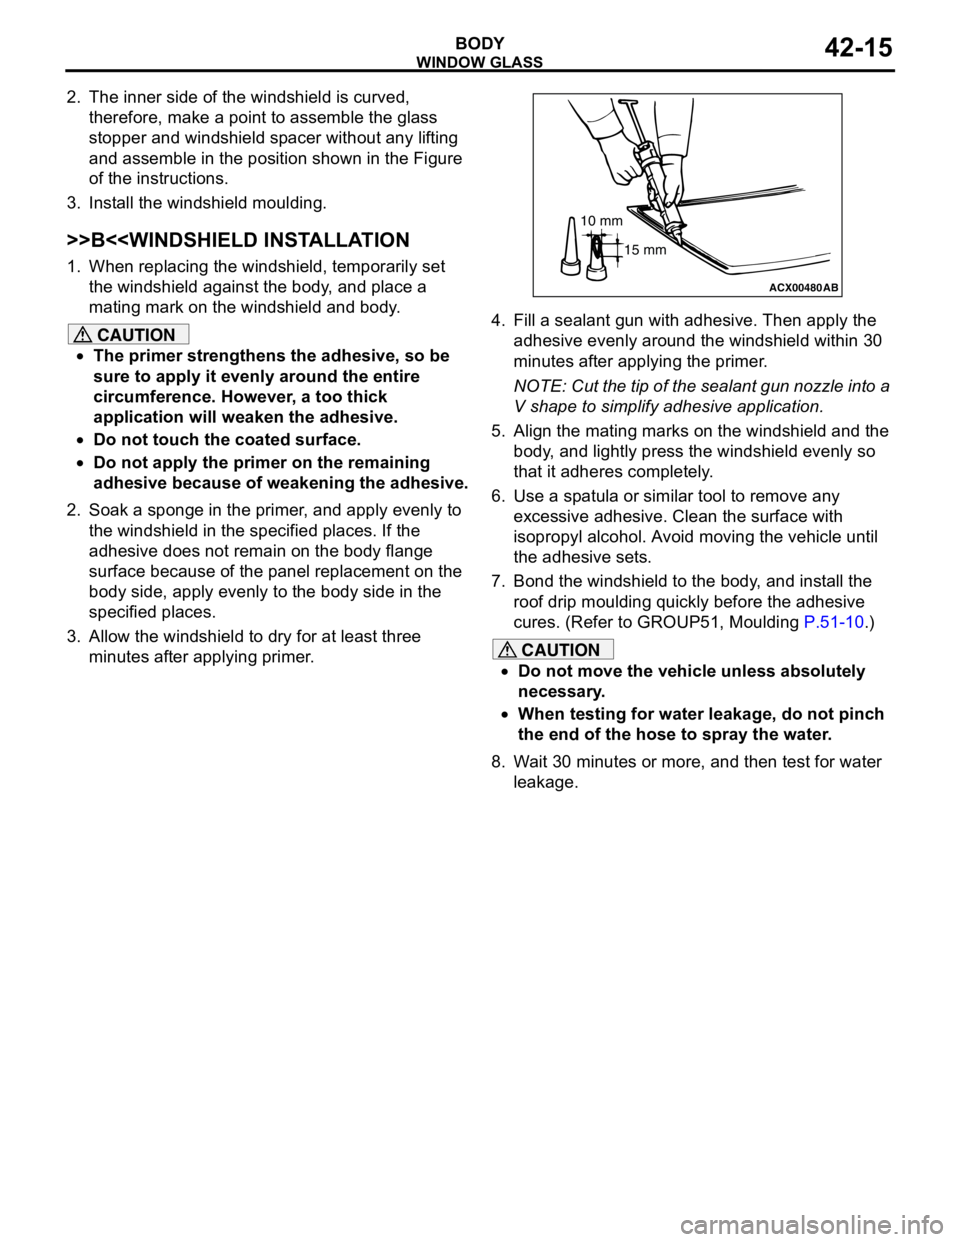
minutes after applying primer.4. Fill a sealant gun with adhesive. Then apply the
adhesive evenly around the windshield within 30
minutes after applying the primer.
NOTE: Cut the tip of the sealant gun nozzle into a
V shape to simplify adhesive application.
5. Align the mating marks on the windshield and the
body, and lightly press the windshield evenly so
that it adheres completely.
6. Use a spatula or similar tool to remove any
excessive adhesive. Clean the surface with
isopropyl alcohol. Avoid moving the vehicle until
the adhesive sets.
7. Bond the windshield to the body, and install the
roof drip moulding quickly before the adhesive
cures. (Refer to GROUP51, Moulding P.51-10.)
CAUTION
•Do not move the vehicle unless absolutely
necessary.
•When testing for water leakage, do not pinch
the end of the hose to spray the water.
8. Wait 30 minutes or more, and then test for water
leakage.
ACX00480
10 mm
15 mm
AB
Page 295 of 788
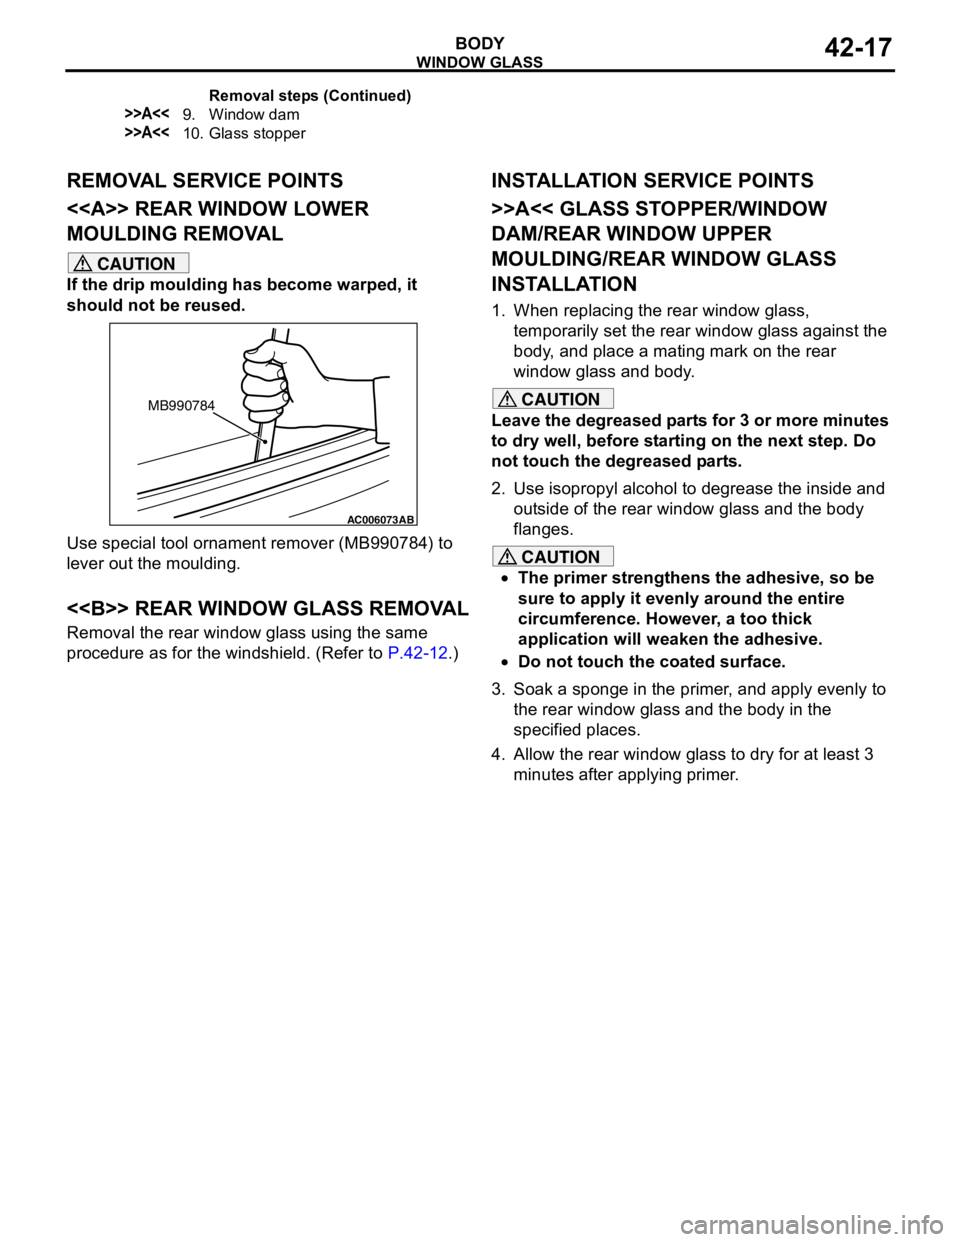
Page 296 of 788
WINDOW GLASS
BODY42-18
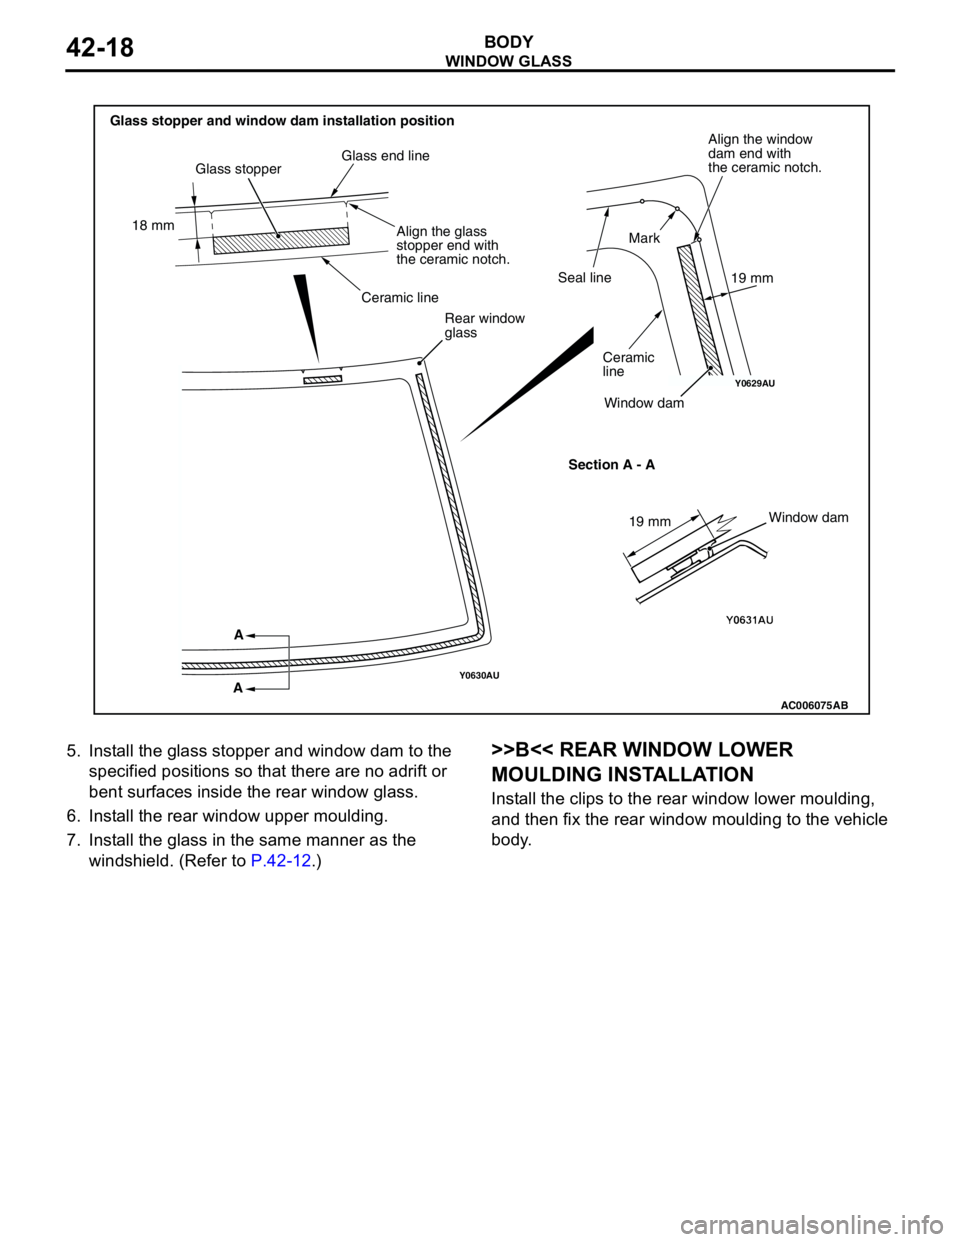
5. Install the glass stopper and window dam to the
specified positions so that there are no adrift or
bent surfaces inside the rear window glass.
6. Install the rear window upper moulding.
7. Install the glass in the same manner as the
windshield. (Refer to P.42-12.)>>B<< REAR WINDOW LOWER
MOULDING INSTALLATION
Install the clips to the rear window lower moulding,
and then fix the rear window moulding to the vehicle
body.
Y0630AU
Y0629AU
AC006075
Glass stopper and window dam installation position
Glass stopper
18 mm
Glass end line
Align the glass
stopper end with
the ceramic notch.
Ceramic line
Rear window
glass
A
ASection A - A
19 mmWindow dam Align the window
dam end with
the ceramic notch.
Mark
Seal line
Ceramic
line
Window dam
19 mm
AB