MITSUBISHI OUTLANDER SPORT 2014 3.G Owners Manual
Manufacturer: MITSUBISHI, Model Year: 2014, Model line: OUTLANDER SPORT, Model: MITSUBISHI OUTLANDER SPORT 2014 3.GPages: 388, PDF Size: 20.04 MB
Page 321 of 388
Tyre repair kit9-10 For emergencies
9
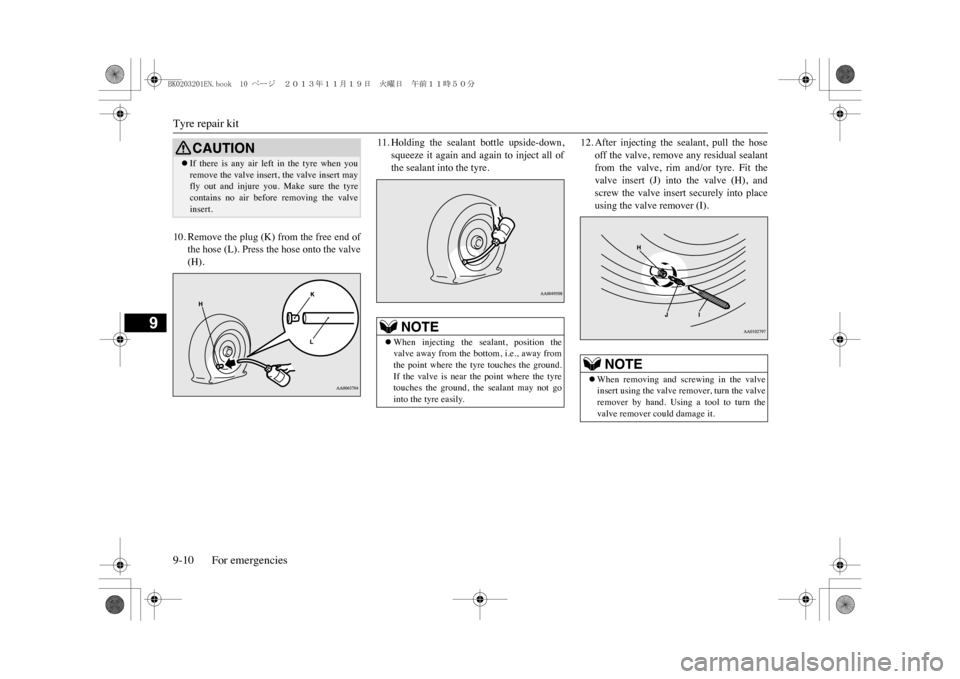
10. Remove the plug (K) from the free end of
the hose (L). Press the hose onto the valve(H).
11. Holding the sealant bottle upside-down,
squeeze it again and again to inject all ofthe sealant into the tyre.
12. After injecting the sealant, pull the hose
off the valve, remove any residual sealantfrom the valve, rim and/or tyre. Fit thevalve insert (J) into the valve (H), andscrew the valve insert securely into placeusing the valve remover (I).
CAUTION�zIf there is any air left in the tyre when youremove the valve insert, the valve insert mayfly out and injure you. Make sure the tyrecontains no air before
removing the valve
insert.
NOTE
�zWhen injecting the sealant, position thevalve away from the bottom, i.e., away fromthe point where the tyre touches the ground.If the valve is near the point where the tyretouches the ground, the sealant may not gointo the tyre easily.
NOTE
�zWhen removing and screwing in the valveinsert using the valve remover, turn the valveremover by hand. Using a tool to turn thevalve remover could damage it.
BK0203201EN.book 10 ページ 2013年11月19日 火曜日 午前11時50分
Page 322 of 388
Tyre repair kit
For emergencies 9-11
9
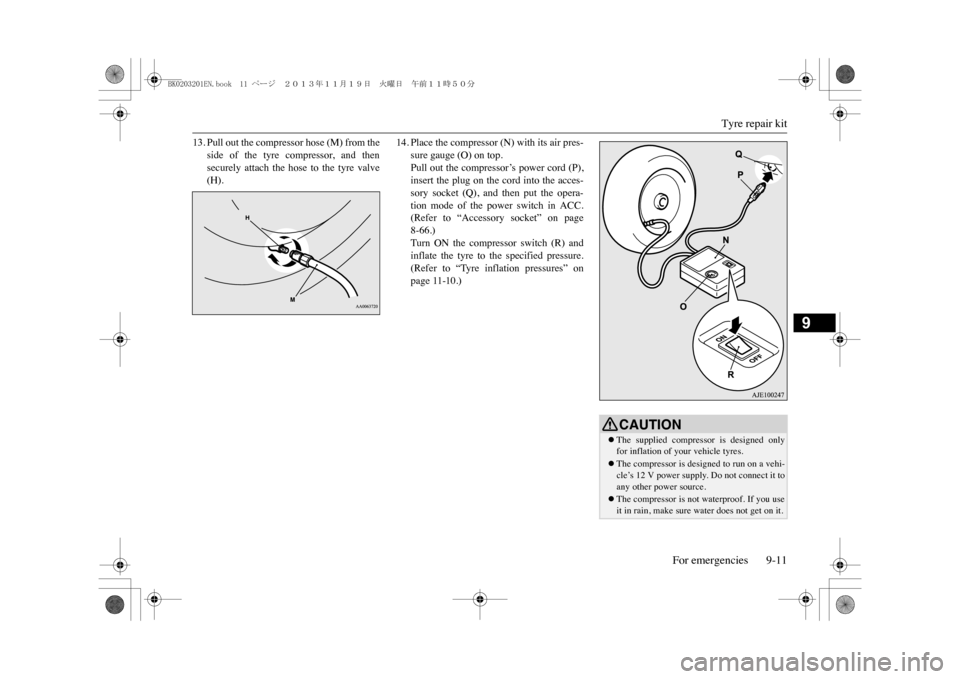
13. Pull out the compressor hose (M) from the
side of the tyre compressor, and thensecurely attach the hose to the tyre valve(H).
14. Place the compressor (N) with its air pres-
sure gauge (O) on top.Pull out the compressor’s power cord (P),insert the plug on the cord into the acces-sory socket (Q), and then put the opera-tion mode of the power switch in ACC.(Refer to “Accessory socket” on page8-66.)Turn ON the compressor switch (R) andinflate the tyre to the specified pressure.(Refer to “Tyre inflation pressures” onpage 11-10.)
CAUTION�zThe supplied compress
or is designed only
for inflation of y
our vehicle tyres.
�zThe compressor is designed to run on a vehi-cle’s 12 V power supply. Do not connect it toany other power source.�zThe compressor is not waterproof. If you useit in rain, make sure water does not get on it.
BK0203201EN.book 11 ページ 2013年11月19日 火曜日 午前11時50分
Page 323 of 388
Tyre repair kit9-12 For emergencies
9
15. Check and adjust the tyre pressure with
reference to the air pressure gauge on thecompressor. If you overinflate the tyre,release air by loosening the hose’s end fit-ting.If there is a gap between the tyre andwheel because the tyre has moved inwardfrom the wheel rim, press the periphery ofthe tyre towards the wheel to close the gapbefore running the compressor. (With nogaps, the tyre pressure will rise.)
16. Turn OFF the compressor switch, then
pull the power cord plug out of the socket.
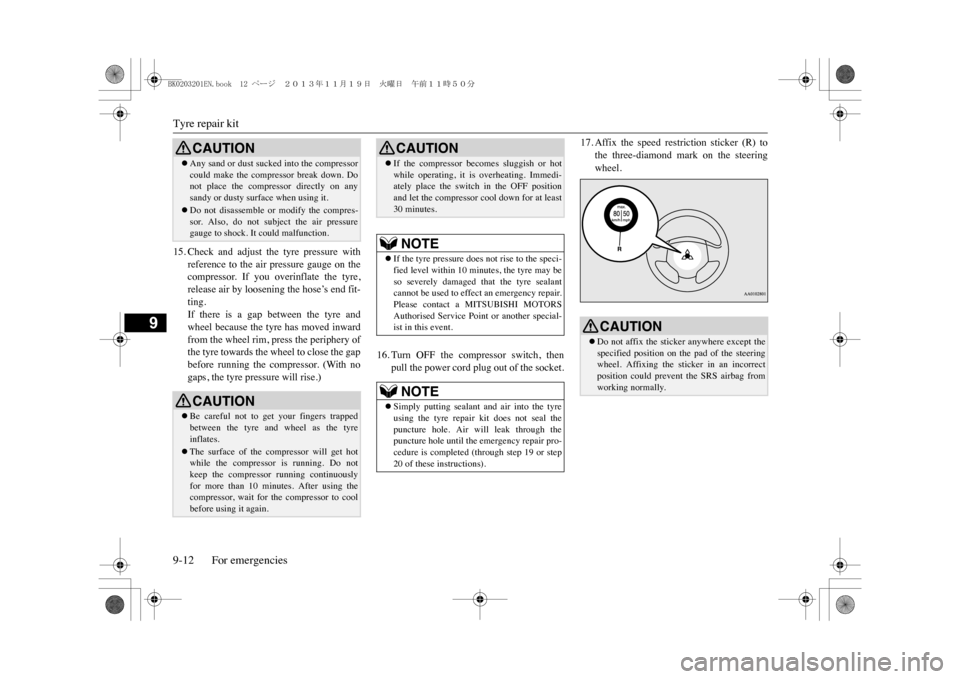
17. Affix the speed restriction sticker (R) to
the three-diamond mark on the steeringwheel.
�zAny sand or dust sucked into the compressorcould make the compressor break down. Donot place the compressor directly on anysandy or dusty surface when using it.�zDo not disassemble or
modify the compres-
sor. Also, do not subject the air pressuregauge to shock. It
could malfunction.
CAUTION�zBe careful not to get your fingers trappedbetween the tyre and wheel as the tyreinflates.�zThe surface of the compressor will get hotwhile the compressor is running. Do notkeep the compressor running continuouslyfor more than 10 minutes. After using thecompressor, wait for the compressor to coolbefore using it again.CAUTION
�zIf the compressor becomes sluggish or hotwhile operating, it is overheating. Immedi-ately place the switch in the OFF positionand let the compressor cool down for at least30 minutes.NOTE
�zIf the tyre pressure does not rise to the speci-fied level within 10 minutes, the tyre may beso severely damaged that the tyre sealantcannot be used to effect an emergency repair.Please contact a MITSUBISHI MOTORSAuthorised Service Poin
t or another special-
ist in this event.NOTE
�zSimply putting sealant and air into the tyreusing the tyre repair kit does not seal thepuncture hole. Air will leak through thepuncture hole until the emergency repair pro-cedure is completed (through step 19 or step20 of these instructions).CAUTION
CAUTION�zDo not affix the sticker anywhere except thespecified position on the pad of the steeringwheel. Affixing the sticker in an incorrectposition could prevent the SRS airbag fromworking normally.
BK0203201EN.book 12 ページ 2013年11月19日 火曜日 午前11時50分
Page 324 of 388
Tyre repair kit
For emergencies 9-13
9
18. When you have inflated the tyre to the
specified pressure, stow the compressor,bottle, and other items in the vehicle andpromptly start driving the vehicle so thatthe tyre sealant can spread evenly in thetyre. Drive with great care. Do not exceeda speed of 80 km/h. Observe local speedlimits.
19. After driving for 10 minutes or 5 km,
check the tyre pressure using the air pres-sure gauge on the compressor. If the tyrepressure has apparently not dropped, theemergency repair procedure is complete.Continue the process from step 21.If the tyre pressure is not sufficient, inflatethe tyre to the specified pressure againand drive the vehicle carefully withoutexceeding a speed of 80 km/h.
20. After driving for 10 minutes or 5 km,
check the tyre pressure using the air pres-sure gauge on the compressor. If the tyrepressure has apparently not dropped, theemergency repair procedure is complete.You must still not exceed a speed of 80km/h. Observe local speed limits.
CAUTION�zIf you sense any abnormality while driving,stop the vehicle and contact a MITSUBISHIMOTORS Authorised Service Point oranother specialist. Otherwise the tyre pres-sure may drop before the emergency repairprocedure is completed, rendering the vehi-cle unsafe.NOTE
�zDriving faster than 80 km/h can make thevehicle vibrate.
CAUTION�zIf the tyre pressure is lower than the mini-mum permitted pressure (1.3 bar {130 kPa}),the tyre cannot successf
ully be repaired with
the tyre sealant. Do not drive the vehicle anyfurther. Contact a MITSUBISHI MOTORSAuthorised Service Point or another special-ist.
NOTE
�zIf the tyre pressure has dropped below thespecified level when you check it at the endof the repair procedure, do not drive thevehicle any further. Contact a MITSUBISHIMOTORS Authorised Service Point oranother specialist.�zIn cold conditions (w
hen the ambient tem-
perature is 0 °C or lower), the time and driv-ing distance necessary until completion ofthe repair can be longer than in warmer con-ditions, meaning that the tyre pressure candrop below the specified level even whenyou have inflated the tyre a second time andsubsequently driven th
e vehicle. If this hap-
pens, inflate the tyre to the specified pressureonce more, drive for about 10 minutes or 5km, then check the tyre pressure again. If thetyre pressure has ag
ain dropped below the
specified level, stop dr
iving the vehicle and
contact a MITSUBISHI MOTORS Author-ised Service Point or another specialist.
BK0203201EN.book 13 ページ 2013年11月19日 火曜日 午前11時50分
Page 325 of 388
How to change a tyre9-14 For emergencies
9
21. Immediately drive with great care to a
MITSUBISHI MOTORS Authorised Ser-vice Point or another specialist and havetyre repair/replacement performed.
E00801203924
Before changing a tyre, first stop your vehiclein a safe, flat location.1. Park the vehicle on level and stableground, free of loose pebbles, etc.2. Set the parking brake firmly.3. Put the select position in “P” (PARK)position and stop the Plug-in Hybrid EVsystem.4. Have all your passengers get out of thevehicle.
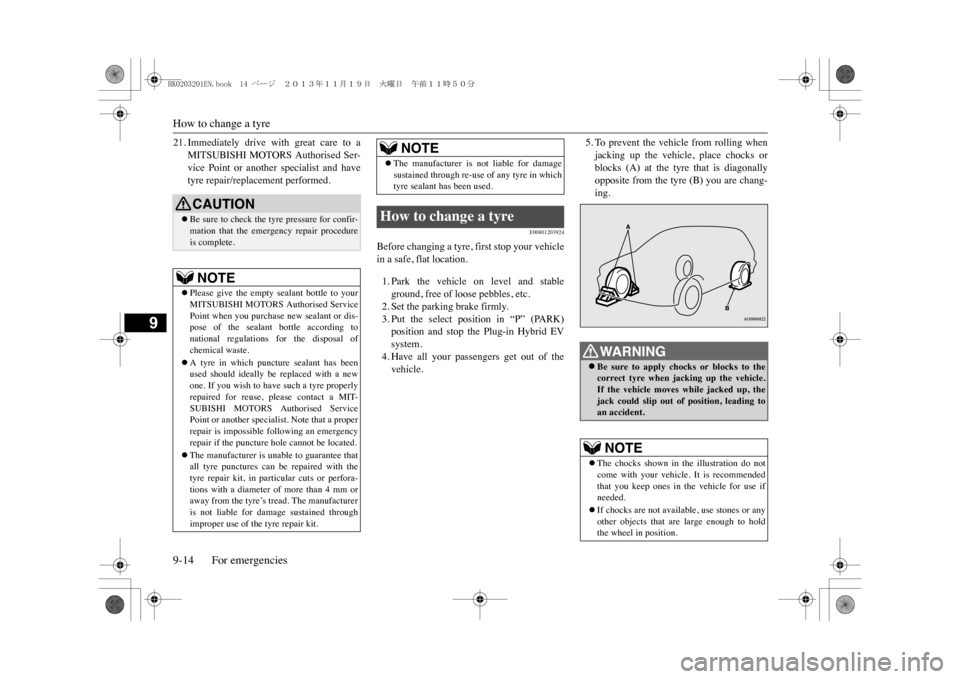
5. To prevent the vehicle from rolling whenjacking up the vehicle, place chocks orblocks (A) at the tyre that is diagonallyopposite from the tyre (B) you are chang-ing.
CAUTION�zBe sure to check the tyre pressure for confir-mation that the emergency repair procedureis complete.NOTE
�zPlease give the empty sealant bottle to yourMITSUBISHI MOTORS Authorised ServicePoint when you purchase new sealant or dis-pose of the sealant bottle according tonational regulations for the disposal ofchemical waste.�zA tyre in which puncture sealant has beenused should ideally be
replaced with a new
one. If you wish to have
such a tyre properly
repaired for reuse, please contact a MIT-SUBISHI MOTORS Authorised ServicePoint or another specialist. Note that a properrepair is impossible fo
llowing an emergency
repair if the puncture hole cannot be located.�zThe manufacturer is unable to guarantee thatall tyre punctures can be repaired with thetyre repair kit, in particular cuts or perfora-tions with a diameter
of more than 4 mm or
away from the tyre’s tread. The manufactureris not liable for damage sustained throughimproper use of the tyre repair kit.
�zThe manufacturer is not liable for damagesustained through re-use of any tyre in whichtyre sealant has been used.
How to change a tyre
NOTE
WA R N I N G�zBe sure to apply choc
ks or blocks to the
correct tyre when jacking up the vehicle.If the vehicle moves while jacked up, thejack could slip out of
position, leading to
an accident.NOTE
�zThe chocks shown in the illustration do notcome with your vehicle. It is recommendedthat you keep ones in the vehicle for use ifneeded.�zIf chocks are not available, use stones or anyother objects that are large enough to holdthe wheel in position.
BK0203201EN.book 14 ページ 2013年11月19日 火曜日 午前11時50分
Page 326 of 388
How to change a tyre
For emergencies 9-15
9
6. Get the jack, jack bar and wheel nutwrench ready.Refer to “Tools and jack” on page 9-6.
E00803201894
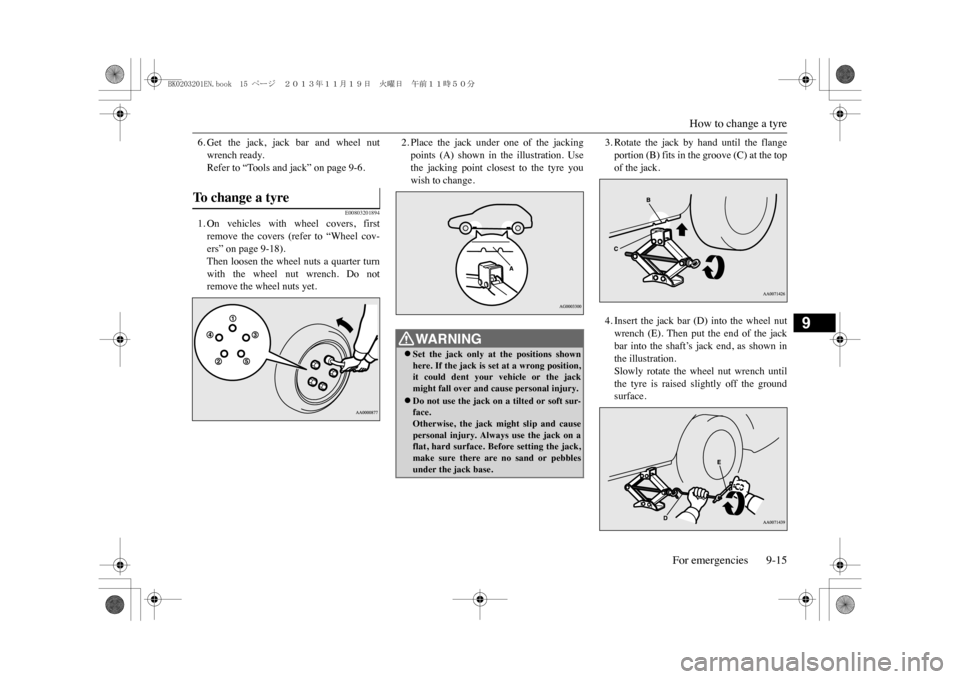
1. On vehicles with wheel covers, firstremove the covers (refer to “Wheel cov-ers” on page 9-18).Then loosen the wheel nuts a quarter turnwith the wheel nut wrench. Do notremove the wheel nuts yet.
2. Place the jack under one of the jackingpoints (A) shown in the illustration. Usethe jacking point closest to the tyre youwish to change.
3. Rotate the jack by hand until the flangeportion (B) fits in the groove (C) at the topof the jack.4. Insert the jack bar (D) into the wheel nutwrench (E). Then put the end of the jackbar into the shaft’s jack end, as shown inthe illustration.Slowly rotate the wheel nut wrench untilthe tyre is raised slightly off the groundsurface.
To c h a n g e a t y r e
WA R N I N G�zSet the jack only at the positions shownhere. If the jack is set at a wrong position,it could dent your vehicle or the jackmight fall over and cause personal injury.�zDo not use the jack on a tilted or soft sur-face.Otherwise, the jack might slip and causepersonal injury. Always use the jack on aflat, hard surface. Before setting the jack,make sure there are no sand or pebblesunder the jack base.
BK0203201EN.book 15 ページ 2013年11月19日 火曜日 午前11時50分
Page 327 of 388
How to change a tyre9-16 For emergencies
9
5. Remove the wheel nuts with the wheel nutwrench, then take the wheel off.
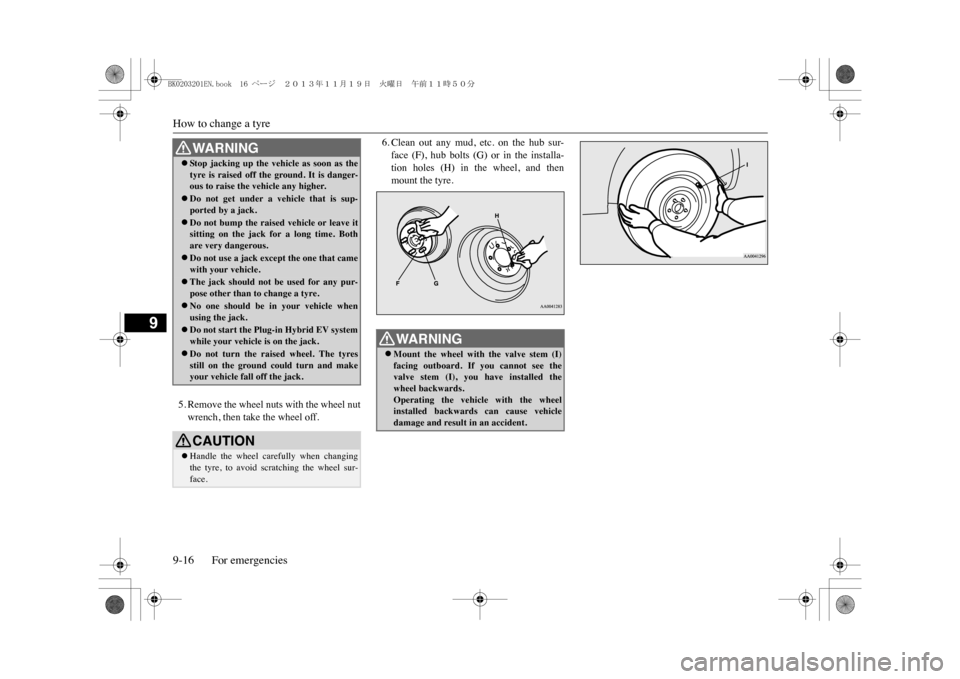
6. Clean out any mud, etc. on the hub sur-face (F), hub bolts (G) or in the installa-tion holes (H) in the wheel, and thenmount the tyre.
WA R N I N G�zSt o p j a c k i n g u p th e v e h i
cle as soon as the
tyre is raised off the ground. It is danger-ous to raise the vehicle any higher.�zDo not get under a vehicle that is sup-ported by a jack.�zDo not bump the raised vehicle or leave itsitting on the jack for a long time. Bothare very dangerous.�zDo not use a jack except the one that camewith your vehicle.�zThe jack should not be used for any pur-pose other than to change a tyre.�zNo one should be in your vehicle whenusing the jack.�zDo not start the Plug-in Hybrid EV systemwhile your vehicle is on the jack.�zDo not turn the raised wheel. The tyresstill on the ground could turn and makeyour vehicle fall off the jack.CAUTION�zHandle the wheel carefully when changingthe tyre, to avoid scratching the wheel sur-face.
WA R N I N G�zMount the wheel with the valve stem (I)facing outboard. If you cannot see thevalve stem (I), you have installed thewheel backwards.Operating the vehicle with the wheelinstalled backwards can cause vehicledamage and result in an accident.
BK0203201EN.book 16 ページ 2013年11月19日 火曜日 午前11時50分
Page 328 of 388
![MITSUBISHI OUTLANDER SPORT 2014 3.G Owners Manual How to change a tyre
For emergencies 9-17
9
7. Turn the wheel nuts clockwise by hand toinitially tighten them.[Type 1: On vehicles with steel wheels]Te m p o r a r i l y t i g h t e n t h e w h MITSUBISHI OUTLANDER SPORT 2014 3.G Owners Manual How to change a tyre
For emergencies 9-17
9
7. Turn the wheel nuts clockwise by hand toinitially tighten them.[Type 1: On vehicles with steel wheels]Te m p o r a r i l y t i g h t e n t h e w h](/img/19/7545/w960_7545-327.png)
How to change a tyre
For emergencies 9-17
9
7. Turn the wheel nuts clockwise by hand toinitially tighten them.[Type 1: On vehicles with steel wheels]Te m p o r a r i l y t i g h t e n t h e w h e e l n u t s b yhand until the tapered parts of the wheelnuts make light contact with the seats ofthe wheel holes and the wheel is notloose.[Type 2: On vehicles with aluminiumwheels]Te m p o r a r i l y t i g h t e n t h e w h e e l n u t s b yhand until the flange parts of the wheelnuts make light contact with the wheeland the wheel is not loose.
8. Lower the vehicle slowly by rotating thewheel nut wrench anticlockwise until thetyre touches the ground.
9. Tighten the nuts in the order shown in theillustration until each nut has been tight-ened to the torque listed here.Tightening torque 88 to 108 N•m
10. On vehicles with wheel covers, install the
covers (refer to “Wheel covers” on page9-18).
11. Lower and remove the jack, then store the
jack, flat tyre, and chocks. Have yourdamaged tyre repaired as soon as possi-ble.
CAUTION�zNever apply oil to either the wheel bolts orthe nuts or they will tighten too much.
Ty p e 1Ty p e 2
NOTE
�zOn vehicles with aluminium wheels, if all 4aluminium wheels are changed to steelwheels. e. g. when fitting winter tyres, usetapered nuts.
CAUTION�zNever use your foot or
a pipe extension for
extra force in the wheel nut wrench. If youdo so, you will tighten the nut too much.
BK0203201EN.book 17 ページ 2013年11月19日 火曜日 午前11時50分
Page 329 of 388
How to change a tyre9-18 For emergencies
9
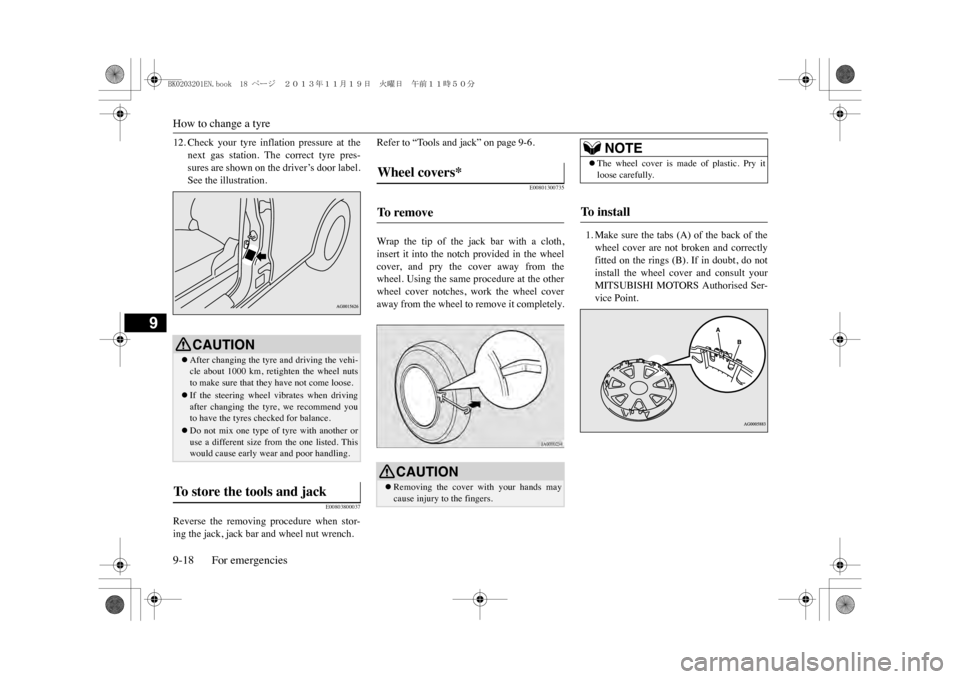
12. Check your tyre inflation pressure at the
next gas station. The correct tyre pres-sures are shown on the driver’s door label.See the illustration.
E00803800037
Reverse the removing procedure when stor-ing the jack, jack bar and wheel nut wrench.
Refer to “Tools and jack” on page 9-6.
E00801300735
Wrap the tip of the jack bar with a cloth,insert it into the notch provided in the wheelcover, and pry the cover away from thewheel. Using the same procedure at the otherwheel cover notches, work the wheel coveraway from the wheel to remove it completely.
1. Make sure the tabs (A) of the back of thewheel cover are not broken and correctlyfitted on the rings (B). If in doubt, do notinstall the wheel cover and consult yourMITSUBISHI MOTORS Authorised Ser-vice Point.
CAUTION�zAfter changing the tyre and driving the vehi-cle about 1000 km, reti
ghten the wheel nuts
to make sure that they have not come loose.�zIf the steering wheel vibrates when drivingafter changing the tyre, we recommend youto have the tyres checked for balance.�zDo not mix one type of
tyre with another or
use a different size from the one listed. Thiswould cause early wear and poor handling.
To s t o r e t h e t o o l s a n d j a c k
Wheel covers* To r e m o v e
CAUTION�zRemoving the cover with your hands maycause injury to the fingers.
NOTE
�zThe wheel cover is made of plastic. Pry itloose carefully.
To i n s t a l l
BK0203201EN.book 18 ページ 2013年11月19日 火曜日 午前11時50分
Page 330 of 388
Towing
For emergencies 9-19
9
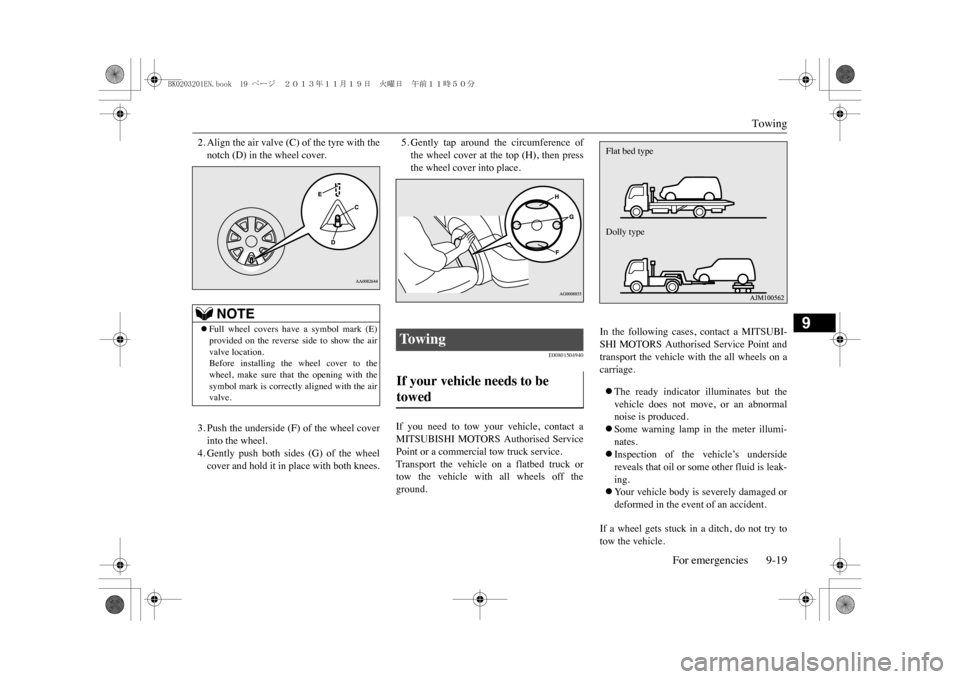
2. Align the air valve (C) of the tyre with thenotch (D) in the wheel cover.3. Push the underside (F) of the wheel coverinto the wheel.4. Gently push both sides (G) of the wheelcover and hold it in place with both knees.
5. Gently tap around the circumference ofthe wheel cover at the top (H), then pressthe wheel cover into place.
E00801504940
If you need to tow your vehicle, contact aMITSUBISHI MOTORS Authorised ServicePoint or a commercial tow truck service.Transport the vehicle on a flatbed truck ortow the vehicle with all wheels off theground.
In the following cases, contact a MITSUBI-SHI MOTORS Authorised Service Point andtransport the vehicle with the all wheels on acarriage.�zThe ready indicator illuminates but thevehicle does not move, or an abnormalnoise is produced.�zSome warning lamp in the meter illumi-nates.�zInspection of the vehicle’s undersidereveals that oil or some other fluid is leak-ing.�zYo u r v e h i c l e b o d y i s s e v e r e l y d a m a g e d o rdeformed in the event of an accident.
If a wheel gets stuck in a ditch, do not try totow the vehicle.
NOTE
�zFull wheel covers have a symbol mark (E)provided on the reverse side to show the airvalve location.Before installing the wheel cover to thewheel, make sure that the opening with thesymbol mark is correctly aligned with the airvalve.
To w i n g If your vehicle needs to be towed
Flat bed typeDolly type
BK0203201EN.book 19 ページ 2013年11月19日 火曜日 午前11時50分