MITSUBISHI SPYDER 1990 Service Repair Manual
Manufacturer: MITSUBISHI, Model Year: 1990, Model line: SPYDER, Model: MITSUBISHI SPYDER 1990Pages: 2103, PDF Size: 68.98 MB
Page 341 of 2103
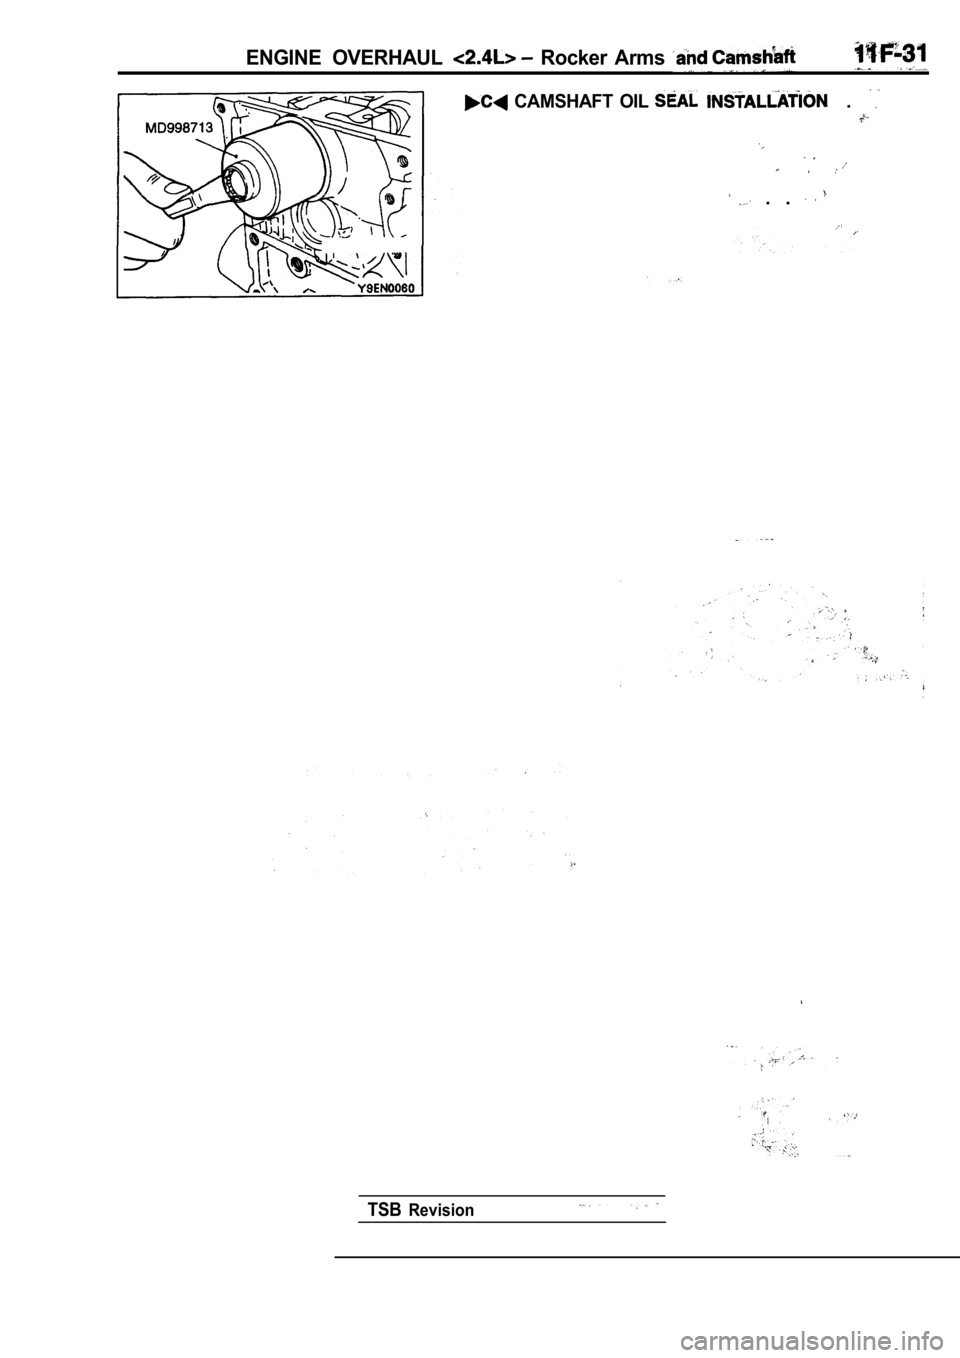
ENGINE OVERHAUL Rocker Arms
CAMSHAFT OIL .
. .
TSBRevision
Page 342 of 2103
ENGINE OVERHAUL Rocker Arms Camshaft
I
INSPECTION
CAMSHAFT.
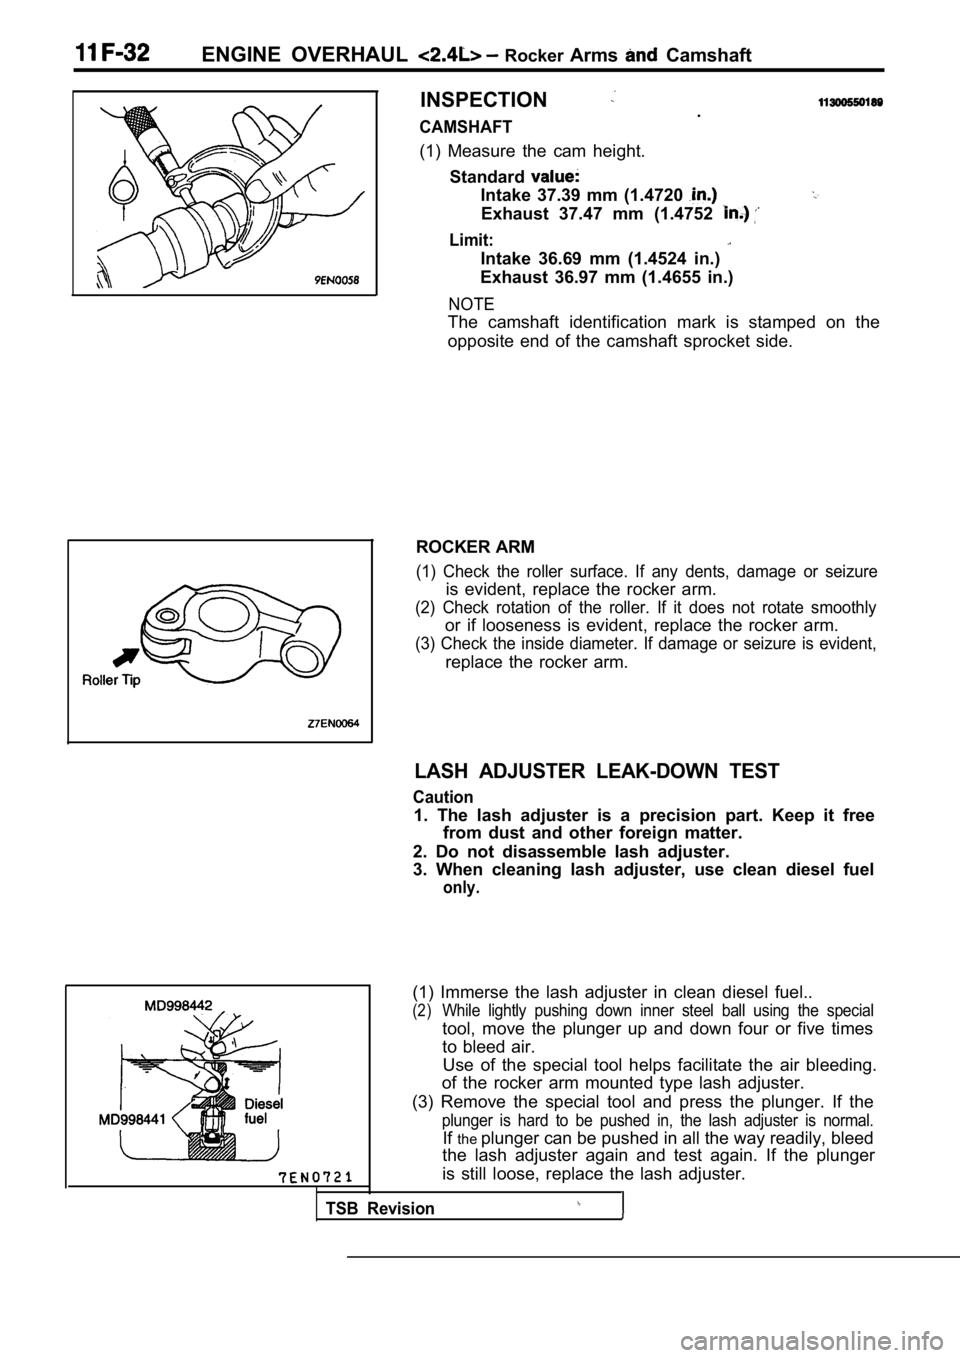
(1) Measure the cam height. Standard
Intake 37.39 mm (1.4720
Exhaust 37.47 mm (1.4752
Limit:
Intake 36.69 mm (1.4524 in.)
Exhaust 36.97 mm (1.4655 in.)
NOTE
The camshaft identification mark is stamped on the
opposite end of the camshaft sprocket side.
ROCKER ARM
(1) Check the roller surface. If any dents, damage or seizure
is evident, replace the rocker arm.
(2) Check rotation of the roller. If it does not rotate smoothly
or if looseness is evident, replace the rocker arm.
(3) Check the inside diameter. If damage or seizure is evident,
replace the rocker arm.
LASH ADJUSTER LEAK-DOWN TEST
Caution
1. The lash adjuster is a precision part. Keep it f ree
from dust and other foreign matter.
2. Do not disassemble lash adjuster.
3. When cleaning lash adjuster, use clean diesel fu el
only.
Use of the special tool helps facilitate the air bleeding.
of the rocker arm mounted type lash adjuster.
(3) Remove the special tool and press the plunger. If the
plunger is hard to be pushed in, the lash adjuster is normal.
Ifthe plunger can be pushed in all the way readily, bleed
the lash adjuster again and test again. If the plun ger
is still loose, replace the lash adjuster.
TSB Revision
(1) Immerse the lash adjuster in clean diesel fuel. .
(2)While lightly pushing down inner steel ball using t he special
tool, move the plunger up and down four or five tim es
to bleed air.
Page 343 of 2103
ENGINE OVERHAUL Rocker and Camshaft
Caution
Upon completion of air bleeding’
upright to prevent inside’ diesel
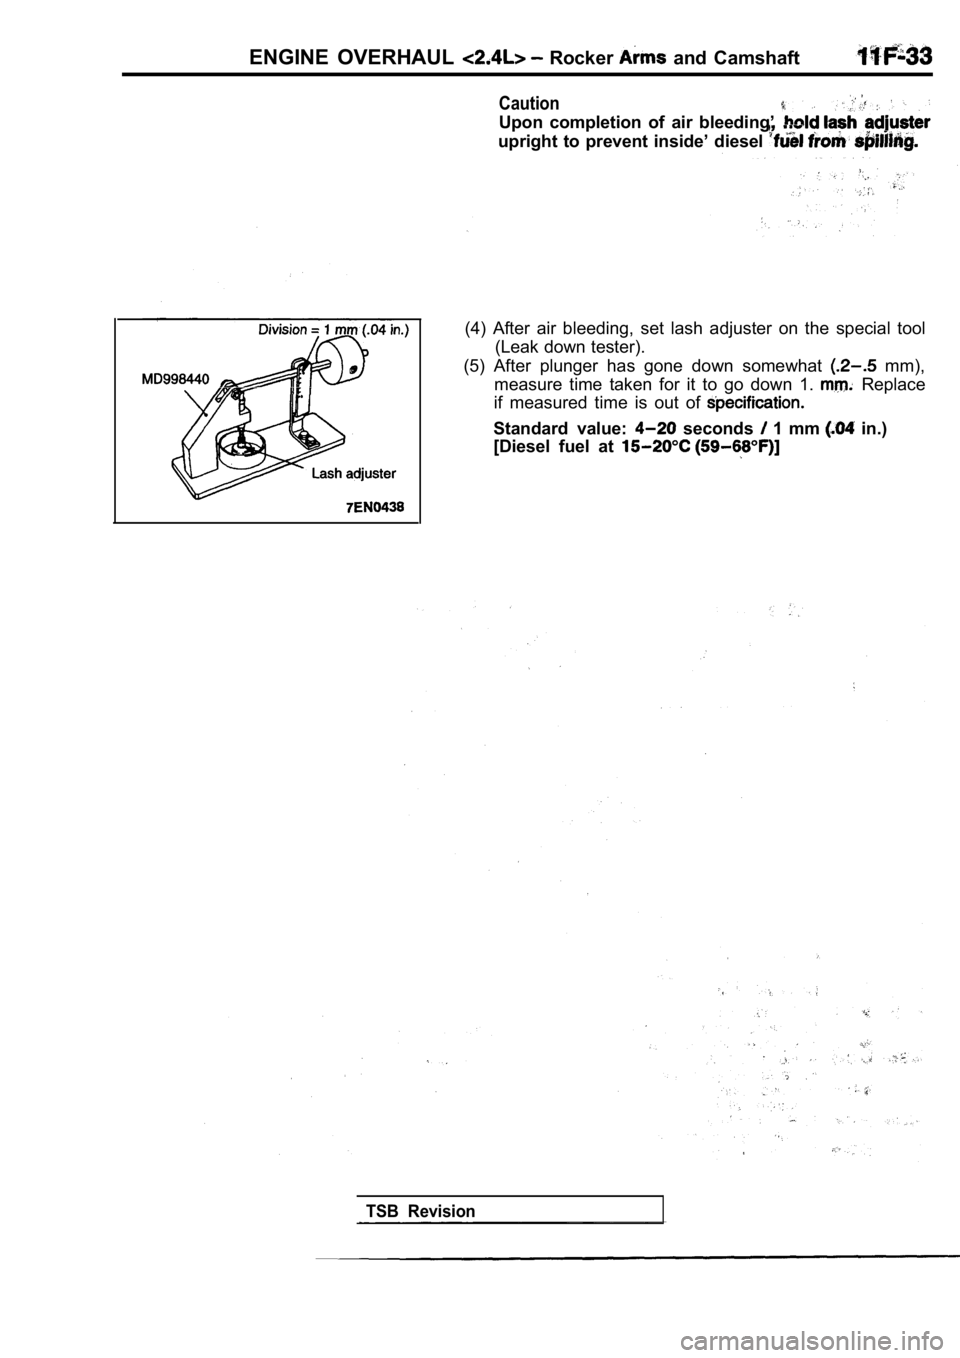
(4) After air bleeding, set lash adjuster on the special tool
(Leak down tester).
(5) After plunger has gone down somewhat
mm),
measure time taken for it to go down 1.
Replace
if measured time is out of
Standard value: seconds 1 mm in.)
[Diesel fuel at
TSB Revision
Page 344 of 2103
11ENGINE OVERHAUL Cylinder Head
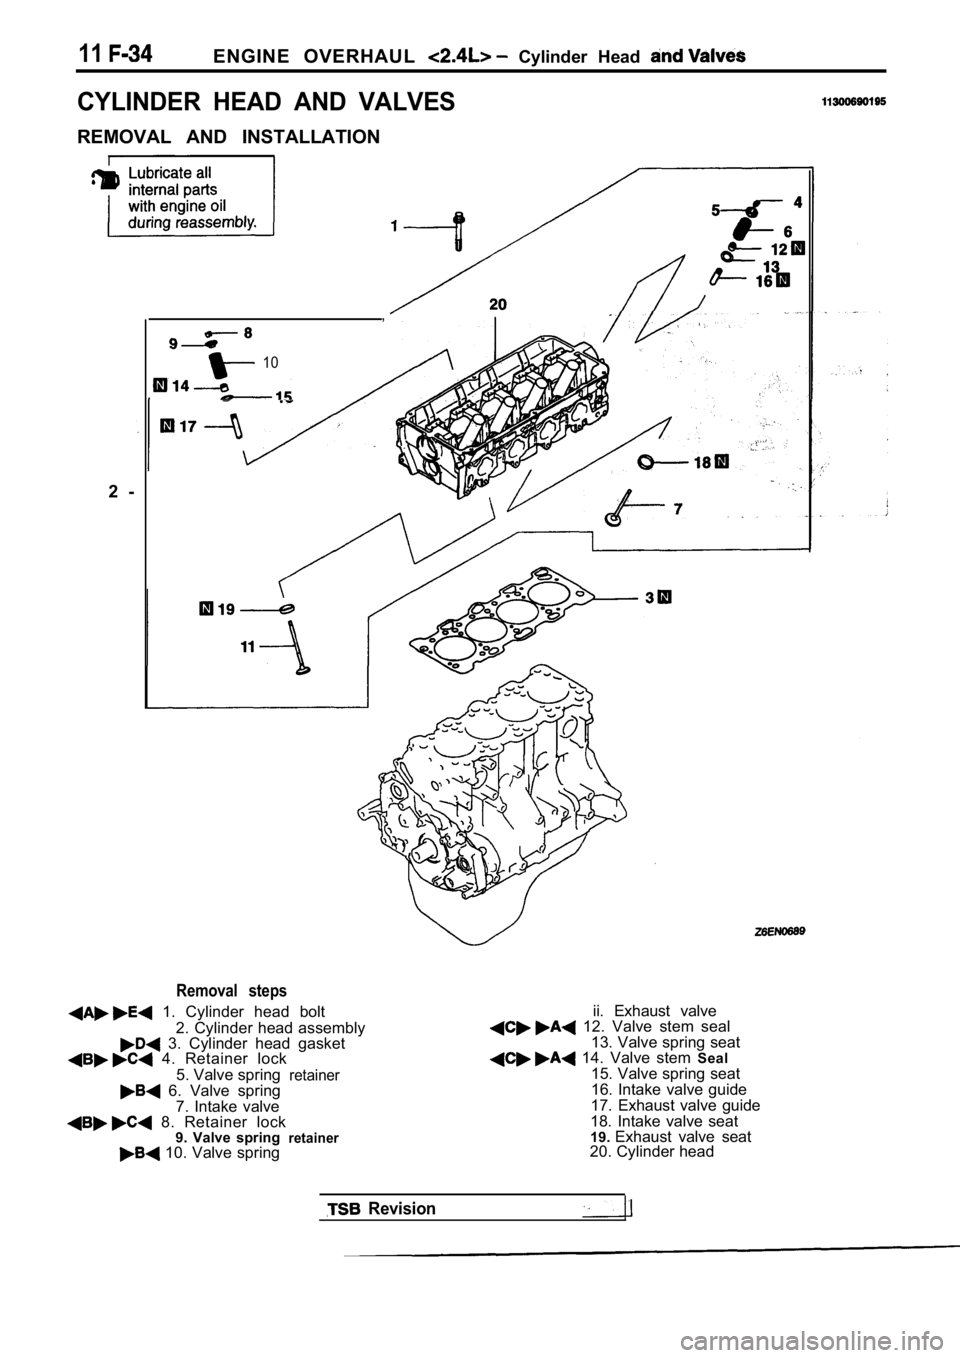
CYLINDER HEAD AND VALVES
REMOVAL AND INSTALLATION2 - ,
10
Removal steps
1. Cylinder head bolt
2. Cylinder head assembly
3. Cylinder head gasket 4. Retainer lock5. Valve spring
retainer 6. Valve spring7. Intake valve
8. Retainer lock 9. Valve springretainer 10. Valve spring ii. Exhaust valve
12. Valve stem seal
13. Valve spring seat
14. Valve stem Seal
15. Valve spring seat
16. Intake valve guide
17. Exhaust valve guide
18. Intake valve seat
19. Exhaust valve seat
20. Cylinder head
Revision
Page 345 of 2103
E N G I N E O V E R H A U L Cylinder Head and Valves
color
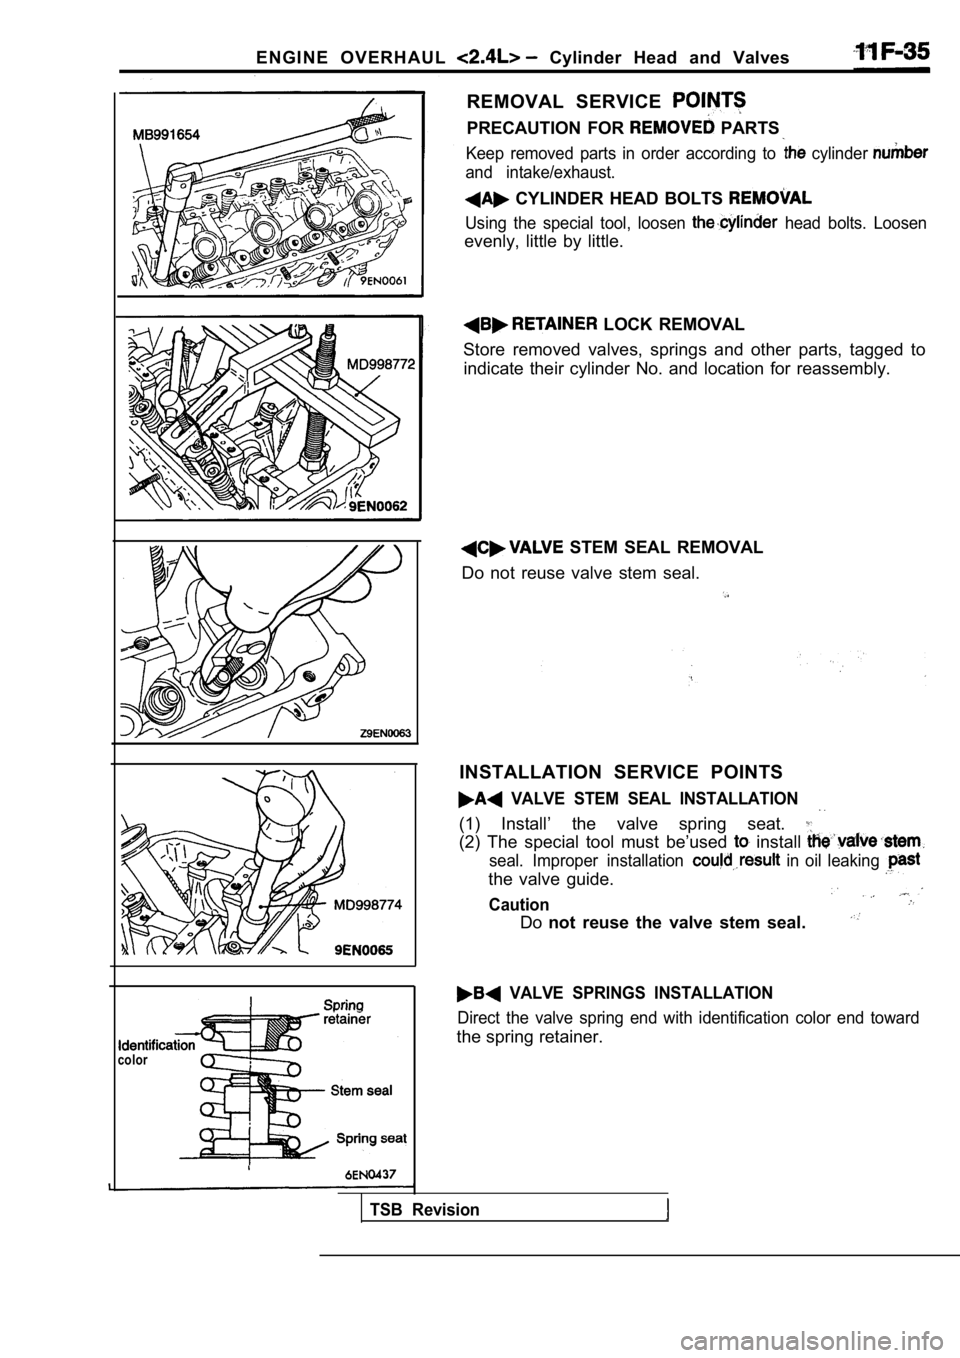
REMOVAL SERVICE
PRECAUTION FOR PARTS
Keep removed parts in order according to cylinder
and intake/exhaust.
CYLINDER HEAD BOLTS
Using the special tool, loosen head bolts. Loosen
evenly, little by little.
LOCK REMOVAL
Store removed valves, springs and other parts, tagg ed to
indicate their cylinder No. and location for reasse mbly.
STEM SEAL REMOVAL
Do not reuse valve stem seal.
INSTALLATION SERVICE POINTS
VALVE STEM SEAL INSTALLATION
(1) Install’ the valve spring seat.
(2) The special tool must be’used install
seal. Improper installation in oil leaking
the valve guide.
Caution
Do not reuse the valve stem seal.
VALVE SPRINGS INSTALLATION
Direct the valve spring end with identification col or end toward
the spring retainer.
TSB Revision
Page 346 of 2103
ENGINE OVERHAUL Cylinder Head . .
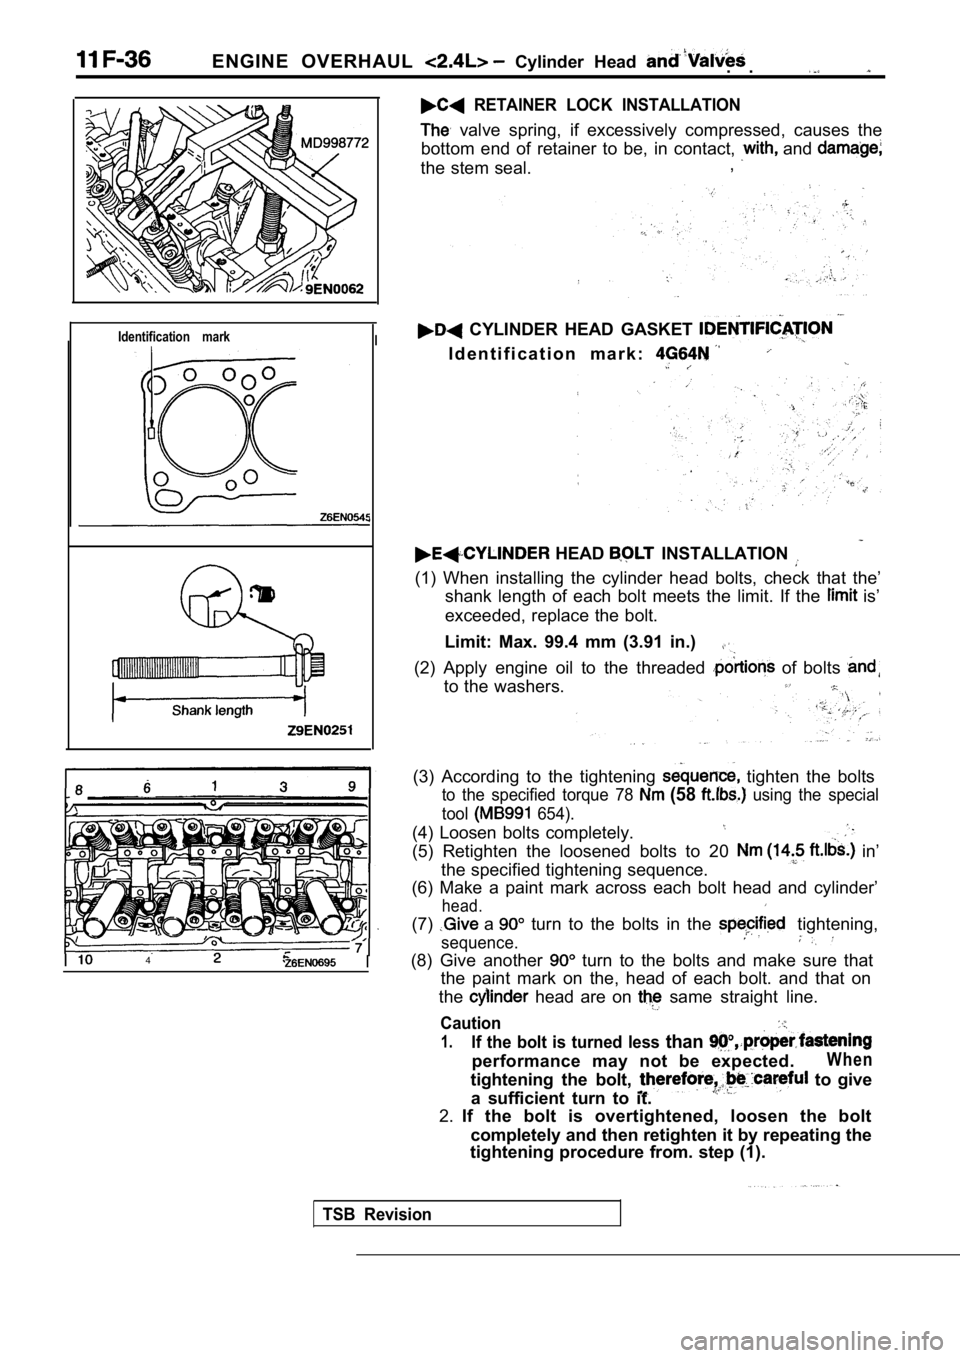
RETAINER LOCK INSTALLATION
valve spring, if excessively compressed, causes the
bottom end of retainer to be, in contact,
and
the stem seal. ,
Identification markI
I4
CYLINDER HEAD GASKET
I d e n t i f i c a t i o n m a r k :
HEAD INSTALLATION
(1) When installing the cylinder head bolts, check
that the’
shank length of each bolt meets the limit. If the
is’
exceeded, replace the bolt.
Limit: Max. 99.4 mm (3.91 in.)
(2) Apply engine oil to the threaded of bolts
to the washers.
(3) According to the tightening tighten the bolts
to the specified torque 78 (58 using the special
tool
654).
(4) Loosen bolts completely.
(5) Retighten the loosened bolts to 20 in’
the specified tightening sequence.
(6) Make a paint mark across each bolt head and cyl inder’
head.
(7) a turn to the bolts in the tightening,
sequence.
(8) Give another turn to the bolts and make sure that
the paint mark on the, head of each bolt. and that on
the
head are on same straight line.
Caution
1.If the bolt is turned less than
performance may not be expected.W h e n
tightening the bolt, to give
a sufficient turn to it.
2. If the bolt is overtightened, loosen the bolt
completely and then retighten it by repeating the
tightening procedure from. step (1).
TSB Revision
Page 347 of 2103
E N G I N E O V E R H A U L Cylinder Head and
Valve seatcontact
I
Free
height
INSPECTION
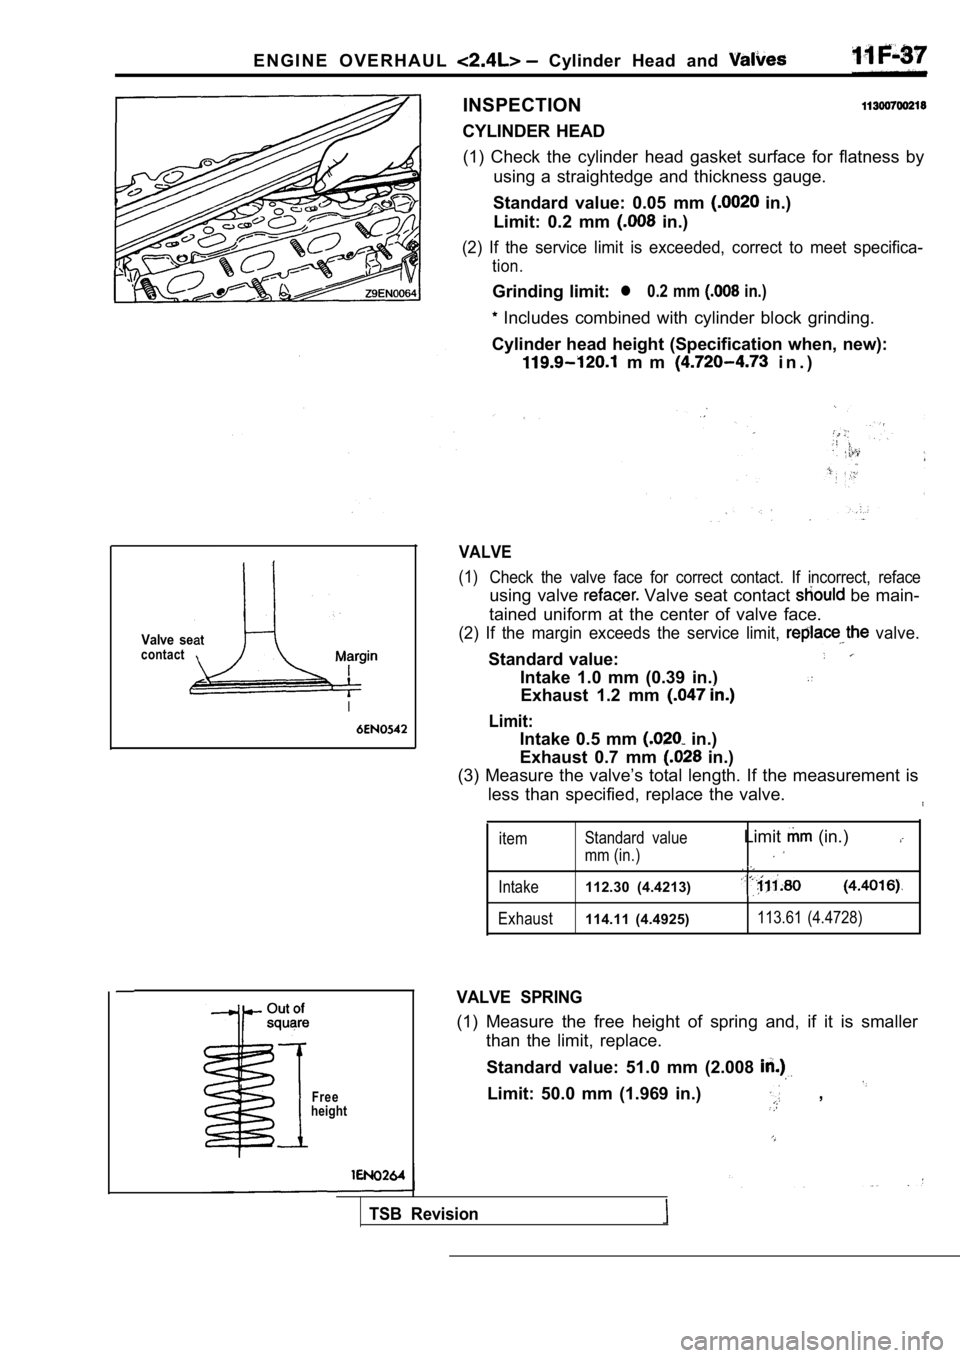
CYLINDER HEAD (1) Check the cylinder head gasket surface for flat ness by
using a straightedge and thickness gauge.
Standard value: 0.05 mm
in.)
Limit: 0.2 mm
in.)
(2) If the service limit is exceeded, correct to me et specifica-
tion.
Grinding limit:l 0.2 mm in.)
Includes combined with cylinder block grinding.
Cylinder head height (Specification when, new):
m m i n . )
VALVE
(1) Check the valve face for correct contact. If incorr ect, reface
using valve Valve seat contact be main-
tained uniform at the center of valve face.
(2) If the margin exceeds the service limit, valve.
Standard value:
Intake 1.0 mm (0.39 in.)
Exhaust 1.2 mm
Limit:
Intake 0.5 mm in.)
Exhaust 0.7 mm
in.)
(3) Measure the valve’s total length. If the measur ement is
less than specified, replace the valve.
item Standard value
mm (in.)
Limit (in.)
Intake112.30 (4.4213)
Exhaust114.11 (4.4925)113.61 (4.4728)
VALVE SPRING
(1) Measure the free height of spring and, if it is
smaller
than the limit, replace.
Standard value: 51.0 mm (2.008
Limit: 50.0 mm (1.969 in.) ,
TSB Revision
Page 348 of 2103
11E N G I N E O V E R H A U L Cylinder Head and
Stem O.D.Valve stem end
Valve stem
projection
Spring seating
surface
1 mm in.)
mm in.)
(2) Measure the squareness of the spring and, if th e limit
is exceeded, replace.
Standard value:
or less
Limit: Max.
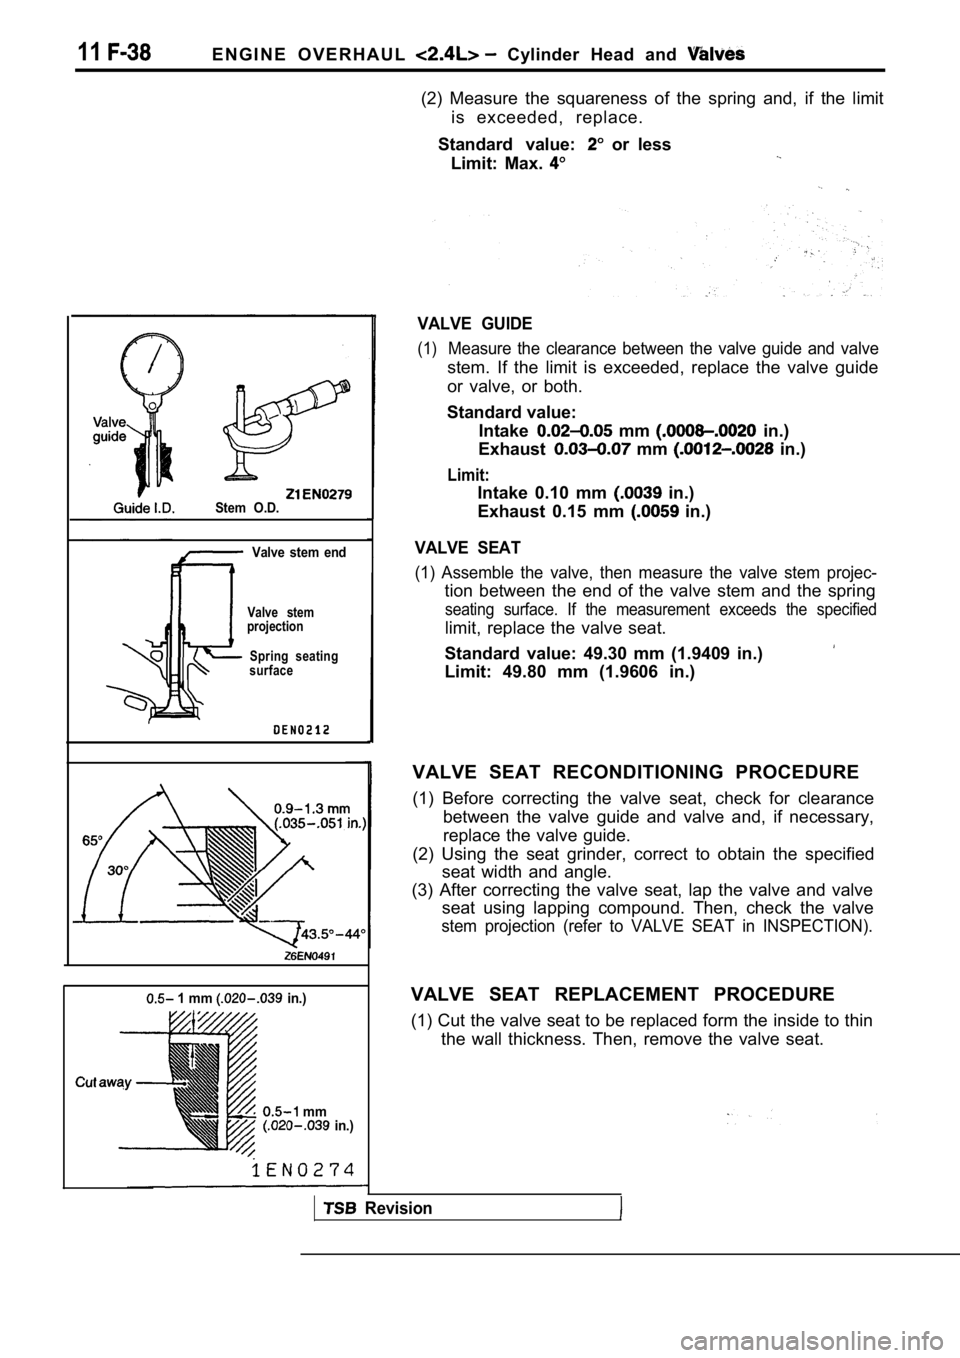
VALVE GUIDE
(1)Measure the clearance between the valve guide and v alve
stem. If the limit is exceeded, replace the valve guide
or valve, or both.
Standard value: Intake
mm in.)
Exhaust
mm in.)
Limit:
Intake 0.10 mm in.)
Exhaust 0.15 mm
in.)
VALVE SEAT
(1) Assemble the valve, then measure the valve stem projec-
tion between the end of the valve stem and the spring
seating surface. If the measurement exceeds the spe cified
limit, replace the valve seat.
Standard value: 49.30 mm (1.9409 in.)
Limit: 49.80 mm (1.9606 in.)
VALVE SEAT RECONDITIONING PROCEDURE
(1) Before correcting the valve seat, check for cle arance
between the valve guide and valve and, if necessary ,
replace the valve guide.
(2) Using the seat grinder, correct to obtain the s pecified
seat width and angle.
(3) After correcting the valve seat, lap the valve and valve
seat using lapping compound. Then, check the valve
stem projection (refer to VALVE SEAT in INSPECTION) .
VALVE SEAT REPLACEMENT PROCEDURE
(1) Cut the valve seat to be replaced form the inside to thin
the wall thickness. Then, remove the valve seat.
Revision
Page 349 of 2103
ENGINE OVERHAUL Cylinder Head and Valves
Removalinstallation
Press
A
Press
A
Push rod
Valve
guide Push rod
Valve
guide
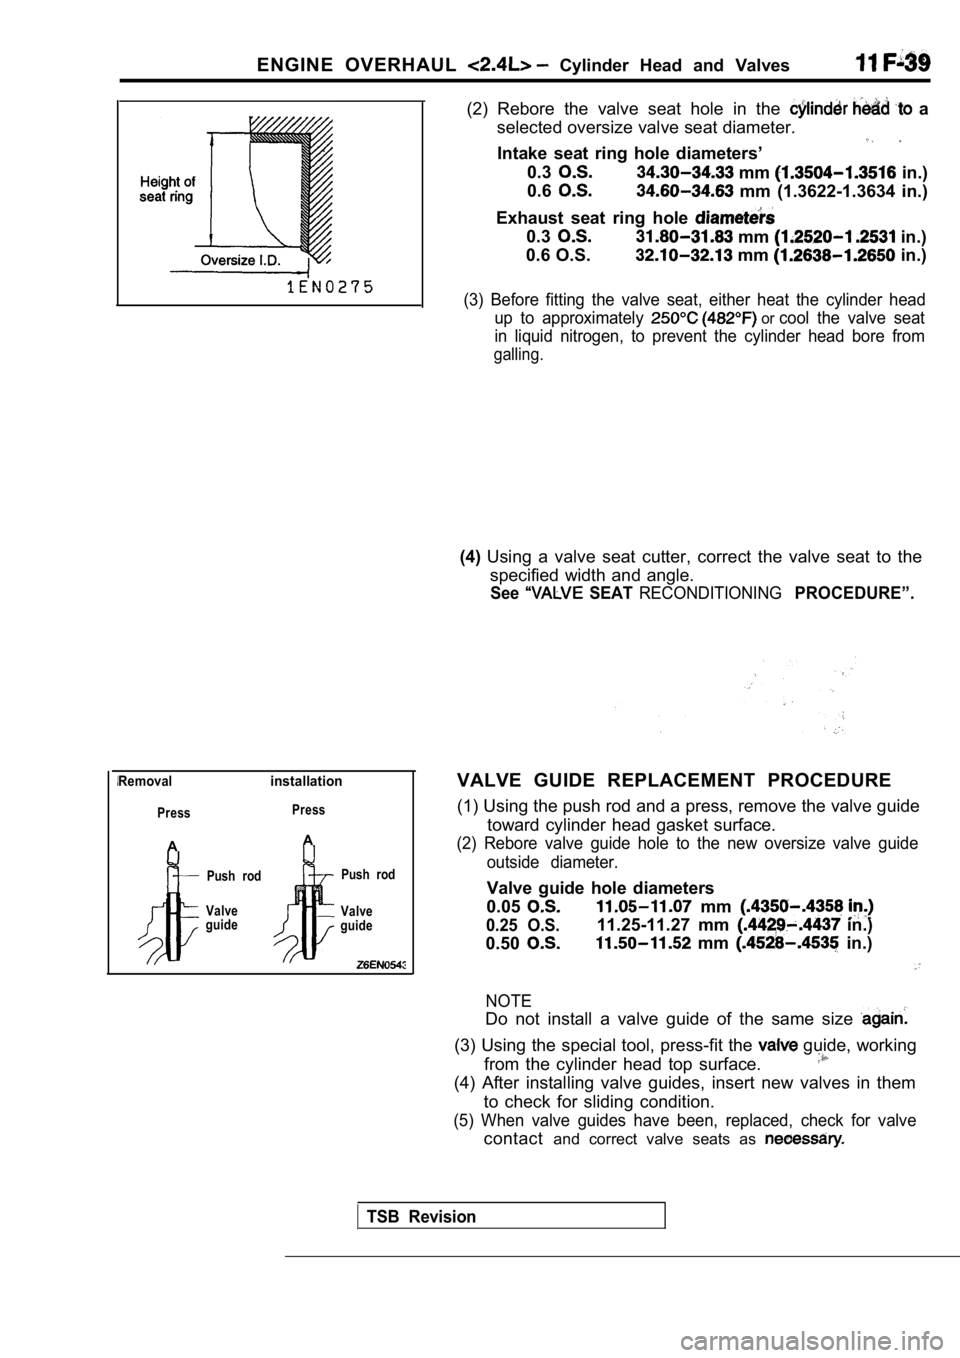
(2) Rebore the valve seat hole in the a
selected oversize valve seat diameter.
Intake seat ring hole diameters’
0.3 mm in.)
0.6
mm (1.3622-1.3634 in.)
Exhaust seat ring hole
0.3 mm in.)
0.6 O.S.
mm in.)
(3) Before fitting the valve seat, either heat the cylinder head
up to approximately
or cool the valve seat
in liquid nitrogen, to prevent the cylinder head bo re from
galling.
(4)Using a valve seat cutter, correct the valve seat t o the
specified width and angle.
See SEAT RECONDITIONINGPROCEDURE”.
VALVE GUIDE REPLACEMENT PROCEDURE
(1) Using the push rod and a press, remove the valv e guide
toward cylinder head gasket surface.
(2) Rebore valve guide hole to the new oversize val ve guide
outside diameter.
Valve guide hole diameters
0.05
0.25 O.S.
mm
0.50
11.25-11.27 mm in.)
mm in.)
NOTE
Do not install a valve guide of the same size
(3) Using the special tool, press-fit the guide, working
from the cylinder head top surface.
(4) After installing valve guides, insert new valve s in them
to check for sliding condition.
(5) When valve guides have been, replaced, check fo r valve
contactand correct valve seats as
TSB Revision
Page 350 of 2103
Front Case, ENGINE OVERHAUL Shaft and
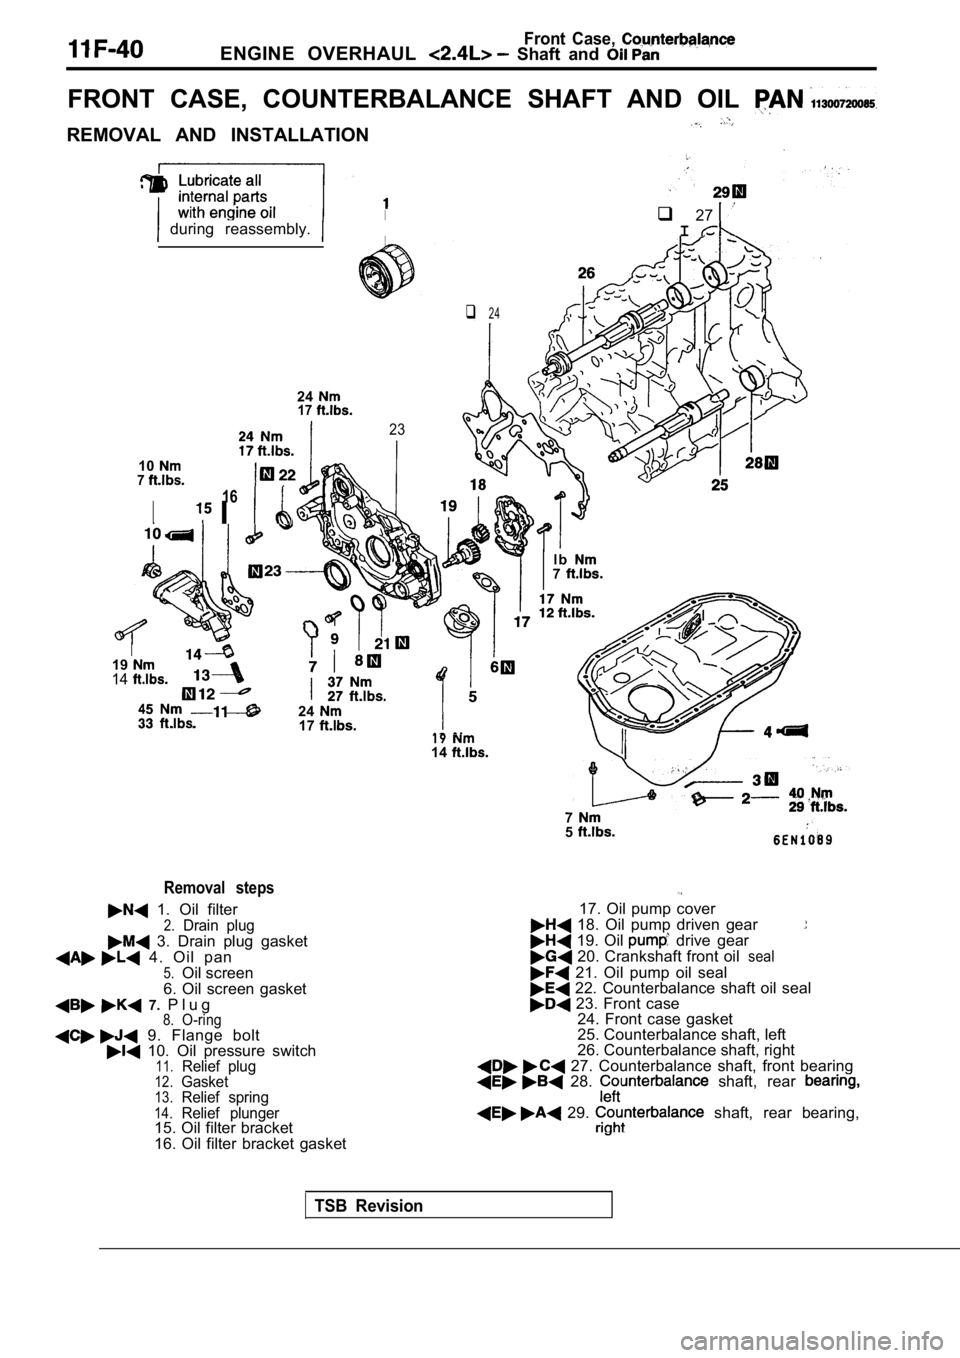
FRONT CASE, COUNTERBALANCE SHAFT AND OIL
REMOVAL AND INSTALLATION
q 27 during reassembly.
2417
107
23
q 24
I
16
I
I1914
24. .
17
Removal steps
1. Oil filter2.Drain plug 3. Drain plug gasket 4. Oil pan5.Oil screen
6. Oil screen gasket
7. P l u g8.O-ring 9. Flange bolt 10. Oil pressure switch11.Relief plug12.Gasket13.Relief spring14.Relief plunger15. Oil filter bracket
16. Oil filter bracket gasket 19
14
I
l b7
75
17. Oil pump cover 18. Oil pump driven gear 19. Oil drive gear 20. Crankshaft front oilseal
21. Oil pump oil seal 22. Counterbalance shaft oil seal 23. Front case
24. Front case gasket
25. Counterbalance shaft, left
26. Counterbalance shaft, right
27. Counterbalance shaft, front bearing 28. shaft, rear
29. shaft, rear bearing,
TSB Revision