MITSUBISHI SPYDER 1990 Service Repair Manual
Manufacturer: MITSUBISHI, Model Year: 1990, Model line: SPYDER, Model: MITSUBISHI SPYDER 1990Pages: 2103, PDF Size: 68.98 MB
Page 861 of 2103
MANUAL TRANSAXLE
ENGINE (TURBO) AND ENGINE>
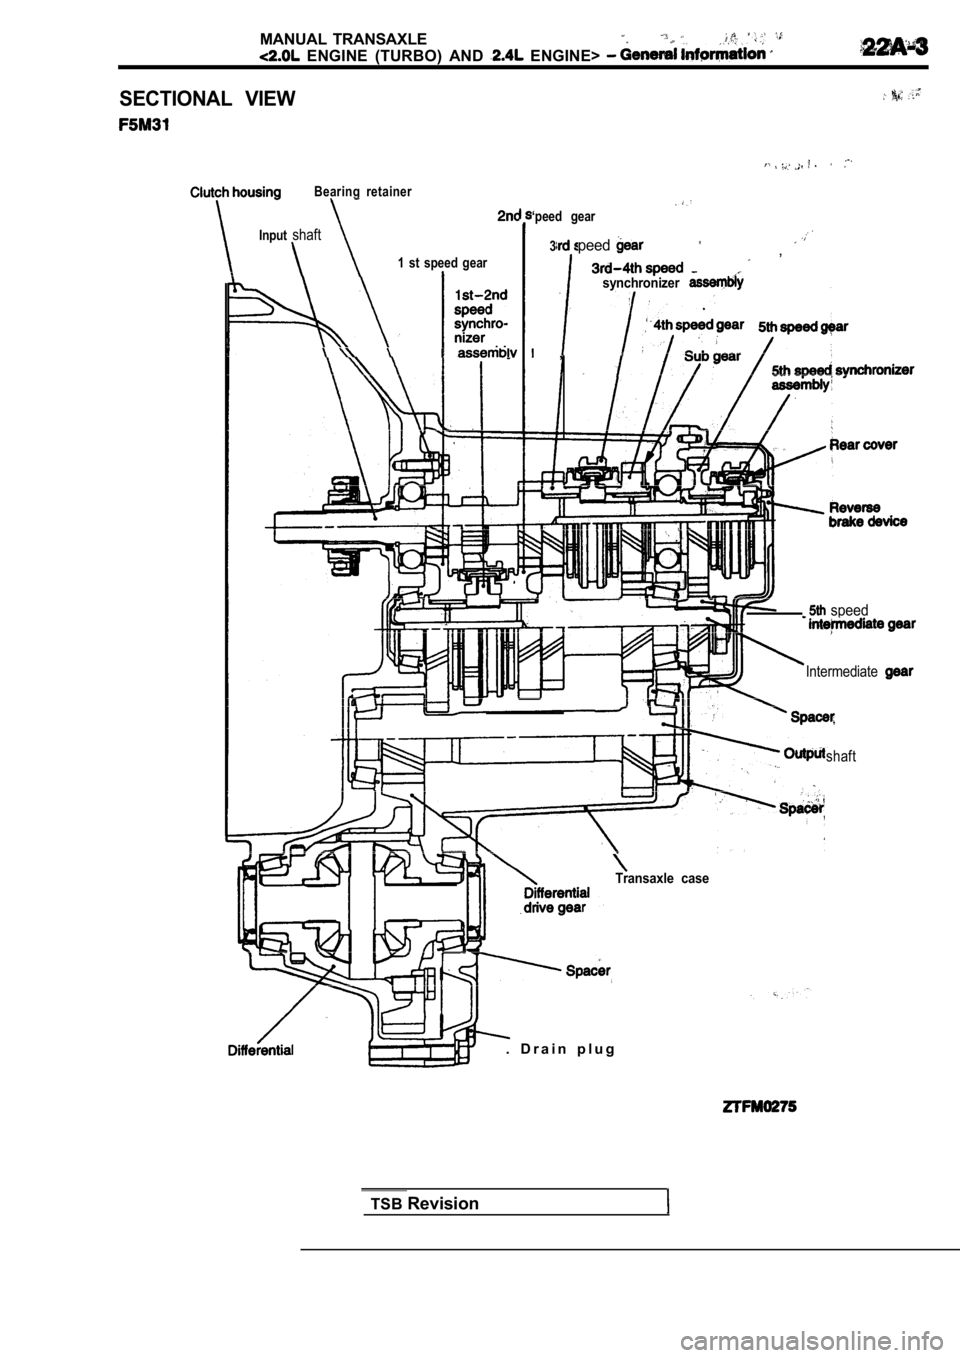
SECTIONAL VIEW
Bearing retainer
Inputshaft
1 st speed gear
‘peed gear
3peed,
synchronizer
,
speed
Intermediate
Transaxle case
. D r a i n p l u g
TSB Revision
shaft
Page 862 of 2103
MANUAL
E N G I N E
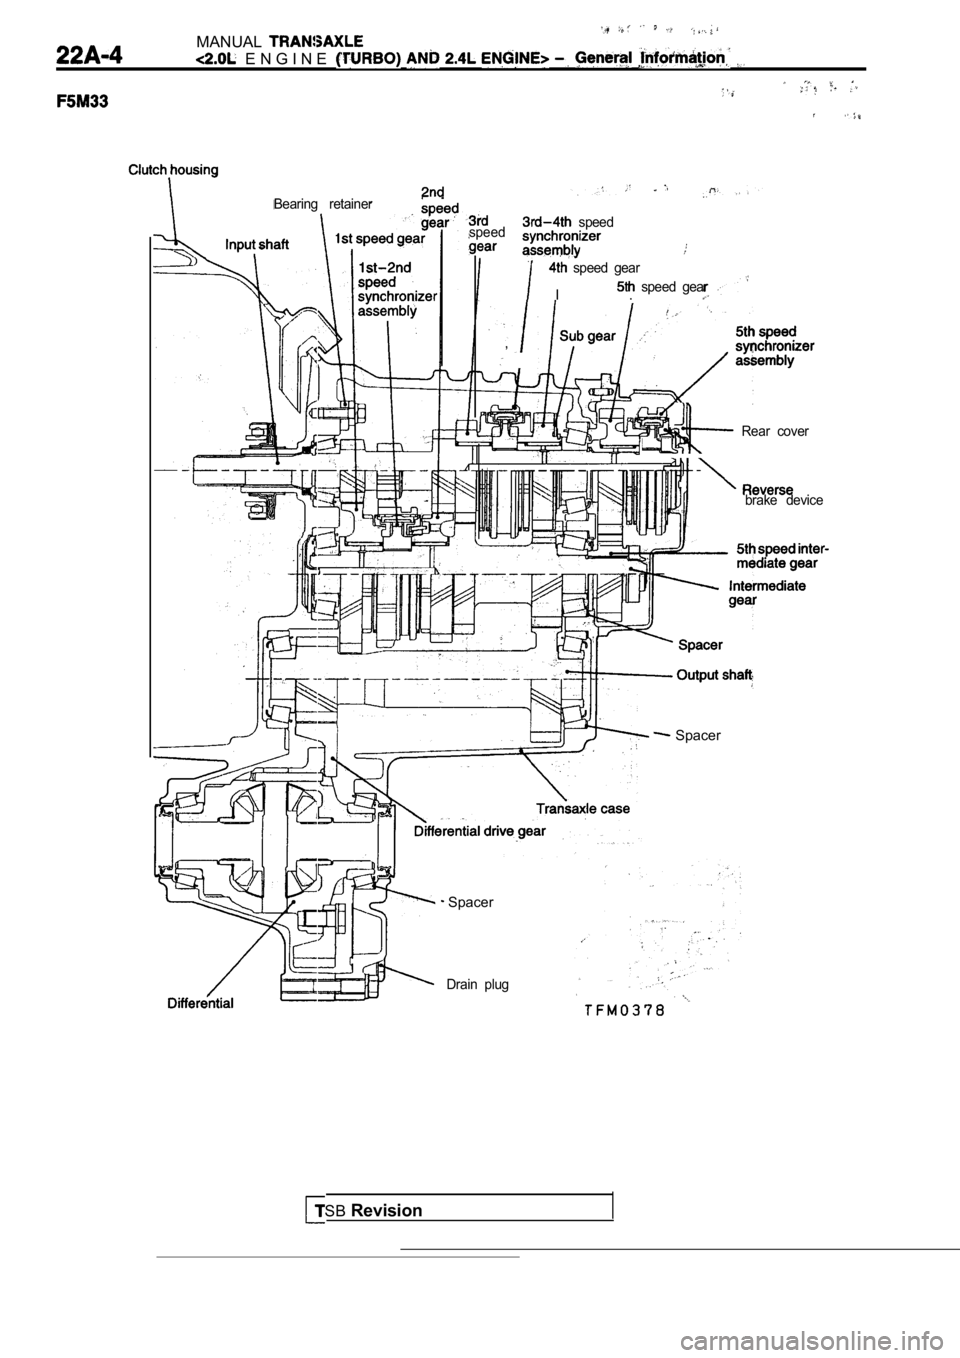
speed
Bearing retainer
speed
speed gear
I . speed gear
, ,
Rear cover
TSBRevision
brake device
Spacer
Spacer
Drain plug
Page 863 of 2103
MANUAL TRANSAXLE
ENGINE (TURBO) Information
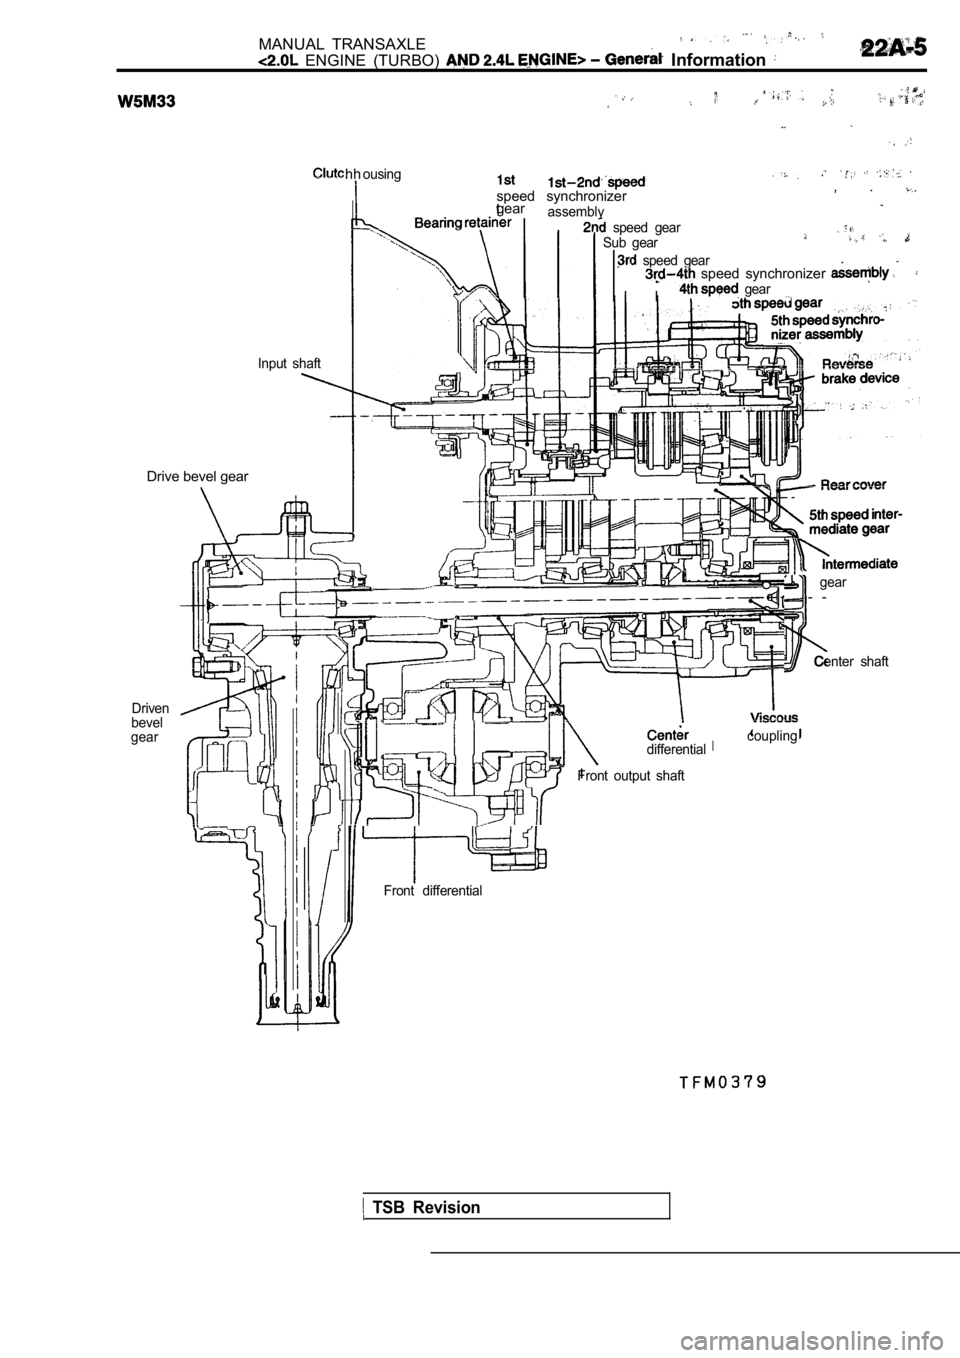
hh
Input shaft
Drive bevel gear
Driven
bevel
gear
ousing
speed synchronizer
gearassembly
, .
speed gearSub gear
speed gear. speed synchronizer
I I gear
differential coupling
Front output shaft
gear- -
Center shaft
TSB Revision
Front differential
Page 864 of 2103
MANUAL TRANSAXLEService Specifications/ ENGINE AND ENGINE> Lubricants
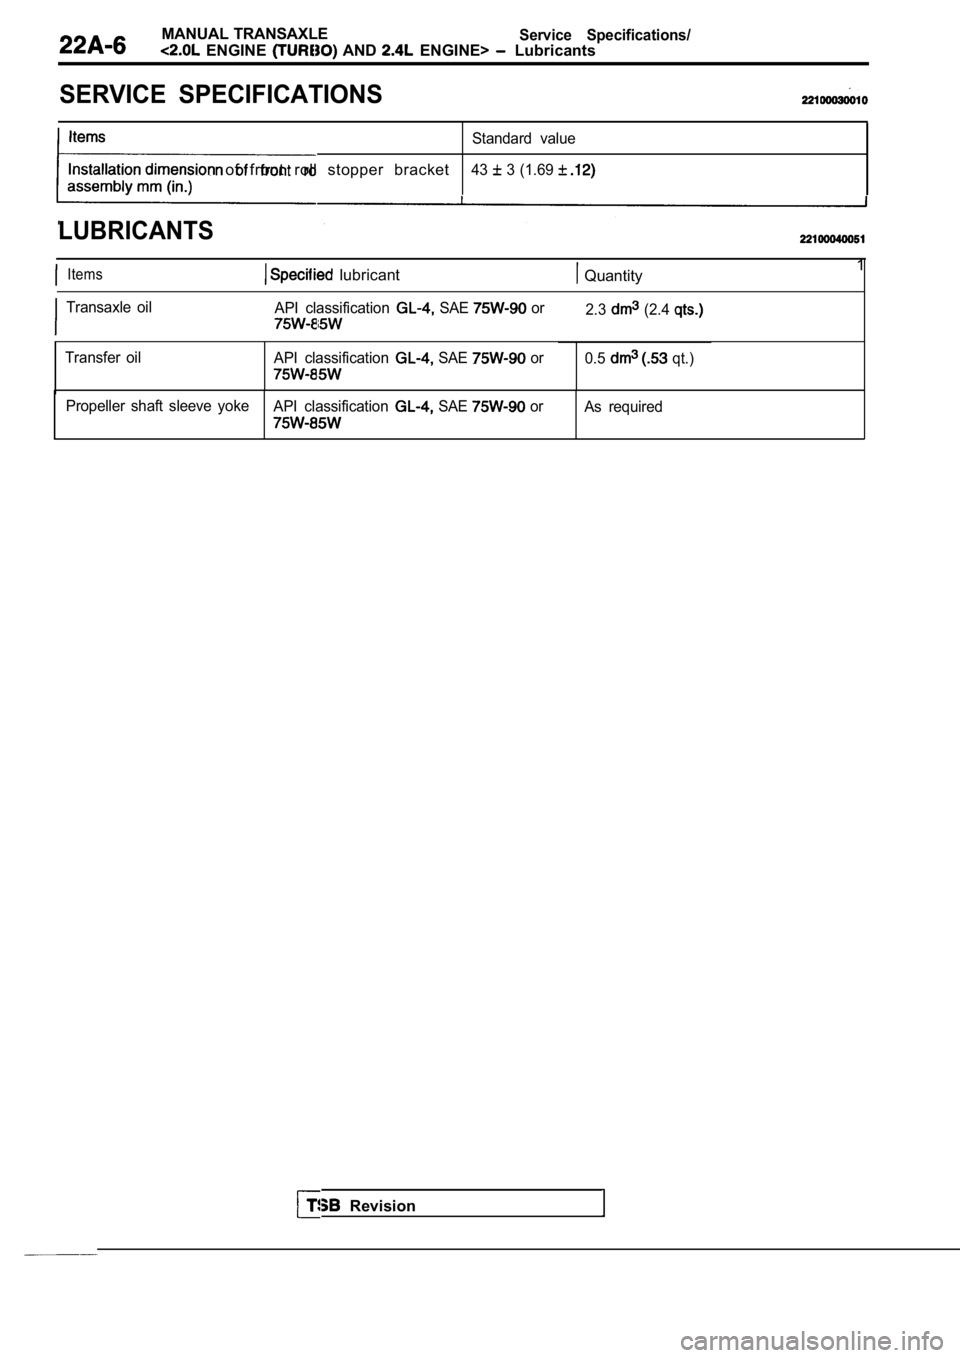
SERVICE SPECIFICATIONS
Standard value
of front roll stopper bracket43 3 (1.69
LUBRICANTS
Items lubricant Quantity
Transaxle oilAPI classification SAE or2.3 (2.4
Transfer oil API classification SAE or0.5 qt.)
Propeller shaft sleeve yoke API classification
SAE orAs required
1
Revision
Page 865 of 2103
MANUAL TRANSAXLE
ENGINE (TURBO) AND ENGINE> Special Tools
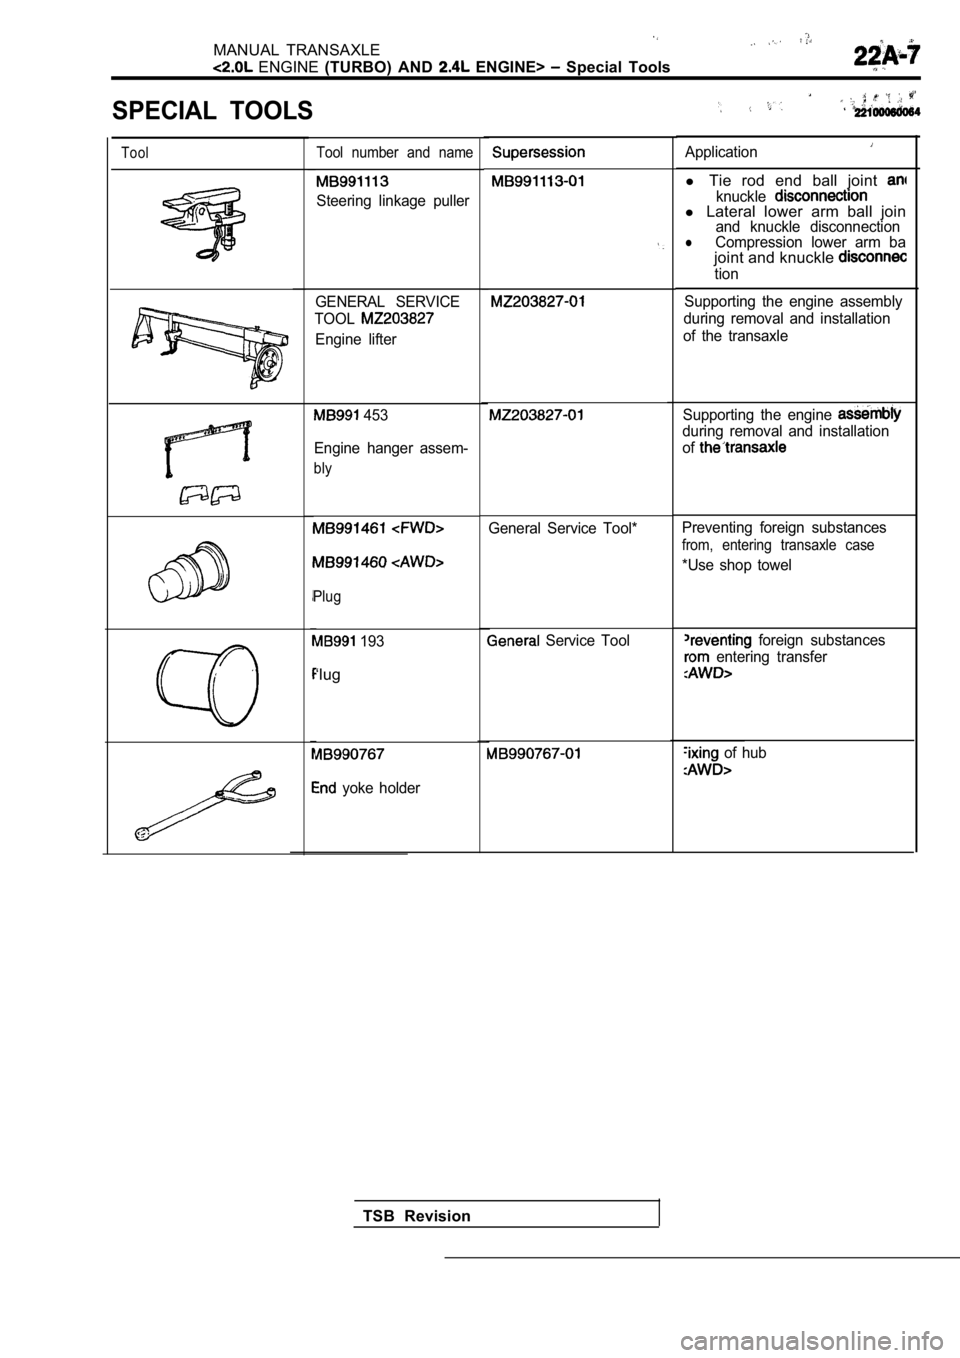
SPECIAL TOOLS
ToolTool number and name
Steering linkage puller
GENERAL SERVICE
TOOL
Engine lifter
453
Engine hanger assem-
bly
Plug
193
‘lug
yoke holder
General Service Tool*
Service Tool
TSB Revision
Application
l Tie rod end ball joint knucklel Lateral lower arm ball joinand knuckle disconnectionlCompression lower arm bajoint and knuckle
tion
Supporting the engine assembly
during removal and installation
of the transaxle
Supporting the engine
during removal and installation
of
Preventing foreign substances
from, entering transaxle case
*Use shop towel
foreign substances
entering transfer
of hub
Page 866 of 2103
MANUAL TRANSAXLETroubleshooting!
ENGINE (TURBO) AND ENGINE> On-vehicle Service
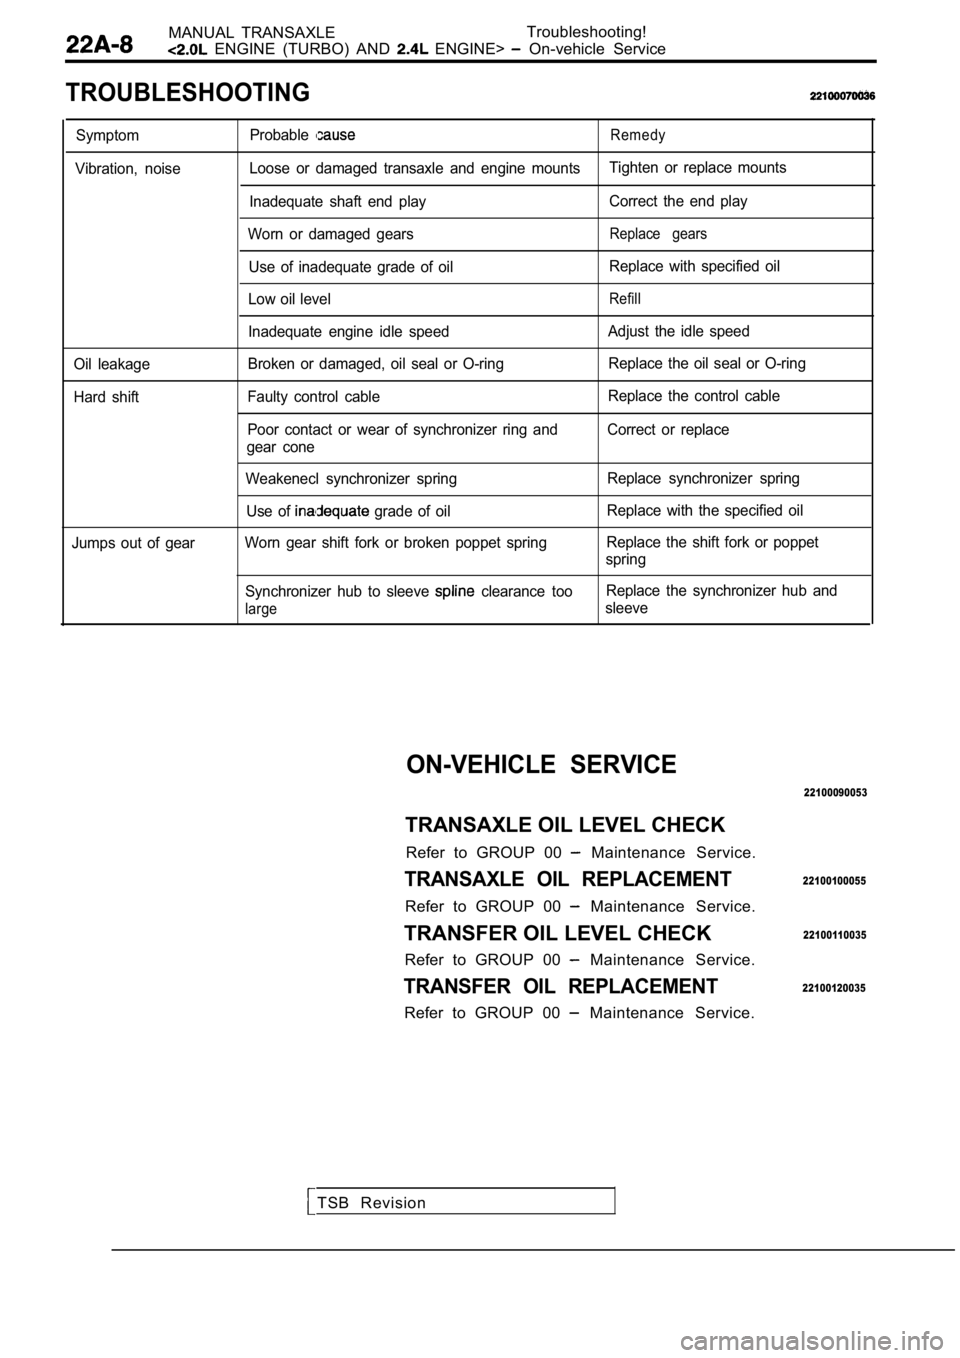
TROUBLESHOOTING
Symptom
Vibration, noise
Oil leakage
Hard shift
Jumps out of gear ProbableRemedy
Loose or damaged transaxle and engine mounts
Tighten or replace mounts
Inadequate shaft end play Correct the end play
Worn or damaged gears
Replace gears
Use of inadequate grade of oil Replace with specified oil
Low oil level
Refill
Inadequate engine idle speed Adjust the idle speed
Broken or damaged, oil seal or O-ring Replace the oil seal or O-ring
Faulty control cable Replace the control cable
Poor contact or wear of synchronizer ring and Correc t or replace
gear cone
Weakenecl synchronizer spring Replace synchronizer spring
Use of
grade of oil Replace with the specified oil
Worn gear shift fork or broken poppet spring Replace the shift fork or poppet
spring
Synchronizer hub to sleeve
clearance too
large
Replace the synchronizer hub and
sleeve
TSB Revision
ON-VEHICLE SERVICE
22100090053
TRANSAXLE OIL LEVEL CHECK
Refer to GROUP 00
Maintenance Service.
TRANSAXLE OIL REPLACEMENT
Refer to GROUP 00 Maintenance Service.
TRANSFER OIL LEVEL CHECK Refer to GROUP 00
Maintenance Service.
TRANSFER OIL REPLACEMENT
Refer to GROUP 00 Maintenance Service.
22100100055
22100110035
22100120035
Page 867 of 2103
MANUAL TRANSAXLE
ENGINE (TURBO) AND ENGINE>
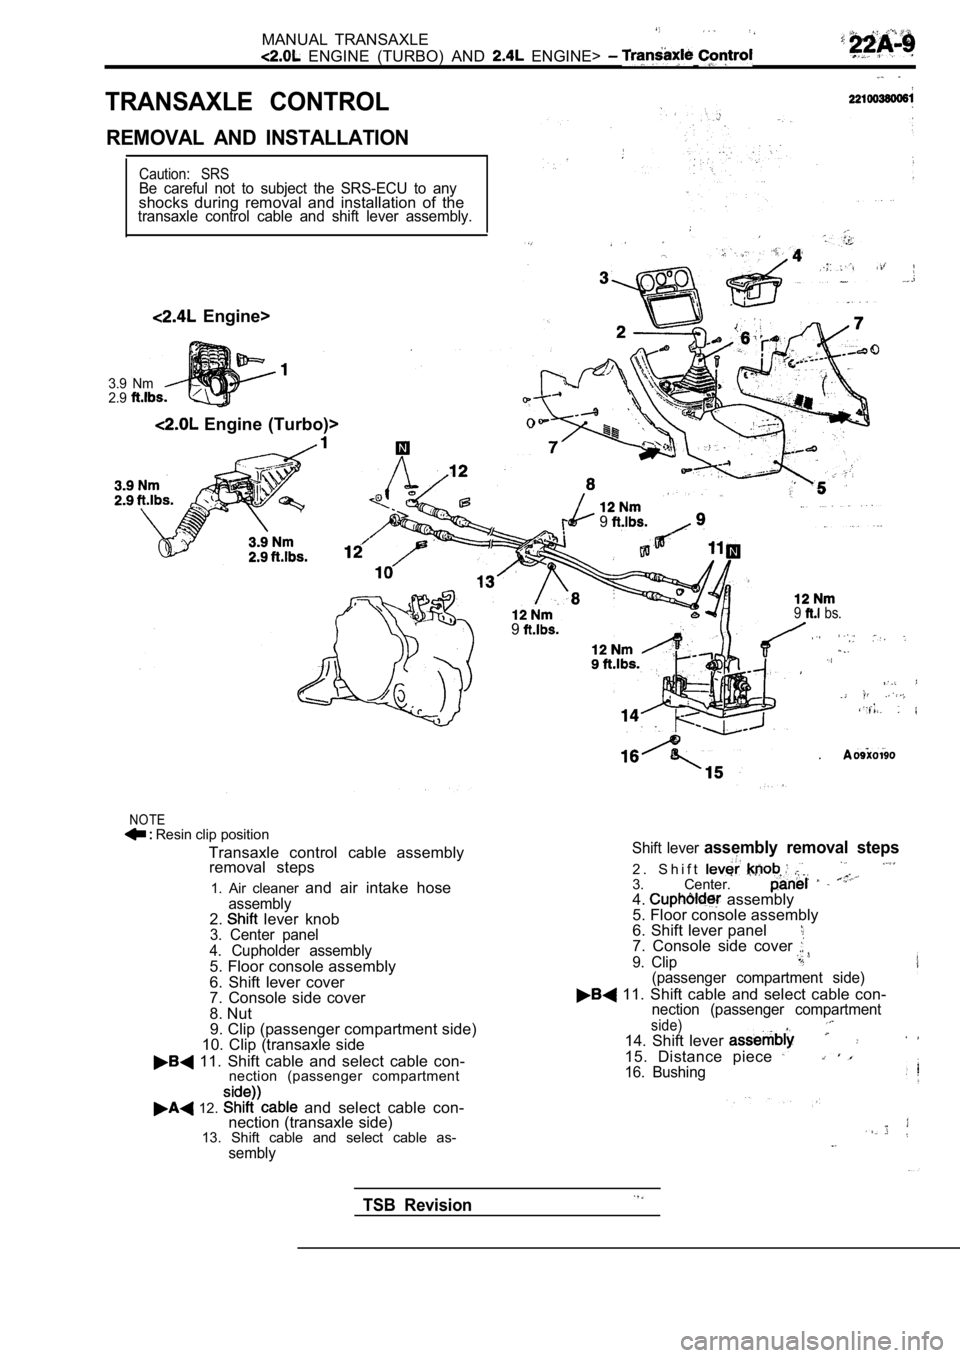
TRANSAXLE CONTROL
REMOVAL AND INSTALLATION
Caution: SRSBe careful not to subject the SRS-ECU to anyshocks during removal and installation of thetransaxle control cable and shift lever assembly.
Engine>
3.9 Nm
2.9
Engine (Turbo)>
9
9
9 bs.
.
NOTE Resin clip positionTransaxle control cable assemblyremoval steps
1. Air cleaner and air intake hose
assembly2. lever knob3. Center panel
4. Cupholder assembly
5. Floor console assembly
6. Shift lever cover
7. Console side cover
8. Nut 9. Clip (passenger compartment side)
10. Clip (transaxle side
11. Shift cable and select cable con- nection (passenger compartment
12. and select cable con-
nection (transaxle side)
13. Shift cable and select cable as-
sembly Shift lever
assembly removal steps
2 . S h i f t 3. Center. 4. assembly
5. Floor console assembly
6. Shift lever panel
7. Console side cover
9. Clip(passenger compartment side)
11. Shift cable and select cable con-nection (passenger compartmentside)14. Shift lever 15. Distance piece 16. Bushing
TSB Revision
Page 868 of 2103
M A N U A L T R A N S A X L E
(TURBO) AND ENGINE> Transaxle
Neutral position
Neutral position
Shift lever
Shift lever
Shift lever
Bushing Bushing A
Slit
Down
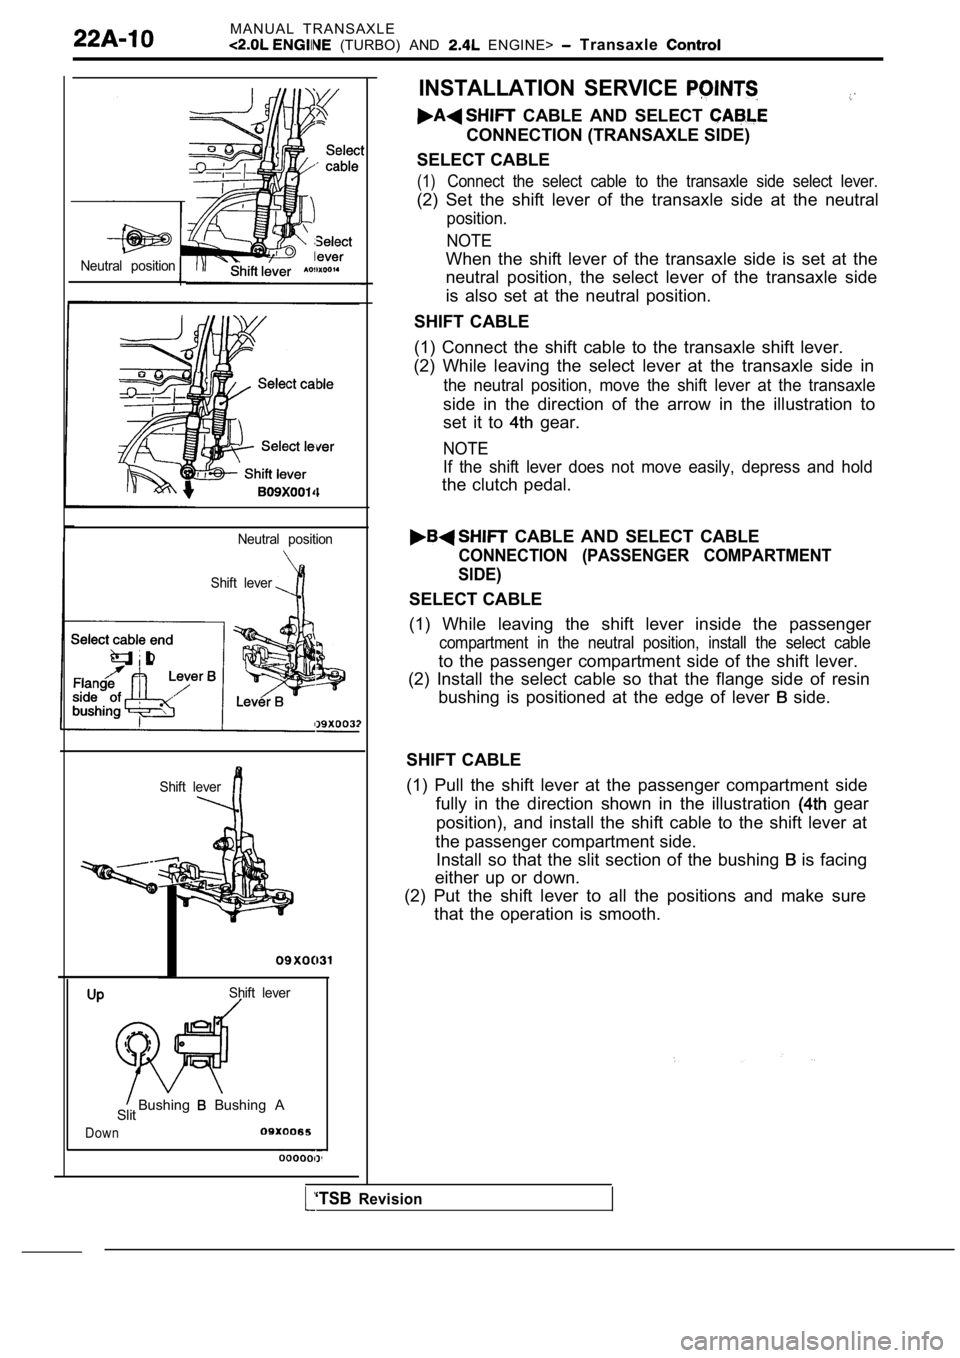
INSTALLATION SERVICE
CABLE AND SELECT
CONNECTION (TRANSAXLE SIDE)
SELECT CABLE
(1)Connect the select cable to the transaxle side sele ct lever.
(2) Set the shift lever of the transaxle side at the neutral
position.
NOTE
When the shift lever of the transaxle side is set a t the
neutral position, the select lever of the transaxle side
is also set at the neutral position.
SHIFT CABLE
(1) Connect the shift cable to the transaxle shift lever.
(2) While leaving the select lever at the transaxle side in
the neutral position, move the shift lever at the transaxle
side in the direction of the arrow in the illustration to
set it to
gear.
NOTE
If the shift lever does not move easily, depress an d hold
the clutch pedal.
CABLE AND SELECT CABLE
CONNECTION (PASSENGER COMPARTMENT
SIDE)
SELECT CABLE
(1) While leaving the shift lever inside the passen ger
compartment in the neutral position, install the select cable
to the passenger compartment side of the shift leve r.
(2) Install the select cable so that the flange sid e of resin
bushing is positioned at the edge of lever
side.
SHIFT CABLE
(1) Pull the shift lever at the passenger compartme nt side
fully in the direction shown in the illustration
gear
position), and install the shift cable to the shift lever at
the passenger compartment side. Install so that the slit section of the bushing
is facing
either up or down.
(2) Put the shift lever to all the positions and ma ke sure
that the operation is smooth.
‘TSBRevision
Page 869 of 2103
MANUAL TRANSAXLE
ENGINE (TURBO) AND ENGINE>
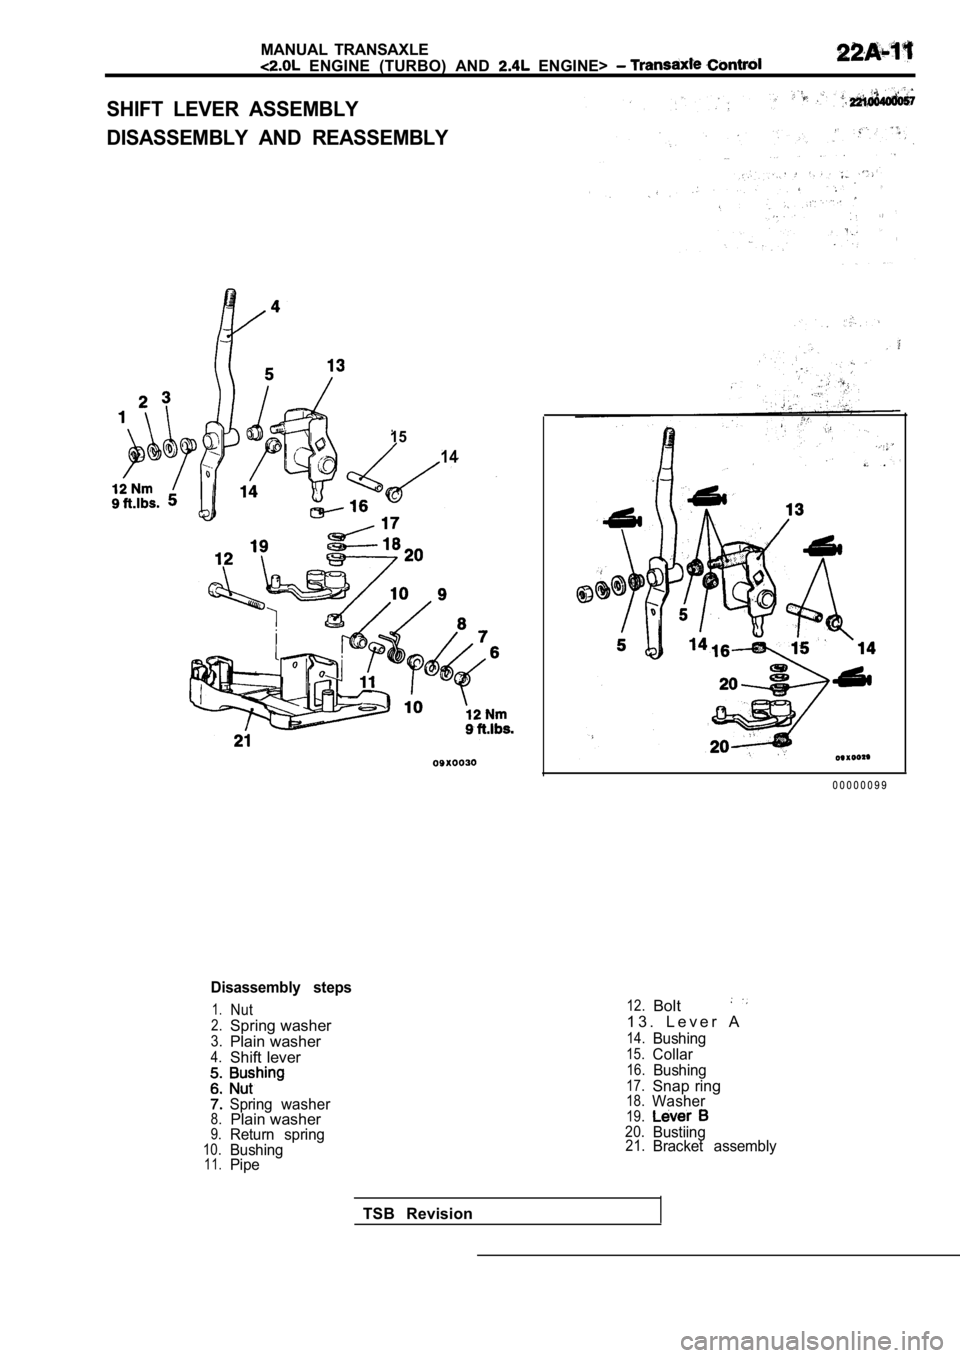
SHIFT LEVER ASSEMBLY
DISASSEMBLY AND REASSEMBLY
15
14
Disassembly steps
1.Nut2.Spring washer3.Plain washer4.Shift lever
Spring washer8.Plain washer9.Return spring10.Bushing11.Pipe
0 0 0 0 0 0 9 9
12.Bolt1 3 . L e v e r A
14.Bushing15.Collar16.Bushing17.Snap ring18.Washer19.20.Bustiing21.Bracket assembly
TSB Revision
Page 870 of 2103
MANUAL TRANSAXLE
ENGINE AND ENGINE> Transaxle
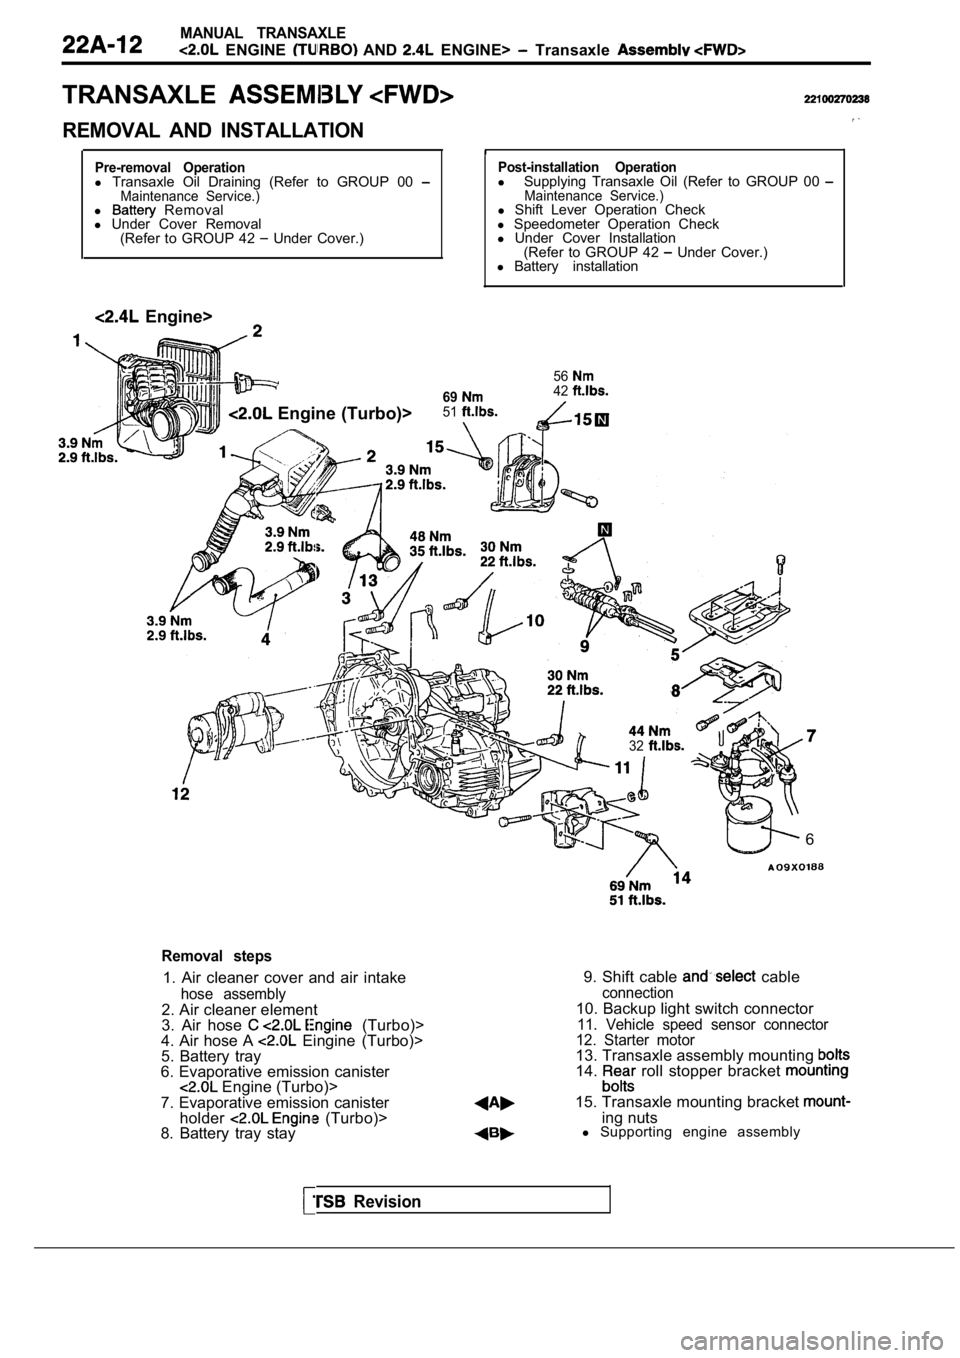
TRANSAXLE
REMOVAL AND INSTALLATION
Pre-removal Operationl Transaxle Oil Draining (Refer to GROUP 00 Maintenance Service.)l Removal
l Under Cover Removal
(Refer to GROUP 42
Under Cover.)
Engine>
Post-installation Operationl Supplying Transaxle Oil (Refer to GROUP 00 Maintenance Service.)l Shift Lever Operation Check
l Speedometer Operation Check
l Under Cover Installation
(Refer to GROUP 42
Under Cover.)
l Battery installation
56
6942
Engine (Turbo)>51
32
6
Removal steps
1. Air cleaner cover and air intake
hose assembly2. Air cleaner element
3. Air hose (Turbo)>
4. Air hose A Eingine (Turbo)>
5. Battery tray
6. Evaporative emission canister
Engine (Turbo)>
7. Evaporative emission canister holder
(Turbo)>
8. Battery tray stay 9. Shift cable
cableconnection10. Backup light switch connector11. Vehicle speed sensor connector
12. Starter motor
13. Transaxle assembly mounting 14. roll stopper bracket
15. Transaxle mounting bracket ing nuts
l Supporting engine assembly
Revision