NISSAN TERRANO 2004 Service Repair Manual
Manufacturer: NISSAN, Model Year: 2004, Model line: TERRANO, Model: NISSAN TERRANO 2004Pages: 1833, PDF Size: 53.42 MB
Page 111 of 1833
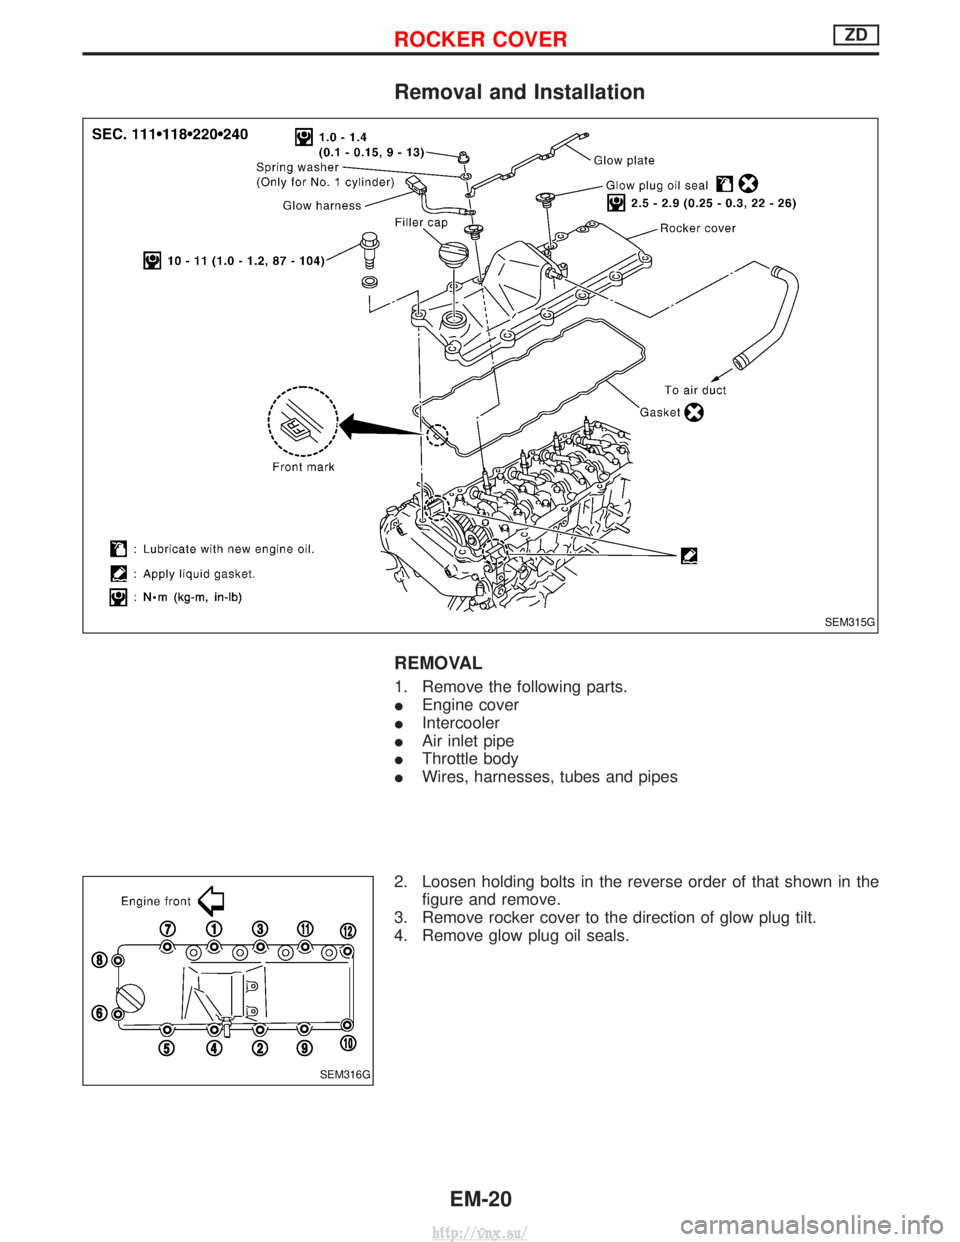
Removal and Installation
REMOVAL
1. Remove the following parts.
IEngine cover
I Intercooler
I Air inlet pipe
I Throttle body
I Wires, harnesses, tubes and pipes
2. Loosen holding bolts in the reverse order of that shown in the figure and remove.
3. Remove rocker cover to the direction of glow plug tilt.
4. Remove glow plug oil seals.
SEM315G
SEM316G
ROCKER COVERZD
EM-20
http://vnx.su/
Page 112 of 1833
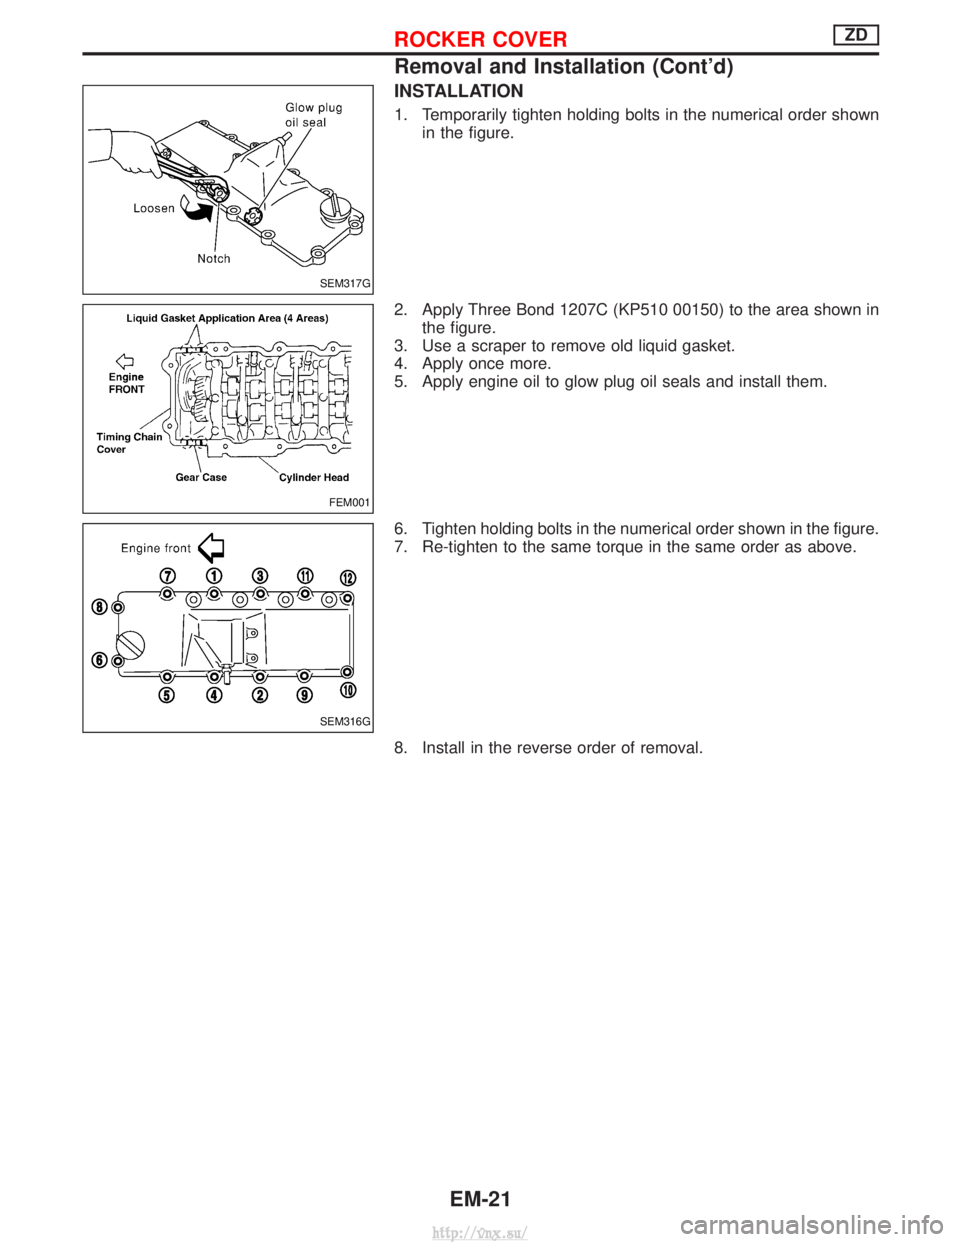
INSTALLATION
1. Temporarily tighten holding bolts in the numerical order shownin the figure.
2. Apply Three Bond 1207C (KP510 00150) to the area shown in the figure.
3. Use a scraper to remove old liquid gasket.
4. Apply once more.
5. Apply engine oil to glow plug oil seals and install them.
6. Tighten holding bolts in the numerical order shown in the figure.
7. Re-tighten to the same torque in the same order as above.
8. Install in the reverse order of removal.
SEM317G
FEM001
SEM316G
ROCKER COVERZD
Removal and Installation (Cont'd)
EM-21
http://vnx.su/
Page 113 of 1833
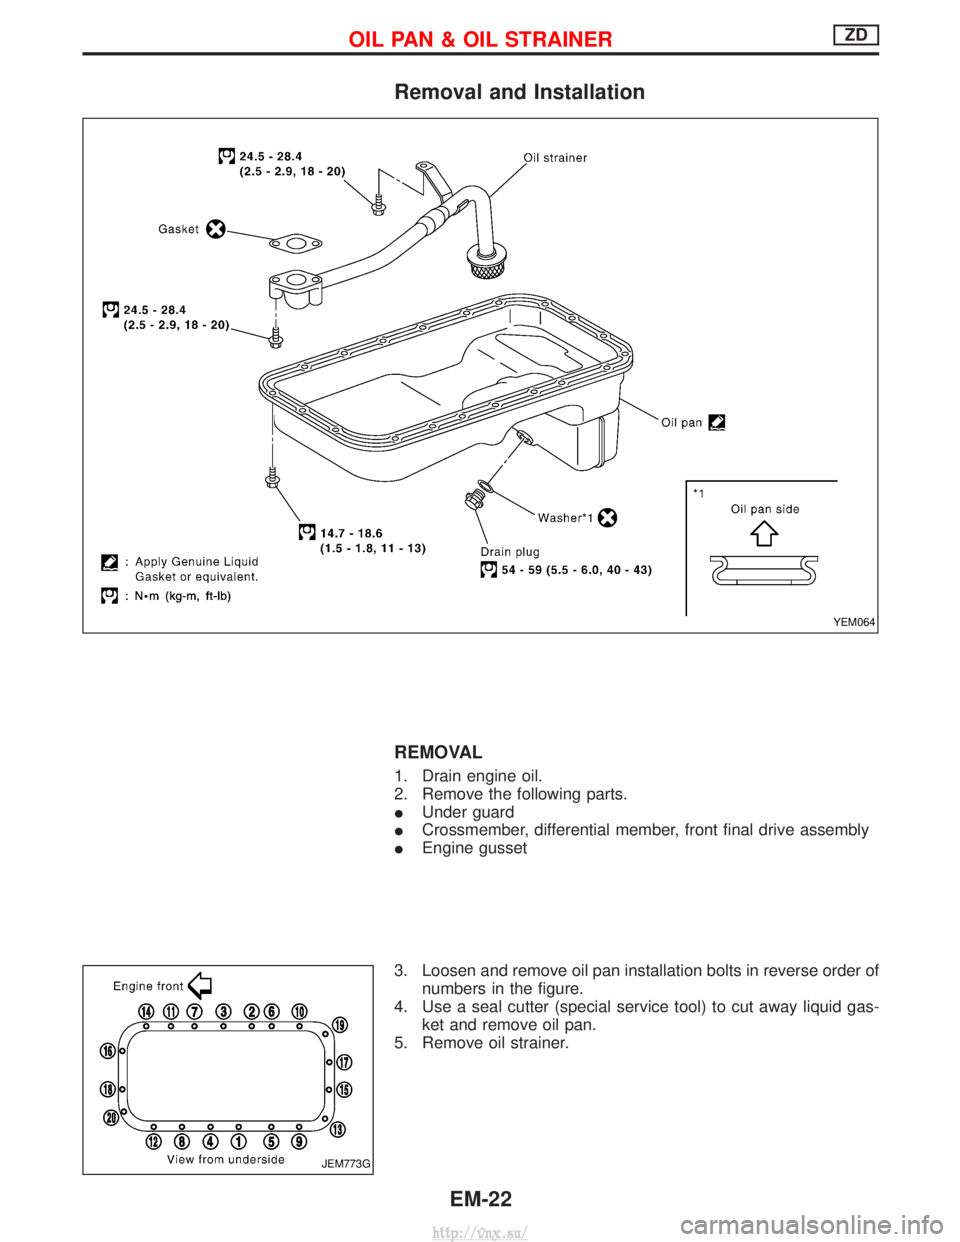
Removal and Installation
REMOVAL
1. Drain engine oil.
2. Remove the following parts.
IUnder guard
I Crossmember, differential member, front final drive assembly
I Engine gusset
3. Loosen and remove oil pan installation bolts in reverse order of numbers in the figure.
4. Use a seal cutter (special service tool) to cut away liquid gas- ket and remove oil pan.
5. Remove oil strainer.
YEM064
JEM773G
OIL PAN & OIL STRAINERZD
EM-22
http://vnx.su/
Page 114 of 1833
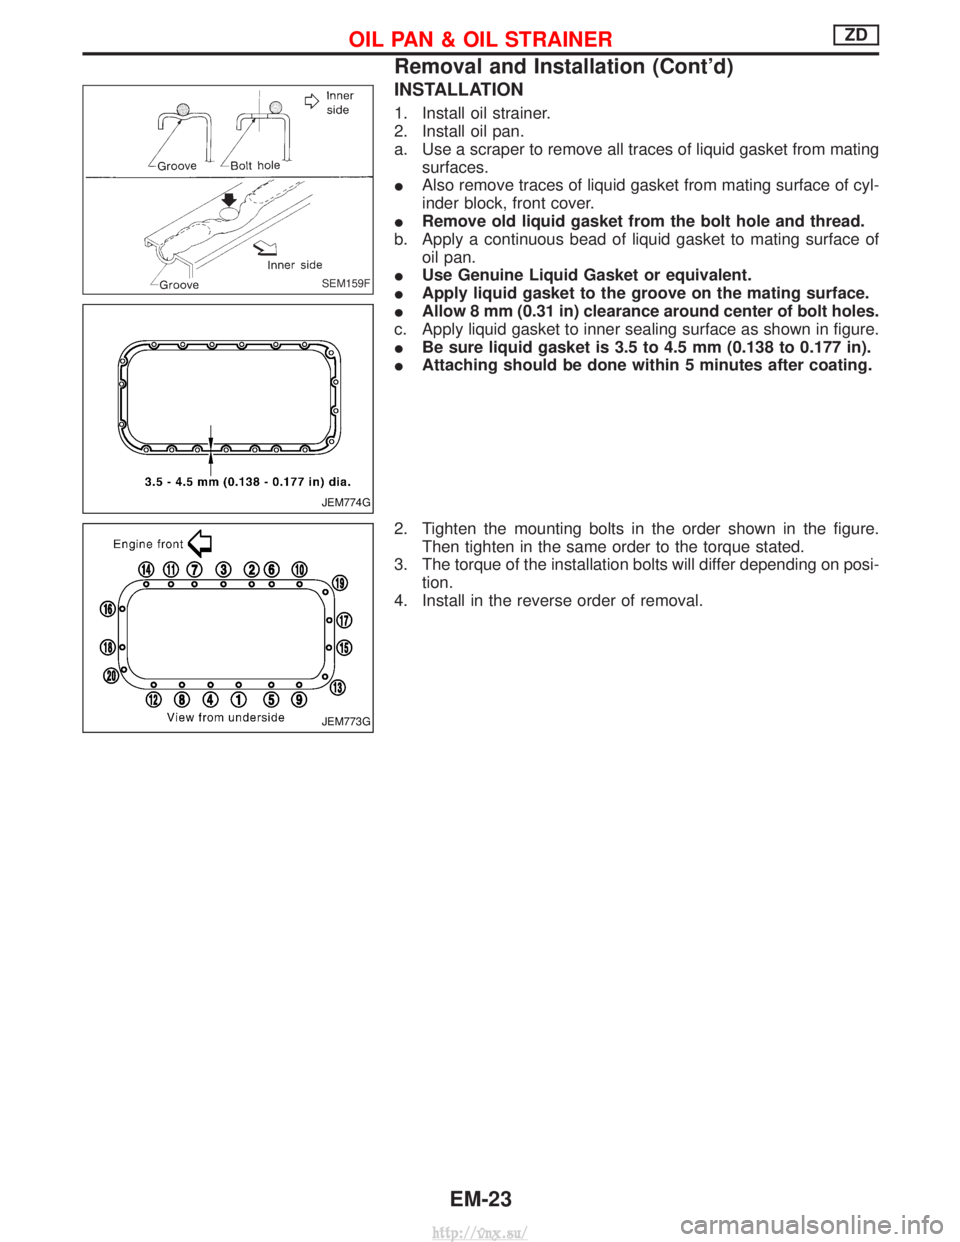
INSTALLATION
1. Install oil strainer.
2. Install oil pan.
a. Use a scraper to remove all traces of liquid gasket from matingsurfaces.
I Also remove traces of liquid gasket from mating surface of cyl-
inder block, front cover.
I Remove old liquid gasket from the bolt hole and thread.
b. Apply a continuous bead of liquid gasket to mating surface of oil pan.
I Use Genuine Liquid Gasket or equivalent.
I Apply liquid gasket to the groove on the mating surface.
I Allow 8 mm (0.31 in) clearance around center of bolt holes.
c. Apply liquid gasket to inner sealing surface as shown in figure.
I Be sure liquid gasket is 3.5 to 4.5 mm (0.138 to 0.177 in).
I Attaching should be done within 5 minutes after coating.
2. Tighten the mounting bolts in the order shown in the figure. Then tighten in the same order to the torque stated.
3. The torque of the installation bolts will differ depending on posi- tion.
4. Install in the reverse order of removal.
SEM159F
JEM774G
JEM773G
OIL PAN & OIL STRAINERZD
Removal and Installation (Cont'd)
EM-23
http://vnx.su/
Page 115 of 1833
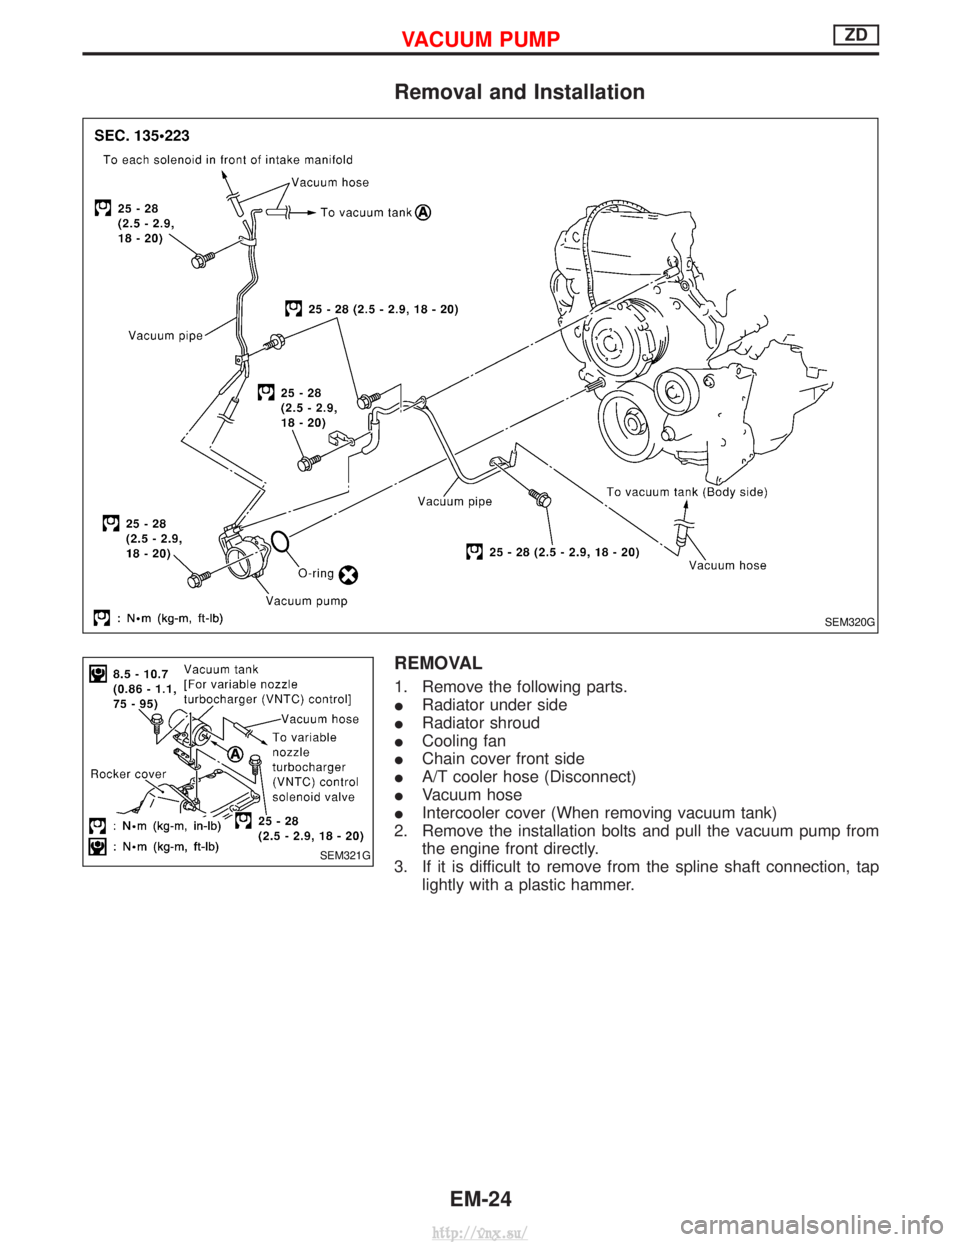
Removal and Installation
REMOVAL
1. Remove the following parts.
IRadiator under side
I Radiator shroud
I Cooling fan
I Chain cover front side
I A/T cooler hose (Disconnect)
I Vacuum hose
I Intercooler cover (When removing vacuum tank)
2. Remove the installation bolts and pull the vacuum pump from the engine front directly.
3. If it is difficult to remove from the spline shaft connection, tap lightly with a plastic hammer.
SEM320G
SEM321G
VACUUM PUMPZD
EM-24
http://vnx.su/
Page 116 of 1833
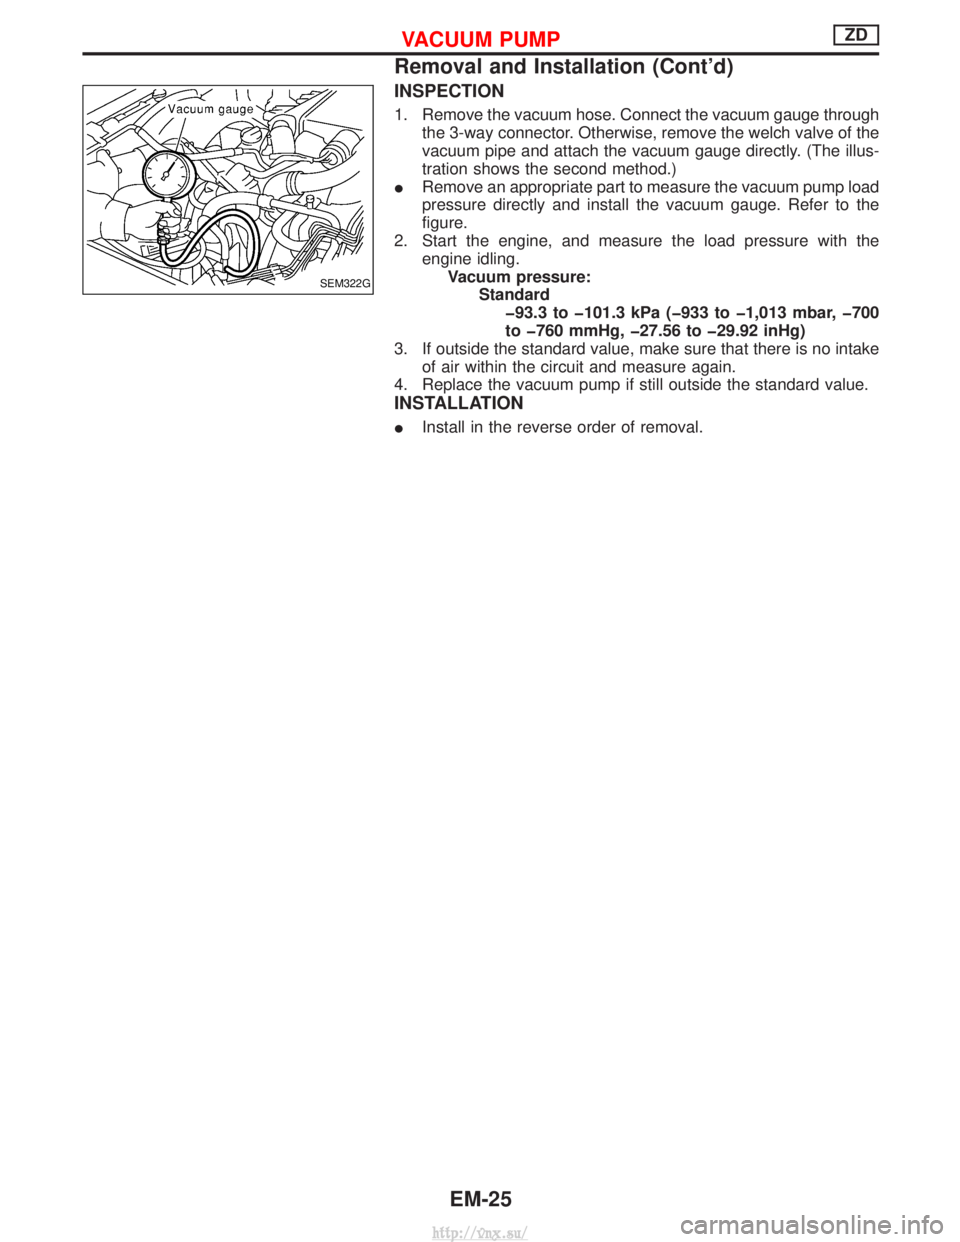
INSPECTION
1. Remove the vacuum hose. Connect the vacuum gauge throughthe 3-way connector. Otherwise, remove the welch valve of the
vacuum pipe and attach the vacuum gauge directly. (The illus-
tration shows the second method.)
I Remove an appropriate part to measure the vacuum pump load
pressure directly and install the vacuum gauge. Refer to the
figure.
2. Start the engine, and measure the load pressure with the engine idling.Vacuum pressure: Standardþ93.3 to þ101.3 kPa (þ933 to þ1,013 mbar, þ700
to þ760 mmHg, þ27.56 to þ29.92 inHg)
3. If outside the standard value, make sure that there is no intake of air within the circuit and measure again.
4. Replace the vacuum pump if still outside the standard value.
INSTALLATION
I Install in the reverse order of removal.
SEM322G
VACUUM PUMPZD
Removal and Installation (Cont'd)
EM-25
http://vnx.su/
Page 117 of 1833
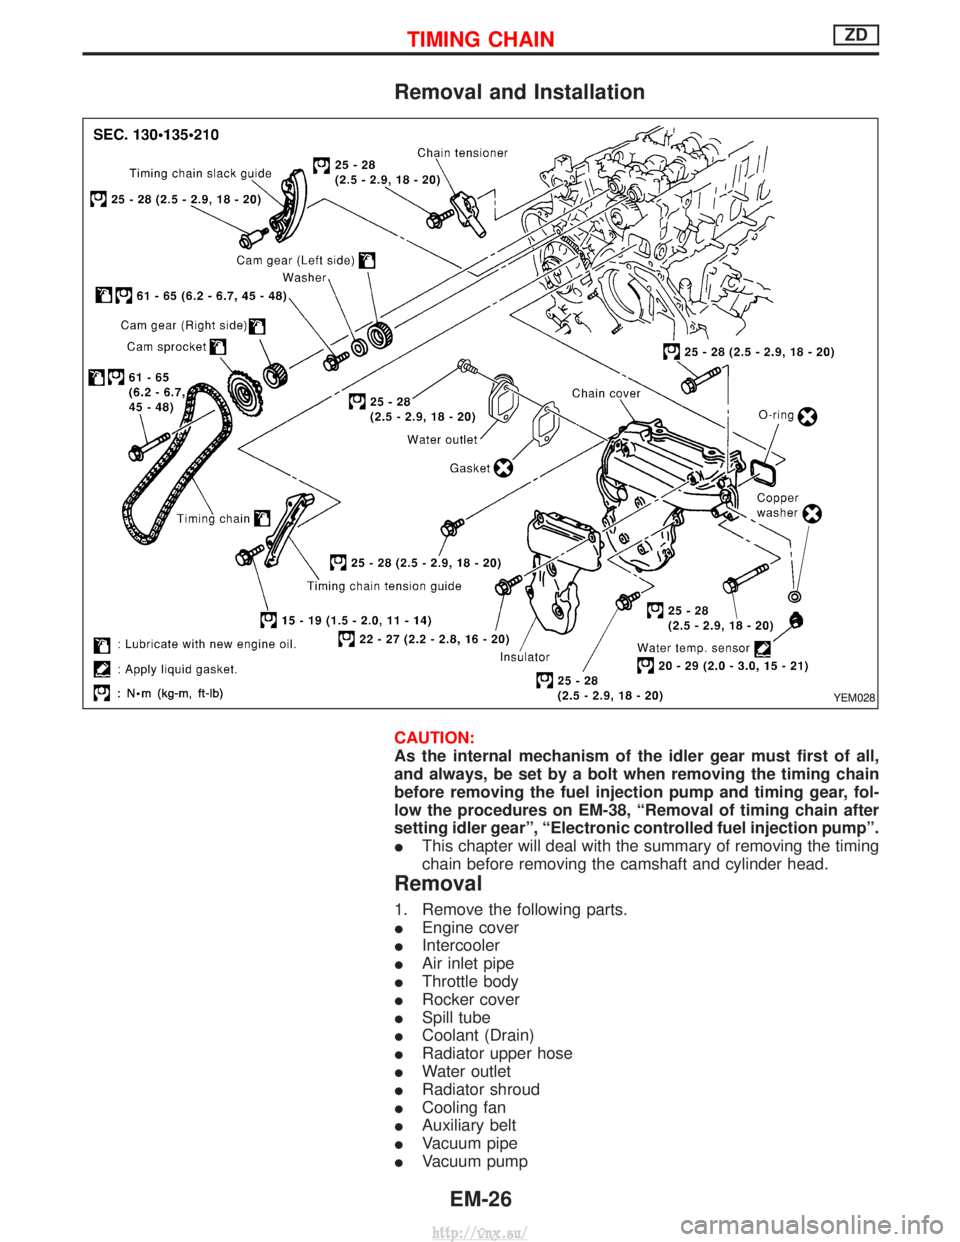
Removal and Installation
CAUTION:
As the internal mechanism of the idler gear must first of all,
and always, be set by a bolt when removing the timing chain
before removing the fuel injection pump and timing gear, fol-
low the procedures on EM-38, ªRemoval of timing chain after
setting idler gearº, ªElectronic controlled fuel injection pumpº.
IThis chapter will deal with the summary of removing the timing
chain before removing the camshaft and cylinder head.
Removal
1. Remove the following parts.
IEngine cover
I Intercooler
I Air inlet pipe
I Throttle body
I Rocker cover
I Spill tube
I Coolant (Drain)
I Radiator upper hose
I Water outlet
I Radiator shroud
I Cooling fan
I Auxiliary belt
I Vacuum pipe
I Vacuum pump
YEM028
TIMING CHAINZD
EM-26
http://vnx.su/
Page 118 of 1833
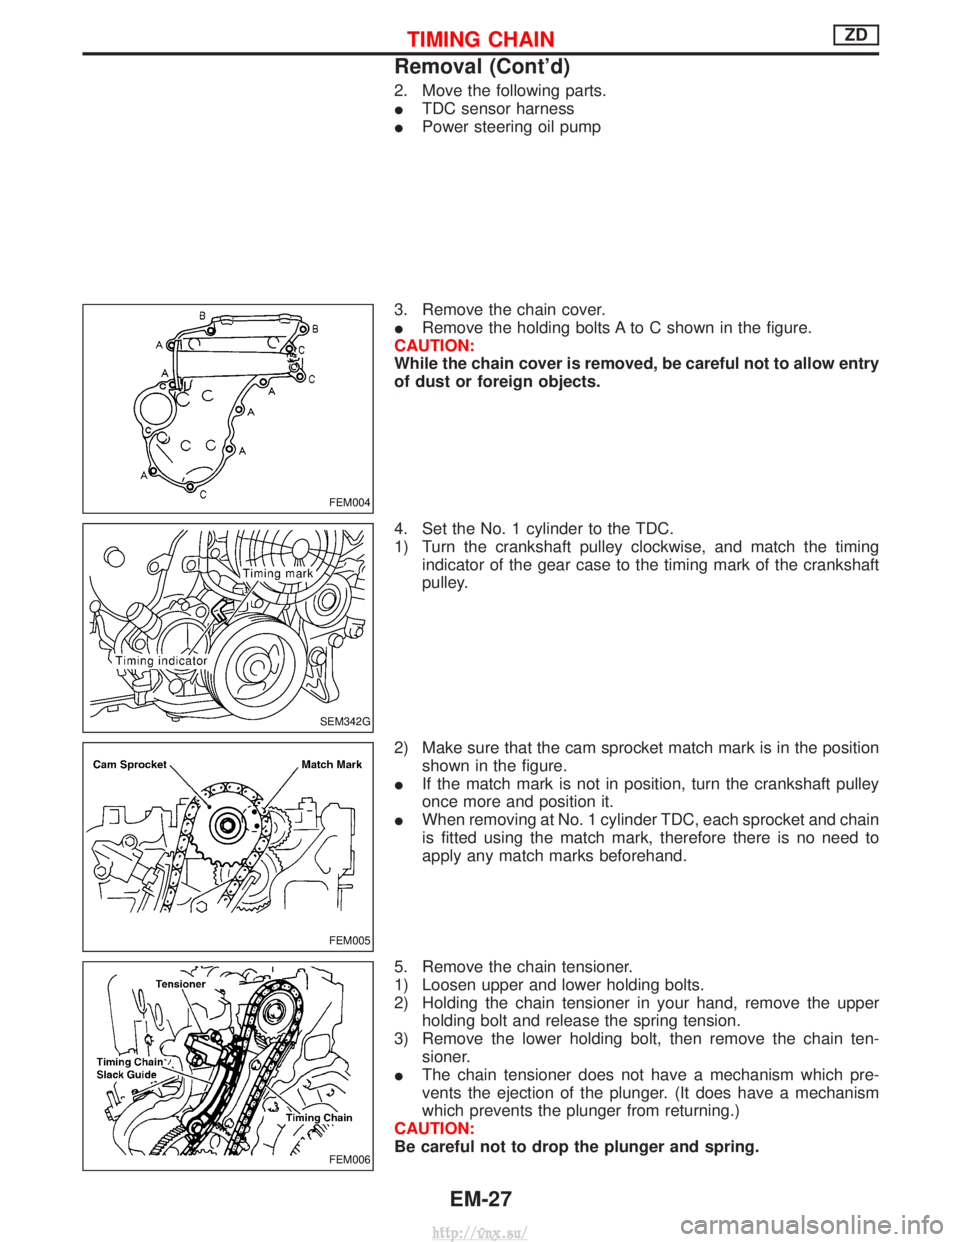
2. Move the following parts.
ITDC sensor harness
I Power steering oil pump
3. Remove the chain cover.
I Remove the holding bolts A to C shown in the figure.
CAUTION:
While the chain cover is removed, be careful not to allow entry
of dust or foreign objects.
4. Set the No. 1 cylinder to the TDC.
1) Turn the crankshaft pulley clockwise, and match the timing indicator of the gear case to the timing mark of the crankshaft
pulley.
2) Make sure that the cam sprocket match mark is in the position shown in the figure.
I If the match mark is not in position, turn the crankshaft pulley
once more and position it.
I When removing at No. 1 cylinder TDC, each sprocket and chain
is fitted using the match mark, therefore there is no need to
apply any match marks beforehand.
5. Remove the chain tensioner.
1) Loosen upper and lower holding bolts.
2) Holding the chain tensioner in your hand, remove the upper holding bolt and release the spring tension.
3) Remove the lower holding bolt, then remove the chain ten- sioner.
I The chain tensioner does not have a mechanism which pre-
vents the ejection of the plunger. (It does have a mechanism
which prevents the plunger from returning.)
CAUTION:
Be careful not to drop the plunger and spring.
FEM004
SEM342G
FEM005
FEM006
TIMING CHAINZD
Removal (Cont'd)
EM-27
http://vnx.su/
Page 119 of 1833
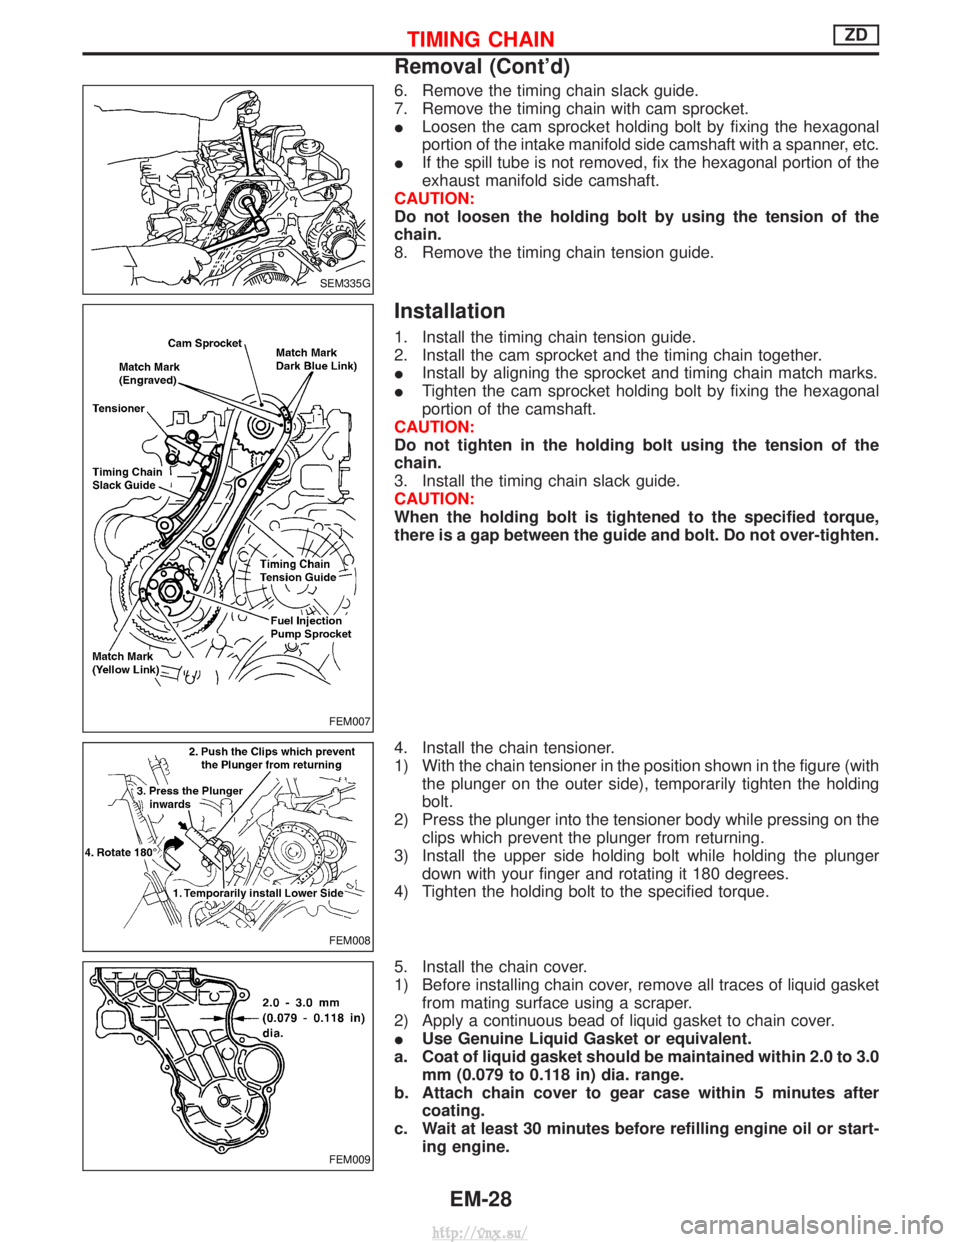
6. Remove the timing chain slack guide.
7. Remove the timing chain with cam sprocket.
ILoosen the cam sprocket holding bolt by fixing the hexagonal
portion of the intake manifold side camshaft with a spanner, etc.
I If the spill tube is not removed, fix the hexagonal portion of the
exhaust manifold side camshaft.
CAUTION:
Do not loosen the holding bolt by using the tension of the
chain.
8. Remove the timing chain tension guide.
Installation
1. Install the timing chain tension guide.
2. Install the cam sprocket and the timing chain together.
I Install by aligning the sprocket and timing chain match marks.
I Tighten the cam sprocket holding bolt by fixing the hexagonal
portion of the camshaft.
CAUTION:
Do not tighten in the holding bolt using the tension of the
chain.
3. Install the timing chain slack guide.
CAUTION:
When the holding bolt is tightened to the specified torque,
there is a gap between the guide and bolt. Do not over-tighten.
4. Install the chain tensioner.
1) With the chain tensioner in the position shown in the figure (with the plunger on the outer side), temporarily tighten the holding
bolt.
2) Press the plunger into the tensioner body while pressing on the clips which prevent the plunger from returning.
3) Install the upper side holding bolt while holding the plunger down with your finger and rotating it 180 degrees.
4) Tighten the holding bolt to the specified torque.
5. Install the chain cover.
1) Before installing chain cover, remove all traces of liquid gasket from mating surface using a scraper.
2) Apply a continuous bead of liquid gasket to chain cover.
I Use Genuine Liquid Gasket or equivalent.
a. Coat of liquid gasket should be maintained within 2.0 to 3.0 mm (0.079 to 0.118 in) dia. range.
b. Attach chain cover to gear case within 5 minutes after coating.
c. Wait at least 30 minutes before refilling engine oil or start- ing engine.
SEM335G
FEM007
FEM008
FEM009
TIMING CHAINZD
Removal (Cont'd)
EM-28
http://vnx.su/
Page 120 of 1833
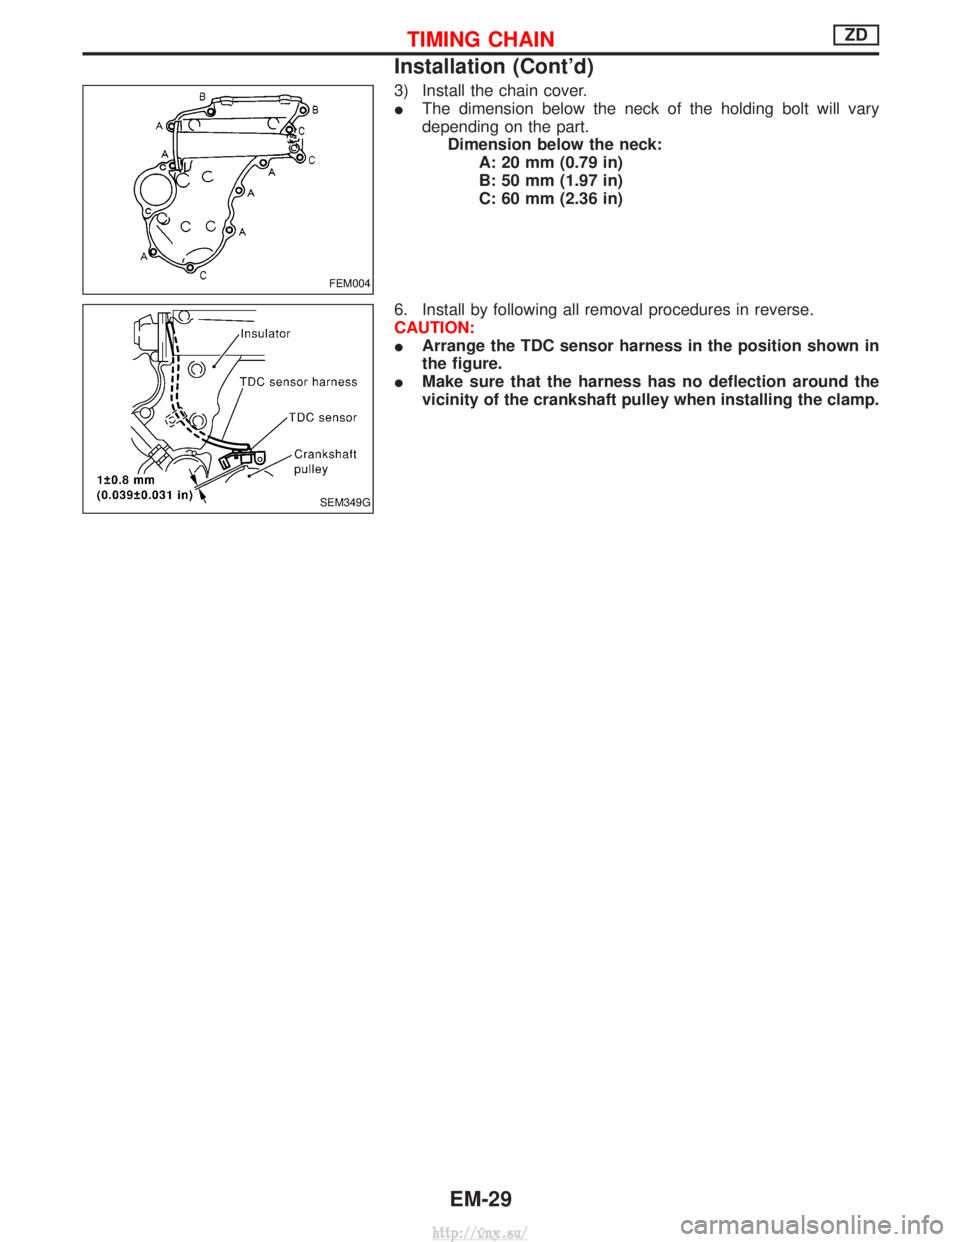
3) Install the chain cover.
IThe dimension below the neck of the holding bolt will vary
depending on the part.
Dimension below the neck: A: 20 mm (0.79 in)
B: 50 mm (1.97 in)
C: 60 mm (2.36 in)
6. Install by following all removal procedures in reverse.
CAUTION:
I Arrange the TDC sensor harness in the position shown in
the figure.
I Make sure that the harness has no deflection around the
vicinity of the crankshaft pulley when installing the clamp.
FEM004
SEM349G
TIMING CHAINZD
Installation (Cont'd)
EM-29
http://vnx.su/