NISSAN X-TRAIL 2003 Electronic Repair Manual
X-TRAIL 2003
NISSAN
NISSAN
https://www.carmanualsonline.info/img/5/57402/w960_57402-0.png
NISSAN X-TRAIL 2003 Electronic Repair Manual
Trending: key battery, fuel type, brakes, flat tire, oil capacity, alternator, timing belt
Page 2431 of 3066

FRONT FOG LAMP
LT-33
C
D
E
F
G
H
I
J
L
MA
B
LT
FRONT FOG LAMPPFP:00011
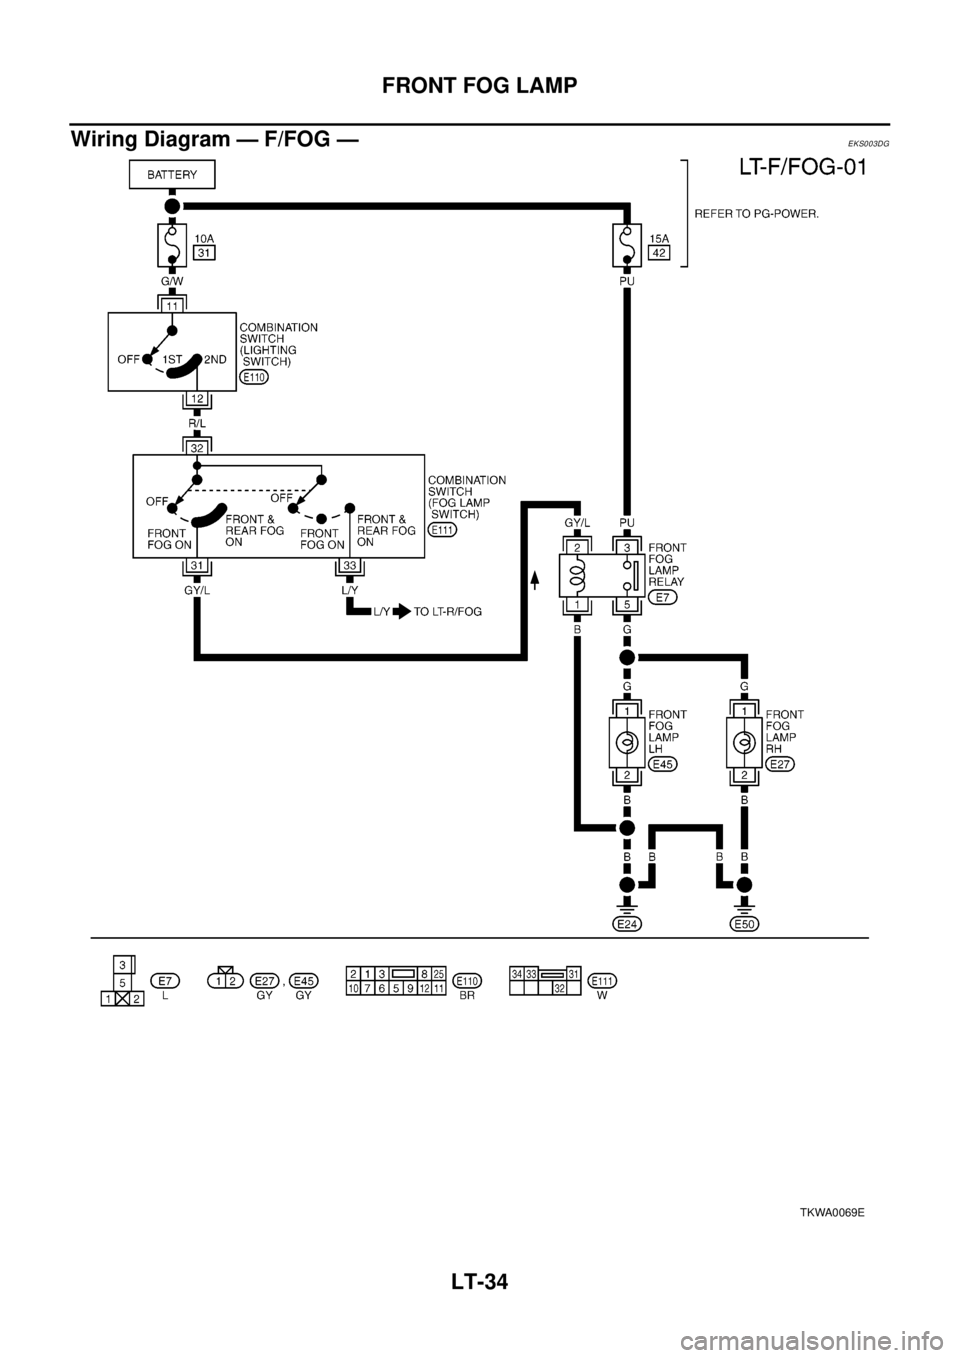
System DescriptionEKS003DF
DESCRIPTION
Power is supplied at all times to fog lamp relay terminal 3
lthrough 15A fuse (No. 42, located in the fuse and fusible link box).
With the lighting switch in the 2ND position and LOW (“B”) position, power is supplied
lthrough 10A fuse (No. 31, located in the fuse and fusible link box).
lto lighting switch terminal 11
lthrough terminal 12 of the lighting switch
lto fog lamp switch terminal 32
lthroughterminal31ofthefoglampswitch
lto fog lamp relay terminal 2.
FOG LAMP OPERATION
The fog lamp switch is built into the combination switch. The lighting switch must be in the 1st or 2nd position
and LOW (“B”) position for fog lamp operation.
With the fog lamp switch in the ON position, ground is supplied
lto fog lamp relay terminal 1
lthrough the fog lamp switch and body grounds E24 and E50.
The fog lamp relay is energized and power is supplied
lfrom fog lamp relay terminal 5
lto terminal 1 of each fog lamp.
Ground is supplied to terminal 2 of each fog lamp through body grounds E24 and E50.
With power and ground supplied, the fog lamps illuminate.
Page 2432 of 3066
LT-34
FRONT FOG LAMP
Wiring Diagram — F/FOG —
EKS003DG
TKWA0069E
Page 2433 of 3066
FRONT FOG LAMP
LT-35
C
D
E
F
G
H
I
J
L
MA
B
LT
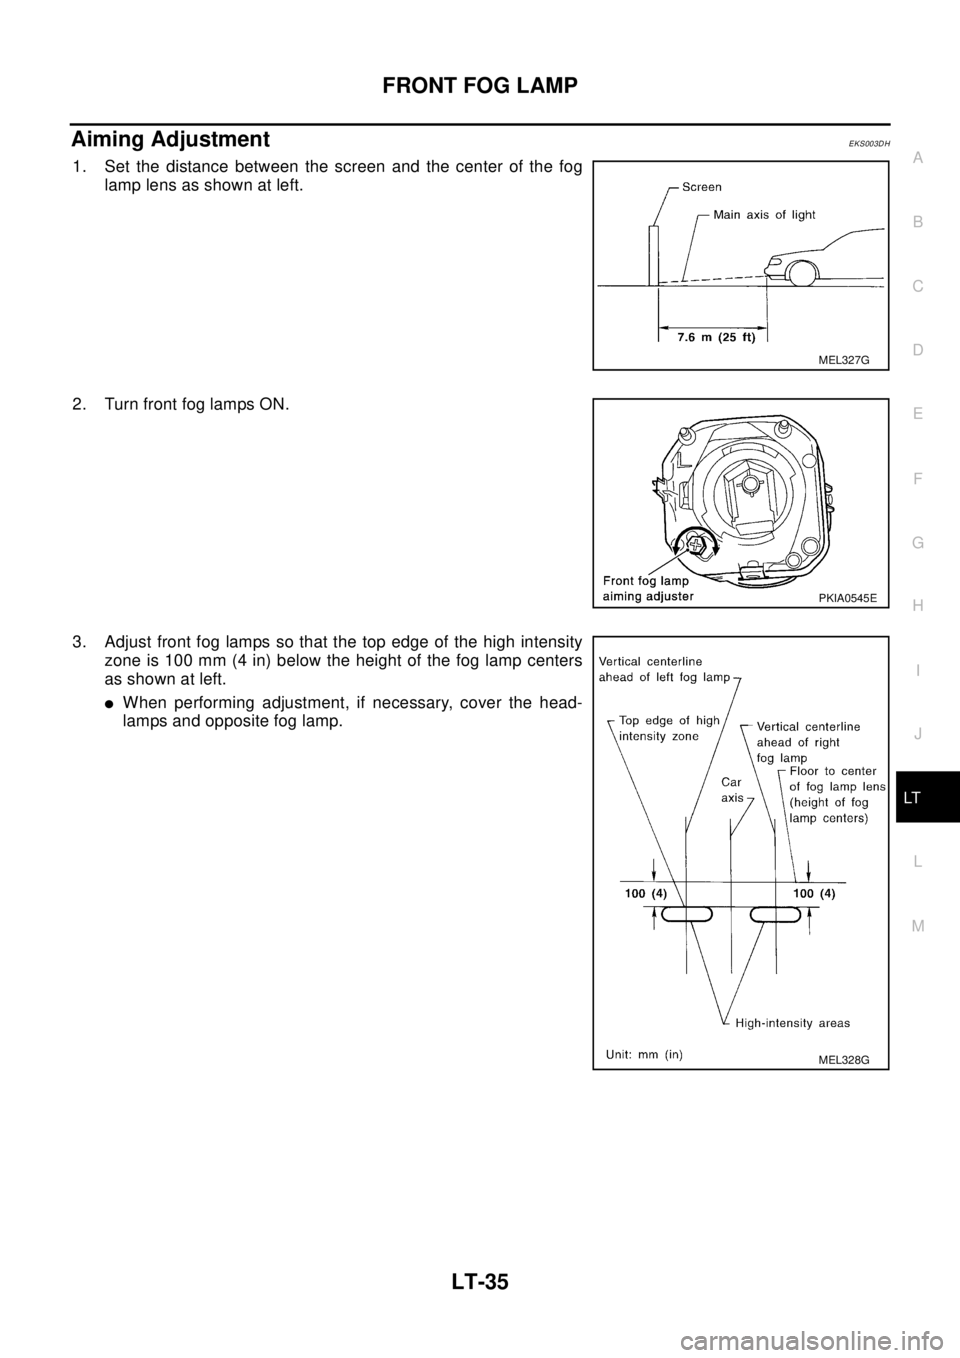
Aiming AdjustmentEKS003DH
1. Set the distance between the screen and the center of the fog
lamp lens as shown at left.
2. Turn front fog lamps ON.
3. Adjust front fog lamps so that the top edge of the high intensity
zone is 100 mm (4 in) below the height of the fog lamp centers
as shown at left.
lWhen performing adjustment, if necessary, cover the head-
lamps and opposite fog lamp.
MEL327G
PKIA0545E
MEL328G
Page 2434 of 3066
LT-36
FRONT FOG LAMP
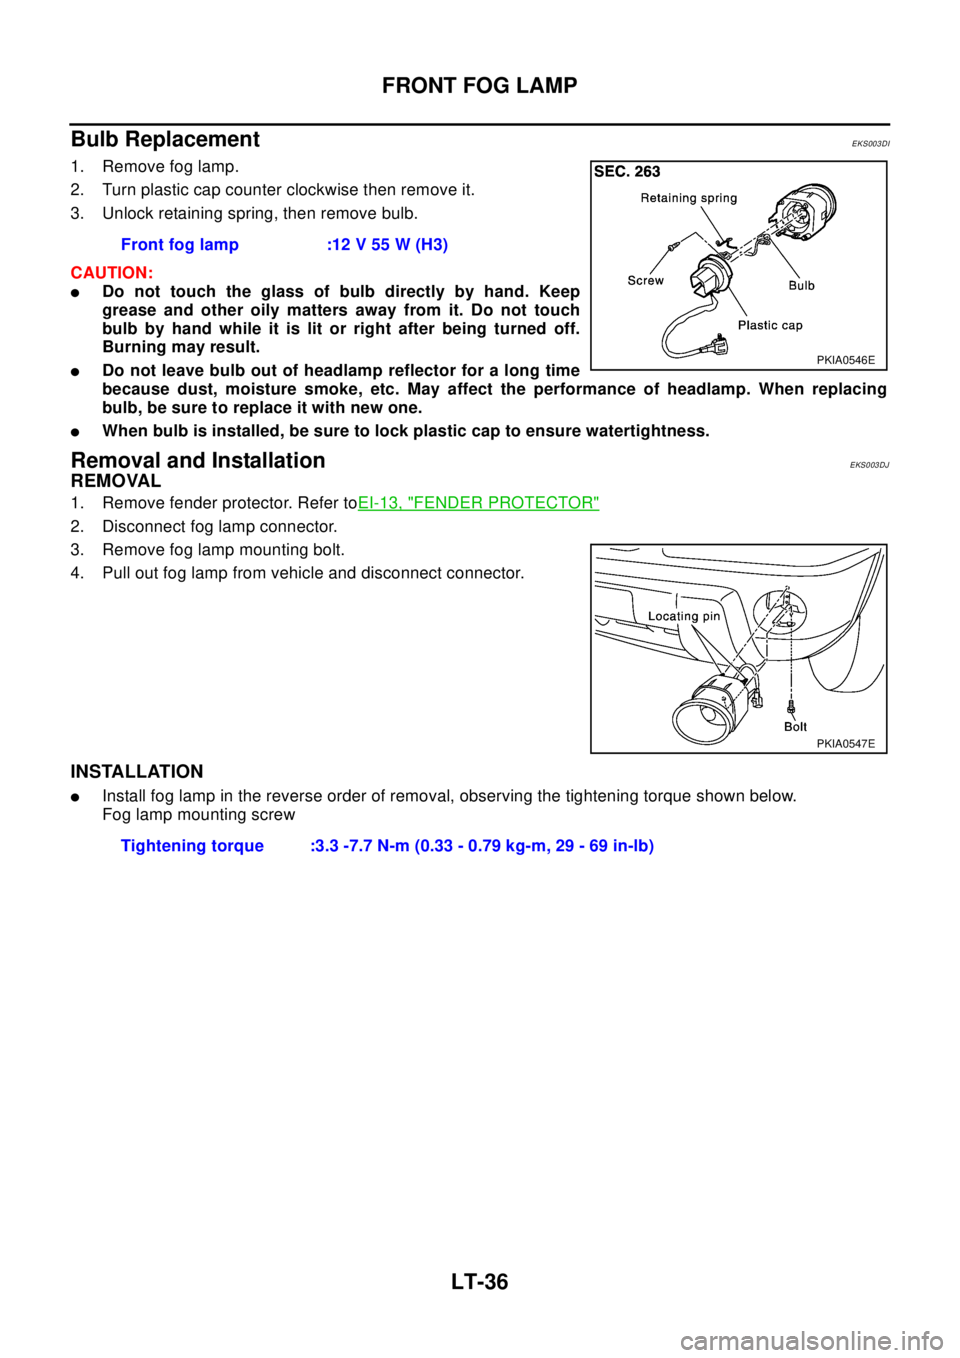
Bulb Replacement
EKS003DI
1. Remove fog lamp.
2. Turn plastic cap counter clockwise then remove it.
3. Unlock retaining spring, then remove bulb.
CAUTION:
lDo not touch the glass of bulb directly by hand. Keep
grease and other oily matters away from it. Do not touch
bulb by hand while it is lit or right after being turned off.
Burning may result.
lDo not leave bulb out of headlamp reflector for a long time
because dust, moisture smoke, etc. May affect the performance of headlamp. When replacing
bulb, be sure to replace it with new one.
lWhen bulb is installed, be sure to lock plastic cap to ensure watertightness.
Removal and InstallationEKS003DJ
REMOVAL
1. Remove fender protector. Refer toEI-13, "FENDER PROTECTOR"
2. Disconnect fog lamp connector.
3. Remove fog lamp mounting bolt.
4. Pull out fog lamp from vehicle and disconnect connector.
INSTALLATION
lInstall fog lamp in the reverse order of removal, observing the tightening torque shown below.
Fog lamp mounting screwFront fog lamp :12 V 55 W (H3)
PKIA0546E
PKIA0547E
Tightening torque :3.3 -7.7 N-m (0.33 - 0.79 kg-m, 29 - 69 in-lb)
Page 2435 of 3066
REAR FOG LAMP
LT-37
C
D
E
F
G
H
I
J
L
MA
B
LT
REAR FOG LAMPPFP:26550
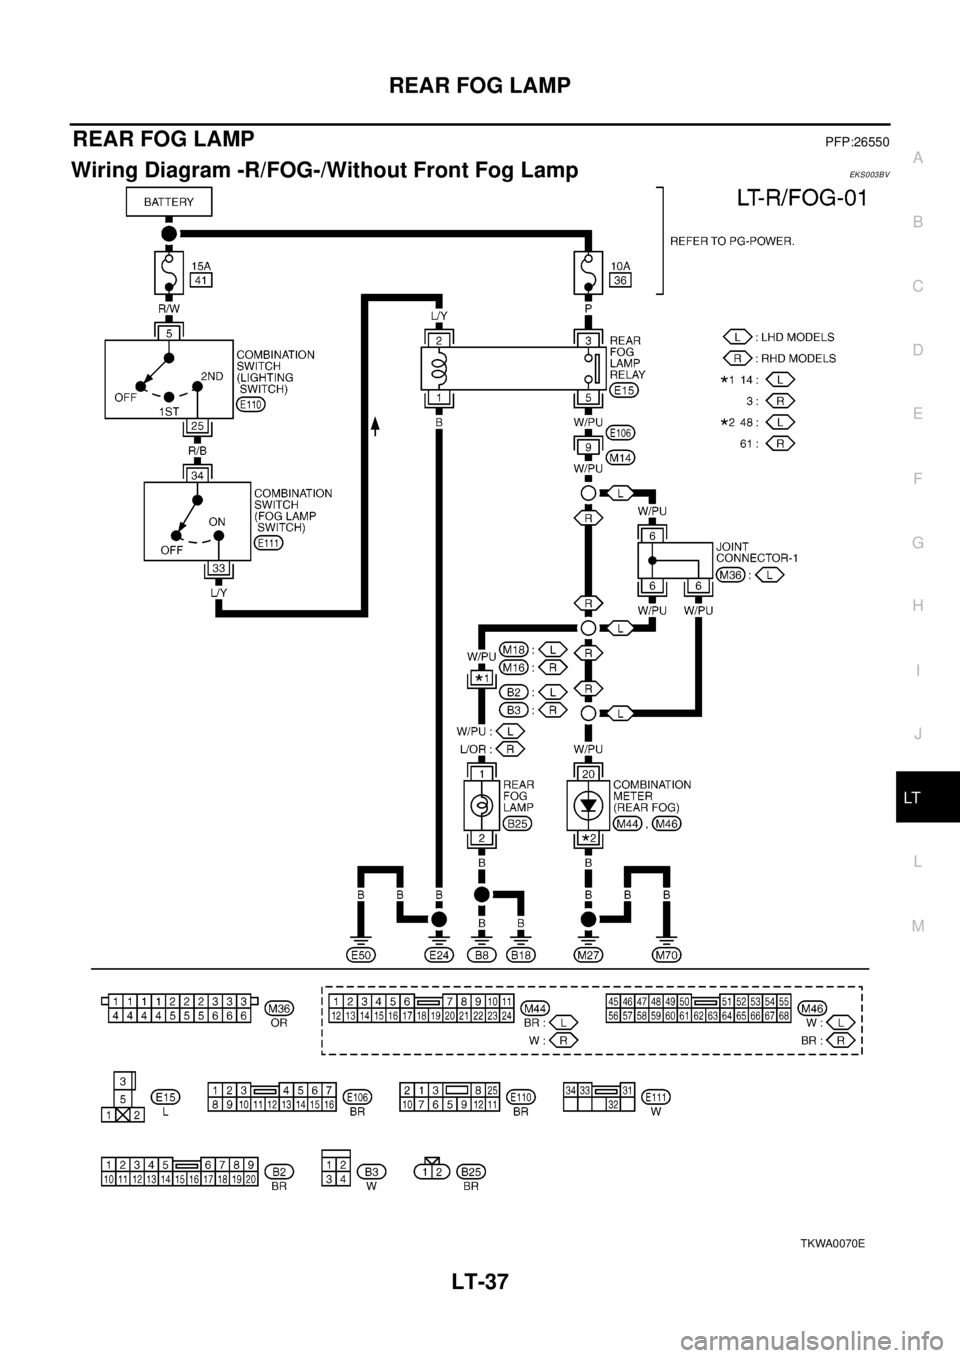
Wiring Diagram -R/FOG-/Without Front Fog LampEKS003BV
TKWA0070E
Page 2436 of 3066
LT-38
REAR FOG LAMP
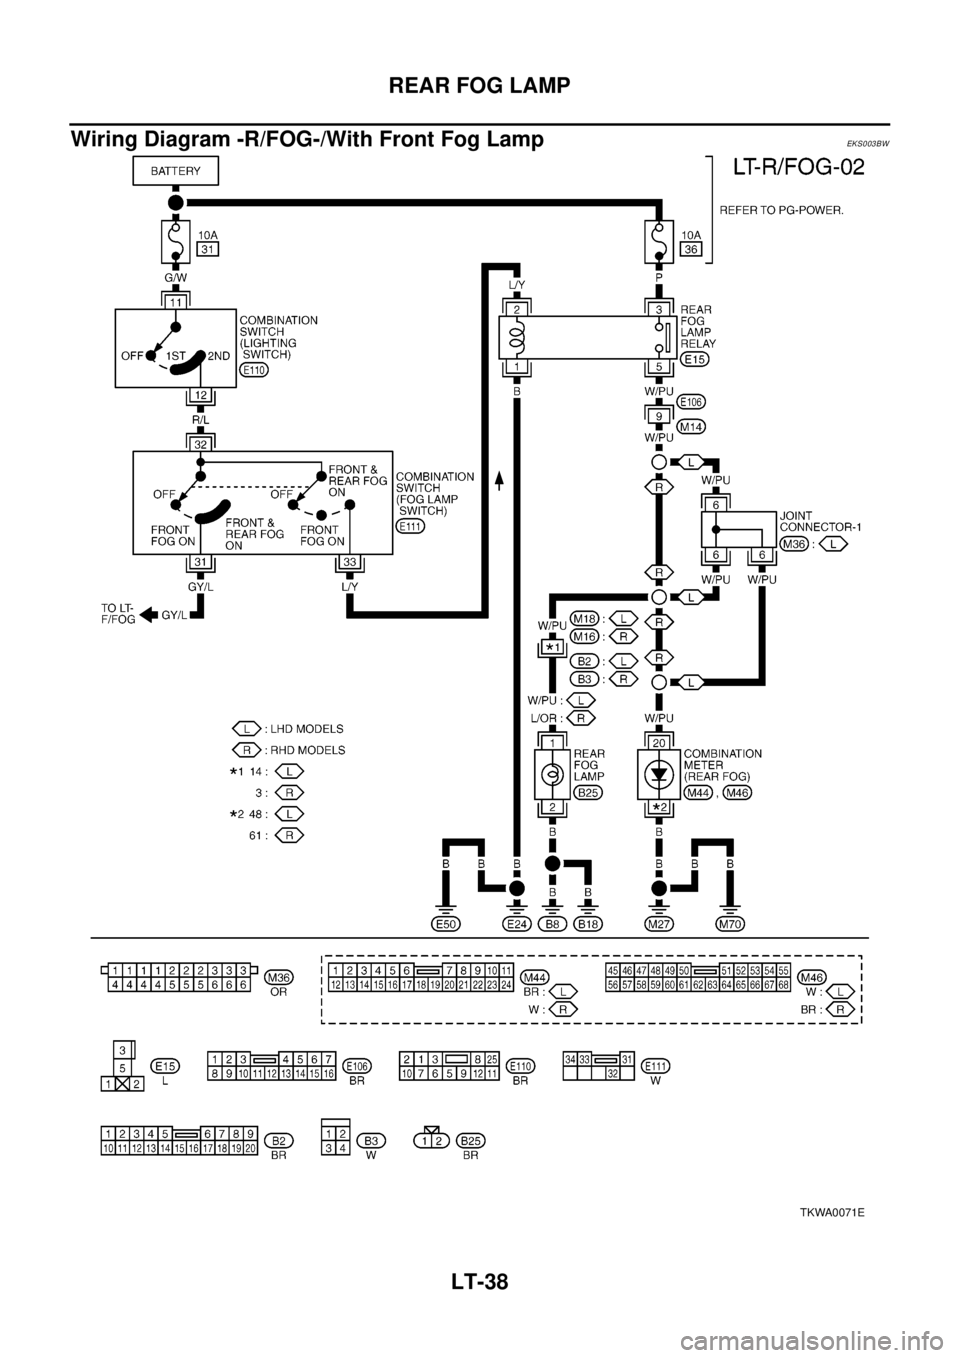
Wiring Diagram -R/FOG-/With Front Fog Lamp
EKS003BW
TKWA0071E
Page 2437 of 3066
REAR FOG LAMP
LT-39
C
D
E
F
G
H
I
J
L
MA
B
LT
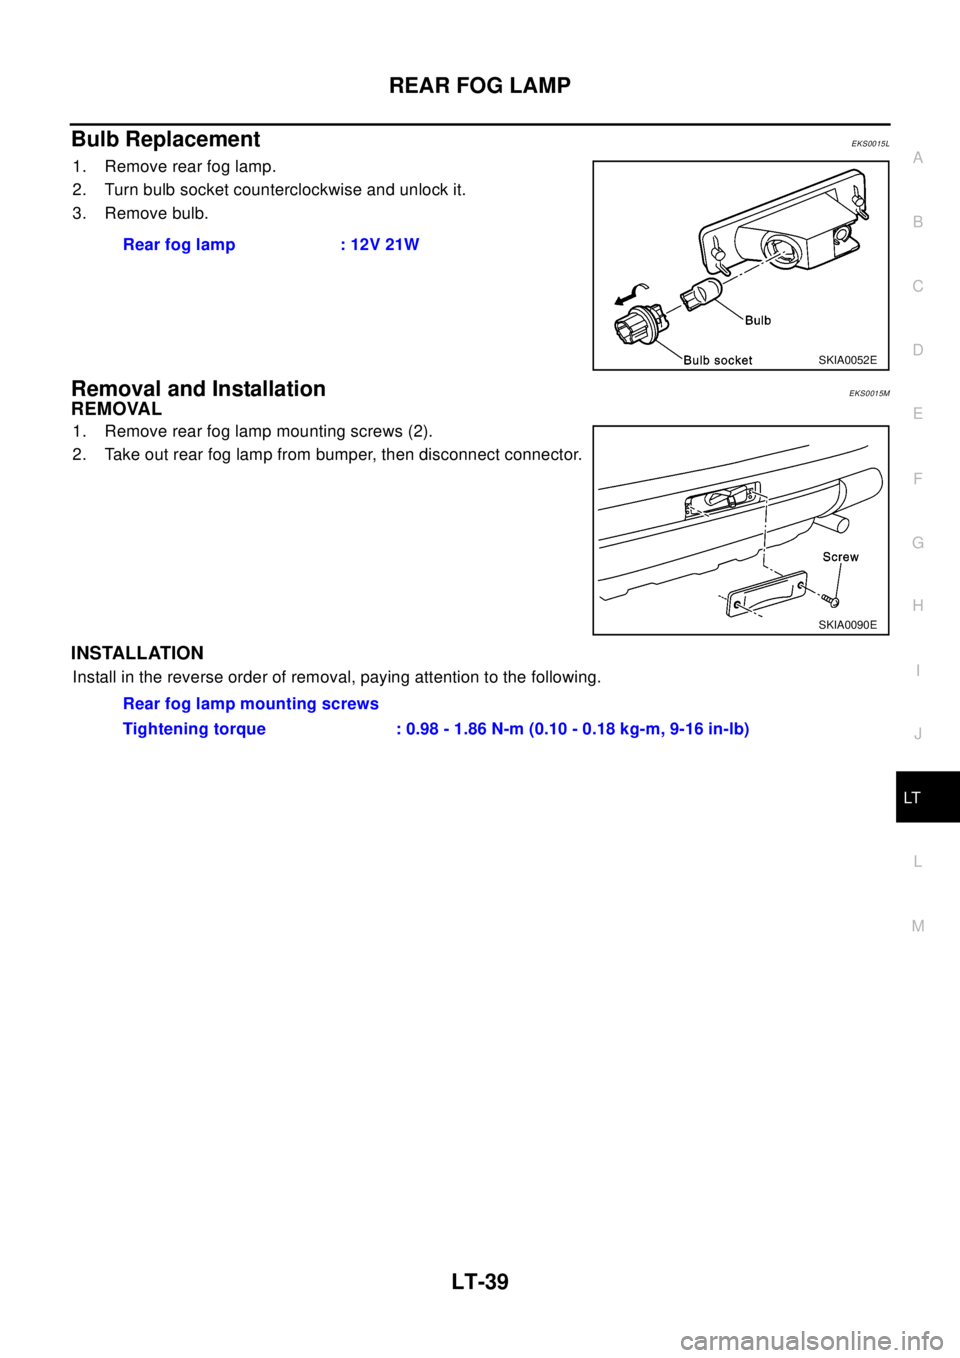
Bulb ReplacementEKS0015L
1. Remove rear fog lamp.
2. Turn bulb socket counterclockwise and unlock it.
3. Remove bulb.
Removal and InstallationEKS0015M
REMOVAL
1. Remove rear fog lamp mounting screws (2).
2. Take out rear fog lamp from bumper, then disconnect connector.
INSTALLATION
Install in the reverse order of removal, paying attention to the following.Rear fog lamp : 12V 21W
SKIA0052E
SKIA0090E
Rear fog lamp mounting screws
Tightening torque : 0.98 - 1.86 N-m (0.10 - 0.18 kg-m, 9-16 in-lb)
Page 2438 of 3066
LT-40
CLEARANCE LAMP/TAIL LAMP
CLEARANCE LAMP/TAIL LAMP
PFP:26010
Bulb Rplacement (Clearance Lamp)EKS001UR
Refer toLT- 4 , "HEADLAMP"
Bulb Replacement (Taillamp)EKS001US
Refer toLT- 4 2 , "REAR COMBINATION LAMP"
Removal and Installation of Clearance LampEKS001UT
Refer toLT- 4 , "HEADLAMP"
Removal and Installation of TaillampEKS001UU
Refer toLT- 4 2 , "REAR COMBINATION LAMP"
Page 2439 of 3066
HIGH-MOUNTED STOP LAMP
LT-41
C
D
E
F
G
H
I
J
L
MA
B
LT
HIGH-MOUNTED STOP LAMPPFP:26590
Bulb ReplacementEKS0034W
Refer toLT- 2 6 , "STOP LAMP"
Removal and InstallationEKS0034X
Refer toLT- 2 6 , "STOP LAMP"
Page 2440 of 3066
LT-42
REAR COMBINATION LAMP
REAR COMBINATION LAMP
PFP:26554
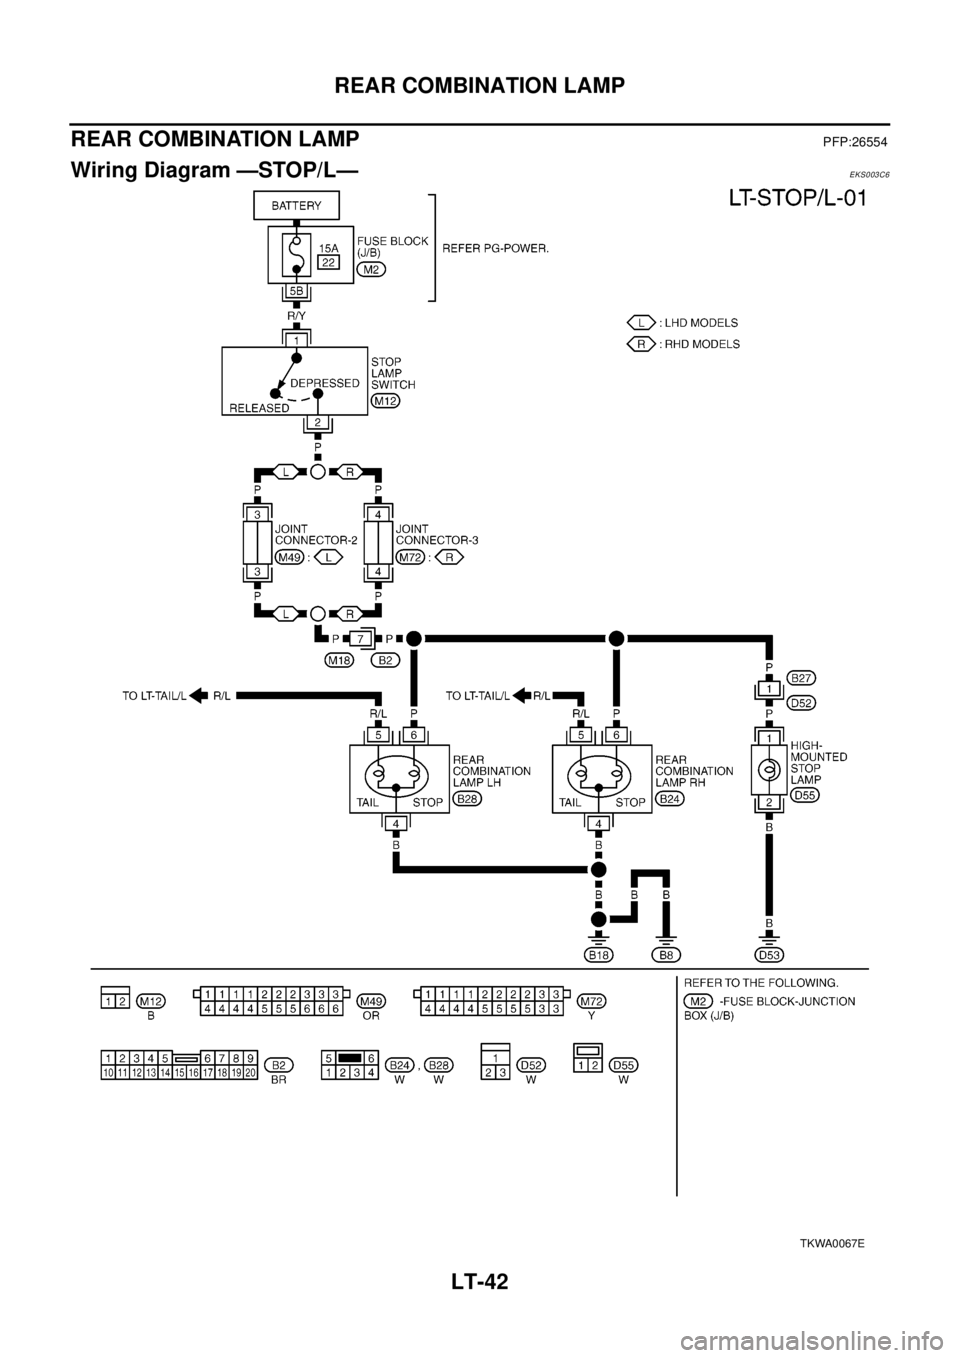
Wiring Diagram —STOP/L—EKS003C6
TKWA0067E
Trending: maintenance reset, airbag, engine oil capacity, CD player, oil capacity, jack points, brake rotor

