SUBARU LEGACY 1999 Service Repair Manual
Manufacturer: SUBARU, Model Year: 1999, Model line: LEGACY, Model: SUBARU LEGACY 1999Pages: 1456, PDF Size: 59.93 MB
Page 1231 of 1456
4. Headlight
A: ADJUSTMENT
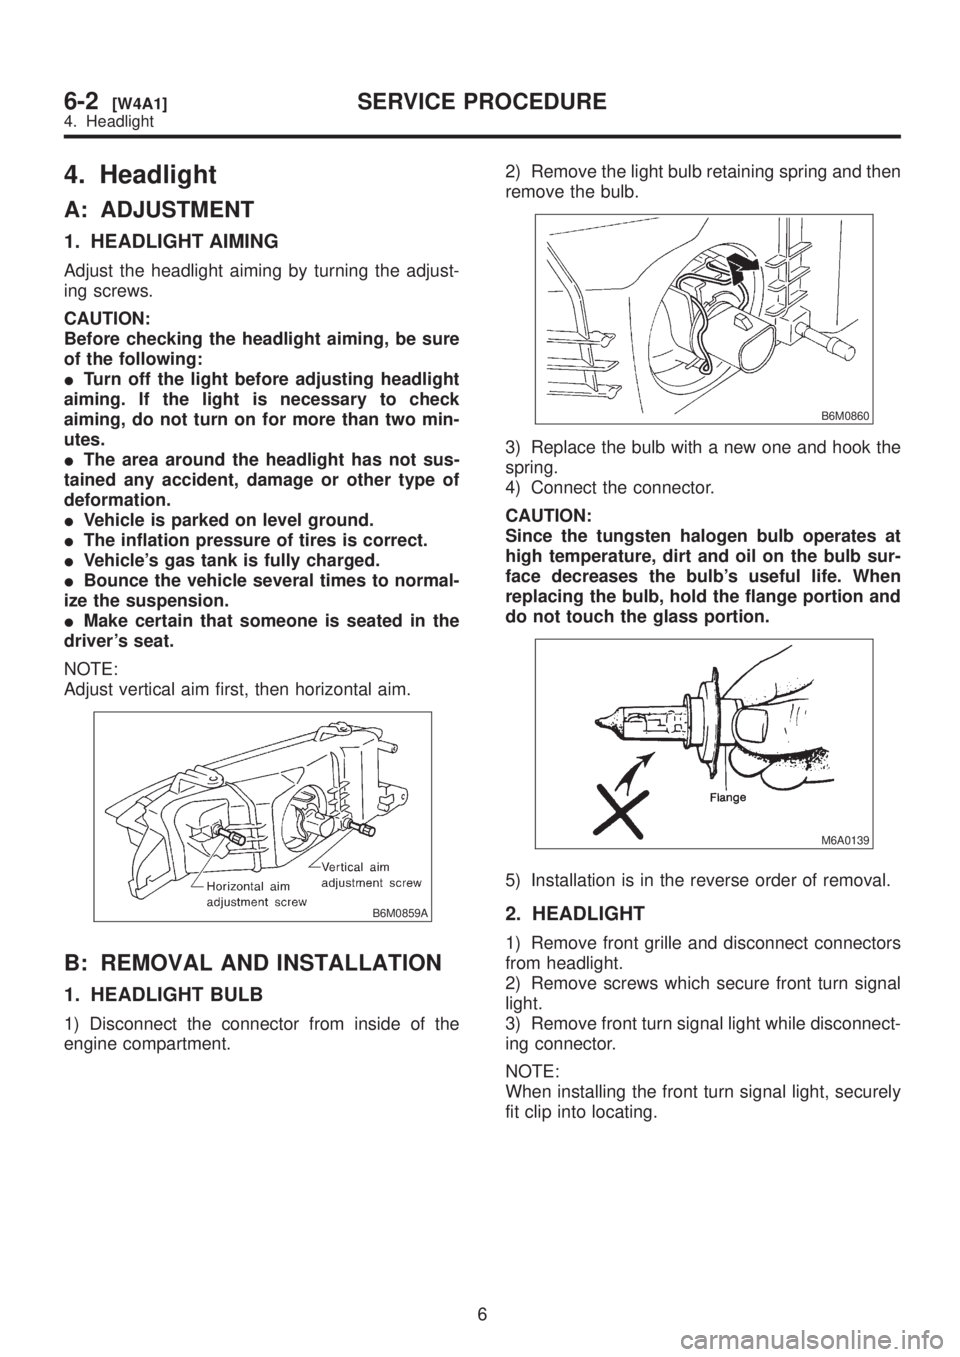
1. HEADLIGHT AIMING
Adjust the headlight aiming by turning the adjust-
ing screws.
CAUTION:
Before checking the headlight aiming, be sure
of the following:
ITurn off the light before adjusting headlight
aiming. If the light is necessary to check
aiming, do not turn on for more than two min-
utes.
IThe area around the headlight has not sus-
tained any accident, damage or other type of
deformation.
IVehicle is parked on level ground.
IThe inflation pressure of tires is correct.
IVehicle's gas tank is fully charged.
IBounce the vehicle several times to normal-
ize the suspension.
IMake certain that someone is seated in the
driver's seat.
NOTE:
Adjust vertical aim first, then horizontal aim.
B6M0859A
B: REMOVAL AND INSTALLATION
1. HEADLIGHT BULB
1) Disconnect the connector from inside of the
engine compartment.2) Remove the light bulb retaining spring and then
remove the bulb.
B6M0860
3) Replace the bulb with a new one and hook the
spring.
4) Connect the connector.
CAUTION:
Since the tungsten halogen bulb operates at
high temperature, dirt and oil on the bulb sur-
face decreases the bulb's useful life. When
replacing the bulb, hold the flange portion and
do not touch the glass portion.
M6A0139
5) Installation is in the reverse order of removal.
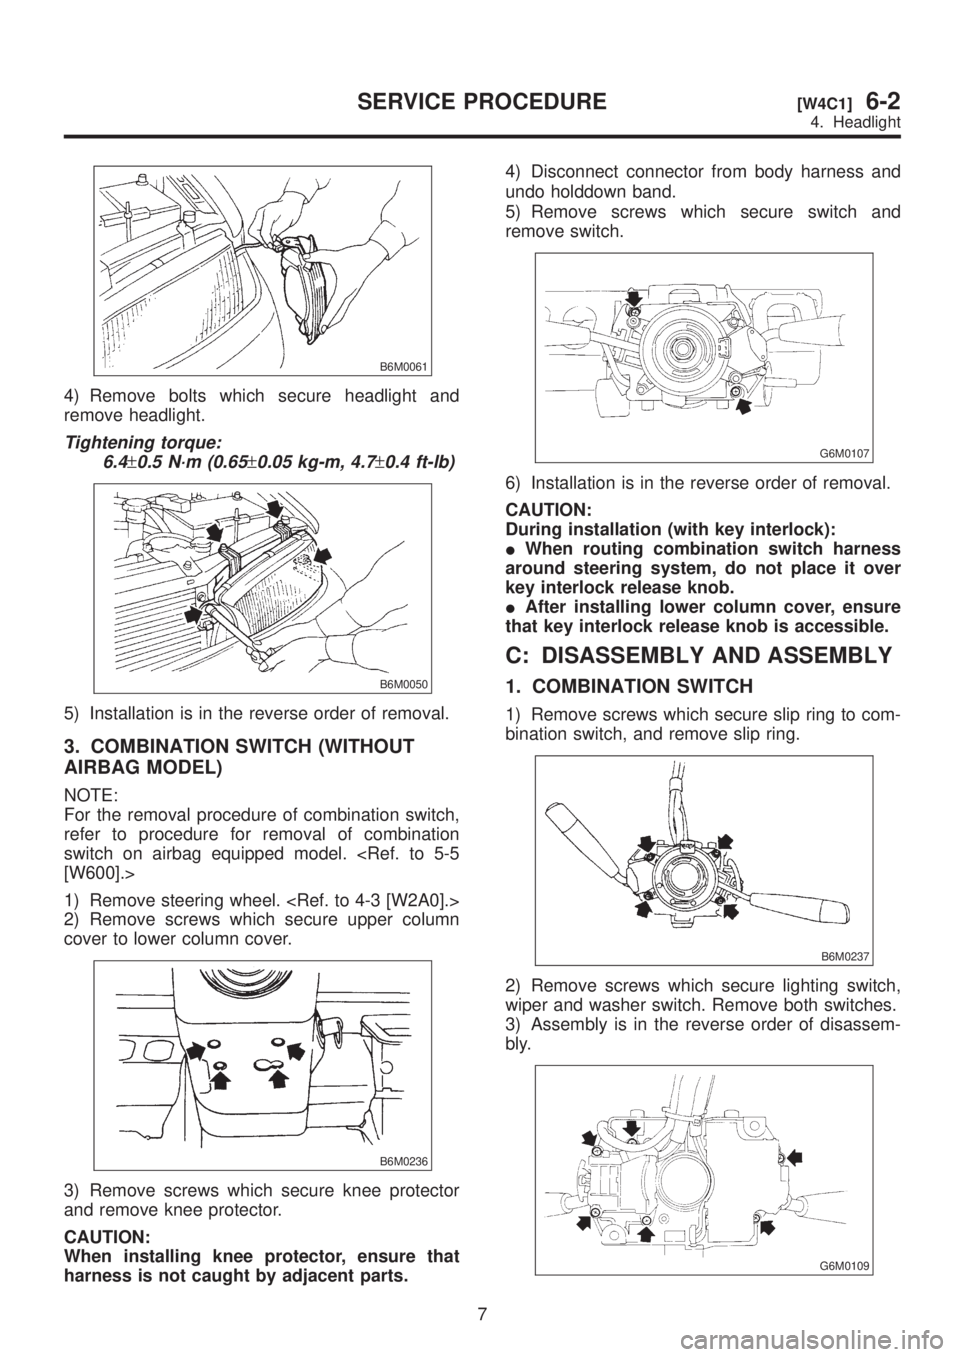
2. HEADLIGHT
1) Remove front grille and disconnect connectors
from headlight.
2) Remove screws which secure front turn signal
light.
3) Remove front turn signal light while disconnect-
ing connector.
NOTE:
When installing the front turn signal light, securely
fit clip into locating.
6
6-2[W4A1]SERVICE PROCEDURE
4. Headlight
Page 1232 of 1456
B6M0061
4) Remove bolts which secure headlight and
remove headlight.
Tightening torque:
6.4
±0.5 N´m (0.65±0.05 kg-m, 4.7±0.4 ft-lb)
B6M0050
5) Installation is in the reverse order of removal.
3. COMBINATION SWITCH (WITHOUT
AIRBAG MODEL)
NOTE:
For the removal procedure of combination switch,
refer to procedure for removal of combination
switch on airbag equipped model.
1) Remove steering wheel.
2) Remove screws which secure upper column
cover to lower column cover.
B6M0236
3) Remove screws which secure knee protector
and remove knee protector.
CAUTION:
When installing knee protector, ensure that
harness is not caught by adjacent parts.4) Disconnect connector from body harness and
undo holddown band.
5) Remove screws which secure switch and
remove switch.
G6M0107
6) Installation is in the reverse order of removal.
CAUTION:
During installation (with key interlock):
IWhen routing combination switch harness
around steering system, do not place it over
key interlock release knob.
IAfter installing lower column cover, ensure
that key interlock release knob is accessible.
C: DISASSEMBLY AND ASSEMBLY
1. COMBINATION SWITCH
1) Remove screws which secure slip ring to com-
bination switch, and remove slip ring.
B6M0237
2) Remove screws which secure lighting switch,
wiper and washer switch. Remove both switches.
3) Assembly is in the reverse order of disassem-
bly.
G6M0109
7
[W4C1]6-2SERVICE PROCEDURE
4. Headlight
Page 1233 of 1456
D: INSPECTION
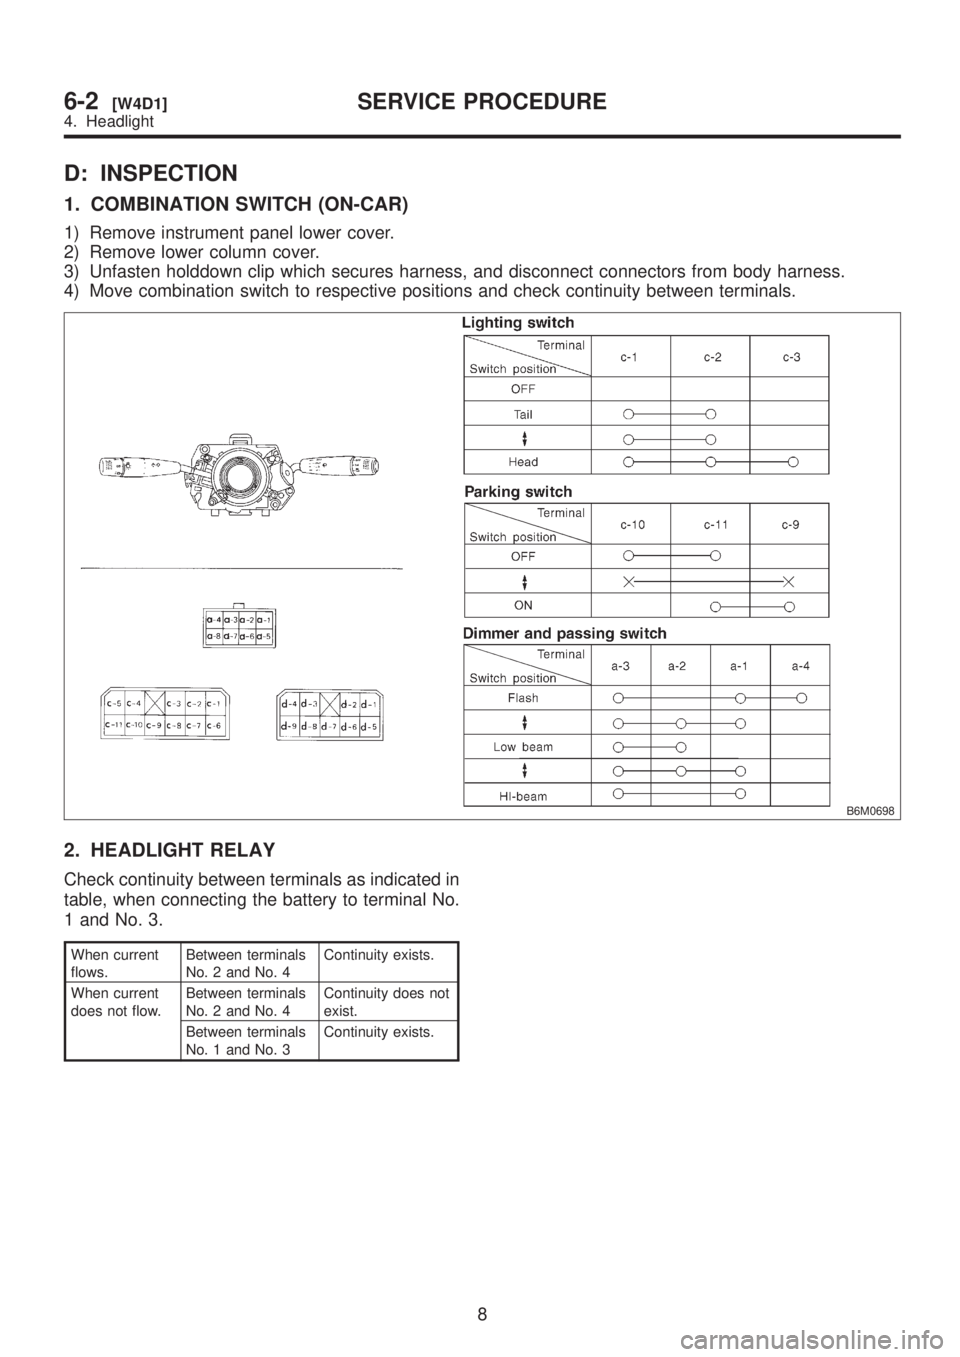
1. COMBINATION SWITCH (ON-CAR)
1) Remove instrument panel lower cover.
2) Remove lower column cover.
3) Unfasten holddown clip which secures harness, and disconnect connectors from body harness.
4) Move combination switch to respective positions and check continuity between terminals.
B6M0698
2. HEADLIGHT RELAY
Check continuity between terminals as indicated in
table, when connecting the battery to terminal No.
1 and No. 3.
When current
flows.Between terminals
No. 2 and No. 4Continuity exists.
When current
does not flow.Between terminals
No. 2 and No. 4Continuity does not
exist.
Between terminals
No. 1 and No. 3Continuity exists.
8
6-2[W4D1]SERVICE PROCEDURE
4. Headlight
Page 1234 of 1456
G6M0111
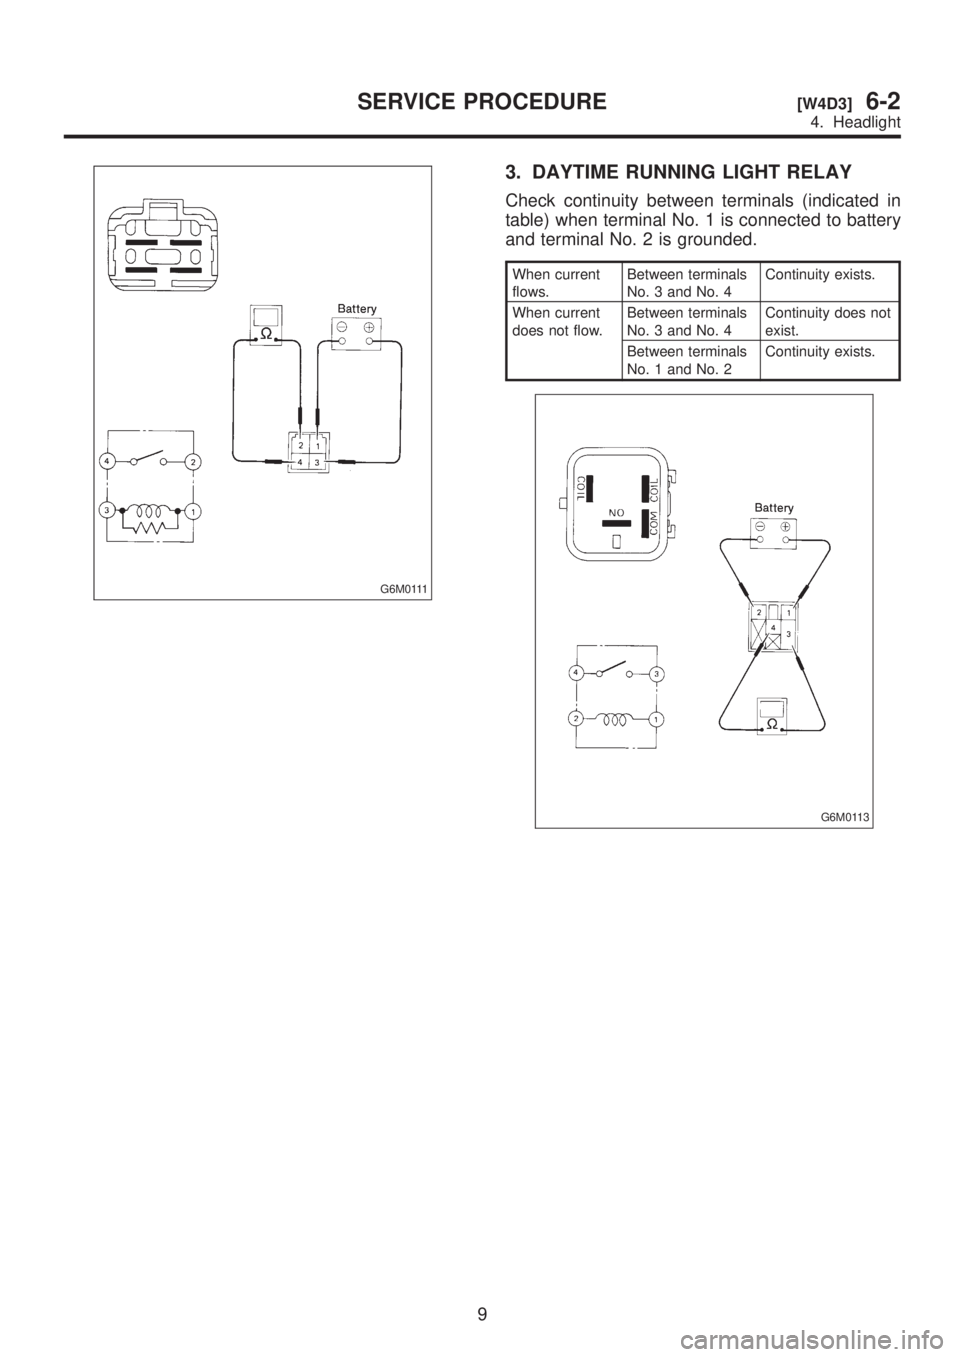
3. DAYTIME RUNNING LIGHT RELAY
Check continuity between terminals (indicated in
table) when terminal No. 1 is connected to battery
and terminal No. 2 is grounded.
When current
flows.Between terminals
No. 3 and No. 4Continuity exists.
When current
does not flow.Between terminals
No. 3 and No. 4Continuity does not
exist.
Between terminals
No. 1 and No. 2Continuity exists.
G6M0113
9
[W4D3]6-2SERVICE PROCEDURE
4. Headlight
Page 1235 of 1456
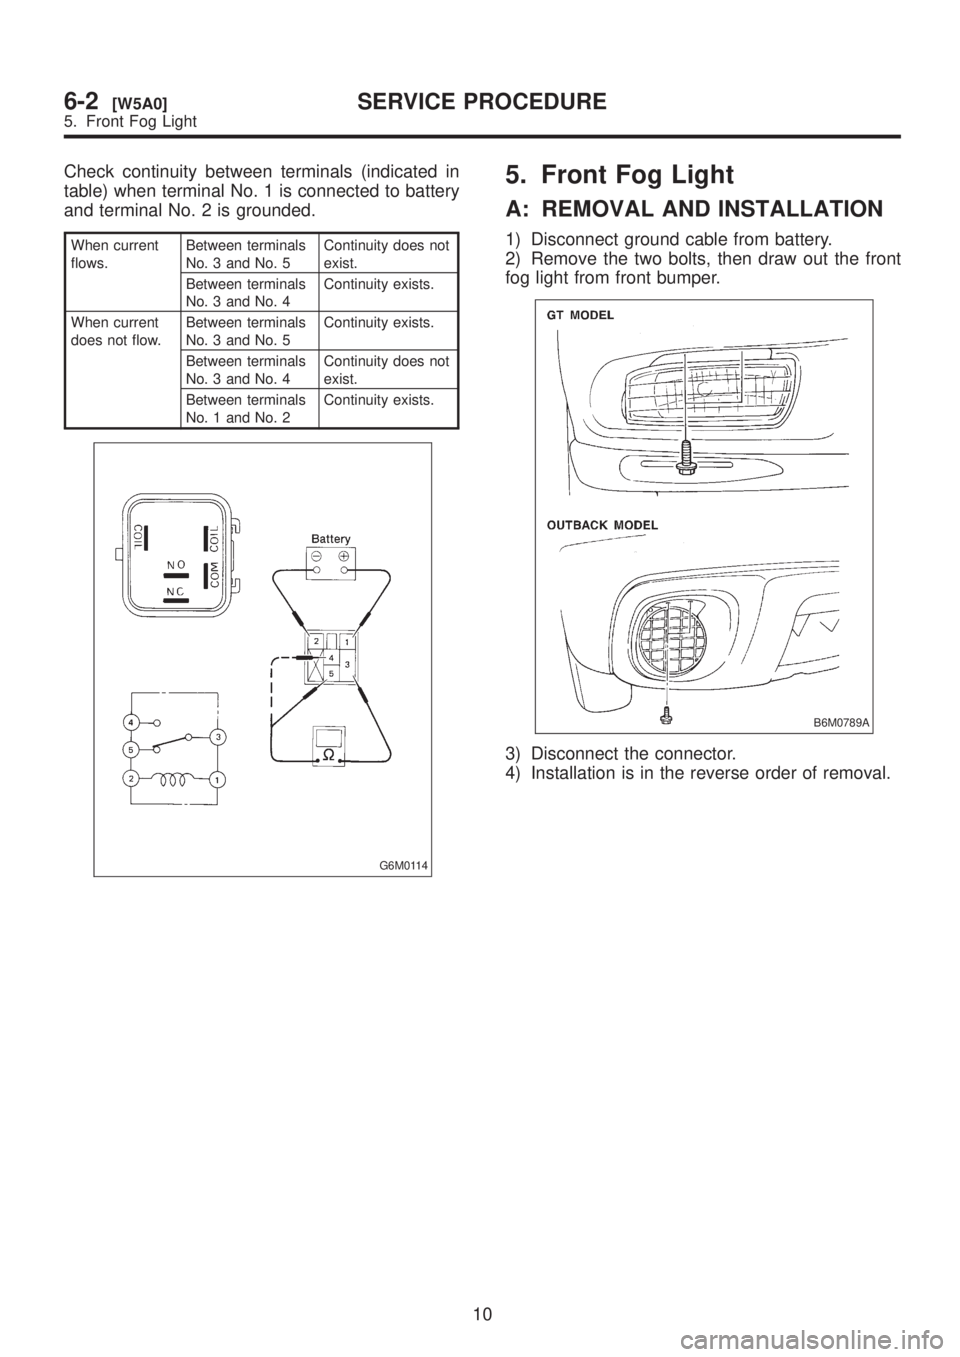
Check continuity between terminals (indicated in
table) when terminal No. 1 is connected to battery
and terminal No. 2 is grounded.
When current
flows.Between terminals
No. 3 and No. 5Continuity does not
exist.
Between terminals
No. 3 and No. 4Continuity exists.
When current
does not flow.Between terminals
No. 3 and No. 5Continuity exists.
Between terminals
No. 3 and No. 4Continuity does not
exist.
Between terminals
No. 1 and No. 2Continuity exists.
G6M0114
5. Front Fog Light
A: REMOVAL AND INSTALLATION
1) Disconnect ground cable from battery.
2) Remove the two bolts, then draw out the front
fog light from front bumper.
B6M0789A
3) Disconnect the connector.
4) Installation is in the reverse order of removal.
10
6-2[W5A0]SERVICE PROCEDURE
5. Front Fog Light
Page 1236 of 1456
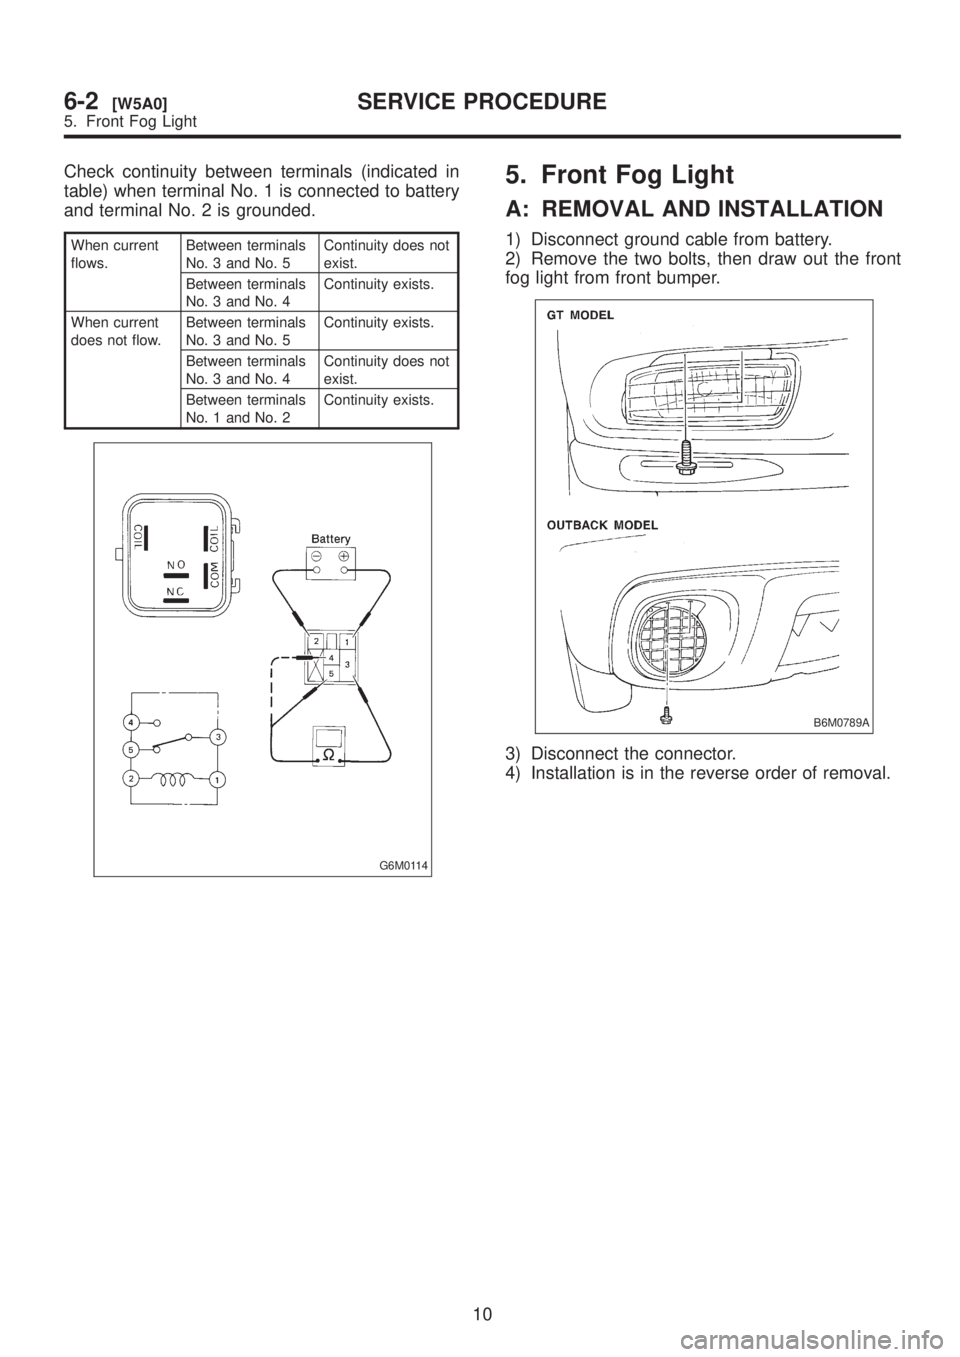
Check continuity between terminals (indicated in
table) when terminal No. 1 is connected to battery
and terminal No. 2 is grounded.
When current
flows.Between terminals
No. 3 and No. 5Continuity does not
exist.
Between terminals
No. 3 and No. 4Continuity exists.
When current
does not flow.Between terminals
No. 3 and No. 5Continuity exists.
Between terminals
No. 3 and No. 4Continuity does not
exist.
Between terminals
No. 1 and No. 2Continuity exists.
G6M0114
5. Front Fog Light
A: REMOVAL AND INSTALLATION
1) Disconnect ground cable from battery.
2) Remove the two bolts, then draw out the front
fog light from front bumper.
B6M0789A
3) Disconnect the connector.
4) Installation is in the reverse order of removal.
10
6-2[W5A0]SERVICE PROCEDURE
5. Front Fog Light
Page 1237 of 1456
6. Stop and Tail Light
A: REMOVAL AND INSTALLATION
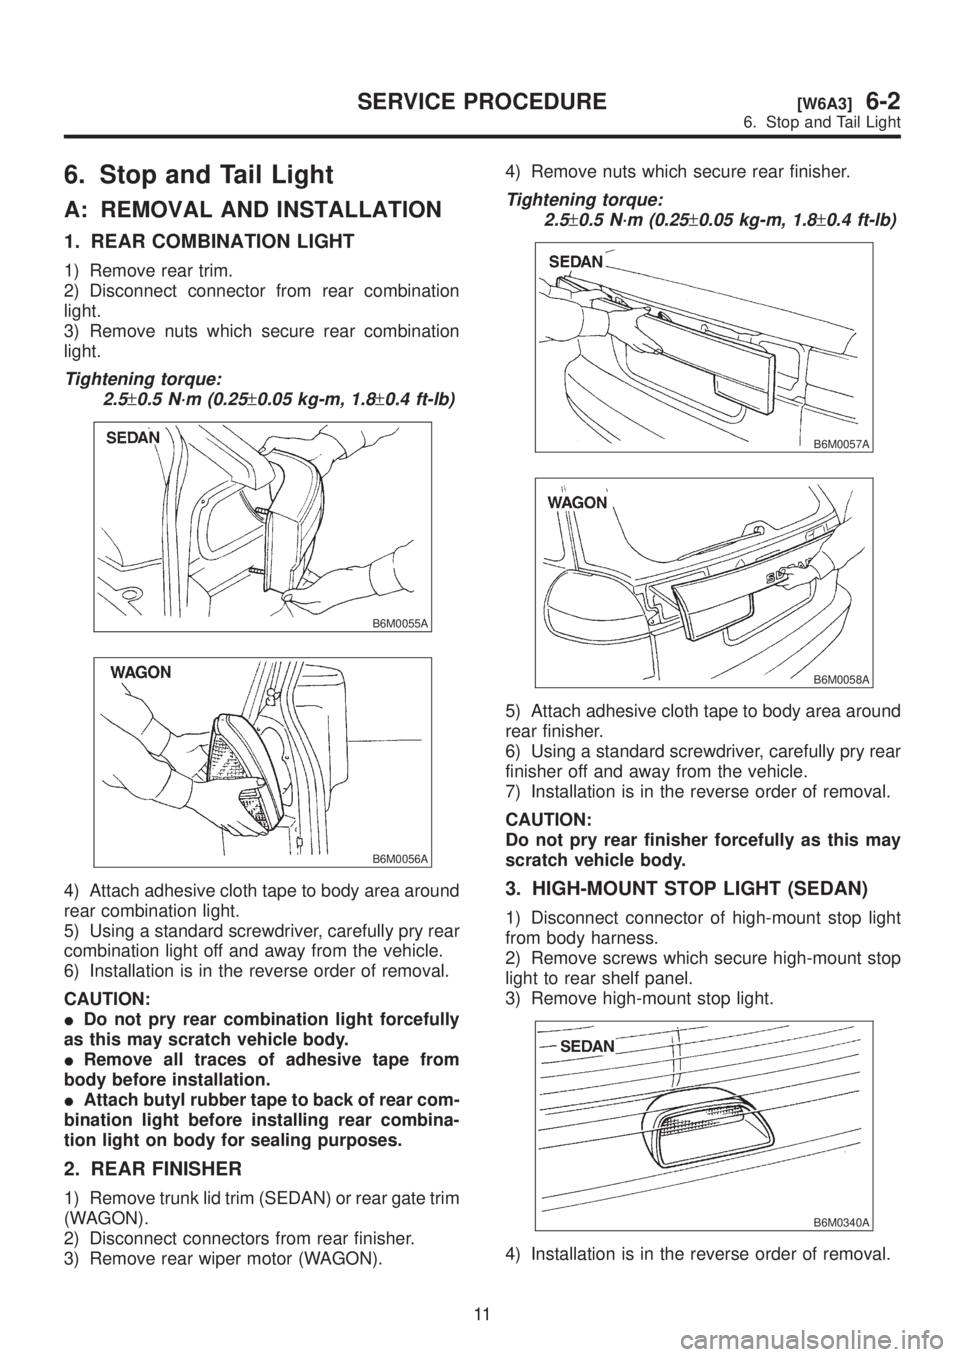
1. REAR COMBINATION LIGHT
1) Remove rear trim.
2) Disconnect connector from rear combination
light.
3) Remove nuts which secure rear combination
light.
Tightening torque:
2.5
±0.5 N´m (0.25±0.05 kg-m, 1.8±0.4 ft-lb)
B6M0055A
B6M0056A
4) Attach adhesive cloth tape to body area around
rear combination light.
5) Using a standard screwdriver, carefully pry rear
combination light off and away from the vehicle.
6) Installation is in the reverse order of removal.
CAUTION:
IDo not pry rear combination light forcefully
as this may scratch vehicle body.
IRemove all traces of adhesive tape from
body before installation.
IAttach butyl rubber tape to back of rear com-
bination light before installing rear combina-
tion light on body for sealing purposes.
2. REAR FINISHER
1) Remove trunk lid trim (SEDAN) or rear gate trim
(WAGON).
2) Disconnect connectors from rear finisher.
3) Remove rear wiper motor (WAGON).4) Remove nuts which secure rear finisher.
Tightening torque:
2.5
±0.5 N´m (0.25±0.05 kg-m, 1.8±0.4 ft-lb)
B6M0057A
B6M0058A
5) Attach adhesive cloth tape to body area around
rear finisher.
6) Using a standard screwdriver, carefully pry rear
finisher off and away from the vehicle.
7) Installation is in the reverse order of removal.
CAUTION:
Do not pry rear finisher forcefully as this may
scratch vehicle body.
3. HIGH-MOUNT STOP LIGHT (SEDAN)
1) Disconnect connector of high-mount stop light
from body harness.
2) Remove screws which secure high-mount stop
light to rear shelf panel.
3) Remove high-mount stop light.
B6M0340A
4) Installation is in the reverse order of removal.
11
[W6A3]6-2SERVICE PROCEDURE
6. Stop and Tail Light
Page 1238 of 1456
4. HIGH-MOUNT STOP LIGHT (WAGON)
1) Remove high-mount stop light cover from rear
gate trim panel.
2) Remove screws which secure high-mount stop
light.
B6M0341A
3) Remove high-mount stop light while discon-
necting connector from body harness.
4) Installation is in the reverse order of removal.
5. STOP LIGHT SWITCH
Remove and install stop light switch.
NOTE:
When installing the stop light switch, adjust the
pedal height by adjusting the stop light switch posi-
tion.
6. COMBINATION SWITCH
Remove and install combination switch.
B: DISASSEMBLY AND ASSEMBLY
1. COMBINATION SWITCH
Disassemble and assemble combination switch.
C: INSPECTION
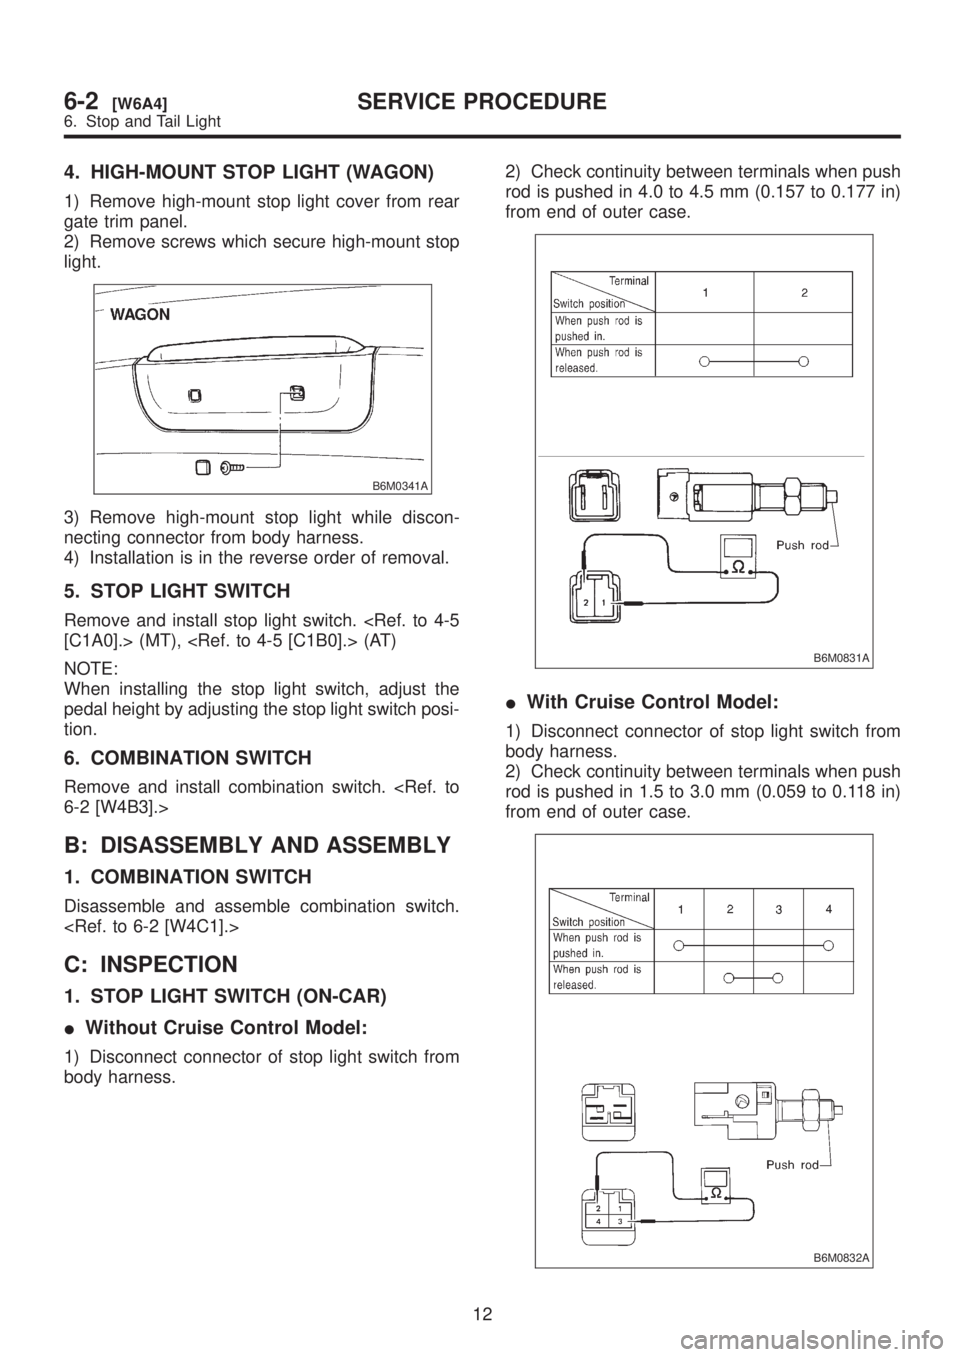
1. STOP LIGHT SWITCH (ON-CAR)
IWithout Cruise Control Model:
1) Disconnect connector of stop light switch from
body harness.2) Check continuity between terminals when push
rod is pushed in 4.0 to 4.5 mm (0.157 to 0.177 in)
from end of outer case.
B6M0831A
IWith Cruise Control Model:
1) Disconnect connector of stop light switch from
body harness.
2) Check continuity between terminals when push
rod is pushed in 1.5 to 3.0 mm (0.059 to 0.118 in)
from end of outer case.
B6M0832A
12
6-2[W6A4]SERVICE PROCEDURE
6. Stop and Tail Light
Page 1239 of 1456
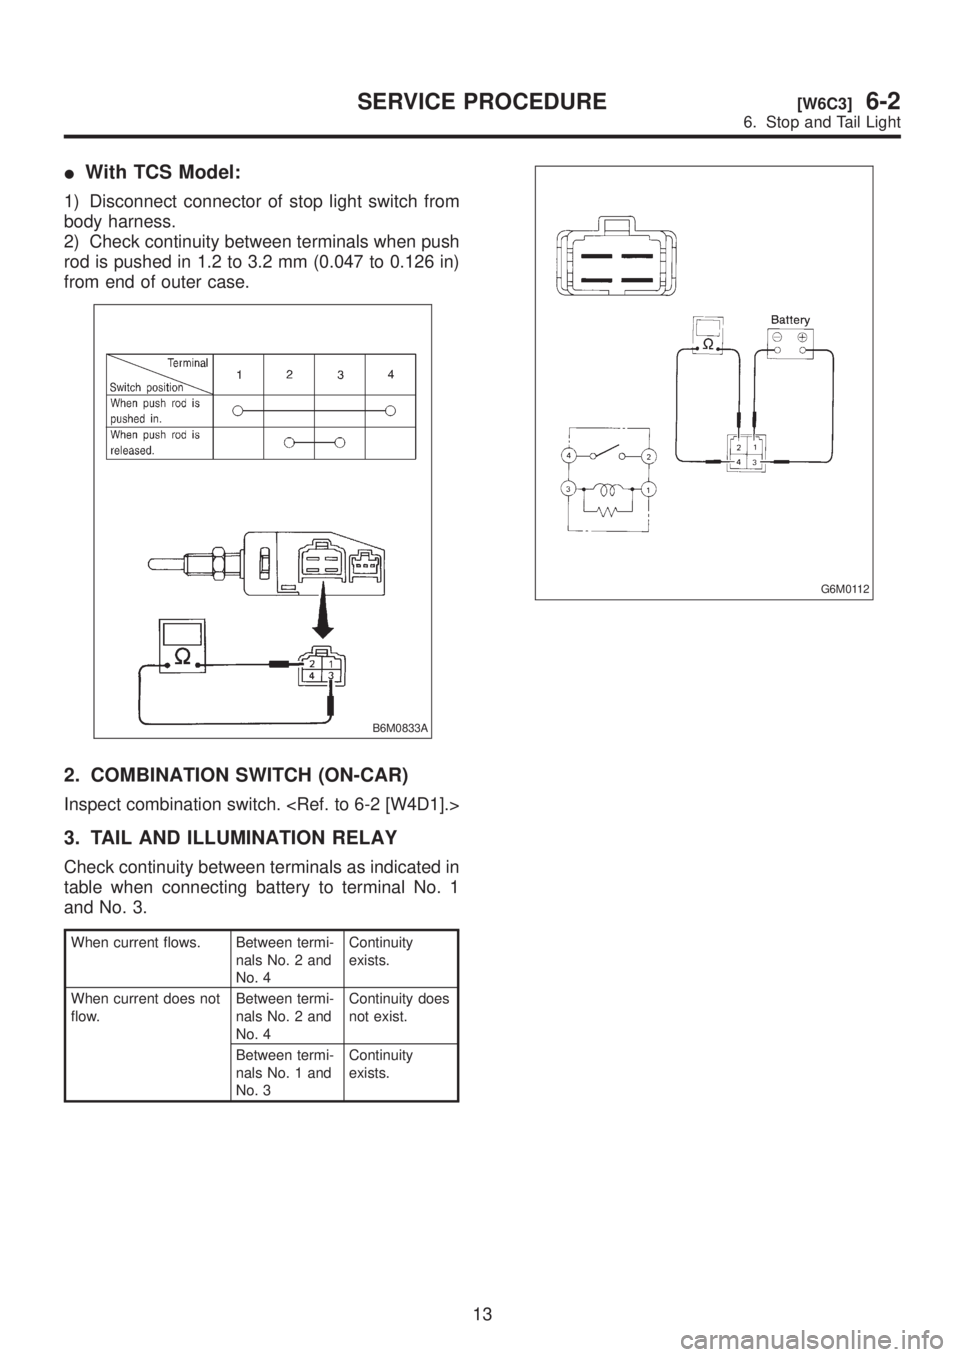
IWith TCS Model:
1) Disconnect connector of stop light switch from
body harness.
2) Check continuity between terminals when push
rod is pushed in 1.2 to 3.2 mm (0.047 to 0.126 in)
from end of outer case.
B6M0833A
2. COMBINATION SWITCH (ON-CAR)
Inspect combination switch.
3. TAIL AND ILLUMINATION RELAY
Check continuity between terminals as indicated in
table when connecting battery to terminal No. 1
and No. 3.
When current flows. Between termi-
nals No. 2 and
No. 4Continuity
exists.
When current does not
flow.Between termi-
nals No. 2 and
No. 4Continuity does
not exist.
Between termi-
nals No. 1 and
No. 3Continuity
exists.
G6M0112
13
[W6C3]6-2SERVICE PROCEDURE
6. Stop and Tail Light
Page 1240 of 1456
![SUBARU LEGACY 1999 Service Repair Manual 7. Turn Signal and Hazard
Warning Light
A: REMOVAL AND INSTALLATION
1. FRONT TURN SIGNAL LIGHT
Remove and install front turn signal light. <Ref. to
6-2 [W4B2].>
NOTE:
The front turn signal light is un SUBARU LEGACY 1999 Service Repair Manual 7. Turn Signal and Hazard
Warning Light
A: REMOVAL AND INSTALLATION
1. FRONT TURN SIGNAL LIGHT
Remove and install front turn signal light. <Ref. to
6-2 [W4B2].>
NOTE:
The front turn signal light is un](/img/17/57435/w960_57435-1239.png)
7. Turn Signal and Hazard
Warning Light
A: REMOVAL AND INSTALLATION
1. FRONT TURN SIGNAL LIGHT
Remove and install front turn signal light.
NOTE:
The front turn signal light is united with headlight
assembly.
2. REAR COMBINATION LIGHT
Remove and install rear combination light.
3. COMBINATION SWITCH
Remove and install combination switch.
4. HAZARD SWITCH
1) Remove center panel from instrument panel.
2) Disconnect connector of hazard switch from
body harness.
3) Remove hazard switch from center panel.
B6M0063
4) Installation is in the reverse order of removal.
5. TURN SIGNAL AND HAZARD UNIT
1) Remove instrument panel lower cover.
2) Remove engine hood opener lever bracket.
3) Disconnect connector of turn signal and hazard
unit.4) Remove screw, and then remove turn signal
and hazard unit from bracket.
B6M0343A
5) Installation is in the reverse order of removal.
B: DISASSEMBLY AND ASSEMBLY
1. COMBINATION SWITCH
Disassemble and assemble combination switch.
C: INSPECTION
1. COMBINATION SWITCH (ON-CAR)
1) Remove instrument panel lower cover.
2) Remove lower column cover.
3) Unfasten holddown clip which secures harness,
and disconnect connectors from body harness.
4) Move combination switch to respective posi-
tions and check continuity between terminals.
B6M0702
14
6-2[W7A1]SERVICE PROCEDURE
7. Turn Signal and Hazard Warning Light