SUBARU LEGACY 1999 Service Repair Manual
Manufacturer: SUBARU, Model Year: 1999, Model line: LEGACY, Model: SUBARU LEGACY 1999Pages: 1456, PDF Size: 59.93 MB
Page 1241 of 1456
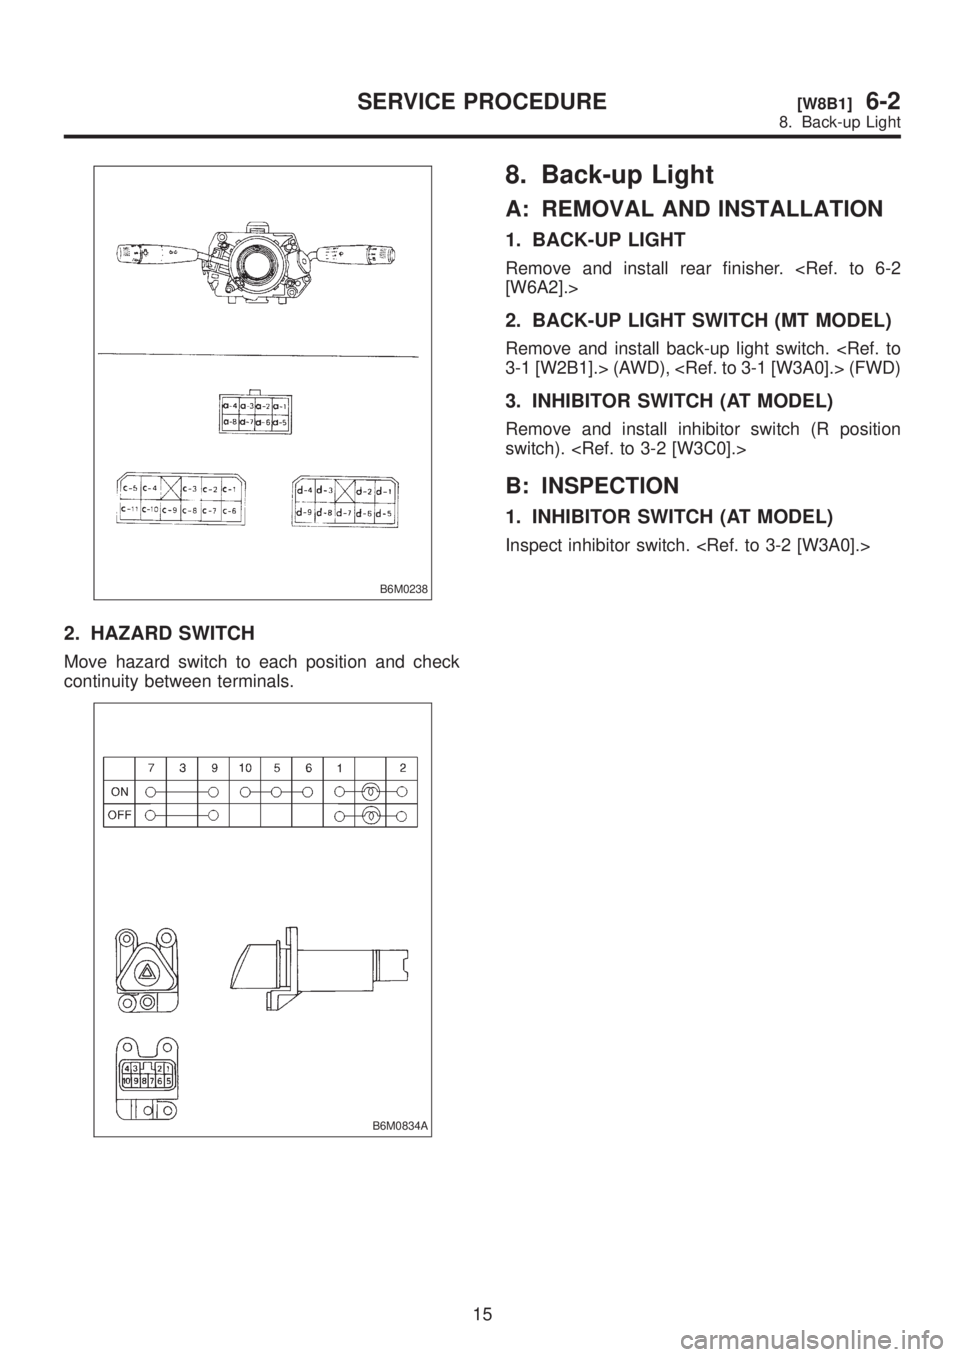
B6M0238
2. HAZARD SWITCH
Move hazard switch to each position and check
continuity between terminals.
B6M0834A
8. Back-up Light
A: REMOVAL AND INSTALLATION
1. BACK-UP LIGHT
Remove and install rear finisher.
2. BACK-UP LIGHT SWITCH (MT MODEL)
Remove and install back-up light switch.
3. INHIBITOR SWITCH (AT MODEL)
Remove and install inhibitor switch (R position
switch).
B: INSPECTION
1. INHIBITOR SWITCH (AT MODEL)
Inspect inhibitor switch.
15
[W8B1]6-2SERVICE PROCEDURE
8. Back-up Light
Page 1242 of 1456
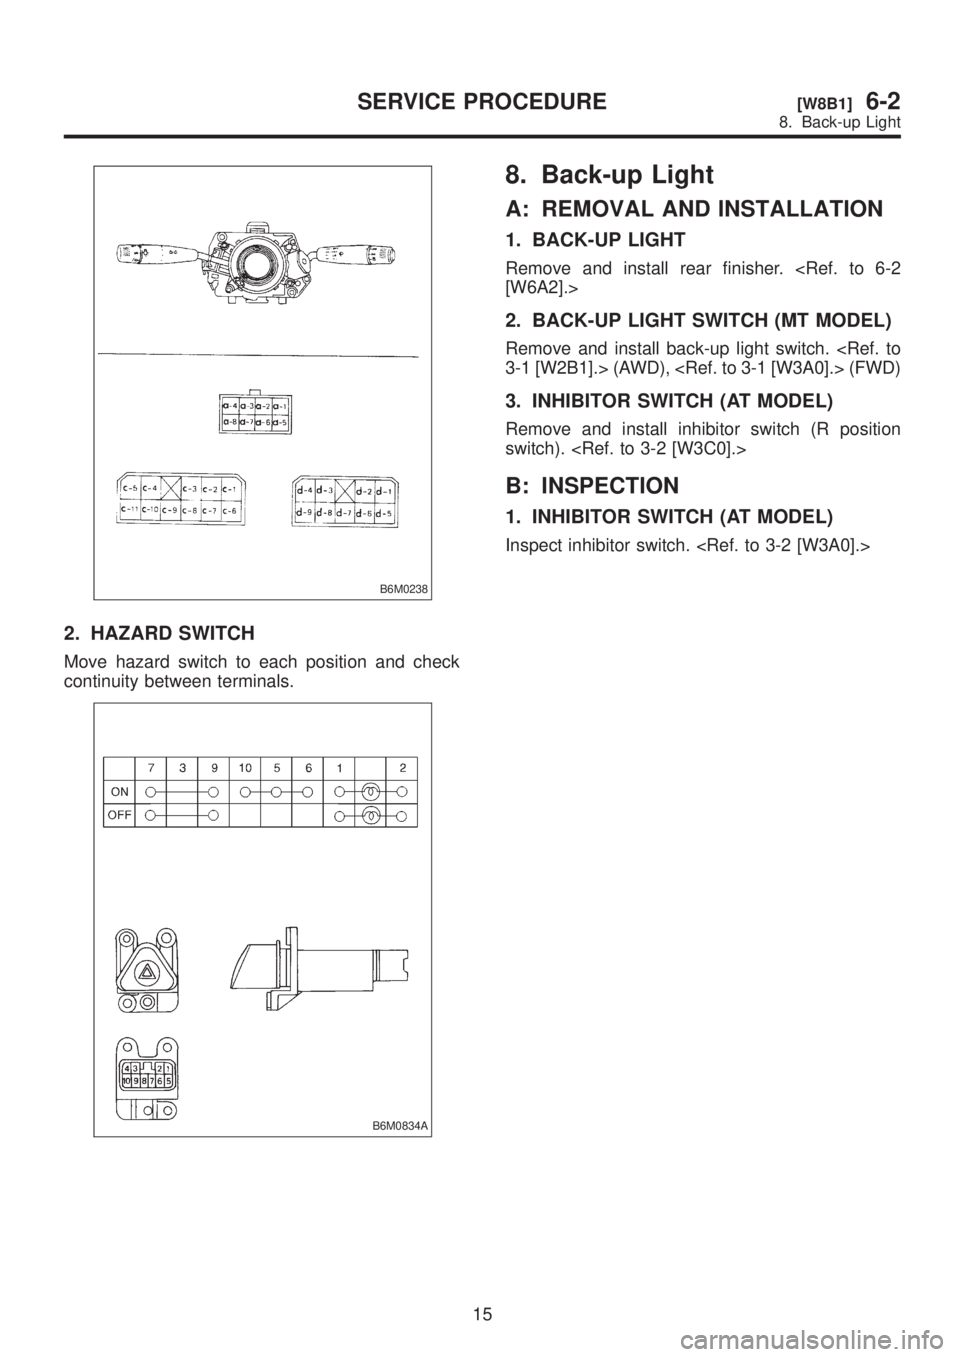
B6M0238
2. HAZARD SWITCH
Move hazard switch to each position and check
continuity between terminals.
B6M0834A
8. Back-up Light
A: REMOVAL AND INSTALLATION
1. BACK-UP LIGHT
Remove and install rear finisher.
2. BACK-UP LIGHT SWITCH (MT MODEL)
Remove and install back-up light switch.
3. INHIBITOR SWITCH (AT MODEL)
Remove and install inhibitor switch (R position
switch).
B: INSPECTION
1. INHIBITOR SWITCH (AT MODEL)
Inspect inhibitor switch.
15
[W8B1]6-2SERVICE PROCEDURE
8. Back-up Light
Page 1243 of 1456
9. Room Light and Door Switch
A: REMOVAL AND INSTALLATION
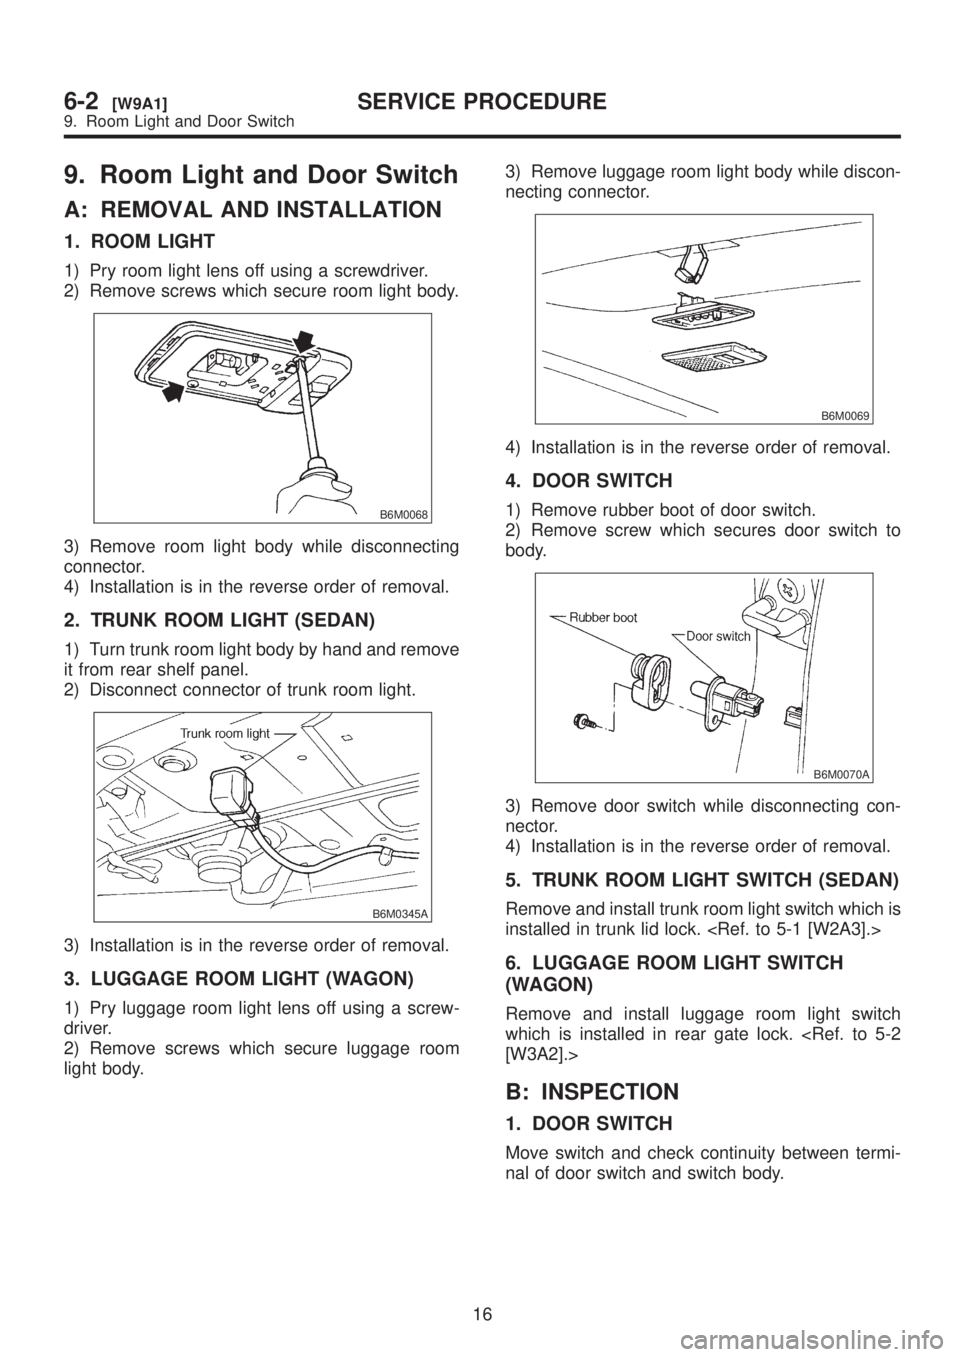
1. ROOM LIGHT
1) Pry room light lens off using a screwdriver.
2) Remove screws which secure room light body.
B6M0068
3) Remove room light body while disconnecting
connector.
4) Installation is in the reverse order of removal.
2. TRUNK ROOM LIGHT (SEDAN)
1) Turn trunk room light body by hand and remove
it from rear shelf panel.
2) Disconnect connector of trunk room light.
B6M0345A
3) Installation is in the reverse order of removal.
3. LUGGAGE ROOM LIGHT (WAGON)
1) Pry luggage room light lens off using a screw-
driver.
2) Remove screws which secure luggage room
light body.3) Remove luggage room light body while discon-
necting connector.
B6M0069
4) Installation is in the reverse order of removal.
4. DOOR SWITCH
1) Remove rubber boot of door switch.
2) Remove screw which secures door switch to
body.
B6M0070A
3) Remove door switch while disconnecting con-
nector.
4) Installation is in the reverse order of removal.
5. TRUNK ROOM LIGHT SWITCH (SEDAN)
Remove and install trunk room light switch which is
installed in trunk lid lock.
6. LUGGAGE ROOM LIGHT SWITCH
(WAGON)
Remove and install luggage room light switch
which is installed in rear gate lock.
B: INSPECTION
1. DOOR SWITCH
Move switch and check continuity between termi-
nal of door switch and switch body.
16
6-2[W9A1]SERVICE PROCEDURE
9. Room Light and Door Switch
Page 1244 of 1456
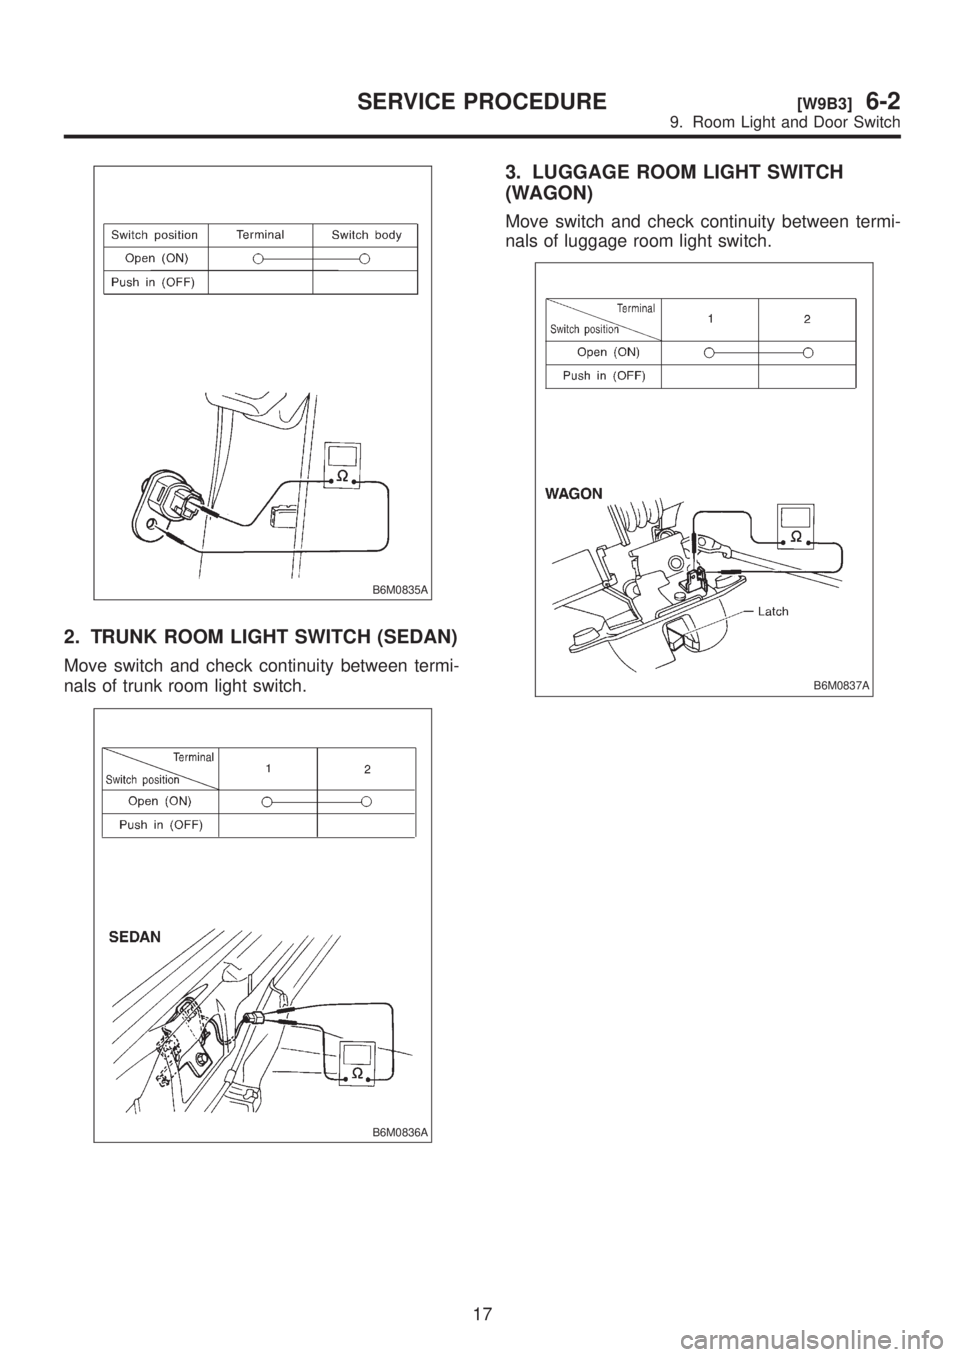
B6M0835A
2. TRUNK ROOM LIGHT SWITCH (SEDAN)
Move switch and check continuity between termi-
nals of trunk room light switch.
B6M0836A
3. LUGGAGE ROOM LIGHT SWITCH
(WAGON)
Move switch and check continuity between termi-
nals of luggage room light switch.
B6M0837A
17
[W9B3]6-2SERVICE PROCEDURE
9. Room Light and Door Switch
Page 1245 of 1456
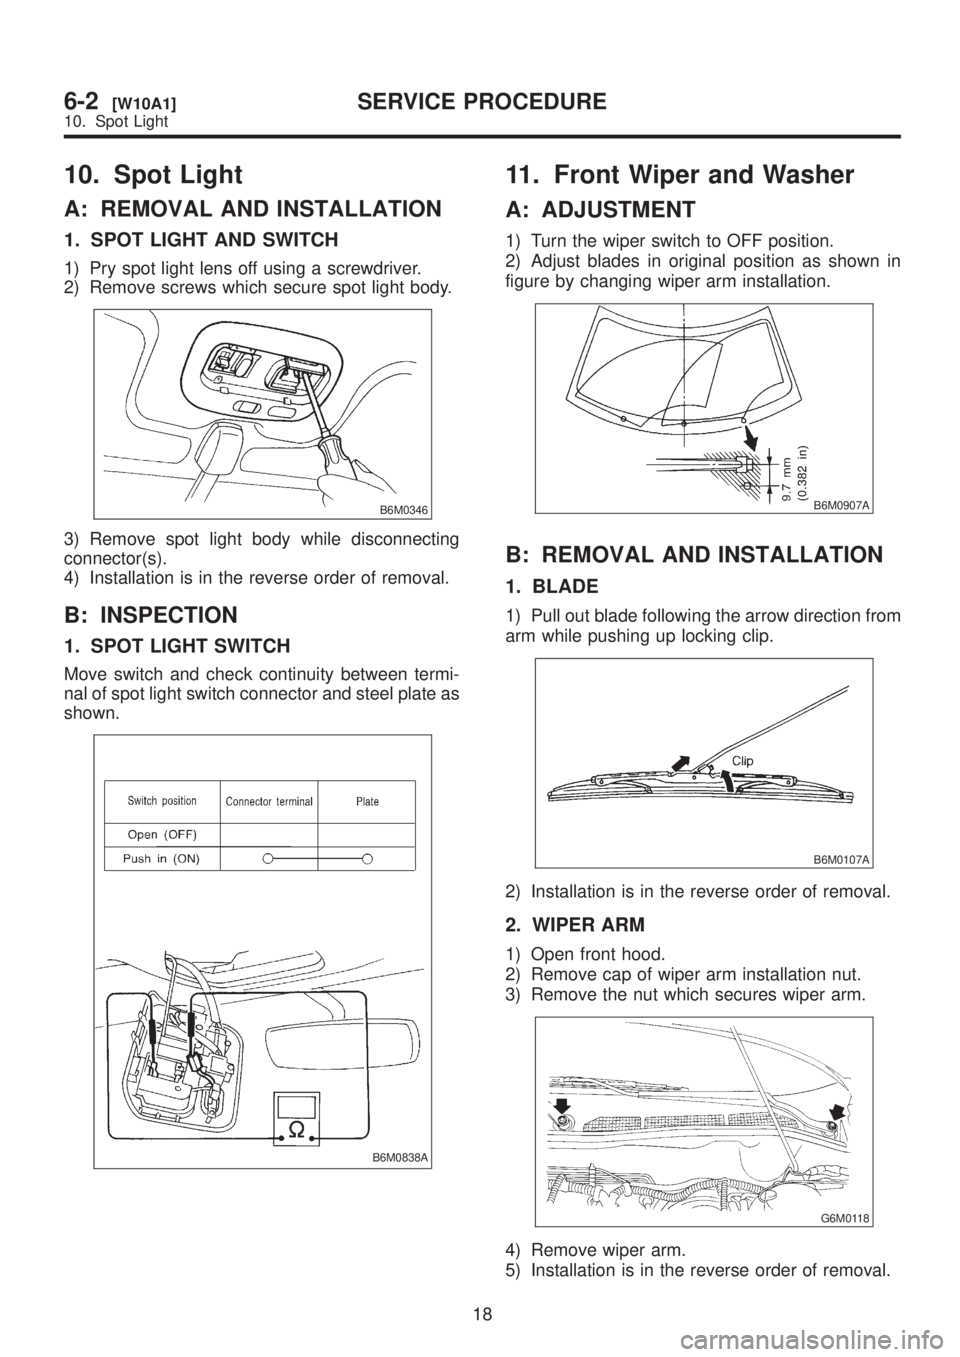
10. Spot Light
A: REMOVAL AND INSTALLATION
1. SPOT LIGHT AND SWITCH
1) Pry spot light lens off using a screwdriver.
2) Remove screws which secure spot light body.
B6M0346
3) Remove spot light body while disconnecting
connector(s).
4) Installation is in the reverse order of removal.
B: INSPECTION
1. SPOT LIGHT SWITCH
Move switch and check continuity between termi-
nal of spot light switch connector and steel plate as
shown.
B6M0838A
11. Front Wiper and Washer
A: ADJUSTMENT
1) Turn the wiper switch to OFF position.
2) Adjust blades in original position as shown in
figure by changing wiper arm installation.
B6M0907A
B: REMOVAL AND INSTALLATION
1. BLADE
1) Pull out blade following the arrow direction from
arm while pushing up locking clip.
B6M0107A
2) Installation is in the reverse order of removal.
2. WIPER ARM
1) Open front hood.
2) Remove cap of wiper arm installation nut.
3) Remove the nut which secures wiper arm.
G6M0118
4) Remove wiper arm.
5) Installation is in the reverse order of removal.
18
6-2[W10A1]SERVICE PROCEDURE
10. Spot Light
Page 1246 of 1456
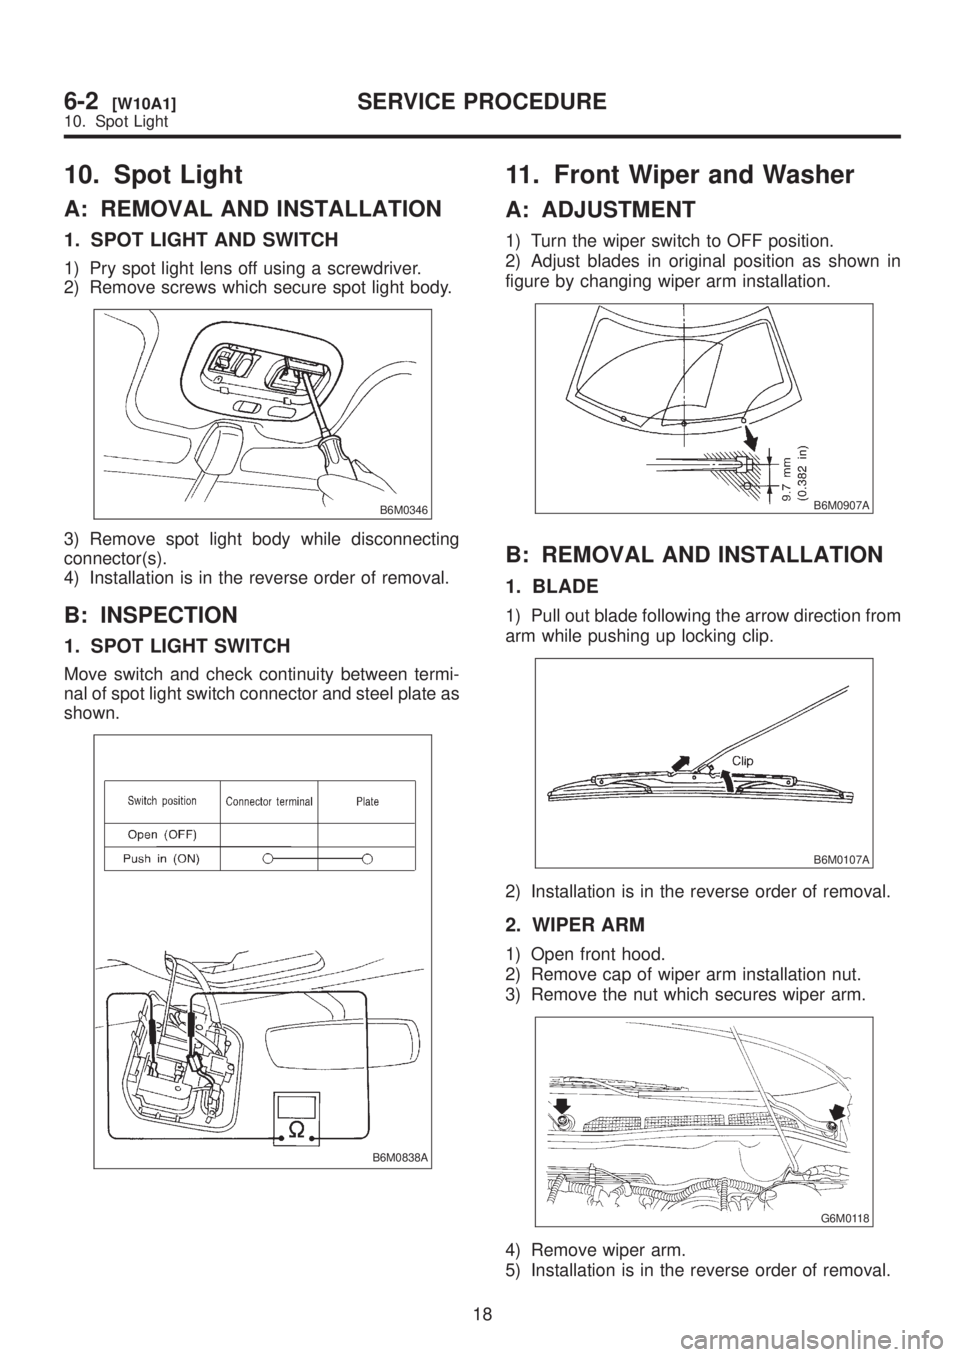
10. Spot Light
A: REMOVAL AND INSTALLATION
1. SPOT LIGHT AND SWITCH
1) Pry spot light lens off using a screwdriver.
2) Remove screws which secure spot light body.
B6M0346
3) Remove spot light body while disconnecting
connector(s).
4) Installation is in the reverse order of removal.
B: INSPECTION
1. SPOT LIGHT SWITCH
Move switch and check continuity between termi-
nal of spot light switch connector and steel plate as
shown.
B6M0838A
11. Front Wiper and Washer
A: ADJUSTMENT
1) Turn the wiper switch to OFF position.
2) Adjust blades in original position as shown in
figure by changing wiper arm installation.
B6M0907A
B: REMOVAL AND INSTALLATION
1. BLADE
1) Pull out blade following the arrow direction from
arm while pushing up locking clip.
B6M0107A
2) Installation is in the reverse order of removal.
2. WIPER ARM
1) Open front hood.
2) Remove cap of wiper arm installation nut.
3) Remove the nut which secures wiper arm.
G6M0118
4) Remove wiper arm.
5) Installation is in the reverse order of removal.
18
6-2[W10A1]SERVICE PROCEDURE
10. Spot Light
Page 1247 of 1456
NOTE:
Remove metal sludge from the wiper arm fixture
before installing it.
Tightening torque:
20
±3 N´m (2.0±0.3 kg-m, 14.5±2.2 ft-lb)
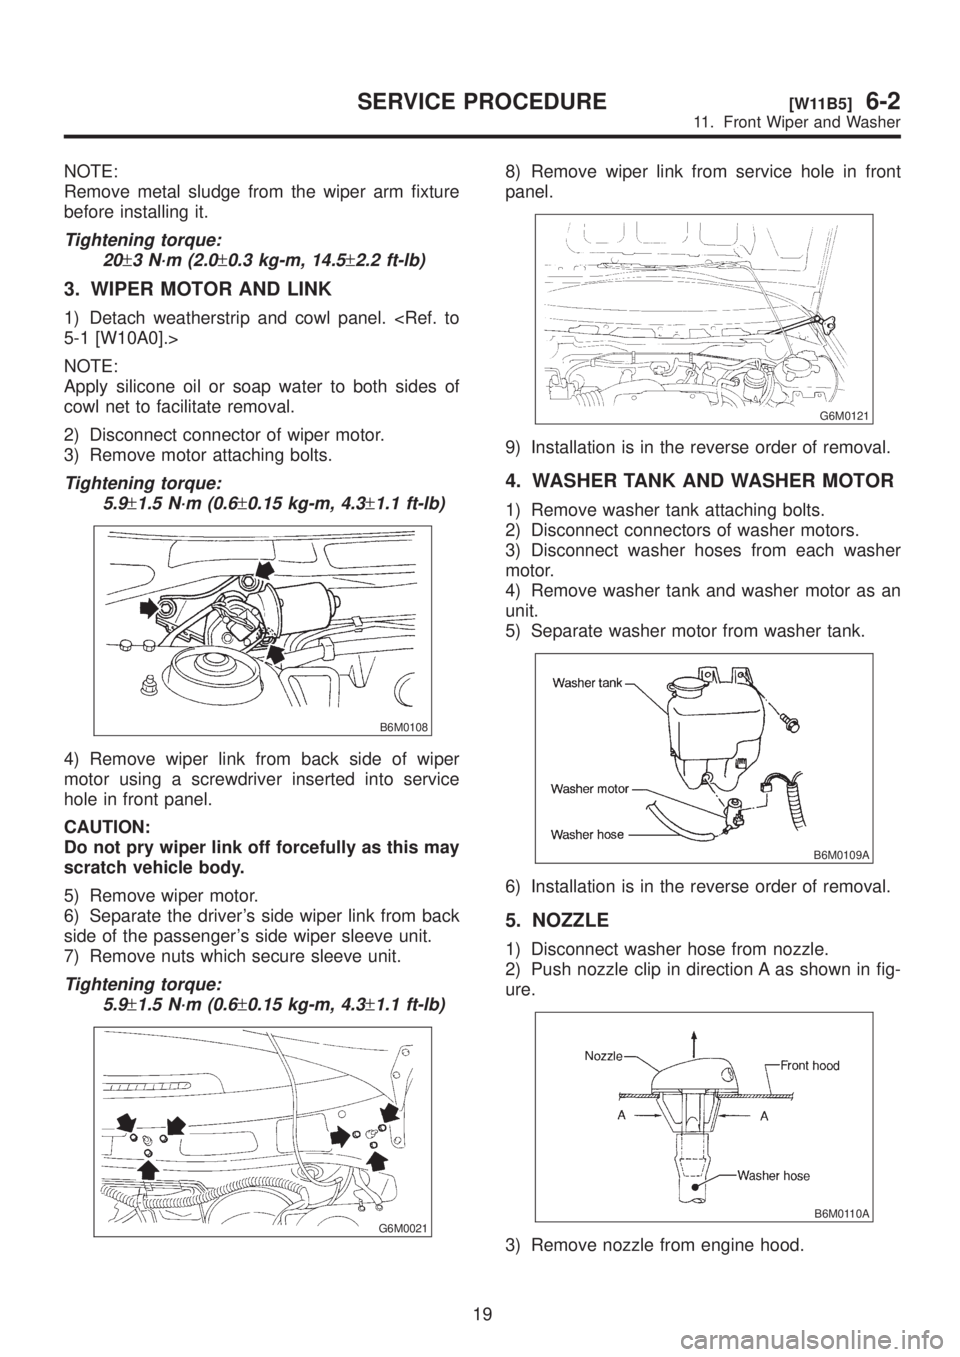
3. WIPER MOTOR AND LINK
1) Detach weatherstrip and cowl panel.
NOTE:
Apply silicone oil or soap water to both sides of
cowl net to facilitate removal.
2) Disconnect connector of wiper motor.
3) Remove motor attaching bolts.
Tightening torque:
5.9
±1.5 N´m (0.6±0.15 kg-m, 4.3±1.1 ft-lb)
B6M0108
4) Remove wiper link from back side of wiper
motor using a screwdriver inserted into service
hole in front panel.
CAUTION:
Do not pry wiper link off forcefully as this may
scratch vehicle body.
5) Remove wiper motor.
6) Separate the driver's side wiper link from back
side of the passenger's side wiper sleeve unit.
7) Remove nuts which secure sleeve unit.
Tightening torque:
5.9
±1.5 N´m (0.6±0.15 kg-m, 4.3±1.1 ft-lb)
G6M0021
8) Remove wiper link from service hole in front
panel.
G6M0121
9) Installation is in the reverse order of removal.
4. WASHER TANK AND WASHER MOTOR
1) Remove washer tank attaching bolts.
2) Disconnect connectors of washer motors.
3) Disconnect washer hoses from each washer
motor.
4) Remove washer tank and washer motor as an
unit.
5) Separate washer motor from washer tank.
B6M0109A
6) Installation is in the reverse order of removal.
5. NOZZLE
1) Disconnect washer hose from nozzle.
2) Push nozzle clip in direction A as shown in fig-
ure.
B6M0110A
3) Remove nozzle from engine hood.
19
[W11B5]6-2SERVICE PROCEDURE
11. Front Wiper and Washer
Page 1248 of 1456
CAUTION:
Do not pry nozzle off forcefully as this may
scratch vehicle body.
4) Installation is in the reverse order of removal.
6. COMBINATION SWITCH
Remove and install combination switch.
C: DISASSEMBLY AND ASSEMBLY
1. COMBINATION SWITCH AND
INTERMITTENT UNIT
Disassemble and assemble combination switch.
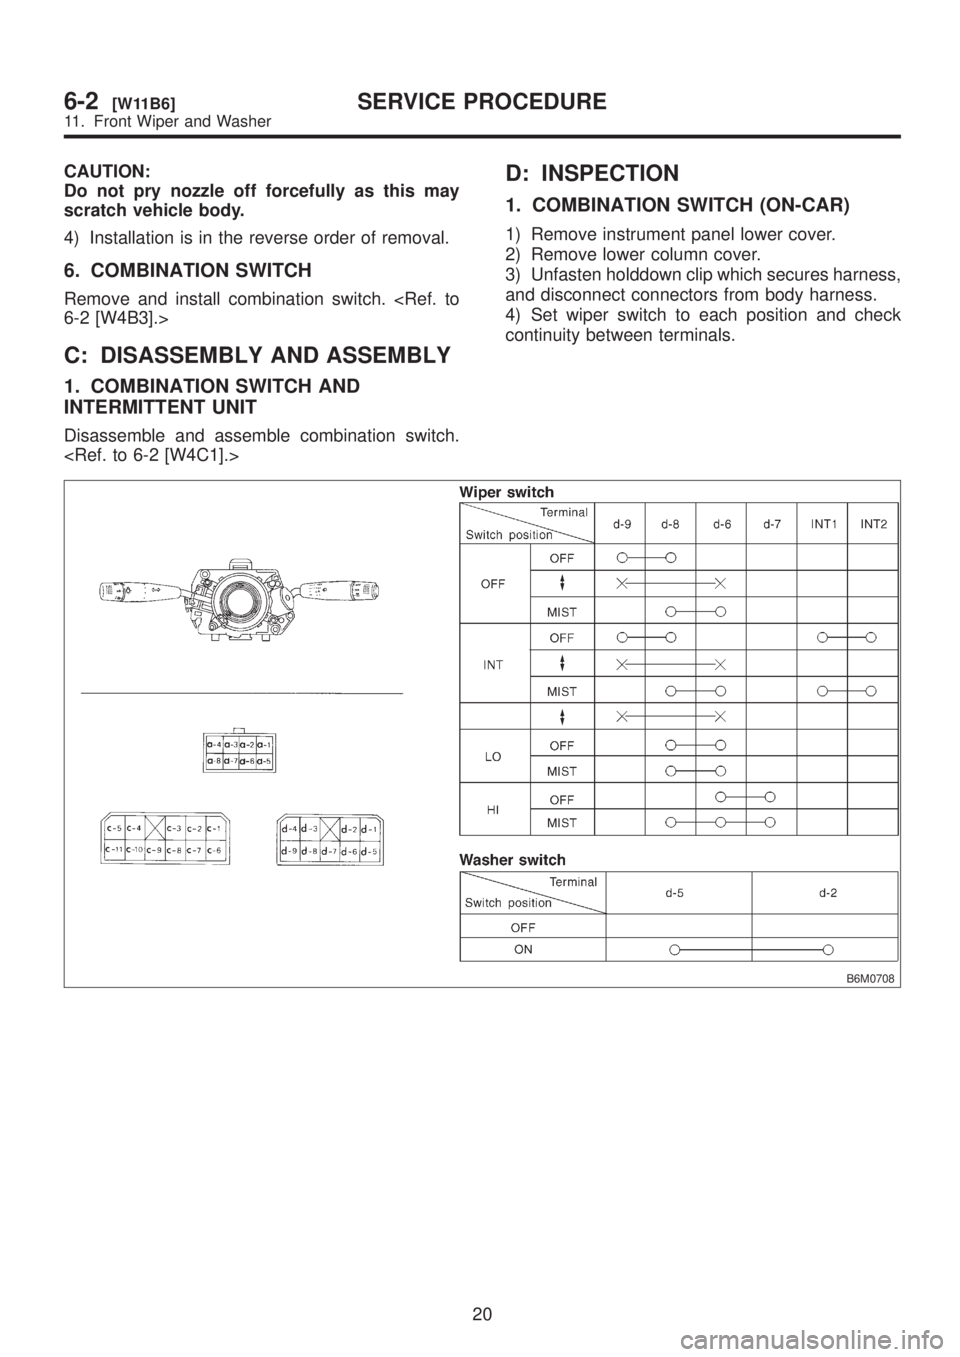
D: INSPECTION
1. COMBINATION SWITCH (ON-CAR)
1) Remove instrument panel lower cover.
2) Remove lower column cover.
3) Unfasten holddown clip which secures harness,
and disconnect connectors from body harness.
4) Set wiper switch to each position and check
continuity between terminals.
B6M0708
20
6-2[W11B6]SERVICE PROCEDURE
11. Front Wiper and Washer
Page 1249 of 1456
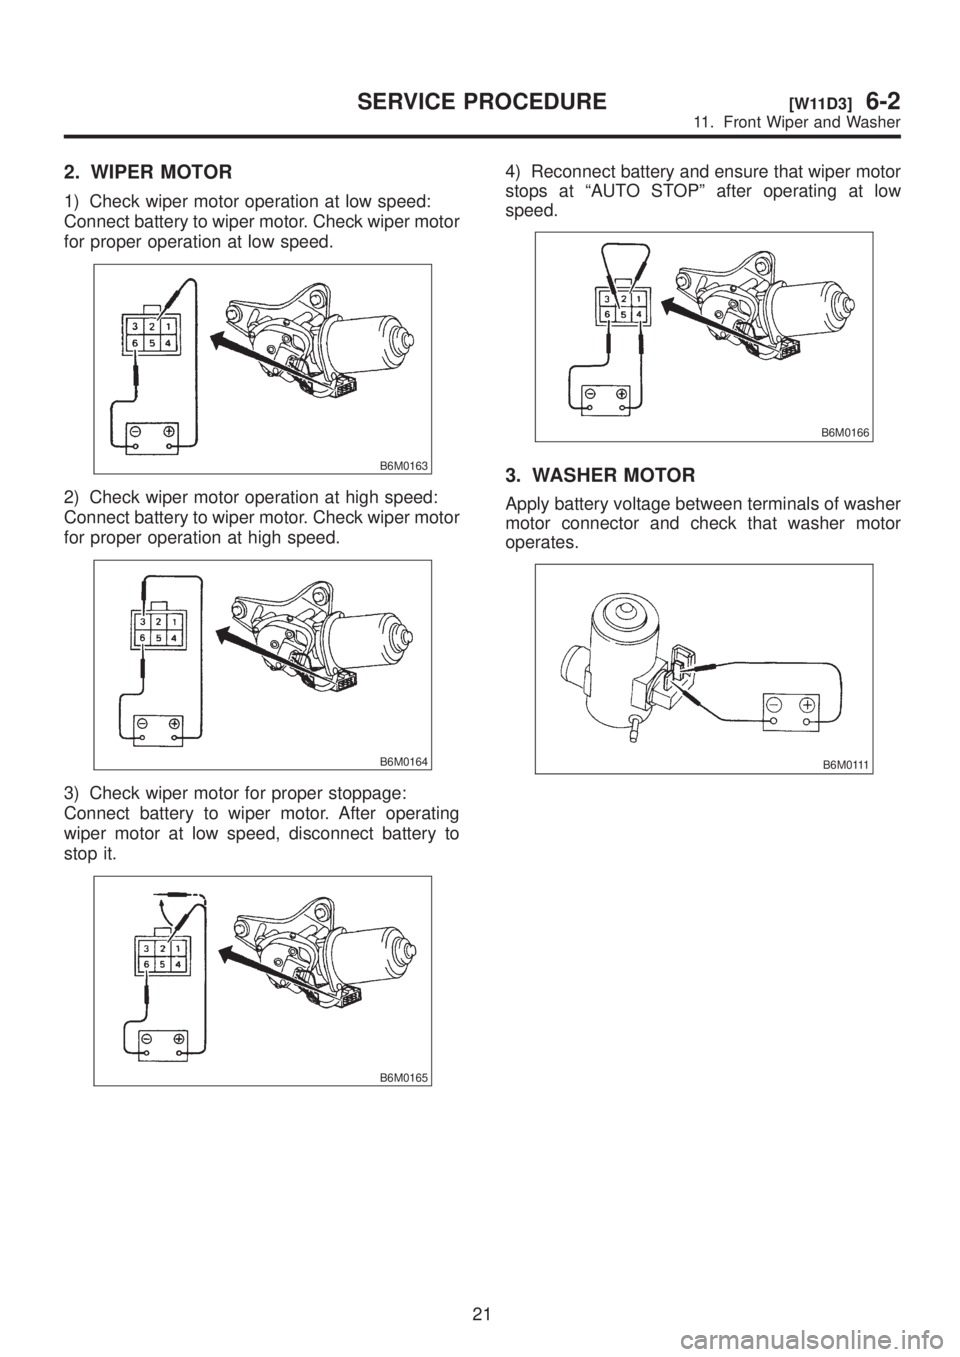
2. WIPER MOTOR
1) Check wiper motor operation at low speed:
Connect battery to wiper motor. Check wiper motor
for proper operation at low speed.
B6M0163
2) Check wiper motor operation at high speed:
Connect battery to wiper motor. Check wiper motor
for proper operation at high speed.
B6M0164
3) Check wiper motor for proper stoppage:
Connect battery to wiper motor. After operating
wiper motor at low speed, disconnect battery to
stop it.
B6M0165
4) Reconnect battery and ensure that wiper motor
stops at ªAUTO STOPº after operating at low
speed.
B6M0166
3. WASHER MOTOR
Apply battery voltage between terminals of washer
motor connector and check that washer motor
operates.
B6M0111
21
[W11D3]6-2SERVICE PROCEDURE
11. Front Wiper and Washer
Page 1250 of 1456
12. Rear Wiper and Washer
A: ADJUSTMENT
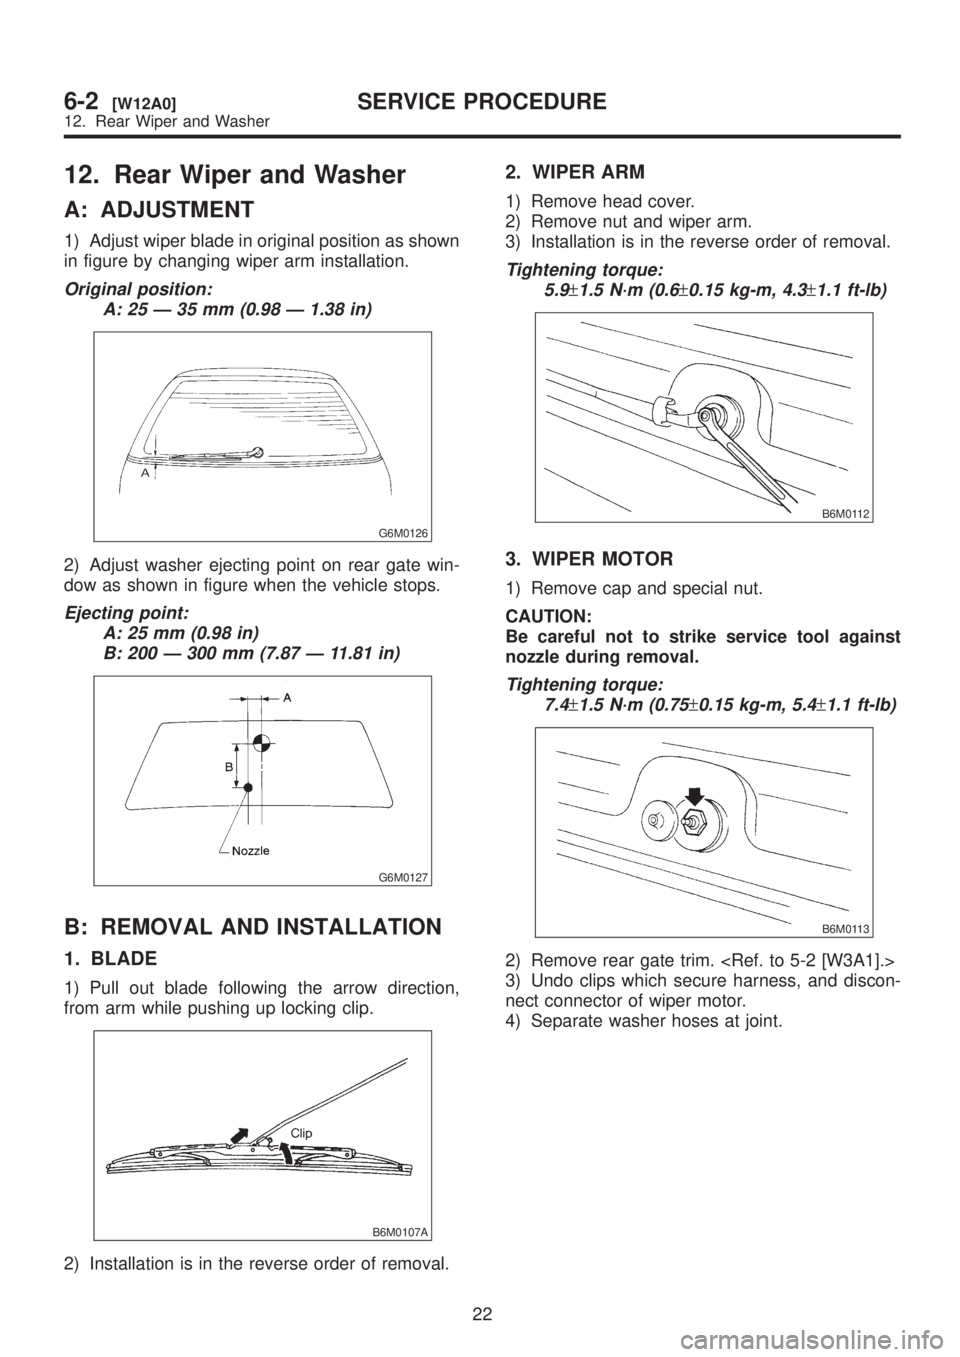
1) Adjust wiper blade in original position as shown
in figure by changing wiper arm installation.
Original position:
A: 25 Ð 35 mm (0.98 Ð 1.38 in)
G6M0126
2) Adjust washer ejecting point on rear gate win-
dow as shown in figure when the vehicle stops.
Ejecting point:
A: 25 mm (0.98 in)
B: 200 Ð 300 mm (7.87 Ð 11.81 in)
G6M0127
B: REMOVAL AND INSTALLATION
1. BLADE
1) Pull out blade following the arrow direction,
from arm while pushing up locking clip.
B6M0107A
2) Installation is in the reverse order of removal.
2. WIPER ARM
1) Remove head cover.
2) Remove nut and wiper arm.
3) Installation is in the reverse order of removal.
Tightening torque:
5.9
±1.5 N´m (0.6±0.15 kg-m, 4.3±1.1 ft-lb)
B6M0112
3. WIPER MOTOR
1) Remove cap and special nut.
CAUTION:
Be careful not to strike service tool against
nozzle during removal.
Tightening torque:
7.4
±1.5 N´m (0.75±0.15 kg-m, 5.4±1.1 ft-lb)
B6M0113
2) Remove rear gate trim.
3) Undo clips which secure harness, and discon-
nect connector of wiper motor.
4) Separate washer hoses at joint.
22
6-2[W12A0]SERVICE PROCEDURE
12. Rear Wiper and Washer