TOYOTA RAV4 1996 Service Repair Manual
Manufacturer: TOYOTA, Model Year: 1996, Model line: RAV4, Model: TOYOTA RAV4 1996Pages: 1632, PDF Size: 41.64 MB
Page 551 of 1632
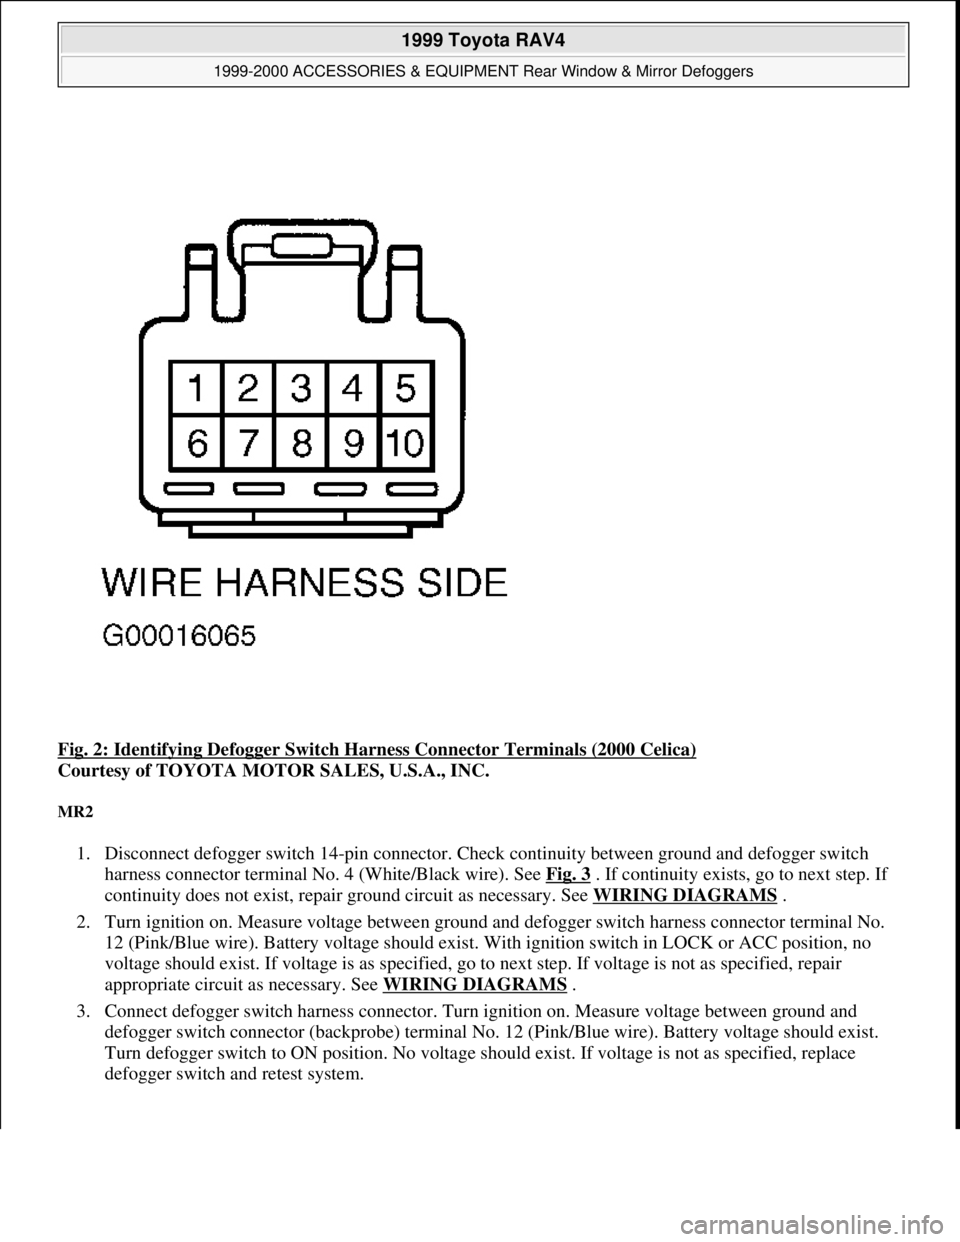
Fig. 2: Identifying Defogger Switch Harness Connector Terminals (2000 Celica)
Courtesy of TOYOTA MOTOR SALES, U.S.A., INC.
MR2
1. Disconnect defogger switch 14-pin connector. Check continuity between ground and defogger switch
harness connector terminal No. 4 (White/Black wire). See Fig. 3
. If continuity exists, go to next step. If
continuity does not exist, repair ground circuit as necessary. See WIRING DIAGRAMS
.
2. Turn ignition on. Measure voltage between ground and defogger switch harness connector terminal No.
12 (Pink/Blue wire). Battery voltage should exist. With ignition switch in LOCK or ACC position, no
voltage should exist. If voltage is as specified, go to next step. If voltage is not as specified, repair
appropriate circuit as necessary. See WIRING DIAGRAMS
.
3. Connect defogger switch harness connector. Turn ignition on. Measure voltage between ground and
defogger switch connector (backprobe) terminal No. 12 (Pink/Blue wire). Battery voltage should exist.
Turn defogger switch to ON position. No voltage should exist. If voltage is not as specified, replace
defo
gger switch and retest system.
1999 Toyota RAV4
1999-2000 ACCESSORIES & EQUIPMENT Rear Window & Mirror Defoggers
Microsoft
Sunday, November 22, 2009 10:55:10 AMPage 3 © 2005 Mitchell Repair Information Company, LLC.
Page 552 of 1632
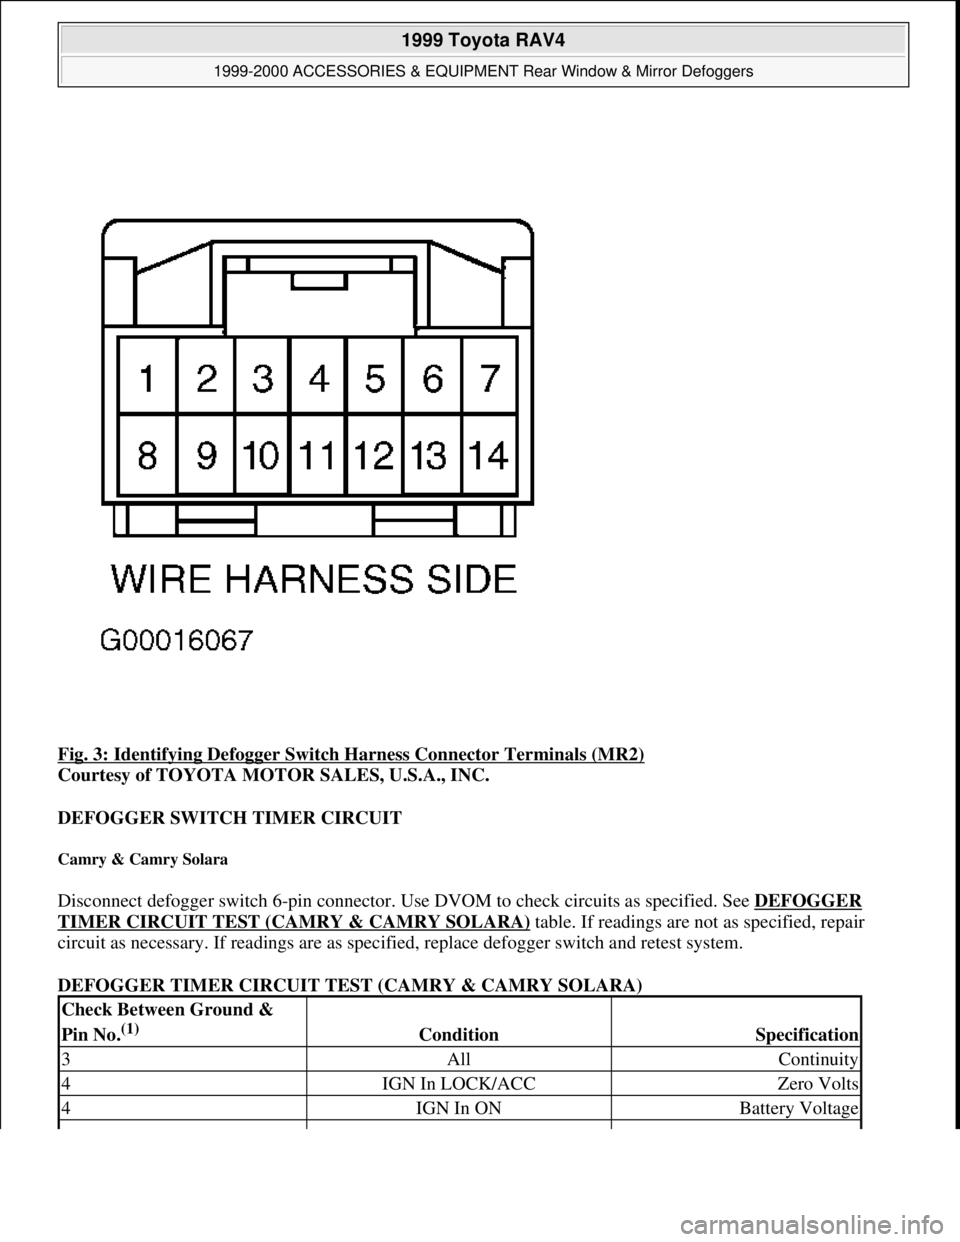
Fig. 3: Identifying Defogger Switch Harness Connector Terminals (MR2)
Courtesy of TOYOTA MOTOR SALES, U.S.A., INC.
DEFOGGER SWITCH TIMER CIRCUIT
Camry & Camry Solara
Disconnect defogger switch 6-pin connector. Use DVOM to check circuits as specified. See DEFOGGER
TIMER CIRCUIT TEST (CAMRY & CAMRY SOLARA) table. If readings are not as specified, repair
circuit as necessary. If readings are as specified, replace defogger switch and retest system.
DEFOGGER TIMER CIRCUIT TEST (CAMRY & CAMRY SOLARA)
Check Between Ground &
Pin No.
(1) ConditionSpecification
3AllContinuity
4IGN In LOCK/ACCZero Volts
4IGN In ONBattery Voltage
1999 Toyota RAV4
1999-2000 ACCESSORIES & EQUIPMENT Rear Window & Mirror Defoggers
Microsoft
Sunday, November 22, 2009 10:55:10 AMPage 4 © 2005 Mitchell Repair Information Company, LLC.
Page 553 of 1632
Corolla & Tercel
Disconnect defogger switch 6-pin connector. Use DVOM to check circuits as specified. See DEFOGGER
TIMER CIRCUIT TEST (COROLLA & TERCEL) table. If readings are not as specified, repair circuit as
necessary. If readings are as specified, replace defogger switch and retest system.
DEFOGGER TIMER CIRCUIT TEST (COROLLA & TERCEL)
ECHO
Disconnect defogger switch 4-pin connector. Use DVOM to check circuits as specified. See DEFOGGER
TIMER CIRCUIT TEST (ECHO) table. If readings are not as specified, repair circuit as necessary. If
readings are as specified, replace defogger switch and retest system.
DEFOGGER TIMER CIRCUIT TEST (ECHO)
Land Cruiser
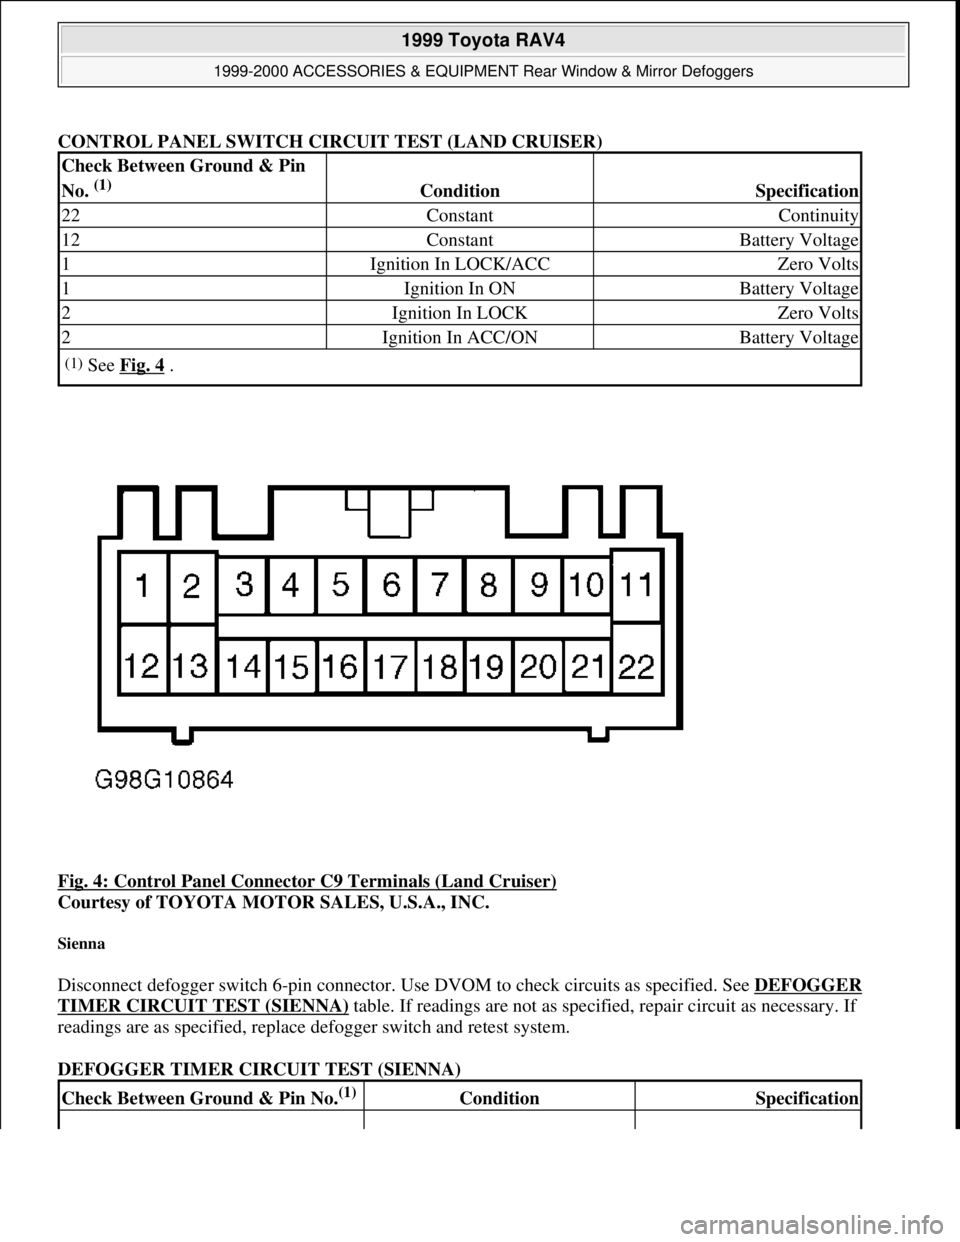
Disconnect control panel 22-pin connector C9. See Fig. 4 and Fig. 12 . Use DVOM to check circuits as
specified. See CONTROL PANEL SWITCH CIRCUIT TEST (LAND CRUISER)
table. If readings are as
specified, replace switch and retest system. If readings are not as specified, repair circuit as necessary. If
readin
gs are as specified, replace defogger switch and retest system.
5IGN In LOCK/ACCZero Volts
5IGN In ONBattery Voltage
(1)See Fig. 9 .
Check Between Ground &
Pin No.
(1) ConditionSpecification
3AllContinuity
2IGN In LOCK/ACCZero Volts
2IGN In ONBattery Voltage
6IGN In LOCK/ACCZero Volts
6IGN In ONBattery Voltage
(1)See Fig. 9 .
Check Between Ground &
Pin No.
(1) ConditionSpecification
2AllContinuity
3IGN In LOCK/ACCZero Volts
3IGN In ONBattery Voltage
4Defogger Switch OffNo Continuity
4Defogger Switch OnContinuity
(1)See Fig. 11 .
1999 Toyota RAV4
1999-2000 ACCESSORIES & EQUIPMENT Rear Window & Mirror Defoggers
Microsoft
Sunday, November 22, 2009 10:55:10 AMPage 5 © 2005 Mitchell Repair Information Company, LLC.
Page 554 of 1632
CONTROL PANEL SWITCH CIRCUIT TEST (LAND CRUISER)
Fig. 4: Control Panel Connector C9 Terminals (Land Cruiser)
Courtesy of TOYOTA MOTOR SALES, U.S.A., INC.
Sienna
Disconnect defogger switch 6-pin connector. Use DVOM to check circuits as specified. See DEFOGGER
TIMER CIRCUIT TEST (SIENNA) table. If readings are not as specified, repair circuit as necessary. If
readings are as specified, replace defogger switch and retest system.
DEFOGGER TIMER CIRCUIT TEST (SIENNA)
Check Between Ground & Pin
No.
(1) ConditionSpecification
22ConstantContinuity
12ConstantBattery Voltage
1Ignition In LOCK/ACCZero Volts
1Ignition In ONBattery Voltage
2Ignition In LOCKZero Volts
2Ignition In ACC/ONBattery Voltage
(1)See Fig. 4 .
Check Between Ground & Pin No.(1) ConditionSpecification
1999 Toyota RAV4
1999-2000 ACCESSORIES & EQUIPMENT Rear Window & Mirror Defoggers
Microsoft
Sunday, November 22, 2009 10:55:10 AMPage 6 © 2005 Mitchell Repair Information Company, LLC.
Page 555 of 1632
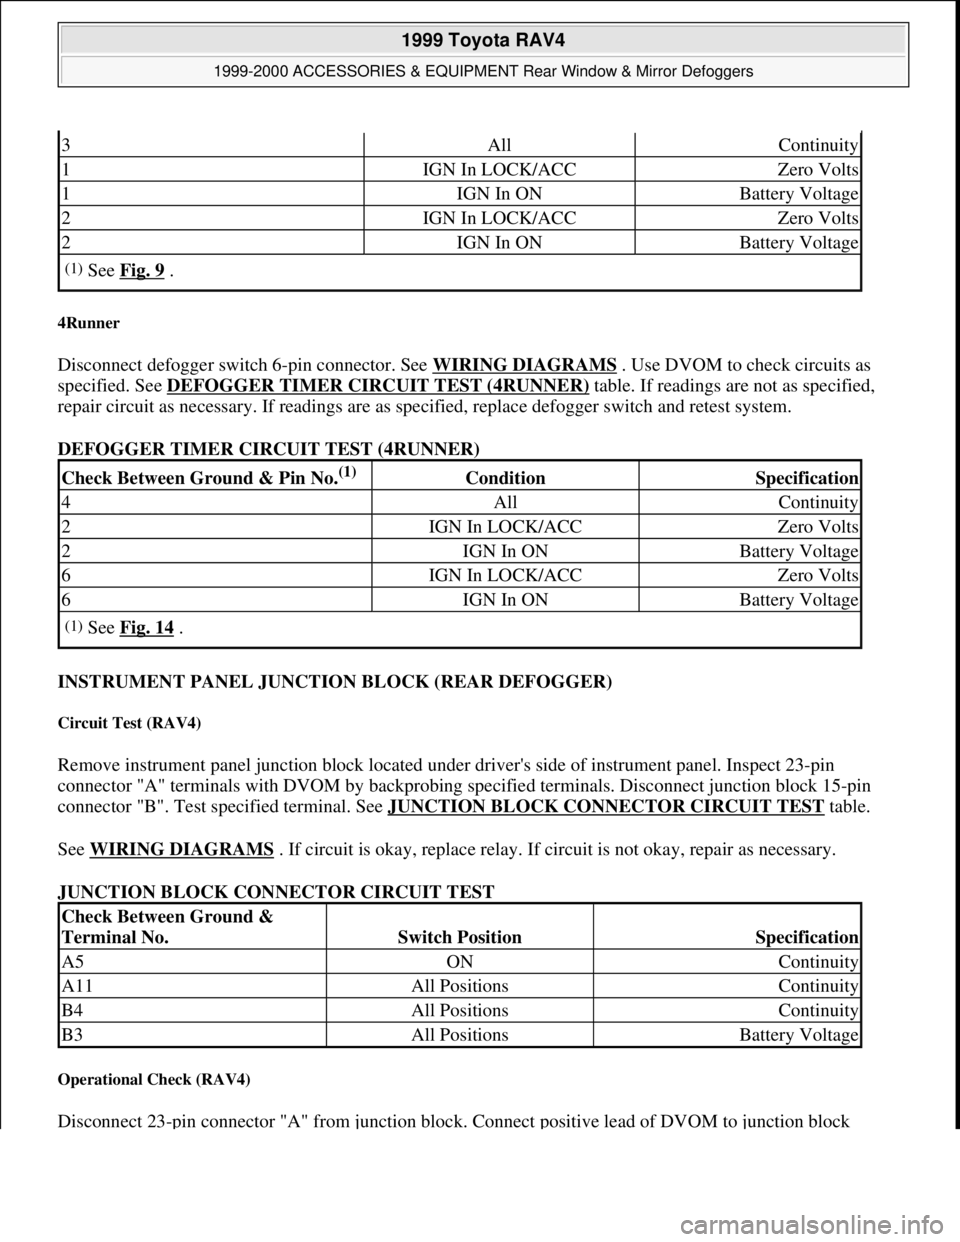
4Runner
Disconnect defogger switch 6-pin connector. See WIRING DIAGRAMS . Use DVOM to check circuits as
specified. See DEFOGGER TIMER CIRCUIT TEST (4RUNNER)
table. If readings are not as specified,
repair circuit as necessary. If readings are as specified, replace defogger switch and retest system.
DEFOGGER TIMER CIRCUIT TEST (4RUNNER)
INSTRUMENT PANEL JUNCTION BLOCK (REAR DEFOGGER)
Circuit Test (RAV4)
Remove instrument panel junction block located under driver's side of instrument panel. Inspect 23-pin
connector "A" terminals with DVOM by backprobing specified terminals. Disconnect junction block 15-pin
connector "B". Test specified terminal. See JUNCTION BLOCK CONNECTOR CIRCUIT TEST
table.
See WIRING DIAGRAMS
. If circuit is okay, replace relay. If circuit is not okay, repair as necessary.
JUNCTION BLOCK CONNECTOR CIRCUIT TEST
Operational Check (RAV4)
Disconnect 23-pin connector "A" from junction block. Connect positive lead of DVOM to junction block
3AllContinuity
1IGN In LOCK/ACCZero Volts
1IGN In ONBattery Voltage
2IGN In LOCK/ACCZero Volts
2IGN In ONBattery Voltage
(1)See Fig. 9 .
Check Between Ground & Pin No.(1) ConditionSpecification
4AllContinuity
2IGN In LOCK/ACCZero Volts
2IGN In ONBattery Voltage
6IGN In LOCK/ACCZero Volts
6IGN In ONBattery Voltage
(1)See Fig. 14 .
Check Between Ground &
Terminal No.
Switch PositionSpecification
A5ONContinuity
A11All PositionsContinuity
B4All PositionsContinuity
B3All PositionsBattery Voltage
1999 Toyota RAV4
1999-2000 ACCESSORIES & EQUIPMENT Rear Window & Mirror Defoggers
Microsoft
Sunday, November 22, 2009 10:55:10 AMPage 7 © 2005 Mitchell Repair Information Company, LLC.
Page 556 of 1632
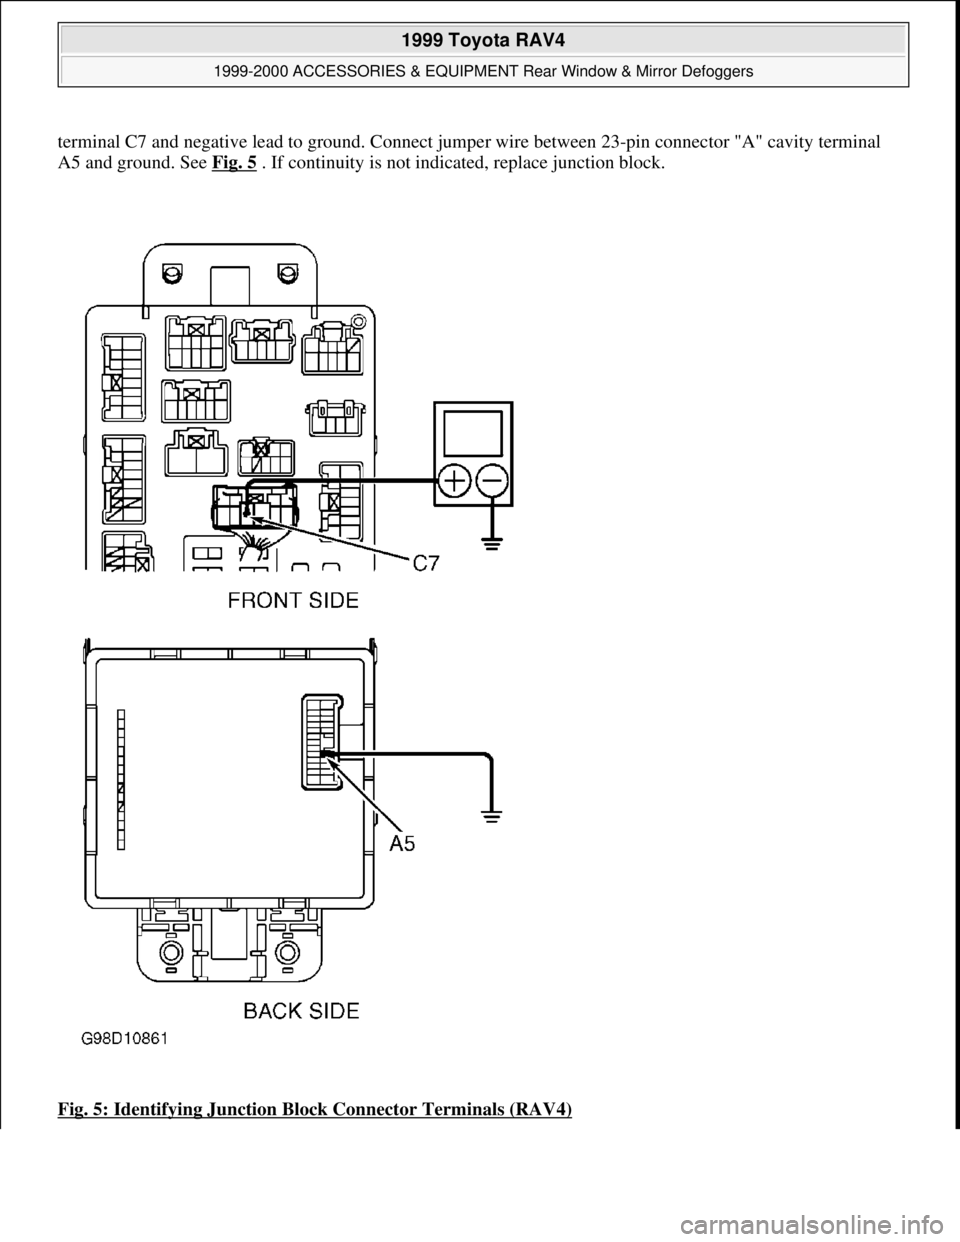
terminal C7 and negative lead to ground. Connect jumper wire between 23-pin connector "A" cavity terminal
A5 and ground. See Fig. 5
. If continuity is not indicated, replace junction block.
Fig. 5: Identifying Junction Block Connector Terminals (RAV4)
1999 Toyota RAV4
1999-2000 ACCESSORIES & EQUIPMENT Rear Window & Mirror Defoggers
Microsoft
Sunday, November 22, 2009 10:55:10 AMPage 8 © 2005 Mitchell Repair Information Company, LLC.
Page 557 of 1632
Courtesy of TOYOTA MOTOR SALES, U.S.A., INC.
REARVIEW MIRROR DEFOGGER TIMER OPERATION
Land Cruiser
1. Remove climate control (A/C-heater control) panel. Connect (backprobe) DVOM negative lead to
connector C9 terminal No. 22. Connect DVOM positive lead to connector C9 terminals No. 2 and 12, and
connector C7 terminal No. 8. See Fig. 12
. Turn ignition switch to ON position and measure voltage.
2. With defogger switch OFF, voltage should be about 12 volts. Turn defogger switch ON and ensure DEF
switch indicator is illuminated. Voltage should be less than one volt for about 15 minutes. After 15
minutes, defogger switch should turn off and voltage should be about 12 volts. Replace defogger switch i
f
voltage is not as specified is not as specified.
COMPONENT TESTS
DEFOGGER SWITCH TEST
1999 Avalon
1. If equipped with automatic A/C-heater system, backprobe defogger switch terminal No. 10 (Blue/Yellow
wire) with positive voltmeter lead and terminal No. 11 (White/Black wire) with negative lead. See Fig. 6
.
If equipped with manual A/C-heater system, backprobe defogger switch terminal No. 11 (Blue/Yellow
wire) with positive voltmeter lead and terminal No. 5 (White/Black wire) with negative lead. See Fig. 7
.
2. On all models, ensure battery voltage exists with defogger switch in OFF position. Turn defogger switch
to ON position. Ensure indicator light is on and less than one volt exists. After 15 minutes, defogger
switch should turn off and battery voltage should exist again. If defogger switch does not operate as
specified, replace switch.
1999 Toyota RAV4
1999-2000 ACCESSORIES & EQUIPMENT Rear Window & Mirror Defoggers
Microsoft
Sunday, November 22, 2009 10:55:10 AMPage 9 © 2005 Mitchell Repair Information Company, LLC.
Page 558 of 1632
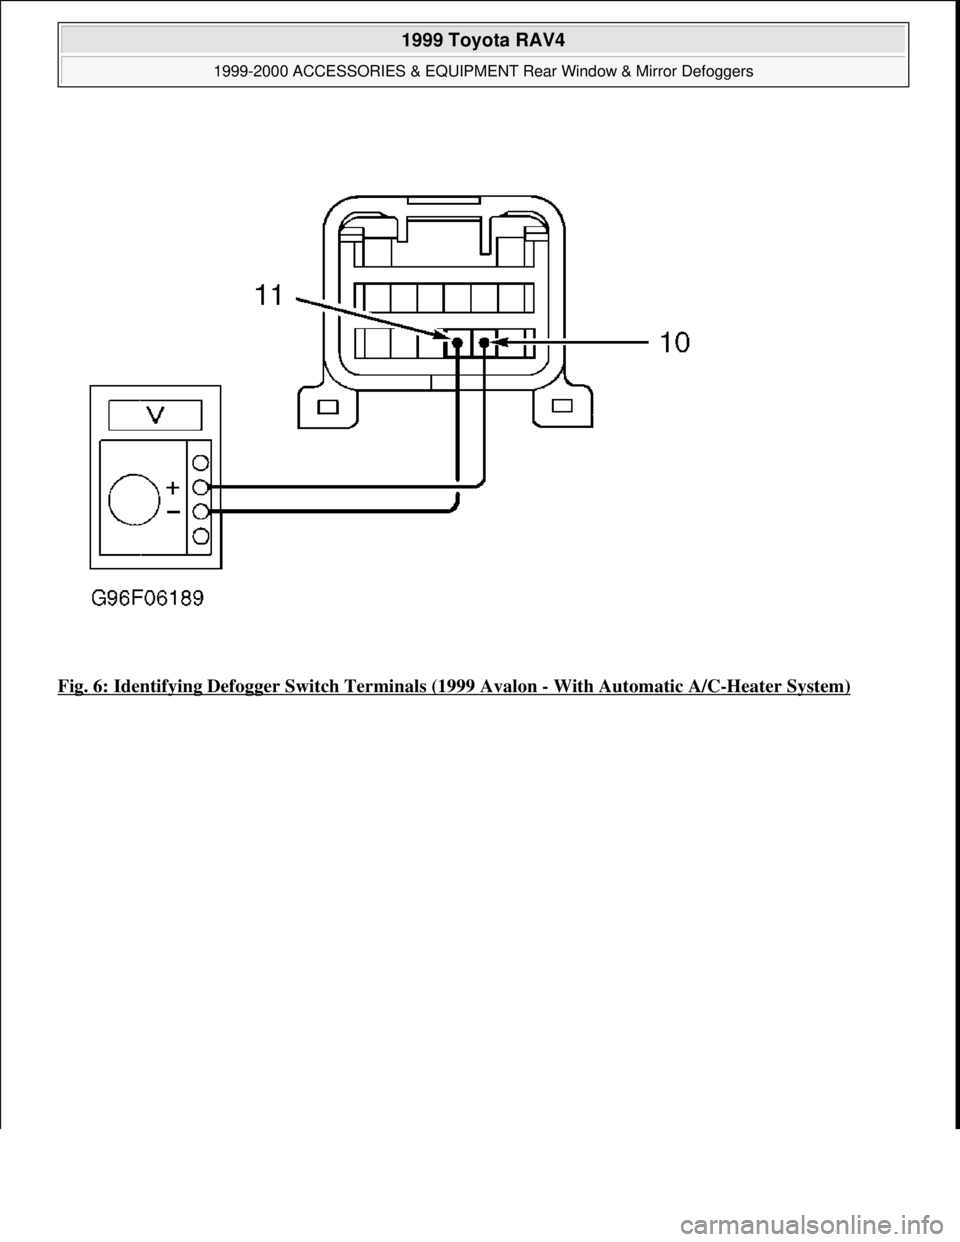
Fig. 6: Identifying Defogger Switch Terminals (1999 Avalon - With Automatic A/C-Heater System)
1999 Toyota RAV4
1999-2000 ACCESSORIES & EQUIPMENT Rear Window & Mirror Defoggers
Microsoft
Sunday, November 22, 2009 10:55:10 AMPage 10 © 2005 Mitchell Repair Information Company, LLC.
Page 559 of 1632
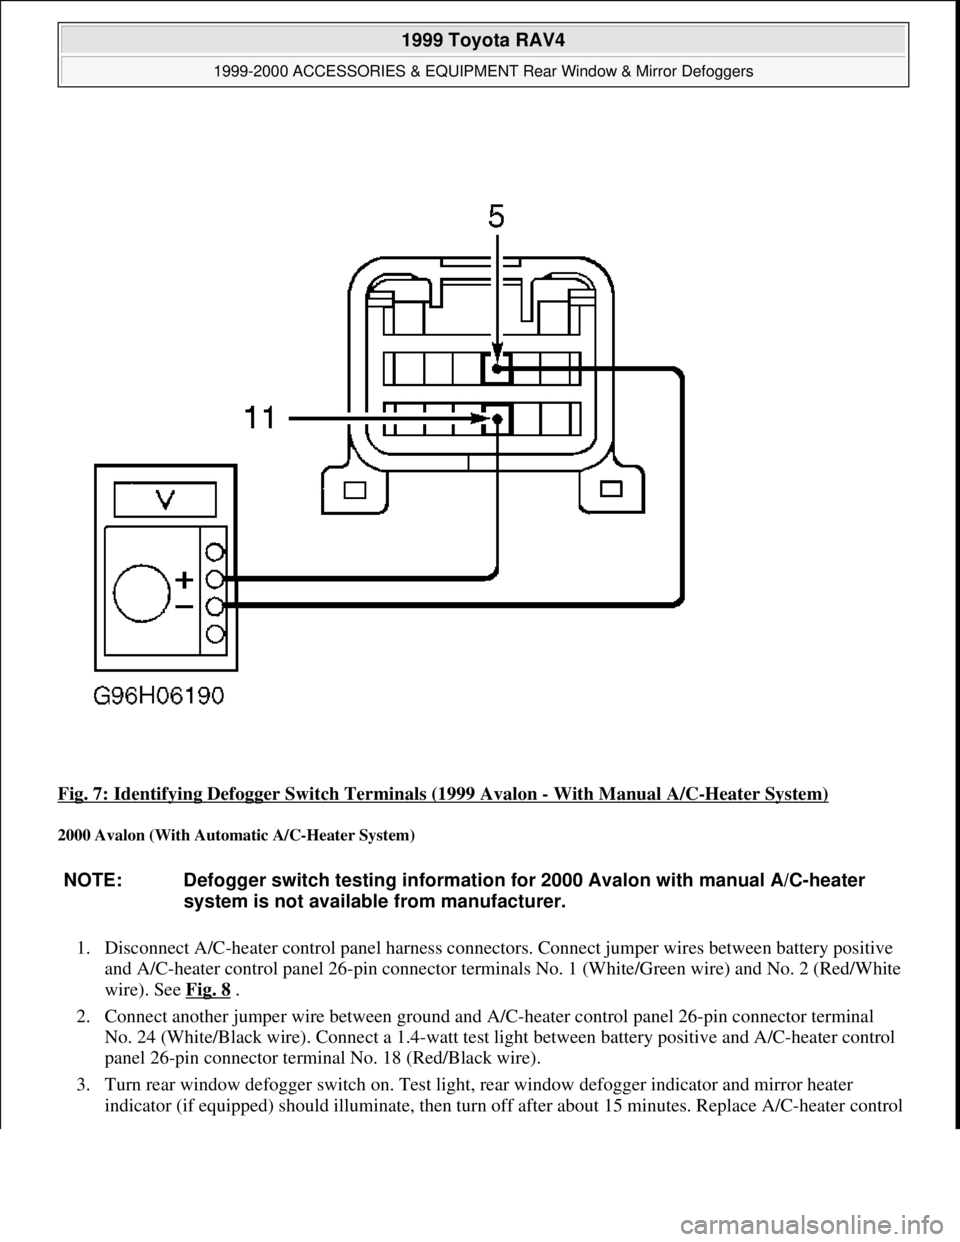
Fig. 7: Identifying Defogger Switch Terminals (1999 Avalon - With Manual A/C-Heater System)
2000 Avalon (With Automatic A/C-Heater System)
1. Disconnect A/C-heater control panel harness connectors. Connect jumper wires between battery positive
and A/C-heater control panel 26-pin connector terminals No. 1 (White/Green wire) and No. 2 (Red/White
wire). See Fig. 8
.
2. Connect another jumper wire between ground and A/C-heater control panel 26-pin connector terminal
No. 24 (White/Black wire). Connect a 1.4-watt test light between battery positive and A/C-heater control
panel 26-pin connector terminal No. 18 (Red/Black wire).
3. Turn rear window defogger switch on. Test light, rear window defogger indicator and mirror heater
indicator (if equipped) should illuminate, then turn off after about 15 minutes. Replace A/C-heater control
NOTE: Defogger switch testing information for 2000 Avalon with manual A/C-heater
system is not available from manufacturer.
1999 Toyota RAV4
1999-2000 ACCESSORIES & EQUIPMENT Rear Window & Mirror Defoggers
Microsoft
Sunday, November 22, 2009 10:55:10 AMPage 11 © 2005 Mitchell Repair Information Company, LLC.
Page 560 of 1632
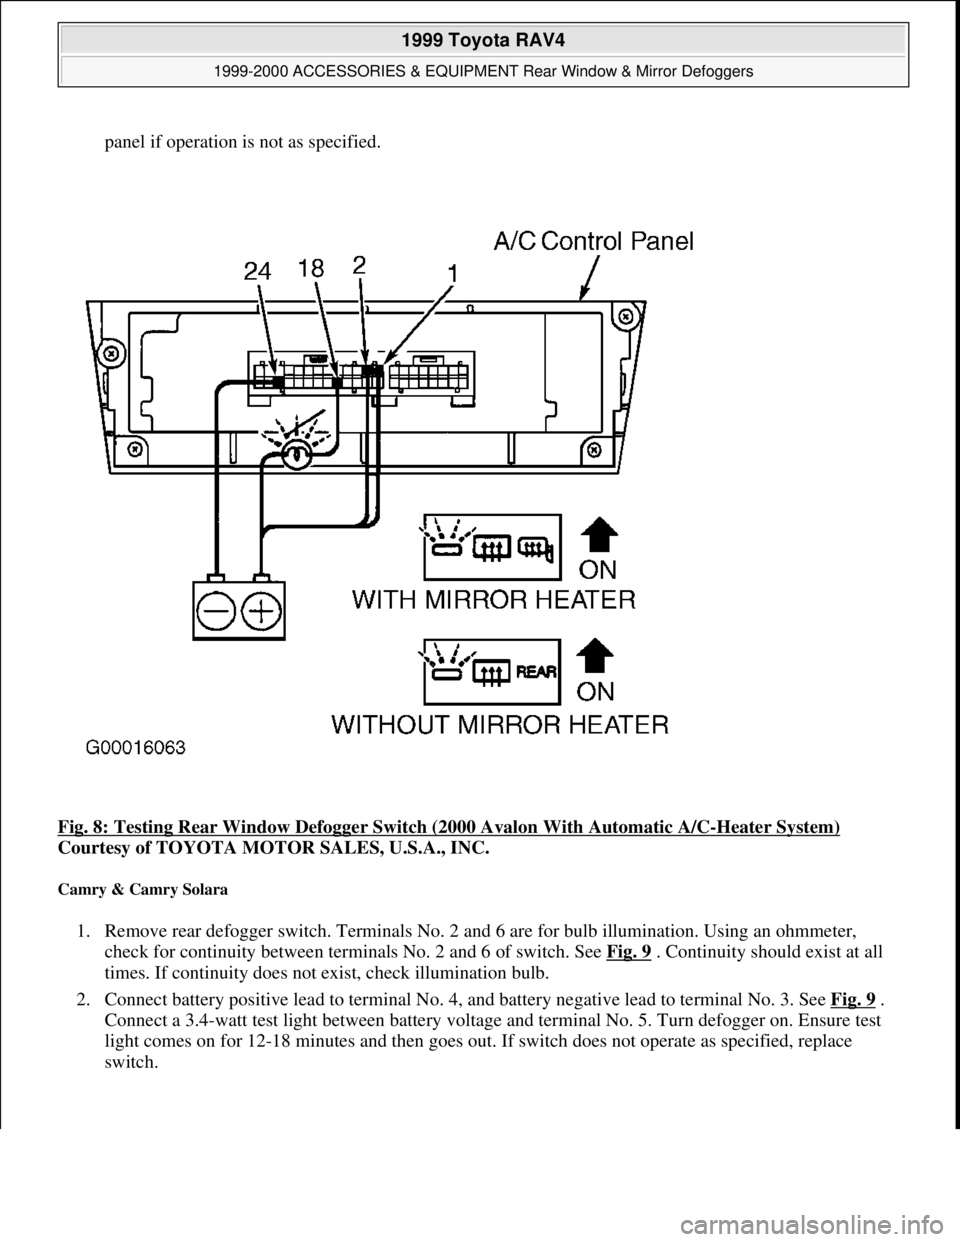
panel if operation is not as specified.
Fig. 8: Testing Rear Window Defogger Switch (2000 Avalon With Automatic A/C
-Heater System)
Courtesy of TOYOTA MOTOR SALES, U.S.A., INC.
Camry & Camry Solara
1. Remove rear defogger switch. Terminals No. 2 and 6 are for bulb illumination. Using an ohmmeter,
check for continuity between terminals No. 2 and 6 of switch. See Fig. 9
. Continuity should exist at all
times. If continuity does not exist, check illumination bulb.
2. Connect battery positive lead to terminal No. 4, and battery negative lead to terminal No. 3. See Fig. 9
.
Connect a 3.4-watt test light between battery voltage and terminal No. 5. Turn defogger on. Ensure test
light comes on for 12-18 minutes and then goes out. If switch does not operate as specified, replace
switch.
1999 Toyota RAV4
1999-2000 ACCESSORIES & EQUIPMENT Rear Window & Mirror Defoggers
Microsoft
Sunday, November 22, 2009 10:55:10 AMPage 12 © 2005 Mitchell Repair Information Company, LLC.