DODGE NEON 1999 Service Repair Manual
Manufacturer: DODGE, Model Year: 1999, Model line: NEON, Model: DODGE NEON 1999Pages: 1200, PDF Size: 35.29 MB
Page 911 of 1200
Rectangular pumping vanes in the shaft driven
rotor, move power steering fluid from the intake to
the cam ring pressure cavities of the power steering
pump. As the rotor begins to turn, centrifugal force
throws the vanes against the inside surface of the
cam ring to pickup residual oil. This oil is then forced
into the high pressure area. As more oil is picked up
by the vanes, the additional oil is forced into the cav-
ities of the thrust plate through two crossover holes
in the cam ring and pressure plate. The crossover
holes empty into the high pressure area between the
pressure plate and the housing end cover.
As the high pressure area is filled, oil flows under
the vanes in the rotor slots, forcing the vanes to fol-
low the inside surface of the cam ring. As the vanes
reach the restricted area of the cam ring, oil is forced
out from between the vanes. When excess oil flow is
generated during high-speed operation, a regulated
amount of oil returns to the pump intake side
through a flow control valve. The flow control valve
reduces the power required to drive the pump and
holds down temperature build-up.
When steering conditions exceed maximum pres-
sure requirements, such as when the wheels are
turned against the stops. The pressure built up in
the steering gear exerts pressure on the spring end of
the flow control valve. The high pressure lifts the
relief valve ball from its seat and allows oil to flow
through a trigger orifice located in the outlet fitting.
This reduces pressure on the spring end of the flow
control valve which then opens and allows the oil to
return to the intake side of the pump. This action
limits maximum pressure output of the pump to a
safe level.
Under normal power steering pump operating con-
ditions, pressure requirements of the pump are below
maximum, causing the pressure relief valve to
remain closed.
DIAGNOSIS AND TESTING
POWER STEERING SYSTEM TEST PROCEDURE
The following procedure can be used to test the
operation of the power steering system on the vehi-
cle. This test will provide the flow rate of the power
steering pump along with the maximum relief pres-
sure. This test is to be performed any time a power
steering system problem is present to determine if
the power steering pump or power steering gear is
not functioning properly. The following pressure and
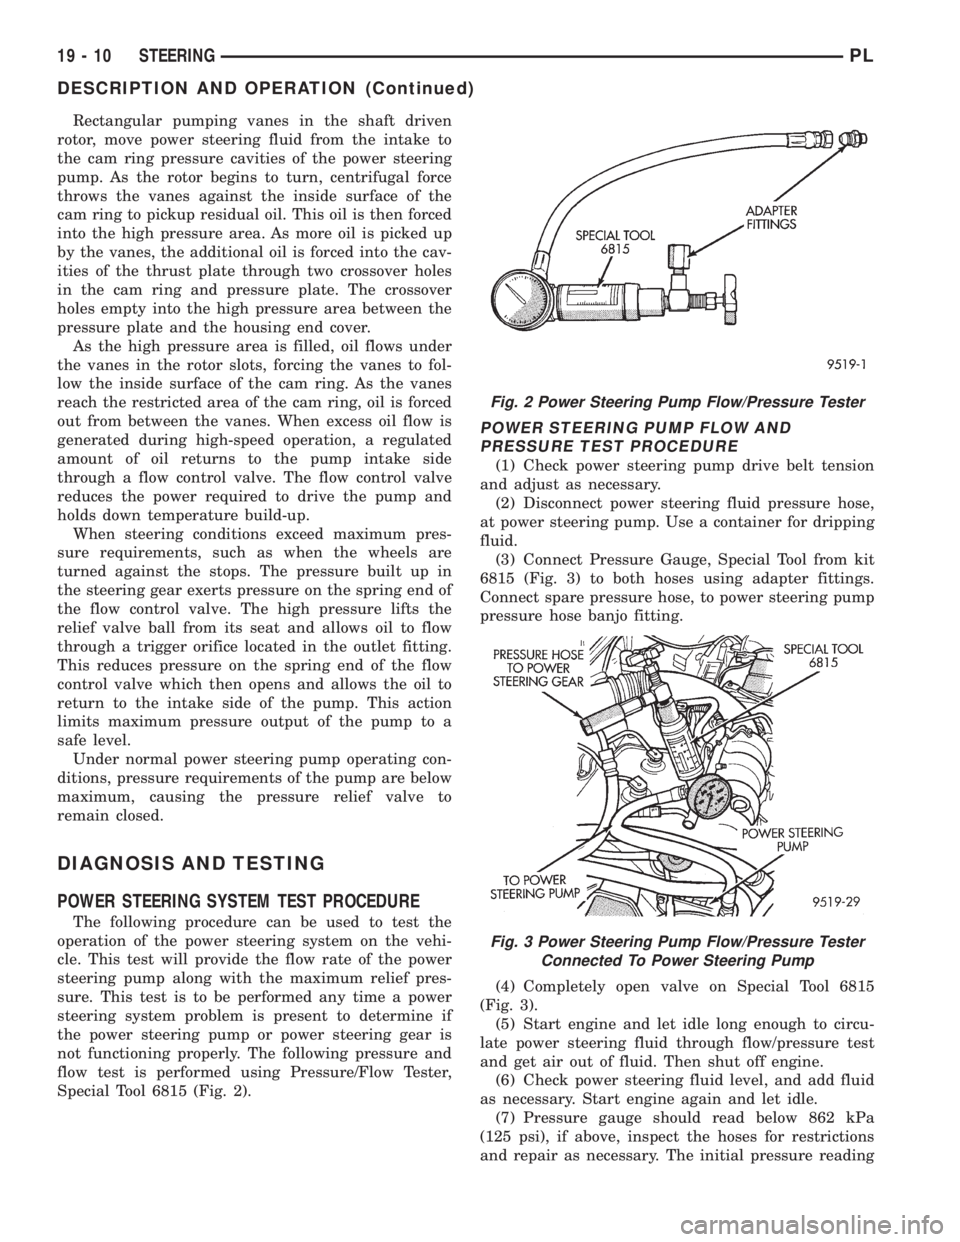
flow test is performed using Pressure/Flow Tester,
Special Tool 6815 (Fig. 2).
POWER STEERING PUMP FLOW AND
PRESSURE TEST PROCEDURE
(1) Check power steering pump drive belt tension
and adjust as necessary.
(2) Disconnect power steering fluid pressure hose,
at power steering pump. Use a container for dripping
fluid.
(3) Connect Pressure Gauge, Special Tool from kit
6815 (Fig. 3) to both hoses using adapter fittings.
Connect spare pressure hose, to power steering pump
pressure hose banjo fitting.
(4) Completely open valve on Special Tool 6815
(Fig. 3).
(5) Start engine and let idle long enough to circu-
late power steering fluid through flow/pressure test
and get air out of fluid. Then shut off engine.
(6) Check power steering fluid level, and add fluid
as necessary. Start engine again and let idle.
(7) Pressure gauge should read below 862 kPa
(125 psi), if above, inspect the hoses for restrictions
and repair as necessary. The initial pressure reading
Fig. 2 Power Steering Pump Flow/Pressure Tester
Fig. 3 Power Steering Pump Flow/Pressure Tester
Connected To Power Steering Pump
19 - 10 STEERINGPL
DESCRIPTION AND OPERATION (Continued)
Page 912 of 1200
should be in the range of 345-552 kPa (50-80 psi).
The flow meter should read between 1.3 and 1.4
GPM
CAUTION: The following test procedure involves
testing power steering pump maximum pressure
output and flow control valve operation. Do not
leave valve closed for more than 5 seconds as the
pump could be damaged.
(8) Close valve fully three times and record high-
est pressure indicated each time.All three read-
ings must be above specifications and within
345 kPa (50 psi) of each other.
NOTE: Power steering pump maximum relief pres-
sure is 8240 to 8920 kPa (1195 to 1293 psi.).
²If power steering pump pressures above specifi-
cations but not within 345 kPa (50 psi) of each other,
then replace power steering pump.
²If pressures within 345 kPa (50 psi) of each
other but below specifications, then replace power
steering pump.
CAUTION: Do not force the pump to operate
against the stops for more than 5 seconds at a time
because, pump damage will result.
(9) Open test valve. Turn steering wheel to the
extreme left and right positions until against the
stops, recording the highest indicated pressure at
each position. Compare pressure gauge readings to
power steering pump specifications. If highest output
pressures are not the same against either stop, the
steering gear is leaking internally and must be
replaced.
SERVICE PROCEDURES
POWER STEERING SYSTEM FLUID LEVEL CHECK
WARNING: FLUID LEVEL SHOULD BE CHECKED
WITH ENGINE OFF TO PREVENT INJURY FROM
MOVING PARTS. DO NOT USE AUTOMATIC TRANS-
MISSION FLUID IN THE POWER STEERING SYS-
TEM. DO NOT OVERFILL THE POWER STEERING
SYSTEM.
Wipe reservoir filler cap free of dirt. Then check
fluid level. The dipstick should indicate COLD when
fluid is at normal ambient temperature, approxi-
mately 21ÉC to 27ÉC (70ÉF to 80ÉF). In all pumps add
fluid as necessary, use onlyMopar Power Steering
Fluid, or equivalent. DO NOT USE ANY TYPE
OF AUTOMATIC TRANSMISSION FLUID.
POWER STEERING PUMP INITIAL OPERATION
CAUTION: The fluid level should be checked with
engine off to prevent injury from moving compo-
nents. Use only MoparTPower Steering Fluid. Do
not use automatic transmission fluid. Do not over-
fill.
Wipe filler cap clean, then check the fluid level.
The dipstick should indicateFULL COLDwhen the
fluid is at normal temperature of approximately 21ÉC
to 27ÉC (70ÉF to 80ÉF).
(1) Fill the pump fluid reservoir to the proper level
and let the fluid settle for at least two (2) minutes.
(2) Start the engine and let run for a few seconds.
Then turn the engine off.
(3) Add fluid if necessary. Repeat the above proce-
dure until the fluid level remains constant after run-
ning the engine.
(4) Raise the front wheels off the ground.
(5) Start the engine. Slowly turn the steering
wheel right and left, lightly contacting the wheel
stops.
(6) Add power steering fluid if necessary.
(7) Lower the vehicle and turn the steering wheel
slowly from lock to lock.
(8) Stop the engine. Check the fluid level and refill
as required.
(9) If the fluid is extremely foamy, allow the vehi-
cle to stand a few minutes and repeat the above pro-
cedure.
POWER STEERING PUMP FLOW CONTROL VALVE
SEAL
The power steering pump does not require removal
from the engine for removal and replacement of the
flow control valve fitting O-Ring.
REMOVE
(1) Remove the power steering fluid pressure hose
from the power steering pump pressure fitting (Fig.
4).
(2) Remove the flow control valve fitting from the
power steering pump housing (Fig. 5).Prevent flow
control valve and spring from sliding out of
housing bore.
(3) Remove and discard O-ring seal from fitting.
INSTALL
(1) If necessary, clean and install flow control
valve and spring in pump housing bore.
(2) Install new O-ring seal on fitting.
(3) Install fitting in pump housing and tighten to
75 N´m (55 ft. lbs.)
(4) Install power steering fluid pressure hose on
flow control valve fitting.
PLSTEERING 19 - 11
DIAGNOSIS AND TESTING (Continued)
Page 913 of 1200
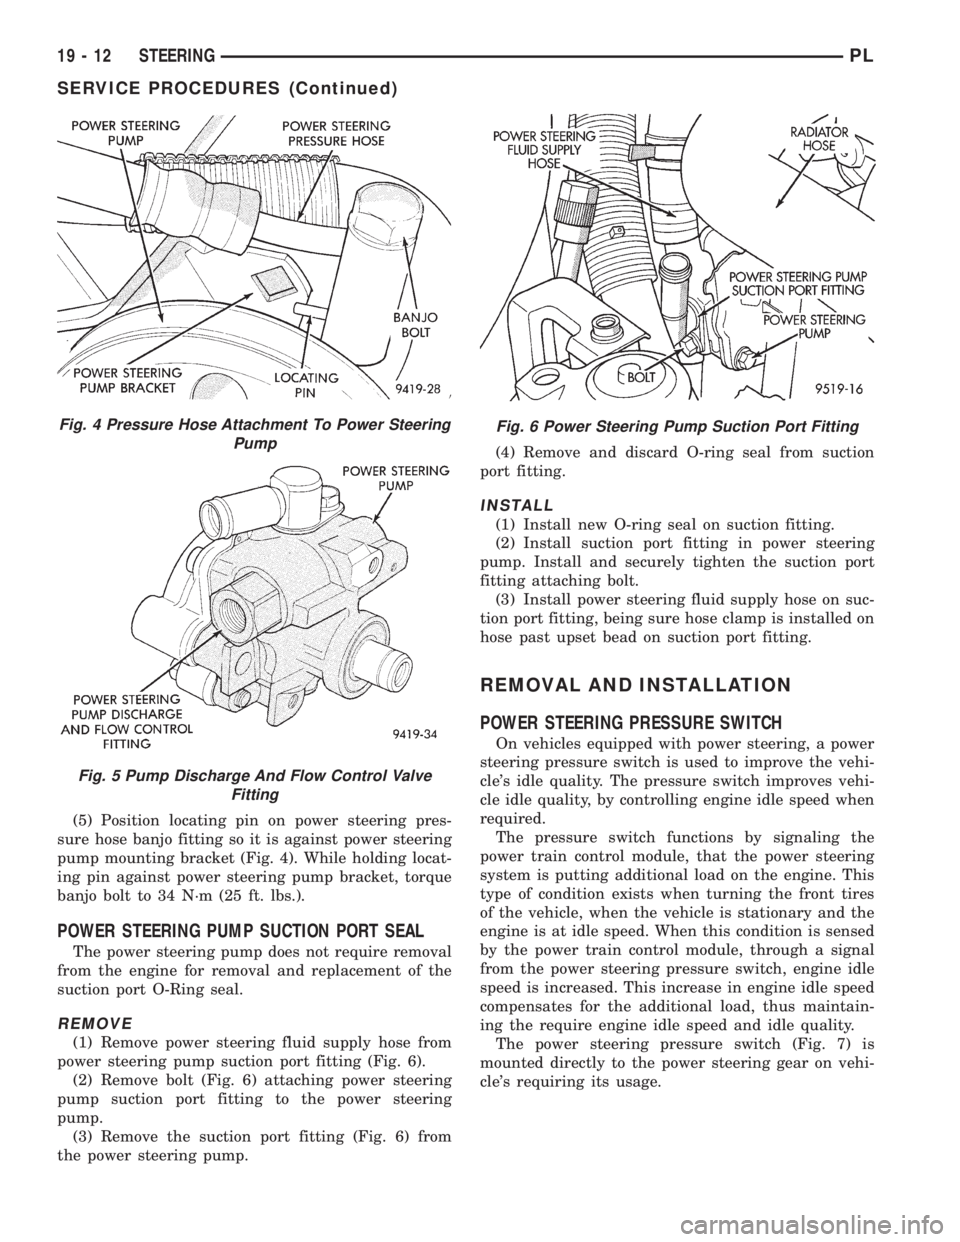
(5) Position locating pin on power steering pres-
sure hose banjo fitting so it is against power steering
pump mounting bracket (Fig. 4). While holding locat-
ing pin against power steering pump bracket, torque
banjo bolt to 34 N´m (25 ft. lbs.).
POWER STEERING PUMP SUCTION PORT SEAL
The power steering pump does not require removal
from the engine for removal and replacement of the
suction port O-Ring seal.
REMOVE
(1) Remove power steering fluid supply hose from
power steering pump suction port fitting (Fig. 6).
(2) Remove bolt (Fig. 6) attaching power steering
pump suction port fitting to the power steering
pump.
(3) Remove the suction port fitting (Fig. 6) from
the power steering pump.(4) Remove and discard O-ring seal from suction
port fitting.
INSTALL
(1) Install new O-ring seal on suction fitting.
(2) Install suction port fitting in power steering
pump. Install and securely tighten the suction port
fitting attaching bolt.
(3) Install power steering fluid supply hose on suc-
tion port fitting, being sure hose clamp is installed on
hose past upset bead on suction port fitting.
REMOVAL AND INSTALLATION
POWER STEERING PRESSURE SWITCH
On vehicles equipped with power steering, a power
steering pressure switch is used to improve the vehi-
cle's idle quality. The pressure switch improves vehi-
cle idle quality, by controlling engine idle speed when
required.
The pressure switch functions by signaling the
power train control module, that the power steering
system is putting additional load on the engine. This
type of condition exists when turning the front tires
of the vehicle, when the vehicle is stationary and the
engine is at idle speed. When this condition is sensed
by the power train control module, through a signal
from the power steering pressure switch, engine idle
speed is increased. This increase in engine idle speed
compensates for the additional load, thus maintain-
ing the require engine idle speed and idle quality.
The power steering pressure switch (Fig. 7) is
mounted directly to the power steering gear on vehi-
cle's requiring its usage.
Fig. 4 Pressure Hose Attachment To Power Steering
Pump
Fig. 5 Pump Discharge And Flow Control Valve
Fitting
Fig. 6 Power Steering Pump Suction Port Fitting
19 - 12 STEERINGPL
SERVICE PROCEDURES (Continued)
Page 914 of 1200
REMOVE
CAUTION: When removing and installing the
power steering pressure switch, the use of a 7/8
inch deep well socket is required. The deep well
socket will prevent damage to the plastic, electrical
connector area, of the power steering pressure
switch.
(1) Disconnect negative battery cable from the neg-
ative post of the battery. Be sure cable is isolated
from negative post on battery.
(2) Raise vehicle.
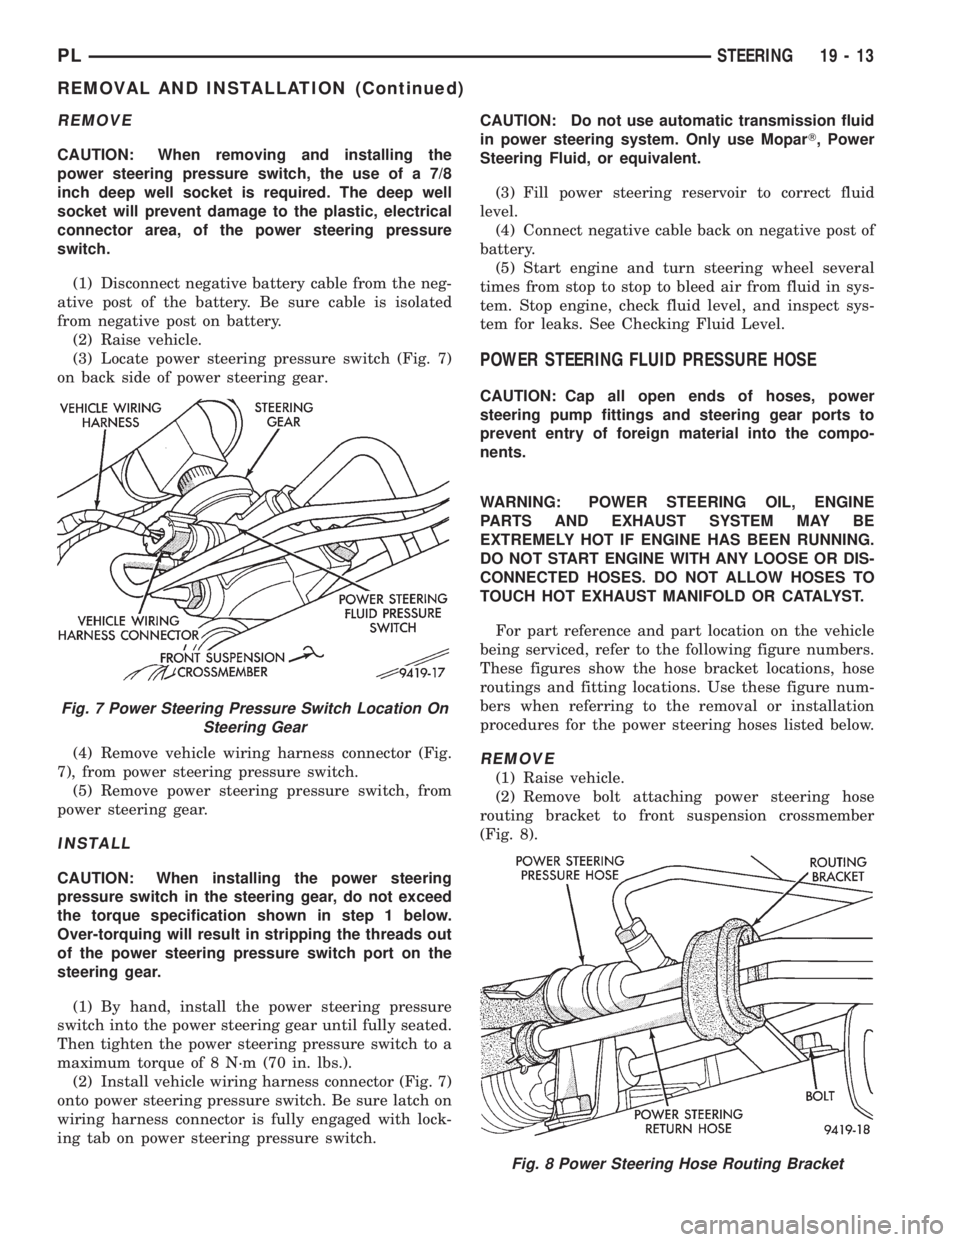
(3) Locate power steering pressure switch (Fig. 7)
on back side of power steering gear.
(4) Remove vehicle wiring harness connector (Fig.
7), from power steering pressure switch.
(5) Remove power steering pressure switch, from
power steering gear.
INSTALL
CAUTION: When installing the power steering
pressure switch in the steering gear, do not exceed
the torque specification shown in step 1 below.
Over-torquing will result in stripping the threads out
of the power steering pressure switch port on the
steering gear.
(1) By hand, install the power steering pressure
switch into the power steering gear until fully seated.
Then tighten the power steering pressure switch to a
maximum torque of 8 N´m (70 in. lbs.).
(2) Install vehicle wiring harness connector (Fig. 7)
onto power steering pressure switch. Be sure latch on
wiring harness connector is fully engaged with lock-
ing tab on power steering pressure switch.CAUTION: Do not use automatic transmission fluid
in power steering system. Only use MoparT, Power
Steering Fluid, or equivalent.
(3) Fill power steering reservoir to correct fluid
level.
(4) Connect negative cable back on negative post of
battery.
(5) Start engine and turn steering wheel several
times from stop to stop to bleed air from fluid in sys-
tem. Stop engine, check fluid level, and inspect sys-
tem for leaks. See Checking Fluid Level.
POWER STEERING FLUID PRESSURE HOSE
CAUTION: Cap all open ends of hoses, power
steering pump fittings and steering gear ports to
prevent entry of foreign material into the compo-
nents.
WARNING: POWER STEERING OIL, ENGINE
PARTS AND EXHAUST SYSTEM MAY BE
EXTREMELY HOT IF ENGINE HAS BEEN RUNNING.
DO NOT START ENGINE WITH ANY LOOSE OR DIS-
CONNECTED HOSES. DO NOT ALLOW HOSES TO
TOUCH HOT EXHAUST MANIFOLD OR CATALYST.
For part reference and part location on the vehicle
being serviced, refer to the following figure numbers.
These figures show the hose bracket locations, hose
routings and fitting locations. Use these figure num-
bers when referring to the removal or installation
procedures for the power steering hoses listed below.
REMOVE
(1) Raise vehicle.
(2) Remove bolt attaching power steering hose
routing bracket to front suspension crossmember
(Fig. 8).
Fig. 7 Power Steering Pressure Switch Location On
Steering Gear
Fig. 8 Power Steering Hose Routing Bracket
PLSTEERING 19 - 13
REMOVAL AND INSTALLATION (Continued)
Page 915 of 1200
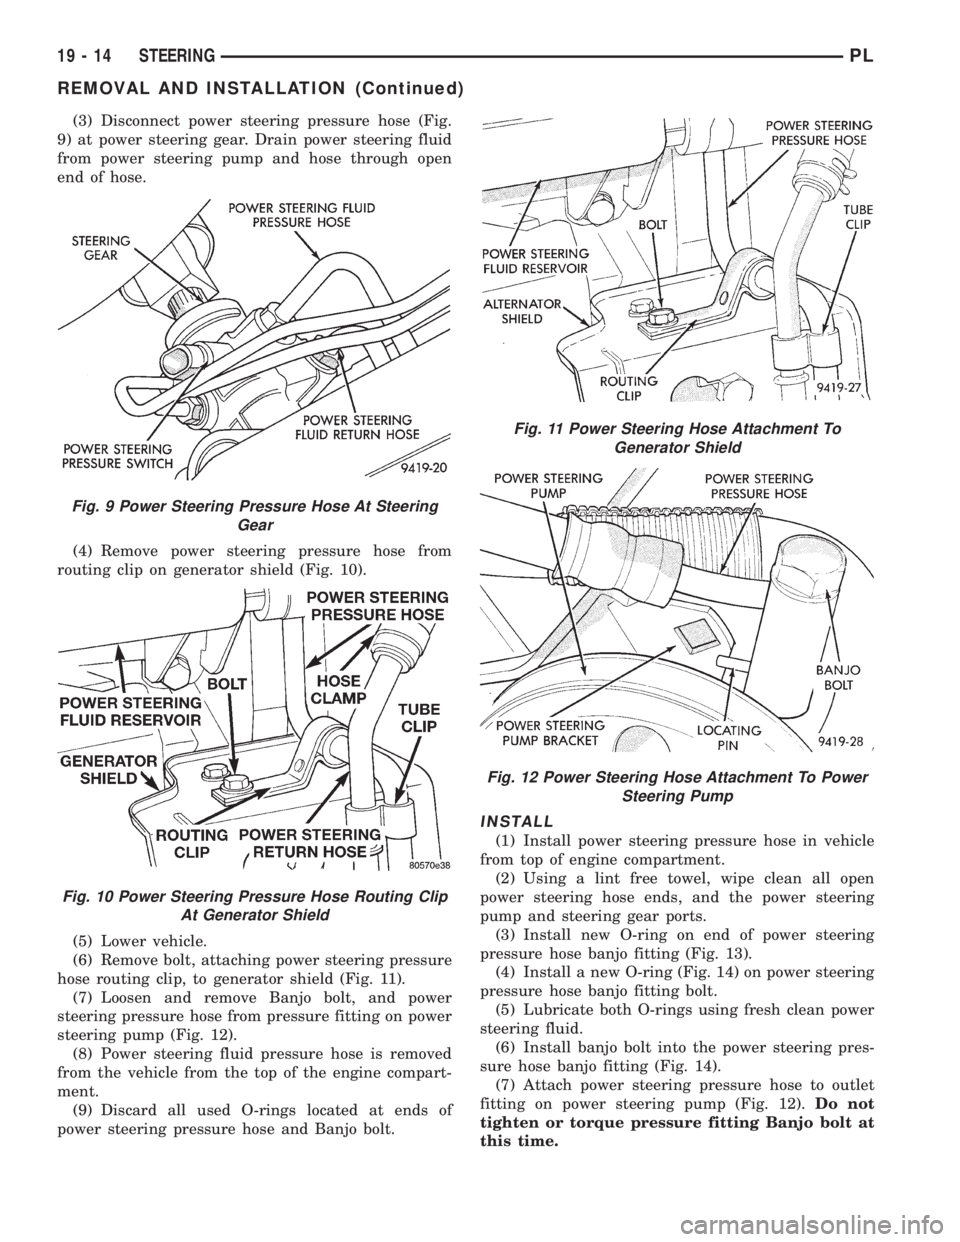
(3) Disconnect power steering pressure hose (Fig.
9) at power steering gear. Drain power steering fluid
from power steering pump and hose through open
end of hose.
(4) Remove power steering pressure hose from
routing clip on generator shield (Fig. 10).
(5) Lower vehicle.
(6) Remove bolt, attaching power steering pressure
hose routing clip, to generator shield (Fig. 11).
(7) Loosen and remove Banjo bolt, and power
steering pressure hose from pressure fitting on power
steering pump (Fig. 12).
(8) Power steering fluid pressure hose is removed
from the vehicle from the top of the engine compart-
ment.
(9) Discard all used O-rings located at ends of
power steering pressure hose and Banjo bolt.
INSTALL
(1) Install power steering pressure hose in vehicle
from top of engine compartment.
(2) Using a lint free towel, wipe clean all open
power steering hose ends, and the power steering
pump and steering gear ports.
(3) Install new O-ring on end of power steering
pressure hose banjo fitting (Fig. 13).
(4) Install a new O-ring (Fig. 14) on power steering
pressure hose banjo fitting bolt.
(5) Lubricate both O-rings using fresh clean power
steering fluid.
(6) Install banjo bolt into the power steering pres-
sure hose banjo fitting (Fig. 14).
(7) Attach power steering pressure hose to outlet
fitting on power steering pump (Fig. 12).Do not
tighten or torque pressure fitting Banjo bolt at
this time.
Fig. 9 Power Steering Pressure Hose At Steering
Gear
Fig. 10 Power Steering Pressure Hose Routing Clip
At Generator Shield
Fig. 11 Power Steering Hose Attachment To
Generator Shield
Fig. 12 Power Steering Hose Attachment To Power
Steering Pump
19 - 14 STEERINGPL
REMOVAL AND INSTALLATION (Continued)
Page 916 of 1200
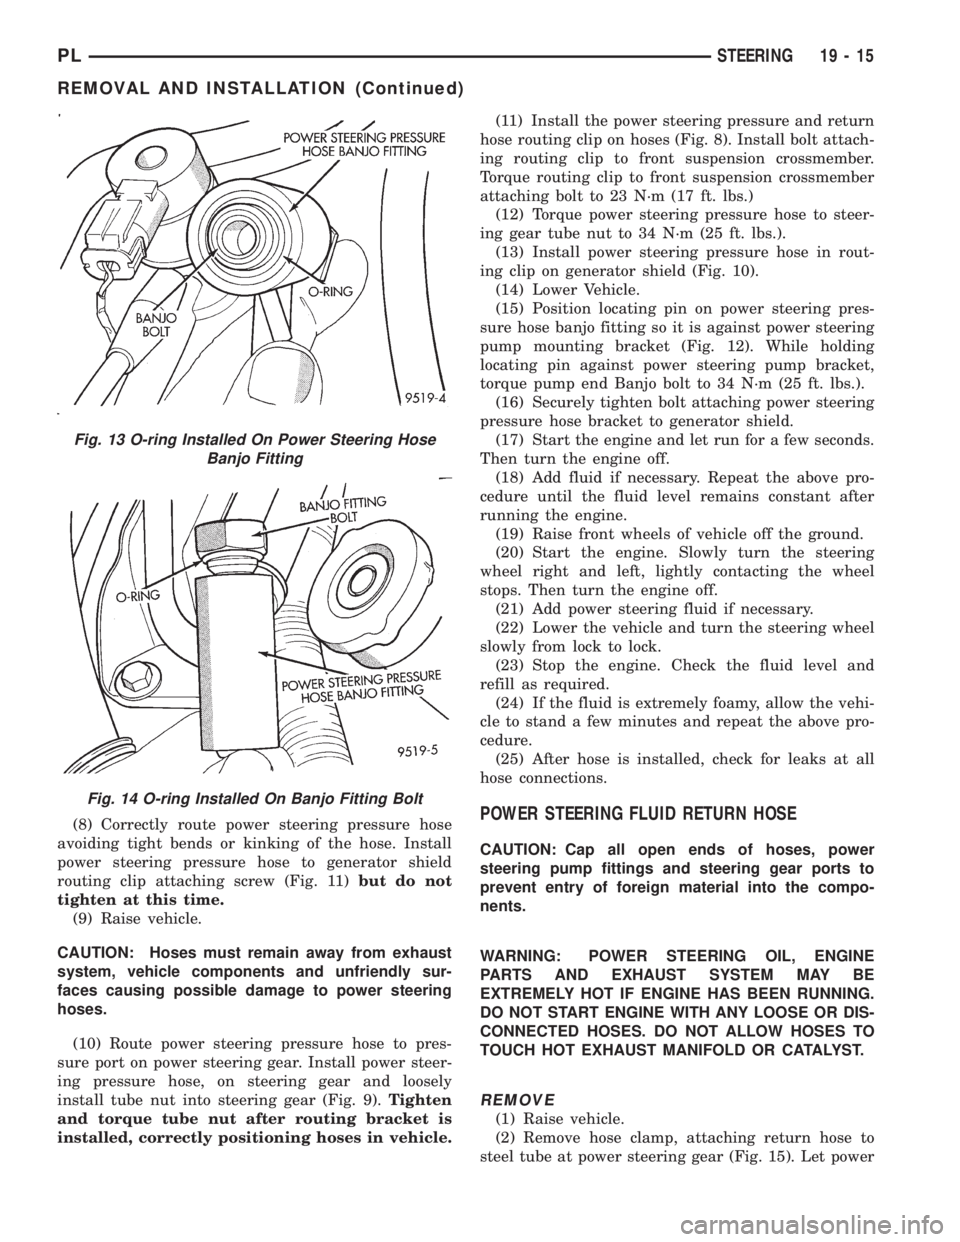
(8) Correctly route power steering pressure hose
avoiding tight bends or kinking of the hose. Install
power steering pressure hose to generator shield
routing clip attaching screw (Fig. 11)but do not
tighten at this time.
(9) Raise vehicle.
CAUTION: Hoses must remain away from exhaust
system, vehicle components and unfriendly sur-
faces causing possible damage to power steering
hoses.
(10) Route power steering pressure hose to pres-
sure port on power steering gear. Install power steer-
ing pressure hose, on steering gear and loosely
install tube nut into steering gear (Fig. 9).Tighten
and torque tube nut after routing bracket is
installed, correctly positioning hoses in vehicle.(11) Install the power steering pressure and return
hose routing clip on hoses (Fig. 8). Install bolt attach-
ing routing clip to front suspension crossmember.
Torque routing clip to front suspension crossmember
attaching bolt to 23 N´m (17 ft. lbs.)
(12) Torque power steering pressure hose to steer-
ing gear tube nut to 34 N´m (25 ft. lbs.).
(13) Install power steering pressure hose in rout-
ing clip on generator shield (Fig. 10).
(14) Lower Vehicle.
(15) Position locating pin on power steering pres-
sure hose banjo fitting so it is against power steering
pump mounting bracket (Fig. 12). While holding
locating pin against power steering pump bracket,
torque pump end Banjo bolt to 34 N´m (25 ft. lbs.).
(16) Securely tighten bolt attaching power steering
pressure hose bracket to generator shield.
(17) Start the engine and let run for a few seconds.
Then turn the engine off.
(18) Add fluid if necessary. Repeat the above pro-
cedure until the fluid level remains constant after
running the engine.
(19) Raise front wheels of vehicle off the ground.
(20) Start the engine. Slowly turn the steering
wheel right and left, lightly contacting the wheel
stops. Then turn the engine off.
(21) Add power steering fluid if necessary.
(22) Lower the vehicle and turn the steering wheel
slowly from lock to lock.
(23) Stop the engine. Check the fluid level and
refill as required.
(24) If the fluid is extremely foamy, allow the vehi-
cle to stand a few minutes and repeat the above pro-
cedure.
(25) After hose is installed, check for leaks at all
hose connections.POWER STEERING FLUID RETURN HOSE
CAUTION: Cap all open ends of hoses, power
steering pump fittings and steering gear ports to
prevent entry of foreign material into the compo-
nents.
WARNING: POWER STEERING OIL, ENGINE
PARTS AND EXHAUST SYSTEM MAY BE
EXTREMELY HOT IF ENGINE HAS BEEN RUNNING.
DO NOT START ENGINE WITH ANY LOOSE OR DIS-
CONNECTED HOSES. DO NOT ALLOW HOSES TO
TOUCH HOT EXHAUST MANIFOLD OR CATALYST.
REMOVE
(1) Raise vehicle.
(2) Remove hose clamp, attaching return hose to
steel tube at power steering gear (Fig. 15). Let power
Fig. 13 O-ring Installed On Power Steering Hose
Banjo Fitting
Fig. 14 O-ring Installed On Banjo Fitting Bolt
PLSTEERING 19 - 15
REMOVAL AND INSTALLATION (Continued)
Page 917 of 1200
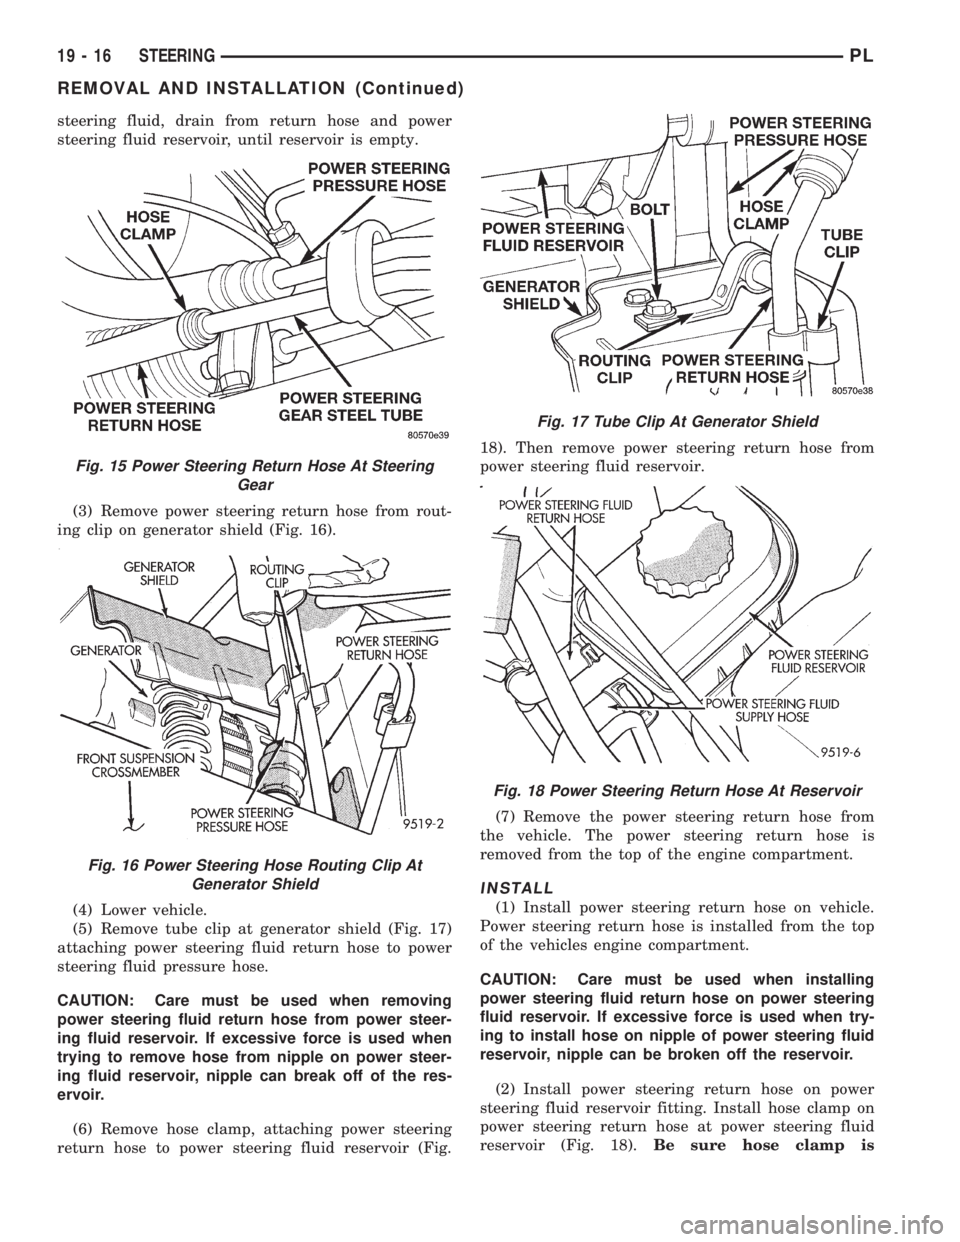
steering fluid, drain from return hose and power
steering fluid reservoir, until reservoir is empty.
(3) Remove power steering return hose from rout-
ing clip on generator shield (Fig. 16).
(4) Lower vehicle.
(5) Remove tube clip at generator shield (Fig. 17)
attaching power steering fluid return hose to power
steering fluid pressure hose.
CAUTION: Care must be used when removing
power steering fluid return hose from power steer-
ing fluid reservoir. If excessive force is used when
trying to remove hose from nipple on power steer-
ing fluid reservoir, nipple can break off of the res-
ervoir.
(6) Remove hose clamp, attaching power steering
return hose to power steering fluid reservoir (Fig.18). Then remove power steering return hose from
power steering fluid reservoir.
(7) Remove the power steering return hose from
the vehicle. The power steering return hose is
removed from the top of the engine compartment.
INSTALL
(1) Install power steering return hose on vehicle.
Power steering return hose is installed from the top
of the vehicles engine compartment.
CAUTION: Care must be used when installing
power steering fluid return hose on power steering
fluid reservoir. If excessive force is used when try-
ing to install hose on nipple of power steering fluid
reservoir, nipple can be broken off the reservoir.
(2) Install power steering return hose on power
steering fluid reservoir fitting. Install hose clamp on
power steering return hose at power steering fluid
reservoir (Fig. 18).Be sure hose clamp is
Fig. 15 Power Steering Return Hose At Steering
Gear
Fig. 16 Power Steering Hose Routing Clip At
Generator Shield
Fig. 17 Tube Clip At Generator Shield
Fig. 18 Power Steering Return Hose At Reservoir
19 - 16 STEERINGPL
REMOVAL AND INSTALLATION (Continued)
Page 918 of 1200
installed on return hose past upset bead on
power steering fluid reservoir.
(3) Raise vehicle.
(4) Clip power steering return hose and pressure
hose together (Fig. 17).
(5) Install power steering return hose on steel tube
at power steering gear (Fig. 15). Install hose clamp
on power steering return hose at power steering gear
(Fig. 15).Be sure hose clamp is installed on
return hose past upset bead on steel tube at
power gear.
(6) Install power steering return hose on routing
clip at generator shield (Fig. 16).
(7) Lower vehicle.
(8) Start the engine and let run for a few seconds.
Then turn the engine off.
(9) Add fluid if necessary. Repeat the above proce-
dure until the fluid level remains constant after run-
ning the engine.
(10) Raise front wheels of vehicle off the ground.
(11) Start the engine. Slowly turn the steering
wheel right and left, lightly contacting the wheel
stops. Then turn the engine off.
(12) Add power steering fluid if necessary.
(13) Lower the vehicle and turn the steering wheel
slowly from lock to lock.
(14) Stop the engine. Check the fluid level and
refill as required.
(15) If the fluid is extremely foamy, allow the vehi-
cle to stand a few minutes and repeat the above pro-
cedure.
(16) After hose is installed, check for leaks at all
hose connections.
POWER STEERING FLUID SUPPLY HOSE
RESERVOIR TO POWER STEERING PUMP
WARNING: POWER STEERING OIL, ENGINE
PARTS AND EXHAUST SYSTEM MAY BE
EXTREMELY HOT IF ENGINE HAS BEEN RUNNING.
DO NOT START ENGINE WITH ANY LOOSE OR DIS-
CONNECTED HOSES. DO NOT ALLOW HOSES TO
TOUCH HOT EXHAUST MANIFOLD OR CATALYST.
REMOVE
CAUTION: Care must be used when removing the
power steering fluid supply hose from power steer-
ing fluid reservoir. If excessive force is used when
trying to remove hose from nipple on power steer-
ing fluid reservoir, nipple can break off of the res-
ervoir.
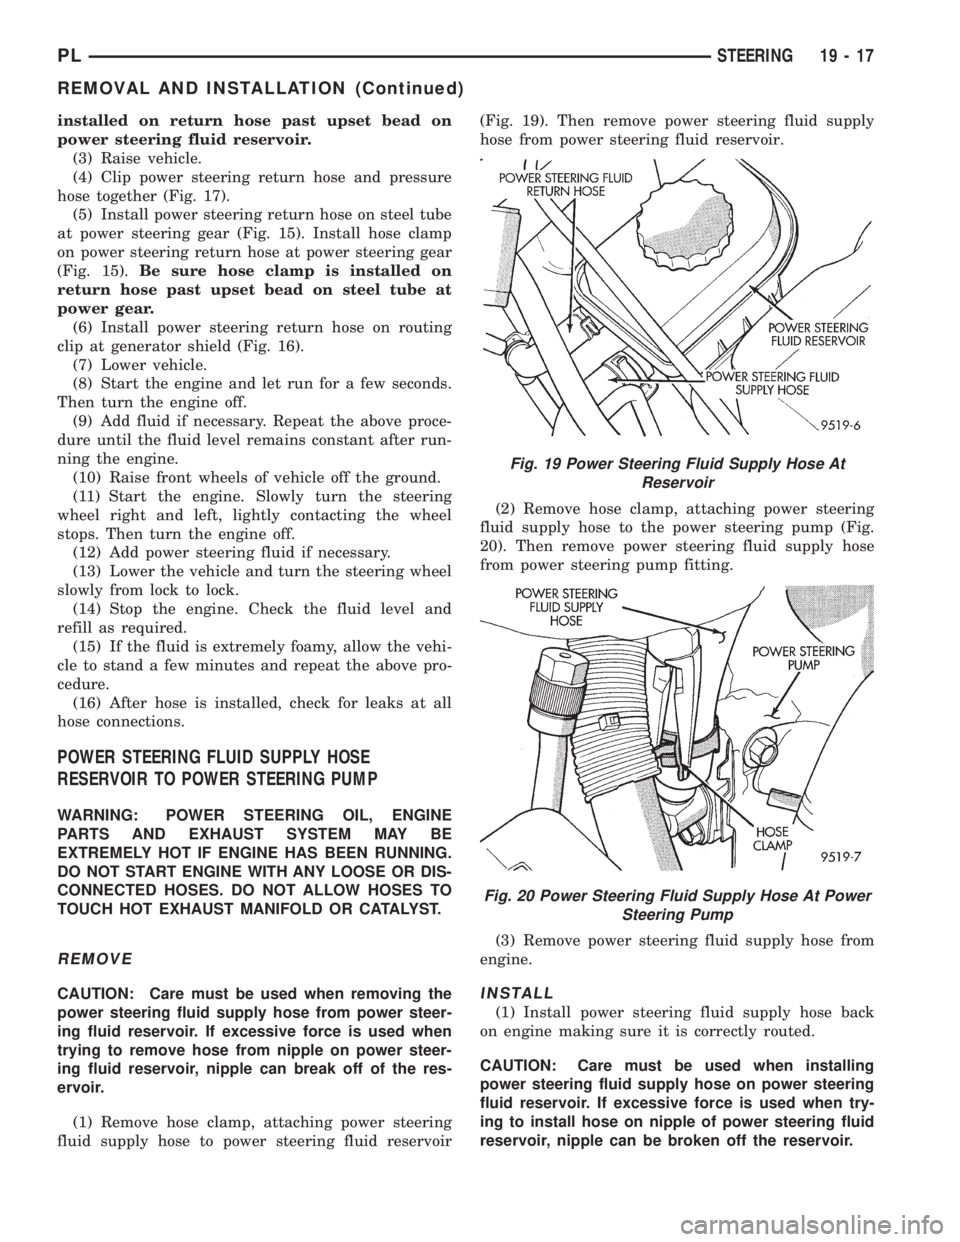
(1) Remove hose clamp, attaching power steering
fluid supply hose to power steering fluid reservoir(Fig. 19). Then remove power steering fluid supply
hose from power steering fluid reservoir.
(2) Remove hose clamp, attaching power steering
fluid supply hose to the power steering pump (Fig.
20). Then remove power steering fluid supply hose
from power steering pump fitting.
(3) Remove power steering fluid supply hose from
engine.INSTALL
(1) Install power steering fluid supply hose back
on engine making sure it is correctly routed.
CAUTION: Care must be used when installing
power steering fluid supply hose on power steering
fluid reservoir. If excessive force is used when try-
ing to install hose on nipple of power steering fluid
reservoir, nipple can be broken off the reservoir.
Fig. 19 Power Steering Fluid Supply Hose At
Reservoir
Fig. 20 Power Steering Fluid Supply Hose At Power
Steering Pump
PLSTEERING 19 - 17
REMOVAL AND INSTALLATION (Continued)
Page 919 of 1200
(2) Install power steering fluid supply hose on
power steering fluid reservoir fitting. Install hose
clamp on power steering fluid supply hose at power
steering fluid reservoir (Fig. 19).Be sure hose
clamp is installed on return hose past upset
bead on power steering fluid reservoir.
(3) Install power steering fluid supply hose on
power steering pump fitting. Install hose clamp on
power steering fluid supply hose at power steering
pump fitting (Fig. 20).Be sure hose clamp is
installed on power steering fluid supply hose
past upset bead on power steering pump fit-
ting.
(4) Start the engine and let run for a few seconds.
Then turn the engine off.
(5) Add fluid if necessary. Repeat the above proce-
dure until the fluid level remains constant after run-
ning the engine.
(6) Raise front wheels of vehicle off the ground.
(7) Start the engine. Slowly turn the steering
wheel right and left, lightly contacting the wheel
stops. Then turn the engine off.
(8) Add power steering fluid if necessary.
(9) Lower the vehicle and turn the steering wheel
slowly from lock to lock.
(10) Stop the engine. Check the fluid level and
refill as required.
(11) If the fluid is extremely foamy, allow the vehi-
cle to stand a few minutes and repeat the above pro-
cedure.
(12) After hose is installed, check for leaks at all
hose connections.
POWER STEERING PUMP (ALL ENGINES)
WARNING: POWER STEERING OIL, ENGINE COM-
PONENTS AND EXHAUST SYSTEM MAY BE
EXTREMELY HOT IF ENGINE HAS BEEN RUNNING.
DO NOT START ENGINE WITH ANY LOOSE OR DIS-
CONNECTED HOSES, OR ALLOW HOSES TO
TOUCH HOT EXHAUST MANIFOLD OR CATALYST.
The power steering pump removal procedure and
pump and bracket fastener locations are the same for
both engine applications used for this vehicle. The
front power steering pump bracket must be removed
as an assembly with the power steering pump and
removed from the pump after removing the pulley
from the power steering pump.
REMOVE
(1) Remove battery cable from (-) negative post on
battery.
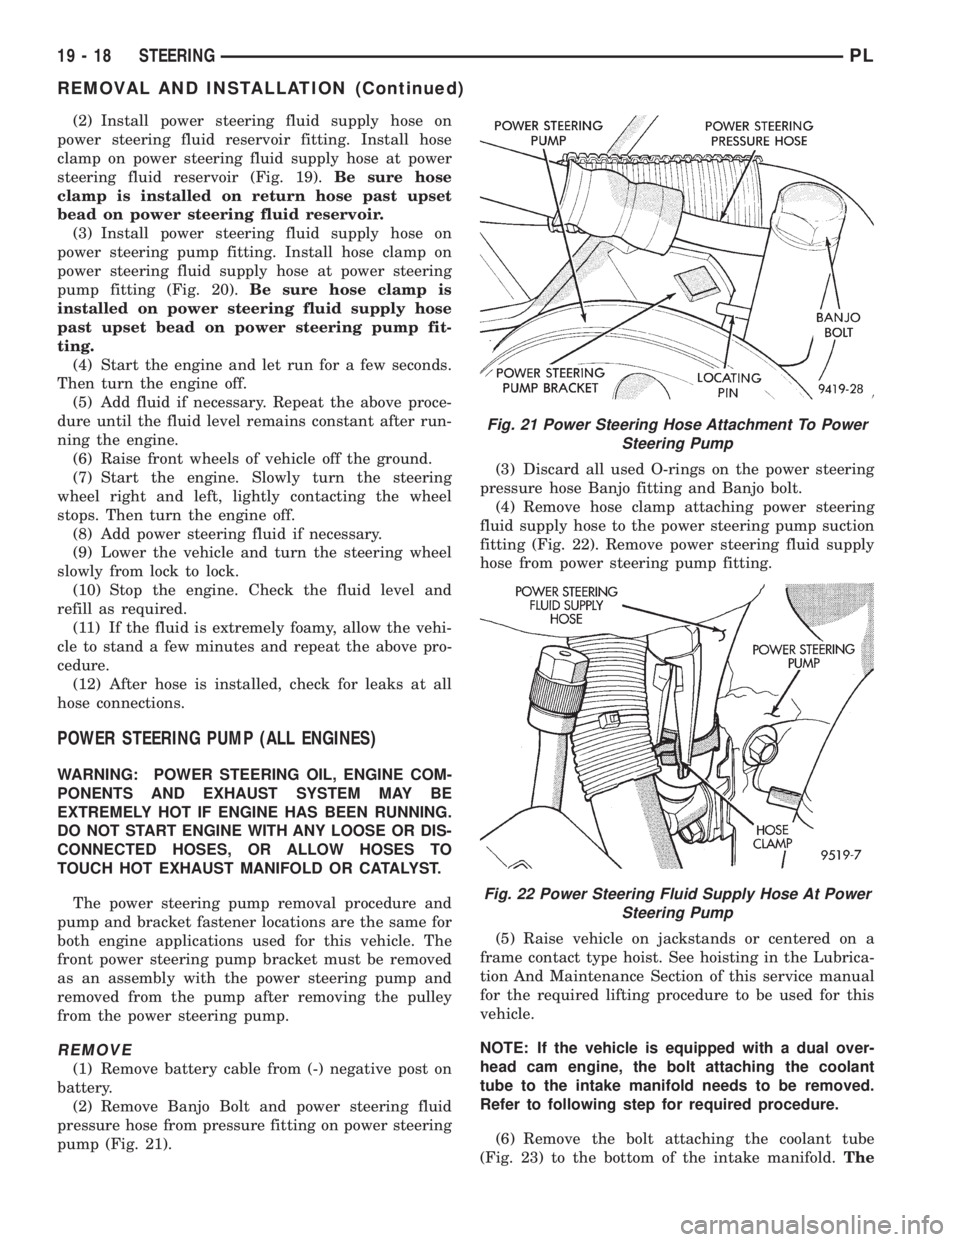
(2) Remove Banjo Bolt and power steering fluid
pressure hose from pressure fitting on power steering
pump (Fig. 21).(3) Discard all used O-rings on the power steering
pressure hose Banjo fitting and Banjo bolt.
(4) Remove hose clamp attaching power steering
fluid supply hose to the power steering pump suction
fitting (Fig. 22). Remove power steering fluid supply
hose from power steering pump fitting.
(5) Raise vehicle on jackstands or centered on a
frame contact type hoist. See hoisting in the Lubrica-
tion And Maintenance Section of this service manual
for the required lifting procedure to be used for this
vehicle.
NOTE: If the vehicle is equipped with a dual over-
head cam engine, the bolt attaching the coolant
tube to the intake manifold needs to be removed.
Refer to following step for required procedure.
(6) Remove the bolt attaching the coolant tube
(Fig. 23) to the bottom of the intake manifold.The
Fig. 21 Power Steering Hose Attachment To Power
Steering Pump
Fig. 22 Power Steering Fluid Supply Hose At Power
Steering Pump
19 - 18 STEERINGPL
REMOVAL AND INSTALLATION (Continued)
Page 920 of 1200
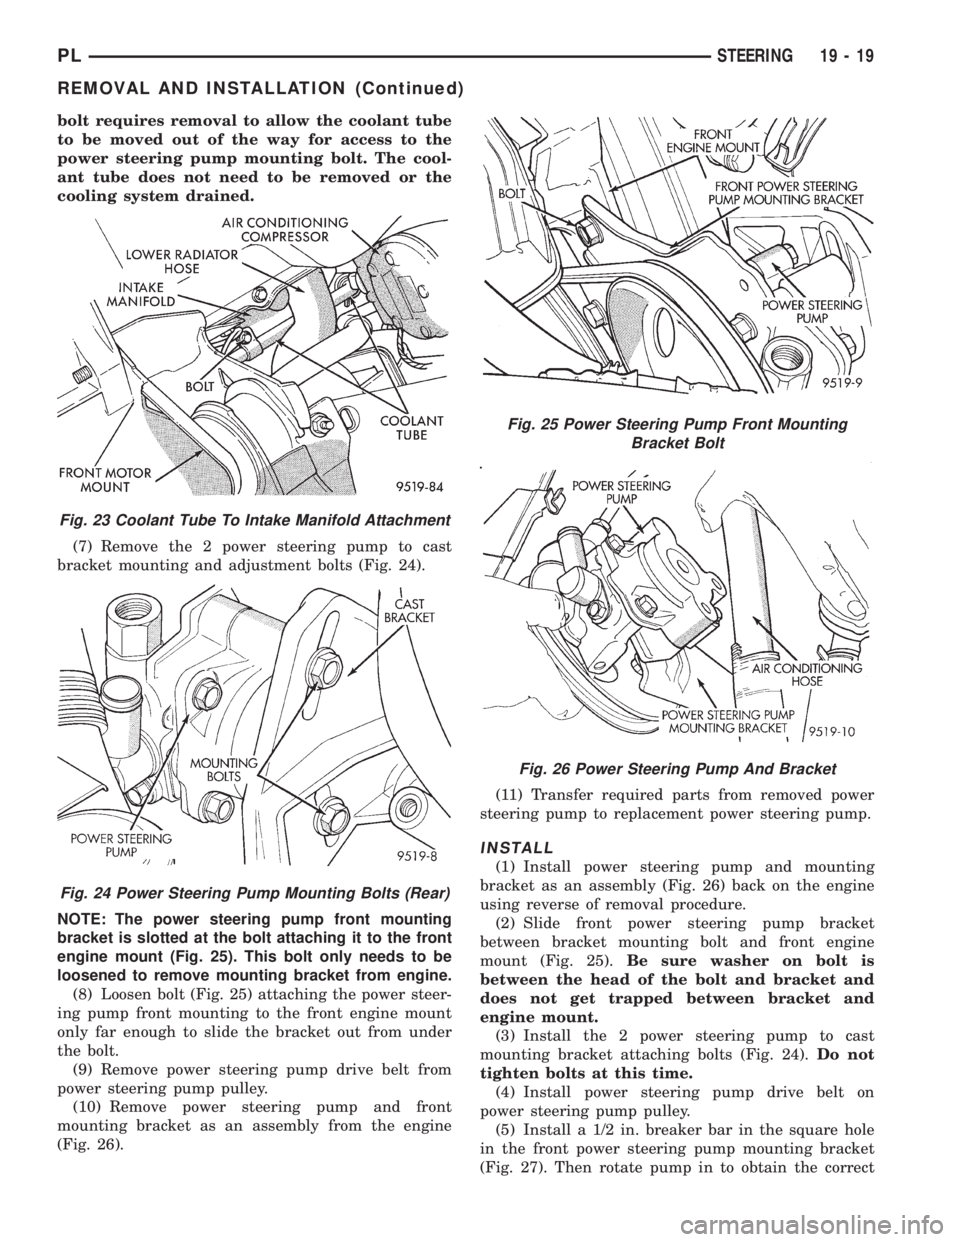
bolt requires removal to allow the coolant tube
to be moved out of the way for access to the
power steering pump mounting bolt. The cool-
ant tube does not need to be removed or the
cooling system drained.
(7) Remove the 2 power steering pump to cast
bracket mounting and adjustment bolts (Fig. 24).
NOTE: The power steering pump front mounting
bracket is slotted at the bolt attaching it to the front
engine mount (Fig. 25). This bolt only needs to be
loosened to remove mounting bracket from engine.
(8) Loosen bolt (Fig. 25) attaching the power steer-
ing pump front mounting to the front engine mount
only far enough to slide the bracket out from under
the bolt.
(9) Remove power steering pump drive belt from
power steering pump pulley.
(10) Remove power steering pump and front
mounting bracket as an assembly from the engine
(Fig. 26).(11) Transfer required parts from removed power
steering pump to replacement power steering pump.
INSTALL
(1) Install power steering pump and mounting
bracket as an assembly (Fig. 26) back on the engine
using reverse of removal procedure.
(2) Slide front power steering pump bracket
between bracket mounting bolt and front engine
mount (Fig. 25).Be sure washer on bolt is
between the head of the bolt and bracket and
does not get trapped between bracket and
engine mount.
(3) Install the 2 power steering pump to cast
mounting bracket attaching bolts (Fig. 24).Do not
tighten bolts at this time.
(4) Install power steering pump drive belt on
power steering pump pulley.
(5) Install a 1/2 in. breaker bar in the square hole
in the front power steering pump mounting bracket
(Fig. 27). Then rotate pump in to obtain the correct
Fig. 23 Coolant Tube To Intake Manifold Attachment
Fig. 24 Power Steering Pump Mounting Bolts (Rear)
Fig. 25 Power Steering Pump Front Mounting
Bracket Bolt
Fig. 26 Power Steering Pump And Bracket
PLSTEERING 19 - 19
REMOVAL AND INSTALLATION (Continued)