ISUZU KB P190 2007 Workshop Repair Manual
Manufacturer: ISUZU, Model Year: 2007, Model line: KB P190, Model: ISUZU KB P190 2007Pages: 6020, PDF Size: 70.23 MB
Page 4131 of 6020

7A3-46 ON-VEHICLE SERVICE (AW30–40LE)
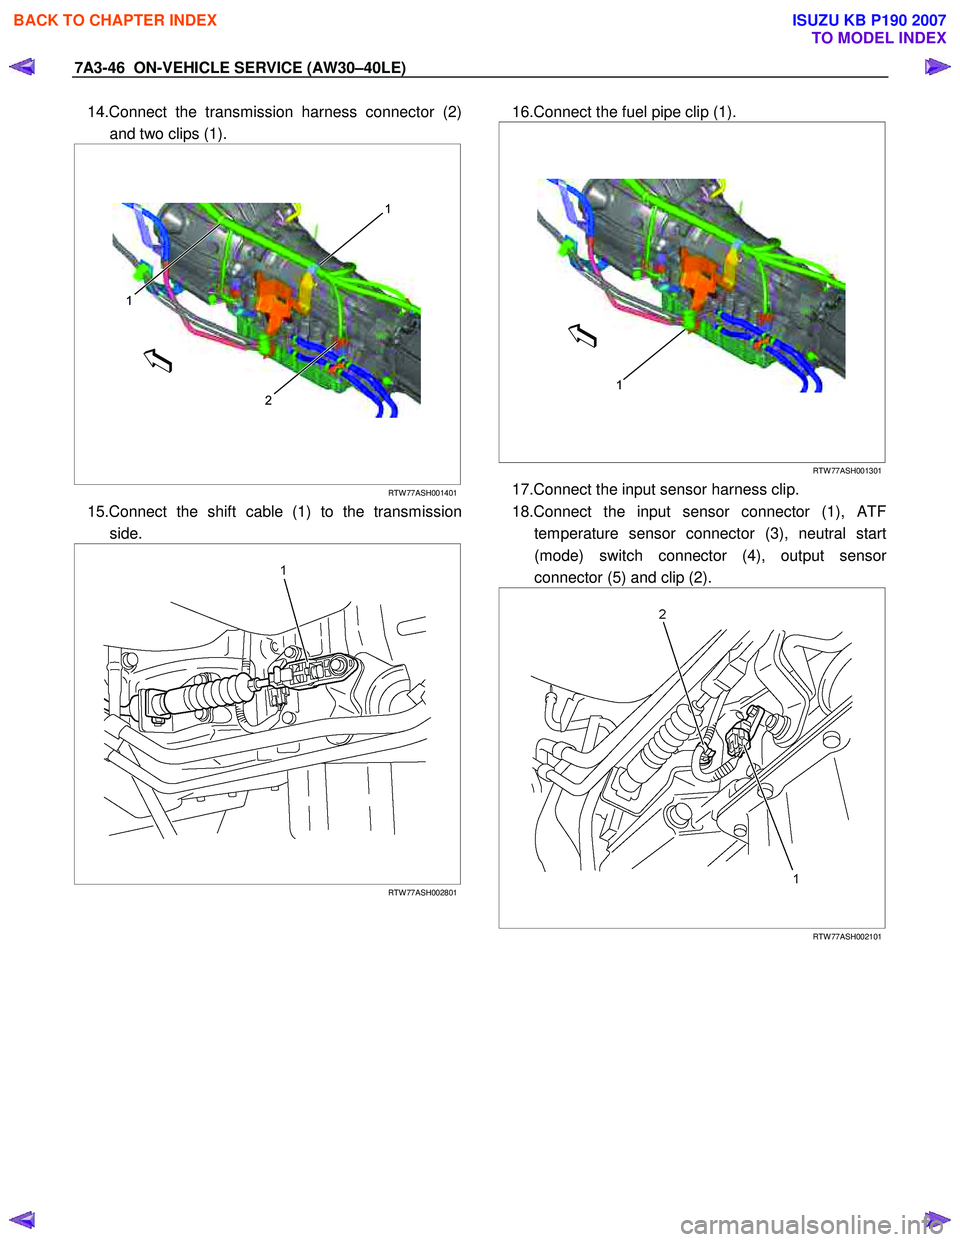
14.Connect the transmission harness connector (2)
and two clips (1).
2
1
1
RTW 77ASH001401
15.Connect the shift cable (1) to the transmission
side.
RTW 77ASH002801
16.Connect the fuel pipe clip (1).
1
RTW 77ASH001301
17.Connect the input sensor harness clip.
18.Connect the input sensor connector (1), ATF temperature sensor connector (3), neutral start
(mode) switch connector (4), output senso
r
connector (5) and clip (2).
RTW 77ASH002101
BACK TO CHAPTER INDEX
TO MODEL INDEX
ISUZU KB P190 2007
Page 4132 of 6020

ON-VEHICLE SERVICE (AW30–40LE) 7A3-47
RTW 77ASH002201
RTW 77ASH002301
19.Install the transfer assembly.(4 ×4 only)
•
Apply a thin coat of molybdenum disulfide
grease to the input shaft spline.
Torque: 41 N ⋅
⋅⋅
⋅
m(4.2 kgf ⋅m/30 lb ⋅ft)
RTW 77ASH001701
20.Connect two harness clips (1) of the tansfer upper
side.
1
1
RTW 77ASH001601
21.Connect the speed sensor connector.
BACK TO CHAPTER INDEX
TO MODEL INDEX
ISUZU KB P190 2007
Page 4133 of 6020

7A3-48 ON-VEHICLE SERVICE (AW30–40LE)
22.Connect the 2W D-4W D switch connector (1),
neutral switch connector (2), actuator connecto
r
(3) and speed sensor connector (4).
RTW 77ASH001801
RTW 77ASH001901
RTW 77ASH002001
23.Install the rear propeller shaft.
NOTE: Align alignment marks on the flange.
Torque: 59 N ⋅
⋅⋅
⋅
m (6.0 kgf ⋅m/43 lb ⋅ft)
RTW 77BSH000201
24.Install the center bearing on the crossmember.
Torque: 69 N ⋅
⋅⋅
⋅
m (7.0 kgf ⋅m/51 lb ⋅ft)
25.Install the front propeller shaft.(4 ×4 only)
NOTE: Align alignment marks on the flange.
Torque: 59 N ⋅
⋅⋅
⋅
m (6.0 kgf ⋅m/43 lb ⋅ft)
26.Remove the drain plug from oil pan and drain the fluid.
27.Install the drain plug. Torque: 19 N ⋅
⋅⋅
⋅
m (1.9 kgf ⋅m/14 lb ⋅ft)
28.Pour the transmission oil.
29.Remove suitable stands.
30.Connect battery ground cable.
BACK TO CHAPTER INDEX
TO MODEL INDEX
ISUZU KB P190 2007
Page 4134 of 6020

ON-VEHICLE SERVICE (AW30–40LE) 7A3-49
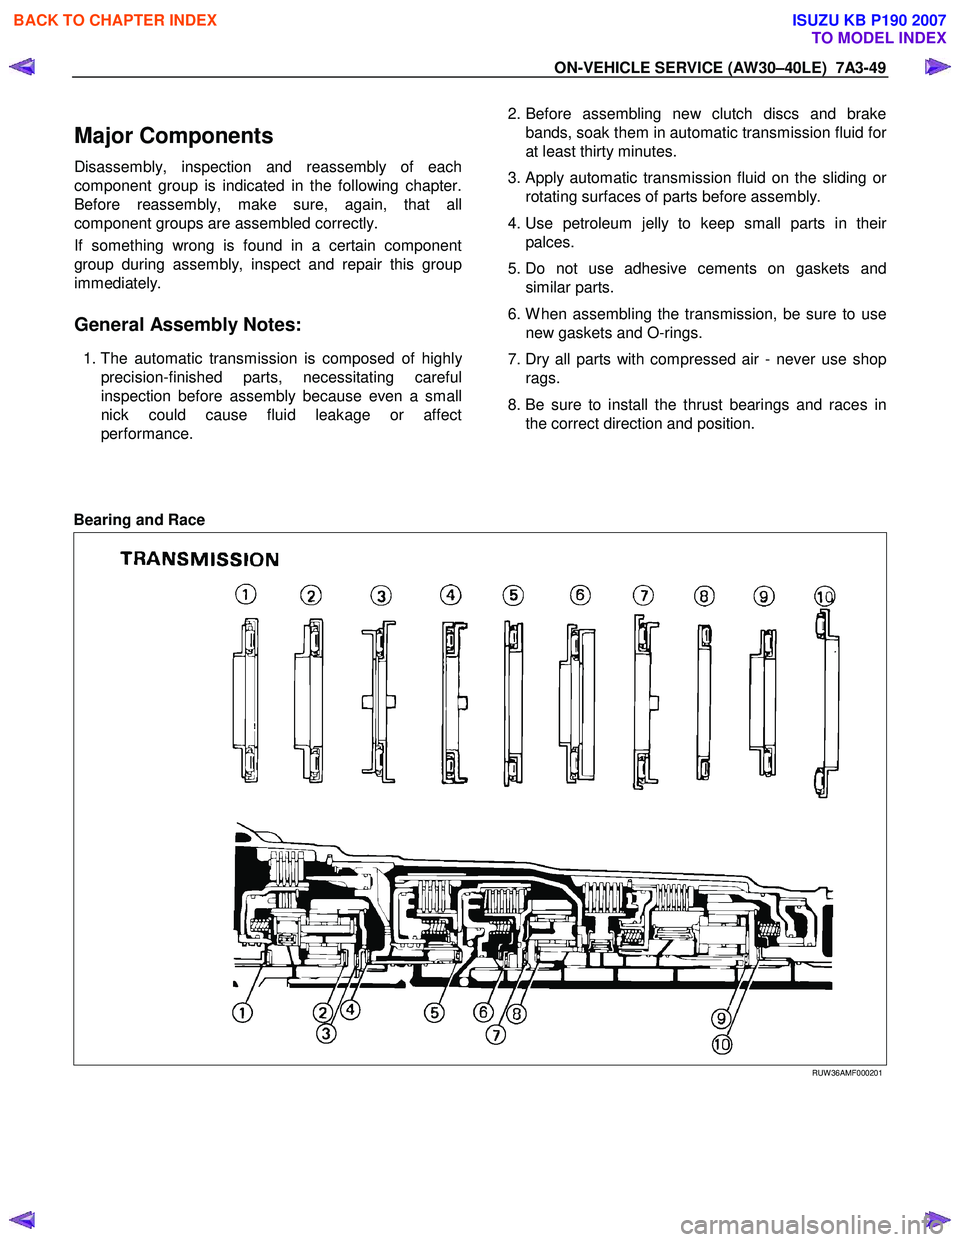
Major Components
Disassembly, inspection and reassembly of each
component group is indicated in the following chapter.
Before reassembly, make sure, again, that all
component groups are assembled correctly.
If something wrong is found in a certain component
group during assembly, inspect and repair this group
immediately.
General Assembly Notes:
1. The automatic transmission is composed of highly
precision-finished parts, necessitating careful
inspection before assembly because even a small
nick could cause fluid leakage or affect
performance.
2. Before assembling new clutch discs and brake
bands, soak them in automatic transmission fluid fo
r
at least thirty minutes.
3. Apply automatic transmission fluid on the sliding o
r
rotating surfaces of parts before assembly.
4. Use petroleum jelly to keep small parts in thei
r
palces.
5. Do not use adhesive cements on gaskets and similar parts.
6. W hen assembling the transmission, be sure to use new gaskets and O-rings.
7. Dry all parts with compressed air - never use shop rags.
8. Be sure to install the thrust bearings and races in the correct direction and position.
Bearing and Race
RUW 36AMF000201
BACK TO CHAPTER INDEX
TO MODEL INDEX
ISUZU KB P190 2007
Page 4135 of 6020

7A3-50 ON-VEHICLE SERVICE (AW30–40LE)
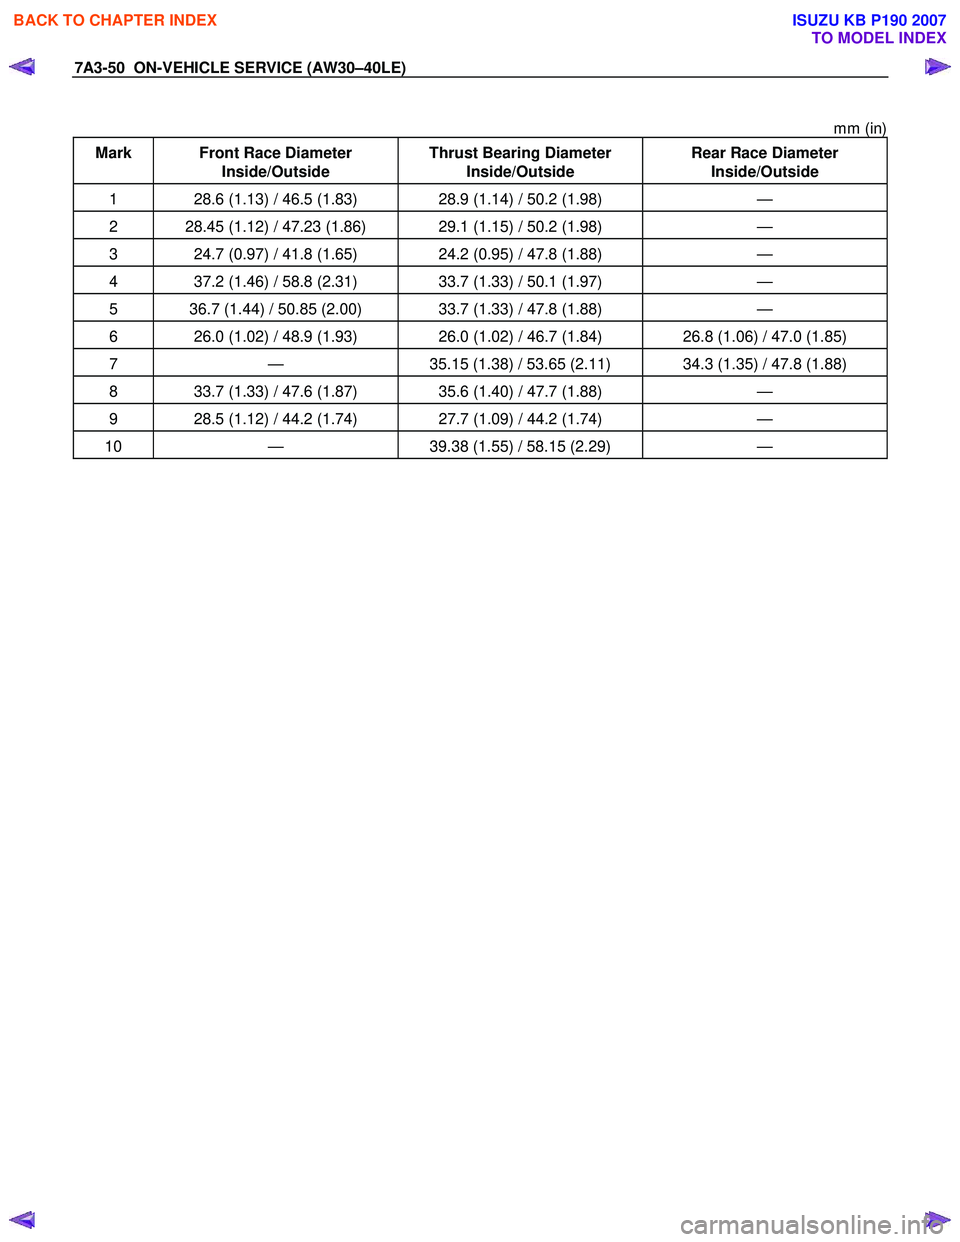
mm (in)
Mark Front Race Diameter Inside/Outside Thrust Bearing Diameter
Inside/Outside Rear Race Diameter
Inside/Outside
1 28.6 (1.13) / 46.5 (1.83) 28.9 (1.14) / 50.2 (1.98) —
2 28.45 (1.12) / 47.23 (1.86) 29.1 (1.15) / 50.2 (1.98) —
3 24.7 (0.97) / 41.8 (1.65) 24.2 (0.95) / 47.8 (1.88) —
4 37.2 (1.46) / 58.8 (2.31) 33.7 (1.33) / 50.1 (1.97) —
5 36.7 (1.44) / 50.85 (2.00) 33.7 (1.33) / 47.8 (1.88) —
6 26.0 (1.02) / 48.9 (1.93) 26.0 (1.02) / 46.7 (1.84) 26.8 (1.06) / 47.0 (1.85)
7 — 35.15 (1.38) / 53.65 (2.11) 34.3 (1.35) / 47.8 (1.88)
8 33.7 (1.33) / 47.6 (1.87) 35.6 (1.40) / 47.7 (1.88) —
9 28.5 (1.12) / 44.2 (1.74) 27.7 (1.09) / 44.2 (1.74) —
10 — 39.38 (1.55) / 58.15 (2.29) —
BACK TO CHAPTER INDEX
TO MODEL INDEX
ISUZU KB P190 2007
Page 4136 of 6020

UNIT REPAIR (AW30–40LE) 7A4–1
SECTION 7A4
TABLE OF CONTENTS
UNIT REPAIR (AW30–40LE)
Major Components (1) ................................... 7A4–2Major Components (1) and Associatedparts ........................................................... 7A4–2
Disassembly steps ...................................... 7A4–2
Components (1) ............................................. 7A4–4 Reassembly ................................................ 7A4–4
Major Components (2) ................................... 7A4–6 Major Componets (2) and Associated Parts ........................................................... 7A4–6
Disassembly ............................................... 7A4–7
Reassembly ................................................ 7A4–10
Major Components (3) ................................... 7A4–15 Major Components (3) and AssociatedParts ........................................................... 7A4–15
Disassembly ............................................... 7A4–16
Reassembly ................................................ 7A4–24
Diaassembly, Inspection and Reassembly of minor Components ................................. 7A4–36
Oil Pump ........................................................ 7A4–37 Disassembly View ...................................... 7A4–37
Disassembly ............................................... 7A4–37
Inspection and Repair ................................. 7A4–38
Reassembly ................................................ 7A4–40
OD Planetary Gear and OD Direct Clutch Assembly (C–0).......................................... 7A4–42
Disassembled View .................................... 7A4–42
Disassembly ............................................... 7A4–43
Inspection and Repair ................................. 7A4–46
Reassembly ................................................ 7A4–47
OD Support Assembly ................................... 7A4–52 Disassembled View .................................... 7A4–52
Disassembly ............................................... 7A4–52
Inspection and Repair ................................. 7A4–53
Reassembly ................................................ 7A4–54
Direct Clutch Assembly (C-2) ........................ 7A4–57 Disassembled View .................................... 7A4–57
Disassembly ............................................... 7A4–58
Inspection and Repair ................................. 7A4–59
Reassembly ................................................ 7A4–60
Forward Clutch Asseembly (C-1)................... 7A4–63 Disassembled View .................................... 7A4–63
Disassembly ............................................... 7A4–64
Inspection and Repair ................................. 7A4–65 Reassembly ................................................ 7A4–66
Front Planetary Gear ..................................... 7A4–70 Disassembled View .................................... 7A4–70
Disassembly ............................................... 7A4–70
Inspection and Repair ................................. 7A4–70
Reassembly ................................................ 7A4–71
Planetary Sun Gear and No.1 One-Way Clutch ......................................................... 7A4–72
Disassembled View .................................... 7A4–72
Disassembly ............................................... 7A4–73
Inspection and Repair ................................. 7A4–73
Reassembly ................................................ 7A4–74
Second Brake Assembly (B–2) ...................... 7A4–76 Disassembled View .................................... 7A4–76
Disassembly ............................................... 7A4–76
Inspection and Repair ................................. 7A4–77
Reassembly ................................................ 7A4–77
Rear Planetary Gear Assembly and Output Shaft ........................................................... 7A4–80
Disassembled View .................................... 7A4–80
Disassembly ............................................... 7A4–81
Reassembly ................................................ 7A4–83
First and Reverse Brake (B–3) ...................... 7A4–86 Disassembled View .................................... 7A4–86
Disassembly ............................................... 7A4–87
Reassembly ................................................ 7A4–88
Transmission Case ........................................ 7A4–91 Disassembled View .................................... 7A4–91
Disassembly ............................................... 7A4–91
Reassembly ................................................ 7A4–92
Torque Converter........................................... 7A4–94 Inspection and Repair ................................. 7A4–94
Adapter Housing (4 × 4)................................. 7A4–95
Disassembled View .................................... 7A4–95
Disassembly ............................................... 7A4–95
Reassembly ................................................ 7A4–95
Extension Housing (4 × 2) ............................. 7A4–96
Disassembled View .................................... 7A4–96
Disassembly ............................................... 7A4–96
Reassembly ................................................ 7A4–97
Main Data and Specifications ........................ 7A4–98
Special Tools ................................................. 7A4–102
BACK TO CHAPTER INDEX
TO MODEL INDEX
ISUZU KB P190 2007
Page 4137 of 6020

7A4–2 UNIT REPAIR (AW30–40LE)
Major Components (1)
Major Components (1) and Associated parts
RTW77AMF003801
EndOFCallout
Disassembly steps
1. Remove the torque converter.
2. Remove the select lever.
Legend (1) Torque converter
(2) Neutral start switch
(3) Elbow
(4) Oil temperature sensor
(5) Breather hose (6) Output revolution sensor
(7) Adapter housing
(8) Transmission assembly
(9) Select lever
(10) Input revolution sensor
BACK TO CHAPTER INDEX
TO MODEL INDEX
ISUZU KB P190 2007
Page 4138 of 6020

UNIT REPAIR (AW30–40LE) 7A4–3
3. Remove the neutral start switch (Mode switch). Unstake the lock washer.
Remove the nut and bolt, and then remove the
neutral start switch.
Remove the lock washer.
RTW77ASH003401
4. Remove the two elbows from transmission case.
240RY00001
5. Remove the oil temperature sensor.
6. Remove the breather hose.
7. Remove the Input revolution sensor.
8. Remove the output revolution sensor (4 ×4).
9. Remove the output revolution sensor (4 ×2).
10. Remove the speedometer sensor, speedometer driven gear and plate (4 ×2).
11. Remove the extension housing (4 ×2).
12. Remove the adapter housing (4 ×4). 13. Remove the transmission assembly.
Install special tool to the transmission unit.
Holding fixture: 5-8840-2152-0 (1)
Holding fixture base: 5-8840-0003-0 (2)
RTW77ASH003301
BACK TO CHAPTER INDEX
TO MODEL INDEX
ISUZU KB P190 2007
Page 4139 of 6020

7A4–4 UNIT REPAIR (AW30–40LE)
Components (1)
Reassembly
1. Install a new gasket and the extension housing(4×2) to the transmission case.
Torque: 36 N·m (3.7 kgf·m/27 Ib ·ft)
2. Install the speedometer driven gear, plate, and speedometer sensor (4 ×2).
Torque:
Plate bolt – 15 N·m (1.5 kgf·m/11 Ib ·ft)
Speedometer sensor – 25 N·m (2.5 kgf·m/18 Ib ·ft)
3. Install the adapter housing (4 ×4).
Remove any gasket material on the contacting
surfaces of the adapter housing and transmission
case.
241RY00020
Apply liquid gasket (TB1281 –B or its equivalent)
(1) and install the apply gaskets (2) to the adapter
housing as shown in the figure.
Install the adapter housing to the transmission
case.
Torque: 36 N·m (3.7 kgf·m/27 Ib ·ft)
4. Install the neutral start switch. Using the transmission select lever, fully turn the
manual valve lever shaft back and return two
notches.
It is now in neutral.
Insert the neutral start switch onto the manual
valve lever shaft and temporarily tighten the
adjusting bolt.
Install the lock washer and nut.
Torque: 7 N·m (0.7 kgf·m/61 Ib ·in)
Align the neutral standard line and the switch
groove and tighten the adjusting bolt.
Torque: 13 N·m (1.3 kgf·m/113 Ib ·in)
Bend the tabs of the lock washer.
NOTE: Bend at least two of the lock washer tabs.
RUW17ASH013601
5. Install the oil temperature sensor to the transmission case.
Torque: 15 N·m (1.5 kgf·m/11 Ib ·ft)
RTW77ASH003501
BACK TO CHAPTER INDEX
TO MODEL INDEX
ISUZU KB P190 2007
Page 4140 of 6020

UNIT REPAIR (AW30–40LE) 7A4–5
6. Install the elbow. Coat new O-rings with ATF, install them to the two
elbows.
Install the two elbows as shown in the figure.
Torque: 29 N ·m (3.0 kgf ·m/22 Ib ·ft)
RTW77ASH003601
7. Install the select lever.
8. Install the output revolution sensor (4 ×2).
9. Install the output revolution sensor (4 ×4).
10. Install the input revolution sensor.
11. Install the breather hose.
12. Install the torque converter. Using calipers and a straightedge, measure the
distance from the installed surface of the
transmission housing to top of the torque converter
nut.
Correct distance: 13.5 mm (0.53 in)
240RY00005
BACK TO CHAPTER INDEX
TO MODEL INDEX
ISUZU KB P190 2007