transmission ISUZU TROOPER 1995 Repair Manual
[x] Cancel search | Manufacturer: ISUZU, Model Year: 1995, Model line: TROOPER, Model: ISUZU TROOPER 1995Pages: 1928
Page 780 of 1928
6E2-84 DRIVEABILITY AND EMISSIONS
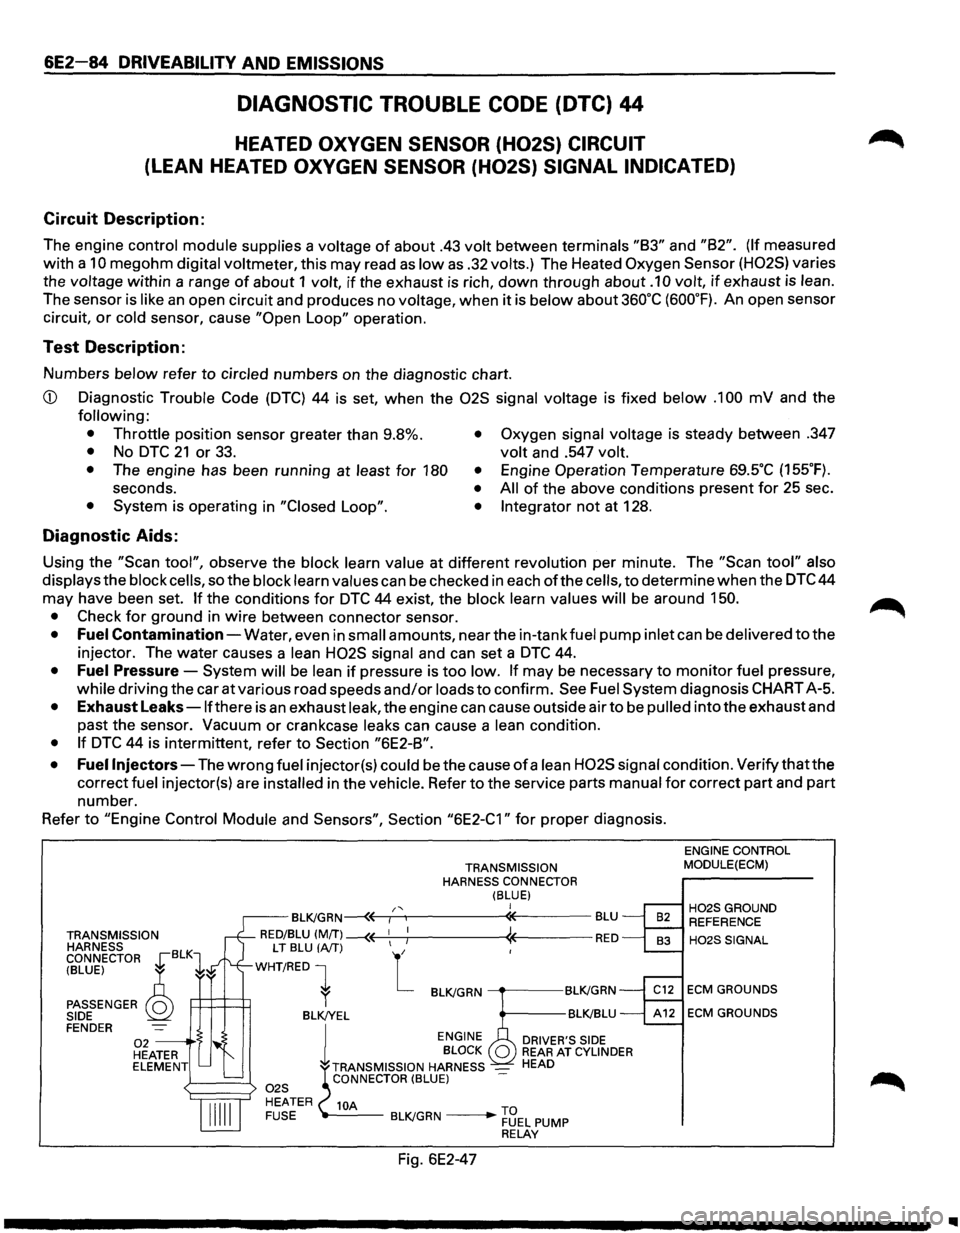
DIAGNOSTIC TROUBLE CODE (DTC) 44
HEATED OXYGEN SENSOR (H02S) CIRCUIT
(LEAN HEATED OXYGEN SENSOR (H02S) SIGNAL INDICATED)
Circuit Description:
The engine control module supplies a voltage of about .43 volt between terminals "83" and "82". (If measured
with a
10 megohm digital voltmeter, this may read as low as .32 volts.) The Heated Oxygen Sensor (H02S) varies
the
voltage within a range of about 1 volt, if the exhaust is rich, down through about .1 0 volt, if exhaust is lean.
The sensor is like an open circuit and produces no voltage, when it is below about 360°C (600°F). An open sensor
circuit,
or cold sensor, cause "Open Loop" operation.
Test Description:
Numbers below refer to circled numbers on the diagnostic chart.
CD Diagnostic Trouble Code (DTC) 44 is set, when the 02S signal voltage is fixed below .1 00 mV and the
following:
• Throttle
position sensor greater than 9.8%.
• No DTC 21 or 33. • Oxygen signal voltage is steady between .347
volt and .547 volt.
•
The engine has been running at least for 180 •
seconds. • • System is operating in "Closed Loop". •
Engine Operation Temperature 69SC (155°F).
All of the above conditions present for 25 sec .
Integrator not at 128 .
Diagnostic Aids:
Using the "Scan tool", observe the block learn value at different revolution per minute. The "Scan tool" also
displays
the block cells, so the block learn values can be checked in each ofthe cells, to determine when the DTC 44
may have been set.
If the conditions for DTC 44 exist, the block learn values will be around 150.
•
Check for ground in wire between connector sensor.
• Fuel Contamination-Water, even in small amounts, near the in-tank fuel pump inlet can be delivered to the
injector. The water causes a
lean H02S signal and can set a DTC 44.
• Fuel Pressure-System will be lean if pressure is too low. If may be necessary to monitor fuel pressure,
while driving the car at various road speeds and/or loads to confirm. See Fuel System diagnosis CHART A-5.
• Exhaust Leaks -lfthere is an exhaust leak, the engine can cause outside air to be pulled into the exhaust and
past the sensor.
Vacuum or crankcase leaks can cause a lean condition.
• If DTC 44 is intermittent, refer to Section "6E2-8".
• Fuel
Injectors-The wrong fuel injector(s) could be the cause of a lean H02S signal condition. Verify that the
correct
fuel injector(s) are installed in the vehicle. Refer to the service parts manual for correct part and part
number.
Refer
to "Engine Control Module and Sensors", Section "6E2-C1" for proper diagnosis.
TRANSMISSION
HARNESS
CONNECTOR
~BLK1
TRANSMISSION
HARNESS CONNECTOR
(BLUE) I /' BL~GRN~r-~----------~-------BLU
RED/BLU (MfT) --(( 1
1 ; « RED
(BLUE) ~
PASSENGER Q SIDE
LT BLU (A/T) L
WHT/RED 1
P:::l=t=t1 l BL~GRN ----.-----BL~GRN
BLK!YEL BL~BLU FENDER 02 --·S HEATER ELEMENT l
ENGINE
DRIVER'S SIDE BLOCK REAR AT CYLINDER
TRANSMISSION HARNESS _ HEAD CONNECTOR (BLUE)
10A -----BL~GRN ____ .,.... ~3EL PUMP RELAY
Fig. 6E2-47
ENGINE CONTROL
MODULE(ECM)
H02SGROUND REFERENCE
H02SSIGNAL
ECM GROUNDS
ECM GROUNDS
..
Page 782 of 1928
6E2-86 DRIVEABILITY AND EMISSIONS
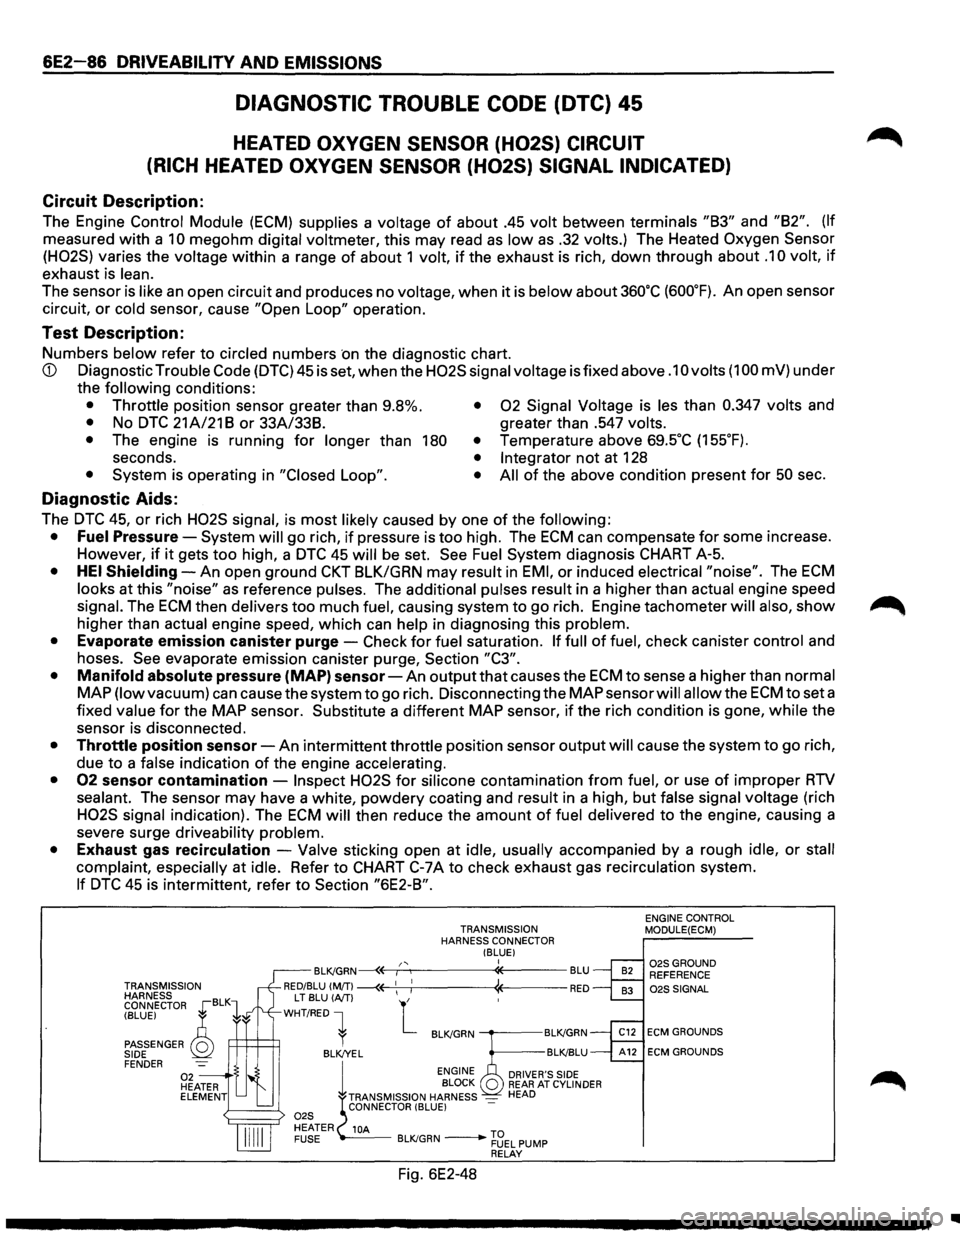
DIAGNOSTIC TROUBLE CODE (DTC) 45
HEATED OXYGEN SENSOR (H02S) CIRCUIT
(RICH
HEATED OXYGEN SENSOR (H02S) SIGNAL INDICATED)
Circuit Description:
The Engine Control Module (ECM) supplies a voltage of about .45 volt between terminals "83" and "82". (If
measured with a 10 megohm digital voltmeter, this may read as low as .32 volts.) The Heated Oxygen Sensor
(H02S)
varies the voltage within a range of about 1 volt, if the exhaust is rich, down through about .1 0 volt, if
exhaust is lean.
The sensor is like an open circuit and produces no voltage, when it is below about 360"C (600"F). An open sensor
circuit,
or cold sensor, cause "Open Loop" operation.
Test Description:
Numbers below refer to circled numbers ·on the diagnostic chart.
CD Diagnostic Trouble Code (DTC) 45 is set, when the H02S signal voltage is fixed above .1 0 volts (1 00 mV) under
the
following conditions:
• Throttle position sensor greater than 9.8%. • 02 Signal Voltage is les than 0.347 volts and
• No DTC 21 A/21 8 or 33A/338. greater than .547 volts.
•
The engine is running for longer than 180 • Temperature above 69.5"C (155"F).
seconds. • Integrator not at 128
• System is operating in "Closed Loop". • All of the above condition present for 50 sec.
Diagnostic Aids:
The DTC 45, or rich H02S signal, is most likely caused by one of the following:
• Fuel Pressure-System will go rich, if pressure is too high. The ECM can compensate for some increase.
However,
if it gets too high, a DTC 45 will be set. See Fuel System diagnosis CHART A-5.
• HEI Shielding-An open ground CKT BLK/GRN may result in EMI, or induced electrical "noise". The ECM
looks at this "noise" as reference pulses. The additional pulses result in a higher than actual engine speed
signal. The ECM then delivers too much fuel, causing system to go rich. Engine tachometer will also, show ~
higher than actual engine speed, which can help in diagnosing this problem.
• Evaporate emission canister purge-Check for fuel saturation. If full of fuel, check canister control and
hoses.
See evaporate emission canister purge, Section "C3".
• Manifold absolute pressure (MAP) sensor-An output that causes the ECM to sense a higher than normal
MAP (low vacuum) can causethesystemto go rich. Disconnecting the MAP sensor will allow the ECMtoseta
fixed value for the MAP sensor. Substitute a different MAP sensor, if the rich condition is gone, while the
sensor is disconnected.
• Throttle position sensor-An intermittent throttle position sensor output will cause the system to go rich,
due
to a false indication of the engine accelerating.
• 02 sensor contamination -Inspect H02S for silicone contamination from fuel, or use of improper RTV
sealant. The sensor may have a white, powdery coating and result in a high, but false signal voltage (rich
H02S signal indication). The ECM will then reduce the amount of fuel delivered to the engine, causing a
severe surge driveability problem.
• Exhaust gas recirculation -Valve sticking open at idle, usually accompanied by a rough idle, or stall
complaint, especially at idle. Refer to CHART C-7A to check exhaust gas recirculation system.
If DTC 45 is intermittent, refer to Section "6E2-8".
TRANSMISSION
HARNESS
CONNECTOR ,[BLK1
TRANSMISSION
HARNESS CONNECTOR !BLUE I I ,, BLK!GRN~E----r:......,-----"*----BLU
RED/BLU (MfT) ~ 1
1 1 RED
(BLUE) ~
PASSENGER Q SIDE FENDER
L T
BLU (AfT) L WHT/RED 1
R=+=+=:R l BLK!GRN -----BLK!GRN
BLK/YEL BLK!BLU
1
ENGINE
BLOCK Q TRANSMISSION HARNESS -CONNECTOR (BLUE) -
DRIVER'S SIDE REAR AT CYLINDER HEAD
10A BLK/GRN -~~EL PUMP RELAY
Fig. 6E2-48
ENGINE CONTROL MODULE(ECM)
02SGROUND REFERENCE 02S SIGNAL
ECM GROUNDS
ECM GROUNDS
..
Page 787 of 1928
FUEL SYSTEM
• CHECK:
• CHECK:
• CHECK:
• CHECK:
• CHECK:
• CHECK:
Fuel pump relay operation-pump should
turn "ON" for 2 seconds when ignition is
turned
"ON". Use CHART A-5.
Fuel injectors are correct for the vehicle.
Fuel
pressure, use CHART A-7.
Contaminated
fuel.
Engine fuse (visual inspect).
A
faulty in-tank fuel pump check valve will
allow
the fuel in the lines to drain back to
the tank after engine is stopped. To check
for this condition, perform fuel system
diagnosis CHART A-7.
IGNITION SYSTEM
• CHECK: For proper ignition voltage output with
spark tester J26792 or equivalent (ST-
125).
DRIVEABILITY AND EMISSIONS 6E2-91
• CHECK: Spark plugs. Remove spark plugs, check
for wet plugs, cracks, wear, improper
gap, burned electrodes, or heavy
deposits. Repair
or replace as necessary.
• CHECK: Bare or shorted wires.
• CHECK: Loose ignition coil ground.
ADDITIONAL CHECKS
• CHECK: Idle air control operation-use CHART C-
2C.
• CHECK: Basic engine problem. Refer to ENGINE
MECHANICAL DIAGNOSIS (SECTION
6A).
• CHECK: Service Bulletins for calibration updates.
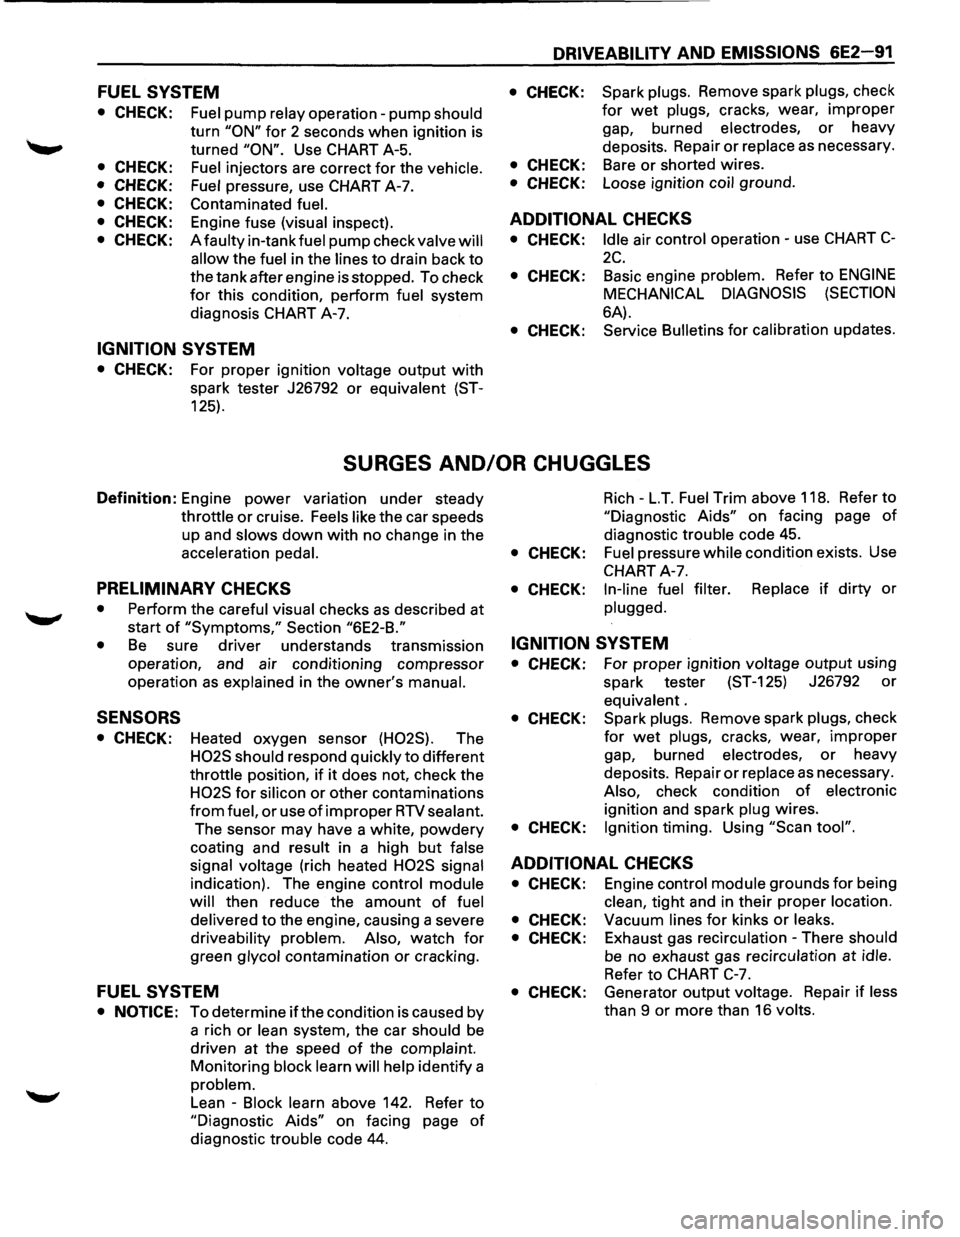
SURGES AND/OR CHUGGLES
Definition: Engine power variation under steady
throttle or cruise. Feels like the car speeds
up and
slows down with no change in the
acceleration pedal.
PRELIMINARY CHECKS
• Perform the careful visual checks as described at
start
of "Symptoms," Section "6E2-B."
•
Be sure driver understands transmission
operation, and air conditioning compressor
operation
as explained in the owner's manual.
SENSORS
• CHECK: Heated oxygen sensor (H02S). The
H02S should respond quickly to different
throttle position, if it does not, check the
H02S for silicon or other contaminations
from fuel, or use of improper RTV sealant.
The sensor may have a white, powdery
coating and result in a high but false
signal voltage
(rich heated H02S signal
indication). The engine control module
will
then reduce the amount of fuel
delivered
to the engine, causing a severe
driveability problem. Also, watch for
green glycol contamination or cracking.
FUEL SYSTEM
• NOTICE: To determine ifthe condition is caused by
a rich
or lean system, the car should be
driven at the speed of the complaint.
Monitoring block learn will help identify a
problem.
Lean -Block learn above 142. Refer to
"Diagnostic Aids" on facing page of
diagnostic trouble code 44.
Rich -L.T. Fuel Trim above 118. Refer to
"Diagnostic Aids" on facing page of
diagnostic trouble code 45.
• CHECK: Fuel pressure while condition exists. Use
CHART A-7.
• CHECK: In-line fuel filter. Replace if dirty or
plugged.
IGNITION SYSTEM
• CHECK: For proper ignition voltage output using
spark tester (ST-125) J26792
or
equivalent .
• CHECK: Spark plugs. Remove spark plugs, check
for wet plugs, cracks, wear, improper
gap, burned electrodes, or heavy
deposits. Repair
or replace as necessary.
Also, check condition of electronic
ignition and spark plug wires.
• CHECK: Ignition timing. Using "Scan tool".
ADDITIONAL CHECKS
• CHECK: Engine control module grounds for being
clean, tight and in their proper location.
• CHECK: Vacuum lines for kinks or leaks.
• CHECK: Exhaust gas recirculation -There should
be no exhaust gas recirculation at idle.
Refer to CHART C-7.
• CHECK: Generator output voltage. Repair if less
than 9 or more than 16 volts.
Page 788 of 1928
6E2-92 DRIVEABILITY AND EMISSIONS
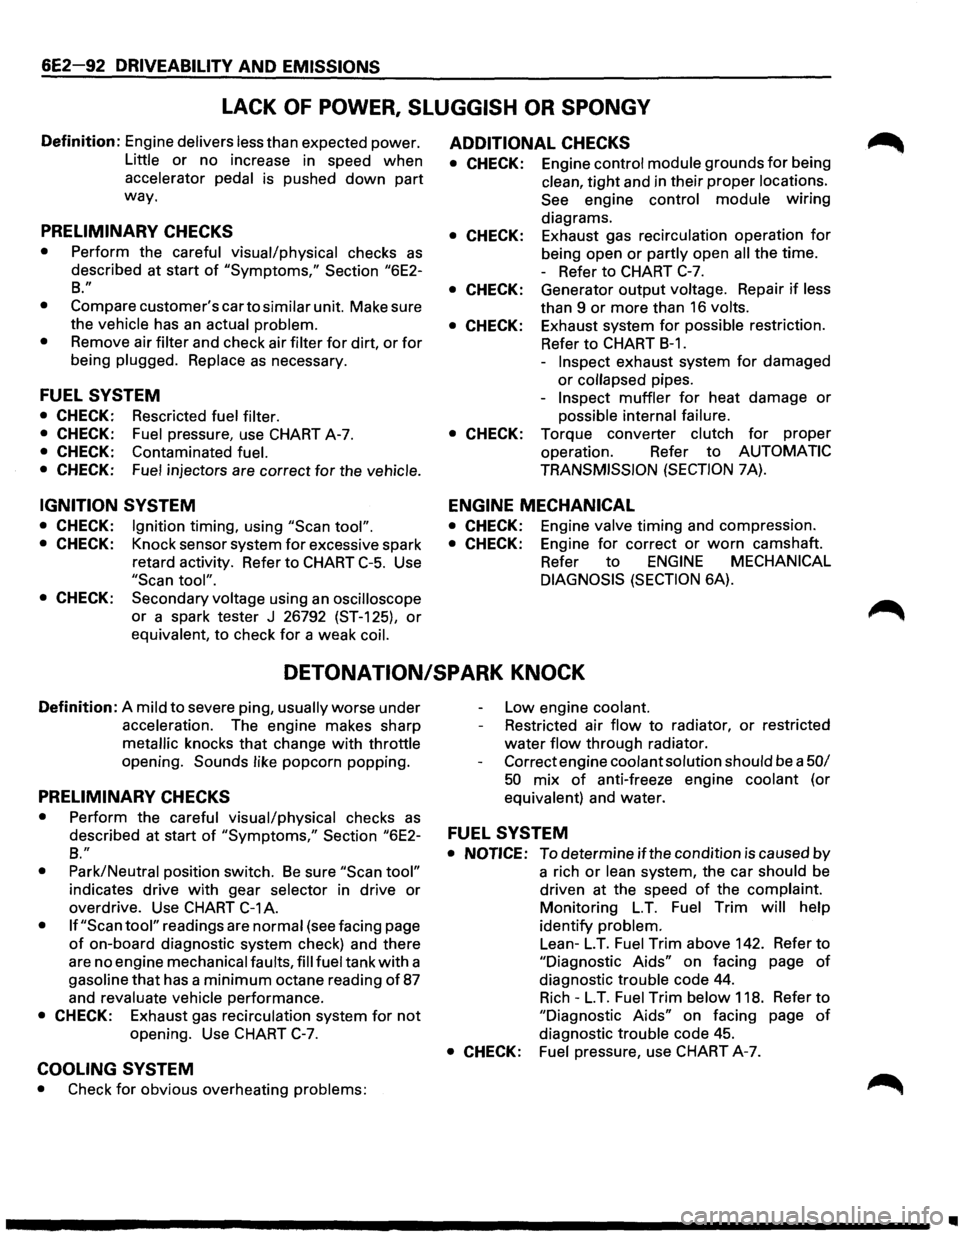
LACK OF POWER, SLUGGISH OR SPONGY
Definition: Engine delivers less than expected power.
Little or no increase in speed when
accelerator
pedal is pushed down part
way.
PRELIMINARY CHECKS
• Perform the careful visual/physical checks as
described at start of "Symptoms," Section "6E2-
B."
•
Compare customer's car to similar unit. Make sure
the
vehicle has an actual problem.
• Remove air filter and check air filter for dirt, or for
being plugged. Replace as necessary.
FUEL SYSTEM
• CHECK: Rescricted fuel filter.
• CHECK: Fuel pressure, use CHART A-7.
• CHECK: Contaminated fuel.
• CHECK: Fuel injectors are correct for the vehicle.
IGNITION SYSTEM
• CHECK: Ignition timing, using "Scan tool".
• CHECK: Knock sensor system for excessive spark
retard activity. Refer to CHART
C-5. Use
"Scan tool".
• CHECK: Secondary voltage using an oscilloscope
or a spark tester J 26792 (ST-125), or
equivalent, to check for a weak coil.
ADDITIONAL CHECKS
• CHECK: Engine control module grounds for being
clean,
tight and in their proper locations.
See engine control module wiring
diagrams.
• CHECK: Exhaust gas recirculation operation for
being open or partly open all the time.
- Refer to CHART
C-7.
• CHECK: Generator output voltage. Repair if less
than 9
or more than 16 volts.
• CHECK: Exhaust system for possible restriction.
Refer
to CHART B-1.
-Inspect exhaust system for damaged
or collapsed pipes.
-
Inspect muffler for heat damage or
possible internal failure.
• CHECK: Torque converter clutch for proper
operation. Refer
to AUTOMATIC
TRANSMISSION
(SECTION 7A).
ENGINE MECHANICAL
• CHECK: Engine valve timing and compression.
• CHECK: Engine for correct or worn camshaft.
Refer
to ENGINE MECHANICAL
DIAGNOSIS
(SECTION 6A).
DETONATION/SPARK KNOCK
Definition: A mild to severe ping, usually worse under
acceleration. The engine makes sharp
metallic knocks that change with throttle
opening.
Sounds like popcorn popping.
PRELIMINARY CHECKS
• Perform the careful visual/physical checks as
Low engine coolant.
Restricted air
flow to radiator, or restricted
water flow through radiator.
Correct engine
coolant solution should be a 50/
50 mix of anti-freeze engine coolant (or
equivalent) and water.
described at start
of "Symptoms," Section "6E2-FUEL SYSTEM
B."
•
Park/Neutral position switch. Be sure "Scan tool"
indicates drive with gear selector in drive or
overdrive. Use
CHART C-1A.
• If "Scan tool" readings are normal (see facing page
of on-board diagnostic system check) and there
are no engine mechanical faults,
fill fuel tank with a
gasoline
that has a minimum octane reading of 87
and revaluate vehicle performance.
• CHECK: Exhaust gas recirculation system for not
opening. Use CHART C-7.
COOLING SYSTEM
• Check for obvious overheating problems:
• NOTICE: To determine if the condition is caused by
a rich
or lean system, the car should be
driven at the speed
of the complaint.
Monitoring
LT. Fuel Trim will help
identify problem.
Lean-
LT. Fuel Trim above 142. Refer to
"Diagnostic Aids" on facing page of
diagnostic trouble code 44.
Rich-LT. Fuel Trim below 118. Refer to
"Diagnostic Aids" on facing page of
diagnostic trouble code 45.
• CHECK: Fuel pressure, use CHART A-7.
..
Page 795 of 1928
DRIVEABILITV AND EMISSIONS 6E2-99
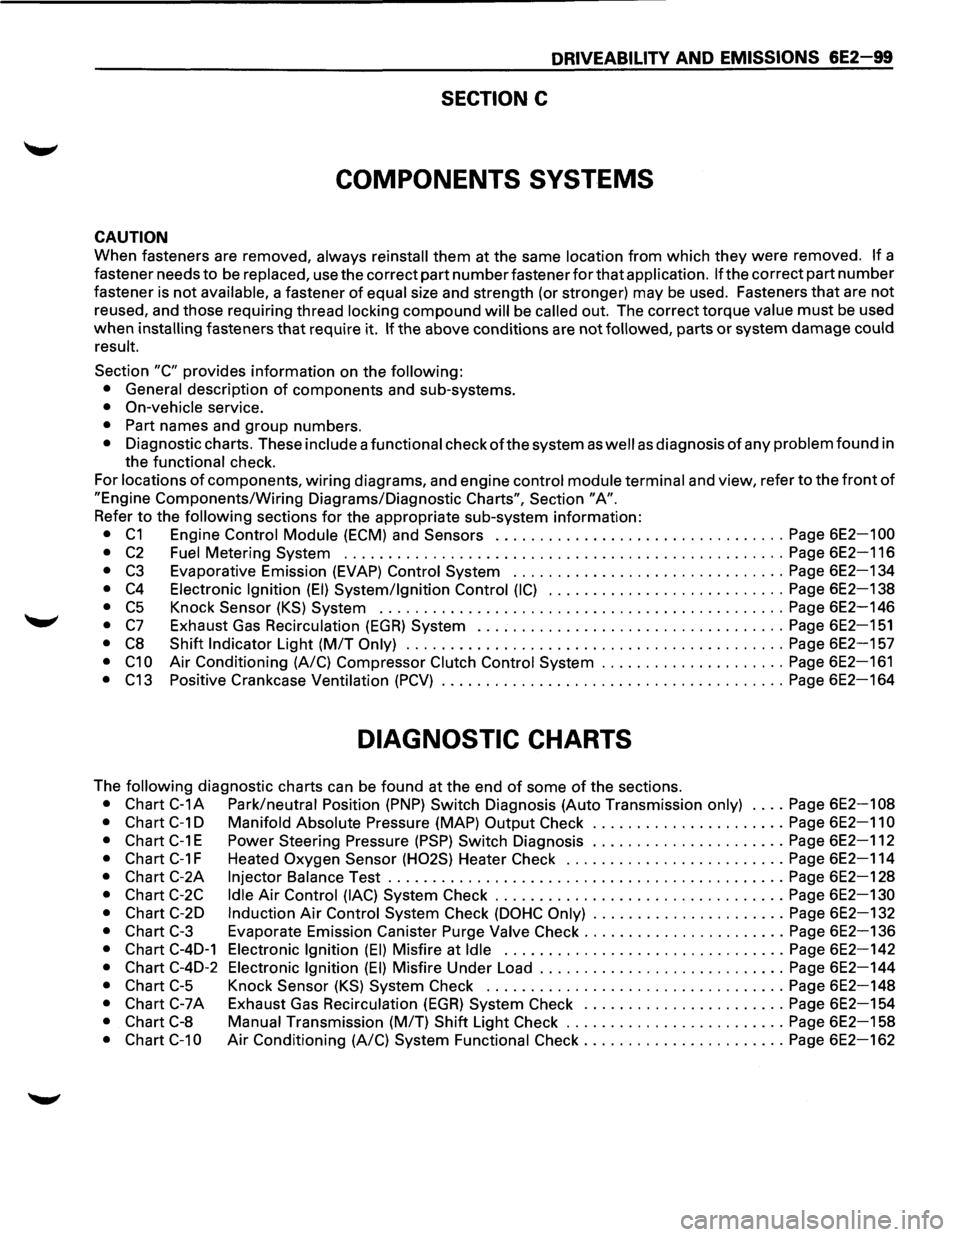
SECTION C
COMPONENTS SYSTEMS
CAUTION
When fasteners are removed, always reinstall them at the same location from which they were removed. If a
fastener needs
to be replaced, use the correct part number fastener for that application. If the correct part number
fastener is not available, a fastener of equal size and strength (or stronger) may be used. Fasteners that are not
reused, and those requiring thread locking compound will be called out. The correct torque value must be used
when installing fasteners that require it. If the above conditions are not followed, parts or system damage could
result.
Section
"C" provides information on the following:
• General description of components and sub-systems.
• On-vehicle service.
• Part names and group numbers.
• Diagnostic charts. These include a functional check of the system as well as diagnosis of any problem found in
the functional check.
For locations
of components, wiring diagrams, and engine control module terminal and view, refer to the front of
"Engine Components/Wiring Diagrams/Diagnostic Charts", Section "A".
Refer to the following sections for the appropriate sub-system information:
• C1 Engine Control Module (ECM) and Sensors ................................. Page 6E2-1 00
•
C2 Fuel Metering System .................................................. Page 6E2-116
• C3 Evaporative Emission (EVAP) Control System ............................... Page 6E2-134
• C4 Electronic Ignition (EI) System/Ignition Control (IC) ........................... Page 6E2-138
• C5 Knock Sensor (KS) System .............................................. Page 6E2-146
• C7 Exhaust Gas Recirculation (EGR) System ................................... Page 6E2-151
• C8 Shift Indicator Light (M/T Only) ........................................... Page 6E2-157
• C1 0 Air Conditioning (A/C) Compressor Clutch Control System ..................... Page 6E2-161
• C13 Positive Crankcase Ventilation (PCV) ....................................... Page 6E2-164
DIAGNOSTIC CHARTS
The following diagnostic charts can be found at the end of some of the sections.
• Chart C-1A Park/neutral Position (PNP) Switch Diagnosis (Auto Transmission only) .... Page 6E2-108
• Chart C-1 D Manifold Absolute Pressure (MAP) Output Check ...................... Page 6E2-11 0
•
Chart C-1 E Power Steering Pressure (PSP) Switch Diagnosis ...................... Page 6E2-112
• Chart C-1 F Heated Oxygen Sensor (H02S) Heater Check ......................... Page 6E2-114
• Chart C-2A Injector Balance Test ............................................. Page 6E2-128
• Chart C-2C Idle Air Control (lAC) System Check ................................. Page 6E2-130
• Chart C-2D Induction Air Control System Check (DOHC Only) ...................... Page 6E2-132
• Chart C-3 Evaporate Emission Canister Purge Valve Check ....................... Page 6E2-136
• Chart C-4D-1 Electronic Ignition (EI) Misfire at Idle ................................ Page 6E2-142
• Chart C-4D-2 Electronic Ignition (EI) Misfire Under Load ............................ Page 6E2-144
• Chart C-5 Knock Sensor (KS) System Check .................................. Page 6E2-148
• Chart C-7A Exhaust Gas Recirculation (EGR) System Check ....................... Page 6E2-154
• Chart C-8 Manual Transmission (MIT) Shift Light Check ......................... Page 6E2-158
• Chart C-1 0 Air Conditioning (A/C) System Functional Check ....................... Page 6E2-162
Page 799 of 1928
Park/Neutral Position (PNP) Switch (Auto Only)
The Park/Neutral position (PNP) switch indicates to the
Engine Control Module
(ECM) when the transmission
is in park, neutral
or drive. This information is used for
the exhaust gas recirculation, and the idle air control
valve operation.
NOTE:
• Vehicle
should not be driven with PNP switch
disconnected,
as idle quality will be affected and a
possible false diagnostic trouble code
(DTC) 24
(vehicle speed sensor).
DRIVEABILITY AND EMISSIONS 6E2-103
See DIAGNOSIS AND GENERAL SERVICE Section for
more information on the PNP switch. The PNP switch is
part
of the neutral/start and backup light switch
assembly mounted on the transmission.
See CHART C-
1 A for PNP switch check.
DIAGNOSIS
To read the DTC(s), use a "Scan tool" or ground the
diagnostic test terminal,
with the engine not running
and the ignition
"ON". The "Check Engine" malfunction
indicator lamp
will flash DTC 12 three times and then
flash each
DTC stored in memory three times. All
DTC(s) stored in memory will have been read when
DTC 12 is flashed again.
No new
DTC(s) can be stored when in the diagnostics
test mode (diagnostics lead grounded). This
eliminates confusion while the system is being
serviced.
To clear the
DTC(s) from memory:
• Ignition "OFF".
•
Disconnect main fuse located in the under hood
fuse/relay center near the battery.
Since the ECM can have a failure which may affect only
one circuit, following the diagnostic procedures in this
section
will determine which circuit has a problem and
where
it is.
If a diagnostic chart indicates thatthe ECM connections
or ECM is the cause of a problem, and the ECM is
replaced,
but does not correct the problem, one of the
following may be the reason.
• There is a problem with the ECM terminal
connections-The diagnostic chart will say ECM
connections or ECM. The terminals may have to
be removed from the connector in order to check
them properly.
• The ECM is not correct for the Vehicle-Ane
incorrect
ECM may cause a malfunction and may
set a DTC.
• The problem is intermittent -This means that
the problem is
not present at the time the system is
being checked.
In this case, refer to the
"Symptoms" portion of the manual and make a
careful physical inspection
of all portions of the
system involved.
• Shorted solenoid, relay coil, or harness
Solenoid and relays are turned "ON" and "OFF" by
the
ECM, using internal electronic switches called
"drivers".
Each driver is part of a group of four,
called "quad-drivers". Failure of one driver can
damage any other driver in the set. A
shorted solenoid, relay coil, or harness in a l-EFT
SHCI
computer will not damage the ECM, but will
cause the circuit and controlled component to be
inoperative. When the circuit fault is not present or
has been repaired, the "quad-driver" will again
operate in a normal manner due to its fault
protected design. If a fault has been repaired in a
circuit controlled by a "quad-driver", the original
ECM should be reinstalled and the circuit checked
for proper operation. ECM replacement will not be
necessary if the repaired circuit or component now
operates correctly.
J 34636 or BT-8405 testers or equivalent provide a fast,
accurate means
of checking for a shorted coil or a short
to battery positive voltage.
• The replacement ECM may be faulty-After the
ECM is replaced, the system should be re-checked
for proper operation. If the diagnostic chart again
indicates the
ECM is the problem, substitute a
known good
ECM. Although this is a rare
condition,
it could happen.
ENGINE CONTROL MODULE (ECM)
A faulty ECM will be determined in the diagnostic
charts.
ELECTRONICALL V ERASABLE
PROGRAMMABLE READ
ONL V MEMORY
A faulty electrically erasable programmable read only
memory, which is part of the ECM, will set a DTC 51.
ENGINE CONTROL MODULE (ECM)
INPUTS
All of the sensors and input switches can be diagnosed
by the use
of "Scan tool".
Following is a short description of how the sensors and
switches can be diagnosed by the use
"Scan tool". The
"Scan tool" can also be used to compare the values for
a normal running engine with the engine you're
diagnosing.
Page 803 of 1928
New or service sensors will already have the
compound
applied to the threads. If a sensor is
removed
from an engine and iffor any reason it
is to be reinstalled, the threads must have anti
seize compound
applied before reinstallation.
•
Apply anti-seize compound or equivalent to
threads of oxygen sensor if necessary.
• Tighten the oxygen sensor to the specified
torque.
1~1 Torque N·m (lb·ft) 55 (40)
1. H02S wiring connector
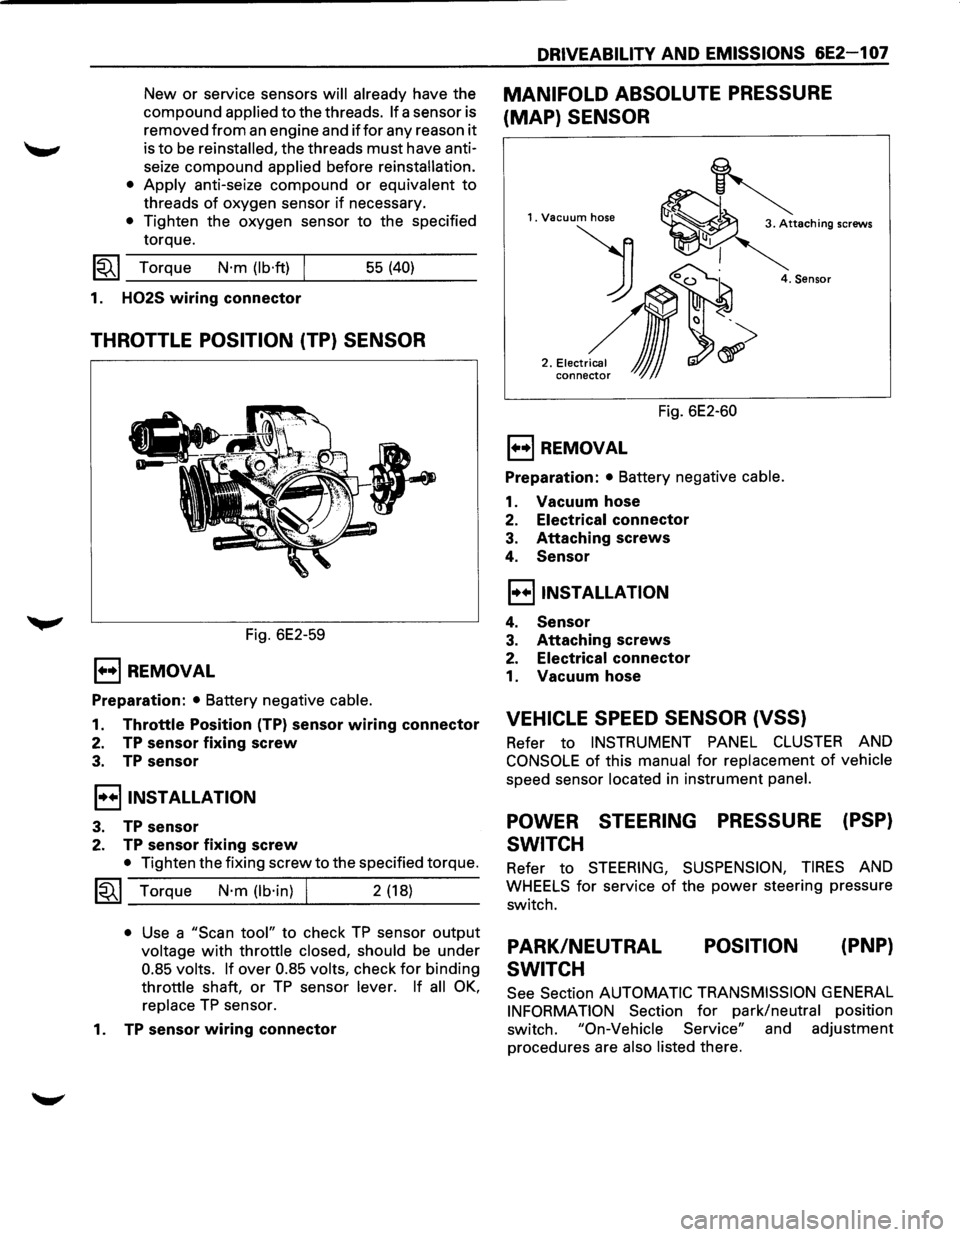
THROTTLE POSITION (TP) SENSOR
Fig. 6E2-59
E) REMOVAL
Preparation: • Battery negative cable.
1. Throttle Position (TP) sensor wiring connector
2. TP sensor fixing screw
3. TP sensor
I••IINSTALLATION
3. TP sensor
2. TP sensor fixing screw
• Tighten the fixing screw to the specified torque.
~~~ Torque N·m (lb·in) I 2 (18)
• Use a "Scan tool" to check TP sensor output
voltage with throttle closed, should be under
0.85 volts. If over 0.85 volts, check for binding
throttle shaft, or TP sensor lever. If all OK,
replace TP sensor.
1.
TP sensor wiring connector
DRIVEABILITY AND EMISSIONS 6E2-1 07
MANIFOLD ABSOLUTE PRESSURE
(MAP) SENSOR
1. Vacuum hose
) 0~
2 .• ,.~,,~,~
conne~ JJJ
4. Sensor
Fig. 6E2-60
E) REMOVAL
Preparation: • Battery negative cable.
1. Vacuum hose
2. Electrical connector
3. Attaching screws
4. Sensor
I••IINSTALLATION
4. Sensor
3. Attaching screws
2. Electrical connector
1. Vacuum hose
VEHICLE SPEED SENSOR (VSS)
Refer to INSTRUMENT PANEL CLUSTER AND
CONSOLE of this manual for replacement of vehicle
speed sensor located in instrument panel.
POWER STEERING PRESSURE (PSP)
SWITCH
Refer to STEERING, SUSPENSION, TIRES AND
WHEELS for service of the power steering pressure
switch.
PARK/NEUTRAL
SWITCH POSITION
(PNP}
See
Section AUTOMATIC TRANSMISSION GENERAL
INFORMATION Section for park/neutral position
switch.
"On-Vehicle Service" and adjustment
procedures are
also listed there.
Page 804 of 1928
6E2-1 08 DRIVEABILITV AND EMISSIONS
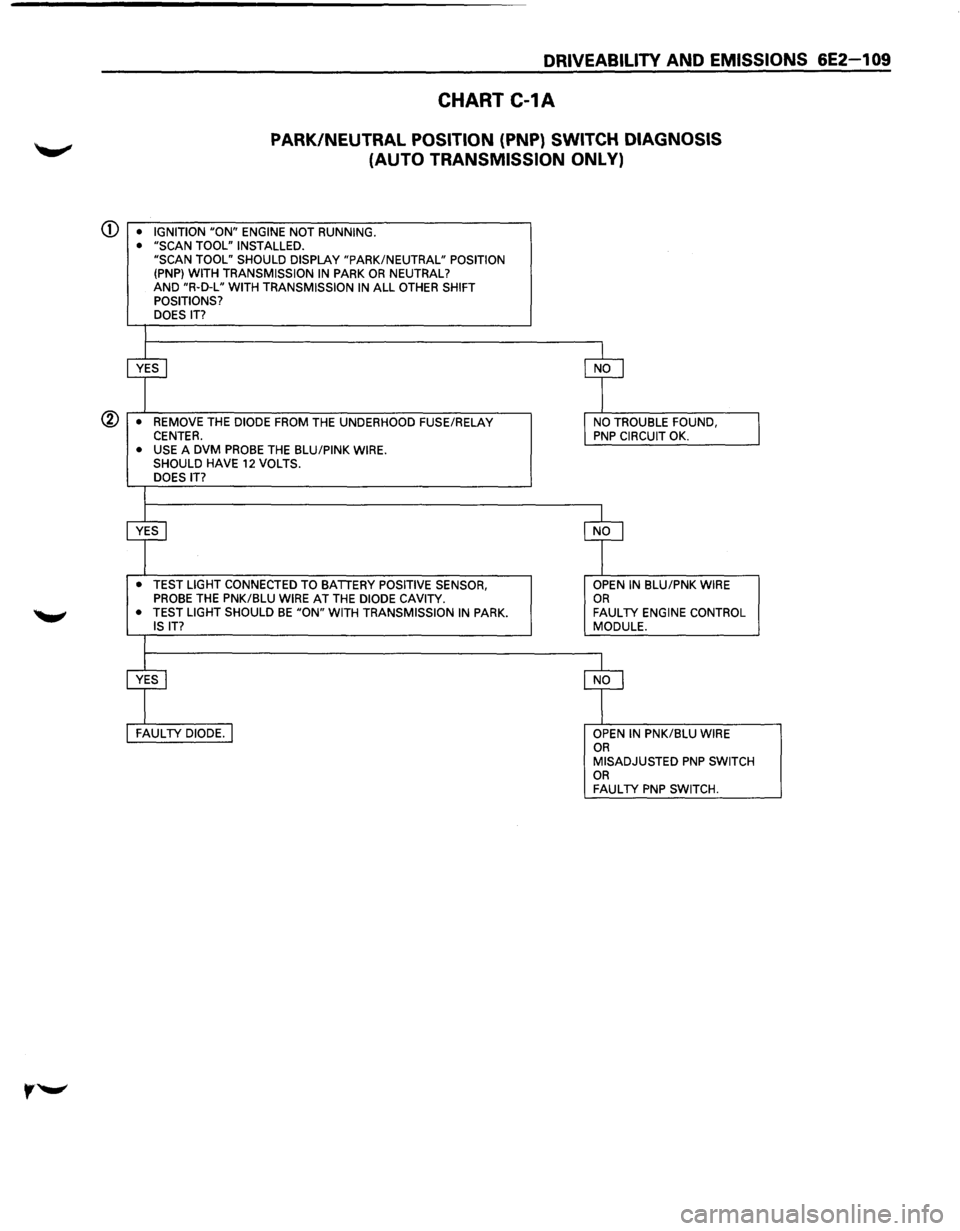
CHART C-1A
PARK/NEUTRAL POSITION (PNP} SWITCH DIAGNOSIS
(AUTO TRANSMISSION ONL
V}
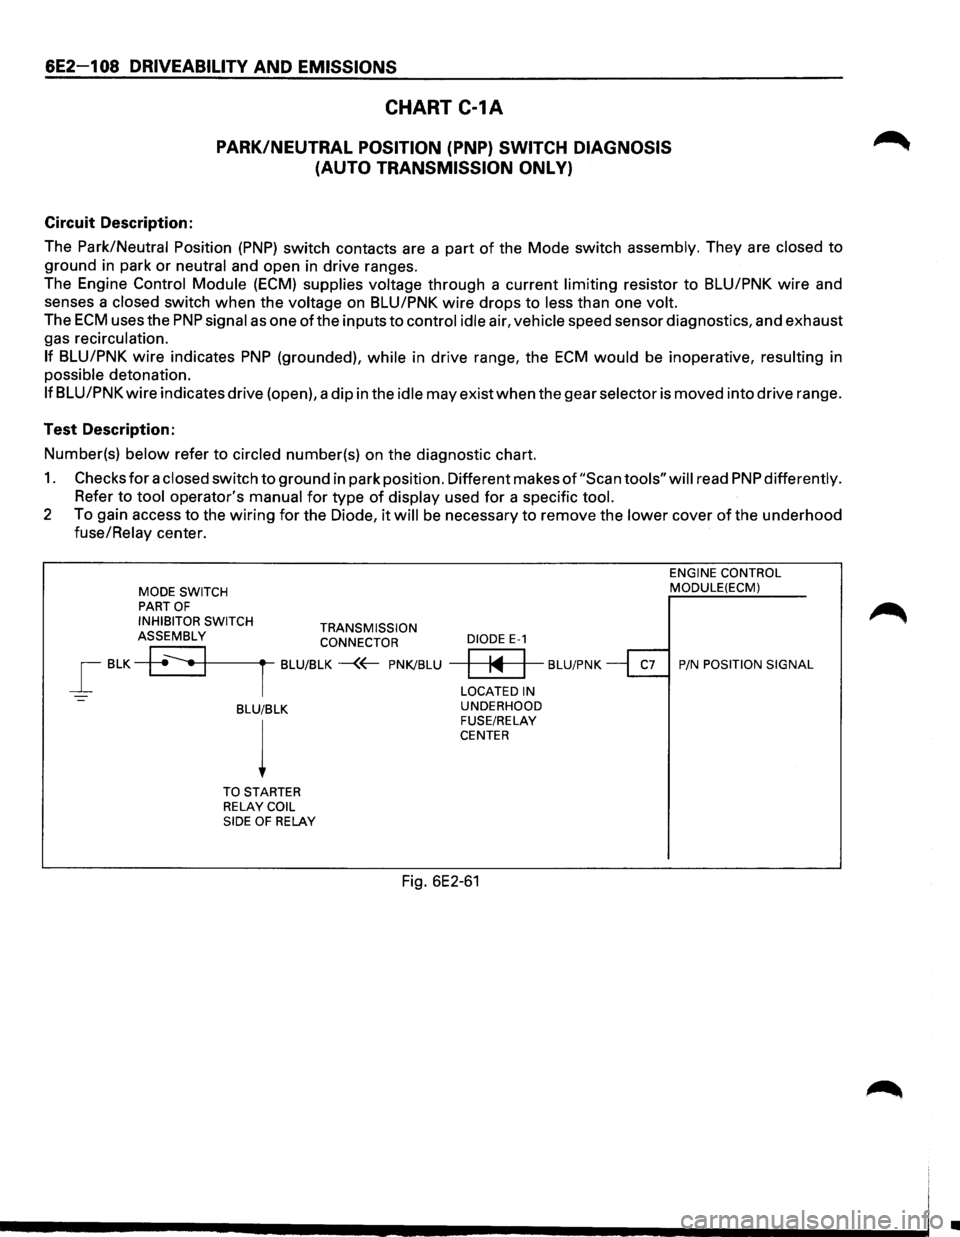
Circuit Description:
The
Park/Neutral Position (PNP) switch contacts are a part of the Mode switch assembly. They are closed to
ground in park or neutral and open in drive ranges.
The Engine
Control Module (ECM) supplies voltage through a current limiting resistor to BLU/PNK wire and
senses a
closed switch when the voltage on BLU/PNK wire drops to less than one volt.
The ECM uses the PNP signal as one ofthe inputs to control idle air, vehicle speed sensor diagnostics, and exhaust
gas recirculation.
If BLU/PNK wire indicates PNP (grounded), while in drive range, the ECM would be inoperative, resulting in
possible detonation.
If BLU/PNK wire indicates drive (open), a dip in the idle may exist when the gear selector is moved into drive range.
Test Description:
Number(s)
below refer to circled number(s) on the diagnostic chart.
1. Checks for a closed switch to ground in park position. Different makes of "Scan tools" will read PNP differently.
Refer to tool operator's manual for type of display used for a specific tool.
2 To gain access to the wiring for the Diode, it will be necessary to remove the lower cover of the underhood
fuse/Relay center.
MODE SWITCH PART OF
INHIBITOR SWITCH TRANSMISSION ASSEMBLY CONNECTOR
_[ BLK +~•+1-------rt--BLU/BLK -{~ PNK/BLU
-BLU/BLK
l
TO STARTER
RELAY COIL
SIDE OF RELAY
DIODE E-1
ENGINE CONTROL MODULE(ECM)
~ BLU/PNK ~ P/N POSITION SIGNAL
LOCATED IN
UNDERHOOD
FUSE/RELAY
CENTER
Fig. 6E2-61
Ill
Page 805 of 1928
DRIVEABILITY AND EMISSIONS 6E2-1 09
CHART C-1A
PARK/NEUTRAL POSITION (PNP) SWITCH DIAGNOSIS
(AUTO TRANSMISSION ONLY)
CD • IGNITION "ON" ENGINE NOT RUNNING.
• "SCAN TOOL" INSTALLED.
"SCAN TOOL" SHOULD DISPLAY "PARK/NEUTRAL" POSITION
(PNP} WITH TRANSMISSION
IN PARK OR NEUTRAL?
AND "R·D-L" WITH TRANSMISSION IN ALL OTHER SHIFT
POSITIONS?
DOES
IT?
@ • REMOVE THE DIODE FROM THE UNDERHOOD FUSE/RELAY CENTER. • USE A DVM PROBE THE BLU/PINK WIRE.
SHOULD HAVE 12 VOLTS.
DOES IT?
• TEST LIGHT CONNECTED TO BATTERY POSITIVE SENSOR,
PROBE THE PNK/BLU WIRE AT THE DIODE CAVITY.
• TEST LIGHT SHOULD BE "ON" WITH TRANSMISSION IN PARK.
IS IT?
OPEN IN BLU/PNK WIRE OR FAULTY ENGINE CONTROL
MODULE.
OPEN
IN PNK/BLU WIRE OR MISADJUSTED PNP SWITCH OR FAULTY PNP SWITCH.
Page 810 of 1928
6E2-114 DRIVEABILITY AND EMISSIONS
CHART C-1F
HEATED OXYGEN SENSOR (H02S} HEATER CHECK
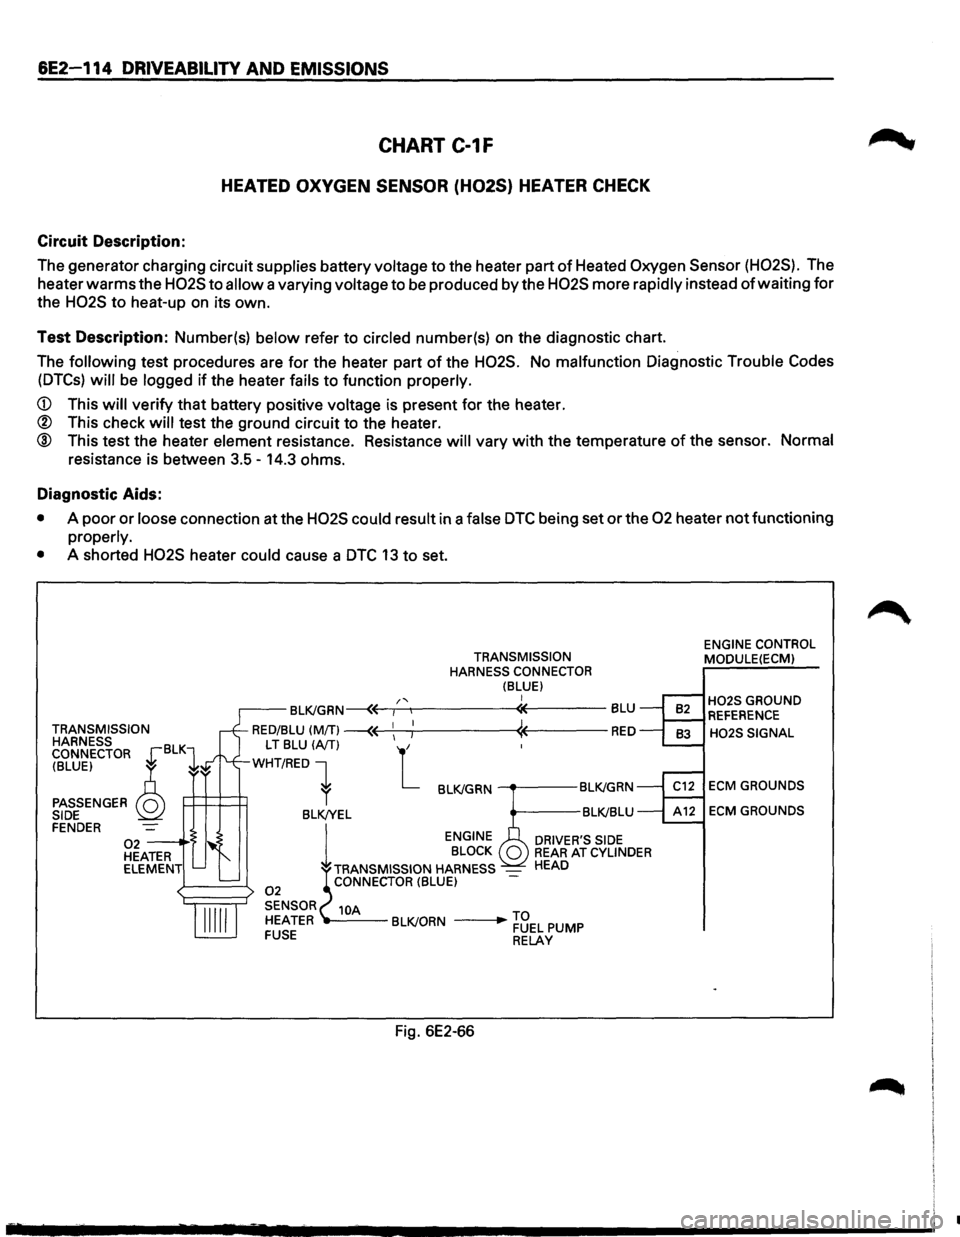
Circuit Description:
The generator charging circuit supplies battery voltage to the heater part of Heated Oxygen Sensor (H02S). The
heater
warms the H02S to allow a varying voltage to be produced by the H02S more rapidly instead of waiting for
the H02S to heat-up on its own.
Test Description: Number(s) below refer to circled number(s) on the diagnostic chart.
The
following test procedures are for the heater part of the H02S. No malfunction Diagnostic Trouble Codes
(DTCs) will be logged if the heater fails to function properly.
CD This will verify that battery positive voltage is present for the heater.
® This check will test the ground circuit to the heater.
® This test the heater element resistance. Resistance will vary with the temperature of the sensor. Normal
resistance is between 3.5-14.3 ohms.
Diagnostic Aids:
• A poor or loose connection at the H02S could result in a false DTC being set or the 02 heater not functioning
properly.
•
A shorted H02S heater could cause a DTC 13 to set.
TRANSMISSION
HARNESS
CONNECTOR
~BLKl
(BLUE) ~ ~
PASSENGER Q SIDE FENDER 02--·'> HEATER
ELEMENT
TRANSMISSION
HARNESS CONNECTOR
(BLUE) I
Fig. 6E2-66
ENGINE CONTROL
MODULE(ECM)
H02S GROUND REFERENCE
H02S SIGNAL
ECM GROUNDS
ECM GROUNDS
•