LAND ROVER FRELANDER 2 2006 Repair Manual
FRELANDER 2 2006
LAND ROVER
LAND ROVER
https://www.carmanualsonline.info/img/64/57251/w960_57251-0.png
LAND ROVER FRELANDER 2 2006 Repair Manual
Trending: brake fluid, engine coolant, recommended oil, key, catalytic converter, MPG, oil dipstick
Page 1571 of 3229
Refi ll t he fuel t ank.2.
Adjus t t he parking brake.
Refer t o: Parking Brake Cabl e Adjus tment (206-05 Parking Brake andActuat ion, General Procedures ).
3.
Page 1572 of 3229
Publi s hed: 11-May-2011
Fuel Tank and Lines - I6 3.2L Petrol - Fuel Tank Filler Pipe
Removal and Inst all ati on
Removal
• NOTE: Removal s t eps in t his procedure may cont ain i nst all ati on det ail s.
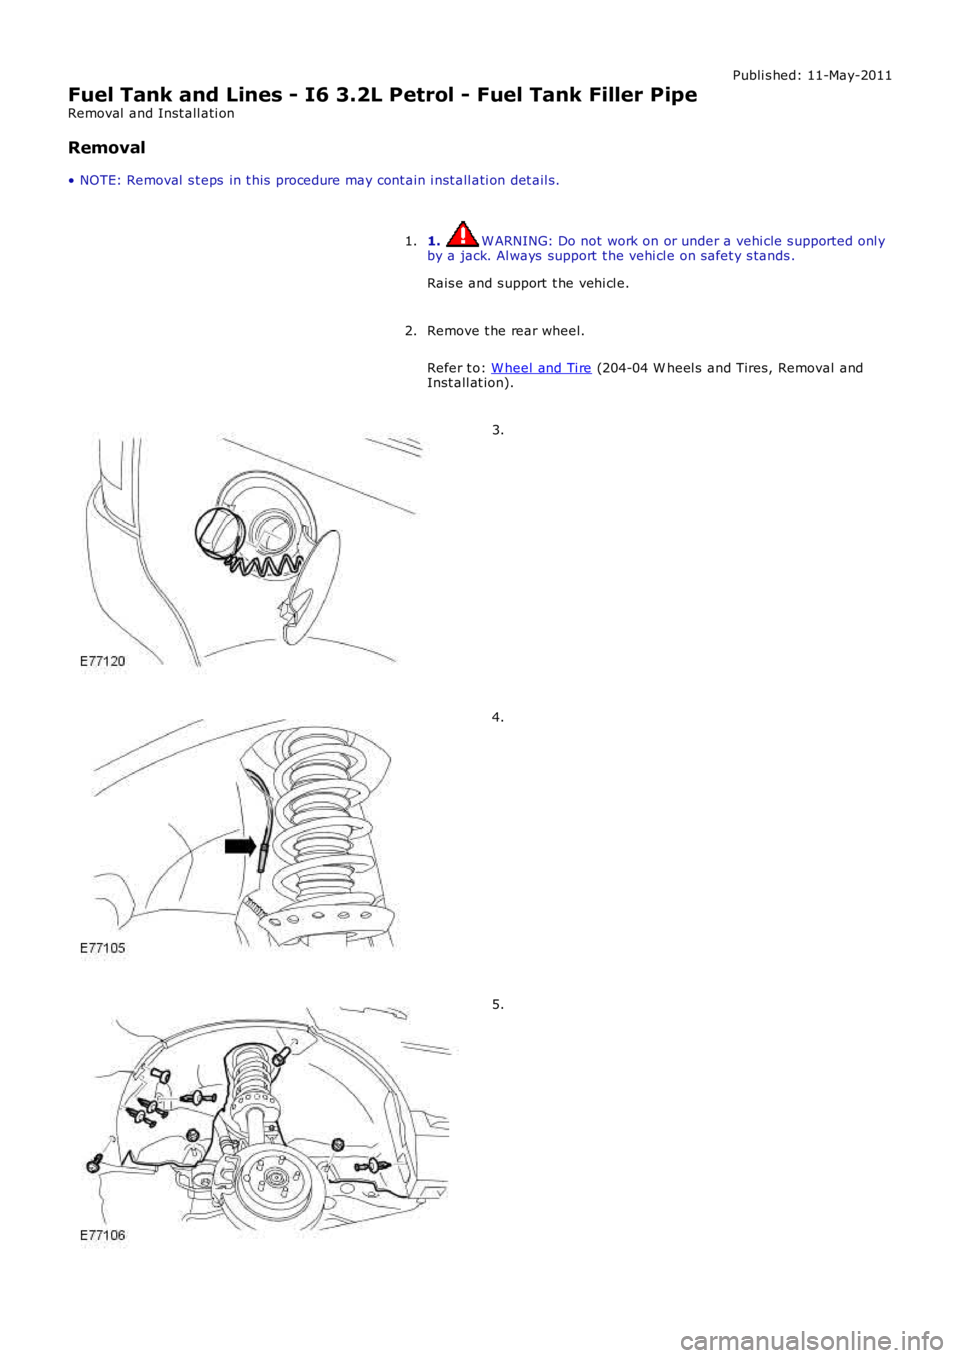
1. W ARNING: Do not work on or under a vehi cle s upported onl yby a jack. Al ways support t he vehi cl e on s afet y s tands .
Rais e and s upport t he vehi cl e.
1.
Remove t he rear wheel.
Refer t o: W heel and Ti re (204-04 W heel s and Tires, Removal andInst all at ion).
2.
3.
4.
5.
Page 1573 of 3229
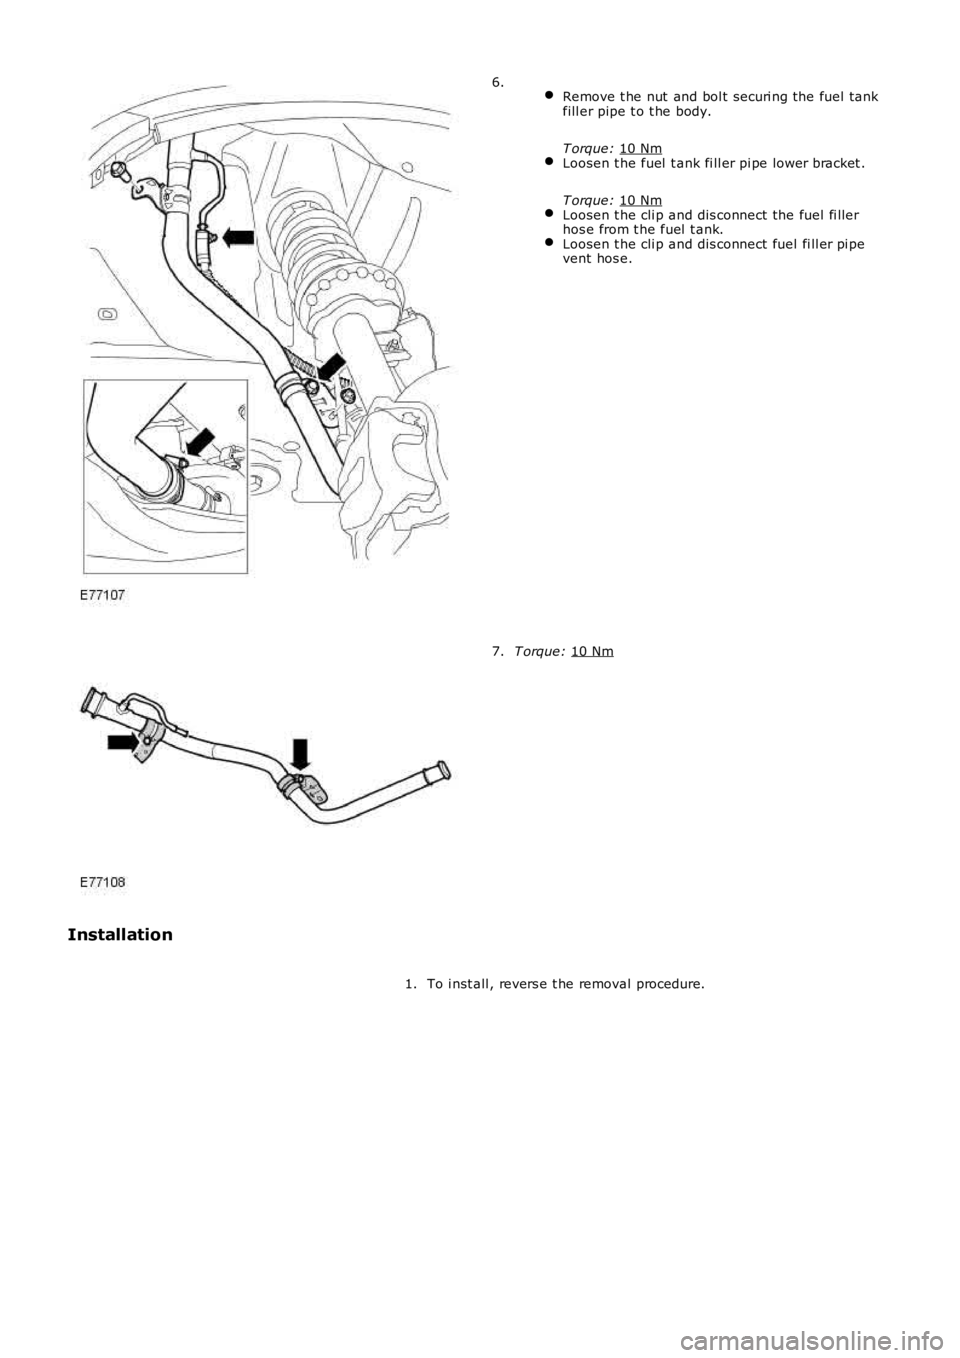
Remove t he nut and bol t securi ng the fuel tank
fill er pipe t o t he body.
T orque: 10 Nm Loosen t he fuel t ank fi ll er pi pe lower bracket .
T orque: 10 Nm Loosen t he cli p and dis connect the fuel fi ller
hos e from t he fuel t ank. Loosen t he cli p and dis connect fuel fi ll er pi pe
vent hos e. 6.
T orque:
10 Nm 7.
Installation To i nst all , revers e t he removal procedure.
1.
Page 1574 of 3229
Publi s hed: 11-May-2011
Fuel Tank and Lines - I6 3.2L Petrol - Fuel Pump and Sender Unit
Removal and Inst all ati on
Removal
• NOTE: Removal s t eps in t his procedure may cont ain i nst all ati on det ail s.
Di sconnect t he bat t ery ground cable.
Refer t o: Specificati ons (414-00 Bat tery and Charging Sys tem -General Informat ion, Specificati ons).
1.
Remove t he fuel fi lt er.
Refer t o: Fuel Fil ter Element (310-01A Fuel Tank and Lines - I6 3.2LPetrol, Removal and Ins tall ati on).
2.
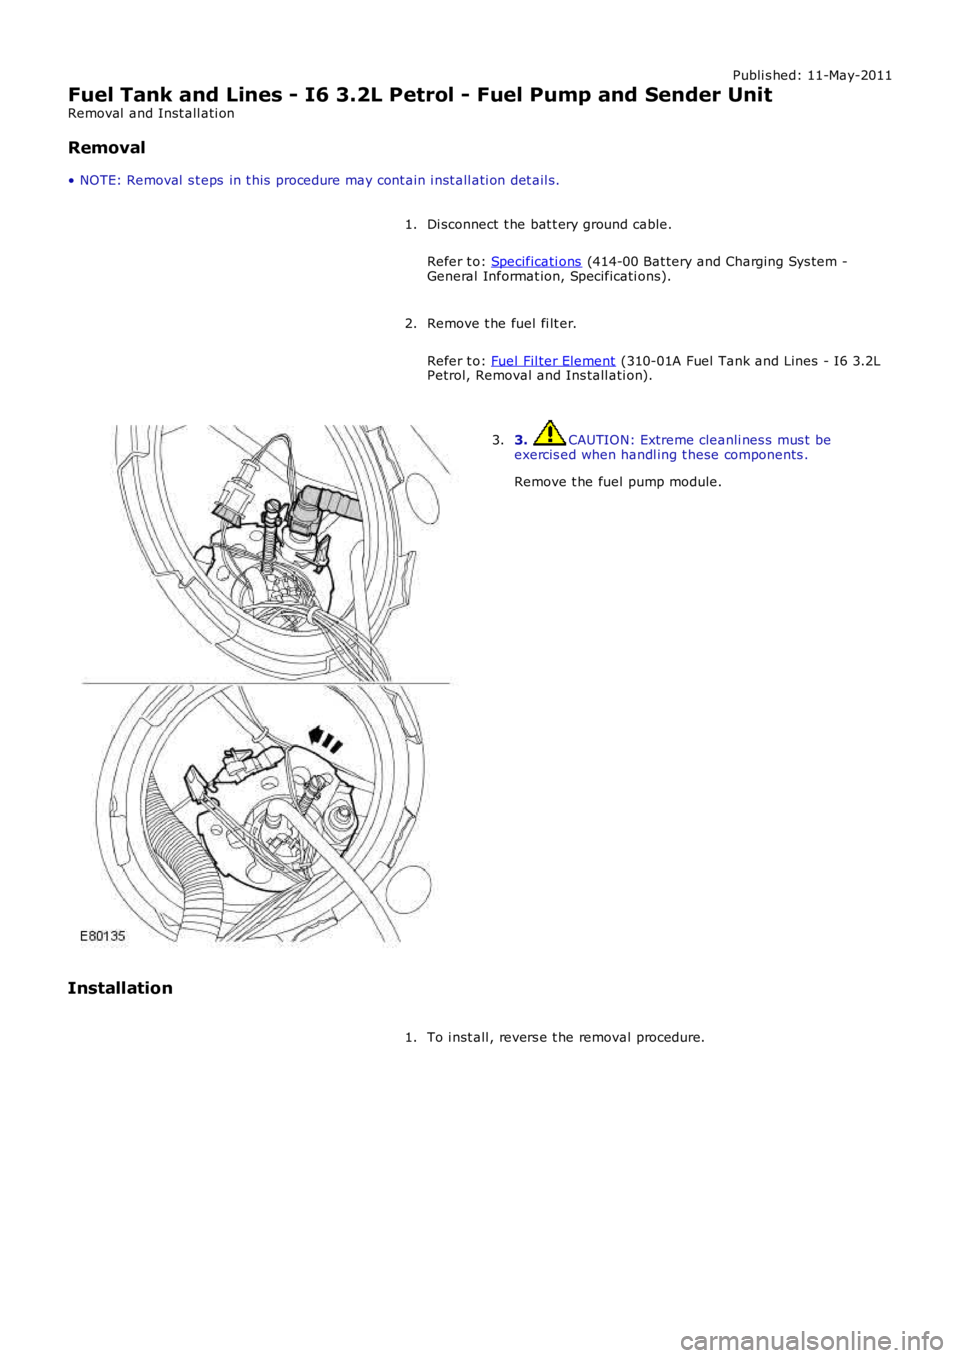
3. CAUTION: Extreme cleanli nes s mus t beexercis ed when handl ing t hese components .
Remove t he fuel pump module.
3.
Installation
To i nst all , revers e t he removal procedure.1.
Page 1575 of 3229
Publi s hed: 11-May-2011
Fuel Tank and Lines - I6 3.2L Petrol - Fuel Level Sender
Removal and Inst all ati on
Removal
• NOTE: Removal s t eps in t his procedure may cont ain i nst all ati on det ail s.
Di sconnect t he bat t ery ground cable.
Refer t o: Specificati ons (414-00 Bat tery and Charging Sys tem -General Informat ion, Specificati ons).
1.
2. W ARNING: Make sure t o s upport the vehicle wit h axles tands .
Rais e and s upport t he vehi cl e.
2.
Remove t he fuel pump module.
Refer t o: Fuel Pump and Sender Uni t (310-01A Fuel Tank and Li nes -I6 3.2L Pet rol, Removal and Ins t al lat ion).
3.
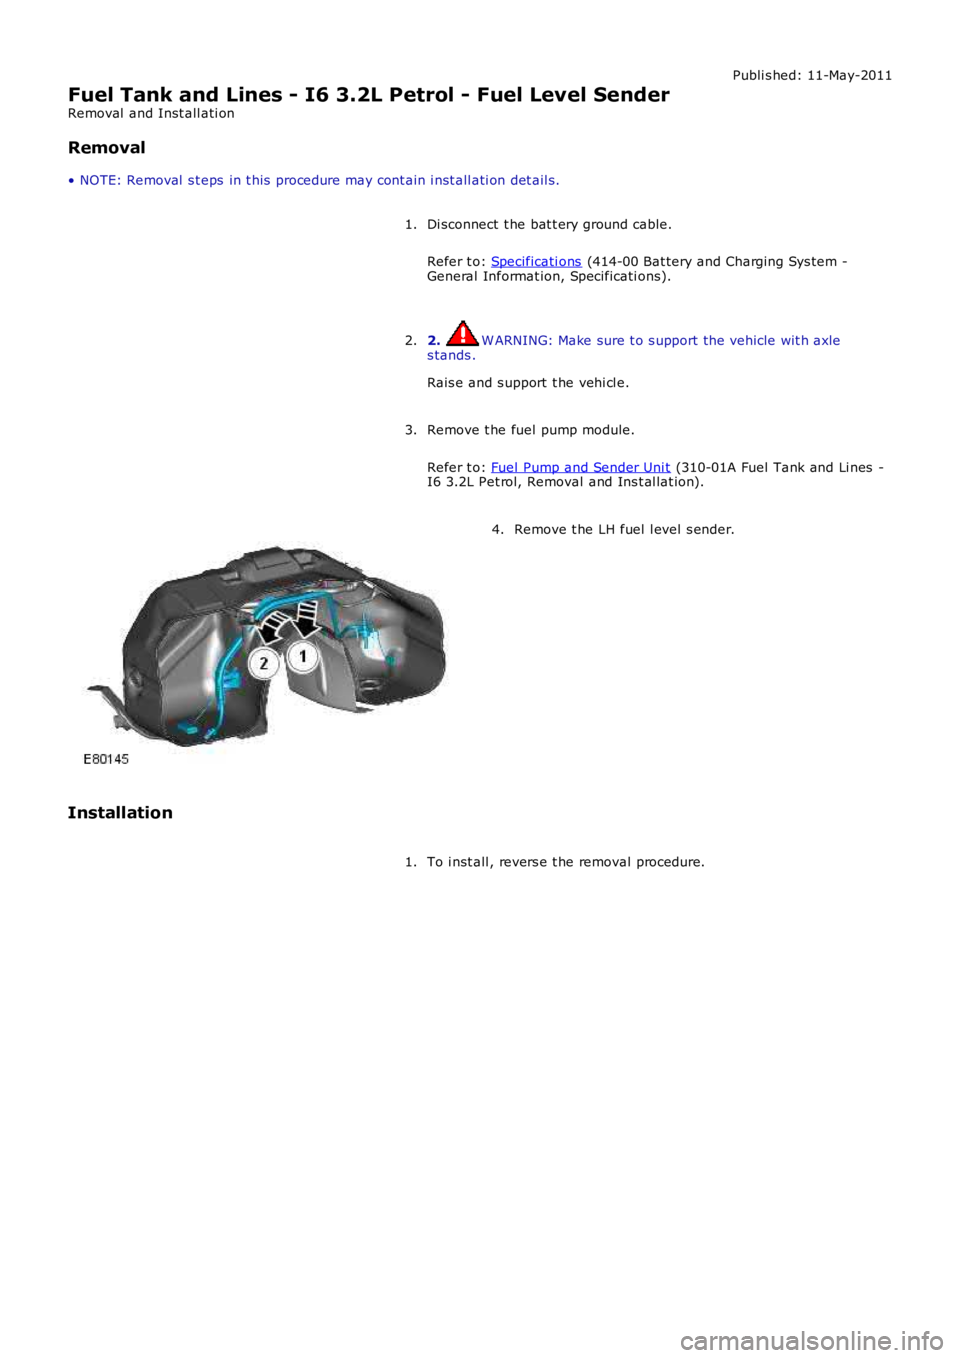
Remove t he LH fuel l evel s ender.4.
Installation
To i nst all , revers e t he removal procedure.1.
Page 1576 of 3229
Publi shed: 08-De c-2011
Fuel Tank and Lines - I6 3.2L Petrol - Fuel Pump and Sender Unit FilterRemova l a nd Inst allat ion
Removal
• NOTE: Removal st eps in t his procedure may cont ain ins ta llat ion det ails.
• NOTE: Some variat ion in t he illust rat ions may occur, but t he es sent ial informat ion is a lways correct.
Refer t o: Fuel Pump and Sender Unit (310-01A Fuel Tank and Lines - I6 3.2L Pet rol,Removal and Inst allat ion).1.
2.
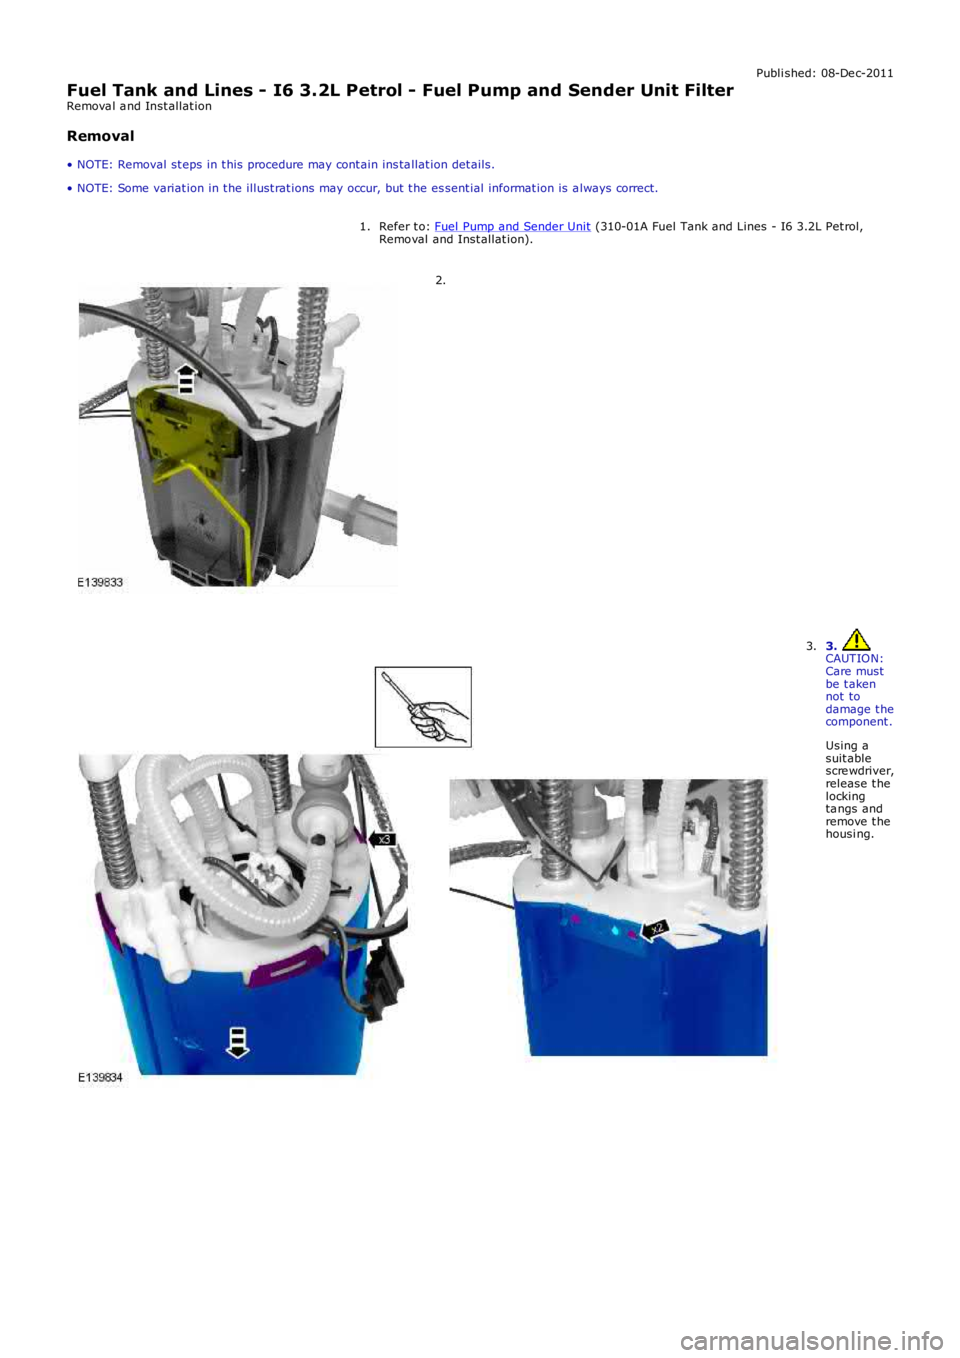
3. CAUTION:Care mustbe t akennot todamage t hecomponent .
Using asuit ablescre wdriver,release t helockingta ngs andremove t hehousi ng.
3.
Page 1577 of 3229
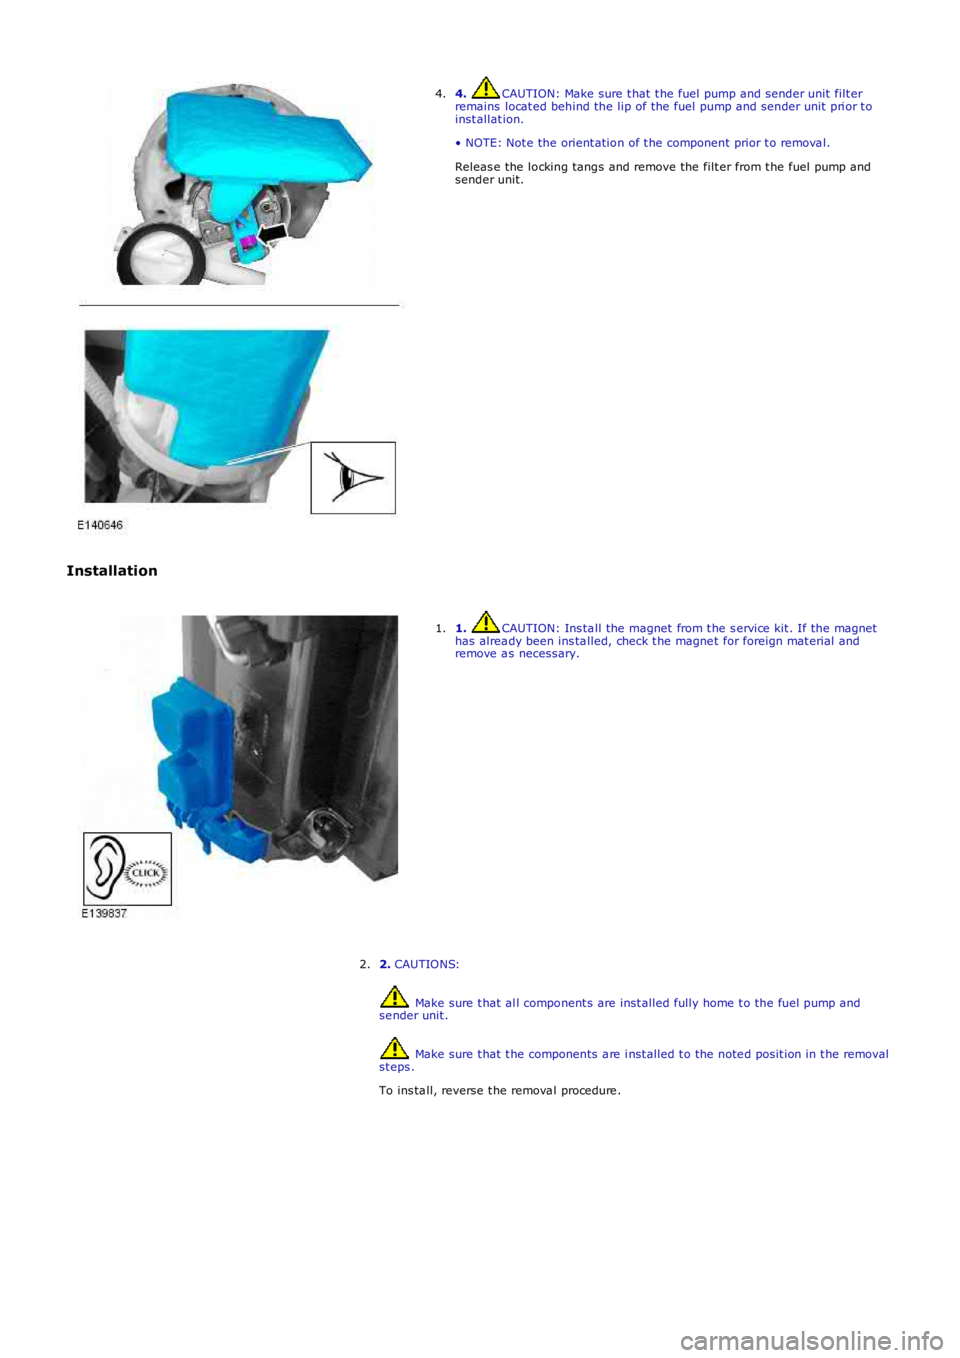
4. CAUTION: Make sure t hat t he fuel pump and sender unit filt erremains locat ed behind the lip of the fuel pump and sender unit pri or t oinst allat ion.
• NOTE: Not e the orient ation of t he component prior t o remova l.
Releas e the locking tangs and remove the filt er from t he fuel pump andsender unit.
4.
Installation
1. CAUTION: Ins ta ll the magnet from t he s ervice kit . If the magnethas alrea dy been ins ta lled, check t he magne t for foreign mat erial andremove a s necessary.
1.
2. CAUTIONS:
Make sure t hat al l component s are inst alled fully home t o the fuel pump andse nder unit .
Make sure t hat t he components a re i nst alled t o the note d posit ion in t he removalst eps .
To ins ta ll, reverse t he remova l procedure .
2.
Page 1578 of 3229
Publ is hed: 24-Oct -2011
Fuel Tank and Lines - I6 3.2L Petrol - Fuel Pump and Sender Unit Filter
Magnet
Removal and Inst all ati on
Removal
• NOTE: Removal s t eps in t his procedure may cont ain i nst all ati on det ail s.
Refer t o: Fuel Pump and Sender Uni t (310-01A Fuel Tank and Li nes -I6 3.2L Pet rol, Removal and Ins t al lat ion).1.
2.
Installation
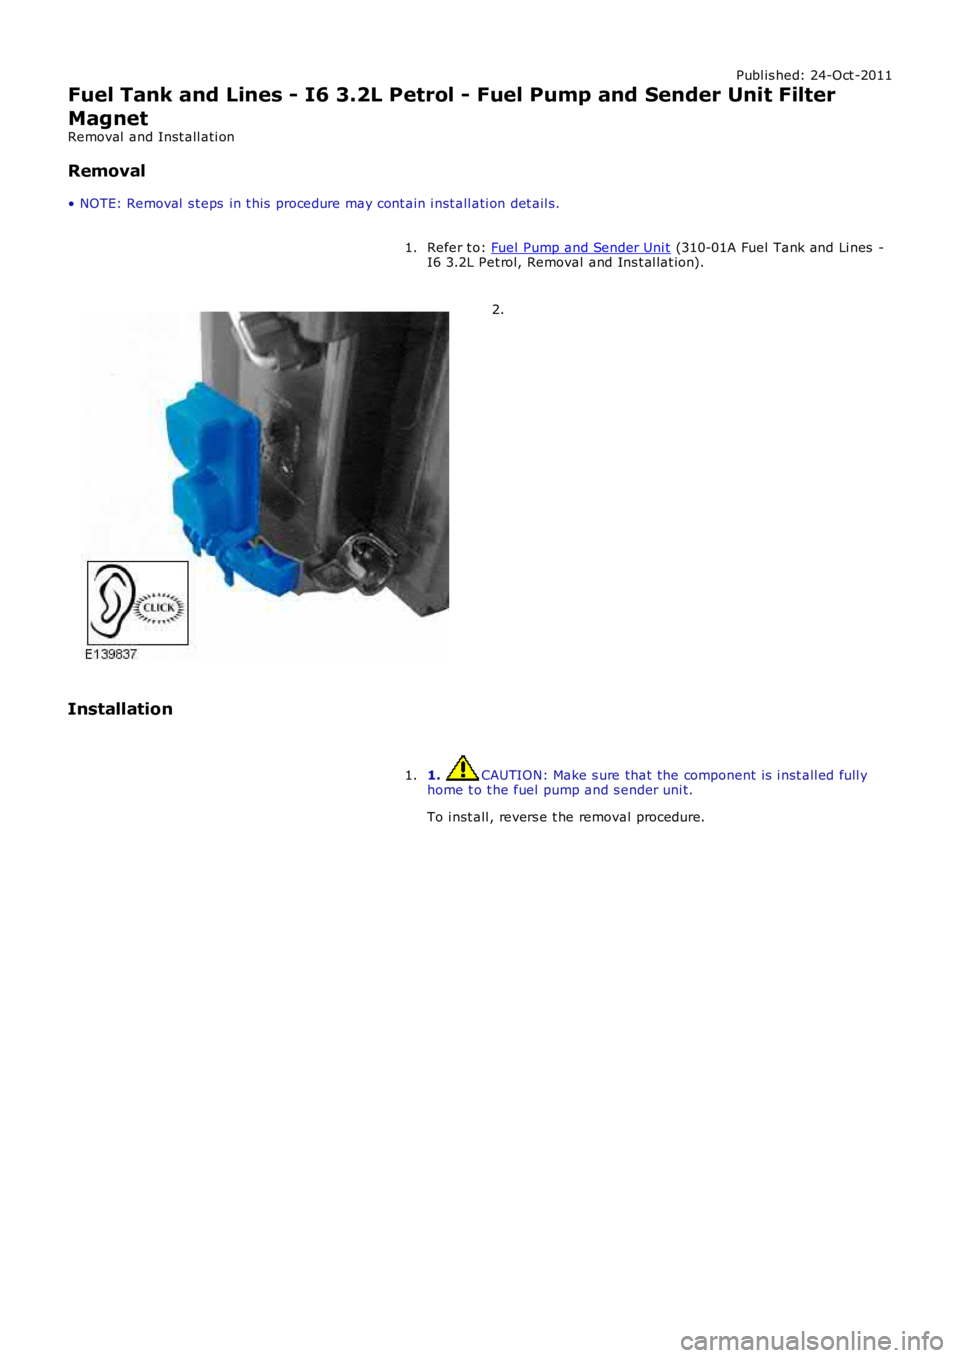
1. CAUTION: Make s ure that the component is i nst all ed full yhome t o t he fuel pump and s ender uni t.
To i nst all , revers e t he removal procedure.
1.
Page 1579 of 3229
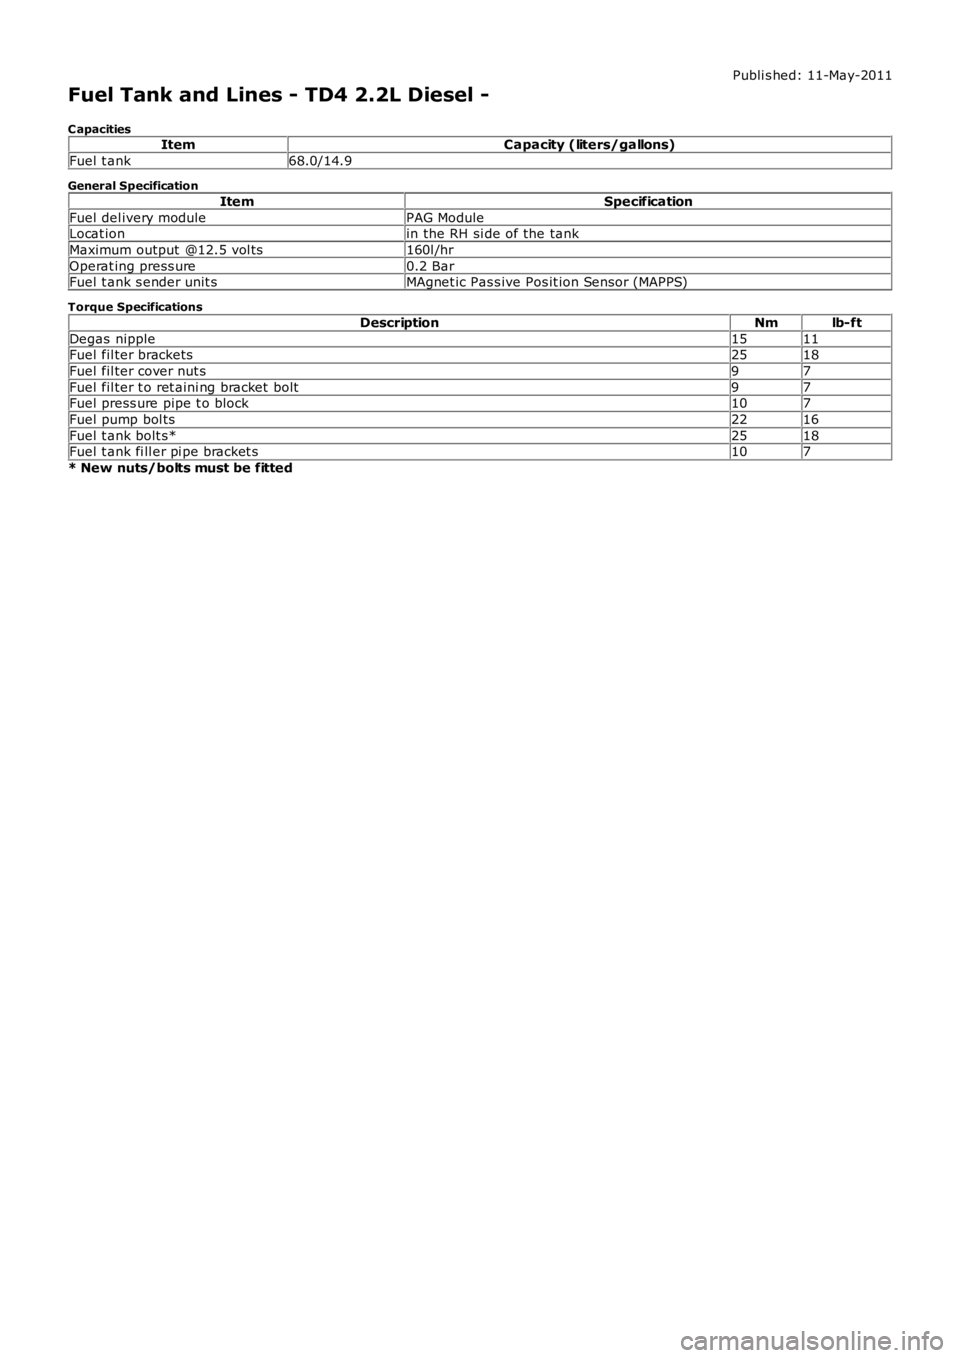
Publi s hed: 11-May-2011
Fuel Tank and Lines - TD4 2.2L Diesel -
C apacitiesItemCapacity (liters/gallons)
Fuel t ank68.0/14.9
General Specification
ItemSpecification
Fuel del ivery modulePAG ModuleLocat ionin the RH si de of the tank
Maximum output @12.5 vol ts160l /hr
Operat ing press ure0.2 BarFuel t ank s ender unit sMAgnet ic Pas s ive Pos it ion Sensor (MAPPS)
Torque Specifications
DescriptionNmlb-ft
Degas nipple1511Fuel fil ter brackets2518
Fuel fil ter cover nut s97
Fuel fil ter t o ret aini ng bracket bolt97Fuel press ure pipe t o block107
Fuel pump bol ts2216
Fuel t ank bolt s*2518Fuel t ank fi ll er pi pe bracket s107
* New nuts/bolts must be fitted
Page 1580 of 3229
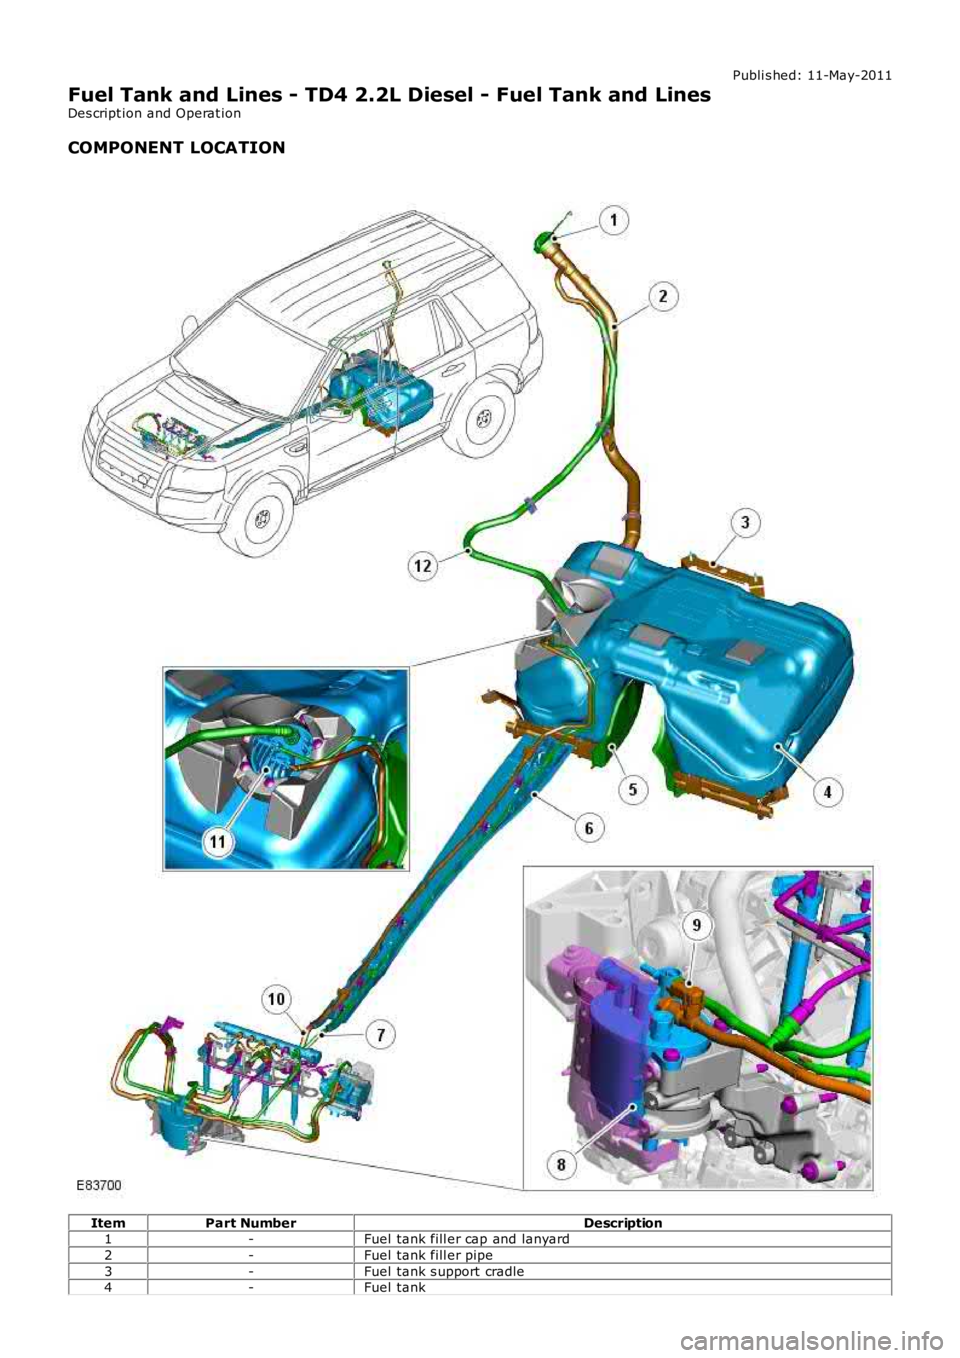
Publi s hed: 11-May-2011
Fuel Tank and Lines - TD4 2.2L Diesel - Fuel Tank and Lines
Des cript ion and Operat ion
COMPONENT LOCATION
ItemPart NumberDescription1-Fuel tank fill er cap and lanyard
2-Fuel tank fill er pipe
3-Fuel tank s upport cradle4-Fuel tank
Trending: charging, transmission oil, check oil, instrument panel, turn signal bulb, clock setting, coolant
