NISSAN PRIMERA 1999 Electronic Repair Manual
Manufacturer: NISSAN, Model Year: 1999, Model line: PRIMERA, Model: NISSAN PRIMERA 1999Pages: 2267, PDF Size: 35.74 MB
Page 1621 of 2267
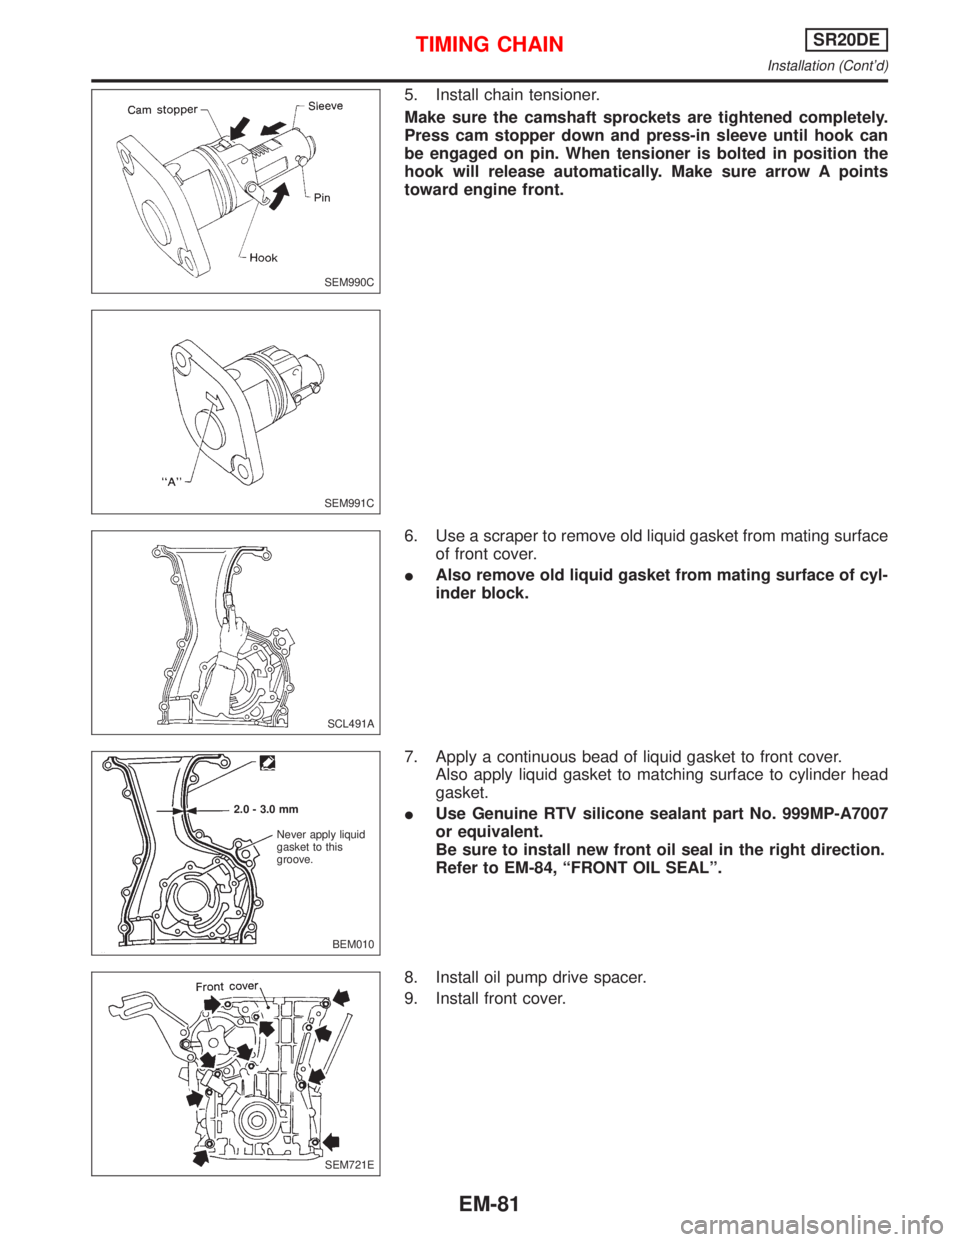
5. Install chain tensioner.
Make sure the camshaft sprockets are tightened completely.
Press cam stopper down and press-in sleeve until hook can
be engaged on pin. When tensioner is bolted in position the
hook will release automatically. Make sure arrow A points
toward engine front.
6. Use a scraper to remove old liquid gasket from mating surface
of front cover.
IAlso remove old liquid gasket from mating surface of cyl-
inder block.
7. Apply a continuous bead of liquid gasket to front cover.
Also apply liquid gasket to matching surface to cylinder head
gasket.
IUse Genuine RTV silicone sealant part No. 999MP-A7007
or equivalent.
Be sure to install new front oil seal in the right direction.
Refer to EM-84, ªFRONT OIL SEALº.
8. Install oil pump drive spacer.
9. Install front cover.
SEM990C
SEM991C
SCL491A
BEM010 2.0 - 3.0 mm
Never apply liquid
gasket to this
groove.
SEM721E
TIMING CHAINSR20DE
Installation (Cont'd)
EM-81
Page 1622 of 2267
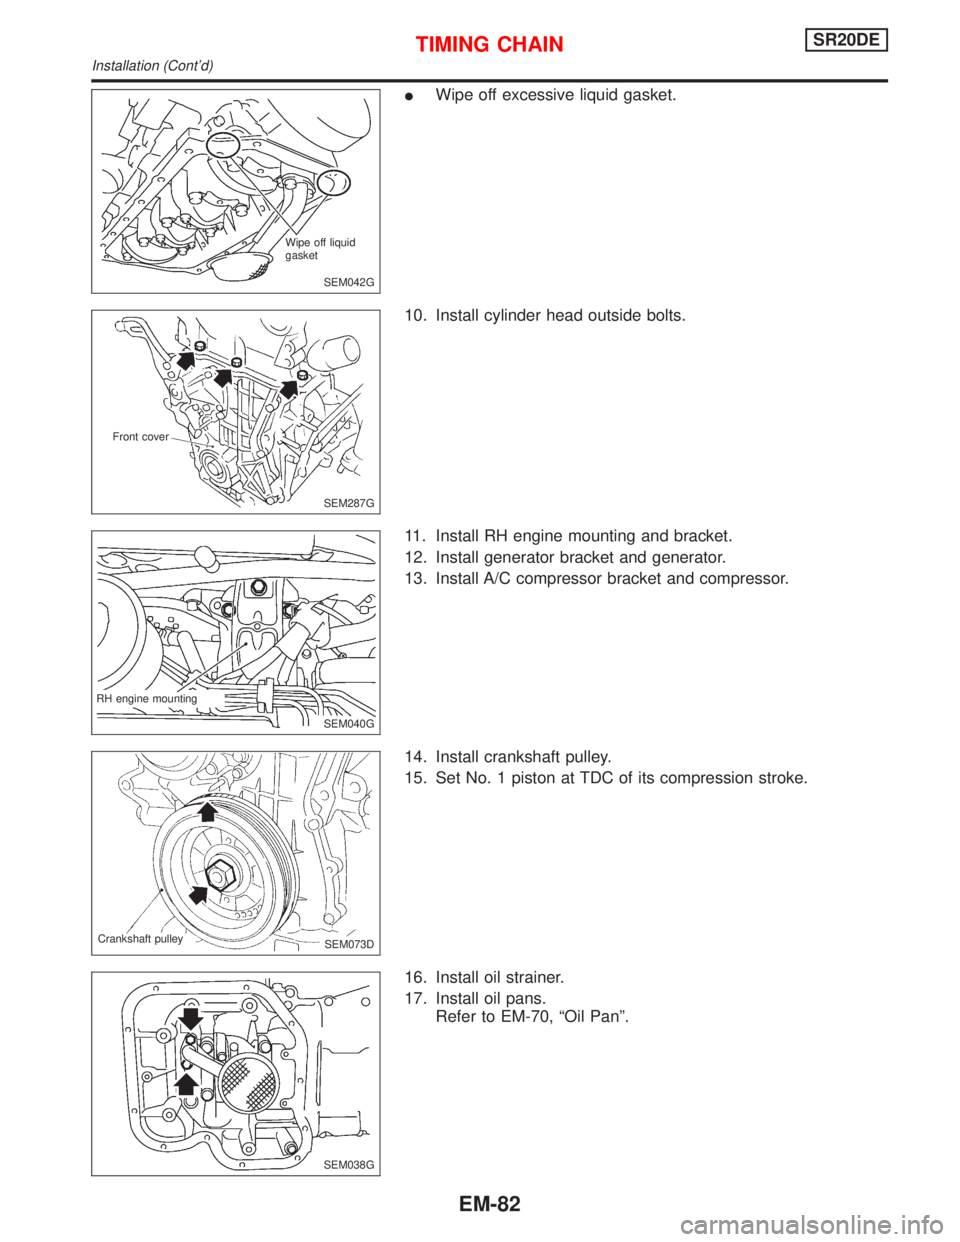
IWipe off excessive liquid gasket.
10. Install cylinder head outside bolts.
11. Install RH engine mounting and bracket.
12. Install generator bracket and generator.
13. Install A/C compressor bracket and compressor.
14. Install crankshaft pulley.
15. Set No. 1 piston at TDC of its compression stroke.
16. Install oil strainer.
17. Install oil pans.
Refer to EM-70, ªOil Panº.
SEM042G Wipe off liquid
gasket
SEM287G Front cover
SEM040G RH engine mounting
.SEM073D Crankshaft pulley
SEM038G
TIMING CHAINSR20DE
Installation (Cont'd)
EM-82
Page 1623 of 2267
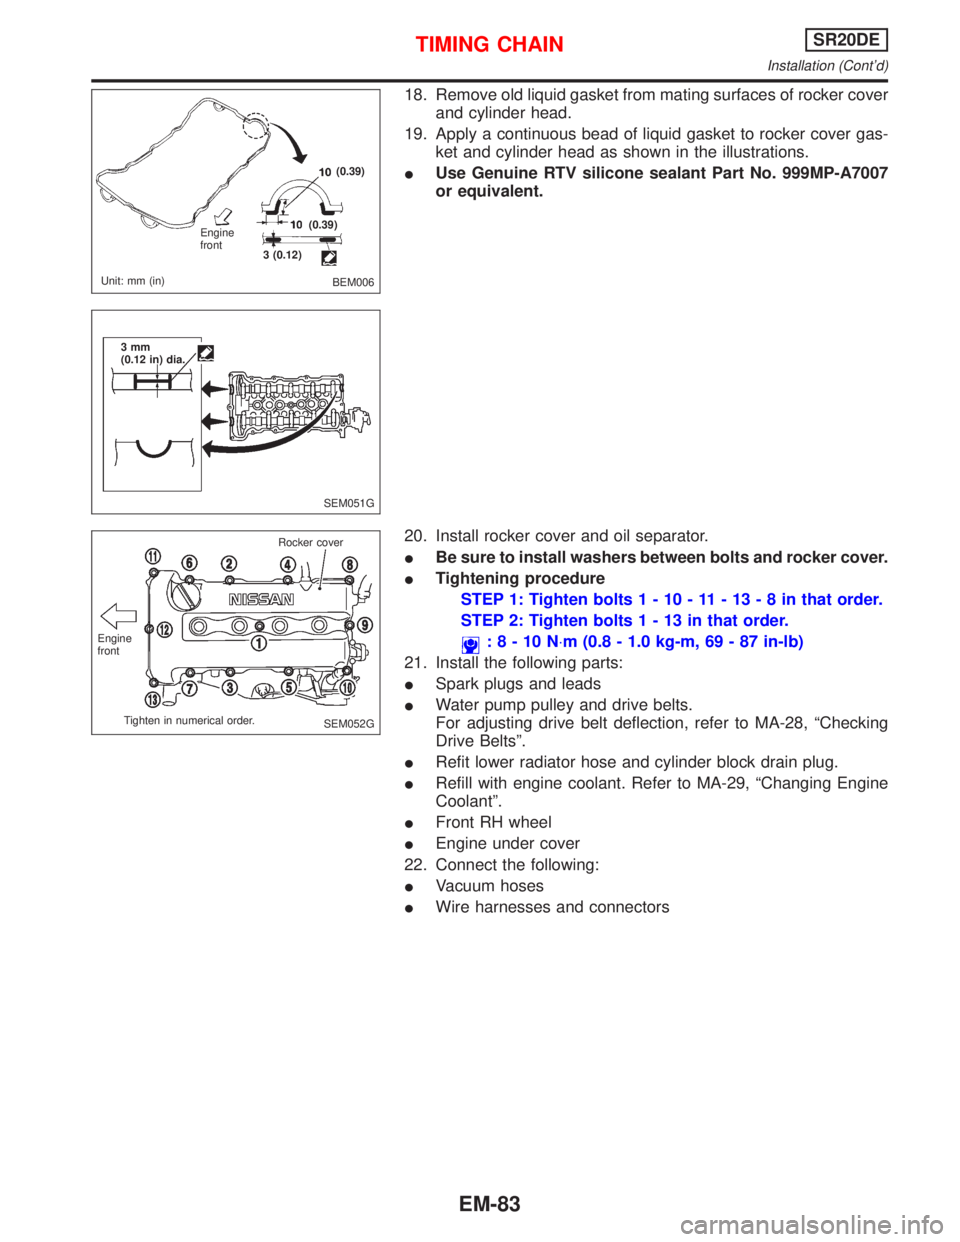
18. Remove old liquid gasket from mating surfaces of rocker cover
and cylinder head.
19. Apply a continuous bead of liquid gasket to rocker cover gas-
ket and cylinder head as shown in the illustrations.
IUse Genuine RTV silicone sealant Part No. 999MP-A7007
or equivalent.
20. Install rocker cover and oil separator.
IBe sure to install washers between bolts and rocker cover.
ITightening procedure
STEP 1: Tighten bolts1-10-11-13-8inthat order.
STEP 2: Tighten bolts1-13inthat order.
:8-10N×m (0.8 - 1.0 kg-m, 69 - 87 in-lb)
21. Install the following parts:
ISpark plugs and leads
IWater pump pulley and drive belts.
For adjusting drive belt deflection, refer to MA-28, ªChecking
Drive Beltsº.
IRefit lower radiator hose and cylinder block drain plug.
IRefill with engine coolant. Refer to MA-29, ªChanging Engine
Coolantº.
IFront RH wheel
IEngine under cover
22. Connect the following:
IVacuum hoses
IWire harnesses and connectors
BEM006 Engine
front
Unit: mm (in)3 (0.12)(0.39)
(0.39)
SEM051G 3mm
(0.12 in) dia.
SEM052G Engine
front
Tighten in numerical order.Rocker cover
TIMING CHAINSR20DE
Installation (Cont'd)
EM-83
Page 1624 of 2267
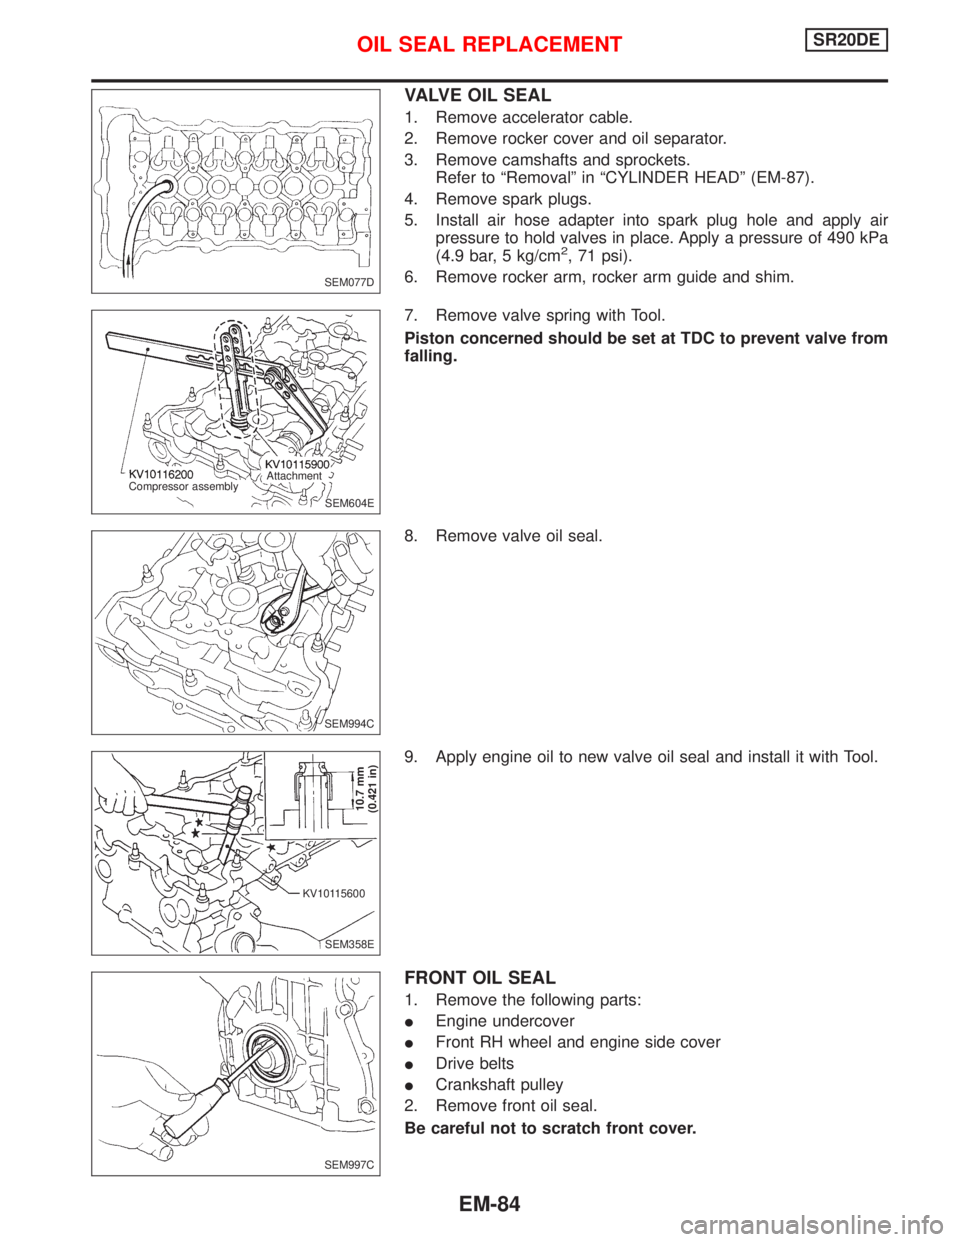
VALVE OIL SEAL
1. Remove accelerator cable.
2. Remove rocker cover and oil separator.
3. Remove camshafts and sprockets.
Refer to ªRemovalº in ªCYLINDER HEADº (EM-87).
4. Remove spark plugs.
5. Install air hose adapter into spark plug hole and apply air
pressure to hold valves in place. Apply a pressure of 490 kPa
(4.9 bar, 5 kg/cm
2, 71 psi).
6. Remove rocker arm, rocker arm guide and shim.
7. Remove valve spring with Tool.
Piston concerned should be set at TDC to prevent valve from
falling.
8. Remove valve oil seal.
9. Apply engine oil to new valve oil seal and install it with Tool.
FRONT OIL SEAL
1. Remove the following parts:
IEngine undercover
IFront RH wheel and engine side cover
IDrive belts
ICrankshaft pulley
2. Remove front oil seal.
Be careful not to scratch front cover.
SEM077D
SEM604E Compressor assemblyAttachment
SEM994C
SEM358E
10.7 mm
(0.421 in)
KV10115600
SEM997C
OIL SEAL REPLACEMENTSR20DE
EM-84
Page 1625 of 2267
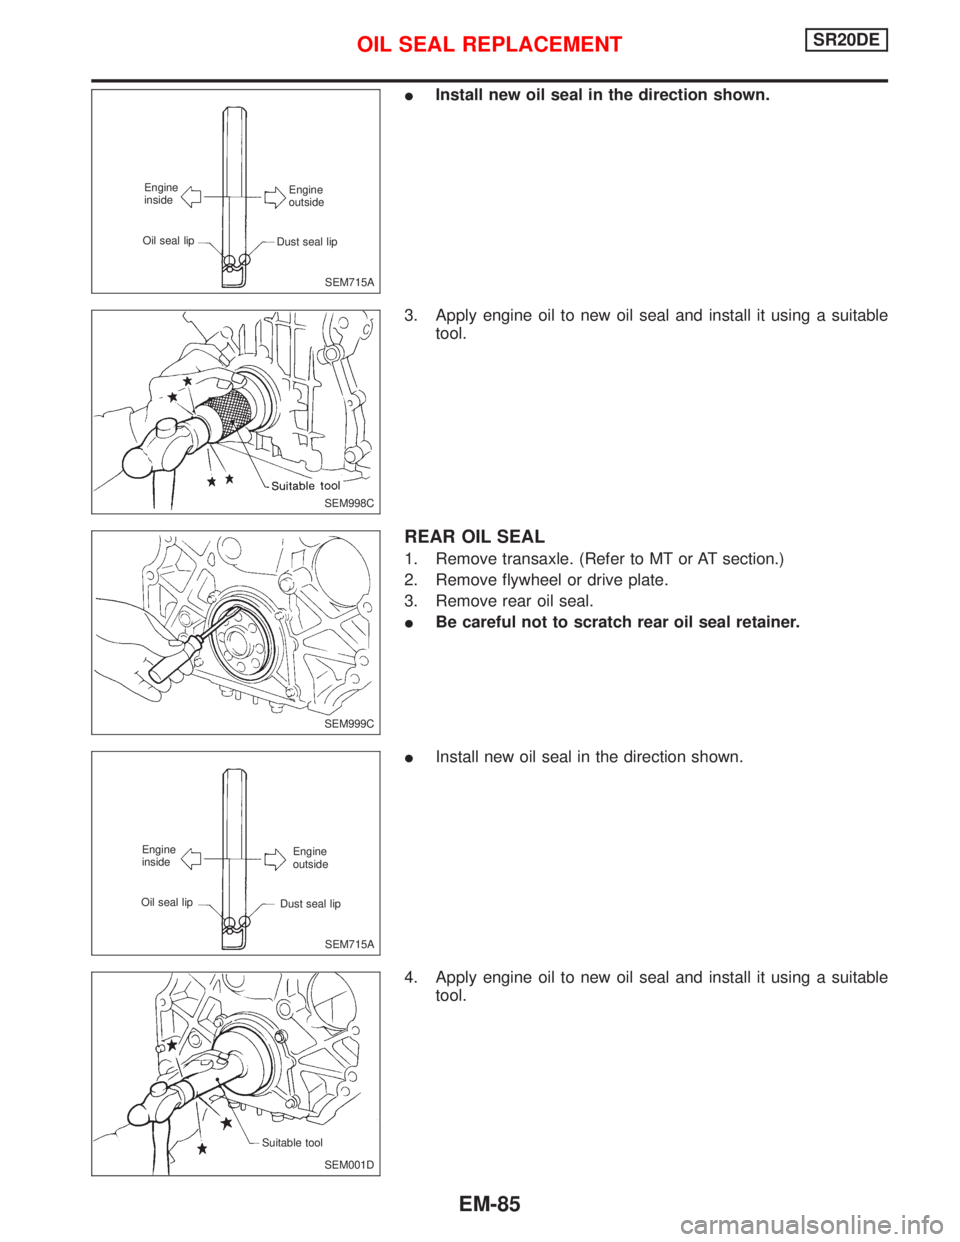
IInstall new oil seal in the direction shown.
3. Apply engine oil to new oil seal and install it using a suitable
tool.
REAR OIL SEAL
1. Remove transaxle. (Refer to MT or AT section.)
2. Remove flywheel or drive plate.
3. Remove rear oil seal.
IBe careful not to scratch rear oil seal retainer.
IInstall new oil seal in the direction shown.
4. Apply engine oil to new oil seal and install it using a suitable
tool.
SEM715A Engine
outside
Dust seal lip Engine
inside
Oil seal lip
SEM998C
SEM999C
SEM715A Engine
inside
Oil seal lipEngine
outside
Dust seal lip
SEM001D Suitable tool
OIL SEAL REPLACEMENTSR20DE
EM-85
Page 1626 of 2267
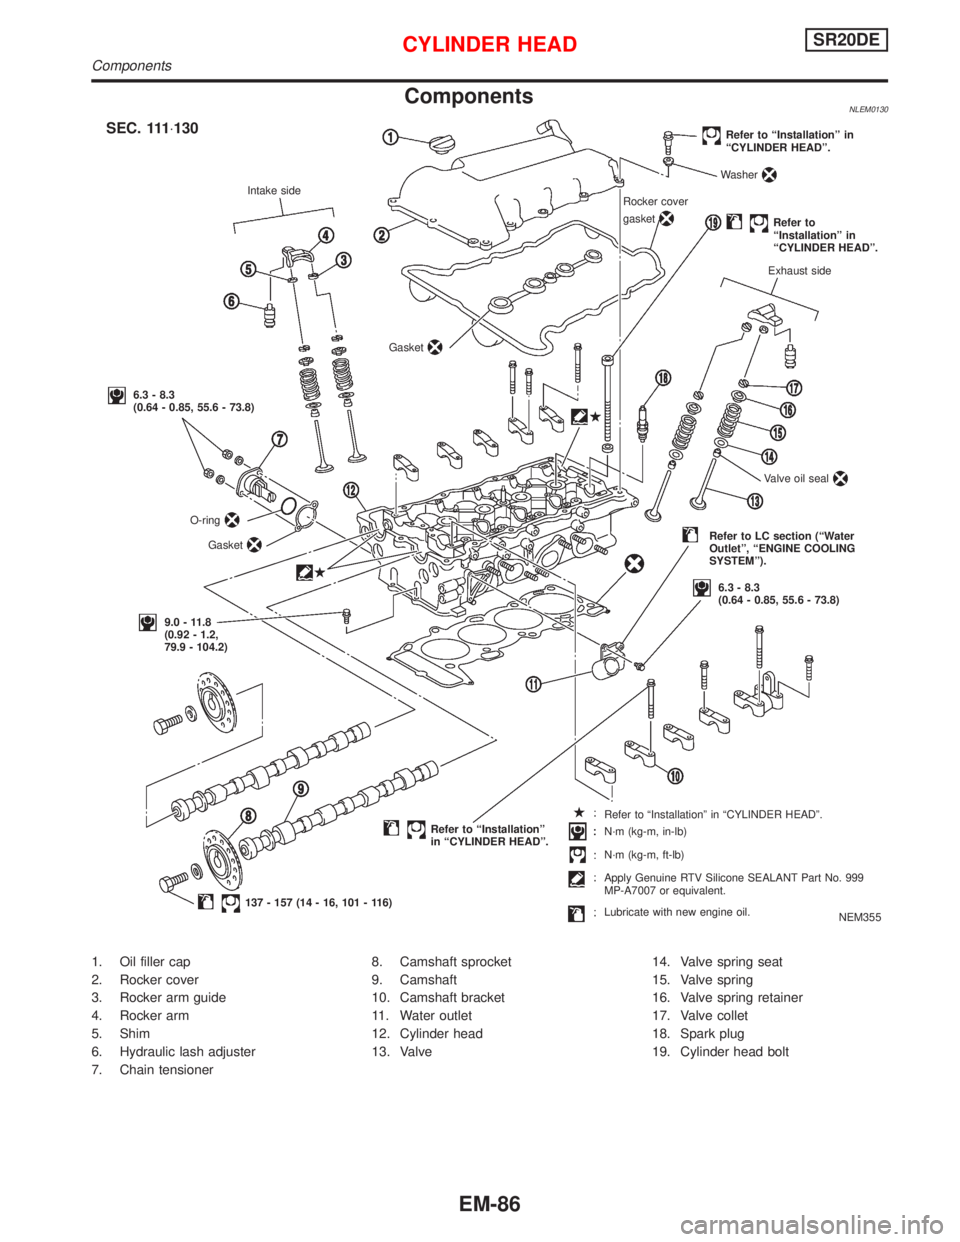
ComponentsNLEM0130
1. Oil filler cap
2. Rocker cover
3. Rocker arm guide
4. Rocker arm
5. Shim
6. Hydraulic lash adjuster
7. Chain tensioner8. Camshaft sprocket
9. Camshaft
10. Camshaft bracket
11. Water outlet
12. Cylinder head
13. Valve14. Valve spring seat
15. Valve spring
16. Valve spring retainer
17. Valve collet
18. Spark plug
19. Cylinder head bolt
NEM355 Intake side
Refer to ªInstallationº in
ªCYLINDER HEADº.
Washer
Refer to
ªInstallationº in
ªCYLINDER HEADº.
Exhaust side
Refer to ªInstallationº
in ªCYLINDER HEADº.
137 - 157 (14 - 16, 101 - 116) Gasket
O-ring
Gasket
Rocker cover
gasket
Valve oil seal
6.3 - 8.3
(0.64 - 0.85, 55.6 - 73.8)
.SEC. 111×130
6.3 - 8.3
(0.64 - 0.85, 55.6 - 73.8)
9.0 - 11.8
(0.92 - 1.2,
79.9 - 104.2)
Refer to LC section (ªWater
Outletº, ªENGINE COOLING
SYSTEMº).
Refer to ªInstallationº in ªCYLINDER HEADº.
N´m (kg-m, in-lb)
N´m (kg-m, ft-lb)
Apply Genuine RTV Silicone SEALANT Part No. 999
MP-A7007 or equivalent.
Lubricate with new engine oil.
CYLINDER HEADSR20DE
Components
EM-86
Page 1627 of 2267
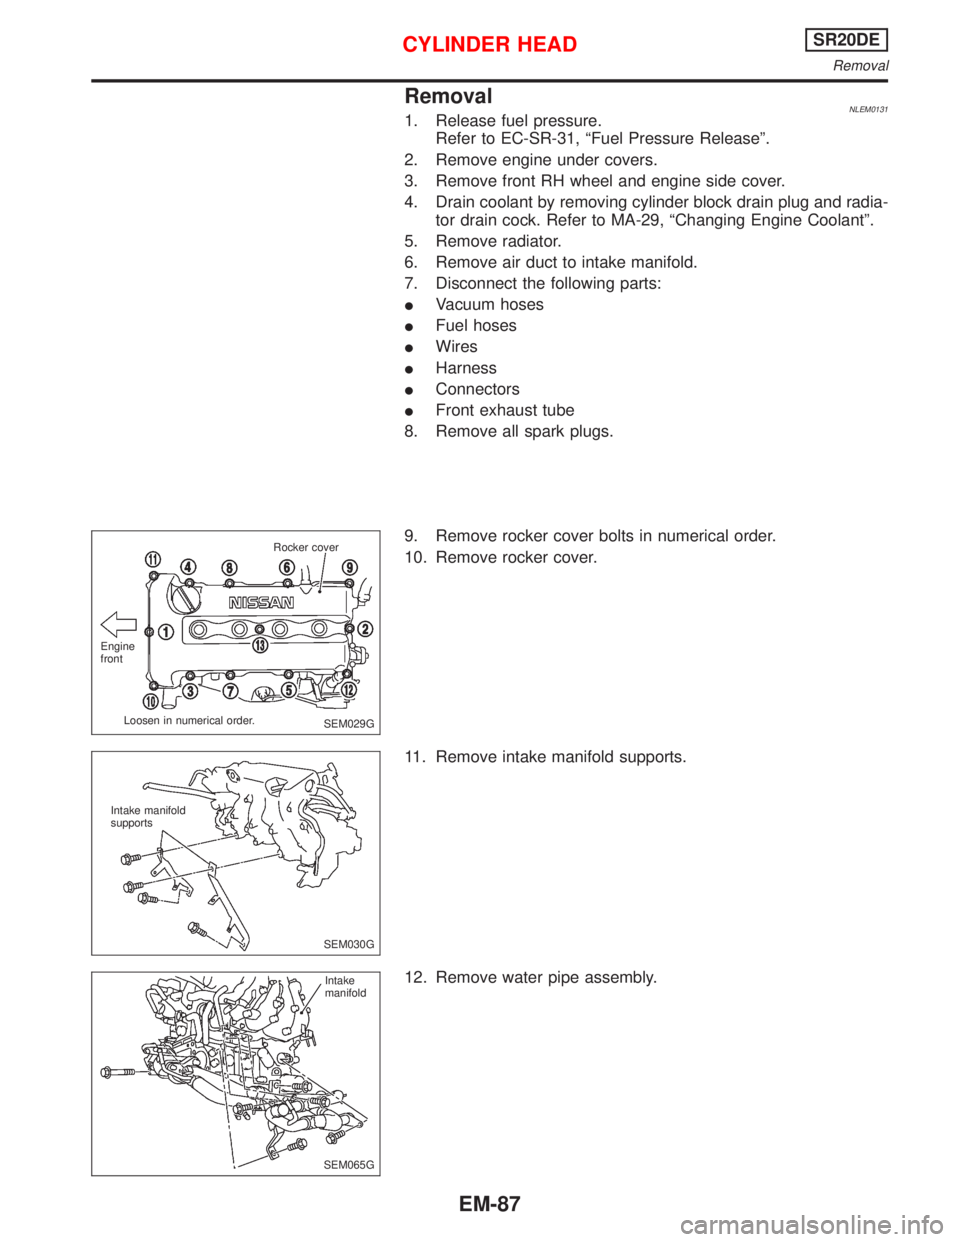
RemovalNLEM01311. Release fuel pressure.
Refer to EC-SR-31, ªFuel Pressure Releaseº.
2. Remove engine under covers.
3. Remove front RH wheel and engine side cover.
4. Drain coolant by removing cylinder block drain plug and radia-
tor drain cock. Refer to MA-29, ªChanging Engine Coolantº.
5. Remove radiator.
6. Remove air duct to intake manifold.
7. Disconnect the following parts:
IVacuum hoses
IFuel hoses
IWires
IHarness
IConnectors
IFront exhaust tube
8. Remove all spark plugs.
9. Remove rocker cover bolts in numerical order.
10. Remove rocker cover.
11. Remove intake manifold supports.
12. Remove water pipe assembly.
SEM029G Engine
front
Loosen in numerical order.Rocker cover
SEM030G Intake manifold
supports
SEM065GIntake
manifold
CYLINDER HEADSR20DE
Removal
EM-87
Page 1628 of 2267
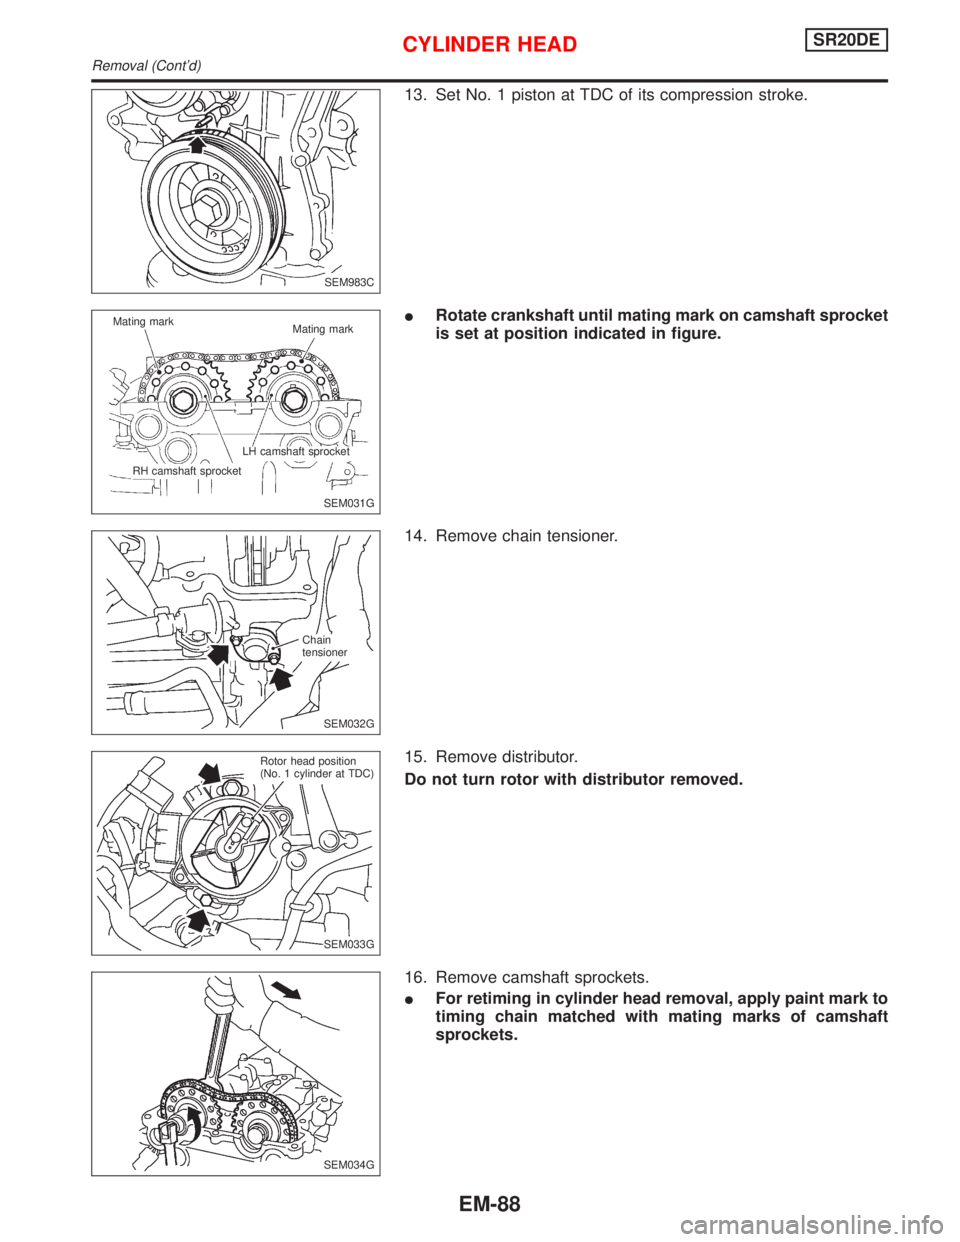
13. Set No. 1 piston at TDC of its compression stroke.
IRotate crankshaft until mating mark on camshaft sprocket
is set at position indicated in figure.
14. Remove chain tensioner.
15. Remove distributor.
Do not turn rotor with distributor removed.
16. Remove camshaft sprockets.
IFor retiming in cylinder head removal, apply paint mark to
timing chain matched with mating marks of camshaft
sprockets.
SEM983C
SEM031G Mating mark
Mating mark
RH camshaft sprocketLH camshaft sprocket
.SEM032G Chain
tensioner
SEM033G Rotor head position
(No. 1 cylinder at TDC)
SEM034G
CYLINDER HEADSR20DE
Removal (Cont'd)
EM-88
Page 1629 of 2267
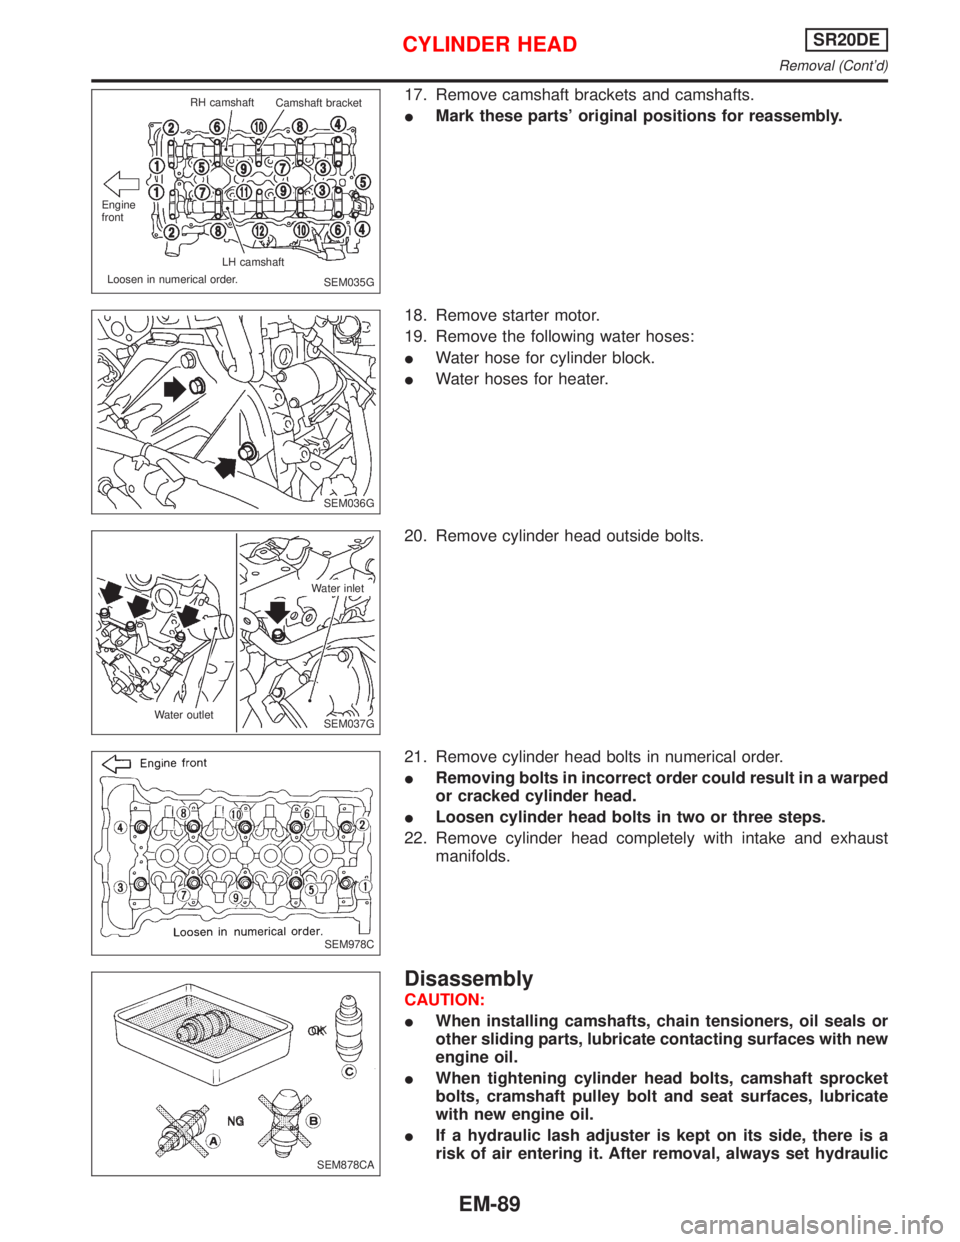
17. Remove camshaft brackets and camshafts.
IMark these parts' original positions for reassembly.
18. Remove starter motor.
19. Remove the following water hoses:
IWater hose for cylinder block.
IWater hoses for heater.
20. Remove cylinder head outside bolts.
21. Remove cylinder head bolts in numerical order.
IRemoving bolts in incorrect order could result in a warped
or cracked cylinder head.
ILoosen cylinder head bolts in two or three steps.
22. Remove cylinder head completely with intake and exhaust
manifolds.
Disassembly
CAUTION:
IWhen installing camshafts, chain tensioners, oil seals or
other sliding parts, lubricate contacting surfaces with new
engine oil.
IWhen tightening cylinder head bolts, camshaft sprocket
bolts, cramshaft pulley bolt and seat surfaces, lubricate
with new engine oil.
IIf a hydraulic lash adjuster is kept on its side, there is a
risk of air entering it. After removal, always set hydraulic
SEM035G Engine
frontRH camshaft
Camshaft bracket
LH camshaft
Loosen in numerical order.
SEM036G
SEM037G Water outletWater inlet
SEM978C
SEM878CA OK
NG
CYLINDER HEADSR20DE
Removal (Cont'd)
EM-89
Page 1630 of 2267
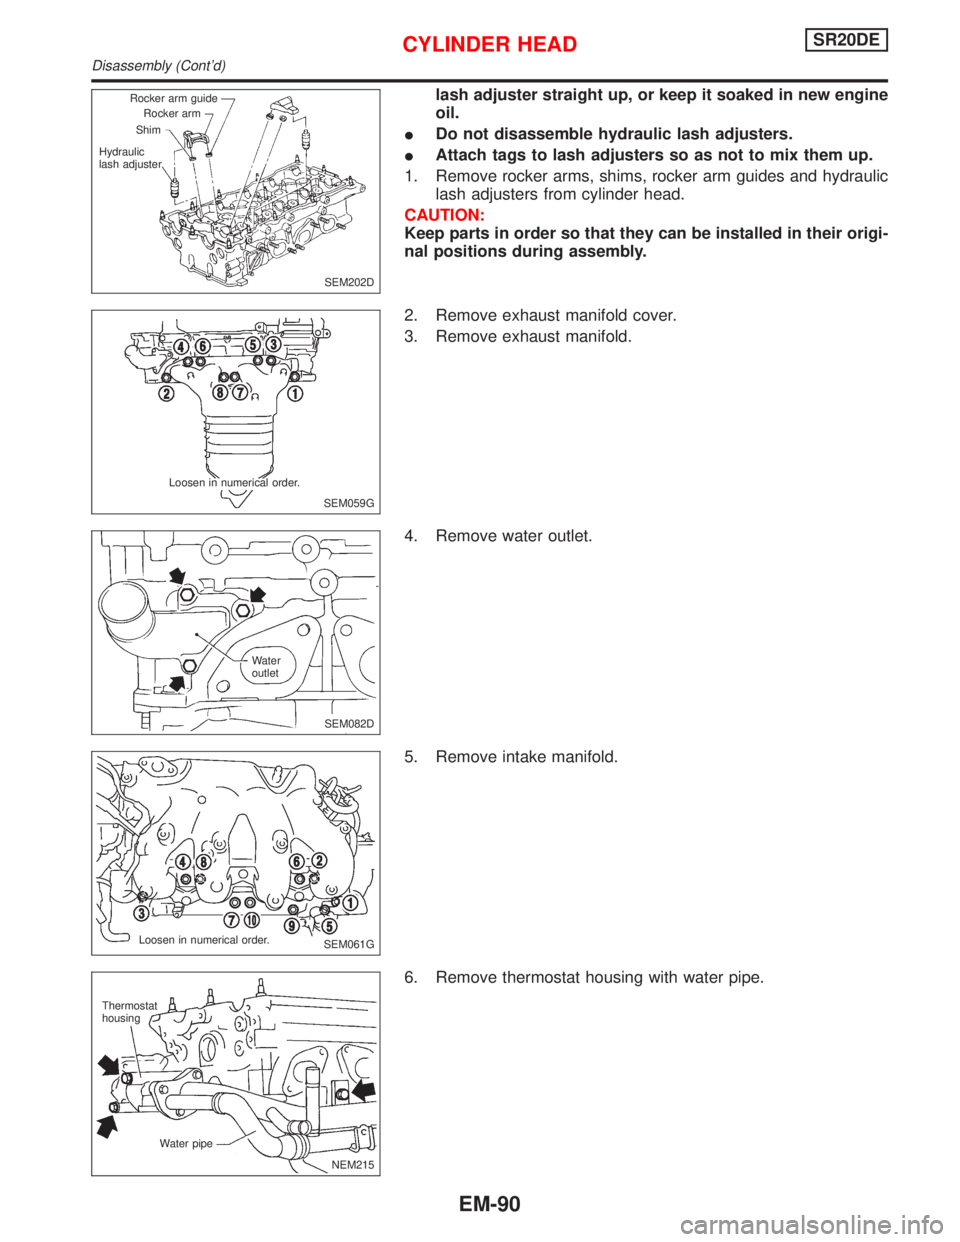
lash adjuster straight up, or keep it soaked in new engine
oil.
IDo not disassemble hydraulic lash adjusters.
IAttach tags to lash adjusters so as not to mix them up.
1. Remove rocker arms, shims, rocker arm guides and hydraulic
lash adjusters from cylinder head.
CAUTION:
Keep parts in order so that they can be installed in their origi-
nal positions during assembly.
2. Remove exhaust manifold cover.
3. Remove exhaust manifold.
4. Remove water outlet.
5. Remove intake manifold.
6. Remove thermostat housing with water pipe.
SEM202D Rocker arm guide
Rocker arm
Shim
Hydraulic
lash adjuster
SEM059G Loosen in numerical order.
.SEM082D Water
outlet
SEM061G Loosen in numerical order.
NEM215 Water pipe Thermostat
housing
CYLINDER HEADSR20DE
Disassembly (Cont'd)
EM-90