OPEL FRONTERA 1998 Workshop Manual
FRONTERA 1998
OPEL
OPEL
https://www.carmanualsonline.info/img/37/57409/w960_57409-0.png
OPEL FRONTERA 1998 Workshop Manual
Trending: door lock, fuse diagram, wheel, roof, tire type, pressure relief, instrument panel
Page 771 of 6000
4D2–4
TRANSFER CASE (TOD)
3. Tighten the transfer case bolts (see the figure below).
Torque : 46 Nꞏm (4.7 kgꞏm/34 lb ft)
261RW004–1
4. Tighten the propeller shaft bolts.
Torque : 63 Nꞏm (6.4 kgꞏm/46 lb ft)
Page 772 of 6000
4D2–5 TRANSFER CASE (TOD)
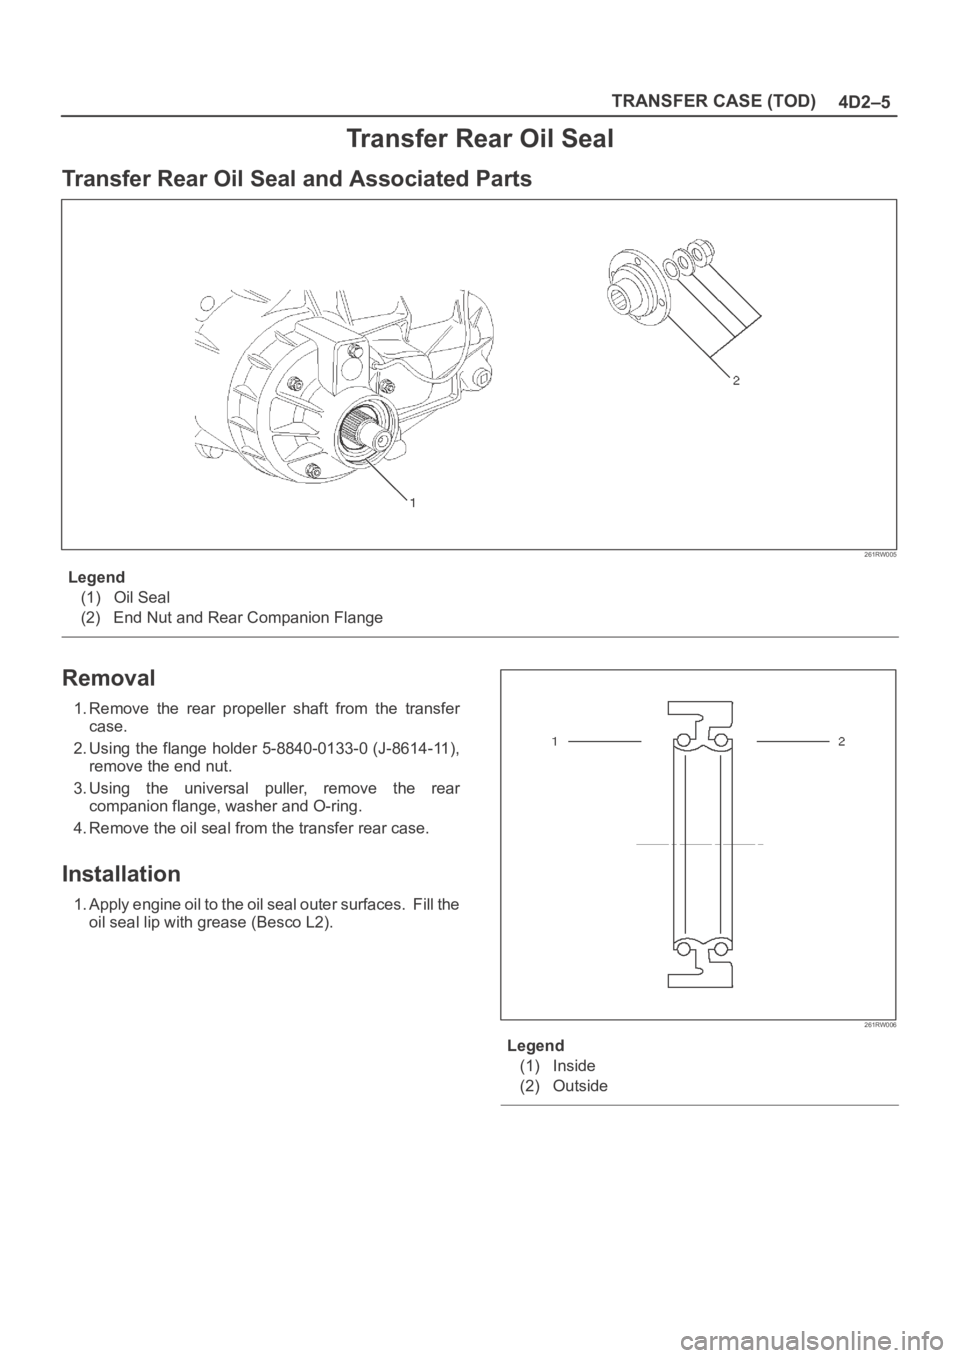
Transfer Rear Oil Seal
Transfer Rear Oil Seal and Associated Parts
261RW005
Legend
(1) Oil Seal
(2) End Nut and Rear Companion Flange
Removal
1. Remove the rear propeller shaft from the transfer
case.
2. Using the flange holder 5-8840-0133-0 (J-8614-11),
remove the end nut.
3. Using the universal puller, remove the rear
companion flange, washer and O-ring.
4. Remove the oil seal from the transfer rear case.
Installation
1. Apply engine oil to the oil seal outer surfaces. Fill the
oil seal lip with grease (Besco L2).
261RW006
Legend
(1) Inside
(2) Outside
Page 773 of 6000
4D2–6
TRANSFER CASE (TOD)
2. Using the oil seal installer 5-8840-2412-0 (J-42804),
install the oil seal.
NOTE: When installing the oil seal, pay attention to the
direction.
261RW051
Rear Output Shaft Oil Seal
Distance between the transfer case end and oil seal.
NOTE: When installing the oil seal to the specified
dimension, be careful not to damage it.
Distance : 9.85 — 10.35mm (0.39 — 0.41 in)
A04RW004
3. Mount the rear companion flange, O-ring , washer,
and nut to the transfer case in this order.
4. Using the flange holder 5-8840-0133-0 (J-8614-11),
install a new end nut.
Torque : 167 Nꞏm (17 kgꞏm /123 lb ft)
5. Using the punch 5-8840-2293-0 (J-39209), stake the
end nut at two spots.
NOTE: Check the staked end nut is free from cracks.
266RW028
260RW007
6. Install the rear propeller shaft to the transfer case and
tighten to the specified torque.
Torque : 63 Nꞏm (6.4 kgꞏm /46 lb ft)
Page 774 of 6000
4D2–7 TRANSFER CASE (TOD)
TOD ECU
Removal
1. Disconnect the ground cable.
2. Move the right-hand seat forward and remove the
second seat foot rest (1).
3. Disconnect the connector from the ECU (2).
4. Remove the bolts and detach the ECU (2) from the
bracket.
F07RW021
Installation
1. Perform the removal step in reverse order.
Page 775 of 6000

4D2–8
TRANSFER CASE (TOD)
Unit Repair
Inspection
Before disassembling and after assembling, check the
following items on the transfer connector terminals.
No.
NAMECONTENTS
1Ref . (Ref . )Rear speed sensor refer-
ence output
2Ref . (Frt . )Front speed sensor refer-
ence output
3SW GNDSW GND
44H SW (+)4H SW plus terminal
5Rer . (+)Rear speed sensor plus
6Frt . (+)Front speed sensor plus
7POWER GNDPower GND
8SOL (+)Electromagnetic solenoid
9COM (–) (Ref .)Rear speed sensor GND
10COM (–) (Frt .)Front speed sensor GND
11NC
124L SW (+)4L SW plus terminal
810RW002
4H and 4L switches
Check whether the 4H switch (terminals 4 and 7) and 4L
switch (terminals 12 and 3 ) work as specified in the table
below. If yes, the continuity is established on these
switches. If not, check the switches, shift rails, transfer
case, and rear cover, and replace the failed parts.
SHIFT POSI-
TION
PIN 4 (4 to 7)PIN 12 (3 to 12)
HIGHOFFOFF
(NEUTRAL)ONON
4LOFFON
Power GND
Check that there is a continuity between the power GND
pin (terminal 7) and transfer case. If not, replace the
grounding wire.
Resistance of electromagnetic coil
Check the resistance between electromagnetic clutch
solenoid (terminal 8) and power GND (terminal 7). If not,
replace the electromagnetic coil.
Standard : 1.4
2.0
Allowable : 1.0 5.0
Page 776 of 6000
4D2–9 TRANSFER CASE (TOD)
Transfer Case
Disassembled View
266RW004
Legend
(1) Front Companion Flange
(2) 4H and 4L Switch, Ground Cable, and Center
Connector
(3) Offset Lever(4) Spring Pin
(5) Transfer Case Assembly
(6) Transfer Cover Assembly
(7) Rear Companion Flange
Disassembly
1. Remove the drain plug from the transfer case and
drain the oil.
2. Disconnect the 4H and 4L switch and ground cable.
3. Remove the clip fixing the harness.
4. Using the flange holder 5-8840-0133-0 (J-8614-11),
remove the flange nut, and remove front companion
flange.
5. Using the flange folder 5-8840-0133-0 (J-8614-11),
remove the flange nut, and remove rear companion
flange.
266RW005
Page 777 of 6000
4D2–10
TRANSFER CASE (TOD)
6. Remove the offset lever set bolt on the right side.
261RW015
7. Remove the offset lever lock spring pin.
NOTE: When removing the spring pin, note the recess
position of the pin.
261RW016
8. Remove the offset lever.
261RW017
9. Remove the sixteen bolts and detach the transfer
cover assembly from the transfer case assembly.
NOTE: When removing the transfer cover assembly, be
careful not to damage the oil seal.
Reassembly
1. Apply liquid gasket (Loctite 598 or equivalent)
uniformly to the mating face that contacts the transfer
case.
261RW023
Page 778 of 6000

4D2–11 TRANSFER CASE (TOD)
2. Tighten the sixteen bolts to the specified torque.
Torque : 31 Nꞏm (3.2 kgꞏm/23 lb ft)
3. Wind the sealing tape around the drain plug thread
and tighten the plug to the specified torque.
Torque : 25 Nꞏm (2.5 kgꞏm/18 lb ft)
4. Mount the offset lever to the transfer shift and install
the spring pin.
261RW016
5. Attach the O-ring and washer to the companion
flange.
NOTE: Securely push the O-ring to the hollow of the
companion flange, and then attach the washer.
6. Use the flange holder 5-8840-0133-0 (J-8614-11) to
tighten the flange nut.
7. Tighten the flange nut to the specified torque.
Torque : 167 Nꞏm (17.0 kgꞏm/123 lb ft)
8. Using the punch 5-8840-2293-0 (J-39209), securely
stake the flange nut at two spots.
NOTE: Check the staked flange nut is free from cracks.
266RW028
260RW007
9. Fix the harness with the clip.
10. Tighten the 4L and 4H switch to the specified torque.
Torque : 24 Nꞏm (2.4 kgꞏm/17 lb ft)
11. Fill the transfer case with ATF II or III (1.9 liters).
12. Wind the sealing tape around the filler plug thread and
tighten the plug to the specified torque.
Torque : 25 Nꞏm (2.5 kgꞏm/18 lb ft)
Page 779 of 6000
4D2–12
TRANSFER CASE (TOD)
Transfer Cover Assembly
Disassembled View
261RW007
Legend
(1) Coil Assembly
(2) Snap Ring
(3) Ball Bearing(4) Speed Gear and Tone Wheel
(5) Ball Bearing
(6) Transfer Cover Assembly
(7) Front and Rear Speed Sensors
Disassembly
1. Using snap ring pliers, remove the snap ring.
261RW047
Page 780 of 6000
4D2–13 TRANSFER CASE (TOD)
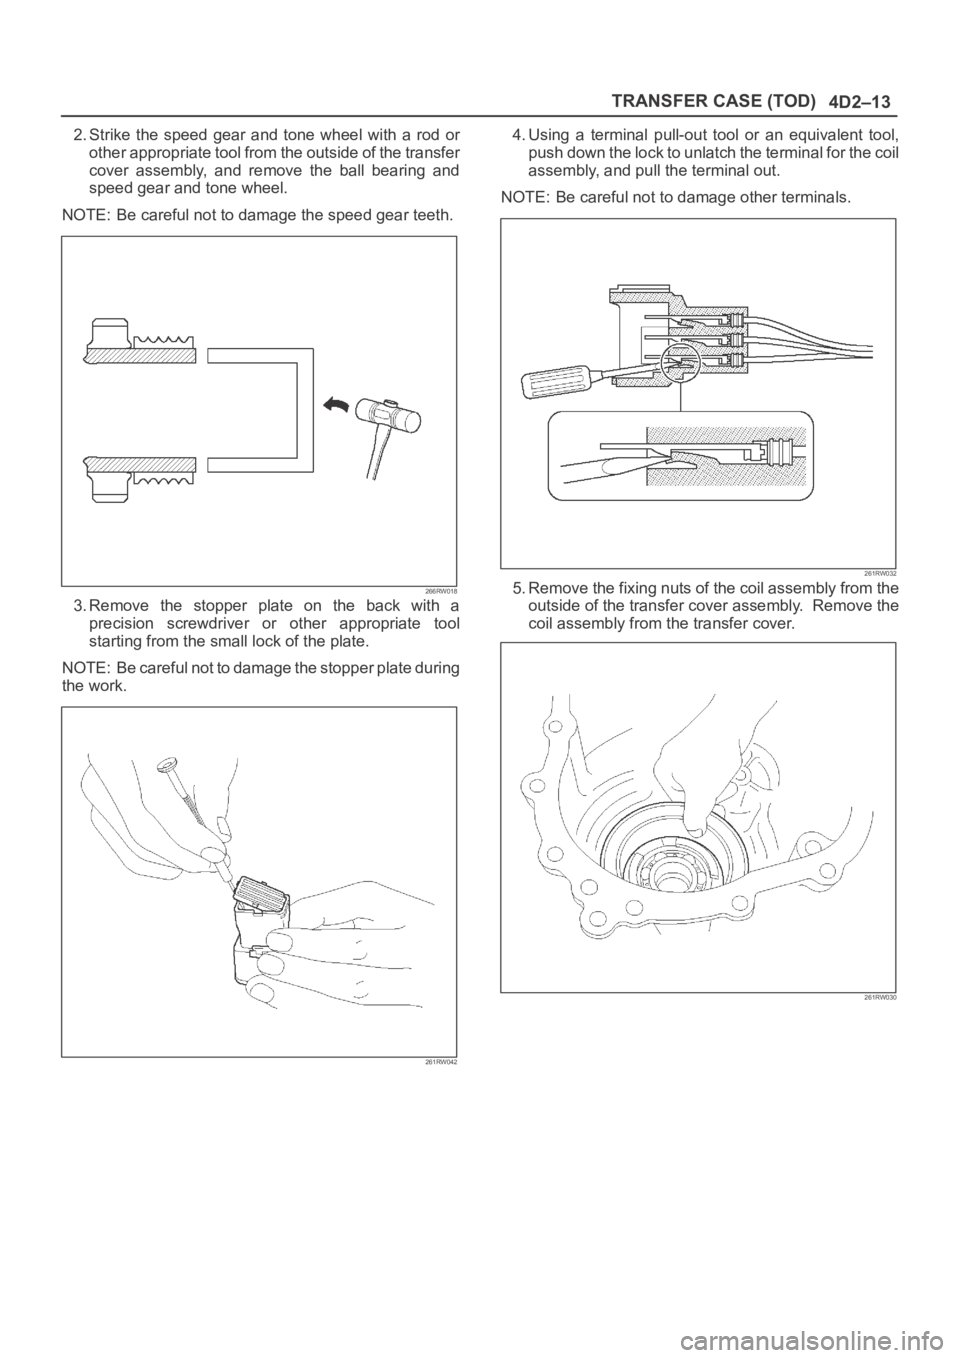
2. Strike the speed gear and tone wheel with a rod or
other appropriate tool from the outside of the transfer
cover assembly, and remove the ball bearing and
speed gear and tone wheel.
NOTE: Be careful not to damage the speed gear teeth.
266RW018
3. Remove the stopper plate on the back with a
precision screwdriver or other appropriate tool
starting from the small lock of the plate.
NOTE: Be careful not to damage the stopper plate during
the work.
261RW042
4. Using a terminal pull-out tool or an equivalent tool,
push down the lock to unlatch the terminal for the coil
assembly, and pull the terminal out.
NOTE: Be careful not to damage other terminals.
261RW032
5. Remove the fixing nuts of the coil assembly from the
outside of the transfer cover assembly. Remove the
coil assembly from the transfer cover.
261RW030
Trending: clock, display, immobilizer, tailgate, motor, oil reset, coolant reservoir


