ISUZU KB P190 2007 Workshop Repair Manual
Manufacturer: ISUZU, Model Year: 2007, Model line: KB P190, Model: ISUZU KB P190 2007Pages: 6020, PDF Size: 70.23 MB
Page 3941 of 6020
Automatic Transmission – 4L60E – On-vehicle Servicing Page 7C4–28
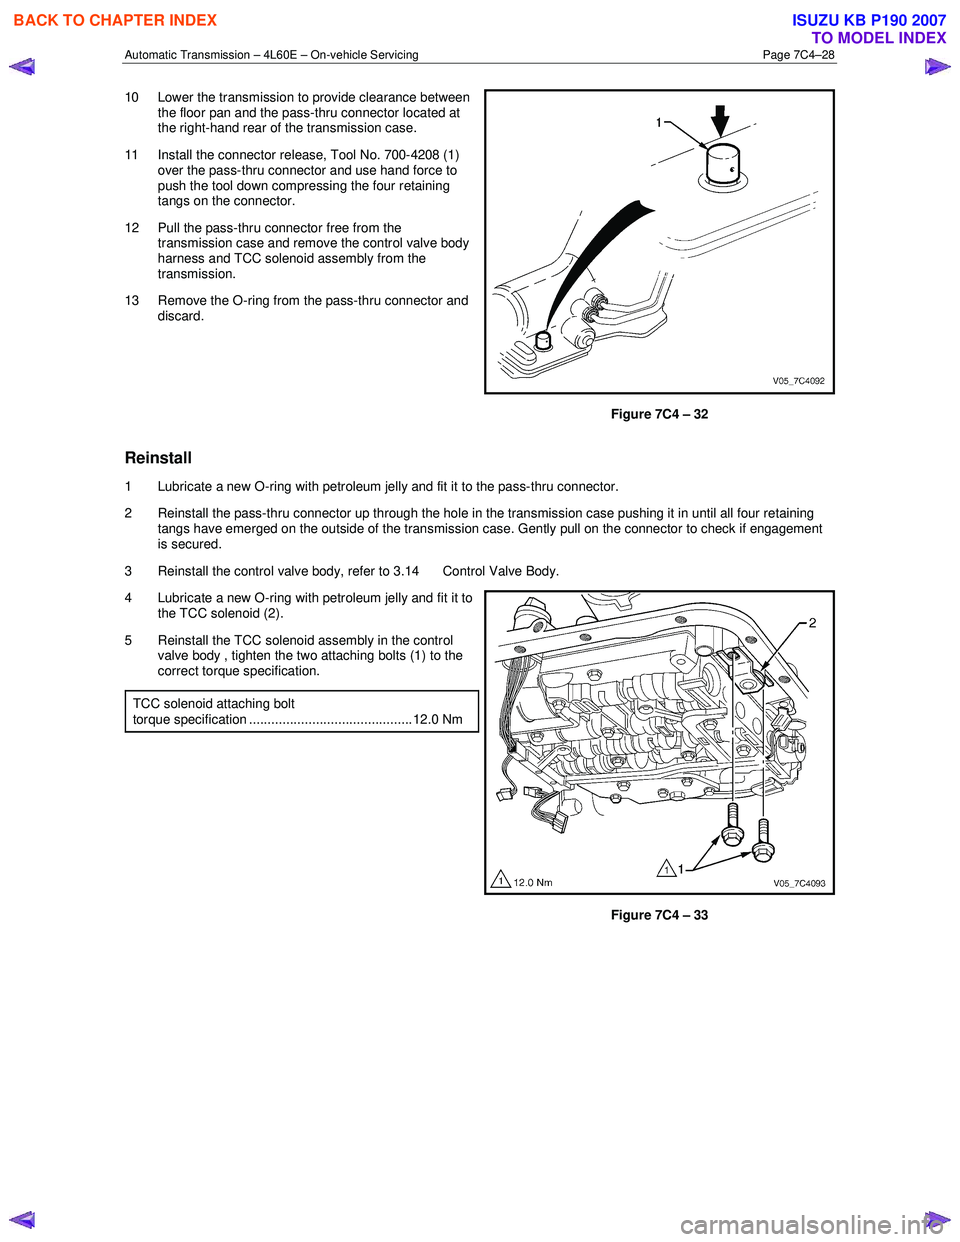
10 Lower the transmission to provide clearance between
the floor pan and the pass-thru connector located at
the right-hand rear of the transmission case.
11 Install the connector release, Tool No. 700-4208 (1) over the pass-thru connector and use hand force to
push the tool down compressing the four retaining
tangs on the connector.
12 Pull the pass-thru connector free from the transmission case and remove the control valve body
harness and TCC solenoid assembly from the
transmission.
13 Remove the O-ring from the pass-thru connector and discard.
Figure 7C4 – 32
Reinstall
1 Lubricate a new O-ring with petroleum jelly and fit it to the pass-thru connector.
2 Reinstall the pass-thru connector up through the hole in the transmission case pushing it in until all four retaining tangs have emerged on the outside of the transmission case. Gently pull on the connector to check if engagement
is secured.
3 Reinstall the control valve body, refer to 3.14 Control Valve Body.
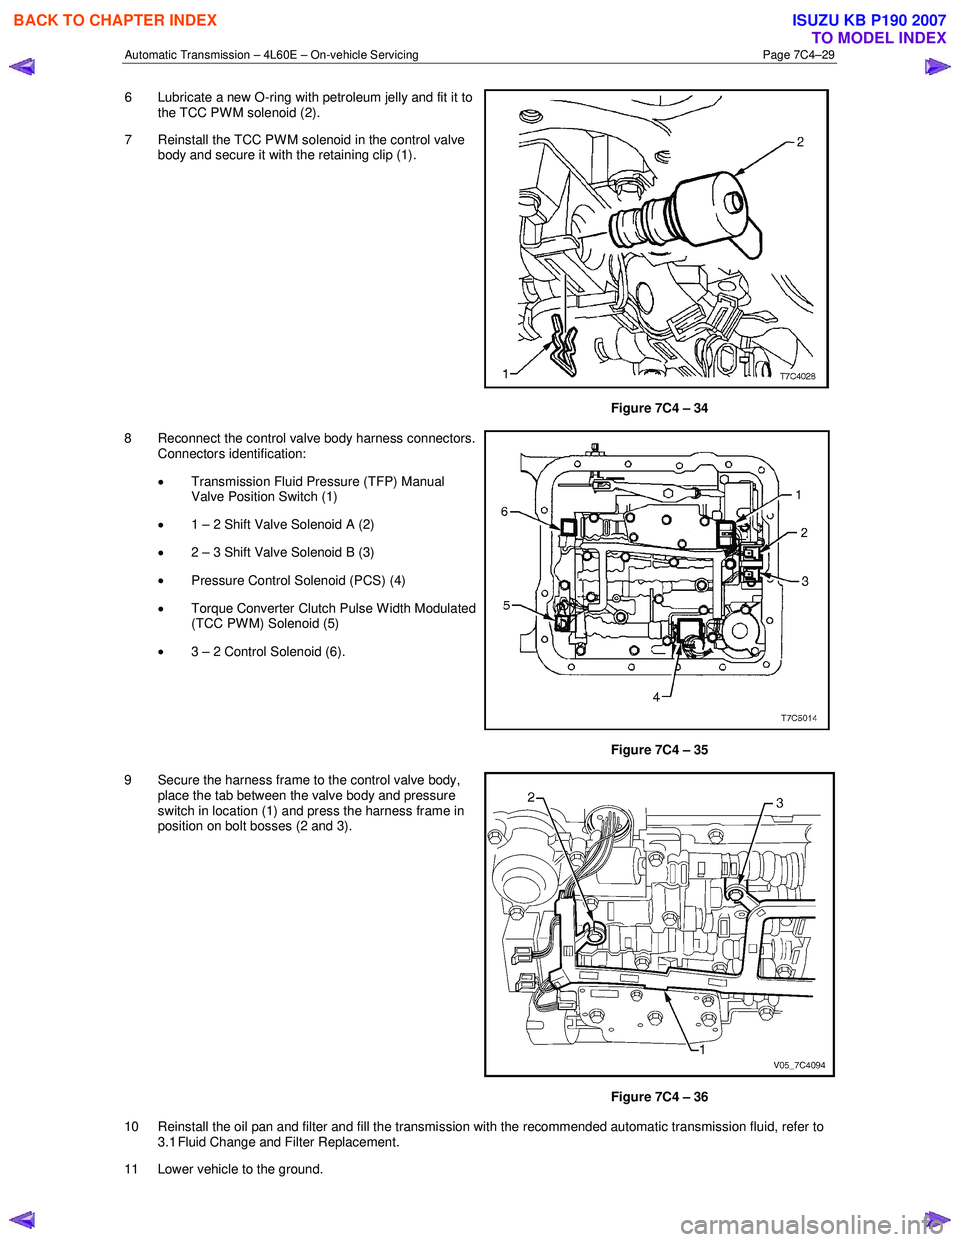
4 Lubricate a new O-ring with petroleum jelly and fit it to the TCC solenoid (2).
5 Reinstall the TCC solenoid assembly in the control valve body , tighten the two attaching bolts (1) to the
correct torque specification.
TCC solenoid attaching bolt
torque specification ............................................ 12.0 Nm
Figure 7C4 – 33
BACK TO CHAPTER INDEX
TO MODEL INDEX
ISUZU KB P190 2007
Page 3942 of 6020
Automatic Transmission – 4L60E – On-vehicle Servicing Page 7C4–29
6 Lubricate a new O-ring with petroleum jelly and fit it to
the TCC PW M solenoid (2).
7 Reinstall the TCC PWM solenoid in the control valve body and secure it with the retaining clip (1).
Figure 7C4 – 34
8 Reconnect the control valve body harness connectors. Connectors identification:
• Transmission Fluid Pressure (TFP) Manual
Valve Position Switch (1)
• 1 – 2 Shift Valve Solenoid A (2)
• 2 – 3 Shift Valve Solenoid B (3)
• Pressure Control Solenoid (PCS) (4)
• Torque Converter Clutch Pulse W idth Modulated
(TCC PWM) Solenoid (5)
• 3 – 2 Control Solenoid (6).
Figure 7C4 – 35
9 Secure the harness frame to the control valve body, place the tab between the valve body and pressure
switch in location (1) and press the harness frame in
position on bolt bosses (2 and 3).
Figure 7C4 – 36
10 Reinstall the oil pan and filter and fill the transmission with the recommended automatic transmission fluid, refer to 3.1 Fluid Change and Filter Replacement.
11 Lower vehicle to the ground.
BACK TO CHAPTER INDEX
TO MODEL INDEX
ISUZU KB P190 2007
Page 3943 of 6020
Automatic Transmission – 4L60E – On-vehicle Servicing Page 7C4–30
12 Road test until the transmission has reached operating temperature. Re-check the fluid level and for any fluid leaks
from the oil pan area, refer to 2.1 Transmission Fluid.
3.14 Control Valve Body
Remove
1 Partially remove the control valve body harness until it hangs from the pass-thru connector, refer to
3.13 Control Valve Body Harness.
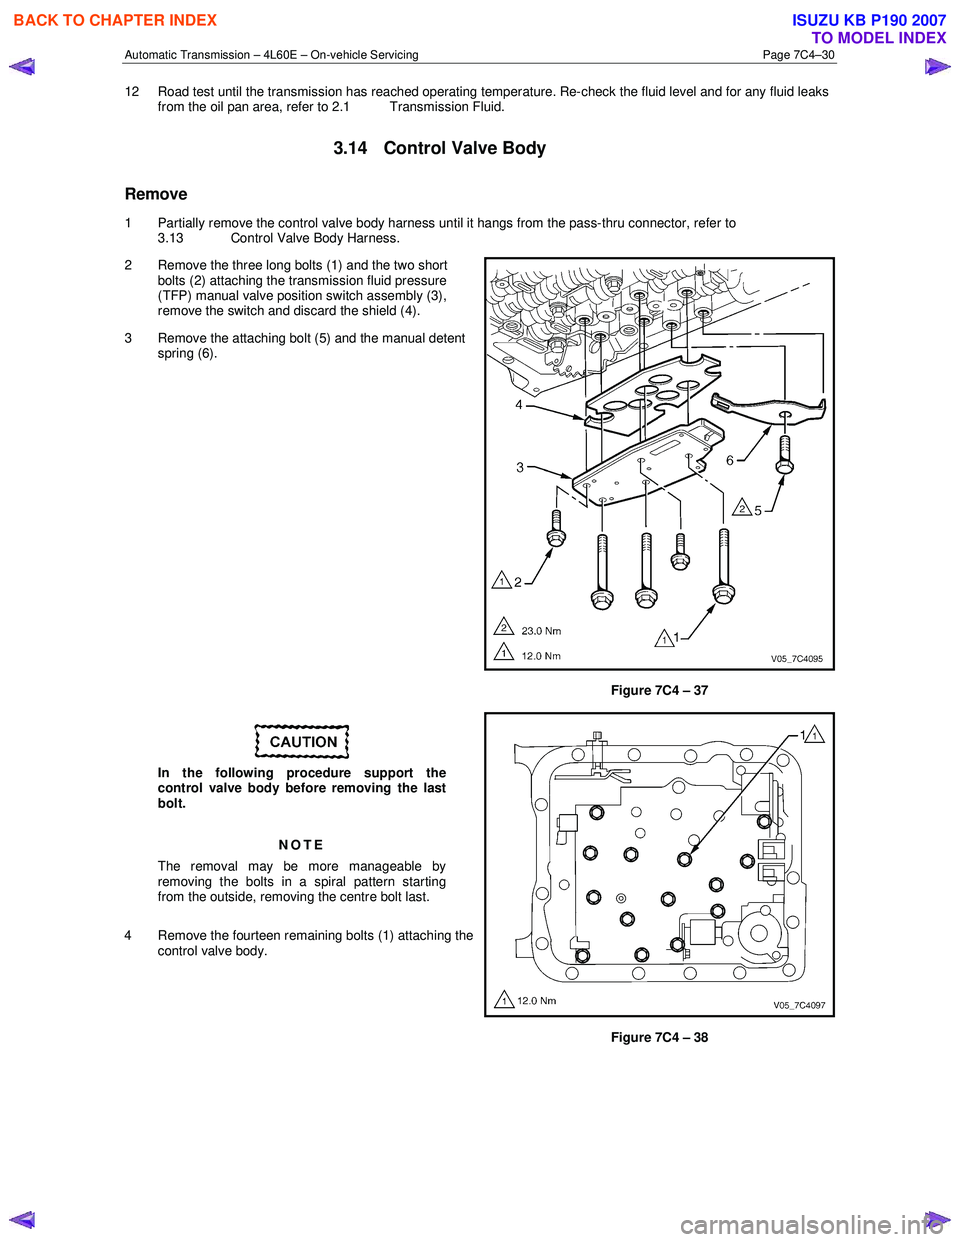
2 Remove the three long bolts (1) and the two short bolts (2) attaching the transmission fluid pressure
(TFP) manual valve position switch assembly (3),
remove the switch and discard the shield (4).
3 Remove the attaching bolt (5) and the manual detent spring (6).
Figure 7C4 – 37
In the following procedure support the
control valve body before removing the last
bolt.
NOTE
The removal may be more manageable by
removing the bolts in a spiral pattern starting
from the outside, removing the centre bolt last.
4 Remove the fourteen remaining bolts (1) attaching the control valve body.
Figure 7C4 – 38
BACK TO CHAPTER INDEX
TO MODEL INDEX
ISUZU KB P190 2007
Page 3944 of 6020
Automatic Transmission – 4L60E – On-vehicle Servicing Page 7C4–31
Keep the control valve body level when
lowering it to prevent the loss of the
checkballs located in the body passages.
5 Carefully lower the control valve body (1) from the transmission case. As the valve body is being lowered,
rotate it slightly to disconnect the manual valve link (2)
from the manual valve (3) and remove the control
valve body.
6 Remove the manual valve link from the inner detent lever (4).
Figure 7C4 – 39
Reinstall
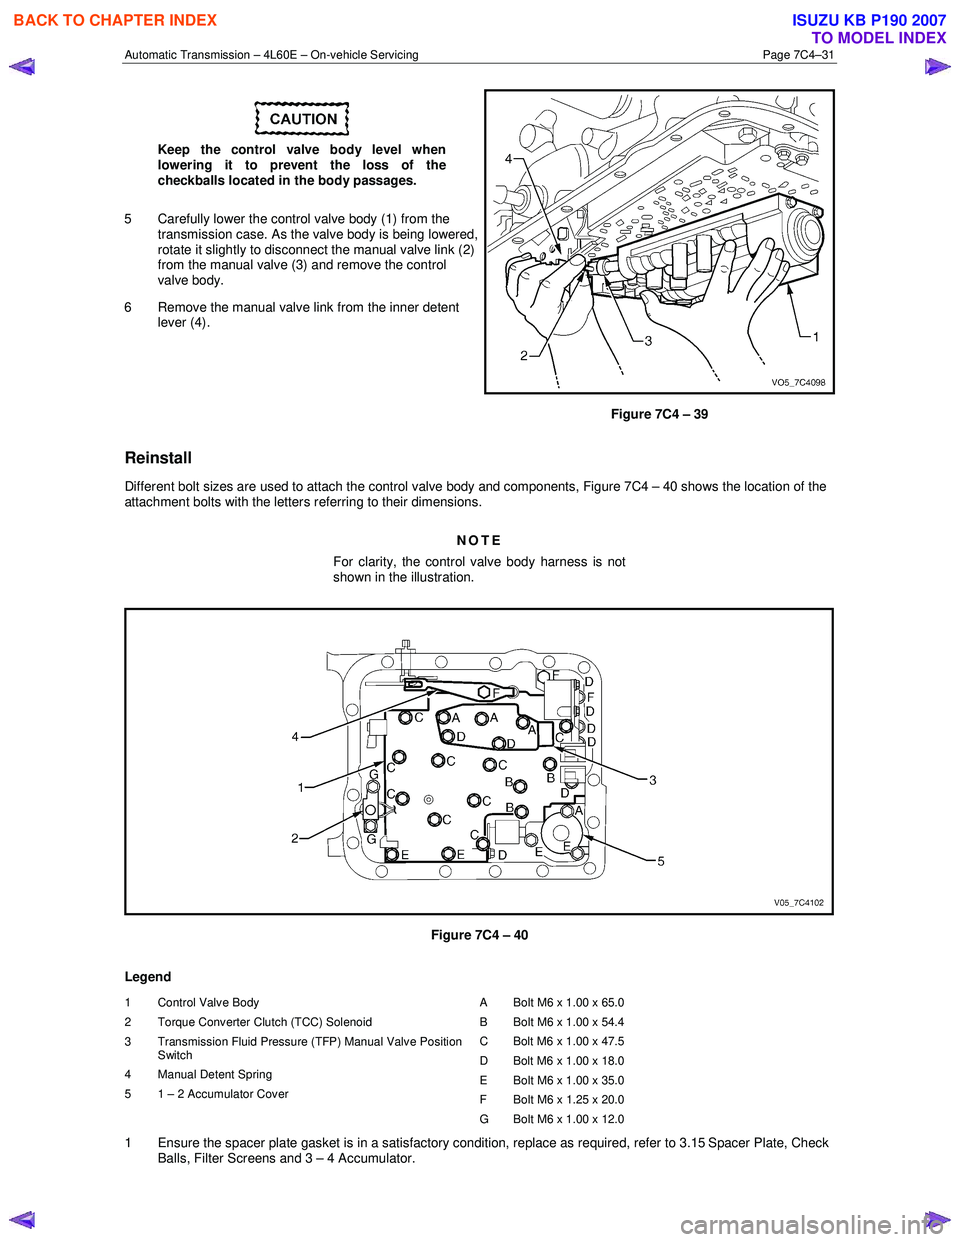
Different bolt sizes are used to attach the control valve body and components, Figure 7C4 – 40 shows the location of the
attachment bolts with the letters referring to their dimensions.
NOTE
For clarity, the control valve body harness is not
shown in the illustration.
Figure 7C4 – 40
Legend
1 Control Valve Body
2 Torque Converter Clutch (TCC) Solenoid
3 Transmission Fluid Pressure (TFP) Manual Valve Position Switch
4 Manual Detent Spring
5 1 – 2 Accumulator Cover A Bolt M6 x 1.00 x 65.0
B Bolt M6 x 1.00 x 54.4
C Bolt M6 x 1.00 x 47.5
D Bolt M6 x 1.00 x 18.0
E Bolt M6 x 1.00 x 35.0
F Bolt M6 x 1.25 x 20.0
G Bolt M6 x 1.00 x 12.0
1 Ensure the spacer plate gasket is in a satisfactory condition, replace as required, refer to 3.15 Spacer Plate, Check Balls, Filter Screens and 3 – 4 Accumulator.
BACK TO CHAPTER INDEX
TO MODEL INDEX
ISUZU KB P190 2007
Page 3945 of 6020
Automatic Transmission – 4L60E – On-vehicle Servicing Page 7C4–32
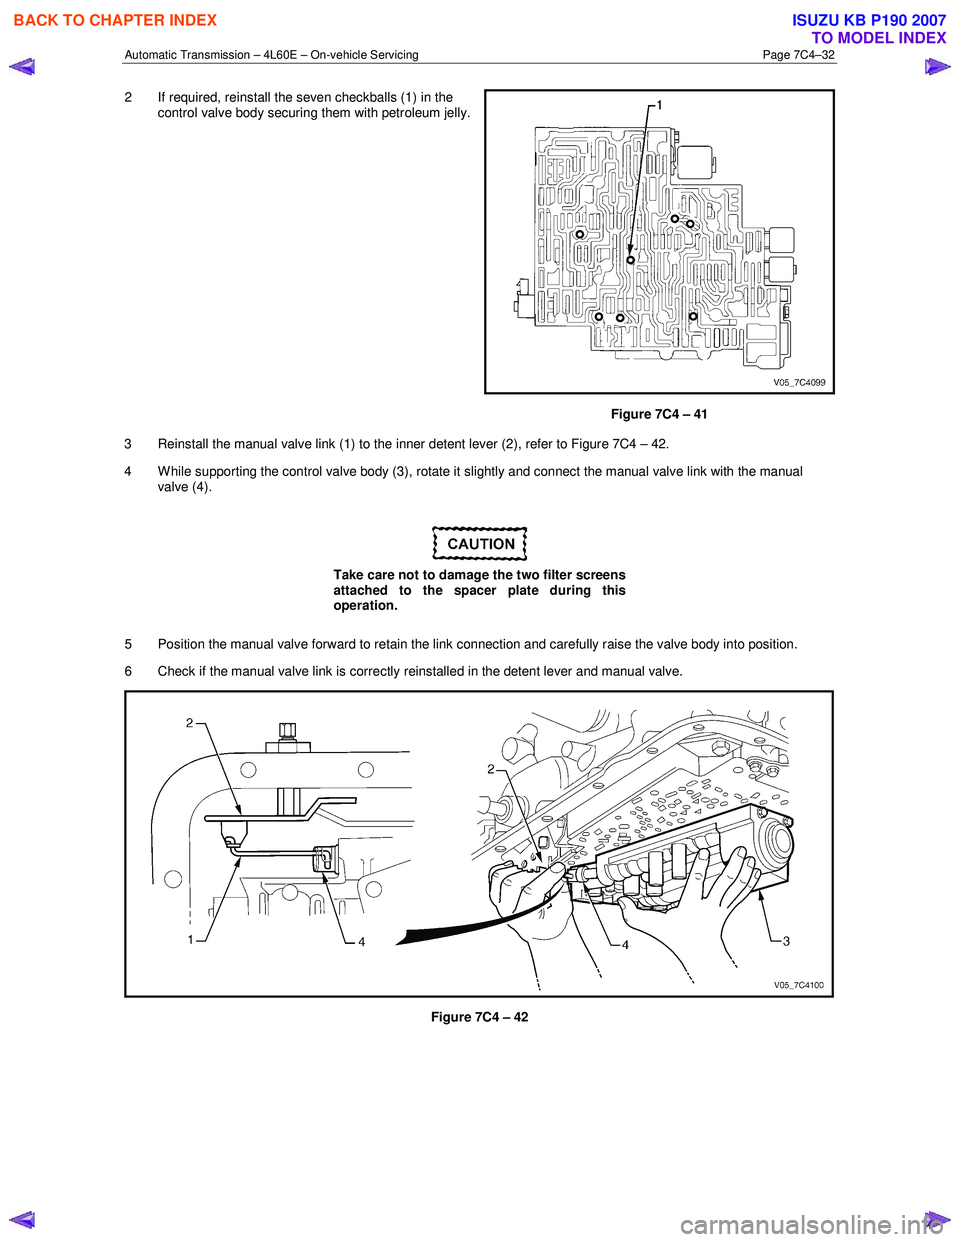
2 If required, reinstall the seven checkballs (1) in the
control valve body securing them with petroleum jelly.
Figure 7C4 – 41
3 Reinstall the manual valve link (1) to the inner detent lever (2), refer to Figure 7C4 – 42.
4 W hile supporting the control valve body (3), rotate it slightly and connect the manual valve link with the manual valve (4).
Take care not to damage the two filter screens
attached to the spacer plate during this
operation.
5 Position the manual valve forward to retain the link connection and carefully raise the valve body into position.
6 Check if the manual valve link is correctly reinstalled in the detent lever and manual valve.
Figure 7C4 – 42
BACK TO CHAPTER INDEX
TO MODEL INDEX
ISUZU KB P190 2007
Page 3946 of 6020
Automatic Transmission – 4L60E – On-vehicle Servicing Page 7C4–33
When reinstalling the bolts throughout this
procedure, ensure to use the correct bolt
dimension in each location.
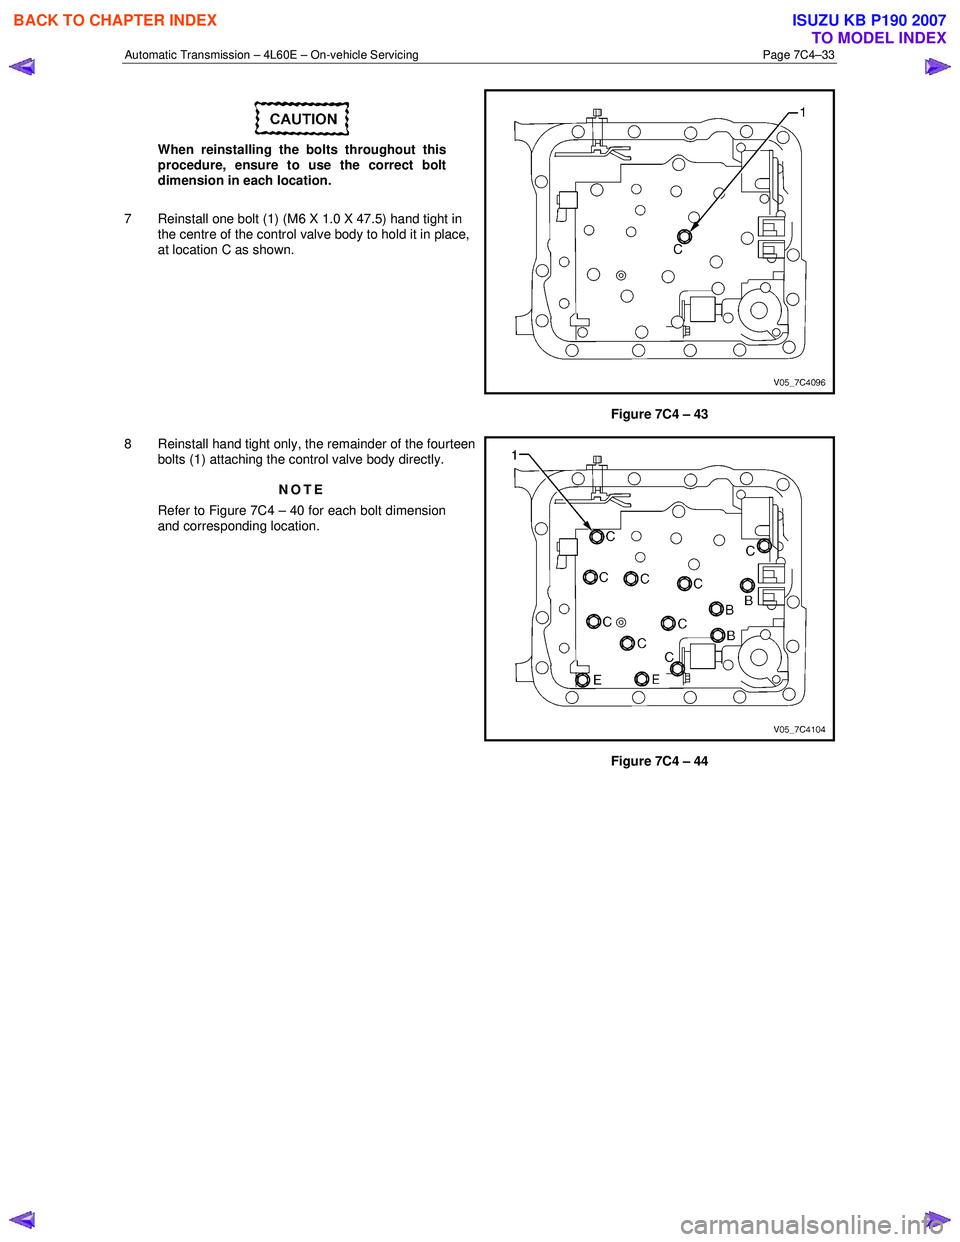
7 Reinstall one bolt (1) (M6 X 1.0 X 47.5) hand tight in the centre of the control valve body to hold it in place,
at location C as shown.
Figure 7C4 – 43
8 Reinstall hand tight only, the remainder of the fourteen bolts (1) attaching the control valve body directly.
NOTE
Refer to Figure 7C4 – 40 for each bolt dimension
and corresponding location.
Figure 7C4 – 44
BACK TO CHAPTER INDEX
TO MODEL INDEX
ISUZU KB P190 2007
Page 3947 of 6020
Automatic Transmission – 4L60E – On-vehicle Servicing Page 7C4–34
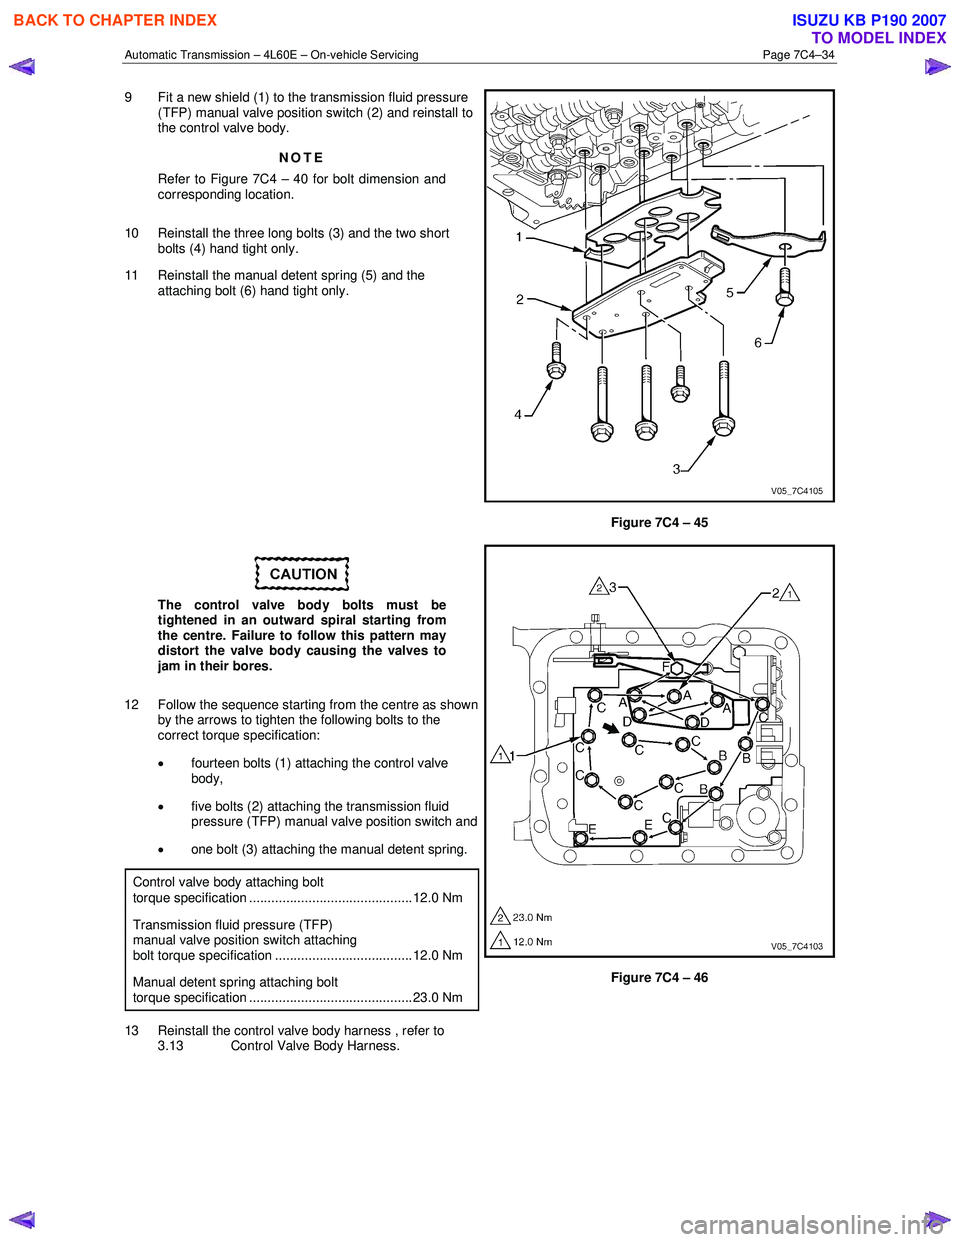
9 Fit a new shield (1) to the transmission fluid pressure
(TFP) manual valve position switch (2) and reinstall to
the control valve body.
NOTE
Refer to Figure 7C4 – 40 for bolt dimension and
corresponding location.
10 Reinstall the three long bolts (3) and the two short bolts (4) hand tight only.
11 Reinstall the manual detent spring (5) and the attaching bolt (6) hand tight only.
Figure 7C4 – 45
The control valve body bolts must be
tightened in an outward spiral starting from
the centre. Failure to follow this pattern may
distort the valve body causing the valves to
jam in their bores.
12 Follow the sequence starting from the centre as shown by the arrows to tighten the following bolts to the
correct torque specification:
• fourteen bolts (1) attaching the control valve
body,
• five bolts (2) attaching the transmission fluid
pressure (TFP) manual valve position switch and
• one bolt (3) attaching the manual detent spring.
Control valve body attaching bolt
torque specification ............................................ 12.0 Nm
Transmission fluid pressure (TFP) manual valve position switch attaching bolt torque specification ..................................... 12.0 Nm
Manual detent spring attaching bolt torque specification ............................................ 23.0 Nm
13 Reinstall the control valve body harness , refer to 3.13 Control Valve Body Harness.
Figure 7C4 – 46
BACK TO CHAPTER INDEX
TO MODEL INDEX
ISUZU KB P190 2007
Page 3948 of 6020
Automatic Transmission – 4L60E – On-vehicle Servicing Page 7C4–35
3.15 Spacer Plate, Check Balls, Filter Screens
and 3 – 4 Accumulator
Remove
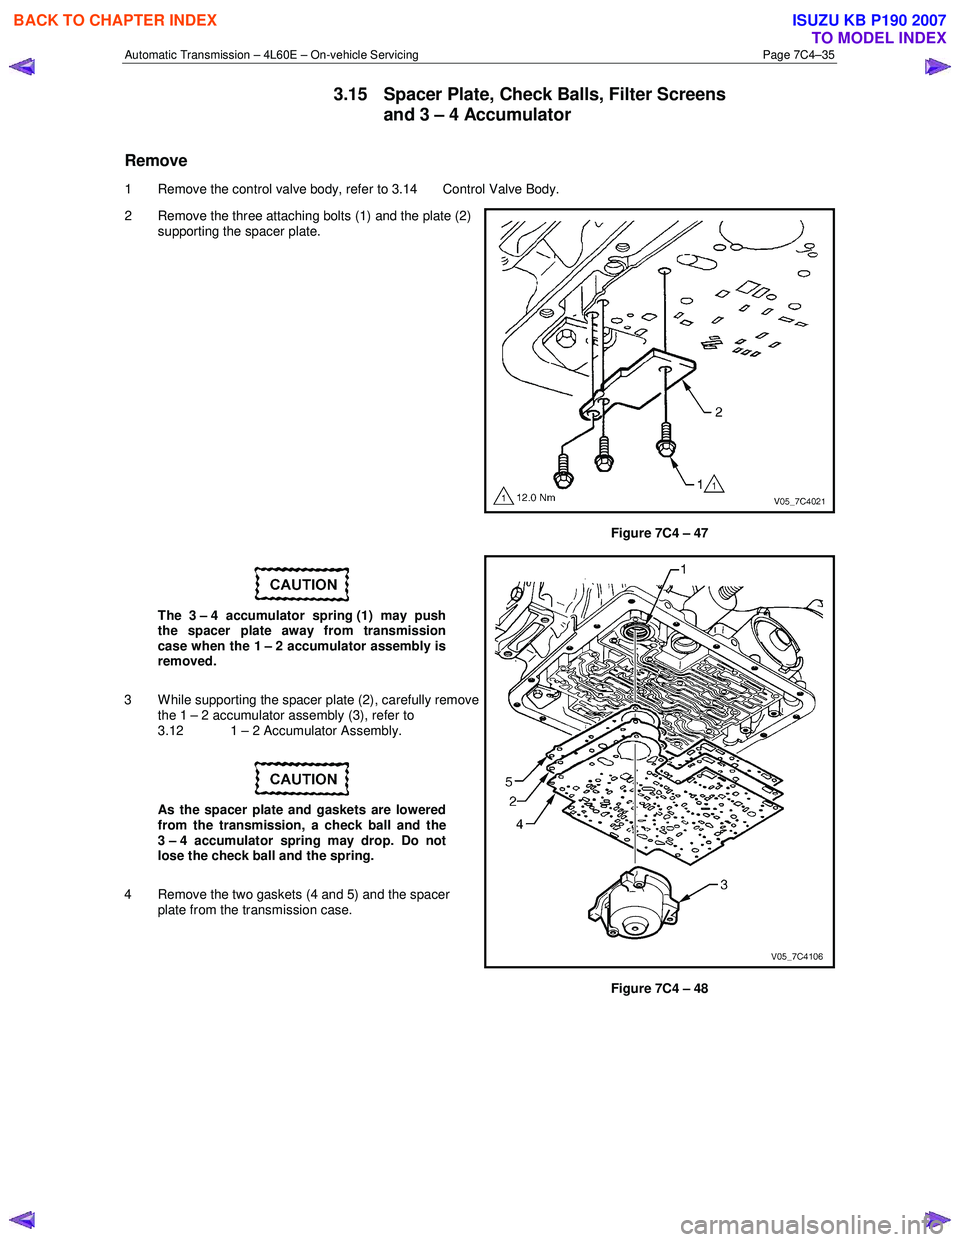
1 Remove the control valve body, refer to 3.14 Control Valve Body.
2 Remove the three attaching bolts (1) and the plate (2) supporting the spacer plate.
Figure 7C4 – 47
The 3 – 4 accumulator spring (1) may push
the spacer plate away from transmission
case when the 1 – 2 accumulator assembly is
removed.
3 W hile supporting the spacer plate (2), carefully remove the 1 – 2 accumulator assembly (3), refer to
3.12 1 – 2 Accumulator Assembly.
As the spacer plate and gaskets are lowered
from the transmission, a check ball and the
3 – 4 accumulator spring may drop. Do not
lose the check ball and the spring.
4 Remove the two gaskets (4 and 5) and the spacer plate from the transmission case.
Figure 7C4 – 48
BACK TO CHAPTER INDEX
TO MODEL INDEX
ISUZU KB P190 2007
Page 3949 of 6020
Automatic Transmission – 4L60E – On-vehicle Servicing Page 7C4–36
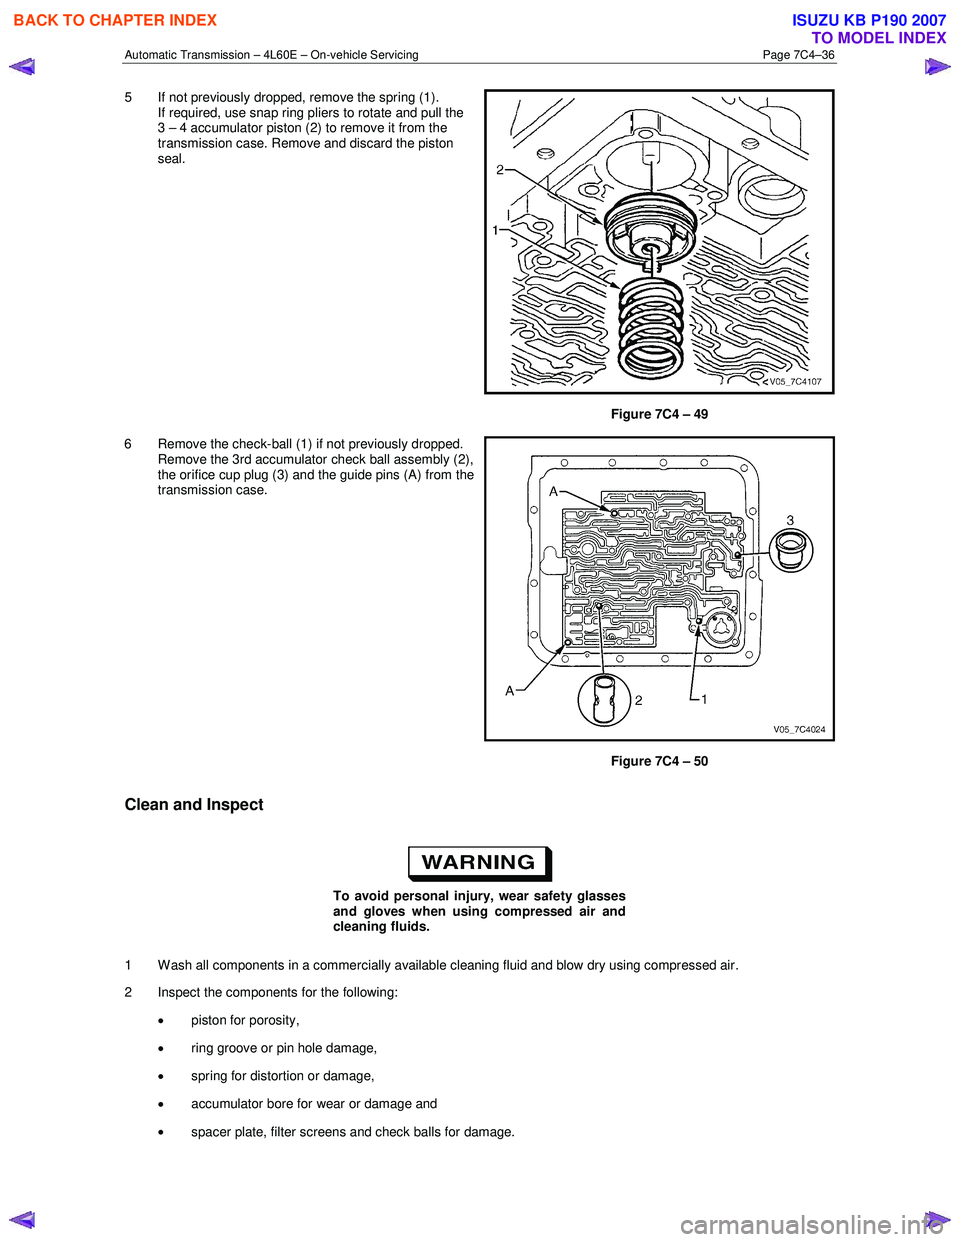
5 If not previously dropped, remove the spring (1).
If required, use snap ring pliers to rotate and pull the
3 – 4 accumulator piston (2) to remove it from the
transmission case. Remove and discard the piston
seal.
Figure 7C4 – 49
6 Remove the check-ball (1) if not previously dropped. Remove the 3rd accumulator check ball assembly (2),
the orifice cup plug (3) and the guide pins (A) from the
transmission case.
Figure 7C4 – 50
Clean and Inspect
To avoid personal injury, wear safety glasses
and gloves when using compressed air and
cleaning fluids.
1 W ash all components in a commercially available cleaning fluid and blow dry using compressed air.
2 Inspect the components for the following:
• piston for porosity,
• ring groove or pin hole damage,
• spring for distortion or damage,
• accumulator bore for wear or damage and
• spacer plate, filter screens and check balls for damage.
BACK TO CHAPTER INDEX
TO MODEL INDEX
ISUZU KB P190 2007
Page 3950 of 6020
Automatic Transmission – 4L60E – On-vehicle Servicing Page 7C4–37
Reinstall
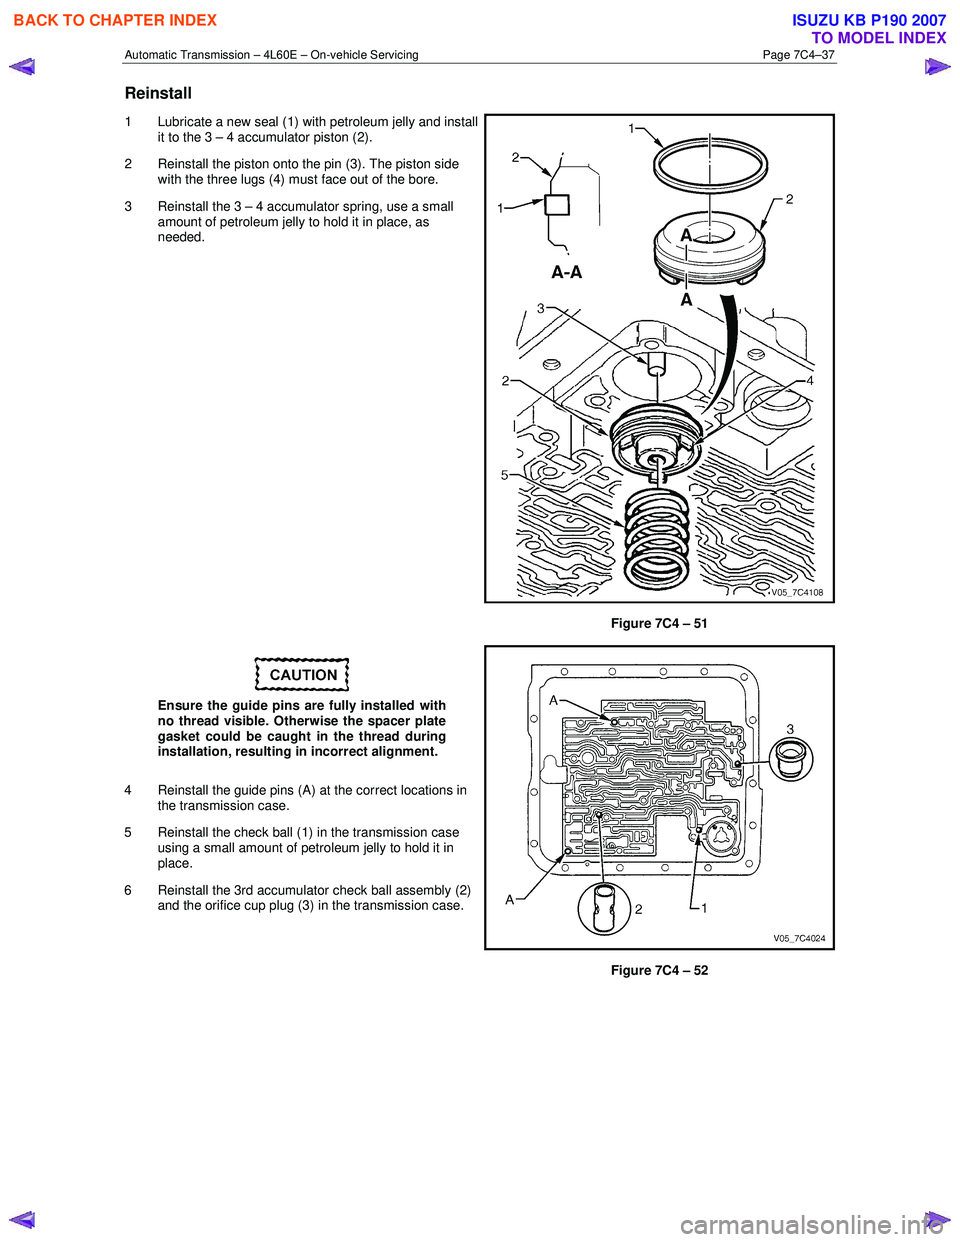
1 Lubricate a new seal (1) with petroleum jelly and install
it to the 3 – 4 accumulator piston (2).
2 Reinstall the piston onto the pin (3). The piston side with the three lugs (4) must face out of the bore.
3 Reinstall the 3 – 4 accumulator spring, use a small amount of petroleum jelly to hold it in place, as
needed.
Figure 7C4 – 51
Ensure the guide pins are fully installed with
no thread visible. Otherwise the spacer plate
gasket could be caught in the thread during
installation, resulting in incorrect alignment.
4 Reinstall the guide pins (A) at the correct locations in the transmission case.
5 Reinstall the check ball (1) in the transmission case using a small amount of petroleum jelly to hold it in
place.
6 Reinstall the 3rd accumulator check ball assembly (2) and the orifice cup plug (3) in the transmission case.
Figure 7C4 – 52
BACK TO CHAPTER INDEX
TO MODEL INDEX
ISUZU KB P190 2007