MAZDA 626 1987 Workshop Manual
Manufacturer: MAZDA, Model Year: 1987, Model line: 626, Model: MAZDA 626 1987Pages: 1865, PDF Size: 94.35 MB
Page 121 of 1865

ASSEMBLY (AUXILIARY PARTS) 1 A
86U01X-171
76G01A-090
76G01A-091
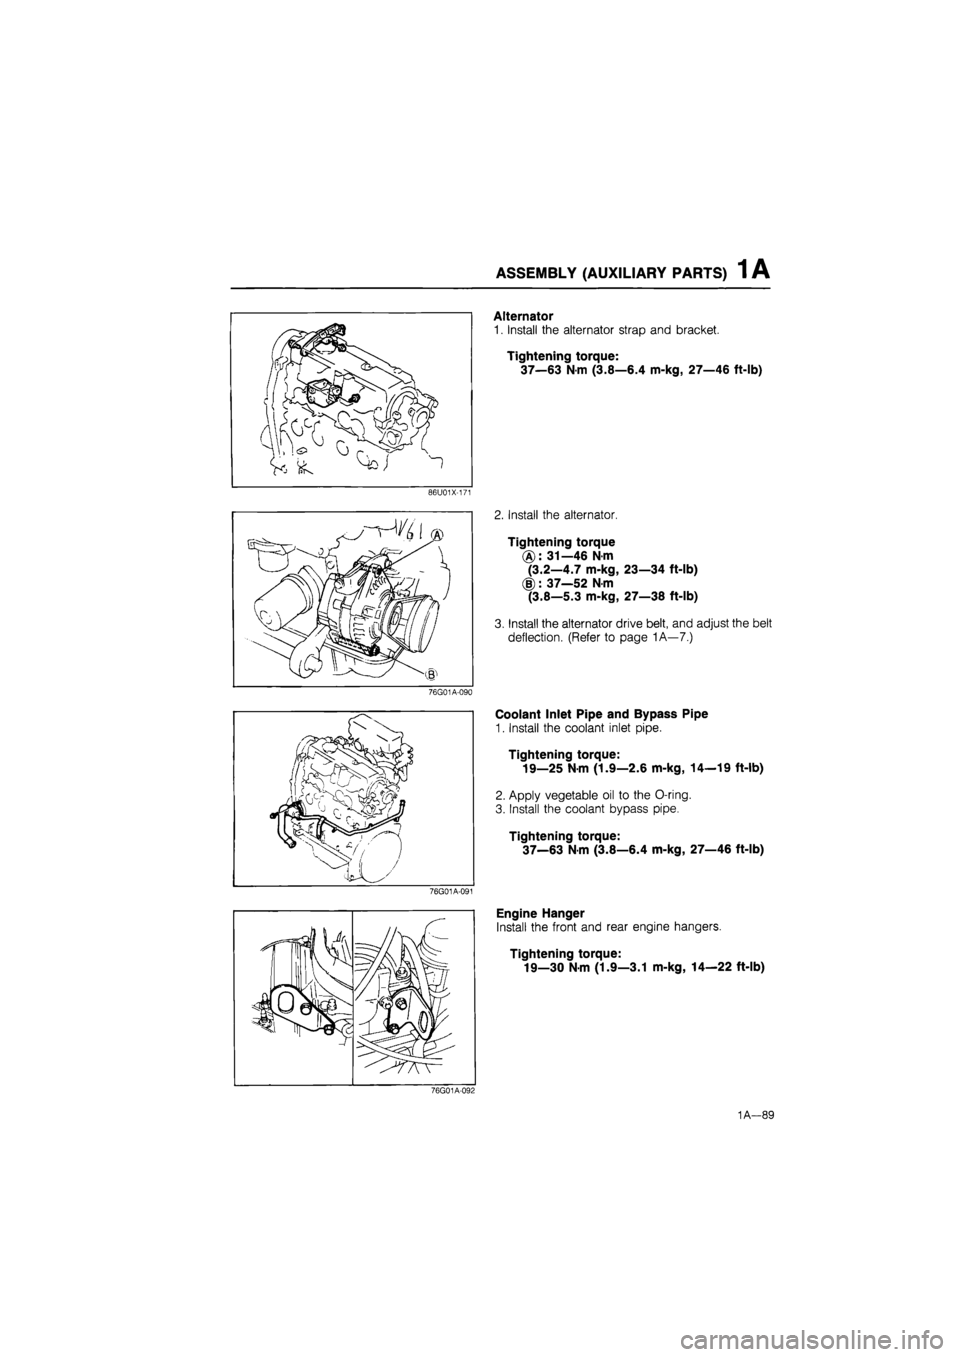
Alternator
1. Install the alternator strap and bracket.
Tightening torque:
37—63 Nm (3.8—6.4 m-kg, 27—46 ft-lb)
2. Install the alternator.
Tightening torque
(A): 31—46 Nm
(3.2—4.7 m-kg, 23—34 ft-lb)
(§): 37—52 N-m
(3.8—5.3 m-kg, 27—38 ft-lb)
3. Install the alternator drive belt, and adjust the belt
deflection. (Refer to page 1A—7.)
Coolant Inlet Pipe and Bypass Pipe
1. Install the coolant inlet pipe.
Tightening torque:
19—25 N-m (1.9—2.6 m-kg, 14—19 ft-lb)
2. Apply vegetable oil to the O-ring.
3. Install the coolant bypass pipe.
Tightening torque:
37—63
N
m (3.8—6.4 m-kg, 27—46 ft-lb)
Engine Hanger
Install the front and rear engine hangers.
Tightening torque:
19—30 N-m (1.9—3.1 m-kg, 14—22 ft-lb)
76G01A-092
1A—89
Page 122 of 1865

1 A ASSEMBLY (AUXILIARY PARTS)
76G01A-093
76G01A-094
76G01A-095
Exhaust Manifold Assembly
1. Place the new gaskets in position with the ridge
facing the cylinder head.
2. Install the exhaust manifold assembly.
3. Tighten the nuts in two or three steps.
Tightening torque:
34—49
N
m (3.5—5.0 m-kg, 25—36 ft-lb)
Exhaust Manifold Insulator
Install the exhaust manifold insulator.
Tightening torque:
19—30
N
m (1.9—3.1 m-kg, 14—22 ft-lb)
EGR Pipe
Install the EGR pipe.
Tightening torque:
34—44 Nm (3.5—4.5 m-kg, 25—33 ft-lb)
Secondary Air Pipe Assembly
Install the secondary air pipe assembly.
Tightening torque:
16—23 Nm (1.6—2.3 m-kg, 12—17 ft-lb)
P/S Oil Pump Bracket
Install the P/S oil pump bracket.
Tightening torque:
37—63 Nm (3.8—6.4 m-kg, 27—46 ft-lb)
86U01X-178
1A—90
Page 123 of 1865

INSTALLATION 1A
INSTALLATION
TRANSAXLE ASSEMBLY
Assemble the transaxle to the engine in the sequence shown in the figure referring to the installation note.
37—52 N-m (3.8—5.3 m-kg, 27—38 ft-lb)
8—11 N-m (80-110 cm-kg, 69-95 In-lb) (2)
37—52 N-m (3.8—5.3 m-kg, 27—38 ft-lb) (3.) B9—117 N-m (9.1—11.9 m-kg, 66—86 ft-lb)
76G01A-143
1. Transaxle
2. Clutch under cover
3. Gusset plate
4. Starter
Installation Note
Clutch under cover
Before installation, fill the notches with silicon as
shown in the figure.
76G01A-096
1A—91
Page 124 of 1865

1A INSTALLATION
ENGINE INSTALLATION
Install the engine and transaxle assembly.
Warning: Be sure the vehicle is securely supported.
Torque Specifications
16—27 N-m (1.6—2.8 m-kg, 12—20 ft-lb)
.OT-
9
85—117 N-m (6.7-11.9 m-kg, 63—86 ft-lb)
8—11 N-m (80—110 cm-kg, 69—95 In-lb)
44—64 N-m I (4.5—6.5 m-kg,
_
33-47 ft-lb)
16—27 N-m (1.6—2.8 m-kg, 12—20 ft-lb)
/ 64—89 N-m (6.5—9.1 m-kg, 47—66 ft-lb)
37—52 N-m (3.8—5.3 m-kg, 27—38 ft-lb)
31—46 N-m (3.2-4.7 m-i 23—34 ft-lb)
39—59 N-m _ (4.0—6.0 m-kg, 29—43 ft-lb)
19—25 N-m (1.9—2.6 m-kg, 14—1S ft-lb)
36-54 N-m (3.7—5.5 m-kg, 27—40 ft-lb)
16—23 N-m (1.6—2.3 m-kg, 12—17 ft-lb)
5—7 N-m (50—70 cm-kg, 43—61 In-lb)
-31—46 N-m (3.2—4.7 m-kg, 23—34 ft-lb)
9—13 N m (90—130 cm-kg, 78—113 ft-lb)
29—44 N-m (3.0—4.5 m-kg, 22—33 ft-lb)
8-11 N-m (80—110 cm-kg, 69—95
31—46 N-m (3.2—4.7 m-kg.
8—11 N-m (80
16—23
88—118 N-m (9.0—12.0 m-kg, 65—87 ft-lb)
43—54 N-m (4.4—5.5 m-kg, 32—40 ft-lb)
8—11 N-m (80—110 cm-kg, 69—95 In-lb)
86U01X-180
1A—92
Page 125 of 1865

INSTALLATION 1A
Engine Mount
Install the engine mount.
76G01A-096
86U01X-181
Exhaust Pipe
1. Install the exhaust pipe.
Tightening torque
31—46
N
m
(3.2—4.7 m-kg, 23—34 ft-lb)
(§): 64—89
N
m
(6.5—9.1 m-kg, 47—66 ft-lb)
2. Tighten the bracket bolt.
Tightening torque:
19—25 Nm (1.9—2.6 m-kg, 14—19 ft-lb)
Extension Bar (MTX)
Install the extension bar to the transaxle.
Tightening torque:
31—46
N
m (3.2—4.7 m-kg, 23—34 ft-lb)
Change Rod (MTX)
Install the change rod to the transaxle.
Tightening torque:
16—23 Nm (1.6—2.3 m-kg, 12—17 ft-lb)
1A—93
Page 126 of 1865

1A INSTALLATION
Driveshaft
1. Apply grease to the end of the driveshaft.
2. Install the driveshaft and a new clip.
Caution
a) When installing the driveshaft, be careful
not to damage the oil seal.
b) After installation, pull the front hub outward
to confirm that the driveshaft is securely
held by the clip.
86U01X-184
Lower Arm
Install the lower arm ball-joint to the knuckle; then tight-
en the lock nut.
Tightening torque:
43—54 N-m (4.4—5.5 m-kg, 32—40 ft-lb)
86U01X-185
Tie-Rod End
1. Install the tie-rod end to the knuckle.
Tightening torque:
29—44 N-m (3.0—4.5 m-kg, 22—33 ft-lb)
2. Install the cotter pin.
86U01X-186
Stabilizer Control Rod
Install and adjust the front stabilizer control rods.
Dimension A: 20.1 mm (0.79 in)
Tightening torque: 16—23 N-m (1.6—2.3 m-kg, 12—17 ft-lb)
Install the front wheel.
Tightening torque:
88—118
N
m (9.0—12.0 m-kg, 65—87 ft-lb)
1A—94
Page 127 of 1865

INSTALLATION 1A
86U01X-188
86U01X-189
P/S Oil Pump
1. Install the P/S oil pump.
Tightening torque:
31—46 N m (3.2—4.7 m-kg, 23—34 ft-lb)
2. Tighten the pulley lock nut.
Tightening torque:
39—59
N
m (4.0—6.0 m-kg, 29—43 ft-lb)
A/C Compressor
1. Install the A/C compressor strap to the P/S oil pump
bracket.
Tightening torque:
19—25 Nm (1.9—2.6 m-kg, 14—19 ft-lb)
2. Install the A/C compressor bracket.
Tightening torque:
37—63 Nm (3.8—6.4 m-kg, 27—46 ft-lb)
3. Install the A/C compressor.
4. Install the A/C compressor upper bracket.
Tightening torque:
37—63
N
m (3.8—6.4 m-kg, 27—46 ft-lb)
5. Tighten to the lock nut and mounting bolts.
Tightening torque:
37—52
N
m (3.8—5.3 m-kg, 27—38 ft-lb)
86U01X-190
Drive Belt
Install the drive belt and adjust the belt deflection. (Re-
fer to page 1A—7.)
76G01A-096
1A—95
Page 128 of 1865

1A INSTALLATION
Clutch Release Cylinder (MTX)
1. Set the pipe bracket in position.
Tightening torque:
8—11 Nm (80—110 cm-kg, 69—95 in-lb)
2. Install the clutch release cylinder.
Tightening torque:
19—25 Nm (1.9—2.6 m-kg, 14—19 ft-lb)
86U01X-192
Control Cable (ATX)
Install the control cable and adjust the shift selector
position. (Refer to Section 7.)
Tightening torque
@: 44—64
N
m
(4.5—6.5 m-kg, 33—47 ft-lb)
(§): 16—23
N
m
(1.6—2.3 m-kg, 12—17 ft-lb)
Speedometer Cable
Install the speedometer cable.
76G01A-097
Three-Way Solenoid Assembly
Install the three-way solenoid assembly.
Tightening torque:
8—11 N-m (80—110 cm-kg, 69—95 in-lb)
76G01A-098
Brake Vacuum Hose
Connect the brake vacuum hose.
Canister Hose
Connect the canister hoses.
86U01X-180
1A—96
Page 129 of 1865

INSTALLATION 1A
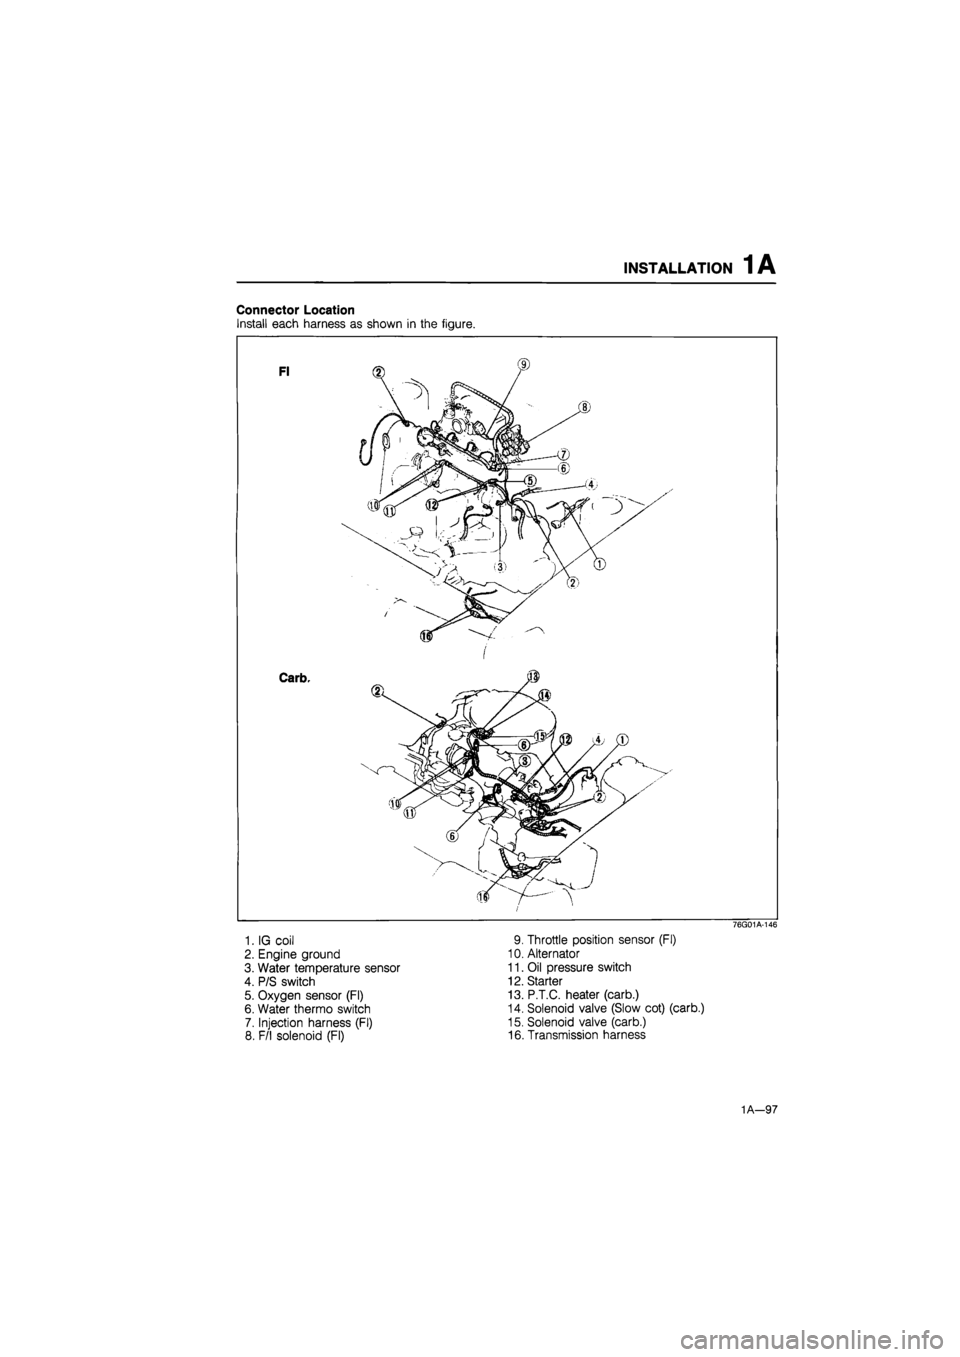
Connector Location
Install each harness as shown in the figure.
1. IG coil
2. Engine ground
3. Water temperature sensor
4. P/S switch
5. Oxygen sensor (Fl)
6. Water thermo switch
7. Injection harness (Fl)
8. F/l solenoid (Fl)
76G01A-146
9. Throttle position sensor (Fl)
10. Alternator
11. Oil pressure switch
12. Starter
13. P.T.C. heater (carb.)
14. Solenoid valve (Slow cot) (carb.)
15. Solenoid valve (carb.)
16. Transmission harness
1A—97
Page 130 of 1865

1A INSTALLATION
76G01A-147
86U01X-199
86U01X-200
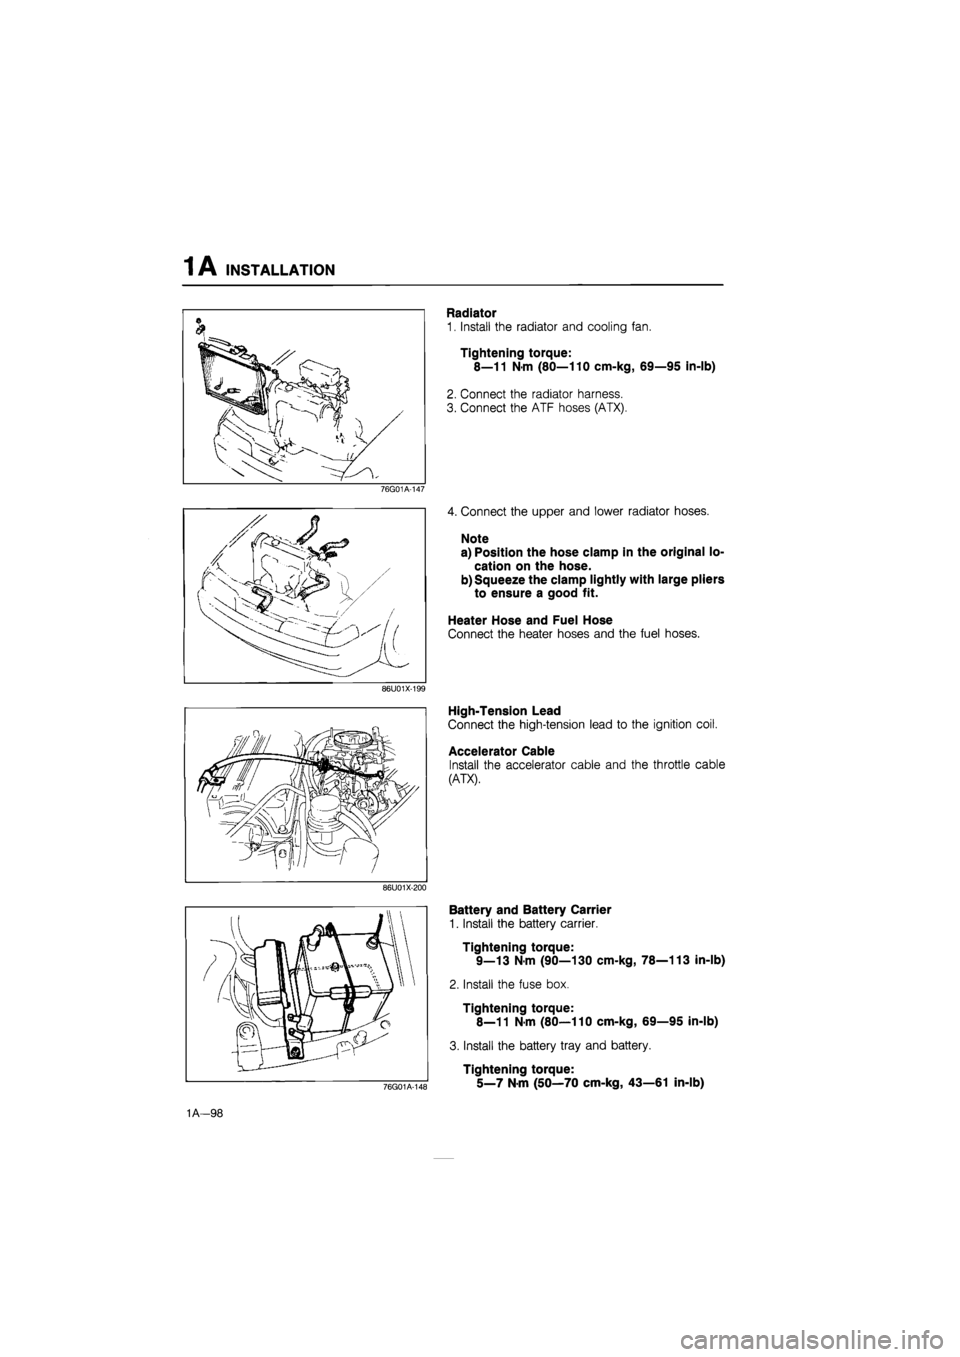
Radiator
1. Install the radiator and cooling fan.
Tightening torque:
8—11 N-m (80—110 cm-kg, 69—95 in-lb)
2. Connect the radiator harness.
3. Connect the ATF hoses (ATX).
4. Connect the upper and lower radiator hoses.
Note
a) Position the hose clamp in the original lo-
cation on the hose.
b) Squeeze the clamp lightly with large pliers
to ensure a good fit.
Heater Hose and Fuel Hose
Connect the heater hoses and the fuel hoses.
High-Tension Lead
Connect the high-tension lead to the ignition coil.
Accelerator Cable
Install the accelerator cable and the throttle cable
(ATX).
76G01A-148
Battery and Battery Carrier
1. Install the battery carrier.
Tightening torque:
9—13 N-m (90—130 cm-kg, 78—113 in-lb)
2. Install the fuse box.
Tightening torque:
8—11 N-m (80—110 cm-kg, 69—95 in-lb)
3. Install the battery tray and battery.
Tightening torque:
5_7 Nm (50—70 cm-kg, 43—61 in-lb)
1A—98