MAZDA 626 1987 Workshop Manual
Manufacturer: MAZDA, Model Year: 1987, Model line: 626, Model: MAZDA 626 1987Pages: 1865, PDF Size: 94.35 MB
Page 161 of 1865

1 B DISASSEMBLY (CYLINDER BLOCK)
CYLINDER BLOCK-I
76G01B-043
1. Clutch cover 6. Oil strainer
2. Clutch disc 7. Rear cover
3. Flywheel 8. Water pump assembly
4. End plate 9. Oil pump assembly
5. Oil pan 10. Oil jet
1B—30
Page 162 of 1865

DISASSEMBLY (CYLINDER BLOCK) 1 B
76G01B-044
Bolt hole
Oil pan • ,„
Cylinder block
76G01B-045
Disassembly Note
Clutch cover and flywheel
Remove the clutch cover and flywheel with the SST.
Oil pan
1. Remove the oil pan mounting bolts.
2. Install the bolt ©from the mounting bolt or 10 mm
(0.39 in) bolts in the specified bolt holes ©(both
sides).
3. Screw in the bolts gradually and alternately to re-
move the oil pan.
Caution
a) Do not pry the oil pan to prevent damaging
the contact surface.
b) Do not damage or scratch the contact sur-
face when removing the oil sealant.
4. Remove the oil pan.
1B—31
Page 163 of 1865

1 B DISASSEMBLY (CYLINDER BLOCK)
CYLINDER BLOCK-II
76G01B-046
1. Connecting rod cap
2. Connecting rod bearing
3. Connecting rod and piston
4. Clip
5. Piston pin
6. Piston ring
7. Main bearing cap
8. Crankshaft
9. Pilot bearing
10. Main bearing
11. Cylinder block
Disassembly Note
Connecting rod and cap
Before removing the connecting rod, clean the bear-
ing, connecting rod, and crank pin, and measure the
following points.
1. Connecting rod side clearance. (Refer to page
1B—53.)
2. Crankpin oil clearance. (Refer to page 1B—53.)
76G01B-047
1B—32
Page 164 of 1865

DISASSEMBLY (CYLINDER BLOCK) 1 B
76G01B-048
76G01B-049
79G01C-050
Main bearing cap
Before removing the main bearing caps, clean the
bearings, main journals, and caps, and measure the
following points.
1. Crankshaft end play. (Refer to page 1B—52.)
2. Main journal oil clearance. (Refer to page 1B—51.)
Pilot bearing
Remove the pilot bearing from the crankshaft with the
SST
Piston and connecting rod
1. Before disassembling the piston and connecting
rod, check the oscillation torque as shown in the
figure.
If the large end does not drop by its own weight,
replace the piston or the piston pin.
2. Remove the piston pin with the SST.
76G01B-050
1 B—33
Page 165 of 1865

1 B INSPECTION AND REPAIR
INSPECTION AND REPAIR
1. Clean all parts, taking care to remove any gasket fragments, dirt, oil or grease, carbon, moisture
residue, or other foreign materials.
2. Inspect and repair must be performed in the order specified.
Caution
Be careful not to damage the joints or friction surfaces of aluminum alloy components (such
as the cylinder head or pistons).
86U01X-077
79G01C-106
76G01B-051
Cylinder Head
1. Inspect the cylinder head for damage, cracks, and
leakage of water or oil. Replace if necessary.
2. Measure the cylinder head distortion in the six
directions shown in the figure.
Distortion: 0.15 mm (0.006 in) max.
3. If the cylinder head distortion exceeds specifica-
tion, grind the cylinder head surface.
If the cylinder head height is not within specifica-
tion, replace it.
Height:
133.95—134.05 mm (5.274—5.278 in)
Grinding limit: 0.20 mm (0.008 in) max.
Note
Before grinding the cylinder head, first check
the following. Replace if necessary.
• Sinking of valve seat
• Damage of manifold contact surface
• Camshaft oil clearance and end play
4. Measure the manifold contact surface distortion in
the six directions shown in the figure.
Distortion: 0.15 mm (0.006 in) max.
5. If distortion exceeds specification grind the surface
or replace the cylinder head.
79G01C-053
1B-34
Page 166 of 1865

INSPECTION AND REPAIR 1 B
Stem tip
Margin i
thickness -f
Valve face
angle
45°
76G01B-120
76G01B-052
Valve and Valve Guide
1. Inspect each valve for the following. Replace or
resurface if necessary.
(1) Damaged or bent stem
(2) Roughness or damage to face
(3) Damage or uneven wear of stem tip
2. Check the valve head margin thickness. Replace
if necessary
Margin thickness
IN : 0.85 mm (0.033 in) min.
EX: 0.9 mm (0.035 in) min.
3. Measure the valve length.
Length
IN : 103.18 mm (4.0622 in)
EX: 103.94 mm (4.0921 in)
4. Measure the valve stem diameter.
Diameter
IN : 5.970—5.985 mm (0.2350—0.2356 in)
EX: 5.965—5.980 mm (0.2348—0.2354 in)
76G01B-053
5. Measure the valve guide inner diameter.
Inner diameter
IN : 6.01—6.03 mm (0.2366—0.2374 in)
EX: 6.01—6.03 mm (0.2366—0.2374 in)
76G01B-121
1B-35
Page 167 of 1865

1 B INSPECTION AND REPAIR
Valve guide
-Valve stem
I/
Clearance
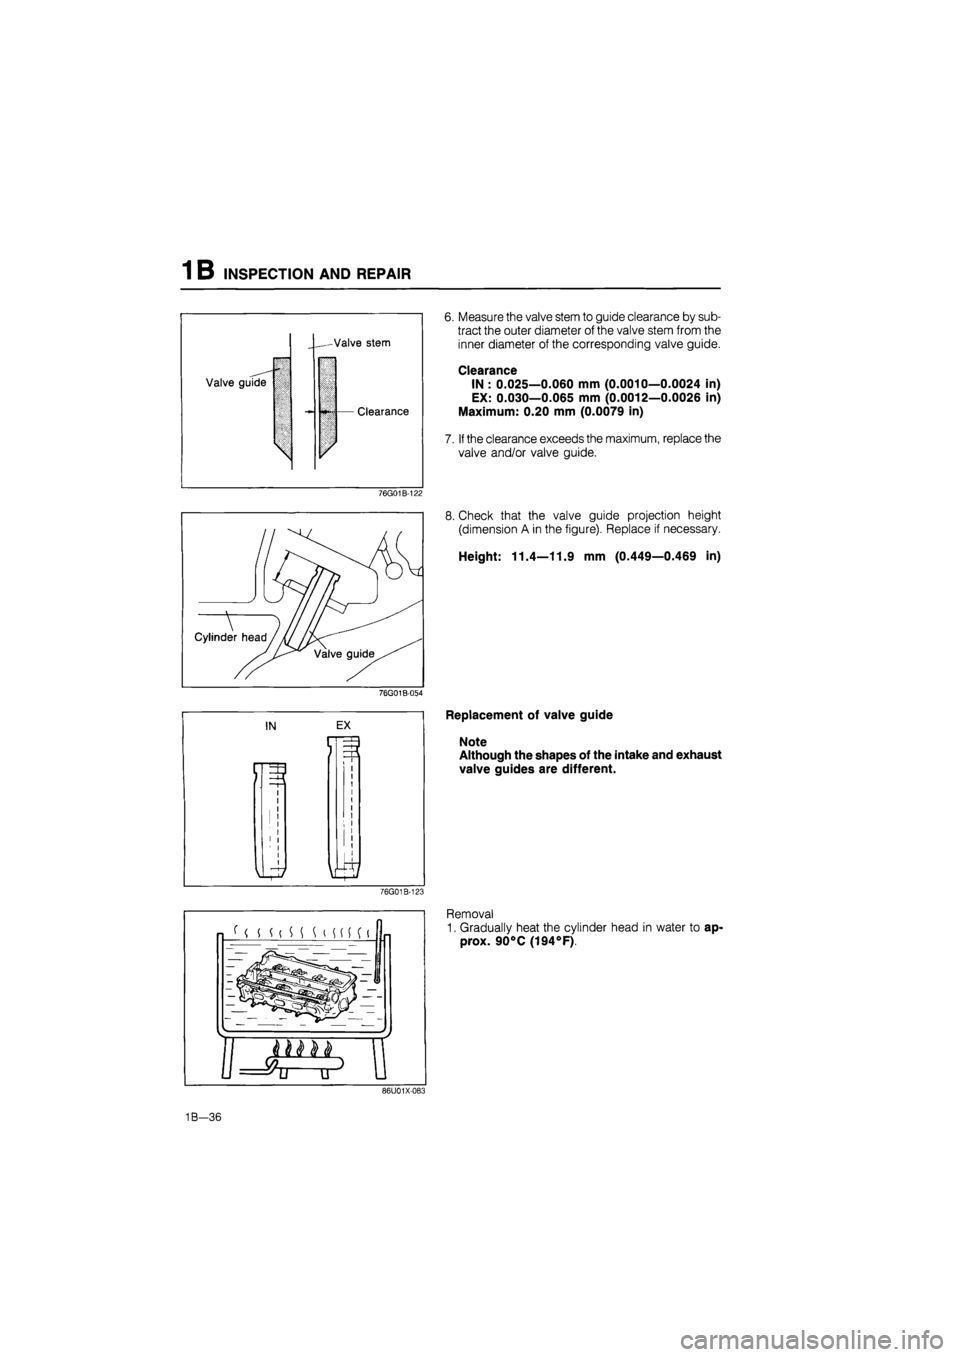
6. Measure the valve stem to guide clearance by sub-
tract the outer diameter of the valve stem from the
inner diameter of the corresponding valve guide.
Clearance
IN : 0.025—0.060 mm (0.0010—0.0024 in)
EX: 0.030—0.065 mm (0.0012—0.0026 in)
Maximum: 0.20 mm (0.0079 in)
7. If the clearance exceeds the maximum, replace the
valve and/or valve guide.
76G01B-122
76G01B-054
8. Check that the valve guide projection height
(dimension A in the figure). Replace if necessary.
Height: 11.4—11.9 mm (0.449—0.469 in)
Replacement of valve guide
Note
Although the shapes of the intake and exhaust
valve guides are different.
76G01B-123
Removal
1. Gradually heat the cylinder head in water to ap-
prox. 90°C (194°F).
86U01X-083
1B-36
Page 168 of 1865

INSPECTION AND REPAIR 1 B
2. Remove the valve guide from the side opposite the
combustion chamber with the SST.
86U01X-084
Installation
1. Gradually heat the cylinder head in water to ap-
prox. 90°C (194°F).
2. Tap the valve guide in from the side opposite the
combustion chamber with the SST until the projec-
tion height is as specified.
76G01B-124
- d
O") (o o
/y^X'/i— l/o\ 1| 1
Valve Seat
1. Inspect the contact surface of the valve seat and
valve face for the following.
(1) Roughness
(2) Damage
2. If necessary, resurface the valve seat with a 45°
valve seat cutter and/or resurface the valve face.
86U01X-087
3. Apply a thin coat of prussian blue to the valve face.
4. Check the valve seating by rotating the valve
against the seat.
(1) If blue does not appear 360° around the valve
face, replace the valve.
(2) If blue does not appear 360° around the valve
seat, resurface the seat.
69G01A-101
1B—37
Page 169 of 1865

INSPECTION AND REPAIR 1 B
76G01A-128
L 75° 75/ 60° 60
35°>
450 V EX '%50 IN
86U01X-088
76G01B-055
5. Check the seat contact width.
Width: 1.2—1.6 mm (0.047—0.063 in)
6. Check that the valve seating position is at the cen-
ter of the valve face.
(1) If the seating position is too high, correct the
valve seat with a 60° cutter and a 45° cutter.
(2) If the seating position is too low, correct the
valve seat with a 35° (IN) or 15° (EX) cutter
and a 45° cutter.
7. Seat the valve to the valve seat with a lapping
compound.
8. Check the sinking of the valve seat.
Measure protruding length (dimension L) of each
valve stem.
Dimension L: 36.8 mm (1.449 in)
(1) If L is as below, it can be used as it is.
36.8—37.6 mm (1.449—1.480 in)
(2) If L is as below, insert a spacer between the
spring seat and cylinder head to adjust.
37.6—38.3 mm (1.480—1.508 in)
(3) If L is more than as below, replace the cylin-
der head.
38.3 mm (1.508 in) or more
Valve Spring 1. Inspect each valve spring for cracks or damage.
2. Check the free length and angle. Replace if
necessary.
Free length
Outer Standard: 39.1 mm (1.539 in)
Minimum: 38.7 mm (1.524 in)
Inner Standard: 38.0 mm (1.496 in)
Minimum: 37.7 mm (1.484 in)
76G01B-059
1B-38
Page 170 of 1865

INSPECTION AND REPAIR 1 B
-Angle limit
76G01B-057
86U01X-092
76G01B-058
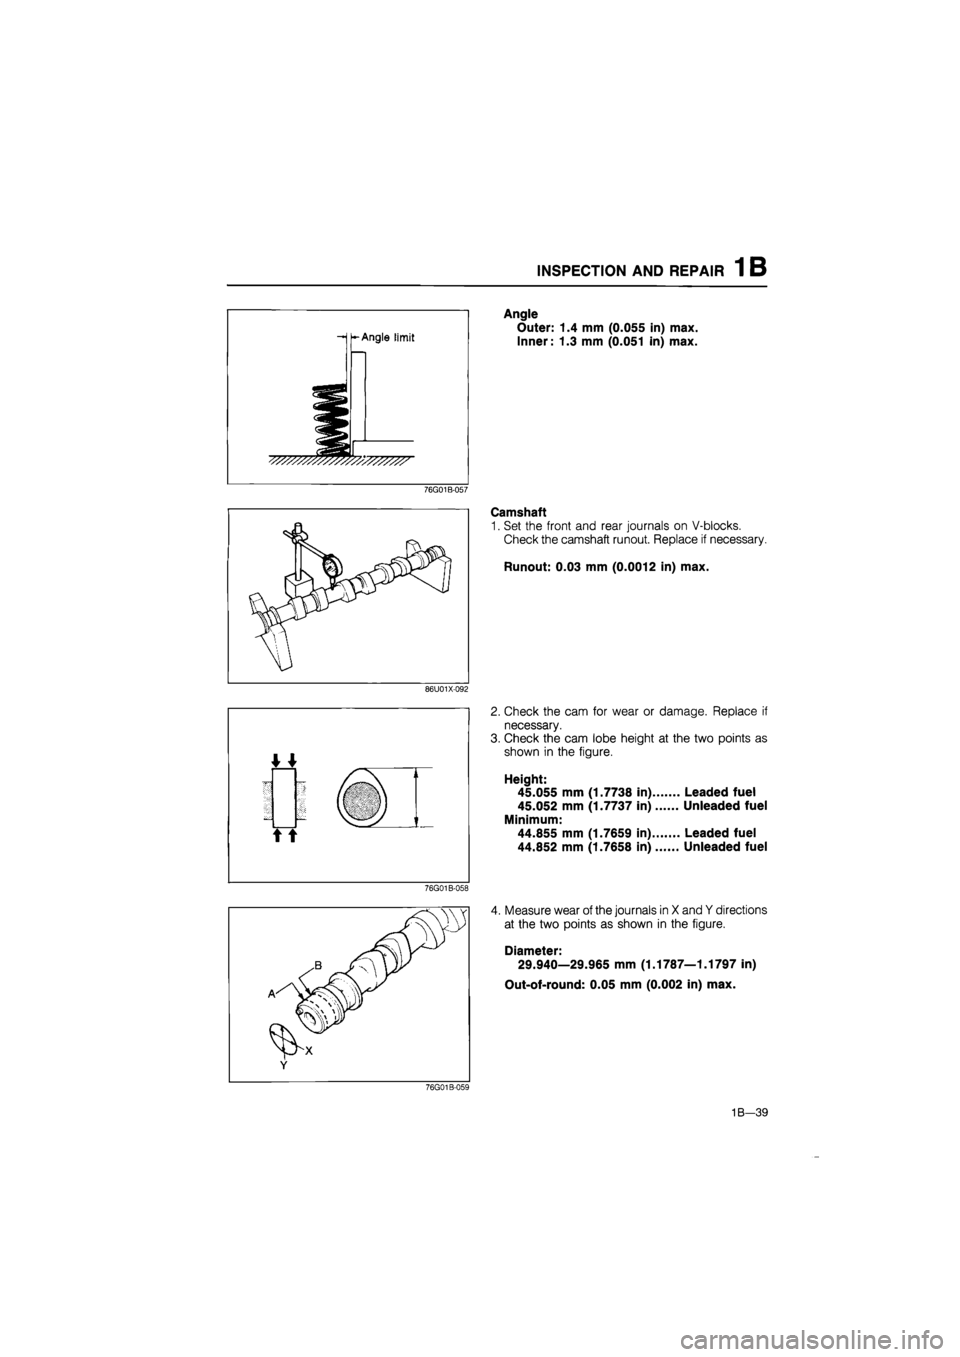
Angle
Outer: 1.4 mm (0.055 in) max.
Inner: 1.3 mm (0.051 in) max.
Camshaft
1. Set the front and rear journals on V-blocks.
Check the camshaft runout. Replace if necessary.
Runout: 0.03 mm (0.0012 in) max.
2. Check the cam for wear or damage. Replace if
necessary.
3. Check the cam lobe height at the two points as
shown in the figure.
Height:
45.055 mm (1.7738 in) Leaded fuel
45.052 mm (1.7737 in) Unleaded fuel
Minimum:
44.855 mm (1.7659 in) Leaded fuel
44.852 mm (1.7658 in) Unleaded fuel
4. Measure wear of the journals in X and Y directions
at the two points as shown in the figure.
Diameter:
29.940—29.965 mm (1.1787—1.1797 in)
Out-of-round: 0.05 mm (0.002 in) max.
76G01B-059
1B-39