MAZDA PROTEGE 1992 Workshop Manual
Manufacturer: MAZDA, Model Year: 1992, Model line: PROTEGE, Model: MAZDA PROTEGE 1992Pages: 1164, PDF Size: 81.9 MB
Page 201 of 1164
ASSEMBLY
2311082-04
05UOBX-17
OSUOBX-17
SPACER TANG
OIL RING
SPACER ENDS
-I
a
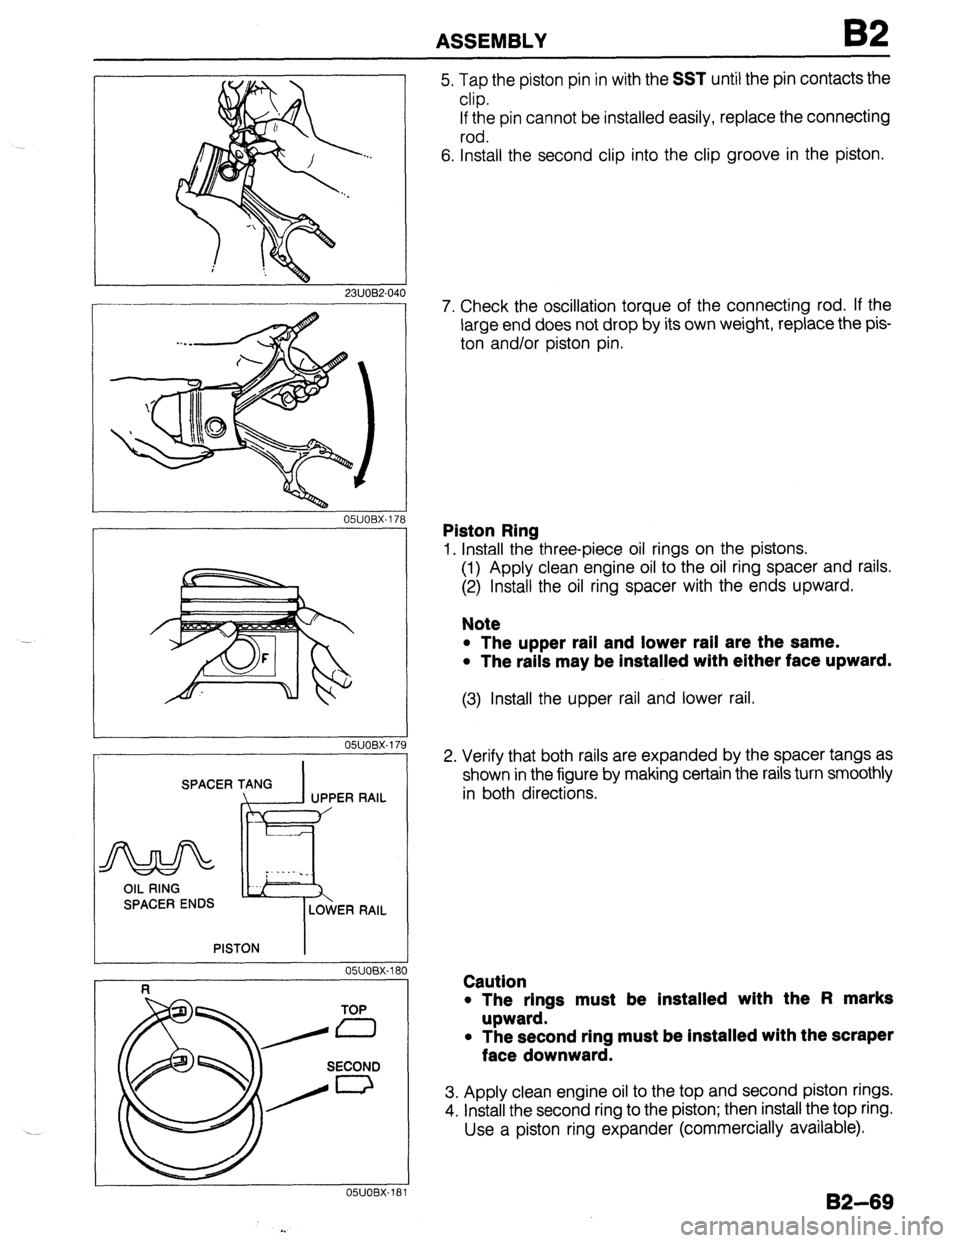
5. Tap the piston pin in with the SST until the pin contacts the
clip.
If the pin cannot be installed easily, replace the connecting
rod.
6. Install the second clip into the clip groove in the piston.
7. Check the oscillation torque of the connecting rod. If the
large end does not drop by its own weight, replace the pis-
ton and/or piston pin.
Piston Ring
1. Install the three-piece oil rings on the pistons.
(1) Apply clean engine oil to the oil ring spacer and rails.
(2) Install the oil ring spacer with the ends upward.
Note
l The upper rail and lower rail are the same.
l The rails may be installed with either face upward.
(3) Install the upper rail and lower rail.
2. Verify that both rails are expanded by the spacer tangs as
shown in the figure by making certain the rails turn smoothly
in both directions.
Caution
l The rings must be installed with the Fl marks
upward.
l The second ring must be installed with the scraper
face downward.
3. Apply clean engine oil to the top and second piston rings.
4. install the second ring to the piston; then install the top ring.
Use a piston ring expander (commercially available).
132-69
Page 202 of 1164

B2 ASSEMBLY
- OWOBX-182
OWOBX-18
PLASTIGAGE
OSJOBX-18
5. Position the end gaps of the rings as shown in the figure.
Oil Jet
1. Install the oil jets.
Tightening torque:
12-l 8 N-m (1.2-l .8 m-kg, 104-l 58 in-lb)
Crankshaft
1. Before installing the crankshaft, inspect the main bearing
oil clearances as follows.
Oil clearance inspection
(1) Remove all foreign material and oil from the journals and
bearings.
Caution
l Install the grooved upper main bearings in the cyl-
inder block.
l Install the thrust bearings wlth the oil groove fac-
ing the crankshaft.
(2) Install the upper main bearings and thrust bearings.
(3) Set the crankshaft in the cylinder block.
Caution
l Do not rotate the crankshaft when measuring the
oil clearances.
(4) Position Plastigage atop the journals in the axial di-
rection.
(5) Install the lower main bearings and the main bearing
caps according to the cap number and * mark.
(6) Tighten the main bearing cap bolts in two or three steps
in the order shown in the figure.
Tightening torque:
54-59 N-m (5.5-8.0 m-kg, 40-43 ft-lb)
B2-70
Page 203 of 1164
ASSEMBLY B2
r
03UOB2-09
__~~
05UOBX-188
.
OWOBX-19(
WIDTH
I
05UOBX-19
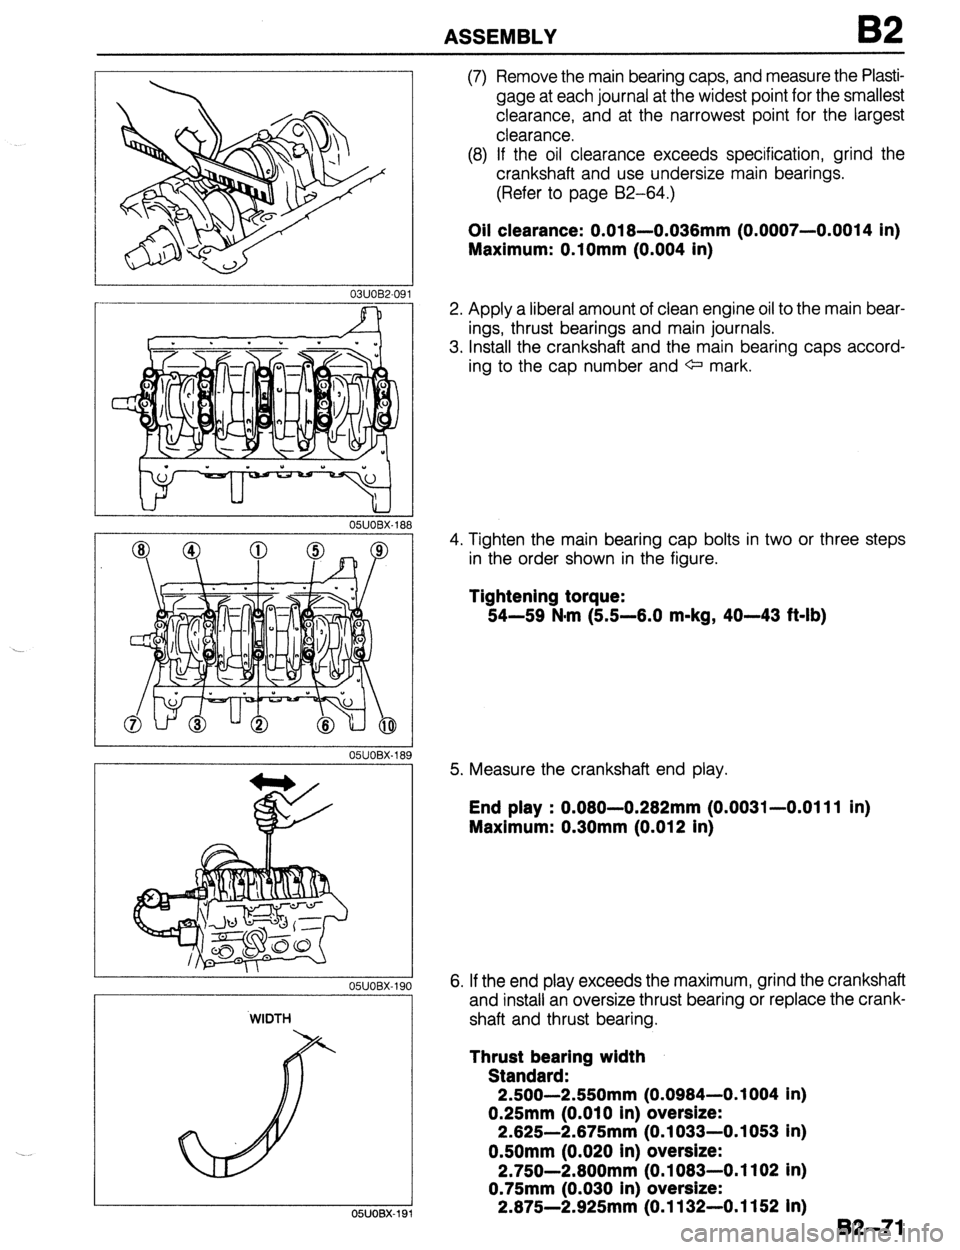
(7) Remove the main bearing caps, and measure the Plasti-
gage at each journal at the widest point for the smallest
clearance, and at the narrowest point for the largest
clearance.
(8) If the oil clearance exceeds specification, grind the
crankshaft and use undersize main bearings.
(Refer to page B2-64.)
Oil clearance: 0.018-0.036mm (0.0007-0.0014 in)
Maximum: O.lOmm (0.004 in)
2. Apply a liberal amount of clean engine oil to the main bear-
ings, thrust bearings and main journals.
3. Install the crankshaft and the main bearing caps accord-
ing to the cap number and C= mark.
4. Tighten the main bearing cap bolts in two or three steps
in the order shown in the figure.
Tightening torque:
54-59 N*m (5.5-6.0 m-kg, 40-43 ft-lb)
5. Measure the crankshaft end play.
End play : 0.080-0.282mm (0.0031-0.0111 in)
Maximum: 0.30mm (0.012 in)
6. If the end play exceeds the maximum, grind the crankshaft
and install an oversize thrust bearing or replace the crank-
shaft and thrust bearing.
Thrust bearlng width
Standard:
2.500-2.550mm (0.0984-0.1004 in)
0.25mm (0.010 in) oversize:
2.625-2.675mm (0.1033-0.1053 in)
0.50mm (0.020 in) oversize:
2.750-2.800mm (0.1083-0.1102 in)
0.75mm (0.030 in) oversize:
2.875-2.925mm (0.1132-0.1152 In)
B2-71
Page 204 of 1164
B2 ASSEMBLY
RUBBER SLEEVE
I
OYJOBX-192
03UOB2-17
03UOB2-09 2 '0
05UOBX-196 Piston and Connecting Rod Assembly
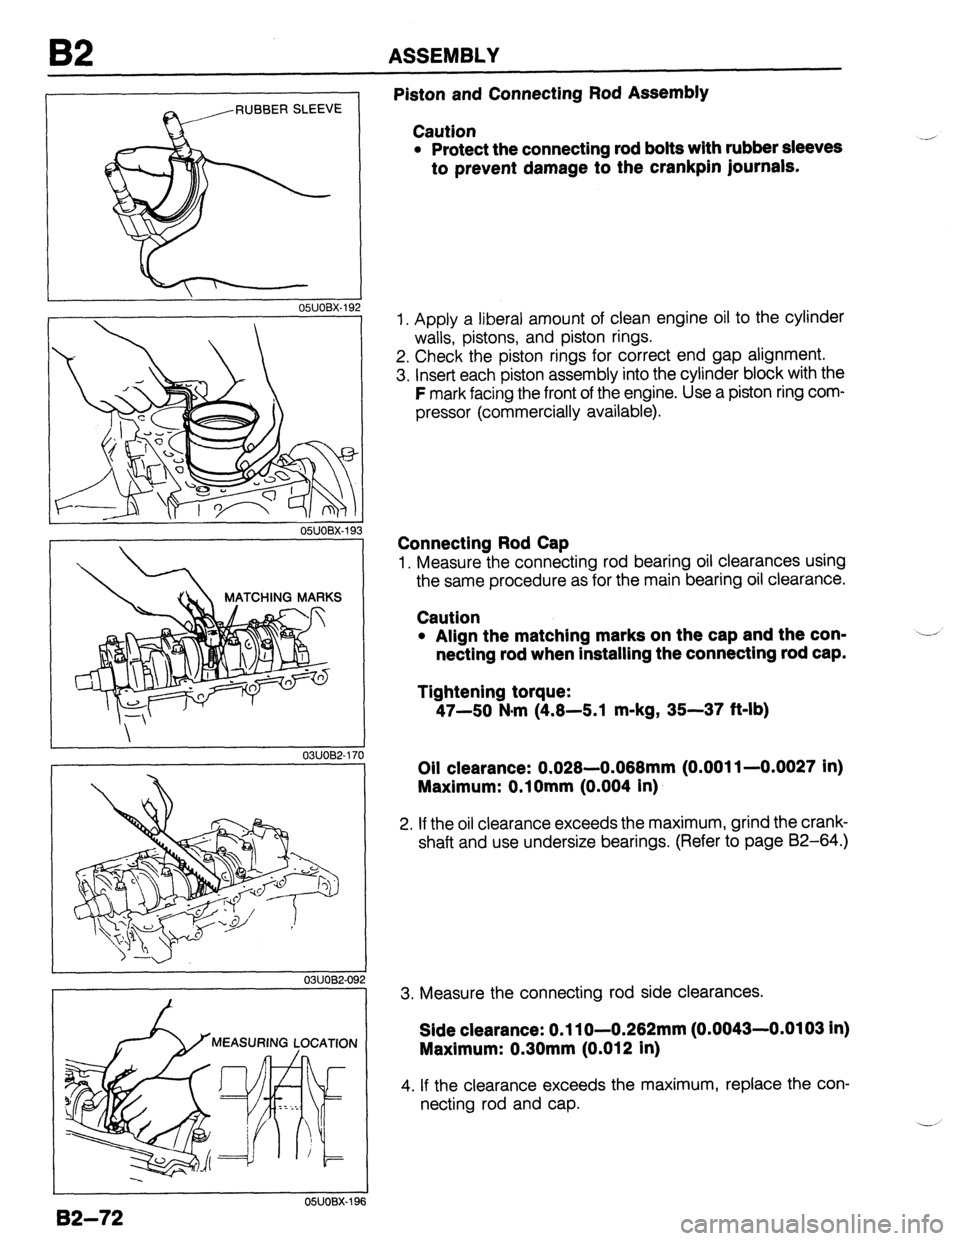
Caution
l Protect the connecting rod bolts with rubber sleeves
to prevent damage to the crankpin journals.
1. Apply a liberal amount of clean engine oil to the cylinder
walls, pistons, and piston rings.
2. Check the piston rings for correct end gap alignment.
3. Insert each piston assembly into the cylinder block with the
F mark facing the front of the engine. Use a piston ring com-
pressor (commercially available).
Connecting Rod Cap
1. Measure the connecting rod bearing oil clearances using
the same procedure as for the main bearing oil clearance.
Caution
l Align the matching marks on the cap and the con-
netting rod when installing the connecting rod cap.
Tightening torque:
47-50 N-m (4.8-5.1 m-kg, 35-37 &lb)
Oil clearance: 0.028.0.088mm (0.001 l-0.0027 in)
Maximum: O.lOmm (0.004 in)
2. If the oil clearance exceeds the maximum, grind the crank-
shaft and use undersize bearings. (Refer to page 82-64.)
3. Measure the connecting rod side clearances.
Side clearance: 0.1 lo-0.282mm (0.0043-0.0103 in)
Maximum: 0.30mm (0.012 in)
4. If the clearance exceeds the maximum, replace the con-
necting rod and cap.
Page 205 of 1164
ASSEMBLY B2
MATCHING MARKS
CYLINDER BLOCK (EXTERNAL PARTS)
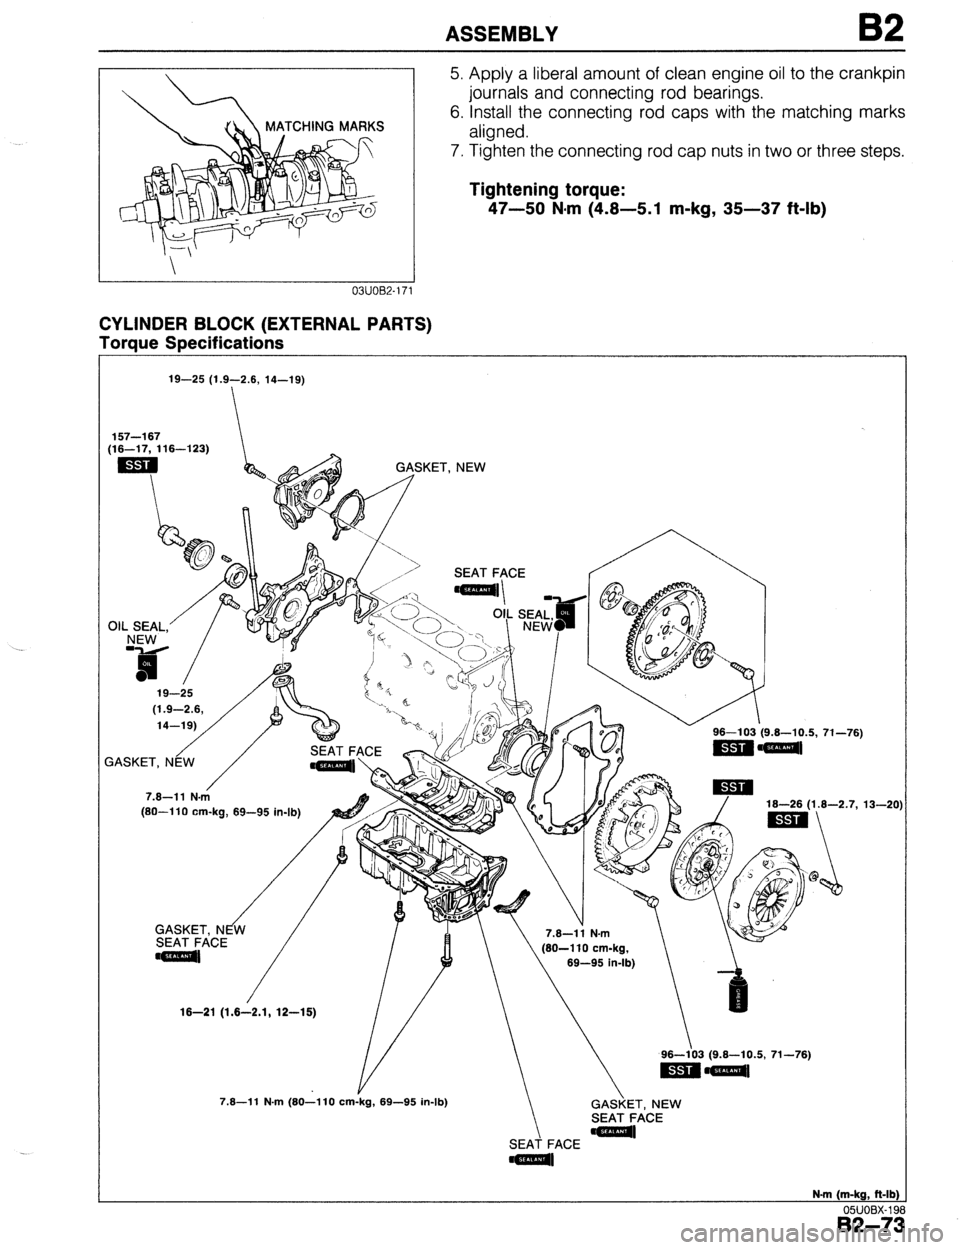
Toraue SPecifications 5. Apply a liberal amount of clean engine oil to the crankpin
journals and connecting rod bearings.
6. Install the connecting rod caps with the matching marks
aligned.
7. Tighten the connecting rod cap nuts in two or three steps.
Tightening torque:
47-50 N*m (4.8-5.1 m-kg, 35-37 ft-lb)
19-25 (1.9-2.6, 14-19)
157-l 67
(16-17, 116-1’23)
OIL SEAL.’
/ GASKET. NEW
[SO--110 cm-ka. 69-95 in-lb) 16-26 (1.6-2.7,
13-20
16-21
(1.6-2.1, 12-16)
GASKET, NEW
SEAT FACE
SEAT FACE
N-m (m-kg, ft-lb)
05UOBX-19
B2-7:
Page 206 of 1164

B2 ASSEMBLY
x9 05UOBX-20
OWOBX-203
Rear Cover
1, Apply a small amount of clean engine oil to the lip of a new
oil seal.
2. Push the oil seal slightly in by hand. -,
Caution
l The oil seal must be pressed in until it is flush with
the edge of the rear cover.
3. Press the oil seal in evenly with a suitable pipe.
Oil seal outer diameter: 1OOmm (3.94 in)
4. Apply silicone sealant to the shaded area shown in the
figure.
5. Install the rear cover.
Tightening torque:
7.8-l 1 N*m (80-l 10 cm-kg, 69-95 in-lb)
Oil Pump
1. Apply a small amount of clean engine oil to the lip of a new
oil seal.
2. Push the oil seal slightly in by hand.
Caution
l The oil seal must be pressed in until it is flush with
the edge of the oil pump body.
3. Press the oil seal in evenly with a suitable pipe.
Oil seal outer diameter: 44mm (1.73 in)
4. Install the oil pump and a new gasket.
Tightening torque:
19-25 N#m (1.9-2.6 m-kg, 14-19 ft-lb)
Page 207 of 1164
ASSEMBLY 82
03UOB2-09
03UOB2-094
-
Caution
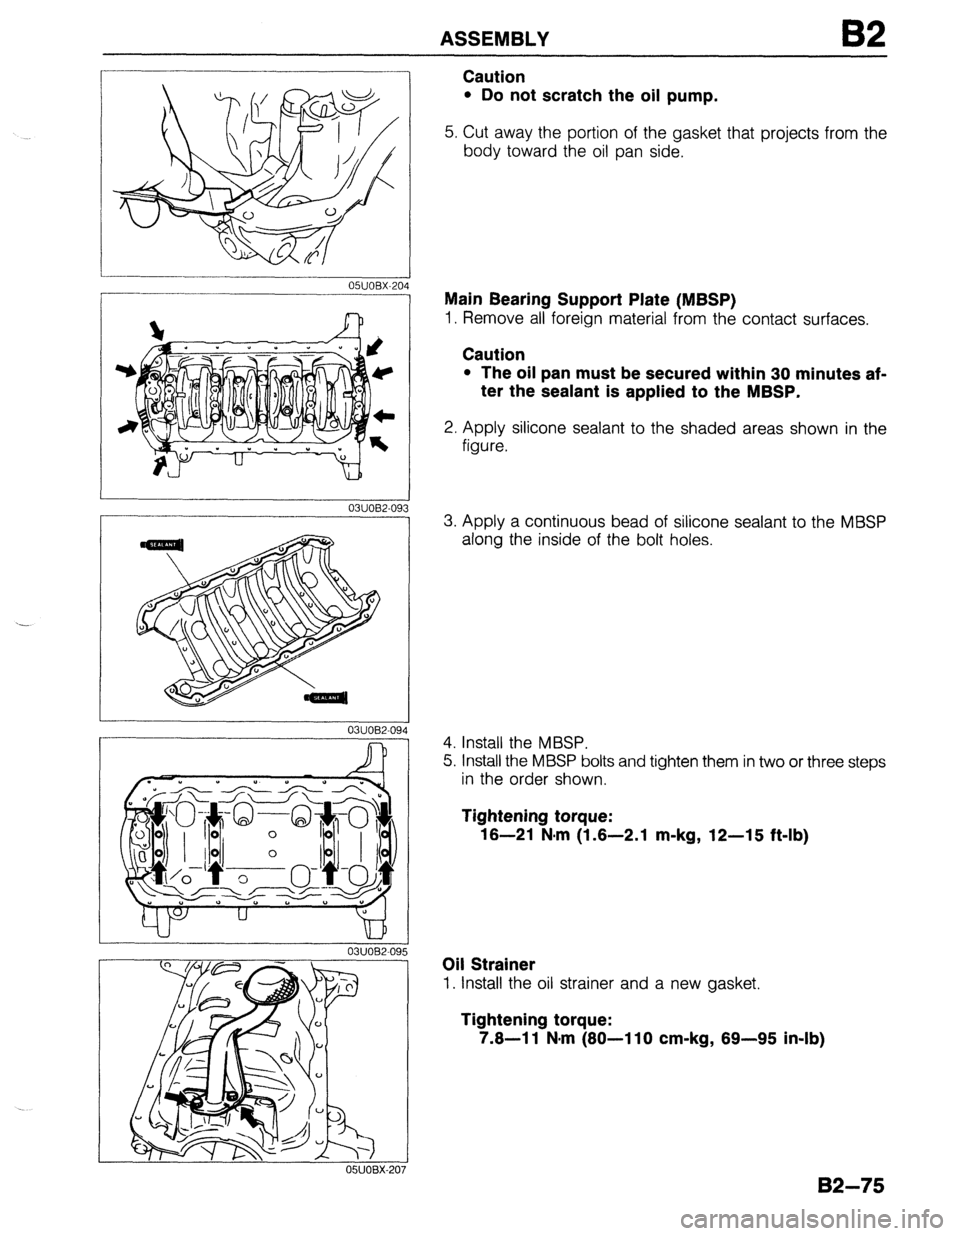
l Do not scratch the oil pump.
5. Cut away the portion of the gasket that projects from the
body toward the oil pan side.
Main Bearing Support Plate (MBSP)
1. Remove all foreign material from the contact surfaces.
Caution
l The oil pan must be secured within 30 minutes af-
ter the sealant is applied to the MBSP.
2. Apply silicone sealant to the shaded areas shown in the
figure.
3. Apply a continuous bead of silicone sealant to the MBSP
along the inside of the bolt holes.
4. Install the MBSP.
5. Install the MBSP bolts and tighten them in two or three steps
in the order shown.
Tightening torque:
16-21 N,m (1.6-2.1 m-kg, 12-15 ft-lb)
Oil Strainer
1. Install the oil strainer and a new gasket.
Tightening torque:
7.6-l 1 N-m (80-l 10 cm-kg, 89-95 in-lb)
B2-75
Page 208 of 1164

B2 ASSEMBLY
I
03UOB2-09
I
05UOBX-20 6
9
OWOBX-211 0
05uoax-21 1
03UOB2-097
Oil Pan
1. Remove all foreign material from the contact surfaces.
2. Apply silicone sealant to the shaded areas shown in the
figure.
3. install new gaskets onto the oil pump body and the rear
cover with the projections in the notches shown in the figure.
4. Apply a continuous bead of silicone sealant to the oil pan
along the inside of the bolt holes and overlap the ends.
5. Install the oil pan.
Tightening torque:
7.8-l 1 N-m (80-l 10 cm-kg, 69-95 in-lb)
End Plate
1. Install the end plate.
Tightening torque:
7.8-l 1 N-m (80-l 10 cm-kg, 69-95 in-lb)
Flywheel (MTX)
1. Remove the sealant from the flywheel bolt holes in the crank-
shaft and from the flywheel bolts.
Caution
l If all the previous sealant cannot be removed from
a bolt, replace the bolt.
l Do not apply sealant if a new bolt is used.
2. Set the flywheel onto the crankshaft.
3. Apply sealant to the flywheel bolts and install them.
82-76
Page 209 of 1164

--
ASSEMBLY B2
2311082-06
2311082.04
1
03UO62-09!
J 2311062-063
4. Hold the flywheel with the SST or equivalent.
5. Tighten the bolts in two or three steps in the order shown.
Tightening torque:
96-l 03 N.m (9.6-10.5 m-kg, 71-76 ft-lb)
Clutch Disc and Clutch Cover (MTX)
1. Install the clutch disc and clutch cover using the SST or
equivalent. (Refer to Section H.)
Tightening torque:
16-26 N.m (1.8-2.7 m-kg, 13-20 ft-lb)
Drive Plate (ATX)
1. Remove the sealant from the drive plate holes in the crank-
shaft and from the drive plate lock bolts.
Caution
l If all the previous sealant cannot be removed from
a bolt, replace the bolt.
l Do not apply sealant if a new bolt is used.
2. Set the adapter, drive plate, and backing plate onto the
crankshaft.
3. Apply sealant to the drive plate bolts and install them.
4. Hold the drive plate with the
SST or equivalent.
5. Tighten the bolts in two or three steps in the order shown.
Tightening torque:
96-103 N.m (9.8-10.5 m-kg, 71-76 ft-lb)
Timing Belt Pulley
1, Reverse the direction of the SST or equivalent on the
flywheel.
2311082.064
B2-77
Page 210 of 1164
I32 ASSEMBLY
Qill’ ’ 23UOB2-050
03UOB2-10
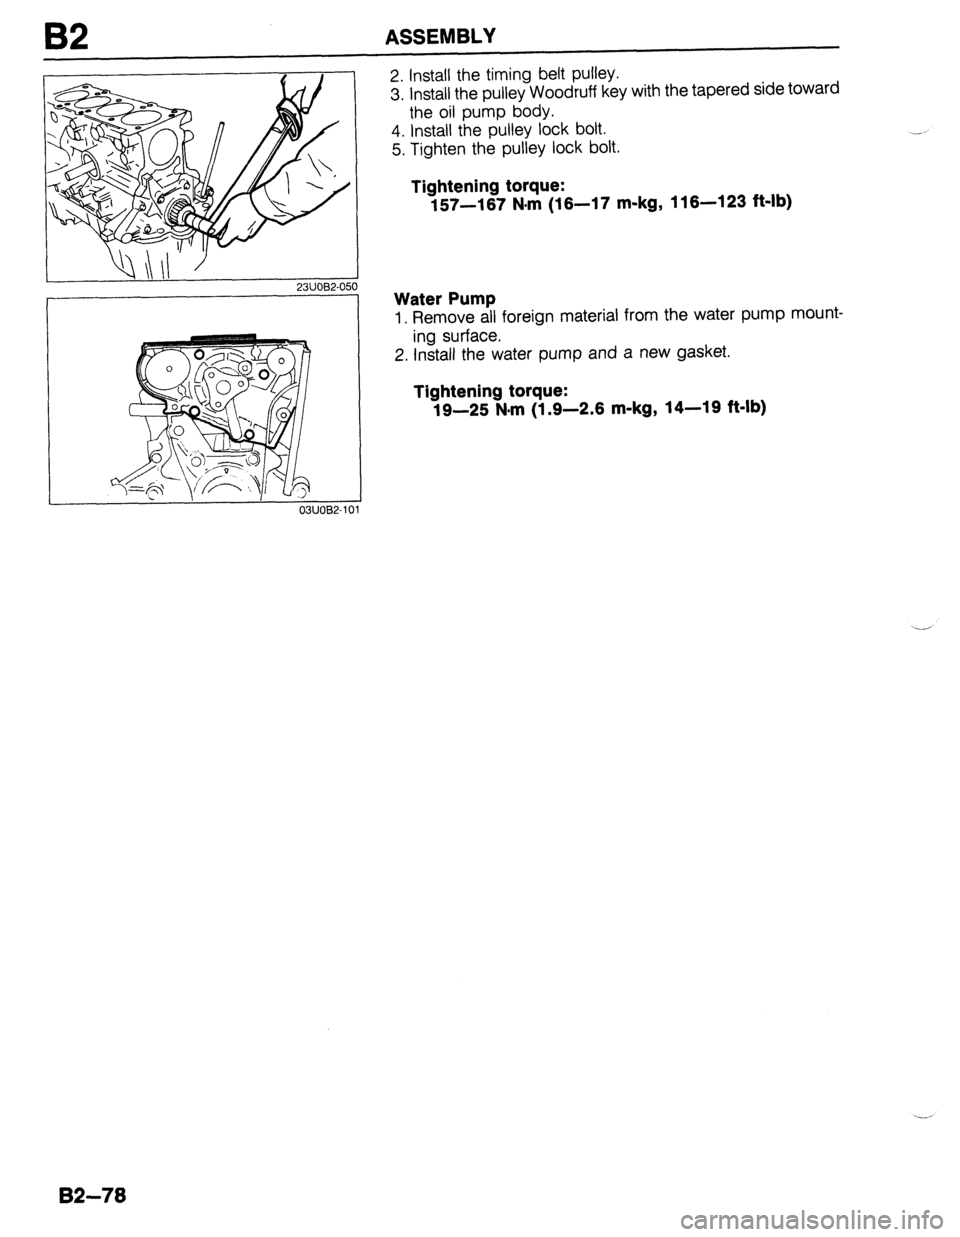
2. Install the timing belt pulley.
3. install the pulley Woodruff key with the tapered side toward
the oil pump body.
4. Install the pulley lock bolt.
5. Tighten the pulley lock bolt.
Tightening torque:
157-167 N#rn (16-17 m-kg, 116-123 ft-lb)
Water Pump
1. Remove all foreign material from the water pump mount-
ing surface.
2. Install the water pump and a new gasket.
Tightening torque:
19-25 N.m (1.9-2.6 m-kg, 14-19 ft-lb)
82-78