MITSUBISHI 3000GT 1991 Service Manual
Manufacturer: MITSUBISHI, Model Year: 1991, Model line: 3000GT, Model: MITSUBISHI 3000GT 1991Pages: 1146, PDF Size: 76.68 MB
Page 291 of 1146
CRUISE CONTROL SYSTEM - Cruise Control System13-185
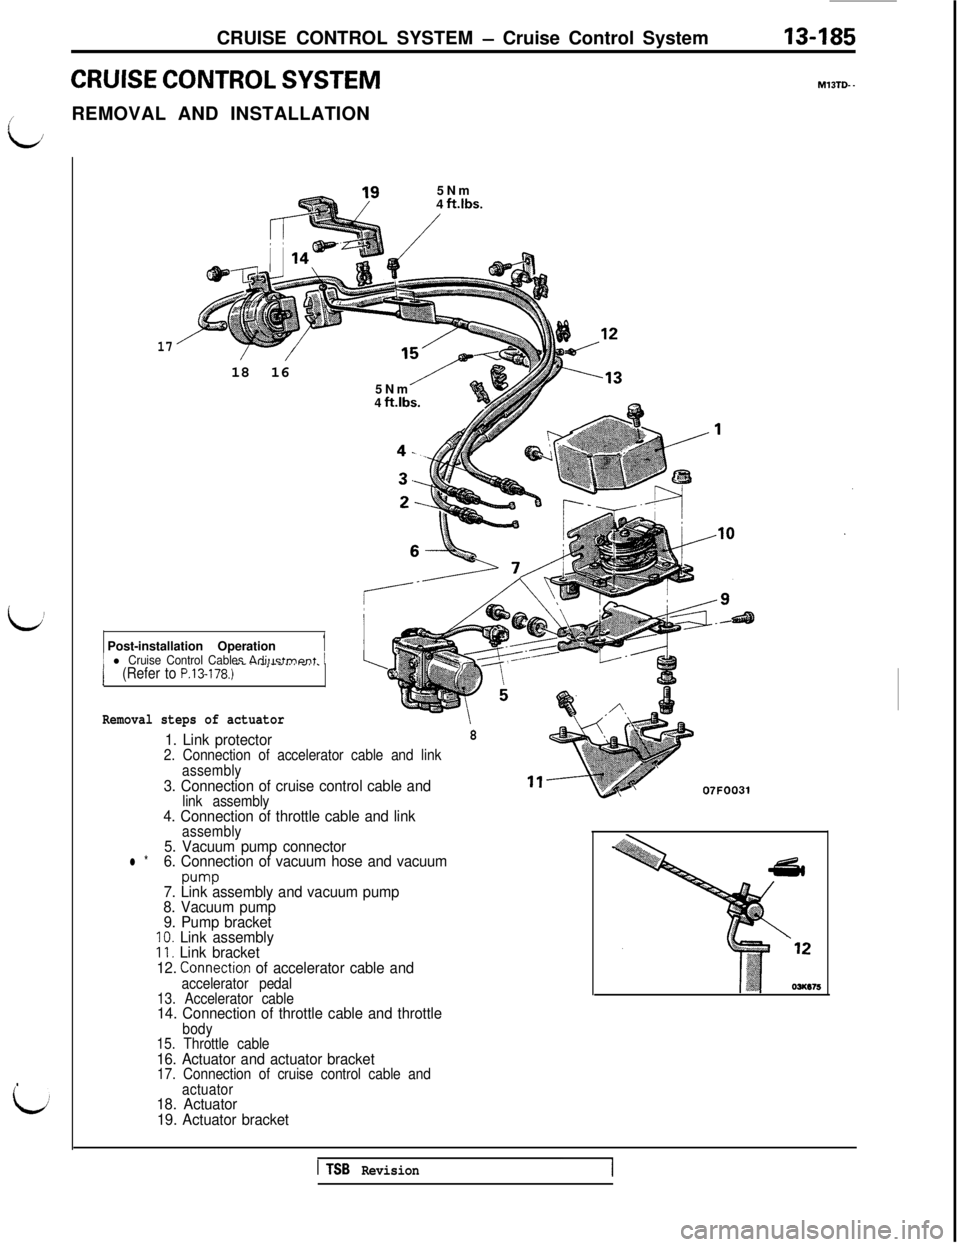
CRUISE CONTROL SYSTEMM13TD. -
L;REMOVAL AND INSTALLATION
5Nm
4
ft.lbs.
h :
17P18 16
5Nm
4
ft.lbs.7Post-installation Operation
11 l Cruise Control Cables Adillstmcwt 1j(Refer to P.13-178.)--’ -->---“‘-.,-
Removal steps of actuator
81. Link protector2. Connection of accelerator cable and link
assembly
3. Connection of cruise control cable andlink assembly4. Connection of throttle cable and linkassembly5. Vacuum pump connectorl *6. Connection of vacuum hose and vacuum
pump7. Link assembly and vacuum pump
8. Vacuum pump
9. Pump bracket
IO. Link assembly11. Link bracket
12. Connecti0.n of accelerator cable andaccelerator pedal
13. Accelerator cable
14. Connection of throttle cable and throttlebody
15. Throttle cable
16. Actuator and actuator bracket17. Connection of cruise control cable and,
Ld
actuator18. Actuator
19. Actuator bracket
07FOO31
1 TSB Revision
Page 292 of 1146
13486CRUISE CONTROL SYSTEM - Cruise Control System
1.6
- 2.2 ft.lbs.
07FOO27
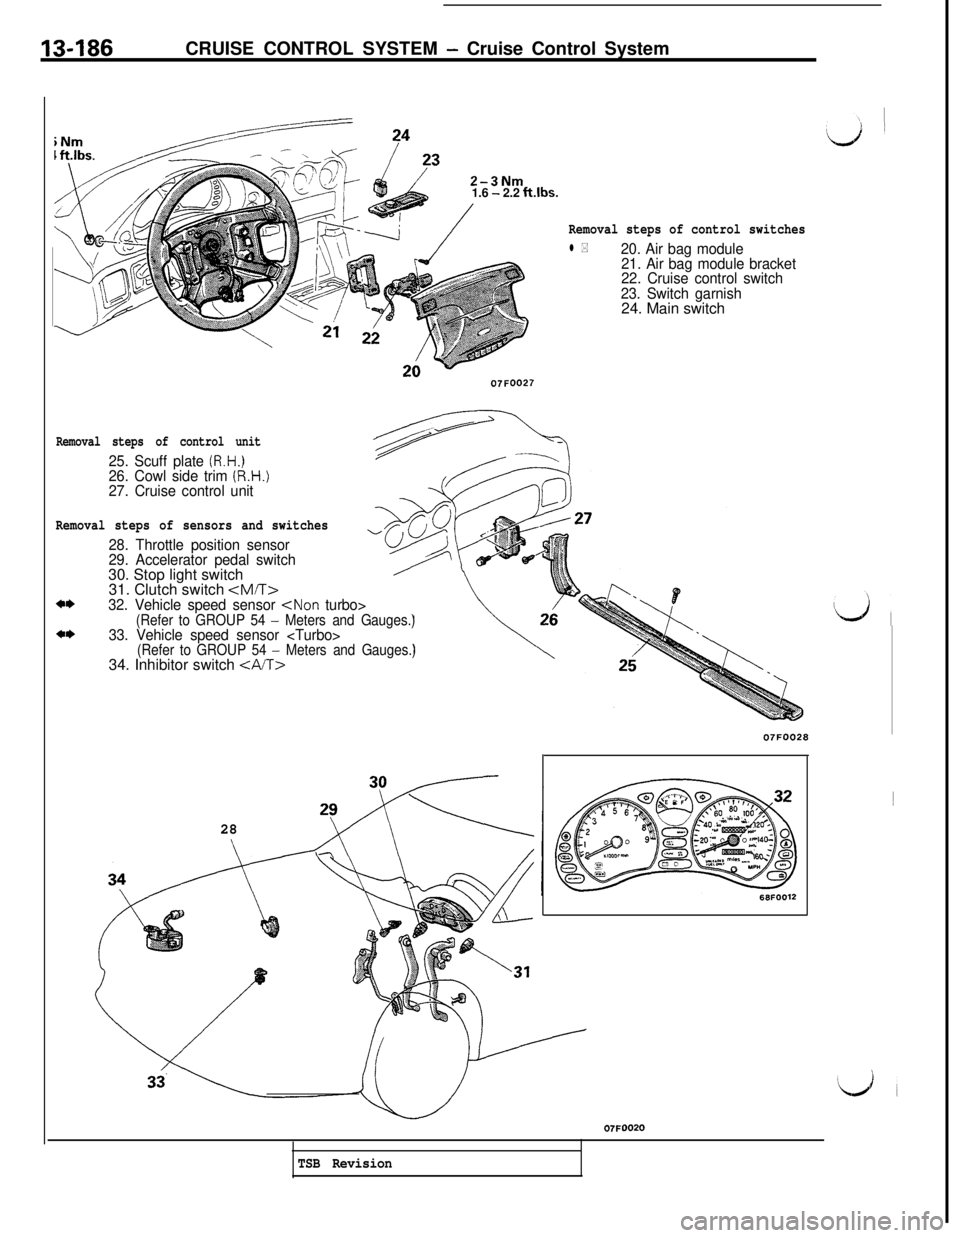
Removal steps of control switches
l *20. Air bag module
21. Air bag module bracket
22. Cruise control switch
23. Switch garnish24. Main switch
Removal steps of sensors and switches
28. Throttle position sensor
29. Accelerator pedal switch30. Stop light switch
31. Clutch switch
4*
4*
Removal steps of control unit
25. Scuff plate (R.H.)26. Cowl side trim (R.H.)27. Cruise control unit34. Inhibitor switch
2807FOO28
68FOO12
07FOO20
TSB Revision
Page 293 of 1146
CRUISE CONTROL SYSTEM - Cruise Control Svstem13-187Vacuum hoseSERVICE POINT OF REMOVAL
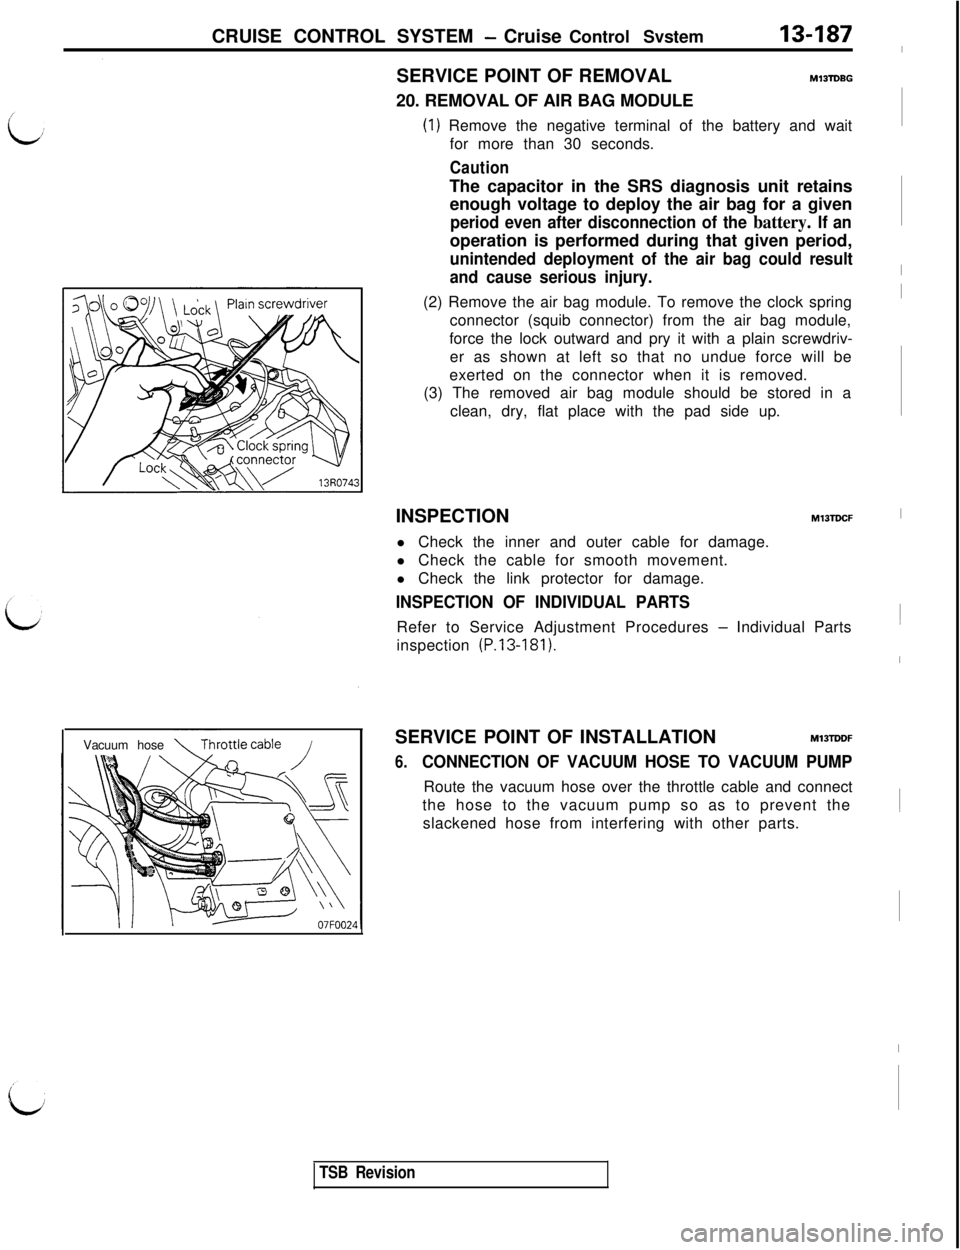
Ml3lDBG20. REMOVAL OF AIR BAG MODULE
(1) Remove the negative terminal of the battery and wait
for more than 30 seconds.
CautionThe capacitor in the SRS diagnosis unit retains
enough voltage to deploy the air bag for a given
period even after disconnection of the battery. If anoperation is performed during that given period,
unintended deployment of the air bag could result
and cause serious injury.(2) Remove the air bag module. To remove the clock spring
connector (squib connector) from the air bag module,
force the lock outward and pry it with a plain screwdriv-
er as shown at left so that no undue force will be
exerted on the connector when it is removed.
(3) The removed air bag module should be stored in a
clean, dry, flat place with the pad side up.
INSPECTION
MlJTDCFl Check the inner and outer cable for damage.
l Check the cable for smooth movement.
l Check the link protector for damage.
INSPECTION OF INDIVIDUAL PARTSRefer to Service Adjustment Procedures
- Individual Parts
inspection (P.l3-181).
SERVICE POINT OF INSTALLATION
M13TDDF
6.CONNECTION OF VACUUM HOSE TO VACUUM PUMPRoute the vacuum hose over the throttle cable and connect
the hose to the vacuum pump so as to prevent the
slackened hose from interfering with other parts.
TSB Revision
I
I
I
I~
I~~
I
Page 294 of 1146

Page 295 of 1146
COOLINGCONTENTS
M14AA..
ENGINE COOLANT TEMPERATURE GAUGE
UNIT, ENGINE COOLANT TEMPERATURESENSOR AND ENGINE COOLANT
TEMPERATURE SWITCH. . . . . . . . . . . . . . . . . . . . . . . . . . . . . . .._.__15
RADIATOR. . . . . . . . . . . . . . . . . . . . . . . . . . . . . . . . . . . . . . . . . . . . . . . . . . . . . . . . . . . .8
SERVICE ADJUSTMENT PROCEDURES . . . . . . . .7Cap Pressure Test
. . . . . . . . . . . . . . . . . . . . . . . . . . . . . . . . . . .._.......7Engine Coolant Concentration Test
. . . . . . . . . . . . . . . .‘7
L,Engine Coolant Leak Check
. . . . . . . . . . . . . . . . . . . . . . . . . . . .7Engine Coolant Replacement
. . . . . . . . . . . . . . . . . . . . . . . .7
SPECIFICATIONS. . . . . . . . . . . . .._.................................General Specifications
. ..___....___._...___.__............Lubricant
. . . . . . . . . . . . . . . . . . . . . . . . . . . . . . .._.................._........Sealant and Adhesive
. . . . . . . . . . . . . . . . .._...........Service Specifications
. . . . . . . . . . . . . . . . . . . . . . . . . .
THERMOSTAT. . . ..__......................_.._...................
TROUBLESHOOTING. . . . . . . . . . . . . . . . . . . . . . . . . . . . . . . . . . .._...No Rise in Temperature
Overheat
WATER PUMP, WATER PIPE AND WATER
HOSE. . . . _......_........_ _.._ .._..... . . . . . . . . . . . ._. . . . . . . . . . . . . . . . .
2
2
2
3
2
11
3
13
Page 296 of 1146
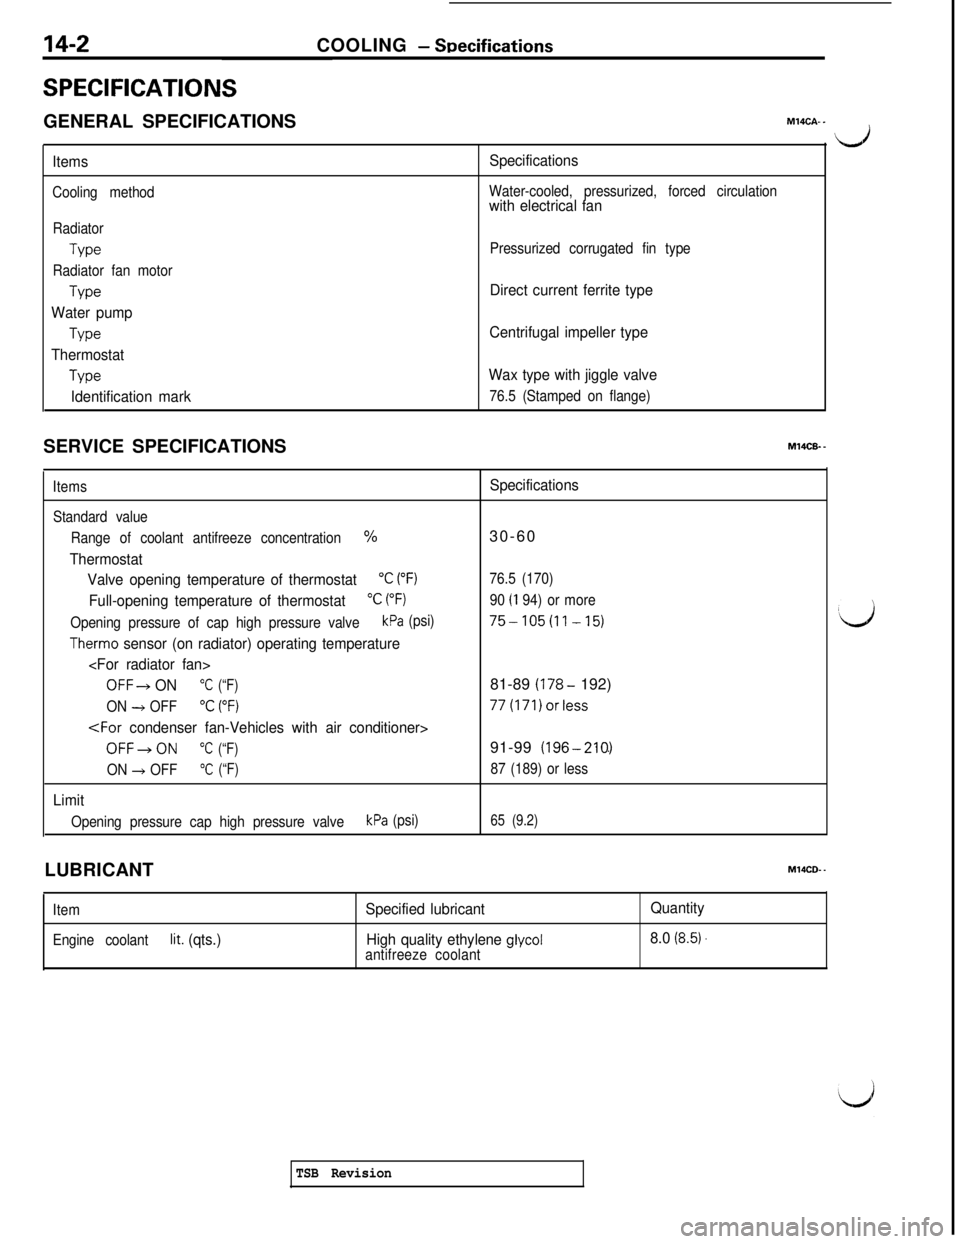
14-2COOLING - SDecifications
SPECIFICATIONSGENERAL SPECIFICATIONSMMCA..
Items
Cooling method
Radiator
Type
Radiator fan motor
Type
Water pump
Type
Thermostat
Type
Identification markSpecifications
Water-cooled, pressurized, forced circulationwith electrical fan
Pressurized corrugated fin type
Direct current ferrite type
Centrifugal impeller type
Wax type with jiggle valve
76.5 (Stamped on flange)
dSERVICE SPECIFICATIONS
Items
Standard valueSpecifications
Range of coolant antifreeze concentration%30-60
Thermostat
Valve opening temperature of thermostat
“C (“F)
Full-opening temperature of thermostat“C (“F)
Opening pressure of cap high pressure valvekPa (psi)
Therm0 sensor (on radiator) operating temperature
OFF-t ON“C (“F)
ON -+ OFF“C (“F)
OFF-ON“C (“F)
ON + OFF“C (“F)
Limit
76.5 (170)
90
(I 94) or more
75-105(11-15)81-89
(178- 192)77(171)orless
91-99
(196-210.)
87 (189) or less
Opening pressure cap high pressure valve
kPa (psi)65 (9.2)LUBRICANT
MlQCD- -
ItemSpecified lubricantQuantity
Engine coolantlit. (qts.)High quality ethylene glycol8.0 (8.5).
antifreeze coolant
‘d
TSB Revision
Page 297 of 1146
COOLING - Specifications / Troubleshooting
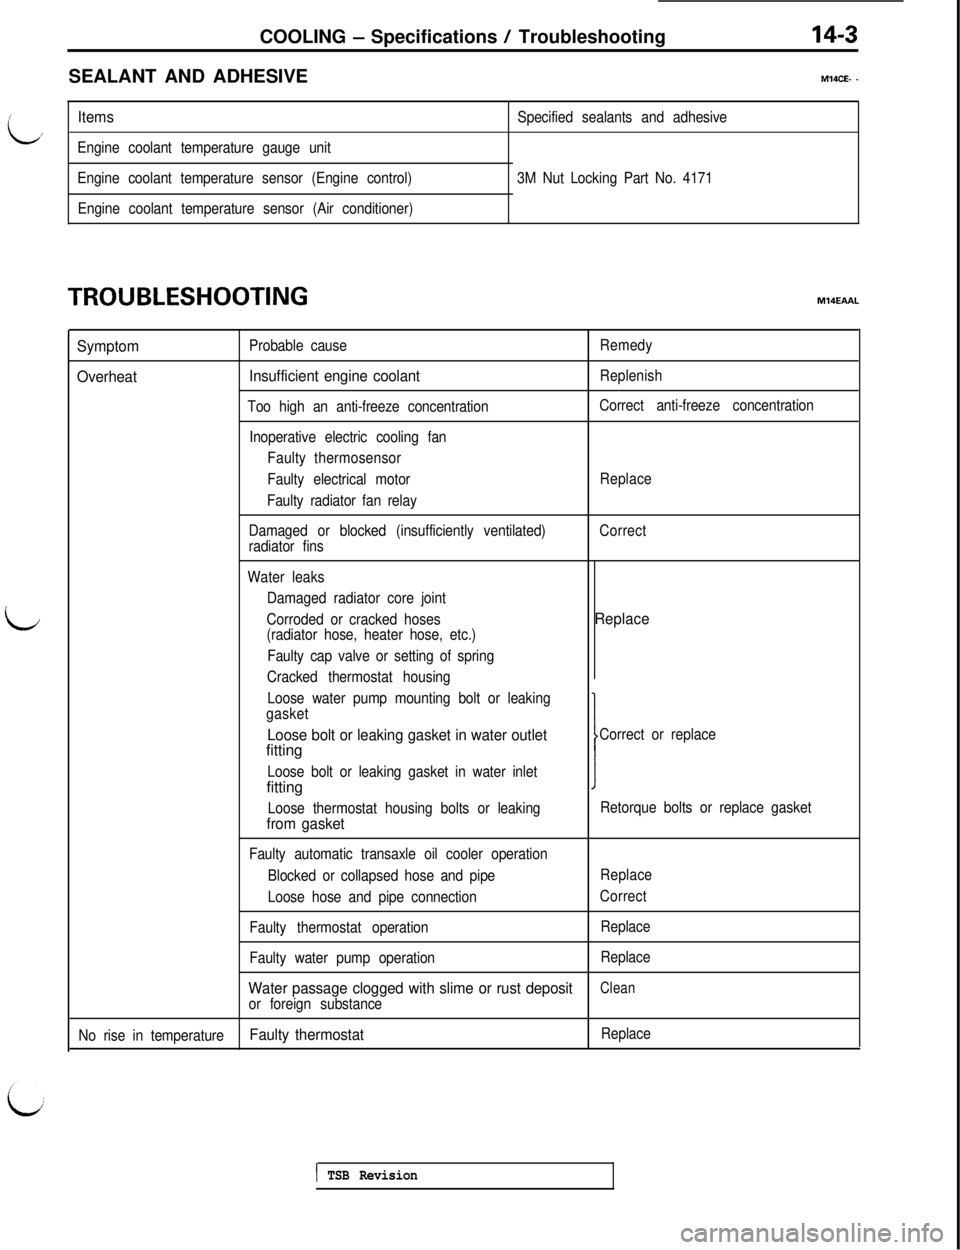
SEALANT AND ADHESIVE14-3
MMCE- -
/
id
ItemsSpecified sealants and adhesive/
Engine coolant temperature gauge unit
Engine coolant temperature sensor (Engine control)
Engine coolant temperature sensor (Air conditioner)3M Nut Locking Part No. 4171
TROUBLESHOOTING
L
MllEAAL
Symptom
OverheatProbable cause
Insufficient engine coolant
Too high an anti-freeze concentration
Inoperative electric cooling fan
Faulty thermosensor
Faulty electrical motor
Faulty radiator fan relayRemedy
Replenish
Correct anti-freeze concentration
Replace
Damaged or blocked (insufficiently ventilated)
radiator finsCorrect
Water leaks
Damaged radiator core joint
Corroded or cracked hoses
(radiator hose, heater hose, etc.)
Faulty cap valve or setting of spring
Cracked thermostat housing
Loose water pump mounting bolt or leaking
gasket
Replace
Loose bolt or leaking gasket in water outlet
I
Correct or replacefitting
Loose bolt or leaking gasket in water inletfitting
Loose thermostat housing bolts or leakingfrom gasket
Retorque bolts or replace gasket
Faulty automatic transaxle oil cooler operation
Blocked or collapsed hose and pipeReplace
Loose hose and pipe connectionCorrect
Faulty thermostat operationReplace
Faulty water pump operationReplace
Water passage clogged with slime or rust depositClean
or foreign substance
No rise in temperature
Faulty thermostatReplace
( TSB Revision
Page 298 of 1146
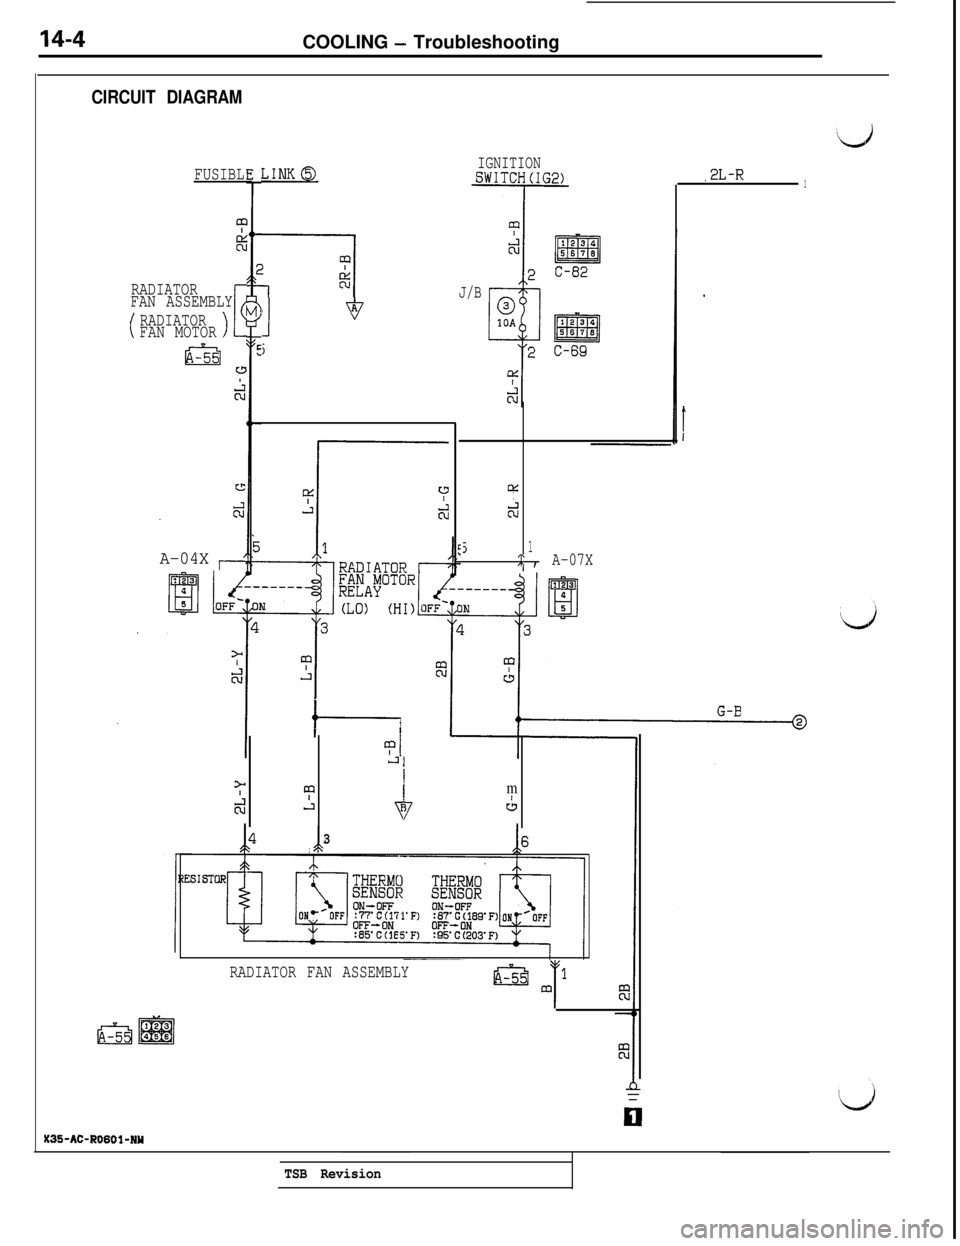
14-4COOLING - Troubleshooting
CIRCUIT DIAGRAM
FUSIBL
RADIATOR
FAN ASSEMBLY
(RADIATOR
,
FAN MOTOR>r{
!&w
F
A-04X ,---LINK0
J
0A
j
IGNITION
J/B
lxI
ti
51.: ,A-07X
J1
>II
ticpLi6
m
R&
b3
,2L-R1
RADIATOR FAN ASSEMBLYL!a ml
T
X35-AC-NWOl-NY
TSB Revision
Page 299 of 1146
COOLING - Troubleshootina14-5
i
L
@2L-R
:---I
I
I
I
I
III1 nI
I
1 6IIIII
I
I
I
I
I
I
I
I
ii
II
! cI1
I--@
G-B
FUSIBLELINK@
_------ __._ -_--
L-
AIR CONDITIONER
COMPRESSOR LOCK
CONTROLLERRADIATOR
FAN MOTOR
RELAYCLO)
A-36
A-45
@!A
TSB Revision
Page 300 of 1146
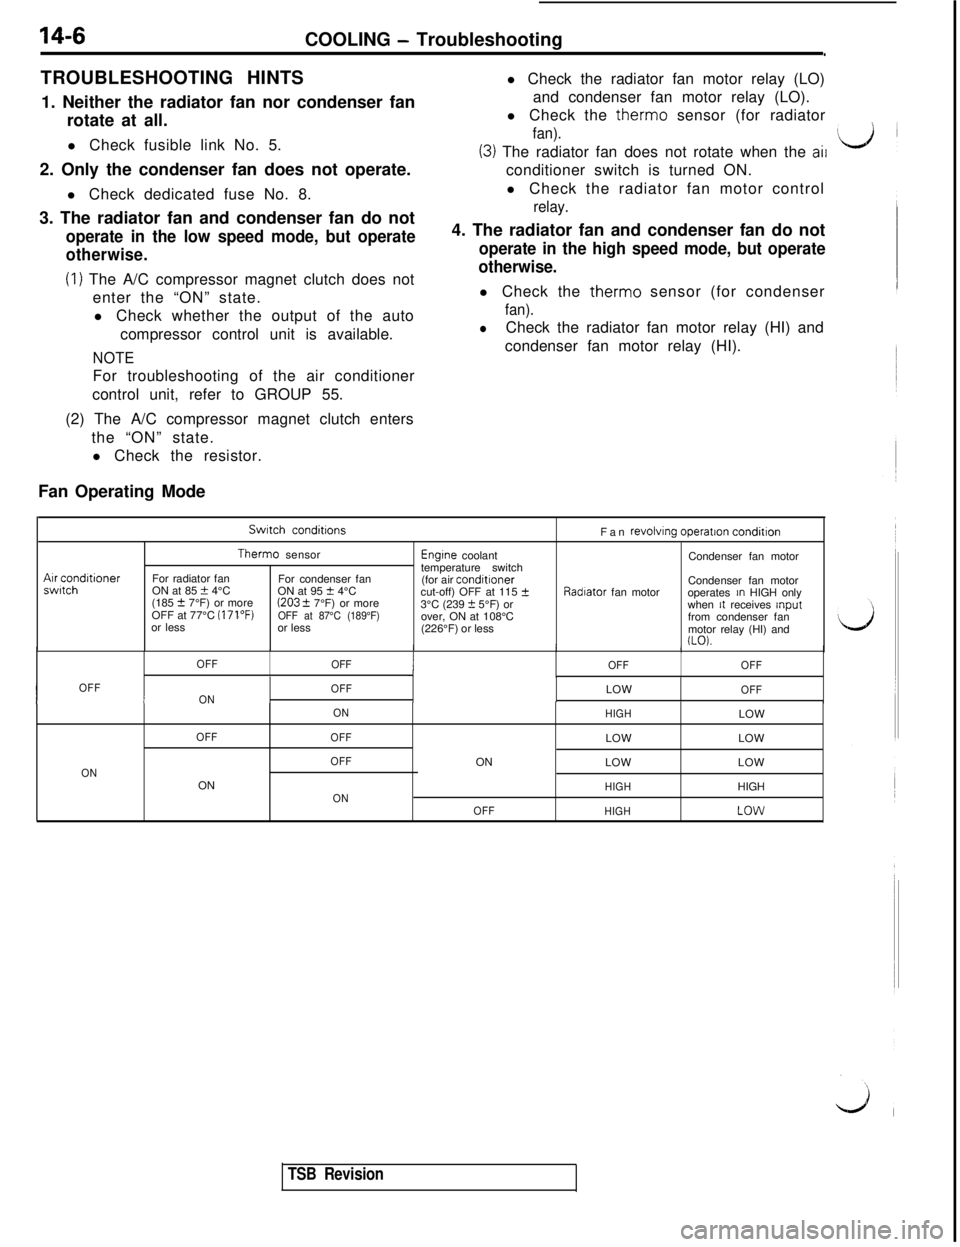
14-6COOLING - Troubleshooting.TROUBLESHOOTING HINTS
1. Neither the radiator fan nor condenser fan
rotate at all.
l Check fusible link No. 5.
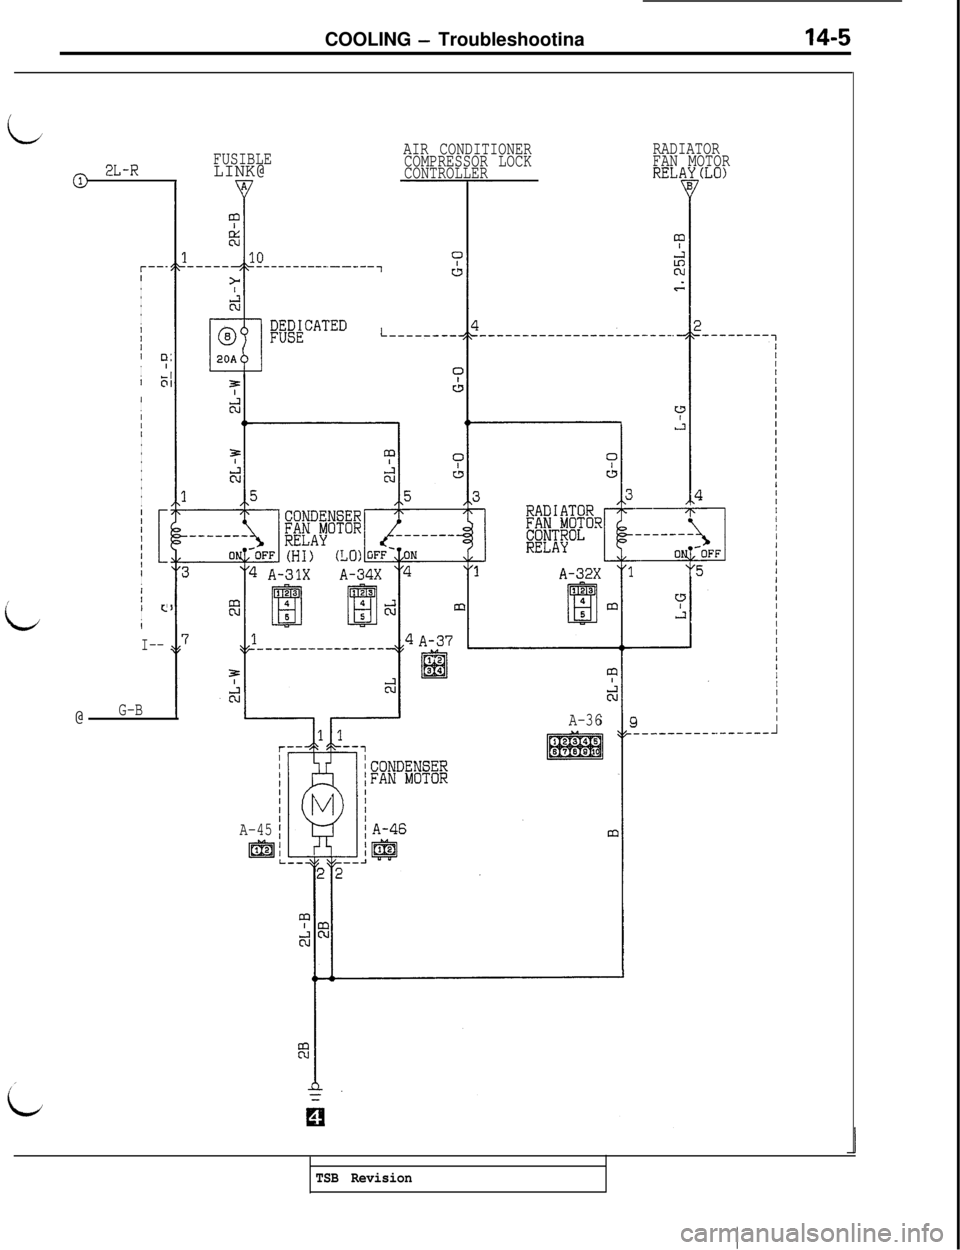
2. Only the condenser fan does not operate.
l Check dedicated fuse No. 8.
3. The radiator fan and condenser fan do not
operate in the low speed mode, but operate
otherwise.
(1) The A/C compressor magnet clutch does not
enter the “ON” state.
l Check whether the output of the auto
compressor control unit is available.
NOTEFor troubleshooting of the air conditioner
control unit, refer to GROUP 55.
(2) The A/C compressor magnet clutch enters
the “ON” state.
l Check the resistor.
Fan Operating Model Check the radiator fan motor relay (LO)
and condenser fan motor relay (LO).
l Check the therm0 sensor (for radiator
fan).
(3) The radiator fan does not rotate when the ailconditioner switch is turned ON.
l Check the radiator fan motor control
relay.4. The radiator fan and condenser fan do not
operate in the high speed mode, but operate
otherwise.l Check the therm0 sensor (for condenser
fan).
lCheck the radiator fan motor relay (HI) and
condenser fan motor relay (HI).Air
conditionerswitch
Switch conditionsTherm0 sensor
For radiator fan
For condenser fan
ON at 85
k 4°C
ON at 95 t 4°C
(185 f 7°F) or more(203 + 7°F) or more
OFF at 77°C (171°F)
OFF at 87°C (189°F)or less
or lessEngine coolant
temperature switch
(for air conditioner
cut-off) OFF at 115
+3°C (239 2 5°F) or
over, ON at 108°C
(226°F) or lessFan revolving operation
conditionCondenser fan motor
Condenser fan motorRadiator fan motor
operates
In HIGH only
when it receives input
from condenser fan
motor relay (HI) and
U-0).I/I/
OFF
OFF
OFFOFF
IOFFIOFF
ONLOWOFF
ON
HIGHLOW
OFF
OFFLOWLOW
OFF
ONON
LOWLOW
ON
HIGH
ONHIGH
OFF
HIGHLOW
TSB Revision