MITSUBISHI SPYDER 1990 Service Repair Manual
Manufacturer: MITSUBISHI, Model Year: 1990, Model line: SPYDER, Model: MITSUBISHI SPYDER 1990Pages: 2103, PDF Size: 68.98 MB
Page 151 of 2103
Front Case,, ENGINE OVERHAUL Shaft and ‘Pan
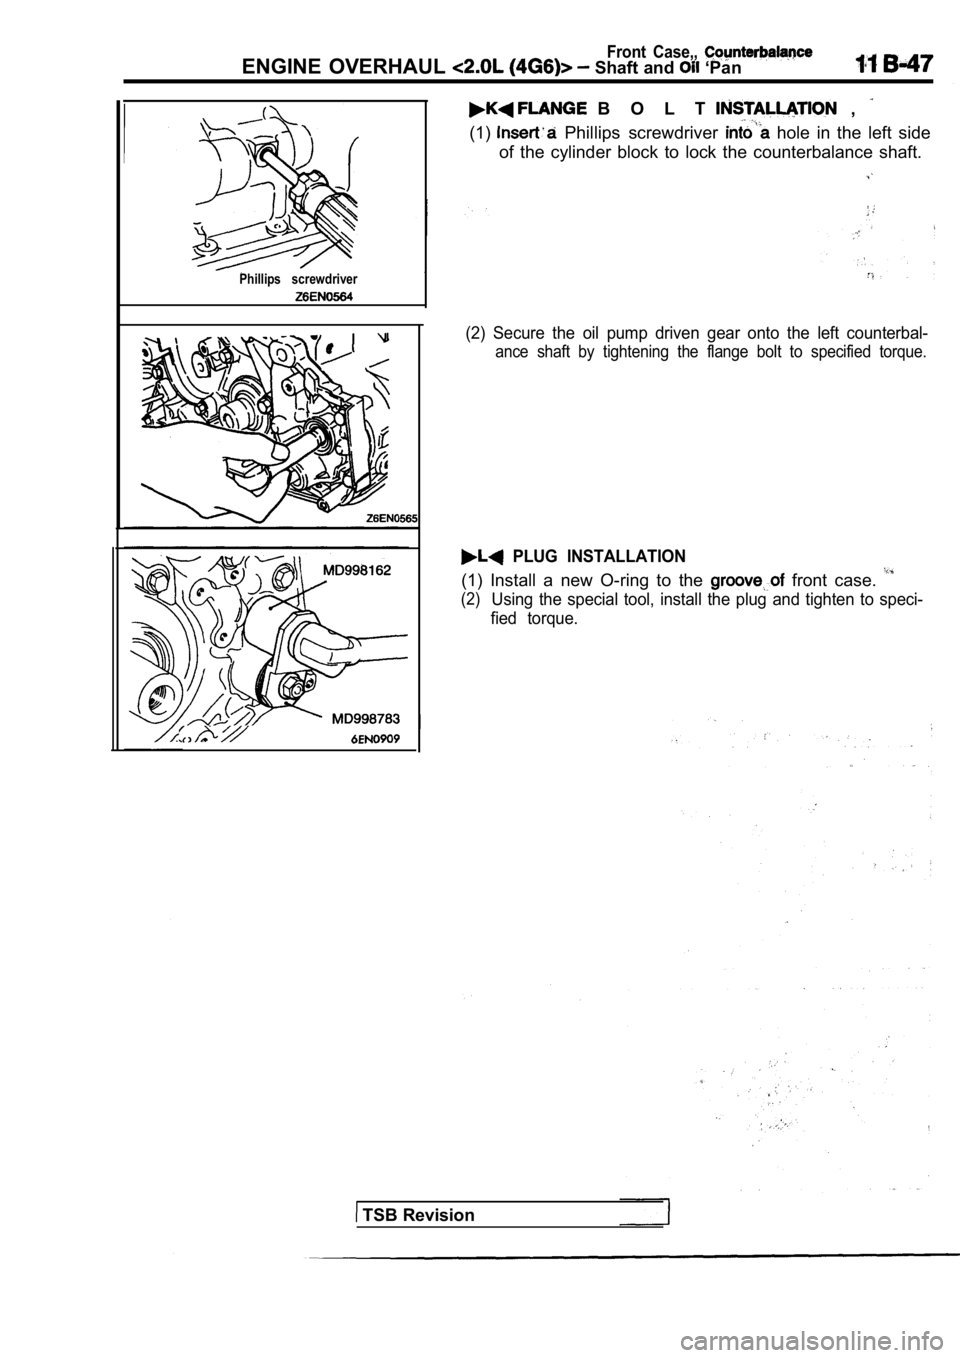
Phillips screwdriver
B O L T ,
(1) Phillips screwdriver hole in the left side
of the cylinder block to lock the counterbalance sh aft.
(2) Secure the oil pump driven gear onto the left c ounterbal-
ance shaft by tightening the flange bolt to specified torque.
PLUG INSTALLATION
(1) Install a new O-ring to the front case.
(2)Using the special tool, install the plug and tighten to speci-
fied torque.
TSB Revision
Page 152 of 2103
Front Case, ENGINE OVERHAUL Shaft and. Pan
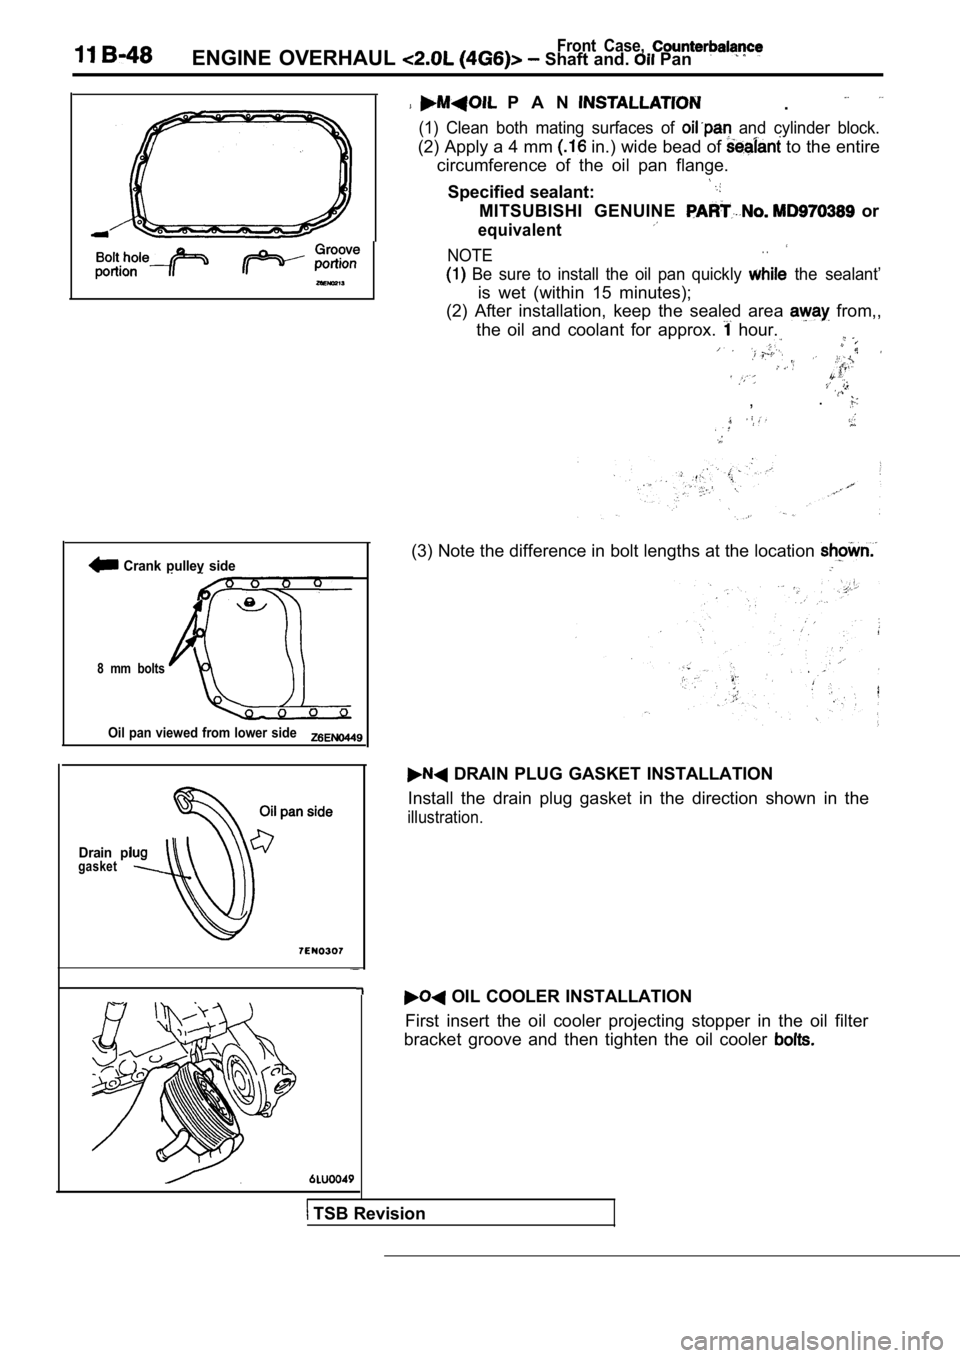
Crank pulley side
8 mm bolts
Oil pan viewed from lower side
Drain pigasket
P A N .
(1) Clean both mating surfaces of and cylinder block.
(2) Apply a 4 mm in.) wide bead of to the entire
circumference of the oil pan flange.
Specified sealant:
MITSUBISHI GENUINE or
equivalent
NOTE. .
Be sure to install the oil pan quickly the sealant’
is wet (within 15 minutes);
(2) After installation, keep the sealed area
from,,
the oil and coolant for approx.
hour.
, .
(3) Note the difference in bolt lengths at the loca
tion
DRAIN PLUG GASKET INSTALLATION
Install the drain plug gasket in the direction show n in the
illustration.
OIL COOLER INSTALLATION
First insert the oil cooler projecting stopper in t he oil filter
bracket groove and then tighten the oil cooler
TSB Revision
Page 153 of 2103
Front Case,
ENGINE OVERHAUL Shaft and
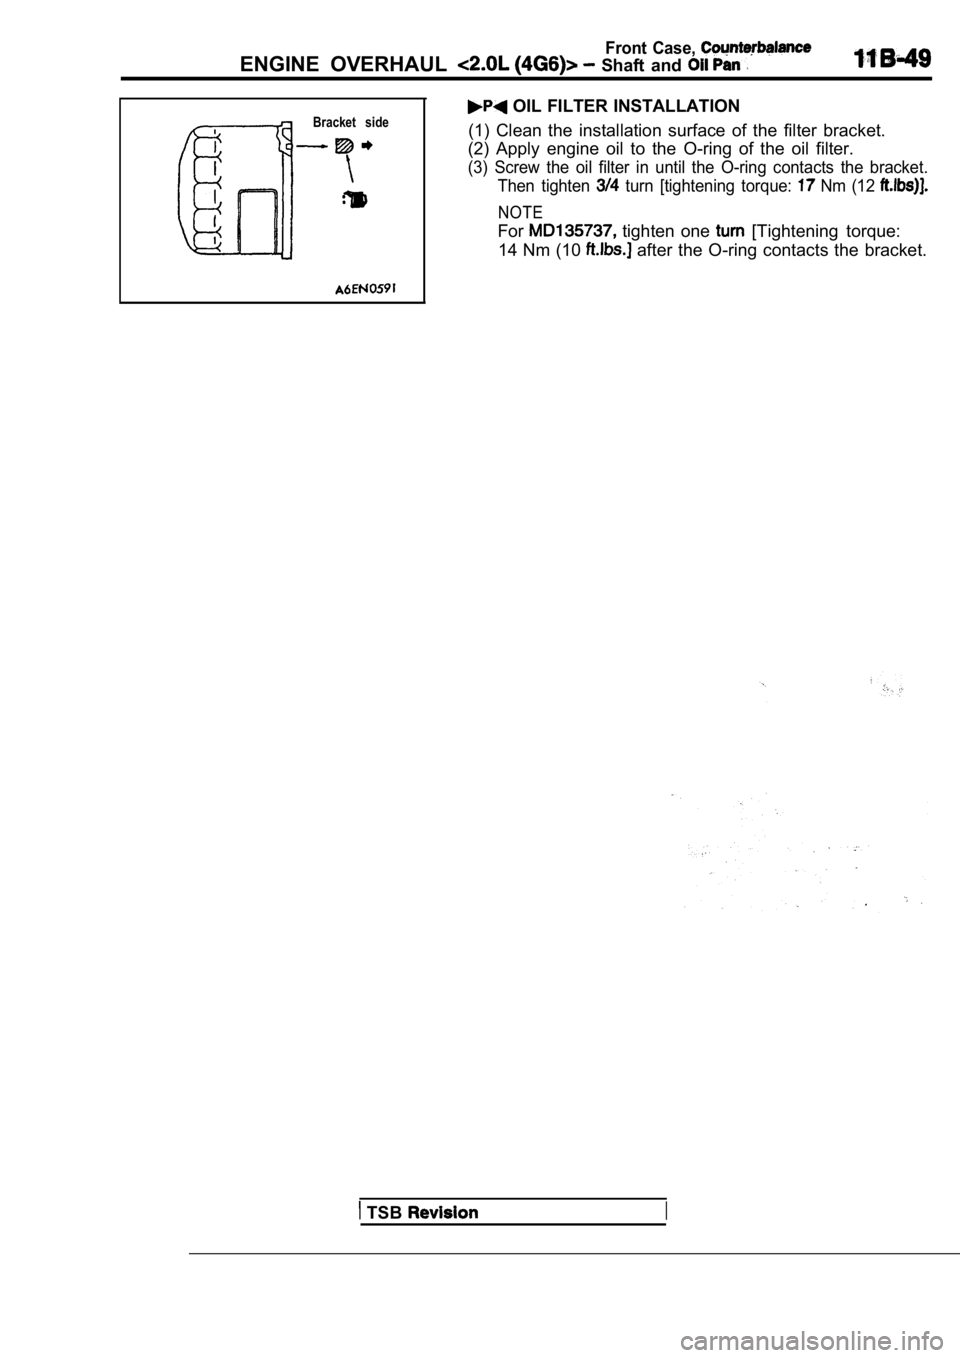
Bracket side OIL FILTER INSTALLATION
(1) Clean the installation surface of the filter br acket.
(2) Apply engine oil to the O-ring of the oil filte r.
(3) Screw the oil filter in until the O-ring contacts the bracket.
Then tighten
turn [tightening torque: Nm (12
NOTE
For tighten one [Tightening torque:
14 Nm (10
after the O-ring contacts the bracket.
TSB I
Page 154 of 2103
Front Case, Counterbalance
ENGINE Shaft and
INSPECTION
FRONT CASE
(1) Check oil holes for clogging and if necessary.
(2)’ Check left counterbalance shaft front bearing
for
Wear, damage and seizure. If there is anything wron g’
with the section, replace the front
(3) Check the front case for cracks and other damag e.
place cracked or damaged front case.
OIL SEAL
(1) Check the oil seal lip for wear and damage. Rep lace
oil seal if necessary.
(2) Check the oil seal lip for deterioration. Repla ce oil seal
if necessary.
I
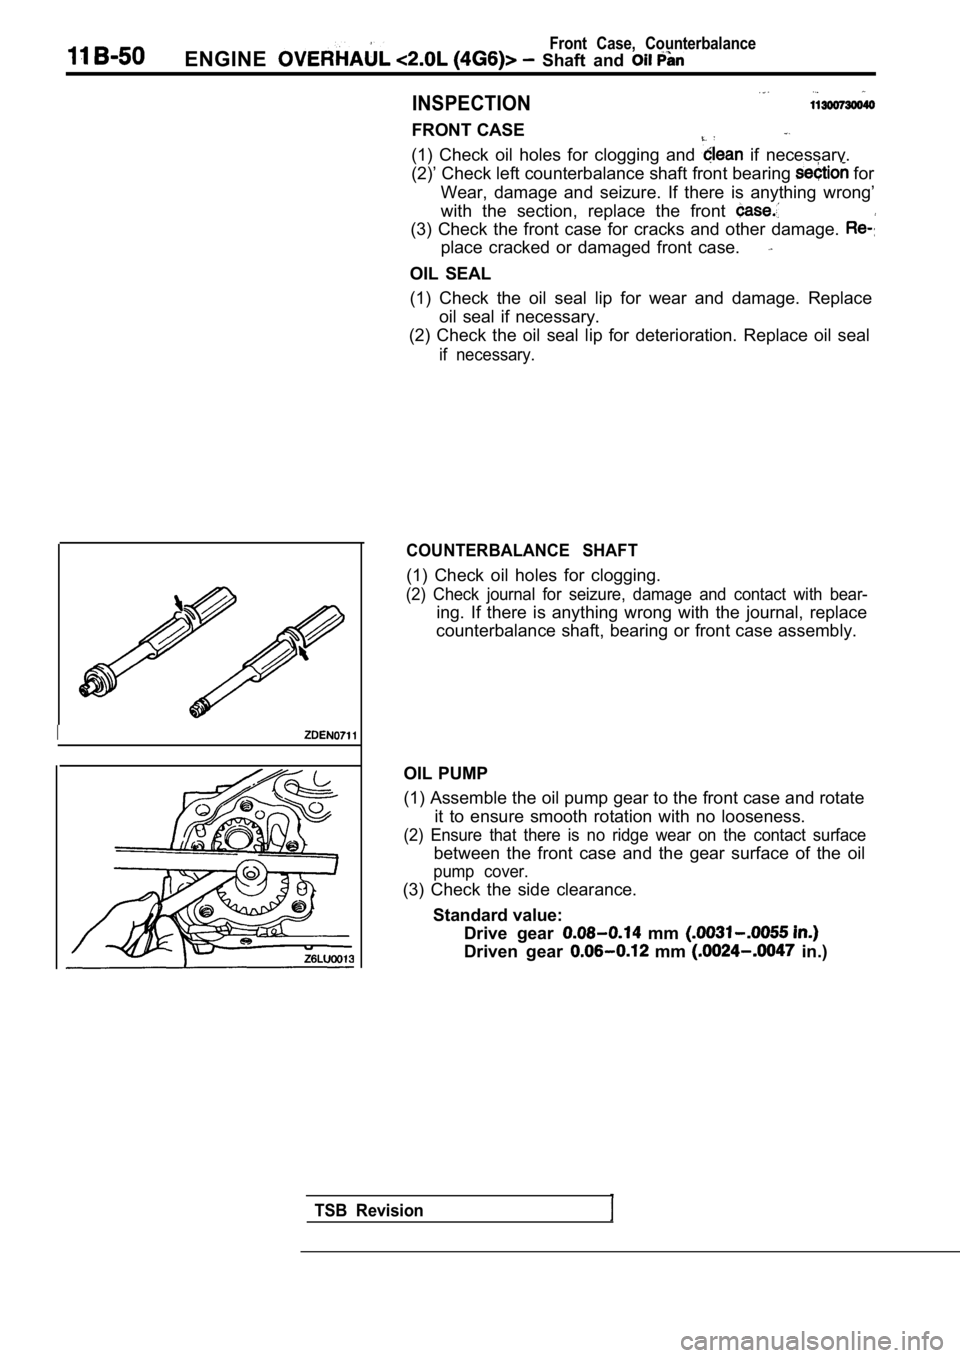
COUNTERBALANCE SHAFT
(1) Check oil holes for clogging.
(2) Check journal for seizure, damage and contact w ith bear-
ing. If there is anything wrong with the journal, replace
counterbalance shaft, bearing or front case assembl y.
OIL PUMP
(1) Assemble the oil pump gear to the front case an d rotate
it to ensure smooth rotation with no looseness.
(2) Ensure that there is no ridge wear on the conta ct surface
between the front case and the gear surface of the oil
pump cover.
(3) Check the side clearance.
Standard value: Drive gear
mm
Driven gear mm in.)
TSB Revision
Page 155 of 2103
ENGINE OVERHAUL Piston and Connecting 1
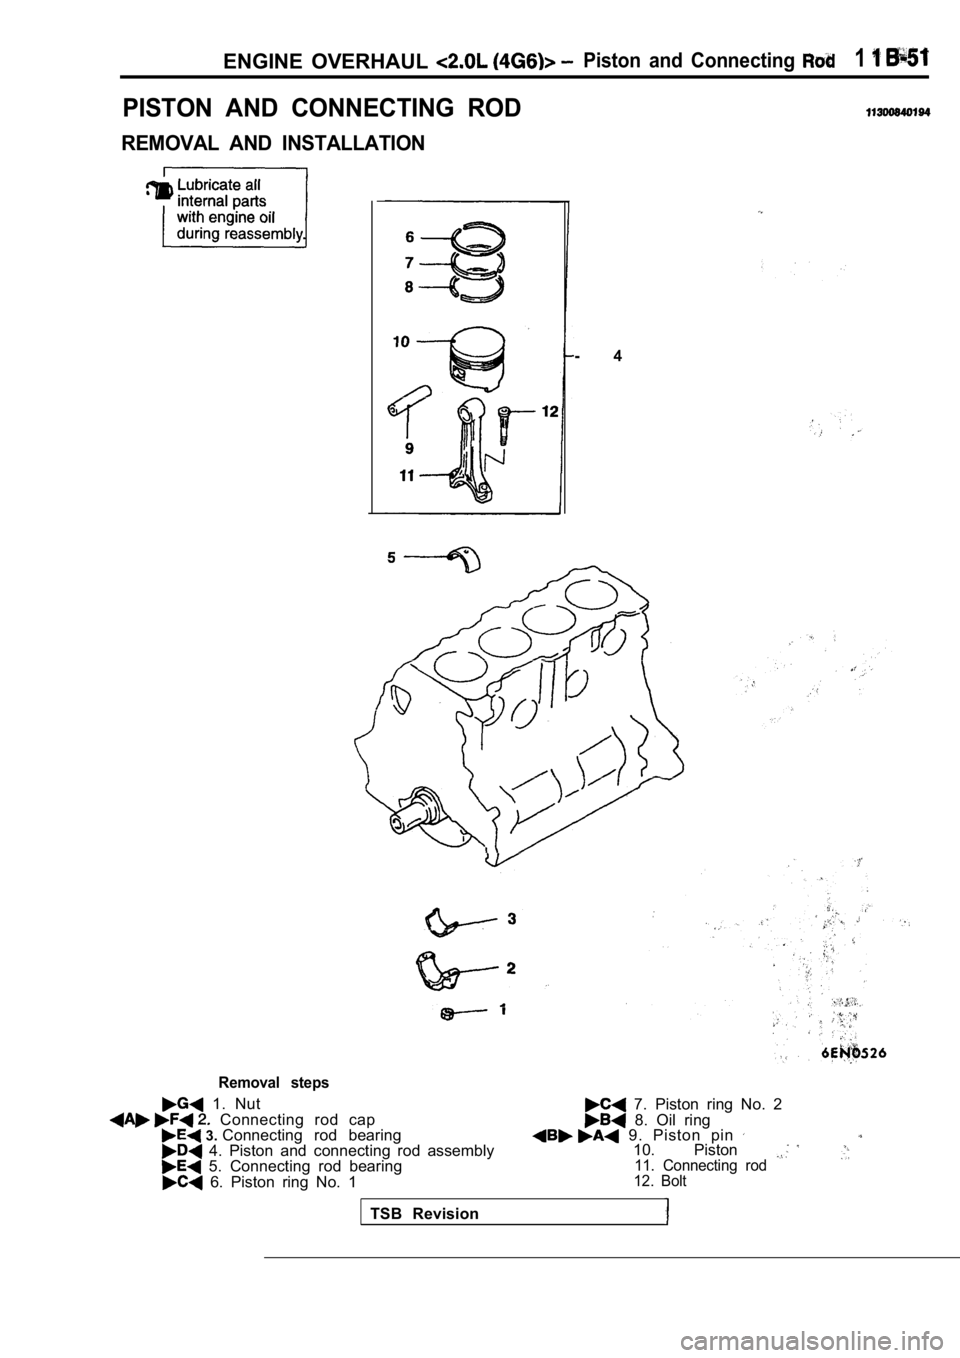
PISTON AND CONNECTING ROD
REMOVAL AND INSTALLATION
- 4
Removal steps
1. Nut Connecting rod cap 3. Connecting rod bearing 4. Piston and connecting rod assembly 5. Connecting rod bearing 6. Piston ring No. 1
7. Piston ring No. 2 8. Oil ring 9. Piston pin 10. Piston 11. Connecting rod
12. Bolt
TSB Revision
Page 156 of 2103
11 ENGINE OVERHAUL Piston and Rod
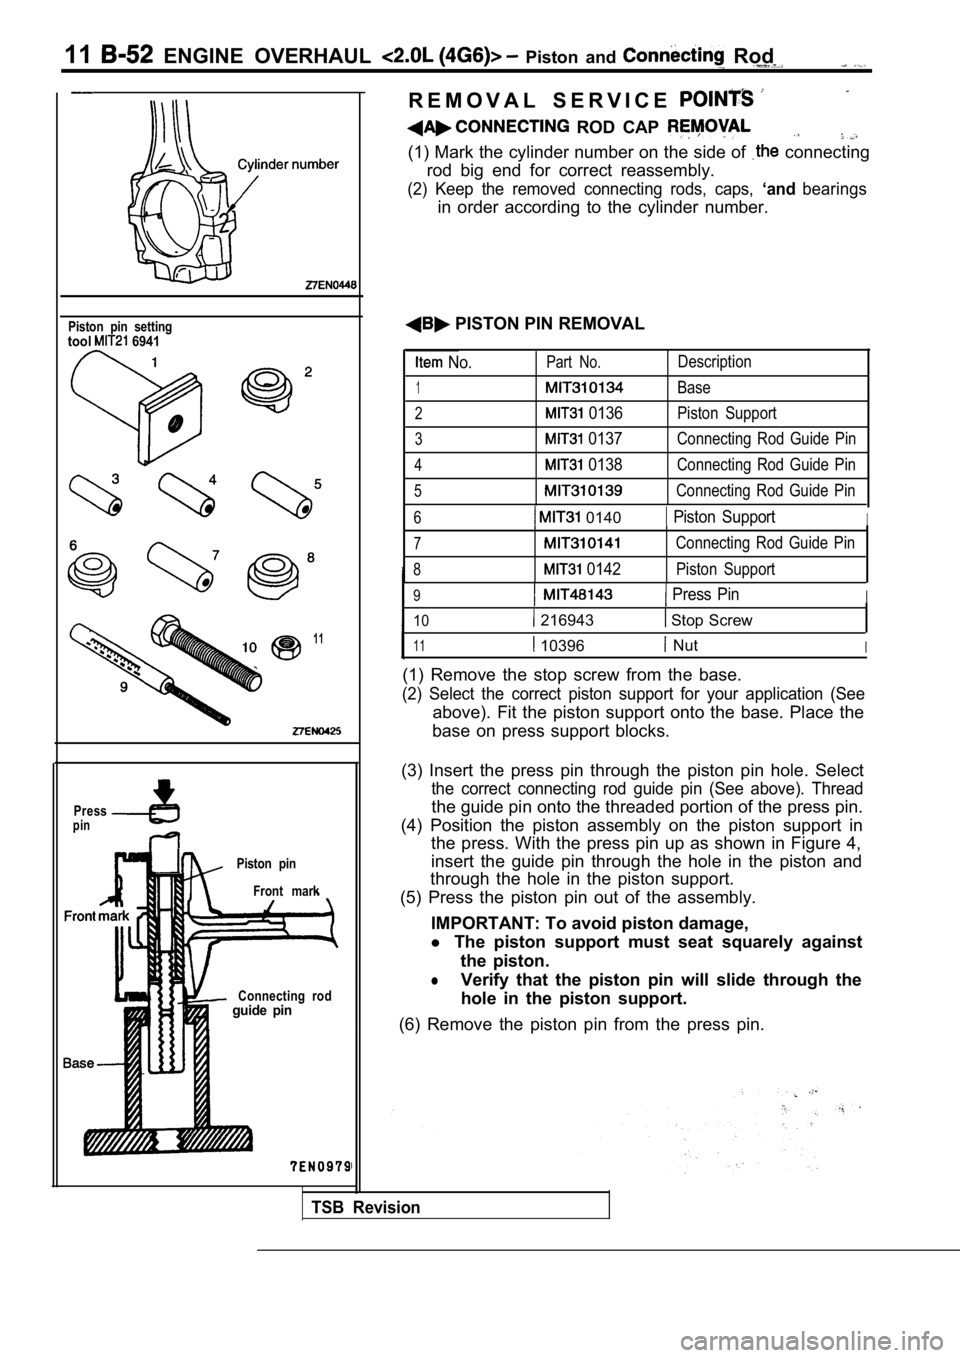
Piston pin settingtool 6941
11
Presspin
Piston pinFront mark
Connecting rod
guide pin
R E M O V A L S E R V I C E
ROD CAP
(1) Mark the cylinder number on the side of connecting
rod big end for correct reassembly.
(2) Keep the removed connecting rods, caps, ‘andbearings
in order according to the cylinder number.
PISTON PIN REMOVAL
No.Part No.
1
2 0136
3 0137
4 0138
5
Description
Base
Piston Support
Connecting Rod Guide Pin
Connecting Rod Guide Pin
Connecting Rod Guide Pin
6 0140 Piston SupportI
7
8 0142
Connecting Rod Guide Pin
Piston Support
9 Press PinI
10 216943 Stop Screw
11 10396 NutI
(1) Remove the stop screw from the base.
(2) Select the correct piston support for your appl ication (See
above). Fit the piston support onto the base. Place the
base on press support blocks.
TSB Revision
(3) Insert the press pin through the piston pin hol e. Select
the correct connecting rod guide pin (See above). T hread
the guide pin onto the threaded portion of the press pin.
(4) Position the piston assembly on the piston supp ort in
the press. With the press pin up as shown in Figure 4,
insert the guide pin through the hole in the piston and
through the hole in the piston support.
(5) Press the piston pin out of the assembly.
IMPORTANT: To avoid piston damage,
l The piston support must seat squarely against
the piston.
lVerify that the piston pin will slide through the
hole in the piston support.
(6) Remove the piston pin from the press pin.
Page 157 of 2103
ENGINE OVERHAUL Piston and Connecting Rod
Piston pin
Base
Front
Base
Connecting rod
guide pin
StopLock nut
1
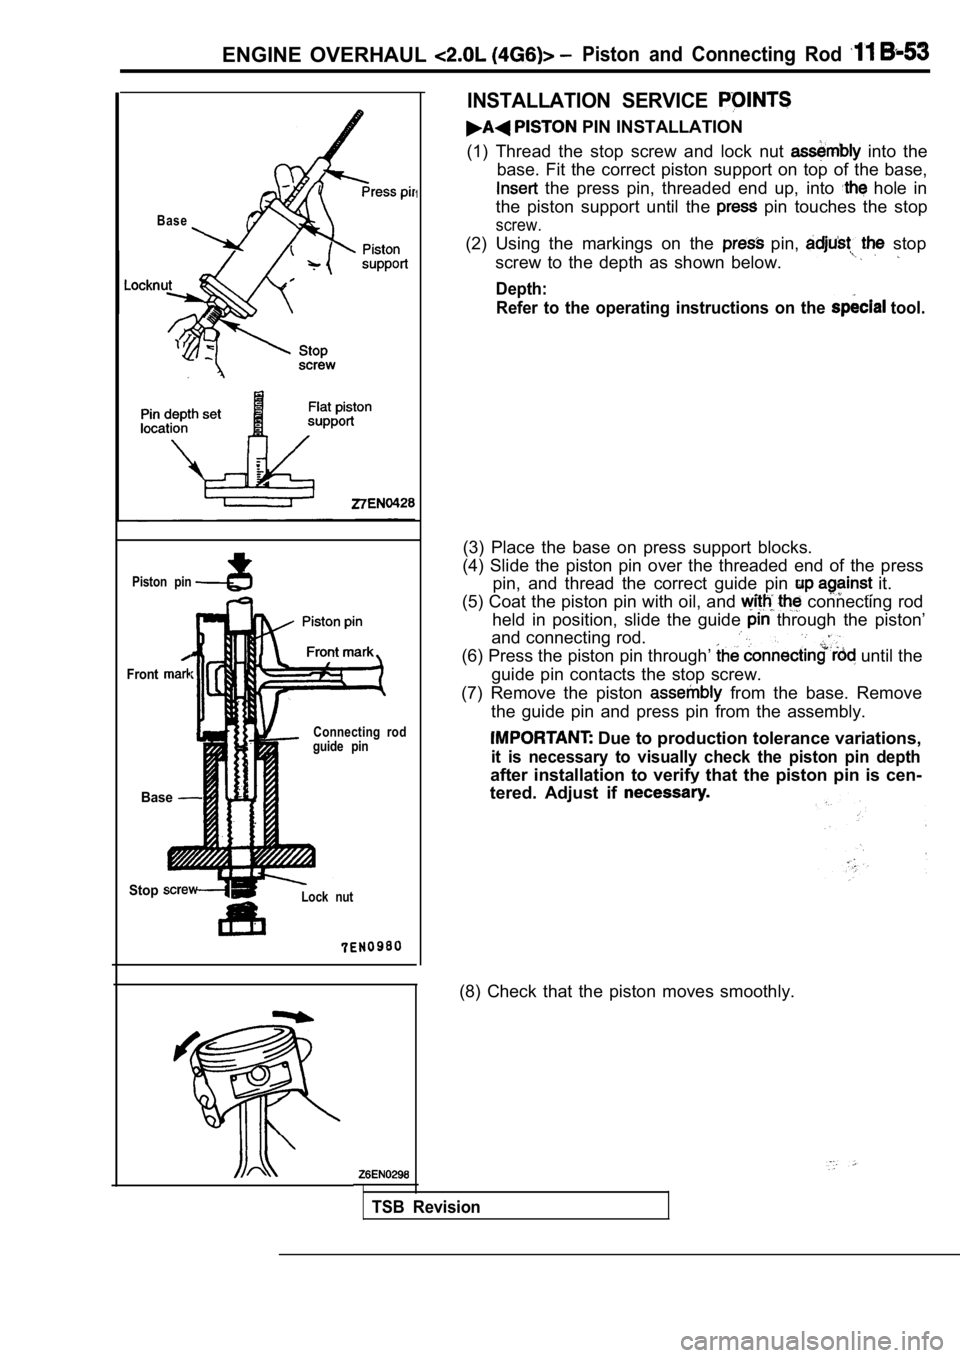
INSTALLATION SERVICE
PIN INSTALLATION
(1) Thread the stop screw and lock nut
into the
base. Fit the correct piston support on top of the base,
the press pin, threaded end up, into hole in
the piston support until the
pin touches the stop
screw.
(2) Using the markings on the pin, stop
screw to the depth as shown below.
Depth: Refer to the operating instructions on the
tool.
(3) Place the base on press support blocks.
(4) Slide the piston pin over the threaded end of t he press
pin, and thread the correct guide pin
it.
(5) Coat the piston pin with oil, and
connecting rod
held in position, slide the guide
through the piston’
and connecting rod.
(6) Press the piston pin through’ until the
guide pin contacts the stop screw.
(7) Remove the piston
from the base. Remove
the guide pin and press pin from the assembly.
Due to production tolerance variations,
it is necessary to visually check the piston pin de pth
after installation to verify that the piston pin is cen-
tered. Adjust if
(8) Check that the piston moves smoothly.
TSB Revision
Page 158 of 2103
11 E N G I N E O V E R H A U L Piston and
Side rail gap
Identification mark
Identification mark Size mark
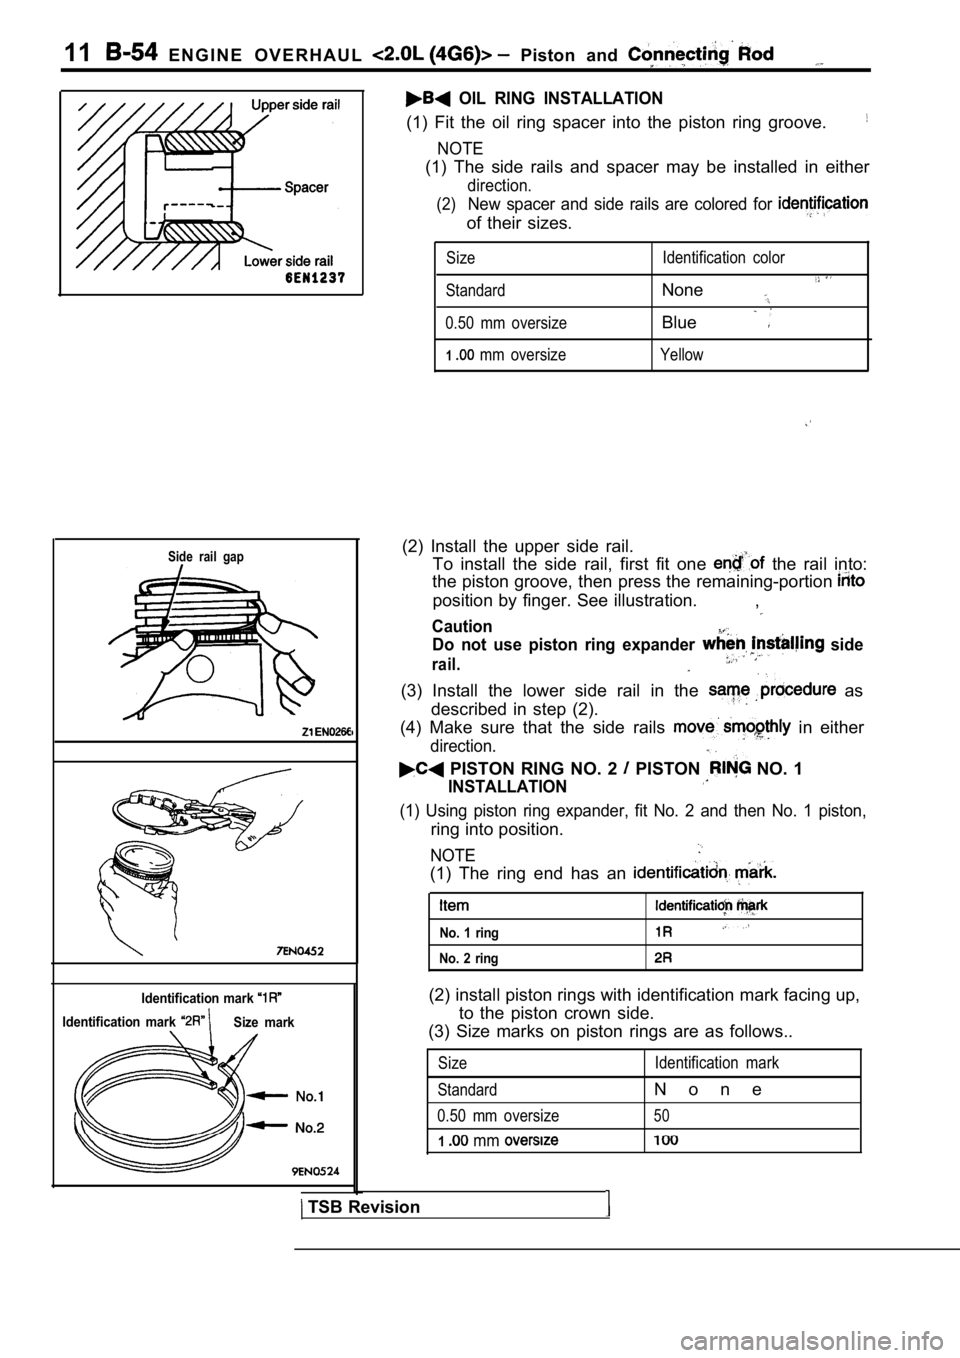
OIL RING INSTALLATION
(1) Fit the oil ring spacer into the piston ring groove.
NOTE
(1) The side rails and spacer may be installed in e ither
direction.
(2)
New spacer and side rails are colored for
of their sizes.
Size
Standard
0.50 mm oversize
1 mm oversize Identification color
None
Blue
Yellow
(2) Install the upper side rail.
To install the side rail, first fit one
the rail into:
the piston groove, then press the remaining-portion
position by finger. See illustration. ,
Caution
Do not use piston ring expander side
rail.
(3) Install the lower side rail in the as
described in step (2).
(4) Make sure that the side rails
in either
direction.
PISTON RING NO. 2 PISTON NO. 1
INSTALLATION
(1) Using piston ring expander, fit No. 2 and then No. 1 piston,
ring into position.
NOTE
(1) The ring end has an
No. 1 ring
No. 2 ring
(2) install piston rings with identification mark facing up,
to the piston crown side.
(3) Size marks on piston rings are as follows..
Size
Standard
0.50 mm oversize
1 mm
Identification mark
N o n e
50
TSB Revision
Page 159 of 2103
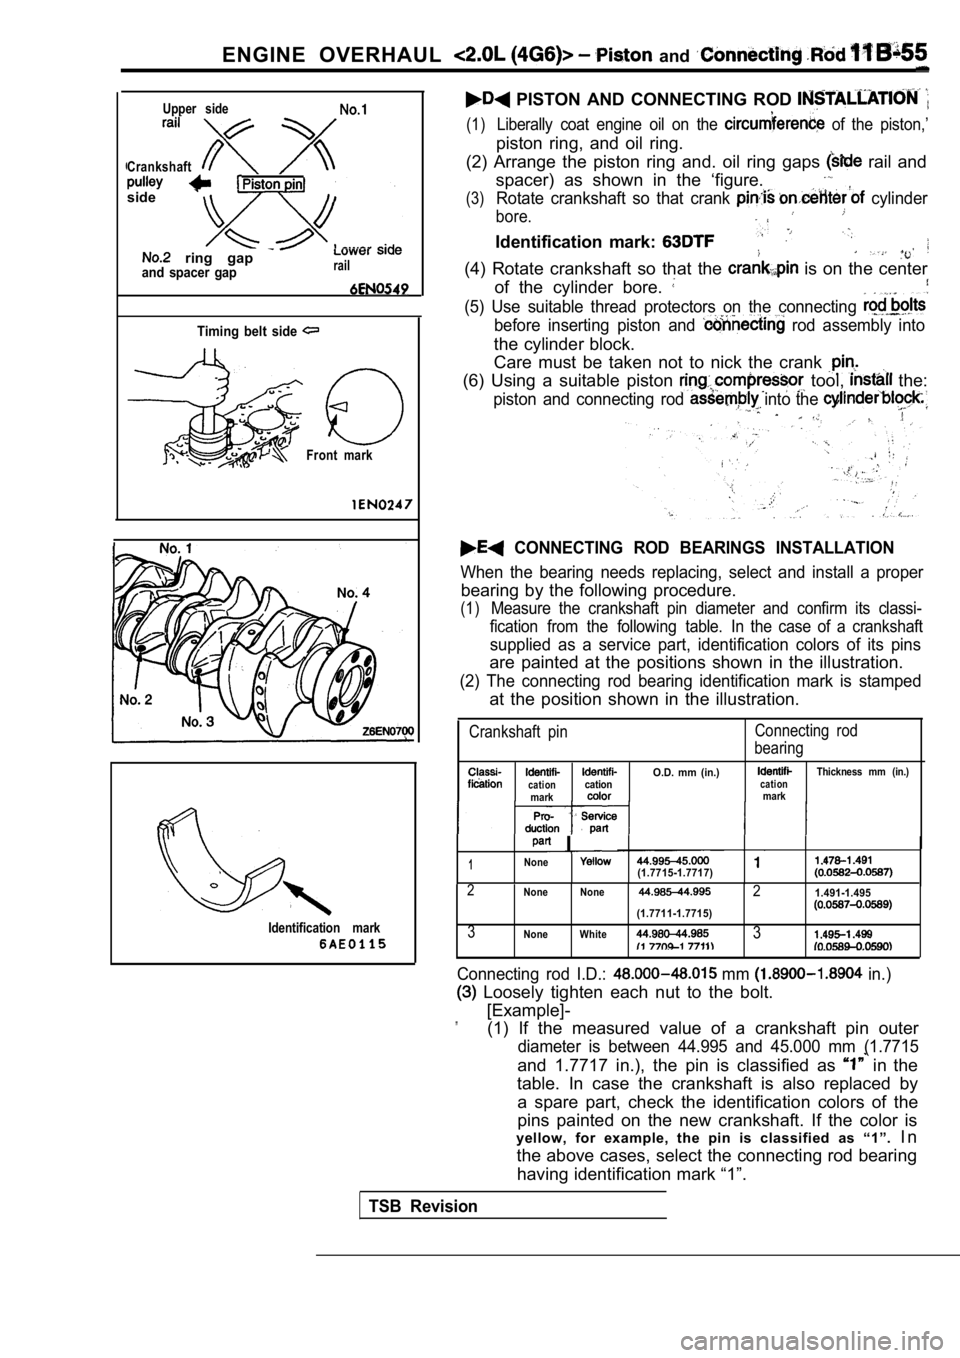
ENGINE OVERHAUL and
CrankshaftUpper side
side
ring gap and spacer gaprail
Timing belt side
Front mark
Identification mark
PISTON AND CONNECTING ROD
(1)Liberally coat engine oil on the of the piston,’
piston ring, and oil ring.
(2) Arrange the piston ring and. oil ring gaps
rail and
spacer) as shown in the ‘figure.
(3)Rotate crankshaft so that crank cylinder
bore.
Identification mark:
(4) Rotate crankshaft so that the is on the center
of the cylinder bore.
(5) Use suitable thread protectors on the connectin g
before inserting piston and rod assembly into
the cylinder block.
Care must be taken not to nick the crank
(6) Using a suitable piston tool, the:
piston and connecting rod into the ,
CONNECTING ROD BEARINGS INSTALLATION
When the bearing needs replacing, select and instal l a proper
bearing by the following procedure.
(1)Measure the crankshaft pin diameter and confirm its classi-
fication from the following table. In the case of a crankshaft
supplied as a service part, identification colors of its pins
are painted at the positions shown in the illustrat ion.
(2) The connecting rod bearing identification mark is stamped
at the position shown in the illustration.
Crankshaft pinConnecting rod
bearing
O.D. mm (in.)Thickness mm (in.)cationcationcationmarkmark
I
1None(1.7715-1.7717)
2None None21.491-1.495
(1.7711-1.7715)
3None White3
Connecting rod I.D.: mm in.)
Loosely tighten each nut to the bolt.
[Example]-
”(1) If the measured value of a crankshaft pin outer
diameter is between 44.995 and 45.000 mm (1.7715
and 1.7717 in.), the pin is classified as in the
table. In case the crankshaft is also replaced by
a spare part, check the identification colors of th e
pins painted on the new crankshaft. If the color is
yellow, for example, the pin is classified as “1”. I n
the above cases, select the connecting rod bearing having identification mark “1”.
TSB Revision
Page 160 of 2103
11ENGINE OVERHAUL Piston and
No.
Notch
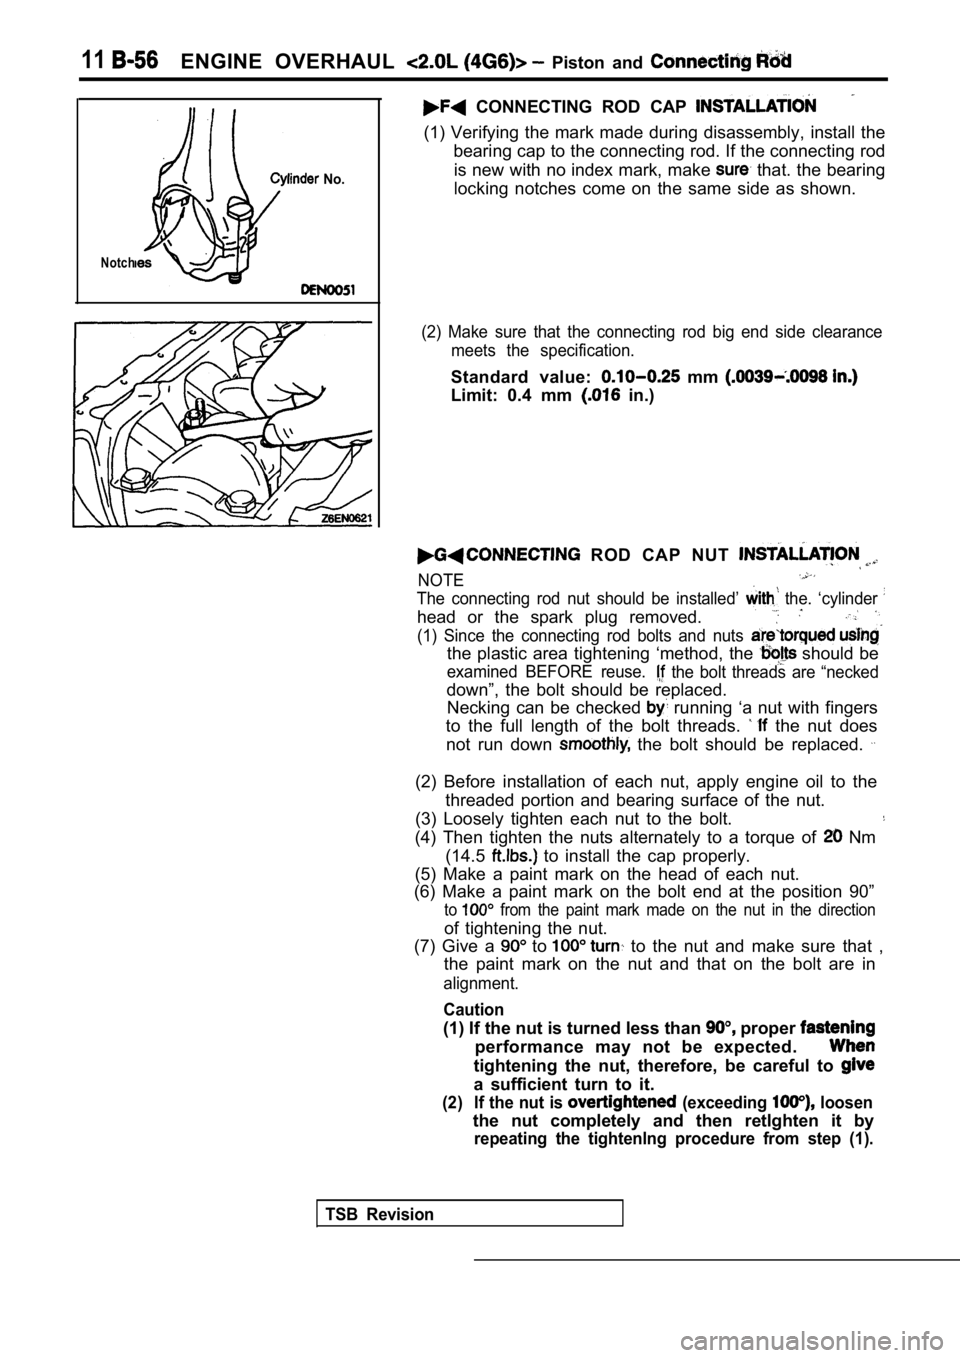
CONNECTING ROD CAP
(1) Verifying the mark made during disassembly, install the
bearing cap to the connecting rod. If the connectin g rod
is new with no index mark, make
that. the bearing
locking notches come on the same side as shown.
(2) Make sure that the connecting rod big end side clearance
meets the specification.
Standard value: mm
Limit: 0.4 mm in.)
ROD CAP NUT
NOTE
The connecting rod nut should be installed’ the. ‘cylinder
head or the spark plug removed.
(1) Since the connecting rod bolts and nuts
the plastic area tightening ‘method, the should be
examined BEFORE reuse. the bolt threads are “necked
down”, the bolt should be replaced. Necking can be checked
running ‘a nut with fingers
to the full length of the bolt threads.
the nut does
not run down
the bolt should be replaced.
(2) Before installation of each nut, apply engine o il to the
threaded portion and bearing surface of the nut.
(3) Loosely tighten each nut to the bolt.
(4) Then tighten the nuts alternately to a torque o f Nm
(14.5
to install the cap properly.
(5) Make a paint mark on the head of each nut.
(6) Make a paint mark on the bolt end at the positi on 90”
to from the paint mark made on the nut in the direction
of tightening the nut.
(7) Give a
to to the nut and make sure that ,
the paint mark on the nut and that on the bolt are in
alignment.
Caution
(1) If the nut is turned less than proper
performance may not be expected.
tightening the nut, therefore, be careful to
a sufficient turn to it.
(2) If the nut is (exceeding loosen
the nut completely and then retlghten it by
repeating the tightenlng procedure from step (1).
TSB Revision