NISSAN TEANA 2008 Service Manual
Manufacturer: NISSAN, Model Year: 2008, Model line: TEANA, Model: NISSAN TEANA 2008Pages: 5121, PDF Size: 69.03 MB
Page 3011 of 5121
INT-34
< ON-VEHICLE REPAIR >
FRONT DOOR FINISHER
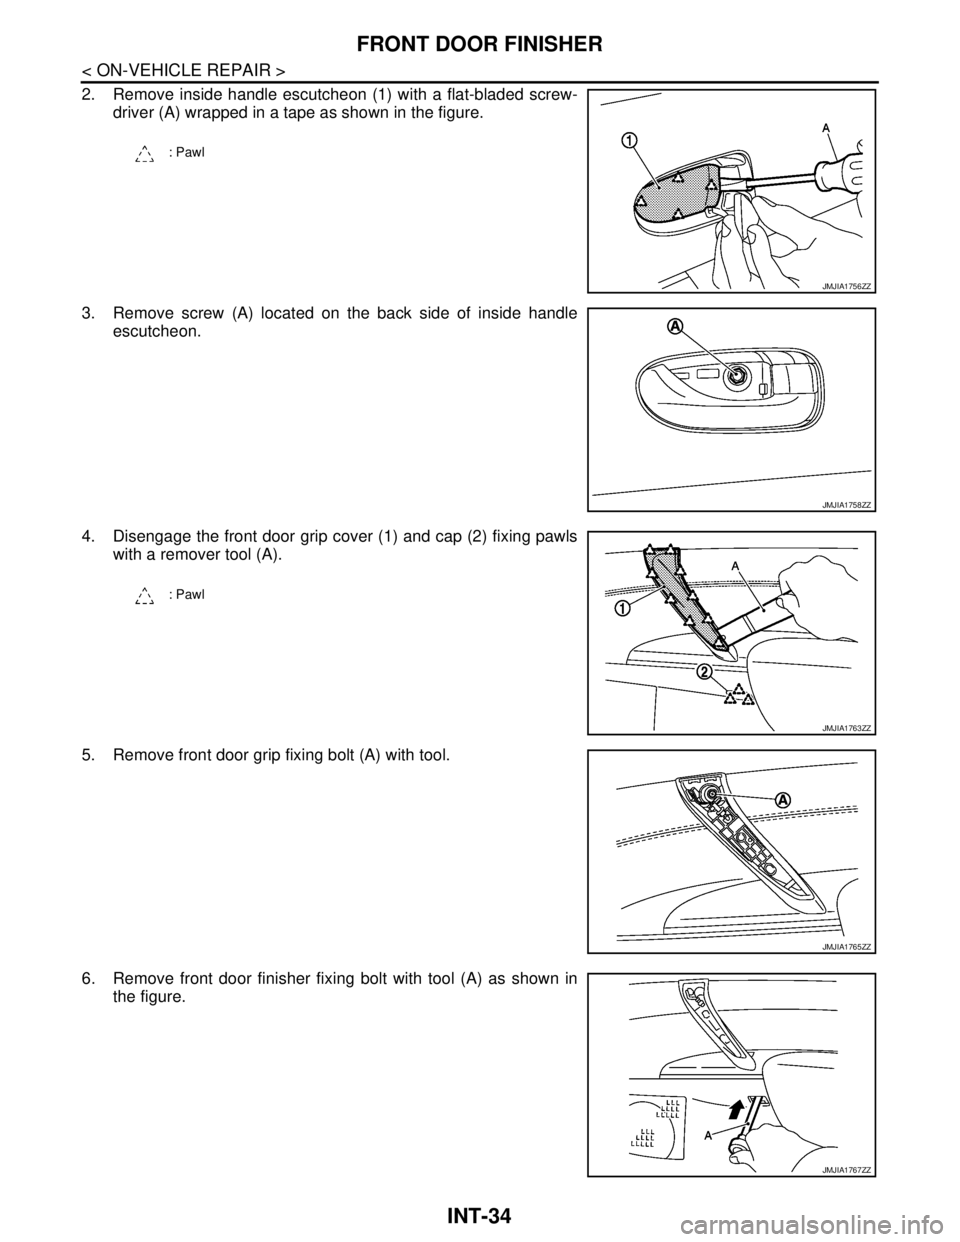
2. Remove inside handle escutcheon (1) with a flat-bladed screw-
driver (A) wrapped in a tape as shown in the figure.
3. Remove screw (A) located on the back side of inside handle
escutcheon.
4. Disengage the front door grip cover (1) and cap (2) fixing pawls
with a remover tool (A).
5. Remove front door grip fixing bolt (A) with tool.
6. Remove front door finisher fixing bolt with tool (A) as shown in
the figure.
: Pawl
JMJIA1756ZZ
JMJIA1758ZZ
: Pawl
JMJIA1763ZZ
JMJIA1765ZZ
JMJIA1767ZZ
Page 3012 of 5121
FRONT DOOR FINISHER
INT-35
< ON-VEHICLE REPAIR >
C
D
E
F
G
H
I
K
L
MA
B
INT
N
O
P
7. Remove step lamp and then disconnect the harness connector. Refer to INL-96, "Removal and Installa-
tion".
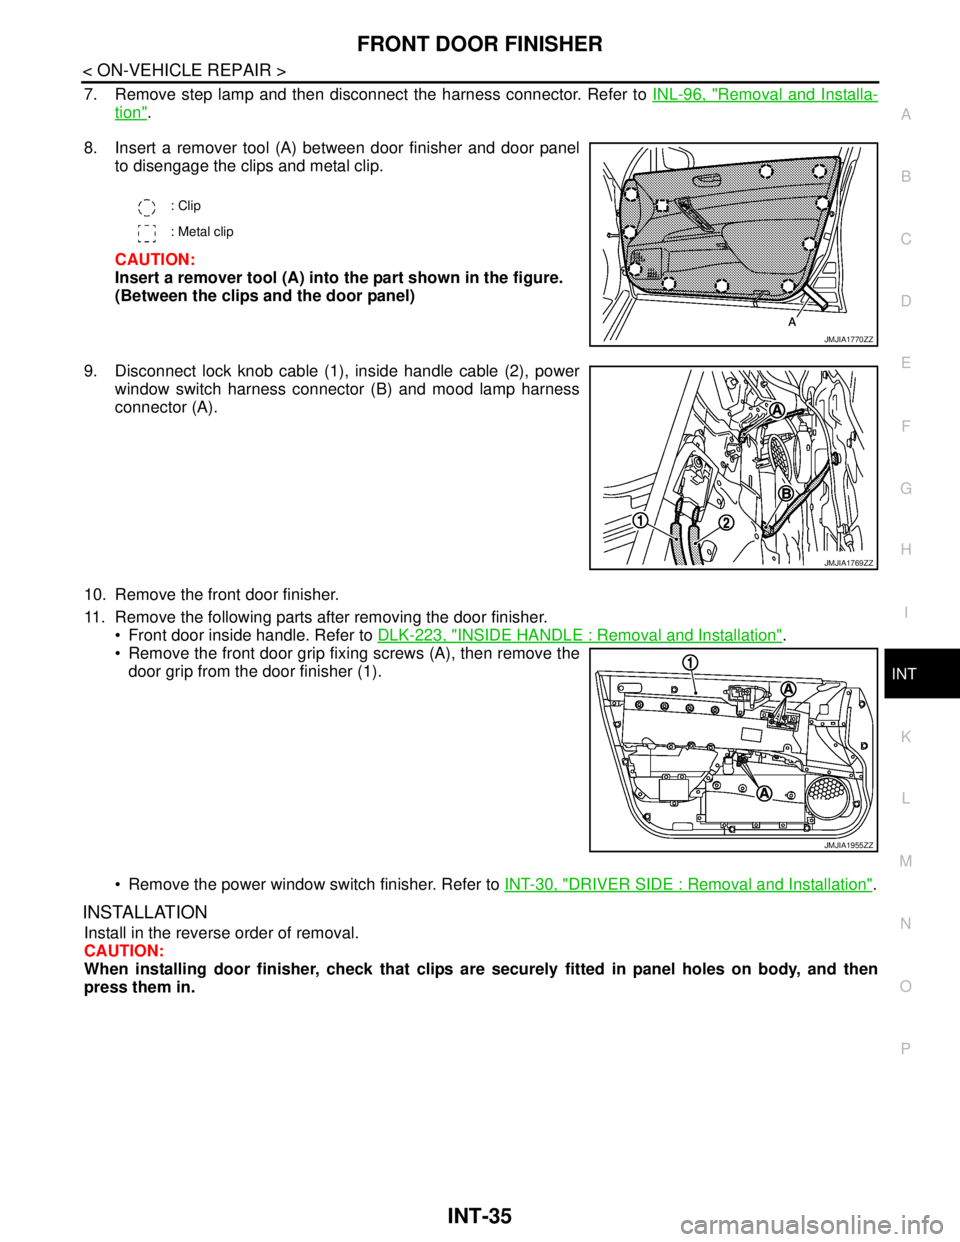
8. Insert a remover tool (A) between door finisher and door panel
to disengage the clips and metal clip.
CAUTION:
Insert a remover tool (A) into the part shown in the figure.
(Between the clips and the door panel)
9. Disconnect lock knob cable (1), inside handle cable (2), power
window switch harness connector (B) and mood lamp harness
connector (A).
10. Remove the front door finisher.
11. Remove the following parts after removing the door finisher.
Front door inside handle. Refer to DLK-223, "
INSIDE HANDLE : Removal and Installation".
Remove the front door grip fixing screws (A), then remove the
door grip from the door finisher (1).
Remove the power window switch finisher. Refer to INT-30, "
DRIVER SIDE : Removal and Installation".
INSTALLATION
Install in the reverse order of removal.
CAUTION:
When installing door finisher, check that clips are securely fitted in panel holes on body, and then
press them in.
: Clip
: Metal clip
JMJIA1770ZZ
JMJIA1769ZZ
JMJIA1955ZZ
Page 3013 of 5121
INT-36
< ON-VEHICLE REPAIR >
REAR DOOR FINISHER
REAR DOOR FINISHER
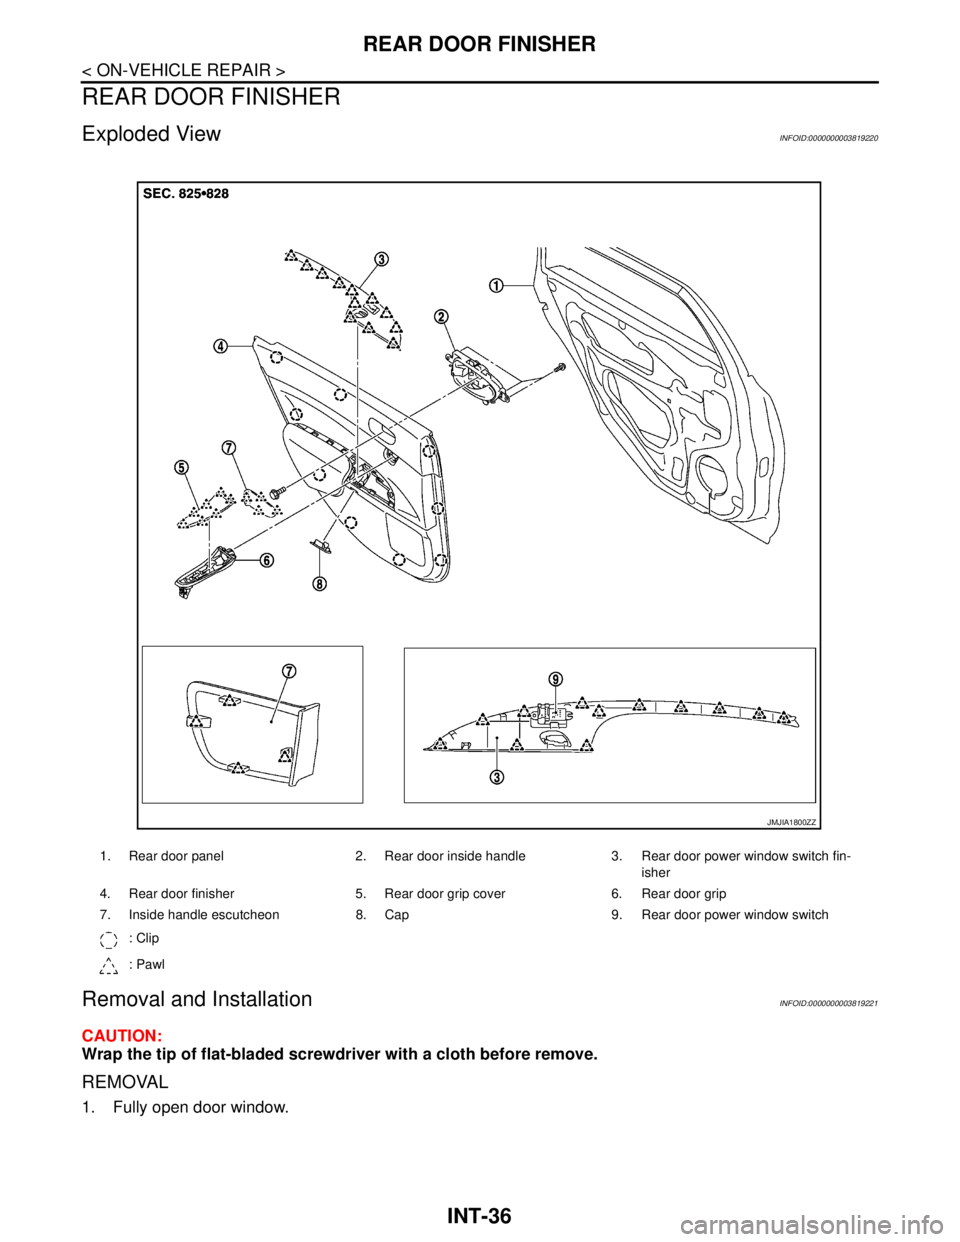
Exploded ViewINFOID:0000000003819220
Removal and InstallationINFOID:0000000003819221
CAUTION:
Wrap the tip of flat-bladed screwdriver with a cloth before remove.
REMOVAL
1. Fully open door window.
1. Rear door panel 2. Rear door inside handle 3. Rear door power window switch fin-
isher
4. Rear door finisher 5. Rear door grip cover 6. Rear door grip
7. Inside handle escutcheon 8. Cap 9. Rear door power window switch
: Clip
: Pawl
JMJIA1800ZZ
Page 3014 of 5121
REAR DOOR FINISHER
INT-37
< ON-VEHICLE REPAIR >
C
D
E
F
G
H
I
K
L
MA
B
INT
N
O
P
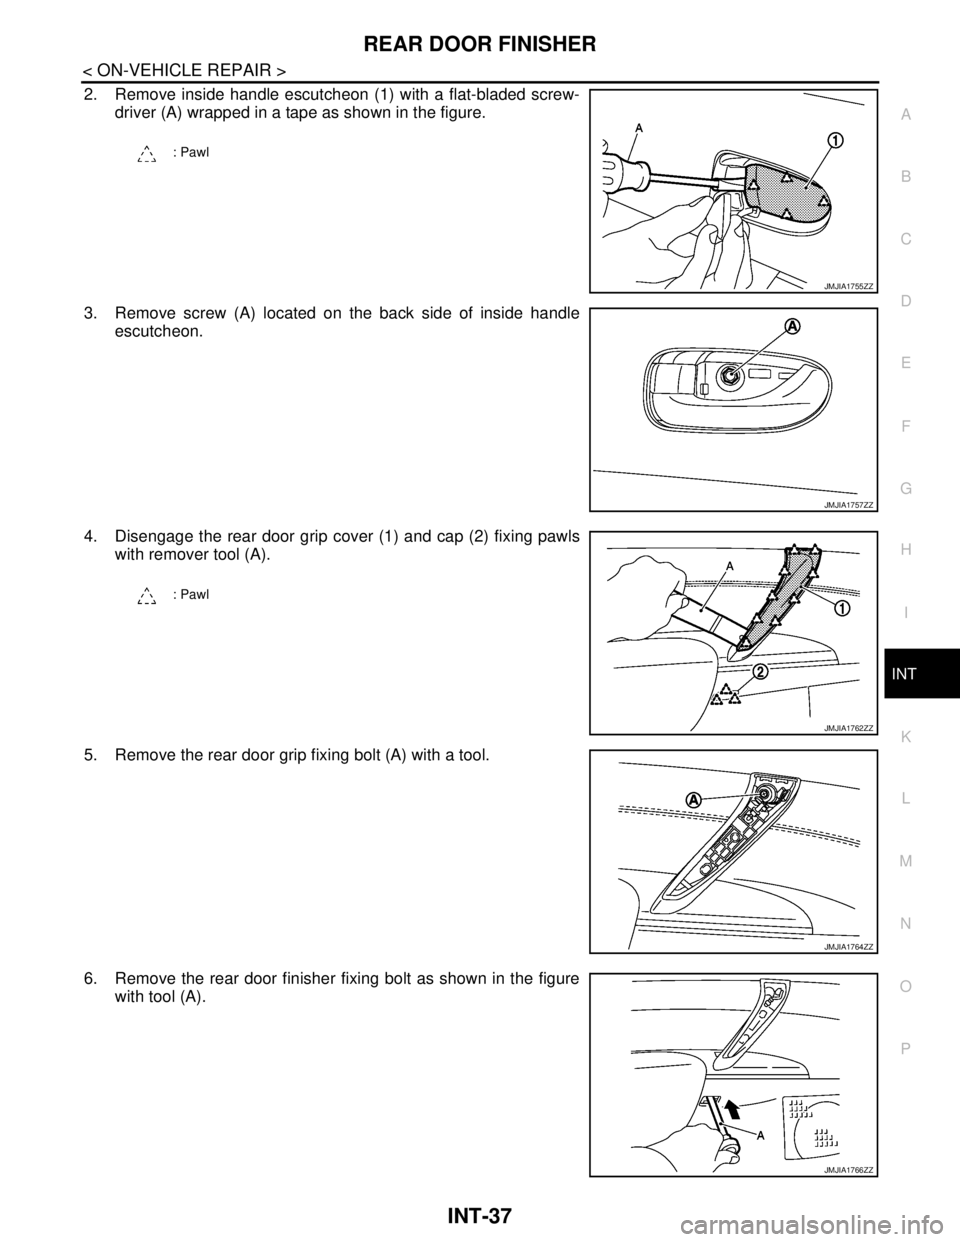
2. Remove inside handle escutcheon (1) with a flat-bladed screw-
driver (A) wrapped in a tape as shown in the figure.
3. Remove screw (A) located on the back side of inside handle
escutcheon.
4. Disengage the rear door grip cover (1) and cap (2) fixing pawls
with remover tool (A).
5. Remove the rear door grip fixing bolt (A) with a tool.
6. Remove the rear door finisher fixing bolt as shown in the figure
with tool (A).
: Pawl
JMJIA1755ZZ
JMJIA1757ZZ
: Pawl
JMJIA1762ZZ
JMJIA1764ZZ
JMJIA1766ZZ
Page 3015 of 5121
INT-38
< ON-VEHICLE REPAIR >
REAR DOOR FINISHER
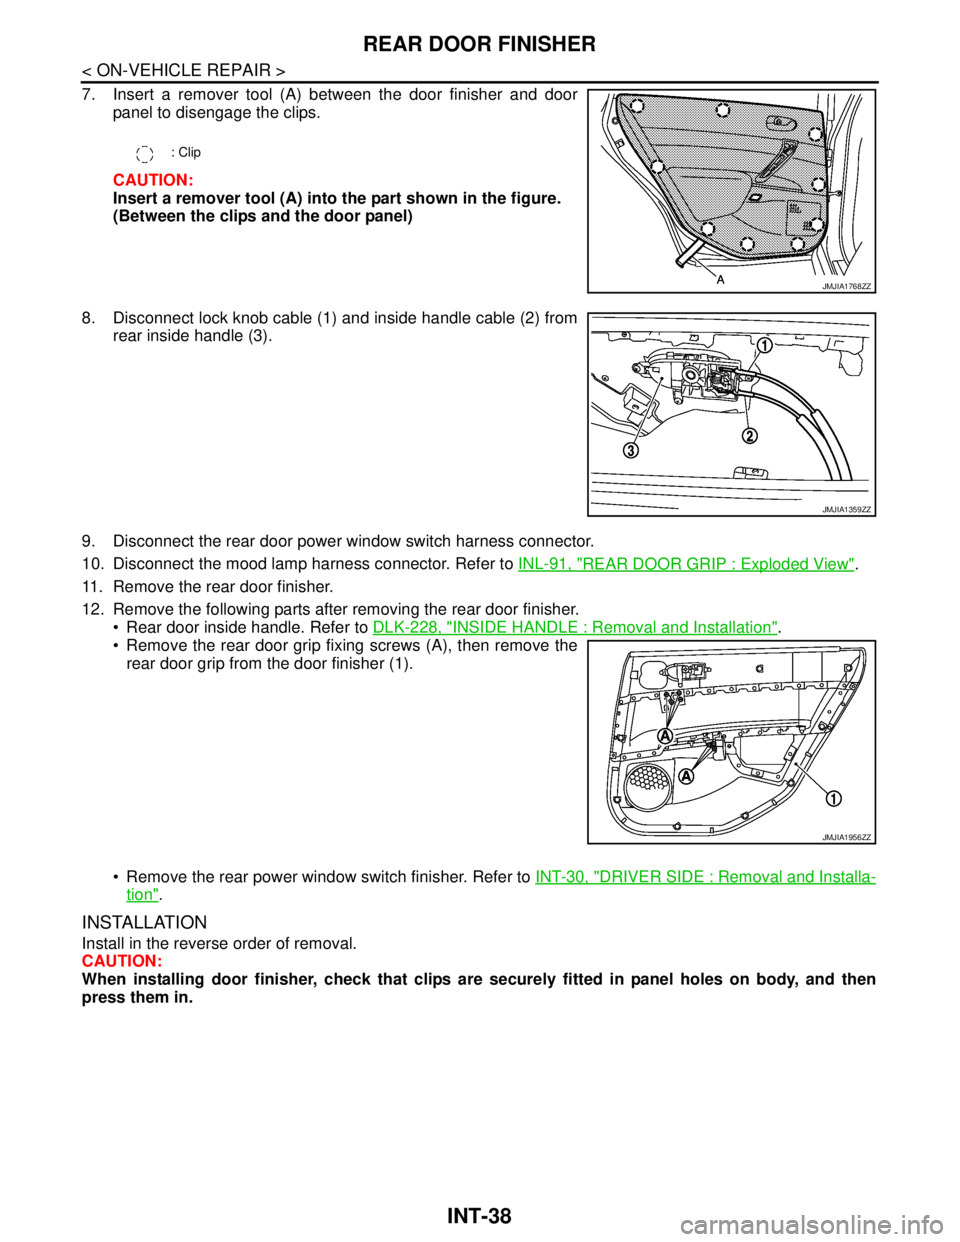
7. Insert a remover tool (A) between the door finisher and door
panel to disengage the clips.
CAUTION:
Insert a remover tool (A) into the part shown in the figure.
(Between the clips and the door panel)
8. Disconnect lock knob cable (1) and inside handle cable (2) from
rear inside handle (3).
9. Disconnect the rear door power window switch harness connector.
10. Disconnect the mood lamp harness connector. Refer to INL-91, "
REAR DOOR GRIP : Exploded View".
11. Remove the rear door finisher.
12. Remove the following parts after removing the rear door finisher.
Rear door inside handle. Refer to DLK-228, "
INSIDE HANDLE : Removal and Installation".
Remove the rear door grip fixing screws (A), then remove the
rear door grip from the door finisher (1).
Remove the rear power window switch finisher. Refer to INT-30, "
DRIVER SIDE : Removal and Installa-
tion".
INSTALLATION
Install in the reverse order of removal.
CAUTION:
When installing door finisher, check that clips are securely fitted in panel holes on body, and then
press them in.
: Clip
JMJIA1768ZZ
JMJIA1359ZZ
JMJIA1956ZZ
Page 3016 of 5121
BODY SIDE TRIM
INT-39
< ON-VEHICLE REPAIR >
C
D
E
F
G
H
I
K
L
MA
B
INT
N
O
P
BODY SIDE TRIM
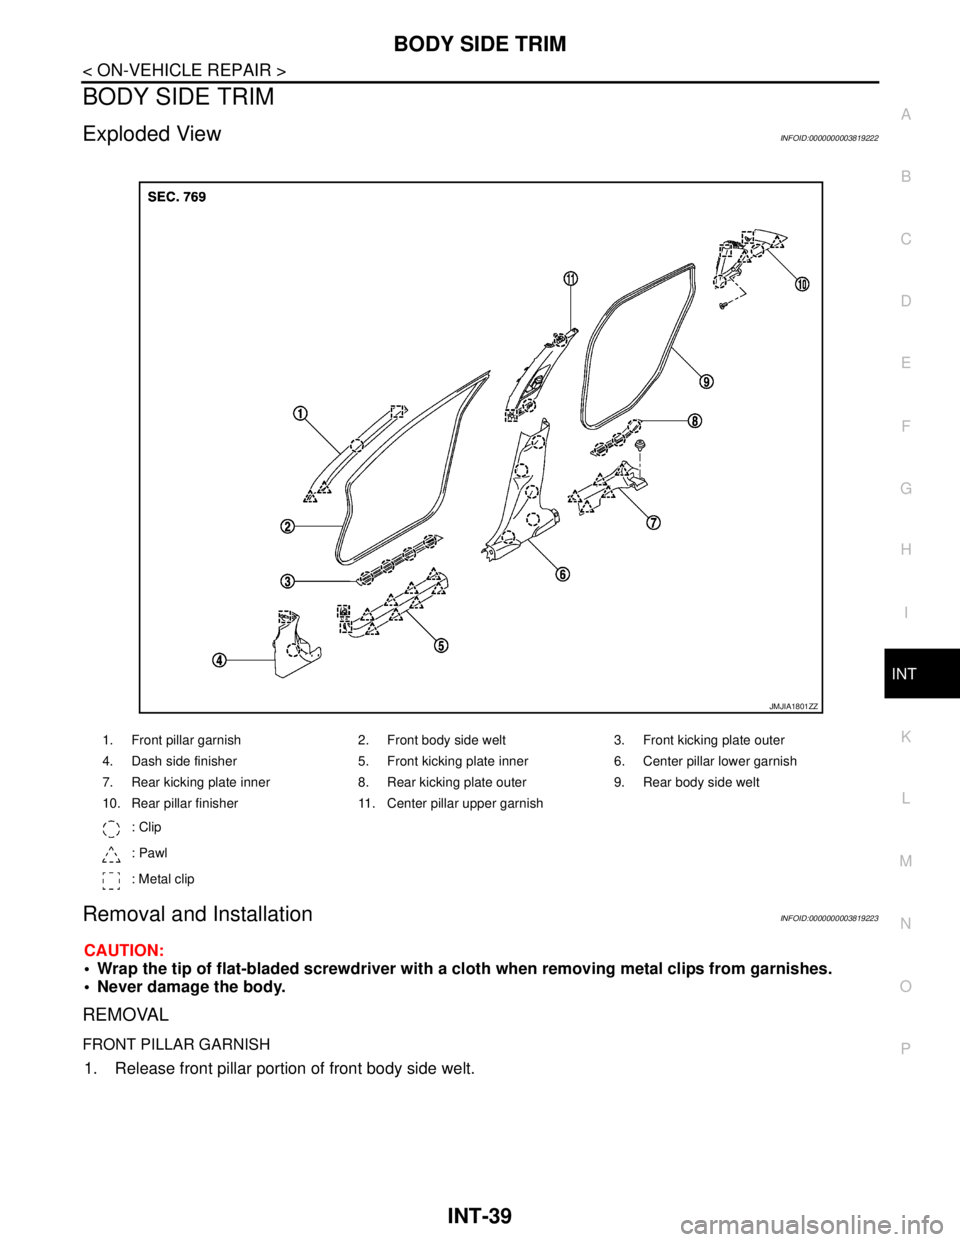
Exploded ViewINFOID:0000000003819222
Removal and InstallationINFOID:0000000003819223
CAUTION:
Wrap the tip of flat-bladed screwdriver with a cloth when removing metal clips from garnishes.
Never damage the body.
REMOVAL
FRONT PILLAR GARNISH
1. Release front pillar portion of front body side welt.
1. Front pillar garnish 2. Front body side welt 3. Front kicking plate outer
4. Dash side finisher 5. Front kicking plate inner 6. Center pillar lower garnish
7. Rear kicking plate inner 8. Rear kicking plate outer 9. Rear body side welt
10. Rear pillar finisher 11. Center pillar upper garnish
: Clip
: Pawl
: Metal clip
JMJIA1801ZZ
Page 3017 of 5121
INT-40
< ON-VEHICLE REPAIR >
BODY SIDE TRIM
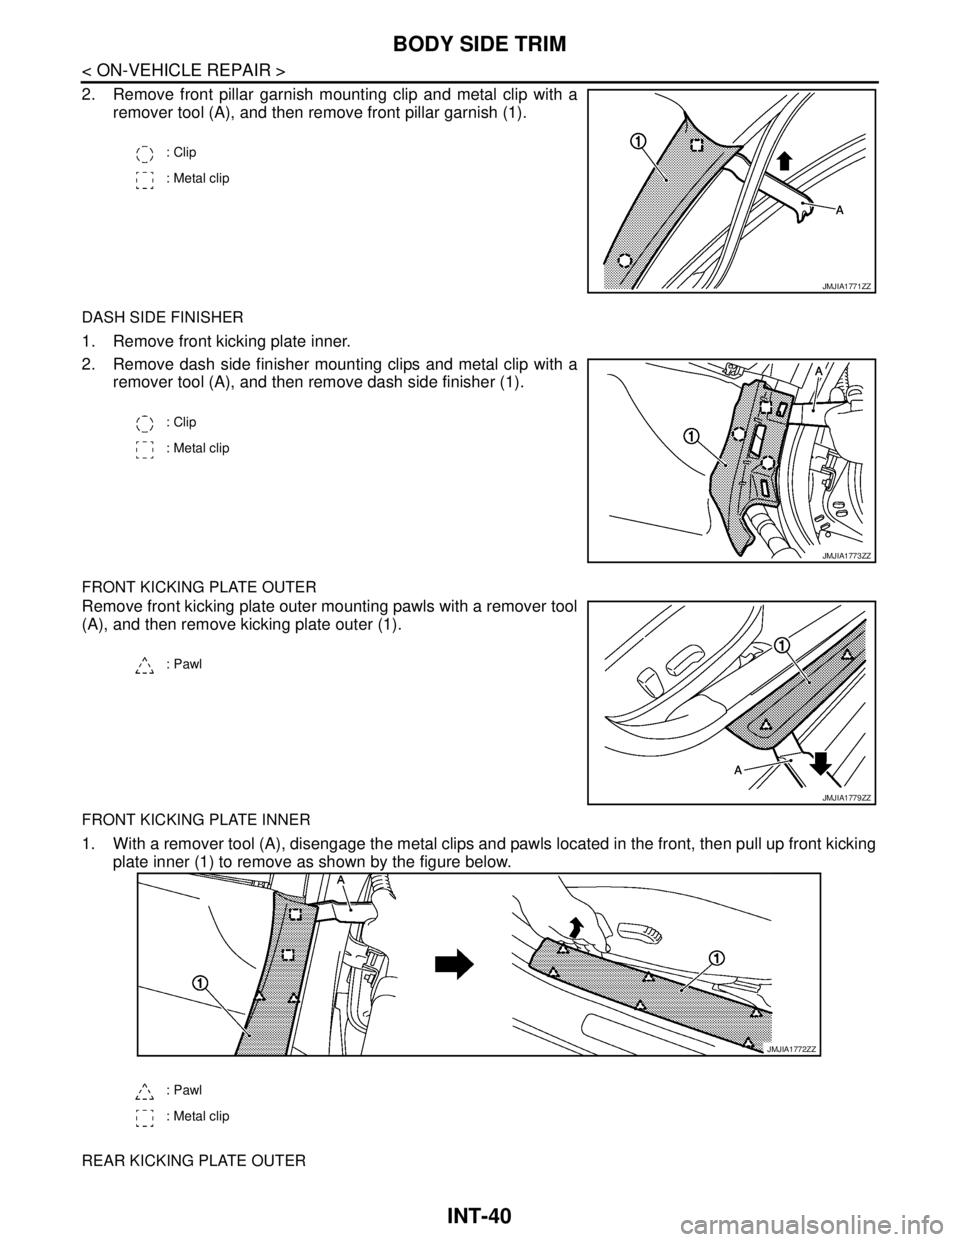
2. Remove front pillar garnish mounting clip and metal clip with a
remover tool (A), and then remove front pillar garnish (1).
DASH SIDE FINISHER
1. Remove front kicking plate inner.
2. Remove dash side finisher mounting clips and metal clip with a
remover tool (A), and then remove dash side finisher (1).
FRONT KICKING PLATE OUTER
Remove front kicking plate outer mounting pawls with a remover tool
(A), and then remove kicking plate outer (1).
FRONT KICKING PLATE INNER
1. With a remover tool (A), disengage the metal clips and pawls located in the front, then pull up front kicking
plate inner (1) to remove as shown by the figure below.
REAR KICKING PLATE OUTER
: Clip
: Metal clip
JMJIA1771ZZ
: Clip
: Metal clip
JMJIA1773ZZ
: Pawl
JMJIA1779ZZ
: Pawl
: Metal clip
JMJIA1772ZZ
Page 3018 of 5121
BODY SIDE TRIM
INT-41
< ON-VEHICLE REPAIR >
C
D
E
F
G
H
I
K
L
MA
B
INT
N
O
P
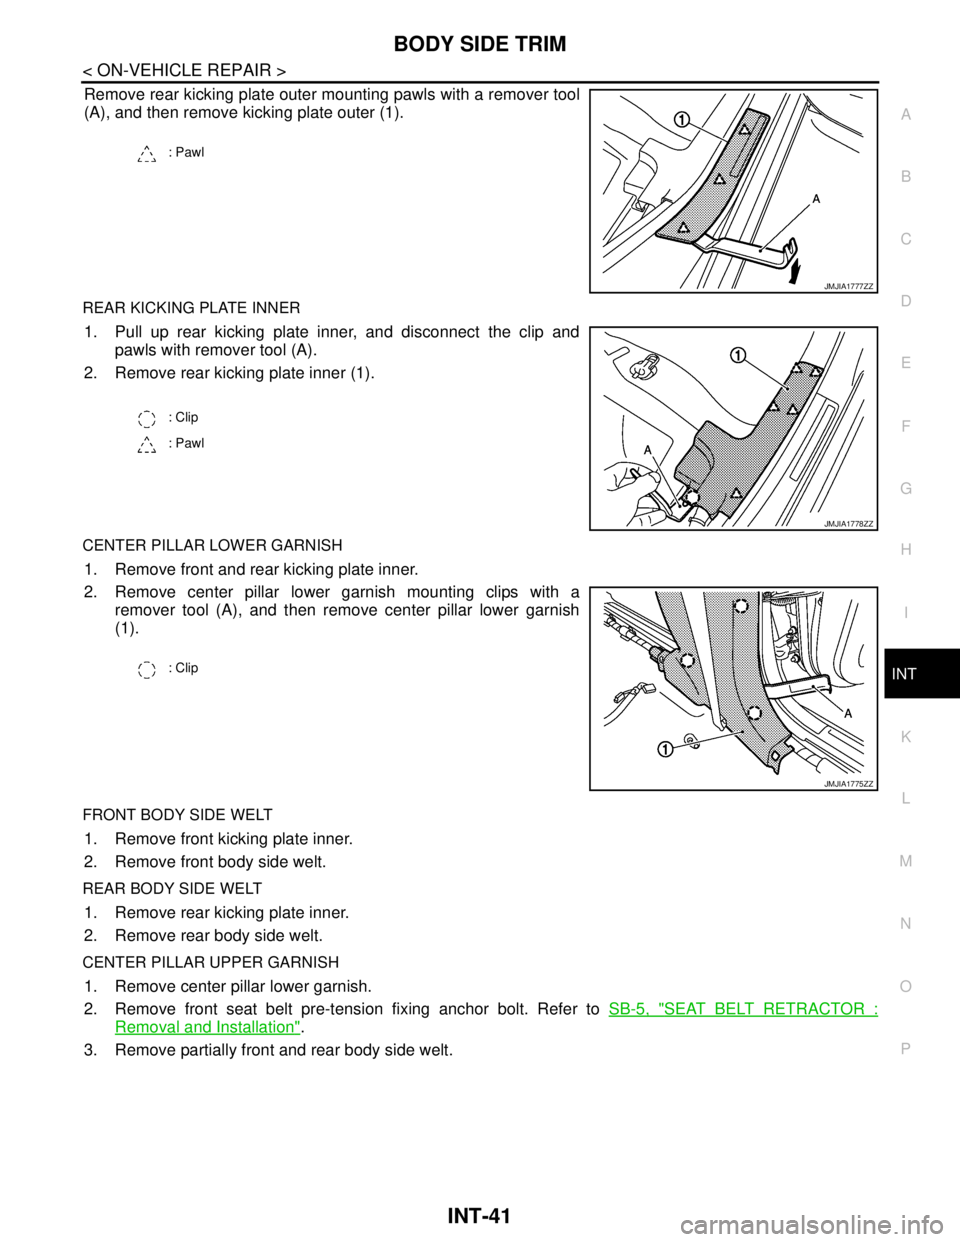
Remove rear kicking plate outer mounting pawls with a remover tool
(A), and then remove kicking plate outer (1).
REAR KICKING PLATE INNER
1. Pull up rear kicking plate inner, and disconnect the clip and
pawls with remover tool (A).
2. Remove rear kicking plate inner (1).
CENTER PILLAR LOWER GARNISH
1. Remove front and rear kicking plate inner.
2. Remove center pillar lower garnish mounting clips with a
remover tool (A), and then remove center pillar lower garnish
(1).
FRONT BODY SIDE WELT
1. Remove front kicking plate inner.
2. Remove front body side welt.
REAR BODY SIDE WELT
1. Remove rear kicking plate inner.
2. Remove rear body side welt.
CENTER PILLAR UPPER GARNISH
1. Remove center pillar lower garnish.
2. Remove front seat belt pre-tension fixing anchor bolt. Refer to SB-5, "
SEAT BELT RETRACTOR :
Removal and Installation".
3. Remove partially front and rear body side welt.
: Pawl
JMJIA1777ZZ
: Clip
: Pawl
JMJIA1778ZZ
: Clip
JMJIA1775ZZ
Page 3019 of 5121
INT-42
< ON-VEHICLE REPAIR >
BODY SIDE TRIM
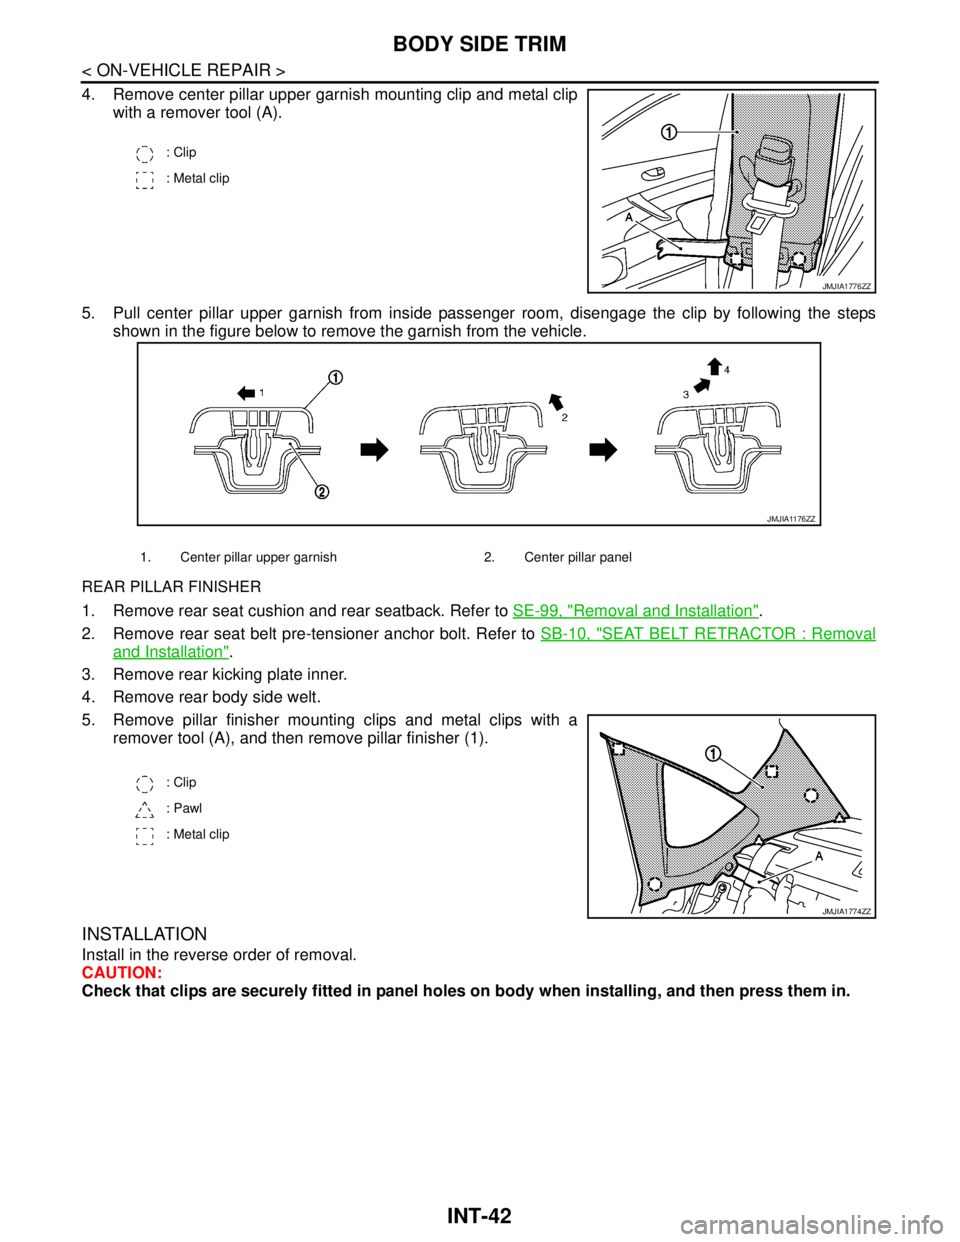
4. Remove center pillar upper garnish mounting clip and metal clip
with a remover tool (A).
5. Pull center pillar upper garnish from inside passenger room, disengage the clip by following the steps
shown in the figure below to remove the garnish from the vehicle.
REAR PILLAR FINISHER
1. Remove rear seat cushion and rear seatback. Refer to SE-99, "Removal and Installation".
2. Remove rear seat belt pre-tensioner anchor bolt. Refer to SB-10, "
SEAT BELT RETRACTOR : Removal
and Installation".
3. Remove rear kicking plate inner.
4. Remove rear body side welt.
5. Remove pillar finisher mounting clips and metal clips with a
remover tool (A), and then remove pillar finisher (1).
INSTALLATION
Install in the reverse order of removal.
CAUTION:
Check that clips are securely fitted in panel holes on body when installing, and then press them in.
: Clip
: Metal clip
JMJIA1776ZZ
1. Center pillar upper garnish 2. Center pillar panel
JMJIA1176ZZ
: Clip
: Pawl
: Metal clip
JMJIA1774ZZ
Page 3020 of 5121
REAR PARCEL SHELF FINISHER
INT-43
< ON-VEHICLE REPAIR >
C
D
E
F
G
H
I
K
L
MA
B
INT
N
O
P
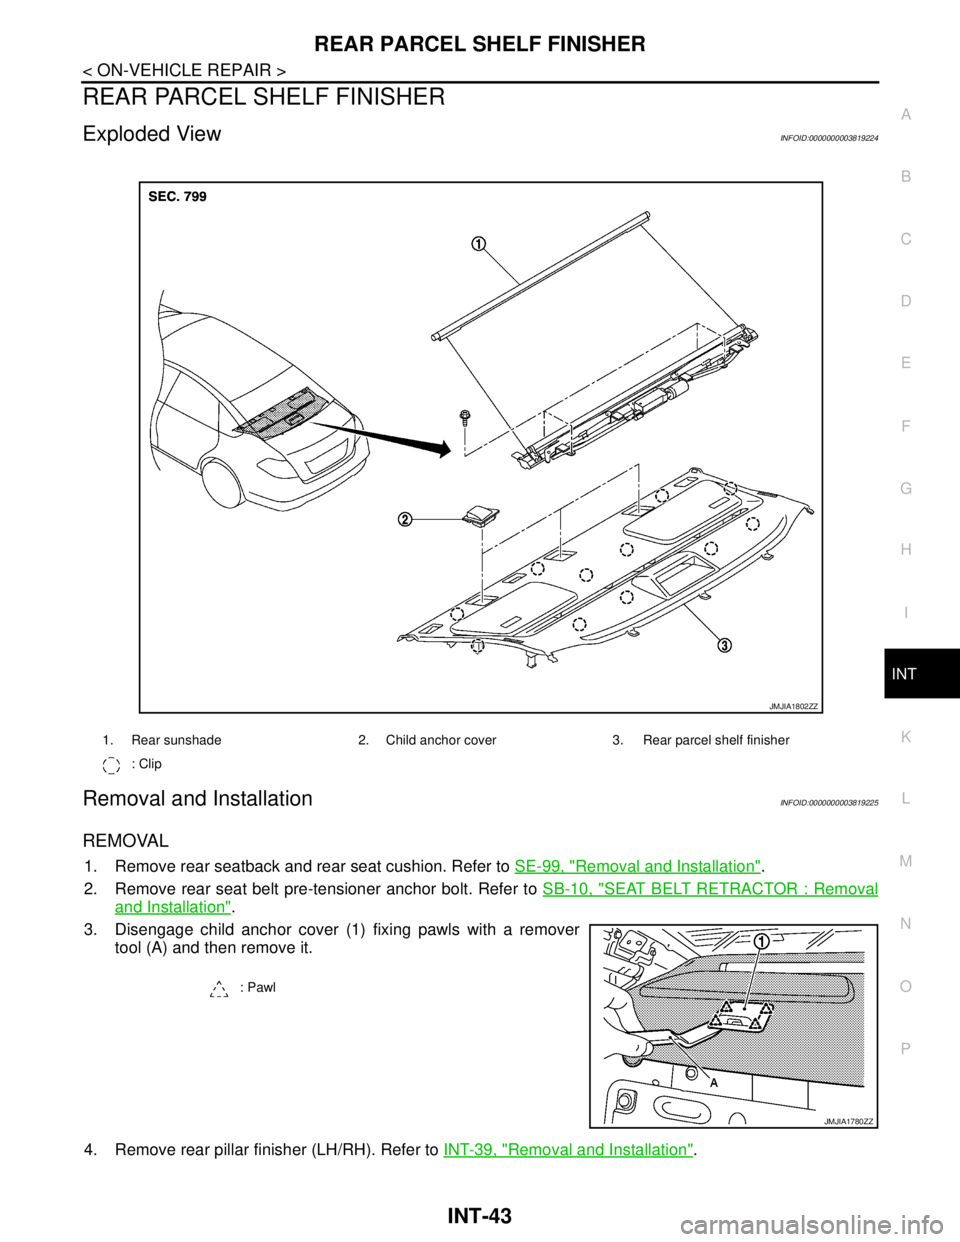
REAR PARCEL SHELF FINISHER
Exploded ViewINFOID:0000000003819224
Removal and InstallationINFOID:0000000003819225
REMOVAL
1. Remove rear seatback and rear seat cushion. Refer to SE-99, "Removal and Installation".
2. Remove rear seat belt pre-tensioner anchor bolt. Refer to SB-10, "
SEAT BELT RETRACTOR : Removal
and Installation".
3. Disengage child anchor cover (1) fixing pawls with a remover
tool (A) and then remove it.
4. Remove rear pillar finisher (LH/RH). Refer to INT-39, "
Removal and Installation".
1. Rear sunshade 2. Child anchor cover 3. Rear parcel shelf finisher
: Clip
JMJIA1802ZZ
: Pawl
JMJIA1780ZZ