NISSAN TERRANO 2004 Service Repair Manual
Manufacturer: NISSAN, Model Year: 2004, Model line: TERRANO, Model: NISSAN TERRANO 2004Pages: 1833, PDF Size: 53.42 MB
Page 161 of 1833
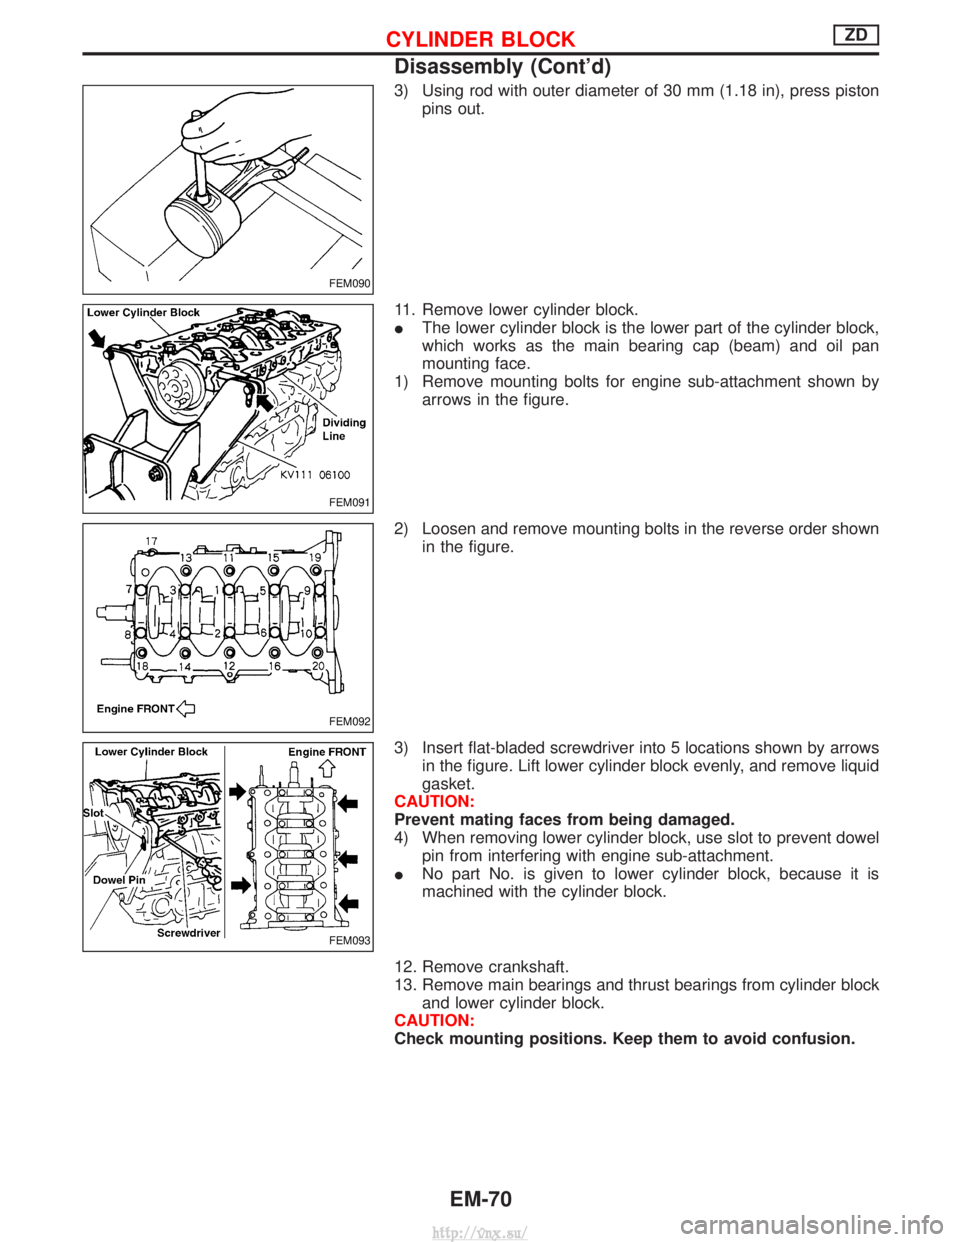
3) Using rod with outer diameter of 30 mm (1.18 in), press pistonpins out.
11. Remove lower cylinder block.
I The lower cylinder block is the lower part of the cylinder block,
which works as the main bearing cap (beam) and oil pan
mounting face.
1) Remove mounting bolts for engine sub-attachment shown by arrows in the figure.
2) Loosen and remove mounting bolts in the reverse order shown in the figure.
3) Insert flat-bladed screwdriver into 5 locations shown by arrows in the figure. Lift lower cylinder block evenly, and remove liquid
gasket.
CAUTION:
Prevent mating faces from being damaged.
4) When removing lower cylinder block, use slot to prevent dowel pin from interfering with engine sub-attachment.
I No part No. is given to lower cylinder block, because it is
machined with the cylinder block.
12. Remove crankshaft.
13. Remove main bearings and thrust bearings from cylinder block and lower cylinder block.
CAUTION:
Check mounting positions. Keep them to avoid confusion.
FEM090
FEM091
FEM092
FEM093
CYLINDER BLOCKZD
Disassembly (Cont'd)
EM-70
http://vnx.su/
Page 162 of 1833
Inspection
CRANKSHAFT END PLAY
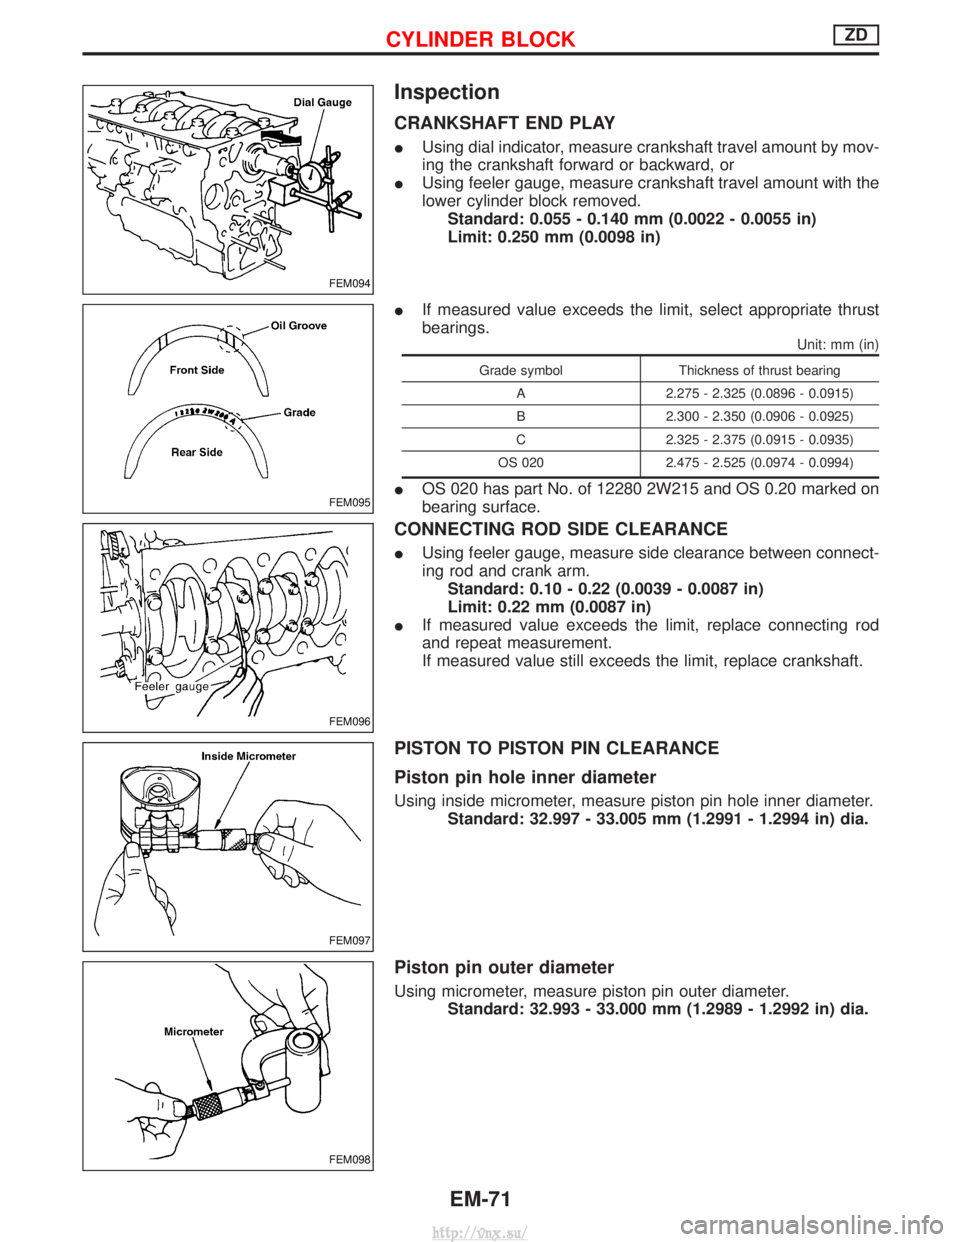
IUsing dial indicator, measure crankshaft travel amount by mov-
ing the crankshaft forward or backward, or
I Using feeler gauge, measure crankshaft travel amount with the
lower cylinder block removed.
Standard: 0.055 - 0.140 mm (0.0022 - 0.0055 in)
Limit: 0.250 mm (0.0098 in)
I If measured value exceeds the limit, select appropriate thrust
bearings.
Unit: mm (in)
Grade symbol Thickness of thrust bearing
A 2.275 - 2.325 (0.0896 - 0.0915)
B 2.300 - 2.350 (0.0906 - 0.0925)
C 2.325 - 2.375 (0.0915 - 0.0935)
OS 020 2.475 - 2.525 (0.0974 - 0.0994)
IOS 020 has part No. of 12280 2W215 and OS 0.20 marked on
bearing surface.
CONNECTING ROD SIDE CLEARANCE
IUsing feeler gauge, measure side clearance between connect-
ing rod and crank arm.
Standard: 0.10 - 0.22 (0.0039 - 0.0087 in)
Limit: 0.22 mm (0.0087 in)
I If measured value exceeds the limit, replace connecting rod
and repeat measurement.
If measured value still exceeds the limit, replace crankshaft.
PISTON TO PISTON PIN CLEARANCE
Piston pin hole inner diameter
Using inside micrometer, measure piston pin hole inner diameter.
Standard: 32.997 - 33.005 mm (1.2991 - 1.2994 in) dia.
Piston pin outer diameter
Using micrometer, measure piston pin outer diameter.Standard: 32.993 - 33.000 mm (1.2989 - 1.2992 in) dia.
FEM094
FEM095
FEM096
FEM097
FEM098
CYLINDER BLOCKZD
EM-71
http://vnx.su/
Page 163 of 1833
Calculation of piston to piston pin clearance
Piston pin clearance = Piston pin hole inner diameter þ Piston pin
outer diameterStandard: þ0.003 (Tightening clearance) to 0.012 mm (þ0.0001 to 0.0005 in)
If out of specifications, replace piston and piston pin assembly.
PISTON RING SIDE CLEARANCE
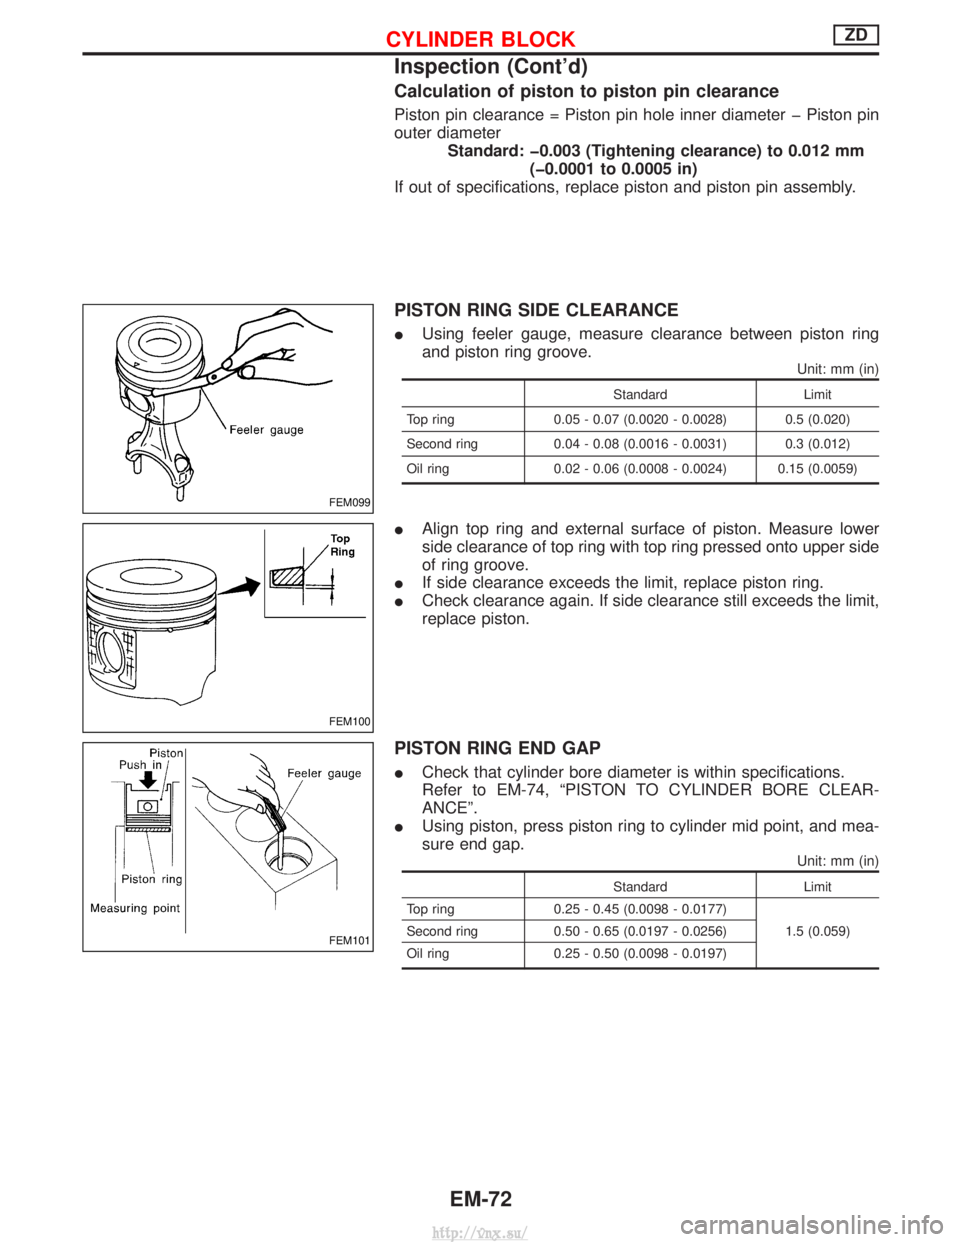
I Using feeler gauge, measure clearance between piston ring
and piston ring groove.
Unit: mm (in)
Standard Limit
Top ring 0.05 - 0.07 (0.0020 - 0.0028) 0.5 (0.020)
Second ring 0.04 - 0.08 (0.0016 - 0.0031) 0.3 (0.012)
Oil ring 0.02 - 0.06 (0.0008 - 0.0024) 0.15 (0.0059)
I Align top ring and external surface of piston. Measure lower
side clearance of top ring with top ring pressed onto upper side
of ring groove.
I If side clearance exceeds the limit, replace piston ring.
I Check clearance again. If side clearance still exceeds the limit,
replace piston.
PISTON RING END GAP
ICheck that cylinder bore diameter is within specifications.
Refer to EM-74, ªPISTON TO CYLINDER BORE CLEAR-
ANCEº.
I Using piston, press piston ring to cylinder mid point, and mea-
sure end gap.
Unit: mm (in)
Standard Limit
Top ring 0.25 - 0.45 (0.0098 - 0.0177)
1.5 (0.059)
Second ring 0.50 - 0.65 (0.0197 - 0.0256)
Oil ring 0.25 - 0.50 (0.0098 - 0.0197)
FEM099
FEM100
FEM101
CYLINDER BLOCKZD
Inspection (Cont'd)
EM-72
http://vnx.su/
Page 164 of 1833
CONNECTING ROD BEND AND TORSION
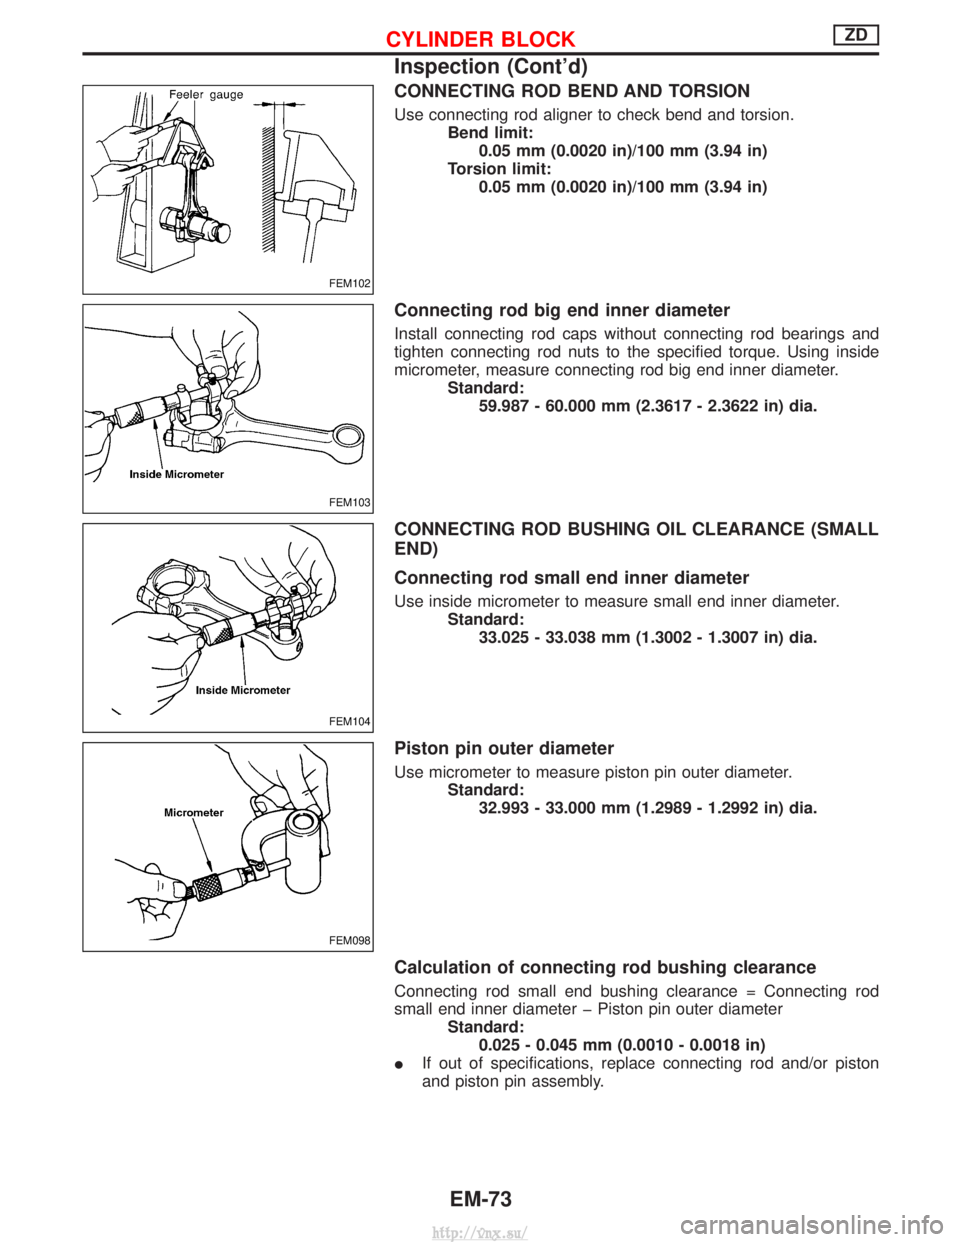
Use connecting rod aligner to check bend and torsion.Bend limit:0.05 mm (0.0020 in)/100 mm (3.94 in)
Torsion limit: 0.05 mm (0.0020 in)/100 mm (3.94 in)
Connecting rod big end inner diameter
Install connecting rod caps without connecting rod bearings and
tighten connecting rod nuts to the specified torque. Using inside
micrometer, measure connecting rod big end inner diameter. Standard:59.987 - 60.000 mm (2.3617 - 2.3622 in) dia.
CONNECTING ROD BUSHING OIL CLEARANCE (SMALL
END)
Connecting rod small end inner diameter
Use inside micrometer to measure small end inner diameter. Standard:33.025 - 33.038 mm (1.3002 - 1.3007 in) dia.
Piston pin outer diameter
Use micrometer to measure piston pin outer diameter. Standard:32.993 - 33.000 mm (1.2989 - 1.2992 in) dia.
Calculation of connecting rod bushing clearance
Connecting rod small end bushing clearance = Connecting rod
small end inner diameter þ Piston pin outer diameter Standard:0.025 - 0.045 mm (0.0010 - 0.0018 in)
I If out of specifications, replace connecting rod and/or piston
and piston pin assembly.
FEM102
FEM103
FEM104
FEM098
CYLINDER BLOCKZD
Inspection (Cont'd)
EM-73
http://vnx.su/
Page 165 of 1833
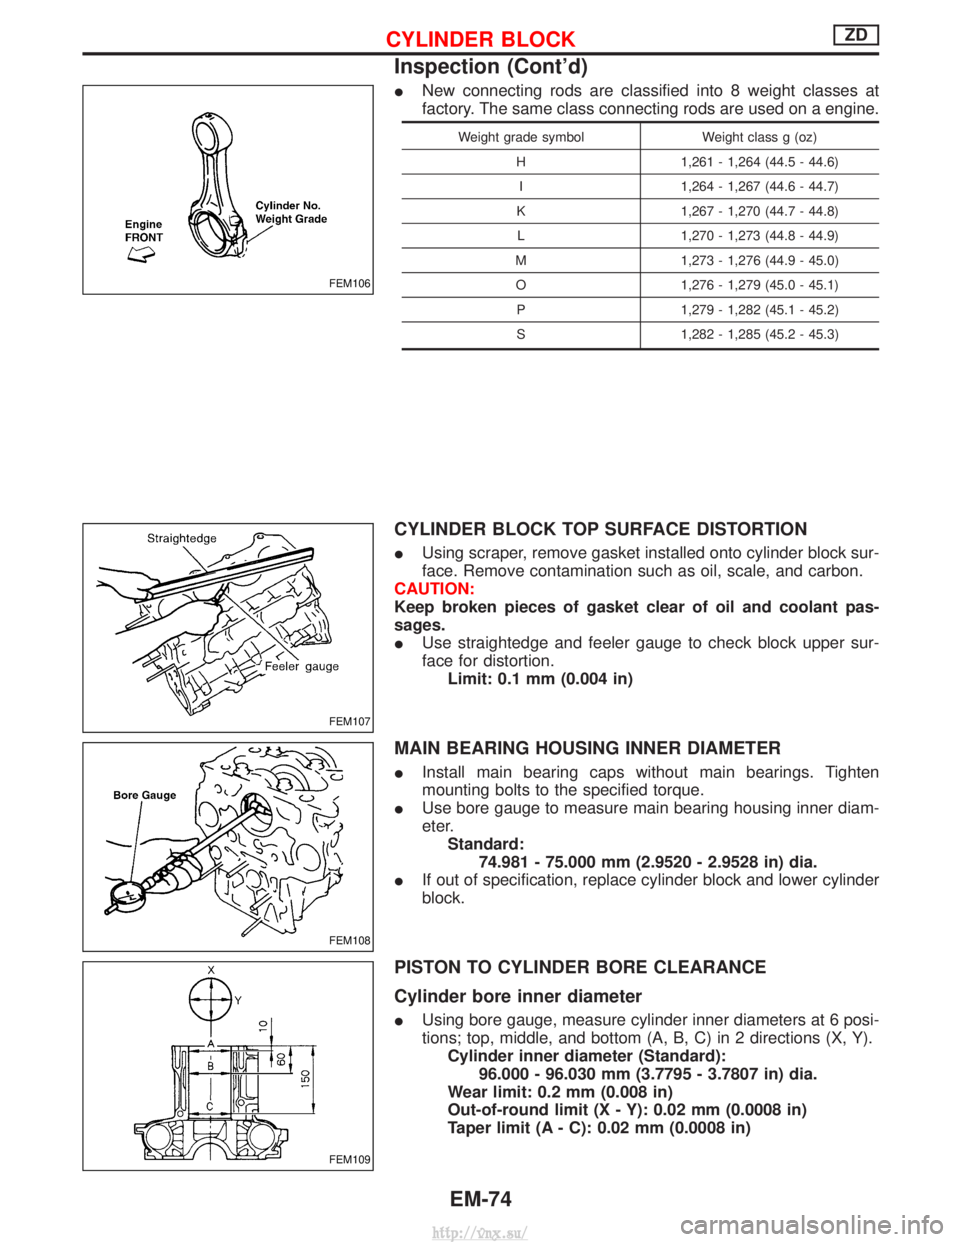
INew connecting rods are classified into 8 weight classes at
factory. The same class connecting rods are used on a engine.
Weight grade symbol Weight class g (oz)
H 1,261 - 1,264 (44.5 - 44.6) I 1,264 - 1,267 (44.6 - 44.7)
K 1,267 - 1,270 (44.7 - 44.8) L 1,270 - 1,273 (44.8 - 44.9)
M 1,273 - 1,276 (44.9 - 45.0) O 1,276 - 1,279 (45.0 - 45.1) P 1,279 - 1,282 (45.1 - 45.2)
S 1,282 - 1,285 (45.2 - 45.3)
CYLINDER BLOCK TOP SURFACE DISTORTION
I Using scraper, remove gasket installed onto cylinder block sur-
face. Remove contamination such as oil, scale, and carbon.
CAUTION:
Keep broken pieces of gasket clear of oil and coolant pas-
sages.
I Use straightedge and feeler gauge to check block upper sur-
face for distortion.
Limit: 0.1 mm (0.004 in)
MAIN BEARING HOUSING INNER DIAMETER
I Install main bearing caps without main bearings. Tighten
mounting bolts to the specified torque.
I Use bore gauge to measure main bearing housing inner diam-
eter.
Standard: 74.981 - 75.000 mm (2.9520 - 2.9528 in) dia.
I If out of specification, replace cylinder block and lower cylinder
block.
PISTON TO CYLINDER BORE CLEARANCE
Cylinder bore inner diameter
IUsing bore gauge, measure cylinder inner diameters at 6 posi-
tions; top, middle, and bottom (A, B, C) in 2 directions (X, Y).
Cylinder inner diameter (Standard): 96.000 - 96.030 mm (3.7795 - 3.7807 in) dia.
Wear limit: 0.2 mm (0.008 in)
Out-of-round limit (X - Y): 0.02 mm (0.0008 in)
Taper limit (A - C): 0.02 mm (0.0008 in)
FEM106
FEM107
FEM108
FEM109
CYLINDER BLOCKZD
Inspection (Cont'd)
EM-74
http://vnx.su/
Page 166 of 1833
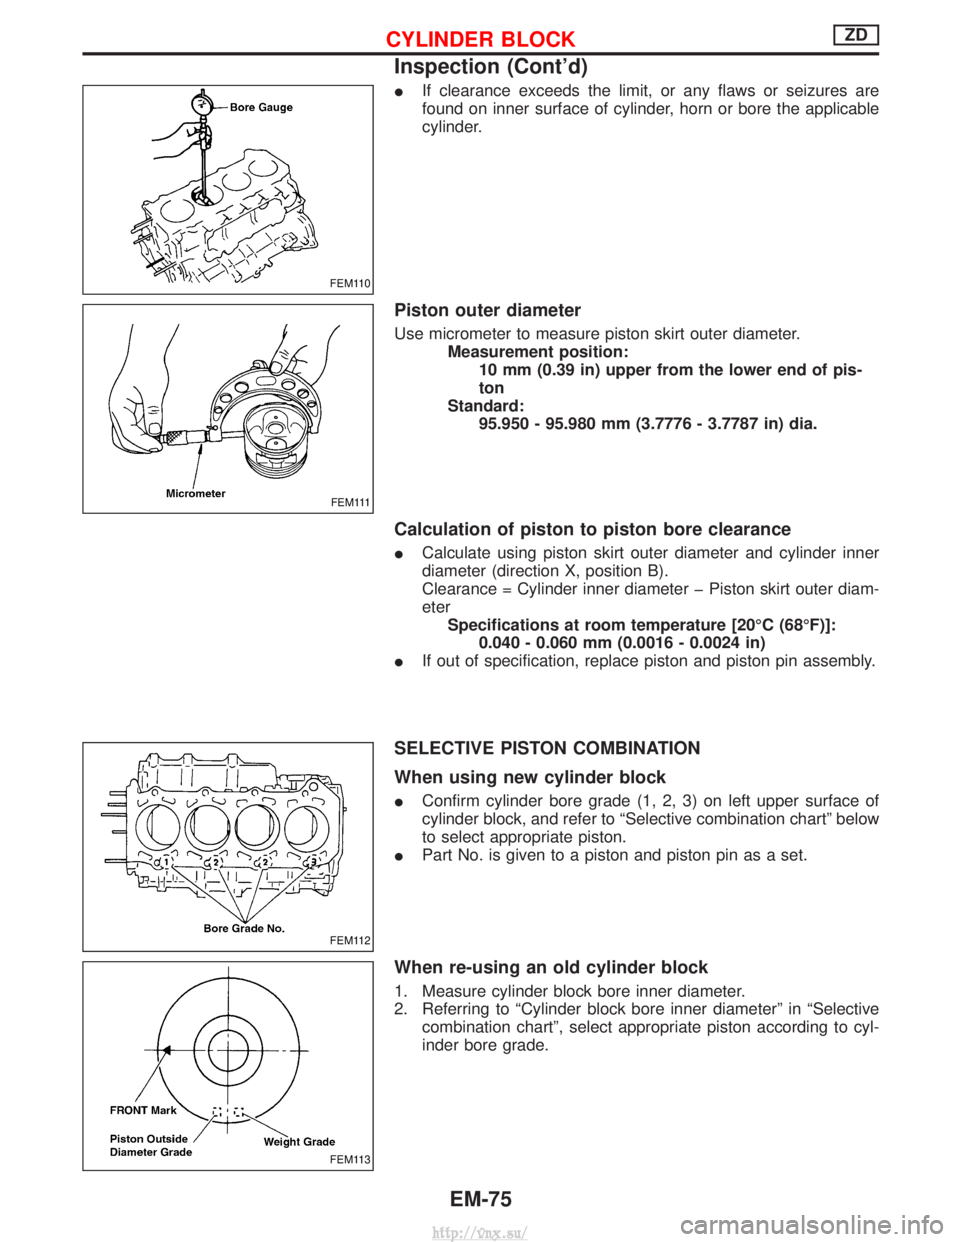
IIf clearance exceeds the limit, or any flaws or seizures are
found on inner surface of cylinder, horn or bore the applicable
cylinder.
Piston outer diameter
Use micrometer to measure piston skirt outer diameter.
Measurement position:10 mm (0.39 in) upper from the lower end of pis-
ton
Standard: 95.950 - 95.980 mm (3.7776 - 3.7787 in) dia.
Calculation of piston to piston bore clearance
ICalculate using piston skirt outer diameter and cylinder inner
diameter (direction X, position B).
Clearance = Cylinder inner diameter þ Piston skirt outer diam-
eter
Specifications at room temperature [20ÉC (68ÉF)]: 0.040 - 0.060 mm (0.0016 - 0.0024 in)
I If out of specification, replace piston and piston pin assembly.
SELECTIVE PISTON COMBINATION
When using new cylinder block
IConfirm cylinder bore grade (1, 2, 3) on left upper surface of
cylinder block, and refer to ªSelective combination chartº below
to select appropriate piston.
I Part No. is given to a piston and piston pin as a set.
When re-using an old cylinder block
1. Measure cylinder block bore inner diameter.
2. Referring to ªCylinder block bore inner diameterº in ªSelective
combination chartº, select appropriate piston according to cyl-
inder bore grade.
FEM110
FEM111
FEM112
FEM113
CYLINDER BLOCKZD
Inspection (Cont'd)
EM-75
http://vnx.su/
Page 167 of 1833
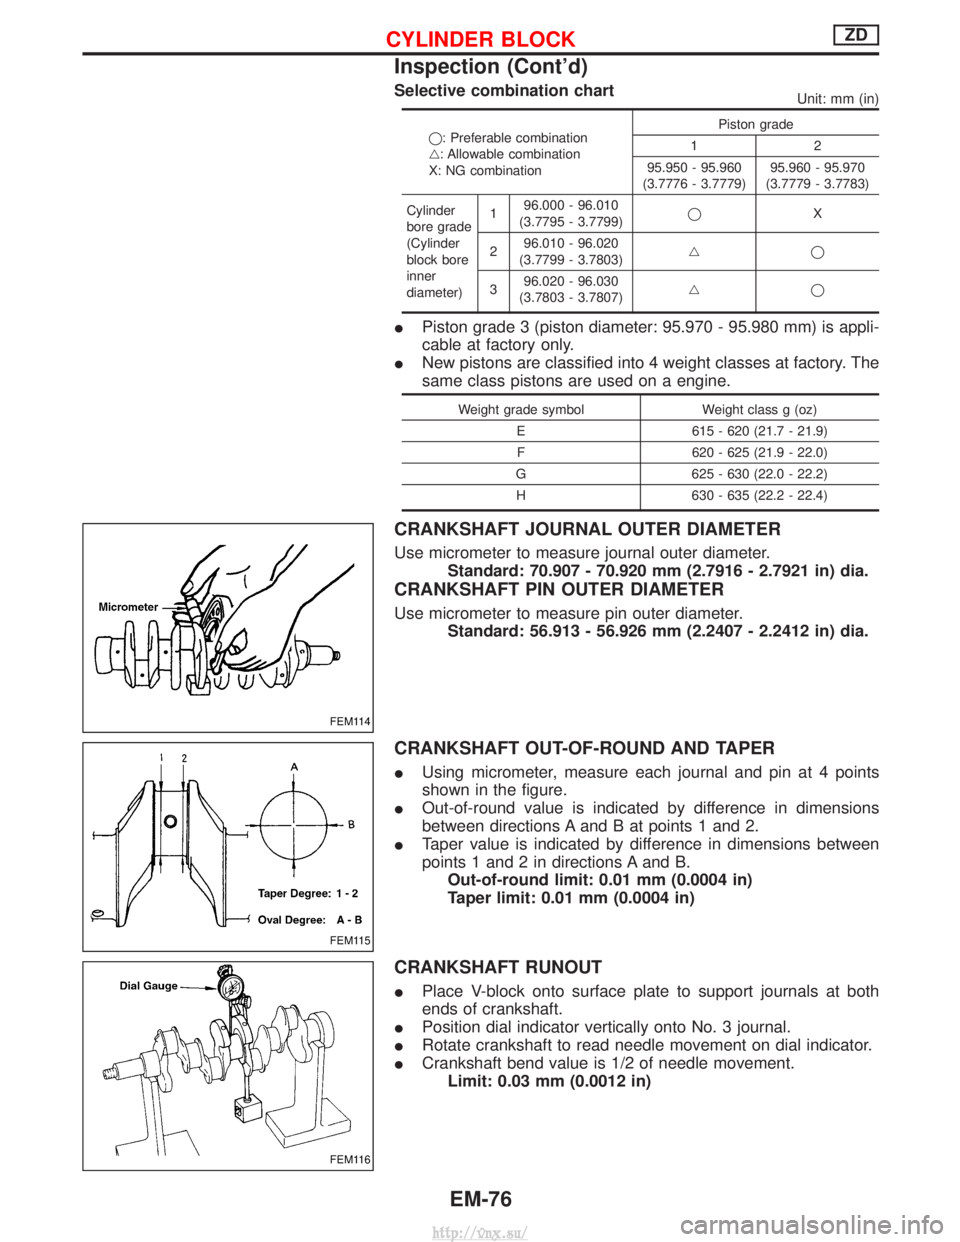
Selective combination chartUnit: mm (in)
q: Preferable combination
g: Allowable combination
X: NG combinationPiston grade
12
95.950 - 95.960
(3.7776 - 3.7779) 95.960 - 95.970
(3.7779 - 3.7783)
Cylinder
bore grade
(Cylinder
block bore
inner
diameter) 1
96.000 - 96.010
(3.7795 - 3.7799) q
X
2 96.010 - 96.020
(3.7799 - 3.7803) gq
3 96.020 - 96.030
(3.7803 - 3.7807) gq
I
Piston grade 3 (piston diameter: 95.970 - 95.980 mm) is appli-
cable at factory only.
I New pistons are classified into 4 weight classes at factory. The
same class pistons are used on a engine.
Weight grade symbol Weight class g (oz)
E 615 - 620 (21.7 - 21.9) F 620 - 625 (21.9 - 22.0)
G 625 - 630 (22.0 - 22.2) H 630 - 635 (22.2 - 22.4)
CRANKSHAFT JOURNAL OUTER DIAMETER
Use micrometer to measure journal outer diameter. Standard: 70.907 - 70.920 mm (2.7916 - 2.7921 in) dia.
CRANKSHAFT PIN OUTER DIAMETER
Use micrometer to measure pin outer diameter.Standard: 56.913 - 56.926 mm (2.2407 - 2.2412 in) dia.
CRANKSHAFT OUT-OF-ROUND AND TAPER
IUsing micrometer, measure each journal and pin at 4 points
shown in the figure.
I Out-of-round value is indicated by difference in dimensions
between directions A and B at points 1 and 2.
I Taper value is indicated by difference in dimensions between
points 1 and 2 in directions A and B.
Out-of-round limit: 0.01 mm (0.0004 in)
Taper limit: 0.01 mm (0.0004 in)
CRANKSHAFT RUNOUT
I Place V-block onto surface plate to support journals at both
ends of crankshaft.
I Position dial indicator vertically onto No. 3 journal.
I Rotate crankshaft to read needle movement on dial indicator.
I Crankshaft bend value is 1/2 of needle movement.
Limit: 0.03 mm (0.0012 in)
FEM114
FEM115
FEM116
CYLINDER BLOCKZD
Inspection (Cont'd)
EM-76
http://vnx.su/
Page 168 of 1833
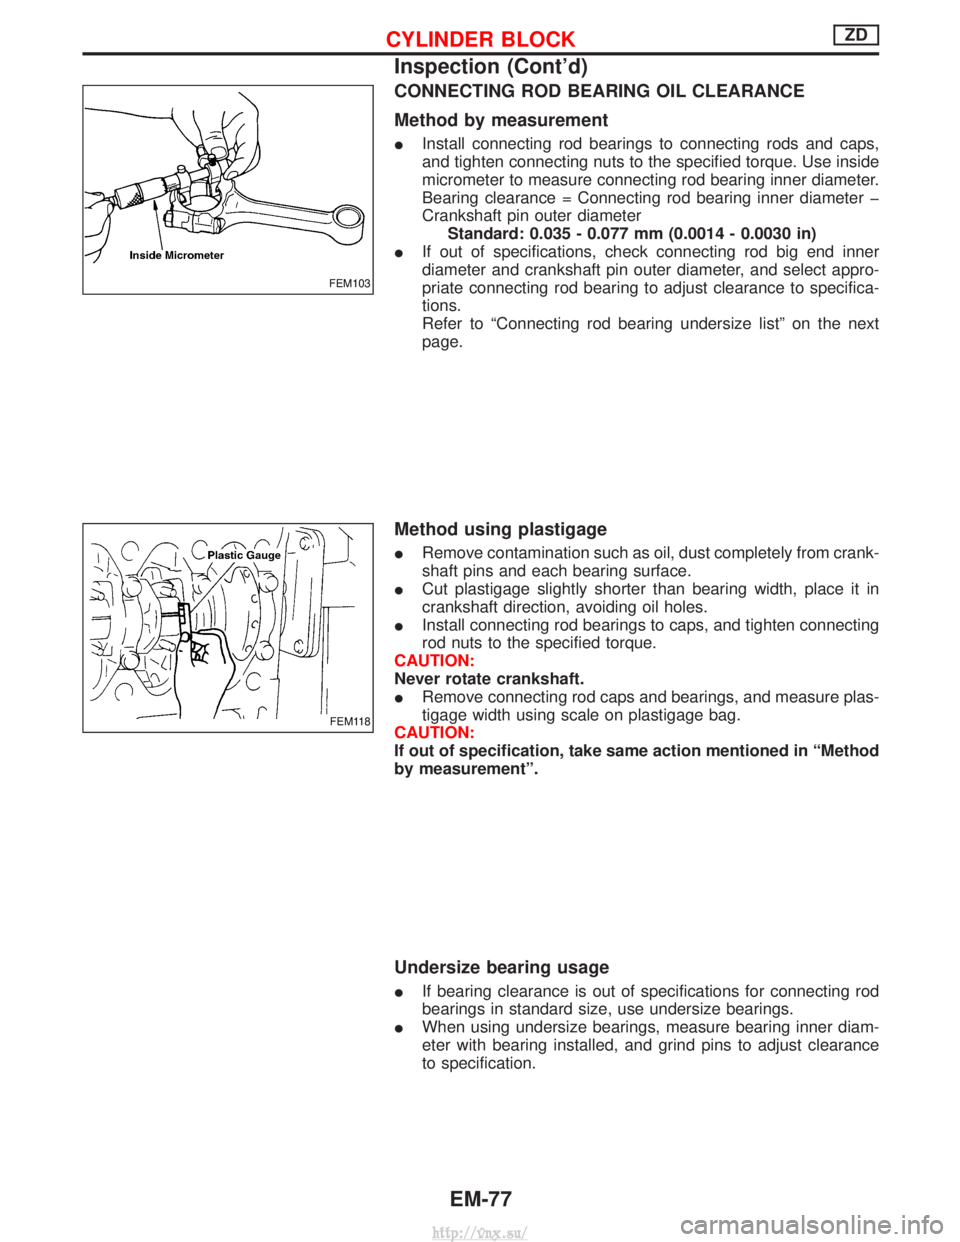
CONNECTING ROD BEARING OIL CLEARANCE
Method by measurement
IInstall connecting rod bearings to connecting rods and caps,
and tighten connecting nuts to the specified torque. Use inside
micrometer to measure connecting rod bearing inner diameter.
Bearing clearance = Connecting rod bearing inner diameter þ
Crankshaft pin outer diameter
Standard: 0.035 - 0.077 mm (0.0014 - 0.0030 in)
I If out of specifications, check connecting rod big end inner
diameter and crankshaft pin outer diameter, and select appro-
priate connecting rod bearing to adjust clearance to specifica-
tions.
Refer to ªConnecting rod bearing undersize listº on the next
page.
Method using plastigage
IRemove contamination such as oil, dust completely from crank-
shaft pins and each bearing surface.
I Cut plastigage slightly shorter than bearing width, place it in
crankshaft direction, avoiding oil holes.
I Install connecting rod bearings to caps, and tighten connecting
rod nuts to the specified torque.
CAUTION:
Never rotate crankshaft.
I Remove connecting rod caps and bearings, and measure plas-
tigage width using scale on plastigage bag.
CAUTION:
If out of specification, take same action mentioned in ªMethod
by measurementº.
Undersize bearing usage
I If bearing clearance is out of specifications for connecting rod
bearings in standard size, use undersize bearings.
I When using undersize bearings, measure bearing inner diam-
eter with bearing installed, and grind pins to adjust clearance
to specification.
FEM103
FEM118
CYLINDER BLOCKZD
Inspection (Cont'd)
EM-77
http://vnx.su/
Page 169 of 1833
Connecting rod bearing undersize list
Unit: mm (in)
SizeThickness
US 0.25 (0.0098) 1.630 - 1.638 (0.0642 - 0.0645)
US 0.50 (0.0197) 1.755 - 1.763 (0.0691 - 0.0694)
US 0.75 (0.0295) 1.880 - 1.888 (0.0740 - 0.0743)
US 1.00 (0.0394) 2.005 - 2.013 (0.0789 - 0.0793)
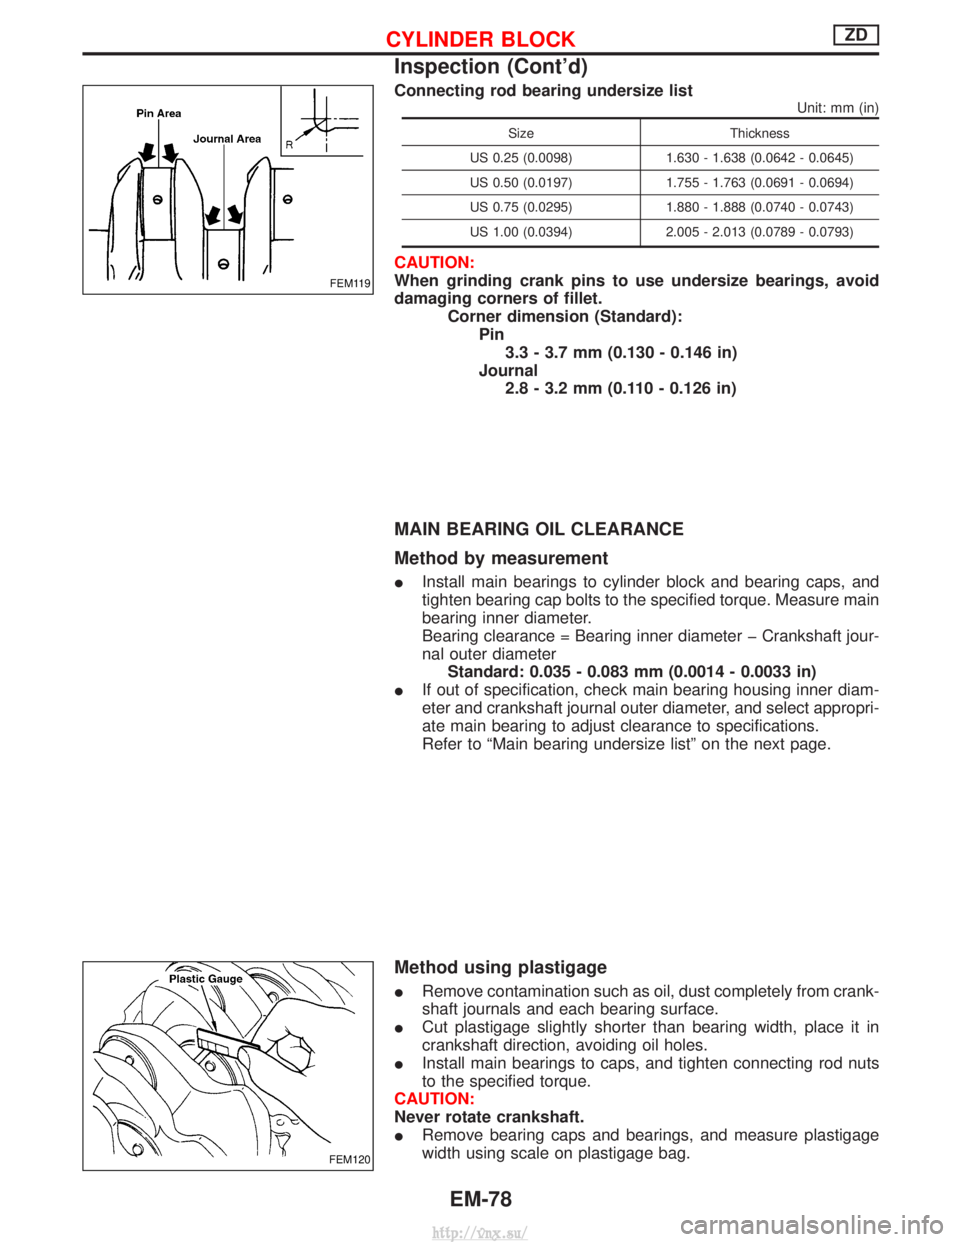
CAUTION:
When grinding crank pins to use undersize bearings, avoid
damaging corners of fillet.
Corner dimension (Standard):Pin3.3 - 3.7 mm (0.130 - 0.146 in)
Journal 2.8 - 3.2 mm (0.110 - 0.126 in)
MAIN BEARING OIL CLEARANCE
Method by measurement
I Install main bearings to cylinder block and bearing caps, and
tighten bearing cap bolts to the specified torque. Measure main
bearing inner diameter.
Bearing clearance = Bearing inner diameter þ Crankshaft jour-
nal outer diameter
Standard: 0.035 - 0.083 mm (0.0014 - 0.0033 in)
I If out of specification, check main bearing housing inner diam-
eter and crankshaft journal outer diameter, and select appropri-
ate main bearing to adjust clearance to specifications.
Refer to ªMain bearing undersize listº on the next page.
Method using plastigage
IRemove contamination such as oil, dust completely from crank-
shaft journals and each bearing surface.
I Cut plastigage slightly shorter than bearing width, place it in
crankshaft direction, avoiding oil holes.
I Install main bearings to caps, and tighten connecting rod nuts
to the specified torque.
CAUTION:
Never rotate crankshaft.
I Remove bearing caps and bearings, and measure plastigage
width using scale on plastigage bag.
FEM119
FEM120
CYLINDER BLOCKZD
Inspection (Cont'd)
EM-78
http://vnx.su/
Page 170 of 1833
CAUTION:
If out of specification, take same action mentioned in ªMethod
by measurementº.
Undersize bearing usage
IIf bearing clearance is out of specifications for main bearings
in standard size, use undersize bearings.
I When using undersize bearings, measure bearing inner diam-
eter with bearing installed, and grind crank journals to adjust
clearance to specification.
Main bearing undersize list
Unit: mm (in)
Size Thickness
US 0.25 (0.0098) 2.130 - 2.138 (0.0839 - 0.0842)
US 0.50 (0.0197) 2.255 - 2.263 (0.0888 - 0.0891)
US 0.75 (0.0295) 2.380 - 2.388 (0.0937 - 0.0940)
US 1.00 (0.0394) 2.505 - 2.513 (0.0986 - 0.0989)
CAUTION:
When grinding crank journals to use undersize bearings,
avoid damaging corners of fillet.
Corner dimension (Standard):Pin3.3 - 3.7 mm (0.130 - 0.146 in)
Journal 2.8 - 3.2 mm (0.110 - 0.126 in)
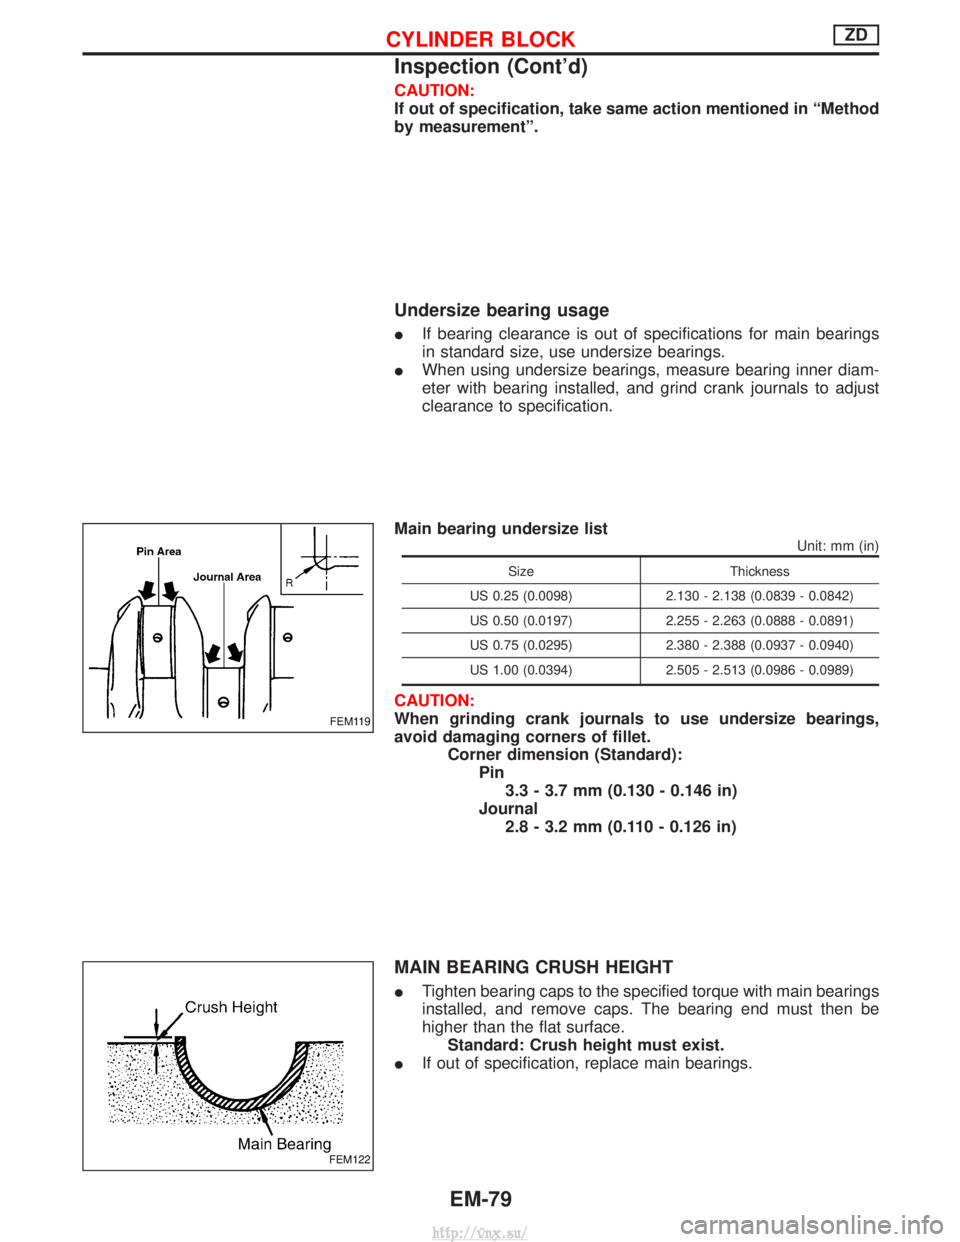
MAIN BEARING CRUSH HEIGHT
I Tighten bearing caps to the specified torque with main bearings
installed, and remove caps. The bearing end must then be
higher than the flat surface.
Standard: Crush height must exist.
I If out of specification, replace main bearings.
FEM119
FEM122
CYLINDER BLOCKZD
Inspection (Cont'd)
EM-79
http://vnx.su/