NISSAN TERRANO 2004 Service Repair Manual
Manufacturer: NISSAN, Model Year: 2004, Model line: TERRANO, Model: NISSAN TERRANO 2004Pages: 1833, PDF Size: 53.42 MB
Page 201 of 1833
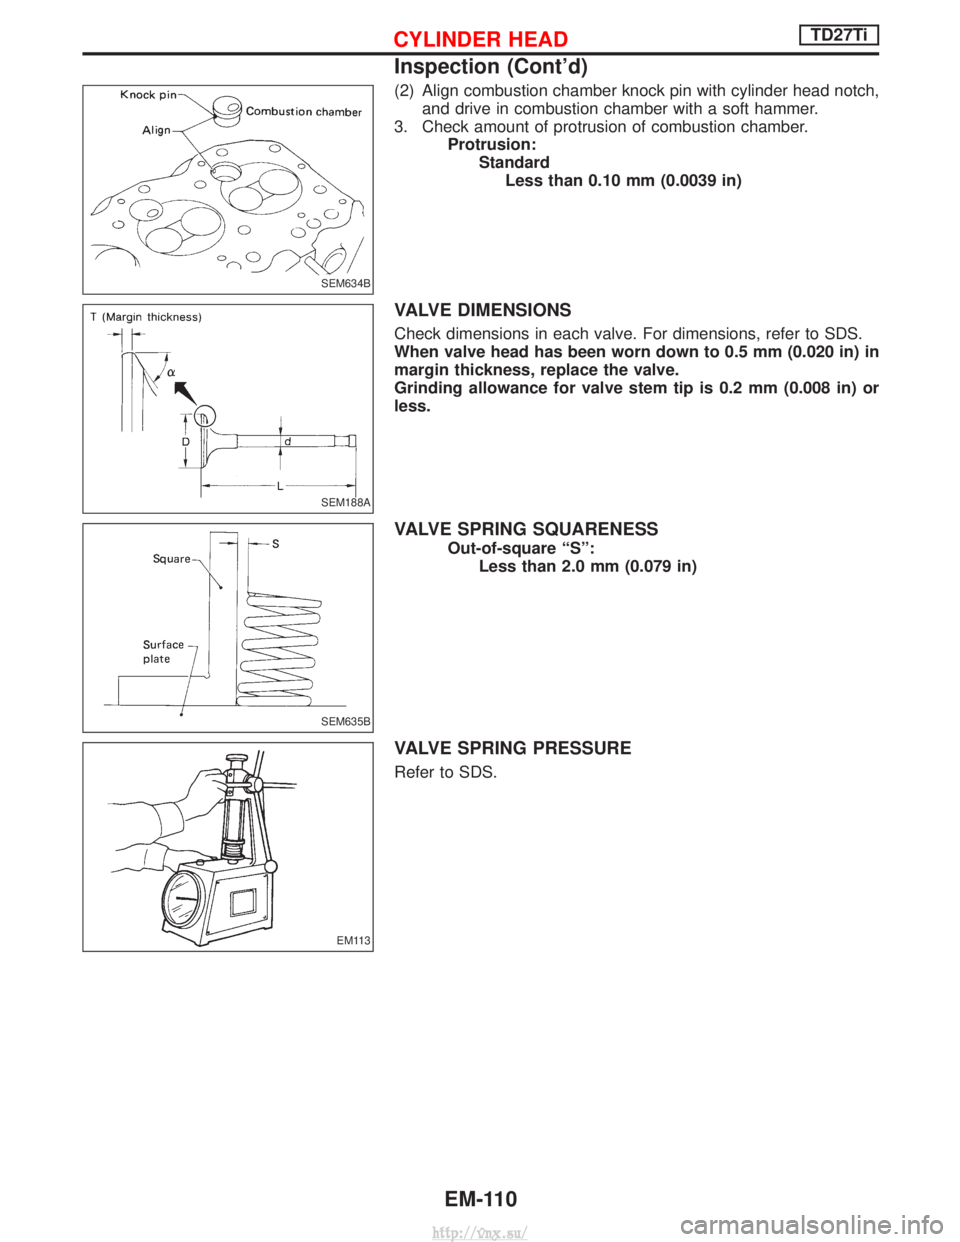
(2) Align combustion chamber knock pin with cylinder head notch,and drive in combustion chamber with a soft hammer.
3. Check amount of protrusion of combustion chamber. Protrusion:StandardLess than 0.10 mm (0.0039 in)
VALVE DIMENSIONS
Check dimensions in each valve. For dimensions, refer to SDS.
When valve head has been worn down to 0.5 mm (0.020 in) in
margin thickness, replace the valve.
Grinding allowance for valve stem tip is 0.2 mm (0.008 in) or
less.
VALVE SPRING SQUARENESS
Out-of-square ªSº: Less than 2.0 mm (0.079 in)
VALVE SPRING PRESSURE
Refer to SDS.
SEM634B
SEM188A
SEM635B
EM113
CYLINDER HEADTD27Ti
Inspection (Cont'd)
EM-110
http://vnx.su/
Page 202 of 1833
VALVE LIFTER AND PUSH ROD
Valve lifter
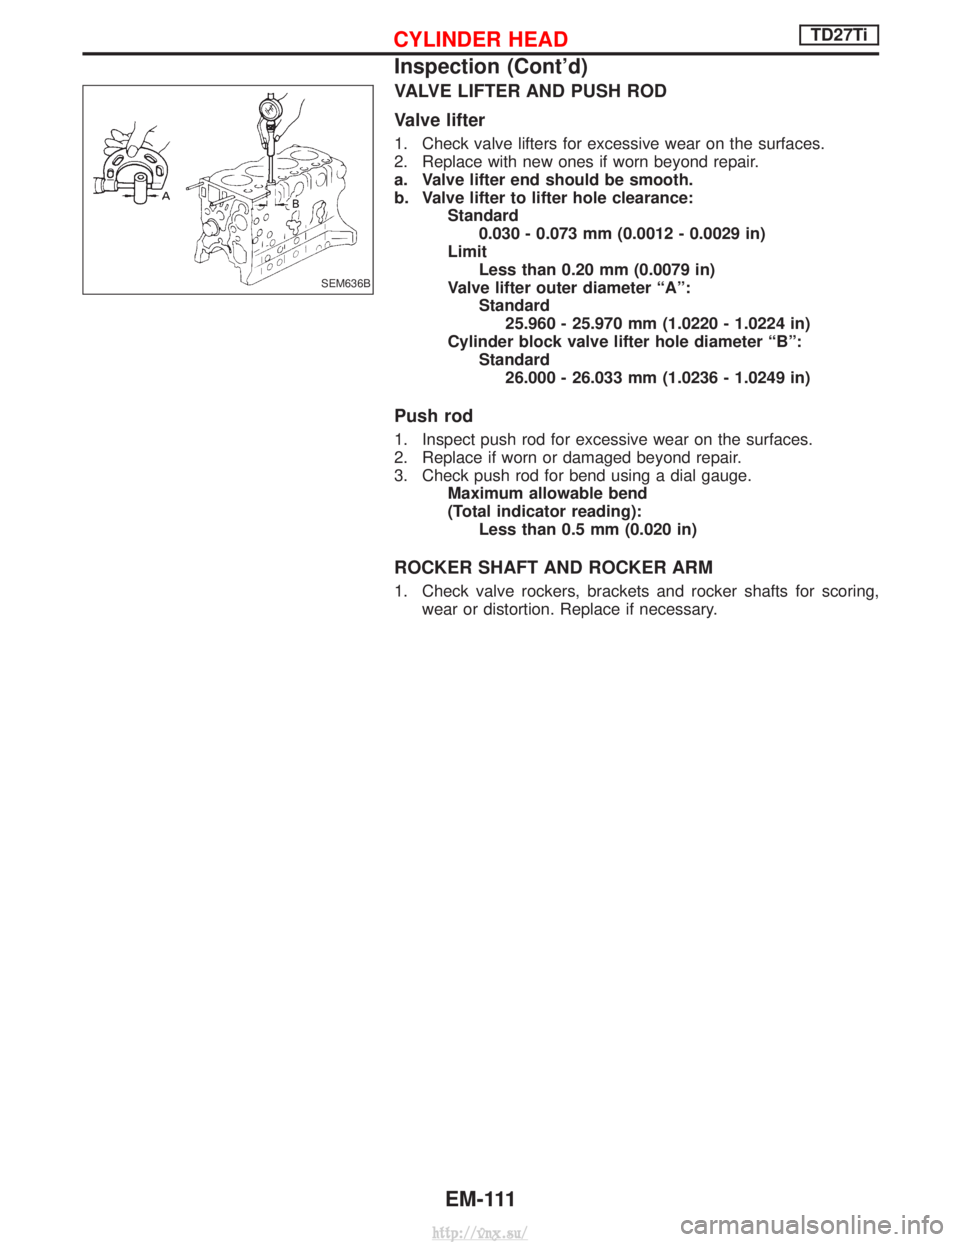
1. Check valve lifters for excessive wear on the surfaces.
2. Replace with new ones if worn beyond repair.
a. Valve lifter end should be smooth.
b. Valve lifter to lifter hole clearance:Standard0.030 - 0.073 mm (0.0012 - 0.0029 in)
Limit Less than 0.20 mm (0.0079 in)
Valve lifter outer diameter ªAº: Standard25.960 - 25.970 mm (1.0220 - 1.0224 in)
Cylinder block valve lifter hole diameter ªBº: Standard26.000 - 26.033 mm (1.0236 - 1.0249 in)
Push rod
1. Inspect push rod for excessive wear on the surfaces.
2. Replace if worn or damaged beyond repair.
3. Check push rod for bend using a dial gauge. Maximum allowable bend
(Total indicator reading):Less than 0.5 mm (0.020 in)
ROCKER SHAFT AND ROCKER ARM
1. Check valve rockers, brackets and rocker shafts for scoring,wear or distortion. Replace if necessary.
SEM636B
CYLINDER HEADTD27Ti
Inspection (Cont'd)
EM-111
http://vnx.su/
Page 203 of 1833
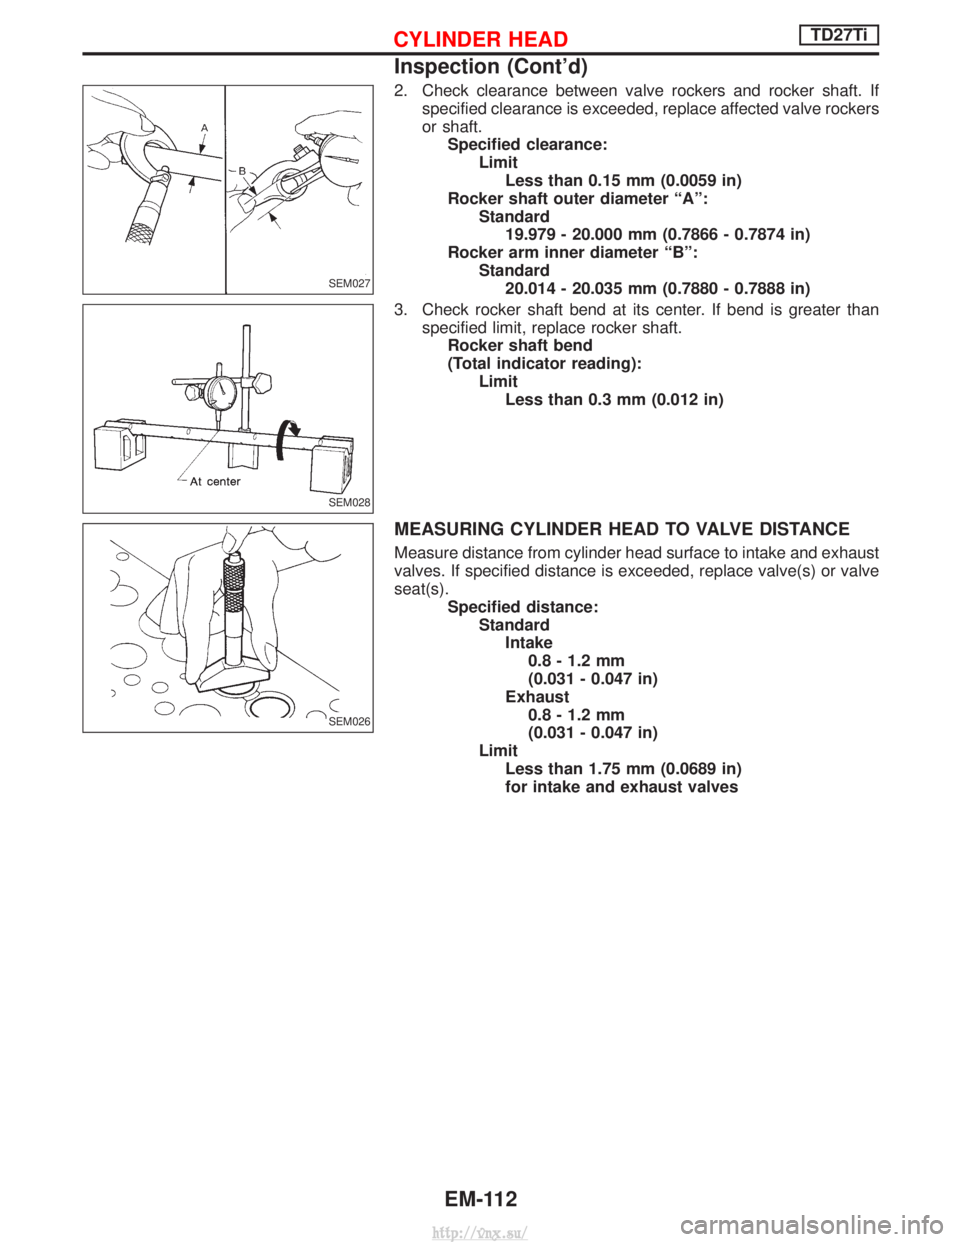
2. Check clearance between valve rockers and rocker shaft. Ifspecified clearance is exceeded, replace affected valve rockers
or shaft.Specified clearance: LimitLess than 0.15 mm (0.0059 in)
Rocker shaft outer diameter ªAº: Standard19.979 - 20.000 mm (0.7866 - 0.7874 in)
Rocker arm inner diameter ªBº: Standard20.014 - 20.035 mm (0.7880 - 0.7888 in)
3. Check rocker shaft bend at its center. If bend is greater than specified limit, replace rocker shaft.Rocker shaft bend
(Total indicator reading): LimitLess than 0.3 mm (0.012 in)
MEASURING CYLINDER HEAD TO VALVE DISTANCE
Measure distance from cylinder head surface to intake and exhaust
valves. If specified distance is exceeded, replace valve(s) or valve
seat(s). Specified distance:StandardIntake0.8 - 1.2 mm
(0.031 - 0.047 in)
Exhaust 0.8 - 1.2 mm
(0.031 - 0.047 in)
Limit Less than 1.75 mm (0.0689 in)
for intake and exhaust valves
SEM027
SEM028
SEM026
CYLINDER HEADTD27Ti
Inspection (Cont'd)
EM-112
http://vnx.su/
Page 204 of 1833
Assembly
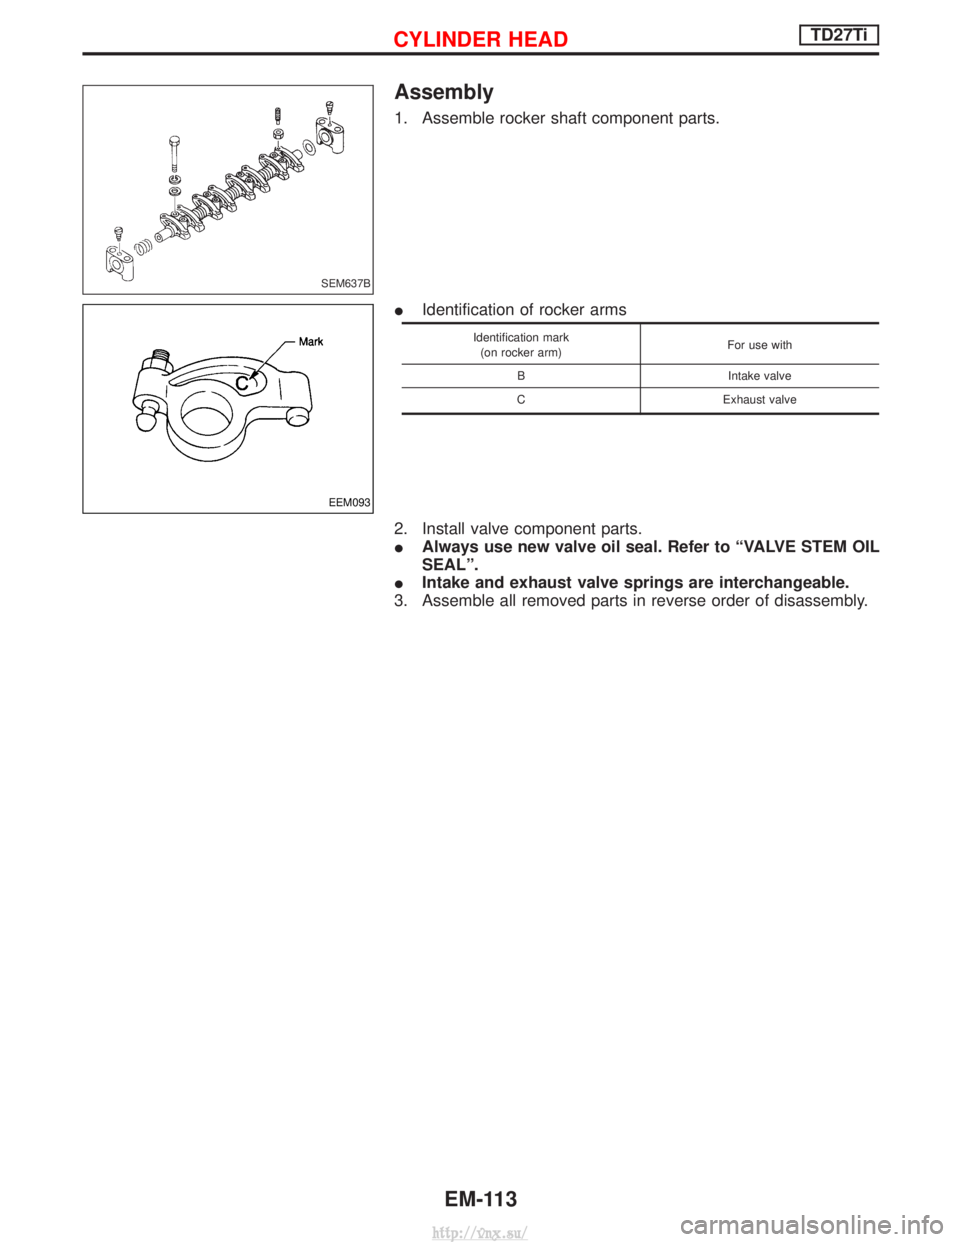
1. Assemble rocker shaft component parts.
IIdentification of rocker arms
Identification mark
(on rocker arm) For use with
B Intake valve
C Exhaust valve
2. Install valve component parts.
I Always use new valve oil seal. Refer to ªVALVE STEM OIL
SEALº.
I Intake and exhaust valve springs are interchangeable.
3. Assemble all removed parts in reverse order of disassembly.
SEM637B
EEM093
CYLINDER HEADTD27Ti
EM-113
http://vnx.su/
Page 205 of 1833
Installation
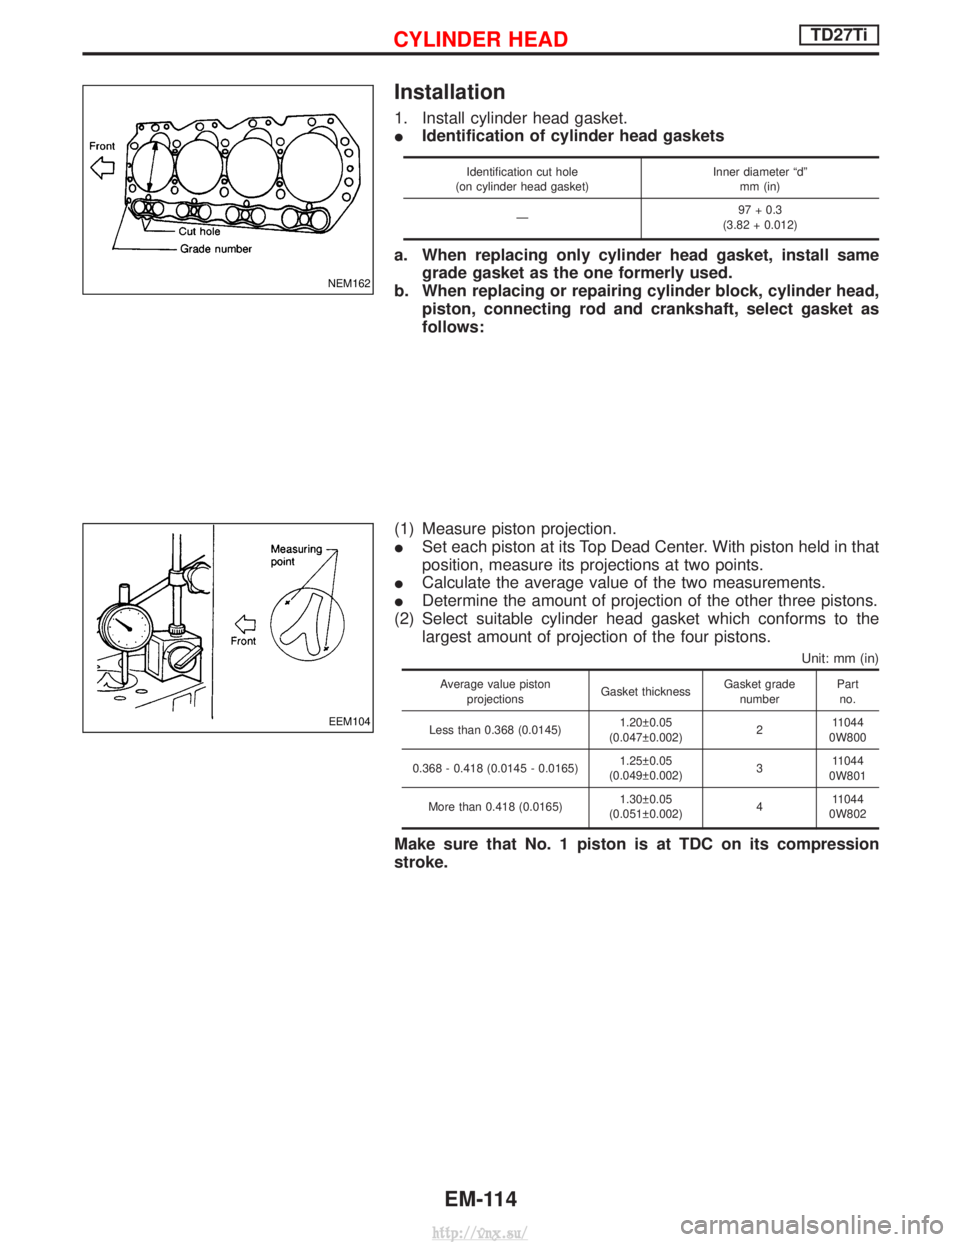
1. Install cylinder head gasket.
IIdentification of cylinder head gaskets
Identification cut hole
(on cylinder head gasket) Inner diameter ªdº
mm (in)
Ð 97 + 0.3
(3.82 + 0.012)
a. When replacing only cylinder head gasket, install same grade gasket as the one formerly used.
b. When replacing or repairing cylinder block, cylinder head, piston, connecting rod and crankshaft, select gasket as
follows:
(1) Measure piston projection.
I Set each piston at its Top Dead Center. With piston held in that
position, measure its projections at two points.
I Calculate the average value of the two measurements.
I Determine the amount of projection of the other three pistons.
(2) Select suitable cylinder head gasket which conforms to the largest amount of projection of the four pistons.
Unit: mm (in)
Average value piston
projections Gasket thicknessGasket grade
number Part
no.
Less than 0.368 (0.0145) 1.20 0.05
(0.047 0.002) 211044
0W800
0.368 - 0.418 (0.0145 - 0.0165) 1.25 0.05
(0.049 0.002) 311044
0W801
More than 0.418 (0.0165) 1.30 0.05
(0.051 0.002) 411044
0W802
Make sure that No. 1 piston is at TDC on its compression
stroke.
NEM162
EEM104
CYLINDER HEADTD27Ti
EM-114
http://vnx.su/
Page 206 of 1833

2. Install cylinder head.
ICylinder head identification mark
3. Apply oil to threaded portion and seat surface of bolts and tighten cylinder head bolts using Tool.
CAUTION:
I Tightening procedure
1st: Tighten bolts to 39 - 44 N×m (4.0 - 4.5 kg-m, 29 - 33 ft-lb)
2nd: Tighten bolts to 54 - 59 N ×m
(5.5 - 6.0 kg-m, 40 - 43 ft-lb)
3rd: (1) Mark exhaust side of cylinder head and cylin-der head bolts with paint as shown.
(2) Turn all bolts 90 10 degrees clockwise.
(3) Check that paint mark of each bolt is facing the front of the vehicle.
4. Apply engine oil and install push rods.
5. Install rocker shaft assembly. Adjust intake and exhaust valve clearance carefully.
Refer to MA section in order to accomplish valve adjustment.
NEM179
SEM641B
SEM580C
SEM642B
CYLINDER HEADTD27Ti
Installation (Cont'd)
EM-115
http://vnx.su/
Page 207 of 1833
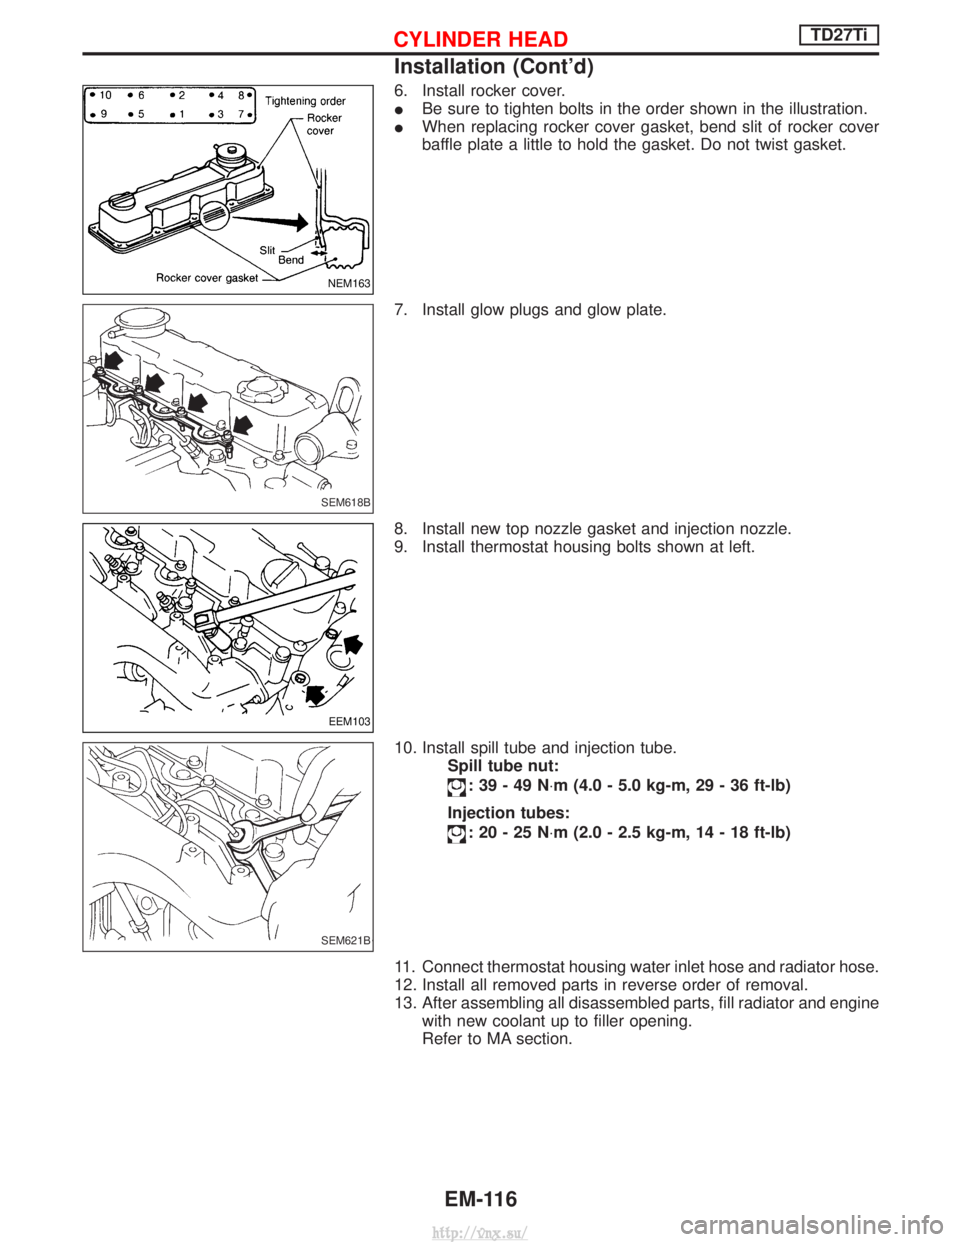
6. Install rocker cover.
IBe sure to tighten bolts in the order shown in the illustration.
I When replacing rocker cover gasket, bend slit of rocker cover
baffle plate a little to hold the gasket. Do not twist gasket.
7. Install glow plugs and glow plate.
8. Install new top nozzle gasket and injection nozzle.
9. Install thermostat housing bolts shown at left.
10. Install spill tube and injection tube. Spill tube nut:
:39-49N ×m (4.0 - 5.0 kg-m, 29 - 36 ft-lb)
Injection tubes:
:20-25N ×m (2.0 - 2.5 kg-m, 14 - 18 ft-lb)
11. Connect thermostat housing water inlet hose and radiator hose.
12. Install all removed parts in reverse order of removal.
13. After assembling all disassembled parts, fill radiator and engine with new coolant up to filler opening.
Refer to MA section.
NEM163
SEM618B
EEM103
SEM621B
CYLINDER HEADTD27Ti
Installation (Cont'd)
EM-116
http://vnx.su/
Page 208 of 1833
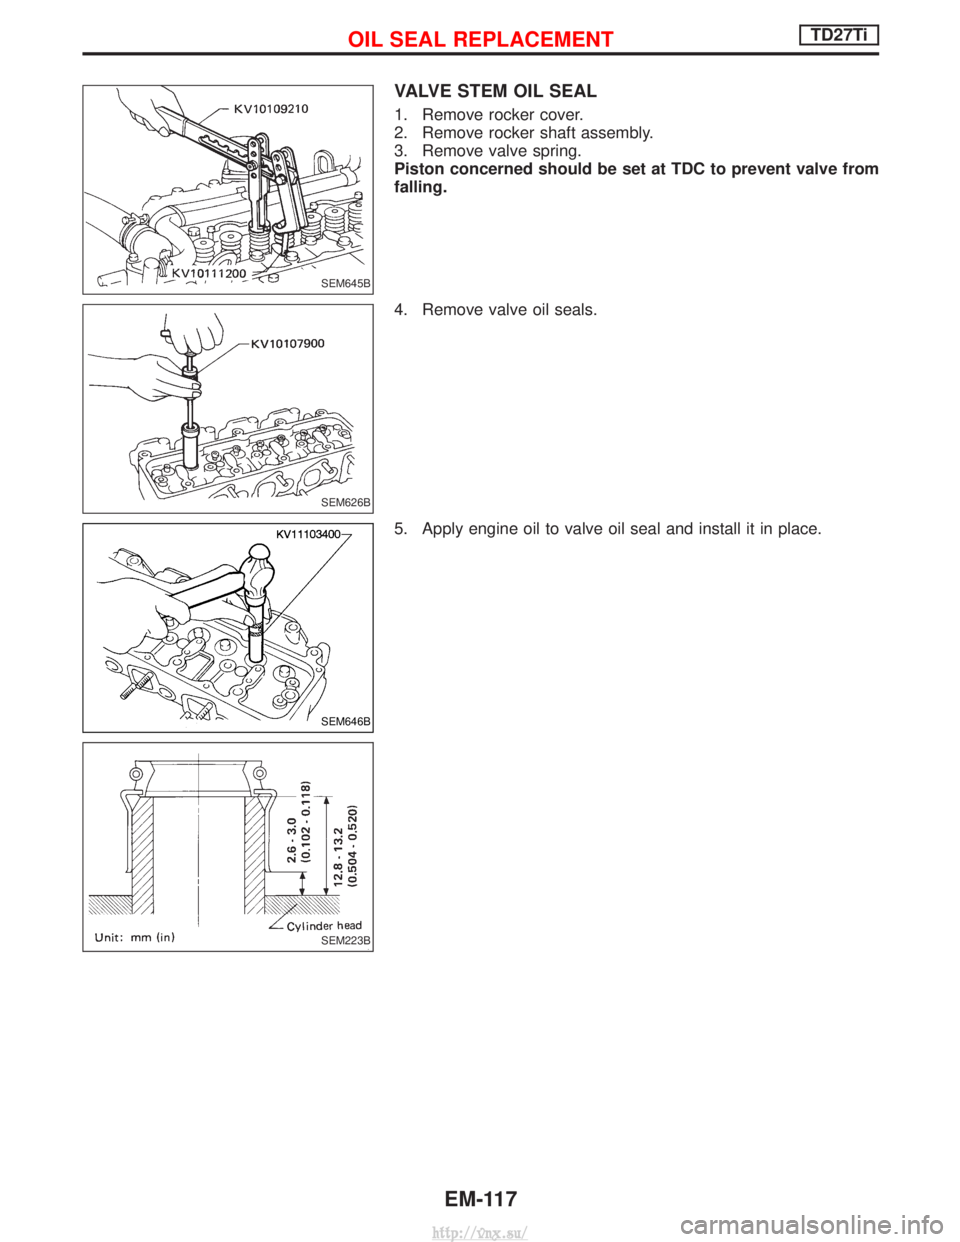
VALVE STEM OIL SEAL
1. Remove rocker cover.
2. Remove rocker shaft assembly.
3. Remove valve spring.
Piston concerned should be set at TDC to prevent valve from
falling.
4. Remove valve oil seals.
5. Apply engine oil to valve oil seal and install it in place.
SEM645B
SEM626B
SEM646B
SEM223B
OIL SEAL REPLACEMENTTD27Ti
EM-117
http://vnx.su/
Page 209 of 1833
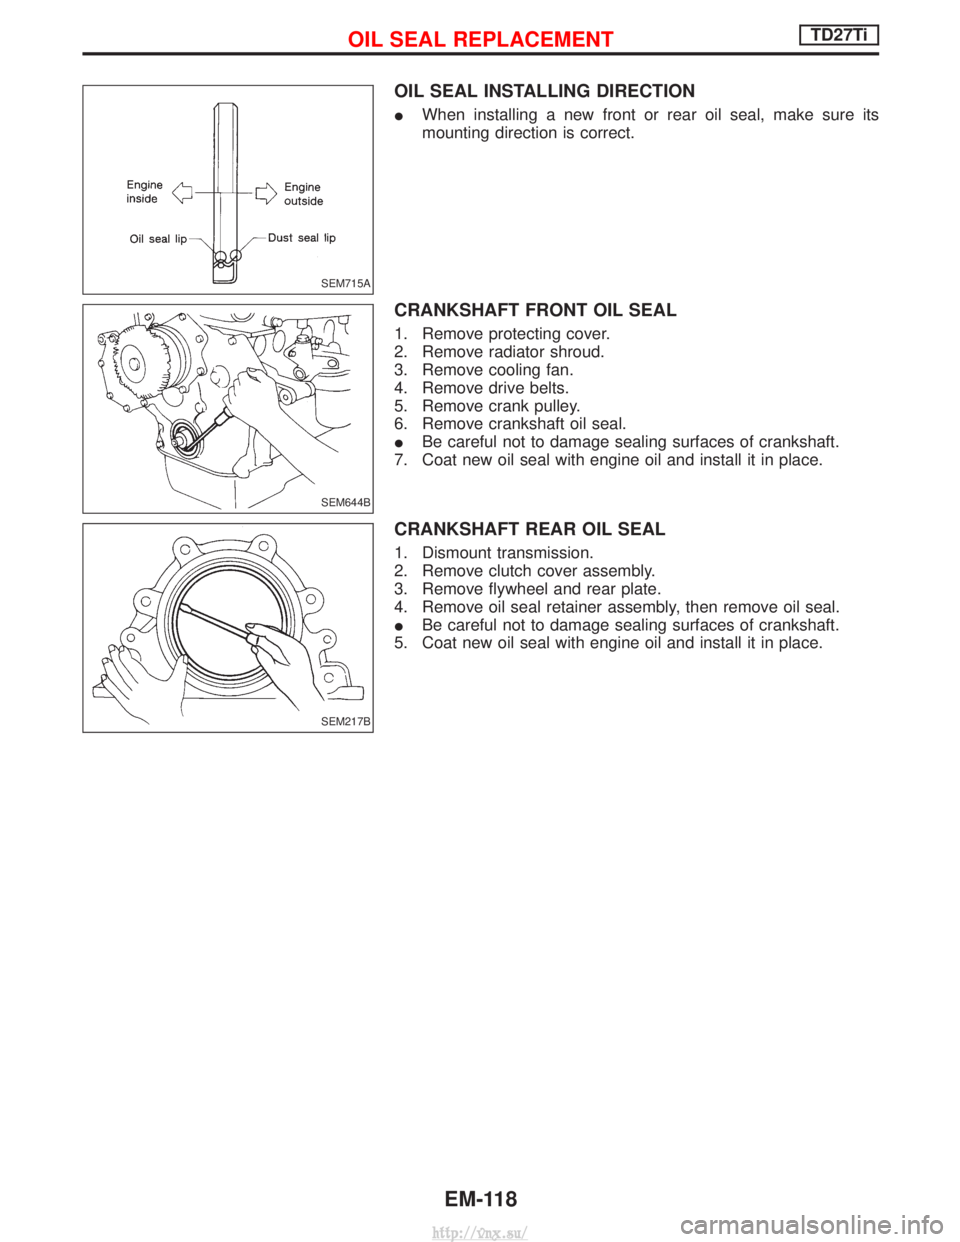
OIL SEAL INSTALLING DIRECTION
IWhen installing a new front or rear oil seal, make sure its
mounting direction is correct.
CRANKSHAFT FRONT OIL SEAL
1. Remove protecting cover.
2. Remove radiator shroud.
3. Remove cooling fan.
4. Remove drive belts.
5. Remove crank pulley.
6. Remove crankshaft oil seal.
IBe careful not to damage sealing surfaces of crankshaft.
7. Coat new oil seal with engine oil and install it in place.
CRANKSHAFT REAR OIL SEAL
1. Dismount transmission.
2. Remove clutch cover assembly.
3. Remove flywheel and rear plate.
4. Remove oil seal retainer assembly, then remove oil seal.
I Be careful not to damage sealing surfaces of crankshaft.
5. Coat new oil seal with engine oil and install it in place.
SEM715A
SEM644B
SEM217B
OIL SEAL REPLACEMENTTD27Ti
EM-118
http://vnx.su/
Page 210 of 1833
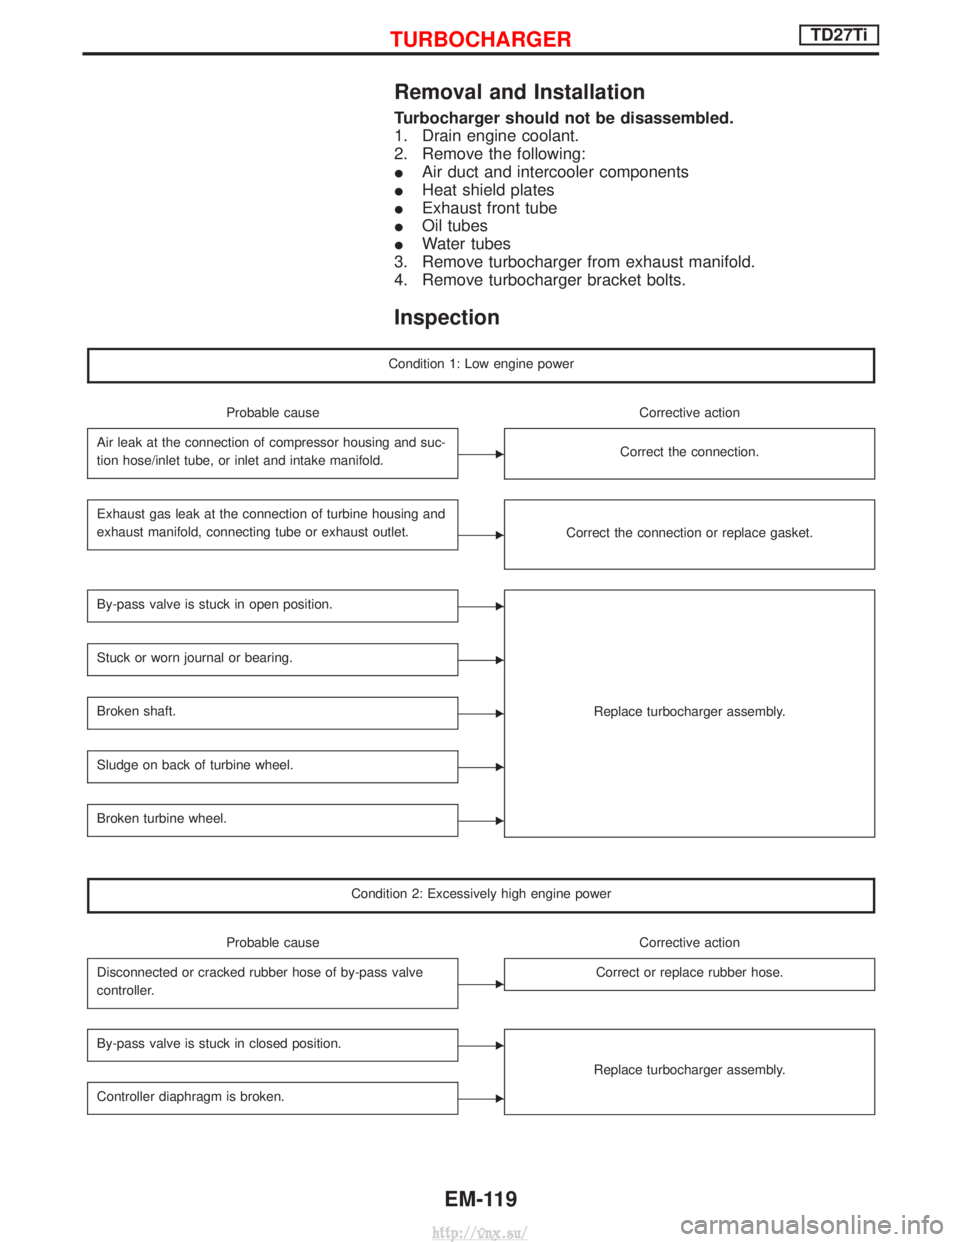
Removal and Installation
Turbocharger should not be disassembled.
1. Drain engine coolant.
2. Remove the following:
IAir duct and intercooler components
I Heat shield plates
I Exhaust front tube
I Oil tubes
I Water tubes
3. Remove turbocharger from exhaust manifold.
4. Remove turbocharger bracket bolts.
Inspection
Condition 1: Low engine power
Probable cause Corrective action
Air leak at the connection of compressor housing and suc-
tion hose/inlet tube, or inlet and intake manifold.
ECorrect the connection.
Exhaust gas leak at the connection of turbine housing and
exhaust manifold, connecting tube or exhaust outlet.
ECorrect the connection or replace gasket.
By-pass valve is stuck in open position.E
Replace turbocharger assembly.
Stuck or worn journal or bearing.E
Broken shaft.E
Sludge on back of turbine wheel.E
Broken turbine wheel.E
Condition 2: Excessively high engine power
Probable cause Corrective action
Disconnected or cracked rubber hose of by-pass valve
controller.
ECorrect or replace rubber hose.
By-pass valve is stuck in closed position.E
Replace turbocharger assembly.
Controller diaphragm is broken.E
TURBOCHARGERTD27Ti
EM-119
http://vnx.su/