NISSAN TIIDA 2007 Service Repair Manual
Manufacturer: NISSAN, Model Year: 2007, Model line: TIIDA, Model: NISSAN TIIDA 2007Pages: 5883, PDF Size: 78.95 MB
Page 201 of 5883

BRAKE FLUID
BR-9
< ON-VEHICLE MAINTENANCE >
C
D
E
G
H
I
J
K
L
MA
B
BR
N
O
P
3. With brake pedal depressed, loosen bleed valve to let the air out, and then tighten it immediately.
4. Repeat steps 2, 3 until no more air comes out.
5. Tighten bleed valve to specified torque. Refer to BR-24, "
Component" (front disc brake), BR-27, "Compo-
nent" (rear drum brake).
6. Following the steps 1 to 5 above, with master cylinder reservoir tank filled at least half way, bleed air from
the rear right, front left, rear left, and front right brake, in that order.
Page 202 of 5883
BR-10
< ON-VEHICLE MAINTENANCE >
FRONT DISC BRAKE
FRONT DISC BRAKE
InspectionINFOID:0000000001717004
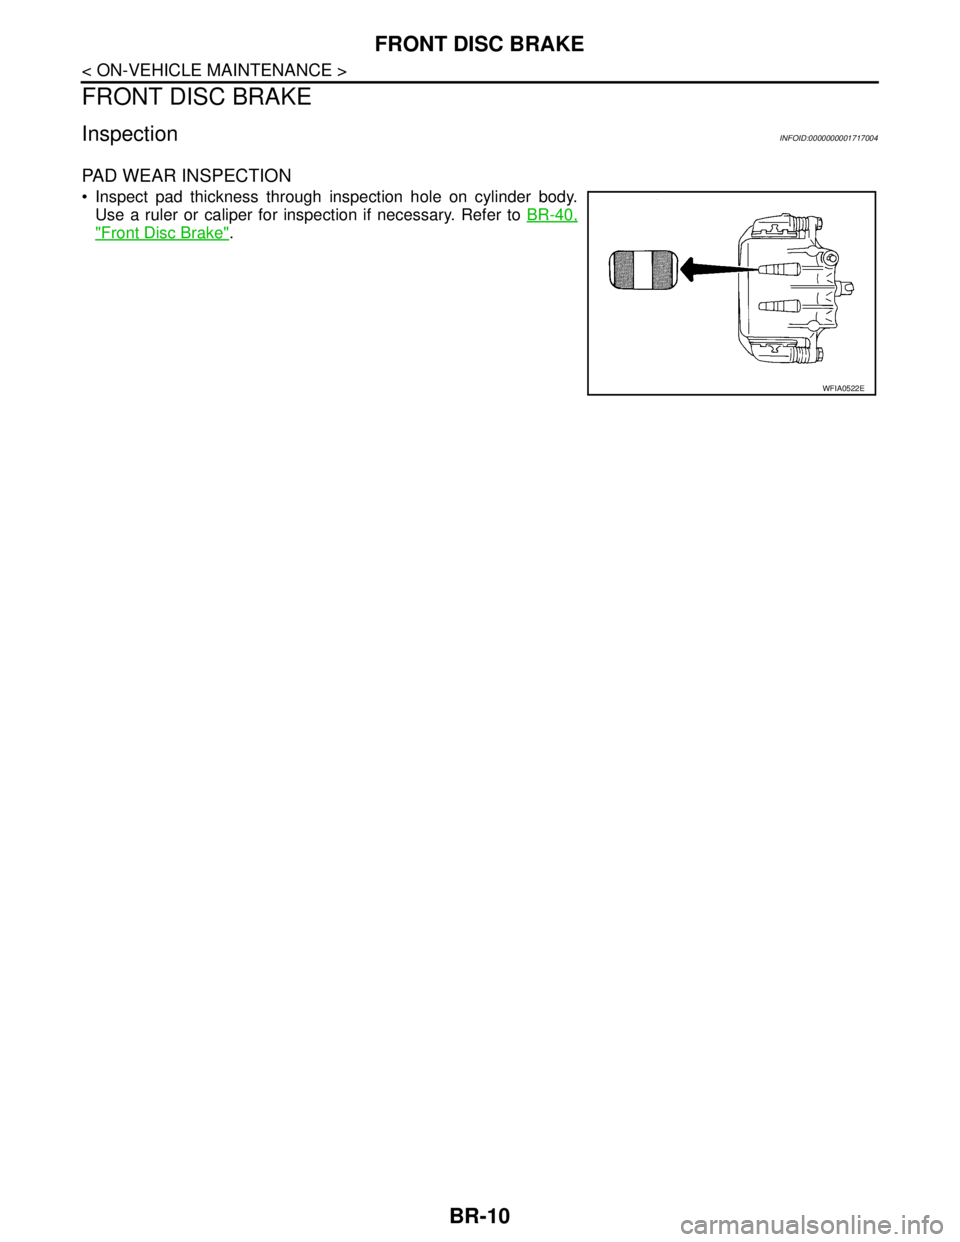
PAD WEAR INSPECTION
Inspect pad thickness through inspection hole on cylinder body.
Use a ruler or caliper for inspection if necessary. Refer to BR-40,
"Front Disc Brake".
WFIA0522E
Page 203 of 5883
REAR DISC BRAKE
BR-11
< ON-VEHICLE MAINTENANCE >
C
D
E
G
H
I
J
K
L
MA
B
BR
N
O
P
REAR DISC BRAKE
InspectionINFOID:0000000001724674
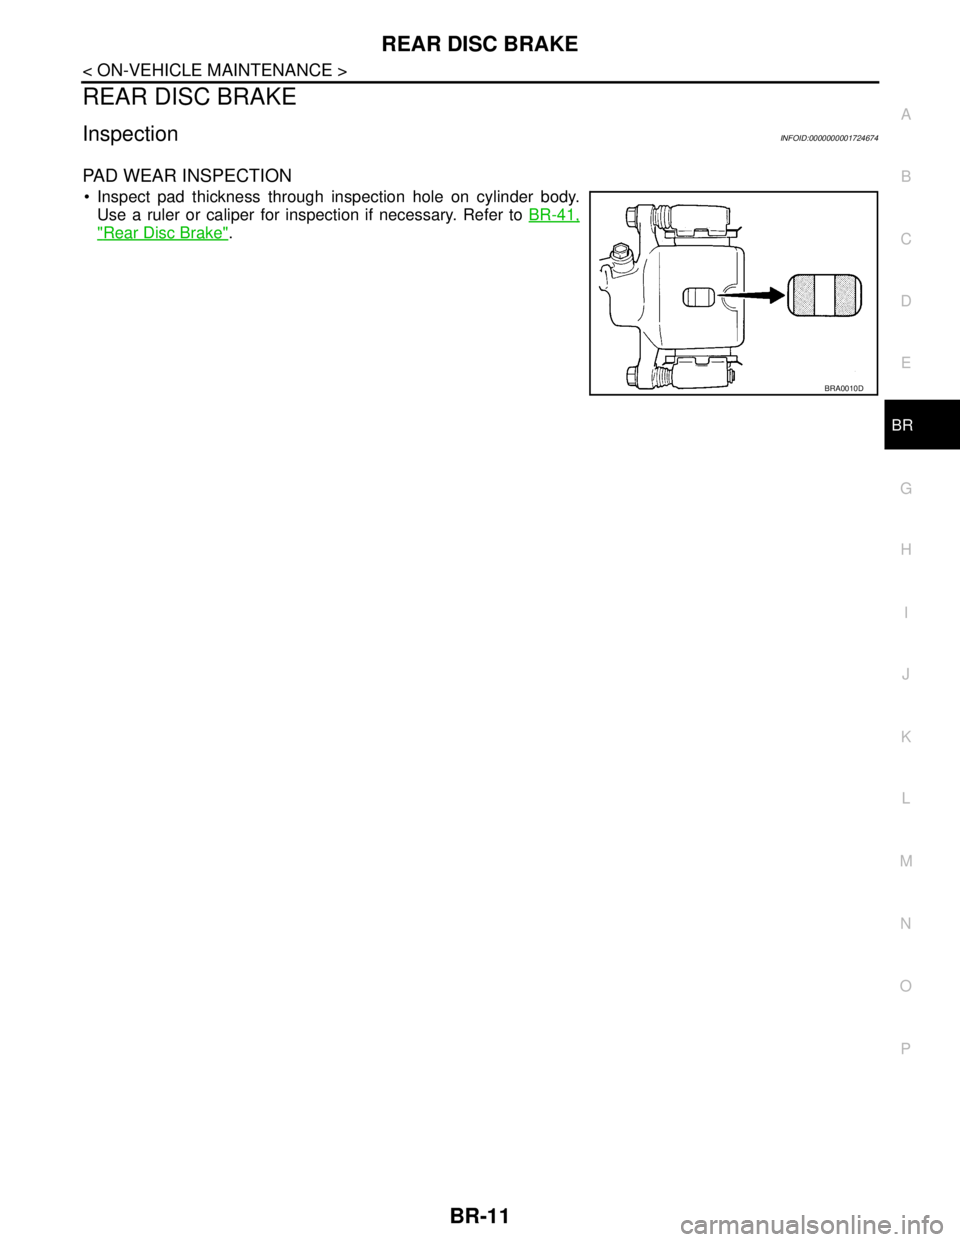
PAD WEAR INSPECTION
Inspect pad thickness through inspection hole on cylinder body.
Use a ruler or caliper for inspection if necessary. Refer to BR-41,
"Rear Disc Brake".
BRA0010D
Page 204 of 5883
BR-12
< ON-VEHICLE REPAIR >
BRAKE PEDAL
ON-VEHICLE REPAIR
BRAKE PEDAL
Removal and InstallationINFOID:0000000001716977
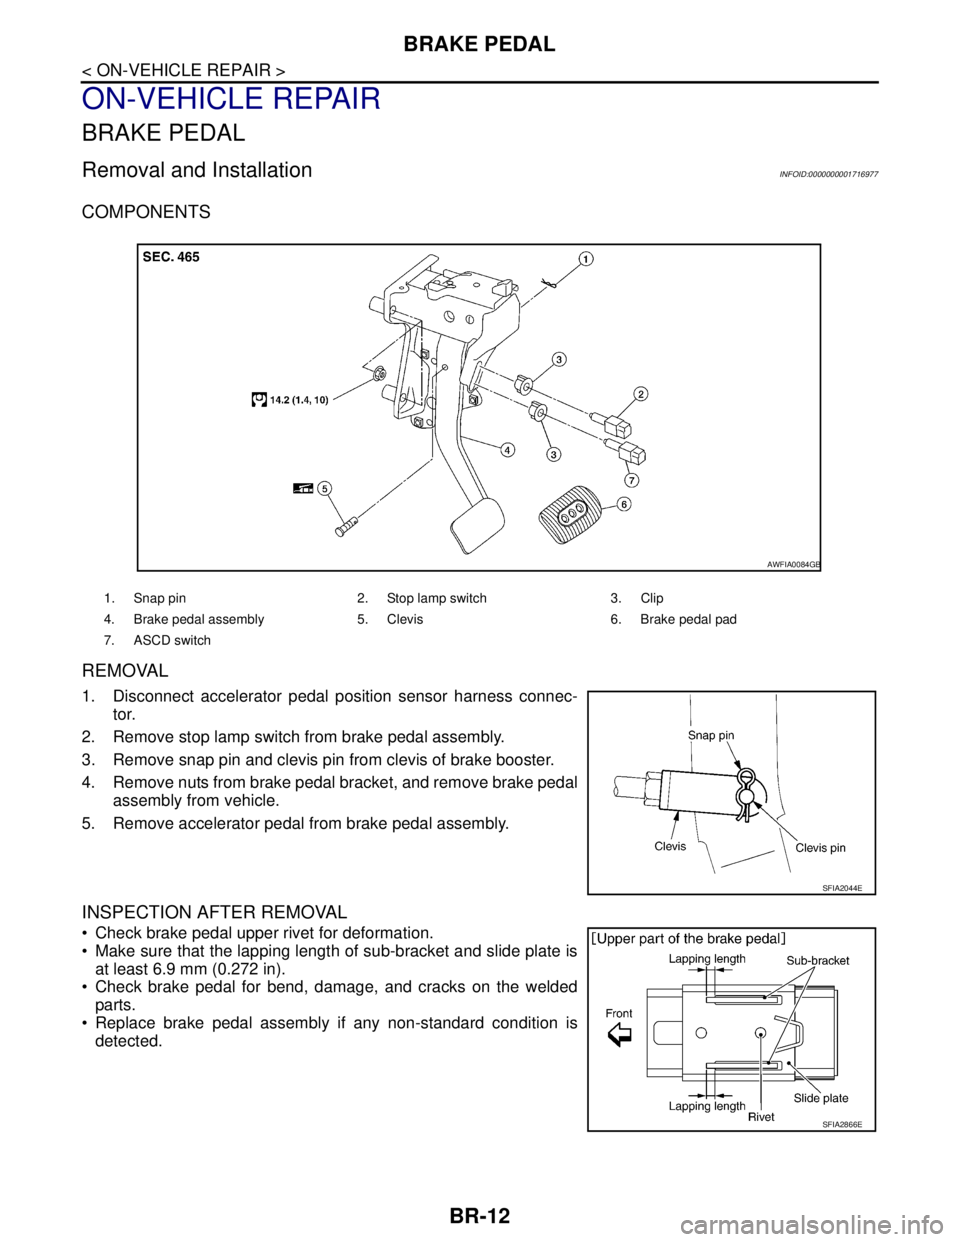
COMPONENTS
REMOVAL
1. Disconnect accelerator pedal position sensor harness connec-
tor.
2. Remove stop lamp switch from brake pedal assembly.
3. Remove snap pin and clevis pin from clevis of brake booster.
4. Remove nuts from brake pedal bracket, and remove brake pedal
assembly from vehicle.
5. Remove accelerator pedal from brake pedal assembly.
INSPECTION AFTER REMOVAL
Check brake pedal upper rivet for deformation.
Make sure that the lapping length of sub-bracket and slide plate is
at least 6.9 mm (0.272 in).
Check brake pedal for bend, damage, and cracks on the welded
parts.
Replace brake pedal assembly if any non-standard condition is
detected.
1. Snap pin 2. Stop lamp switch 3. Clip
4. Brake pedal assembly 5. Clevis 6. Brake pedal pad
7. ASCD switch
AWFIA0084GB
SFIA2044E
SFIA2866E
Page 205 of 5883
BRAKE PEDAL
BR-13
< ON-VEHICLE REPAIR >
C
D
E
G
H
I
J
K
L
MA
B
BR
N
O
P
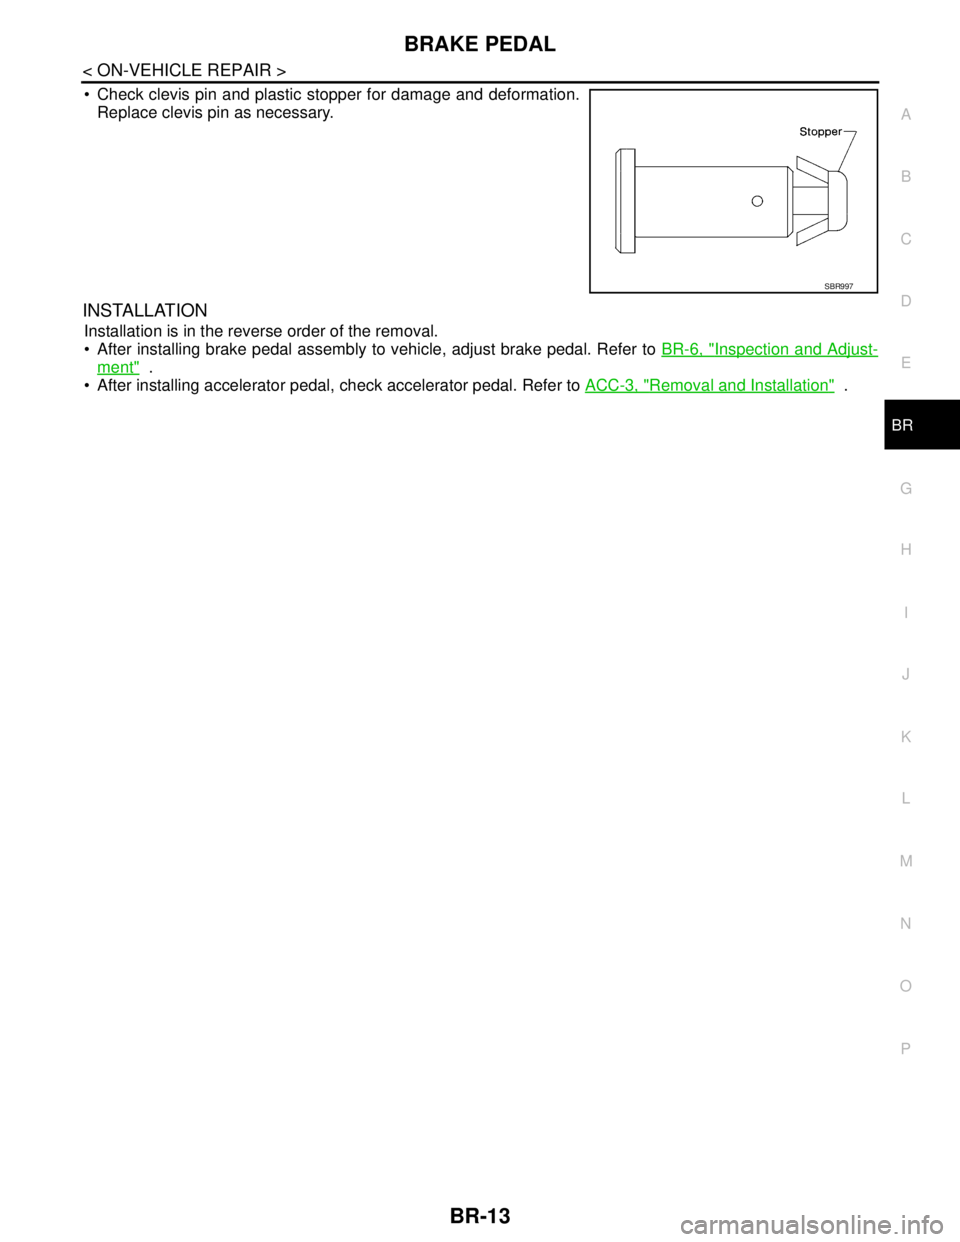
Check clevis pin and plastic stopper for damage and deformation.
Replace clevis pin as necessary.
INSTALLATION
Installation is in the reverse order of the removal.
After installing brake pedal assembly to vehicle, adjust brake pedal. Refer to BR-6, "
Inspection and Adjust-
ment" .
After installing accelerator pedal, check accelerator pedal. Refer to ACC-3, "
Removal and Installation" .
SBR997
Page 206 of 5883
BR-14
< ON-VEHICLE REPAIR >
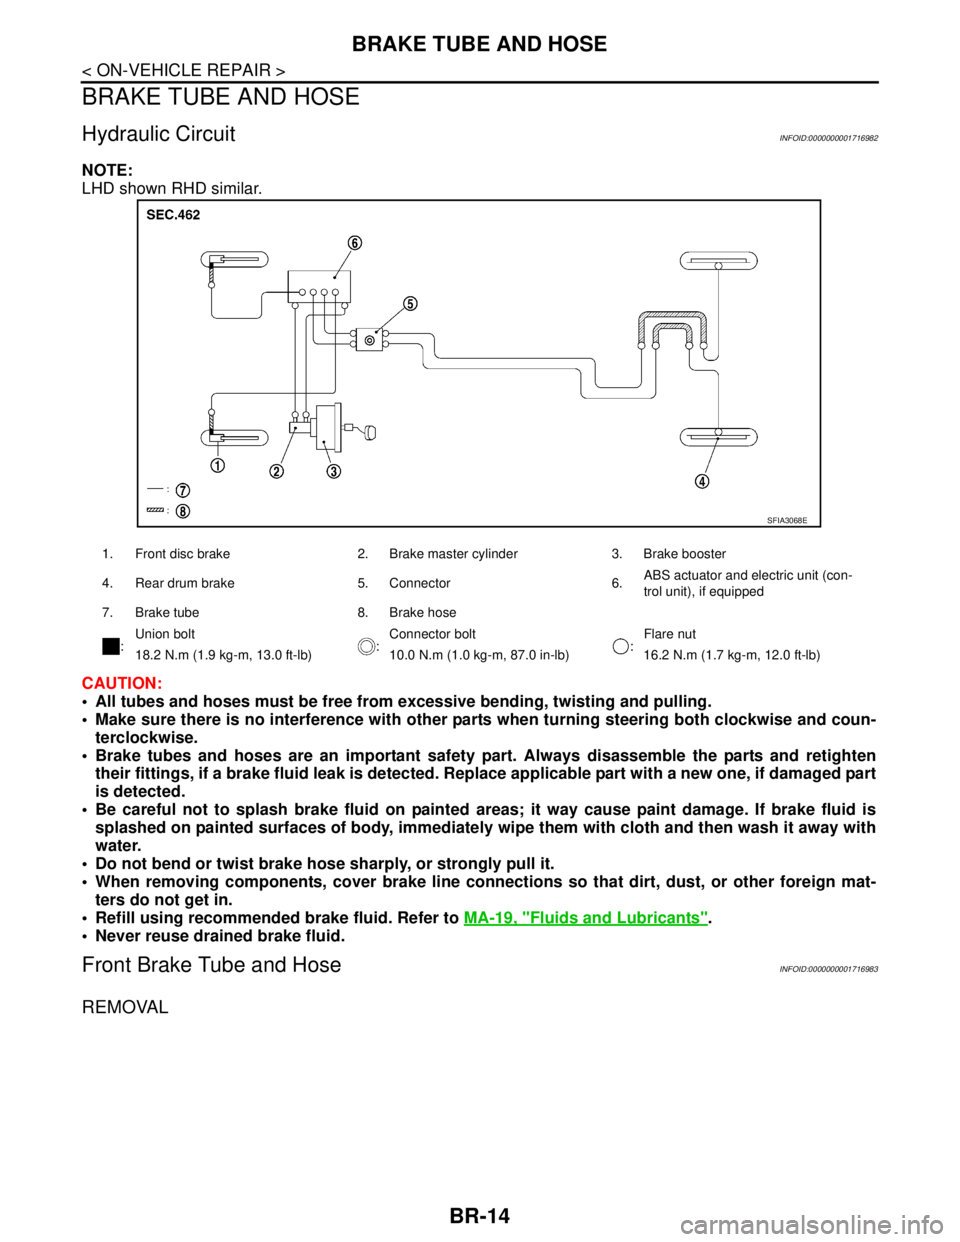
BRAKE TUBE AND HOSE
BRAKE TUBE AND HOSE
Hydraulic CircuitINFOID:0000000001716982
NOTE:
LHD shown RHD similar.
CAUTION:
All tubes and hoses must be free from excessive bending, twisting and pulling.
Make sure there is no interference with other parts when turning steering both clockwise and coun-
terclockwise.
Brake tubes and hoses are an important safety part. Always disassemble the parts and retighten
their fittings, if a brake fluid leak is detected. Replace applicable part with a new one, if damaged part
is detected.
Be careful not to splash brake fluid on painted areas; it way cause paint damage. If brake fluid is
splashed on painted surfaces of body, immediately wipe them with cloth and then wash it away with
water.
Do not bend or twist brake hose sharply, or strongly pull it.
When removing components, cover brake line connections so that dirt, dust, or other foreign mat-
ters do not get in.
Refill using recommended brake fluid. Refer to MA-19, "
Fluids and Lubricants".
Never reuse drained brake fluid.
Front Brake Tube and HoseINFOID:0000000001716983
REMOVAL
1. Front disc brake 2. Brake master cylinder 3. Brake booster
4. Rear drum brake 5. Connector 6.ABS actuator and electric unit (con-
trol unit), if equipped
7. Brake tube 8. Brake hose
:Union bolt
:Connector bolt
:Flare nut
18.2 N.m (1.9 kg-m, 13.0 ft-lb) 10.0 N.m (1.0 kg-m, 87.0 in-lb) 16.2 N.m (1.7 kg-m, 12.0 ft-lb)
SFIA3068E
Page 207 of 5883
BRAKE TUBE AND HOSE
BR-15
< ON-VEHICLE REPAIR >
C
D
E
G
H
I
J
K
L
MA
B
BR
N
O
P
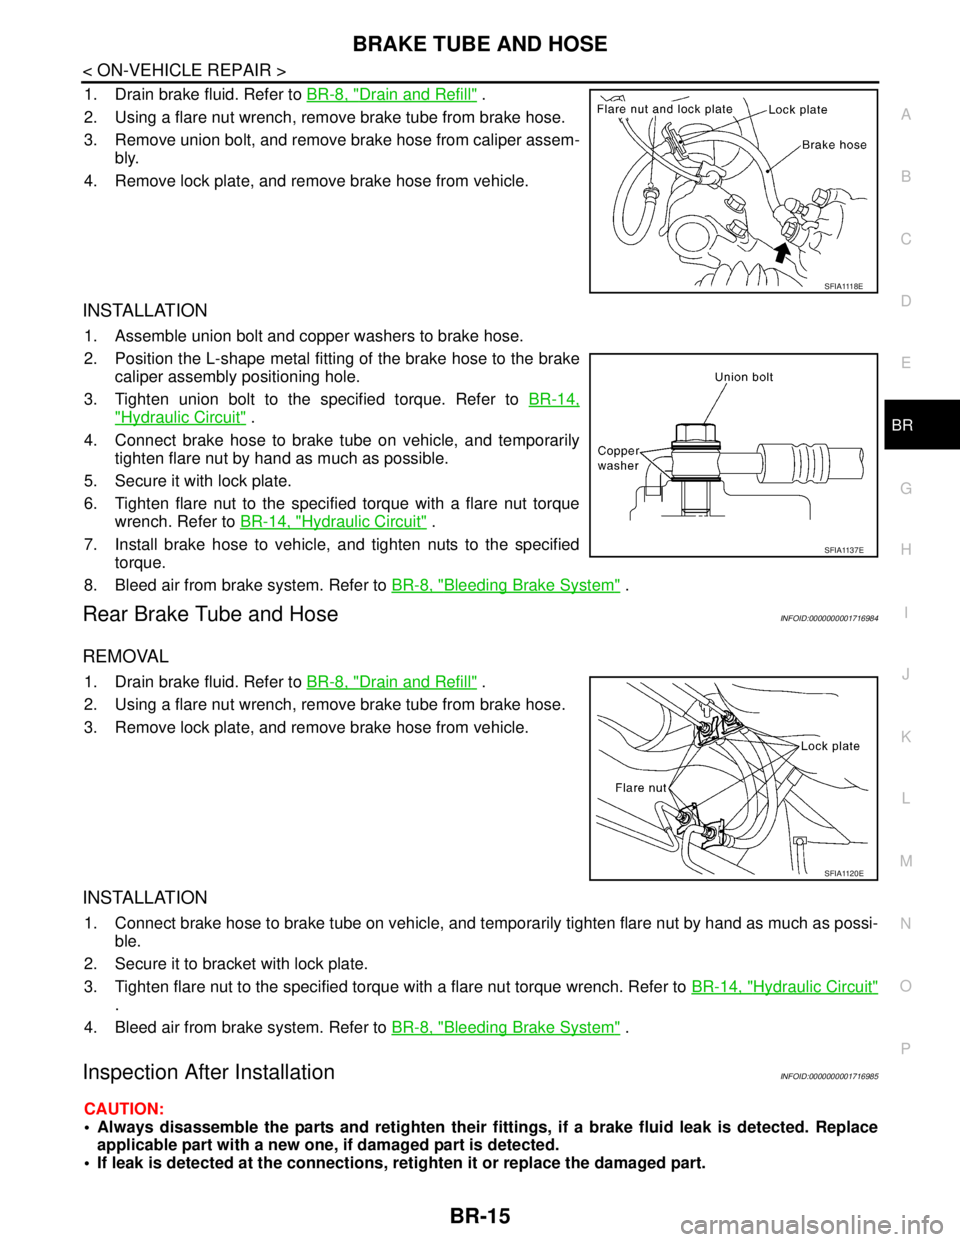
1. Drain brake fluid. Refer to BR-8, "Drain and Refill" .
2. Using a flare nut wrench, remove brake tube from brake hose.
3. Remove union bolt, and remove brake hose from caliper assem-
bly.
4. Remove lock plate, and remove brake hose from vehicle.
INSTALLATION
1. Assemble union bolt and copper washers to brake hose.
2. Position the L-shape metal fitting of the brake hose to the brake
caliper assembly positioning hole.
3. Tighten union bolt to the specified torque. Refer to BR-14,
"Hydraulic Circuit" .
4. Connect brake hose to brake tube on vehicle, and temporarily
tighten flare nut by hand as much as possible.
5. Secure it with lock plate.
6. Tighten flare nut to the specified torque with a flare nut torque
wrench. Refer to BR-14, "
Hydraulic Circuit" .
7. Install brake hose to vehicle, and tighten nuts to the specified
torque.
8. Bleed air from brake system. Refer to BR-8, "
Bleeding Brake System" .
Rear Brake Tube and HoseINFOID:0000000001716984
REMOVAL
1. Drain brake fluid. Refer to BR-8, "Drain and Refill" .
2. Using a flare nut wrench, remove brake tube from brake hose.
3. Remove lock plate, and remove brake hose from vehicle.
INSTALLATION
1. Connect brake hose to brake tube on vehicle, and temporarily tighten flare nut by hand as much as possi-
ble.
2. Secure it to bracket with lock plate.
3. Tighten flare nut to the specified torque with a flare nut torque wrench. Refer to BR-14, "
Hydraulic Circuit"
.
4. Bleed air from brake system. Refer to BR-8, "
Bleeding Brake System" .
Inspection After InstallationINFOID:0000000001716985
CAUTION:
Always disassemble the parts and retighten their fittings, if a brake fluid leak is detected. Replace
applicable part with a new one, if damaged part is detected.
If leak is detected at the connections, retighten it or replace the damaged part.
S F I A 111 8 E
SFIA1137E
SFIA1120E
Page 208 of 5883

BR-16
< ON-VEHICLE REPAIR >
BRAKE TUBE AND HOSE
1. Check brake hose, tube, and connections for fluid leaks, damage, twist, deformation, contact with other
parts, and loose connections.
2. While depressing pedal under a force of 785 N (80 kg-f, 177 lb-f) with the engine running for approxi-
mately 5 seconds, check for fluid leak from each part.
Page 209 of 5883
DUAL PROPORTIONING VALVE
BR-17
< ON-VEHICLE REPAIR >
C
D
E
G
H
I
J
K
L
MA
B
BR
N
O
P
DUAL PROPORTIONING VALVE
Removal and InstallationINFOID:0000000001726771
Removal
1. Disconnect brake lines from dual proportioning valve.
Mark brake lines for installation.
2. Remove dual proportioning valve bolt and dual proportioning valve.
3. Remove two bolts and bracket.
Installation
Installation is in the reverse order of removal.
When installing brake lines to the dual proportioning valve, tighten to specifications. Refer to BR-14,
"Hydraulic Circuit".
InspectionINFOID:0000000001726772
CAUTION:
Carefully monitor brake fluid level at master cylinder.
Use the recommended new brake fluid. Refer to MA-19, "
Fluids and Lubricants".
Be careful not to splash brake fluid on painted areas; it may cause paint damage. If brake fluid is
splashed on paint areas, wash it away with water immediately.
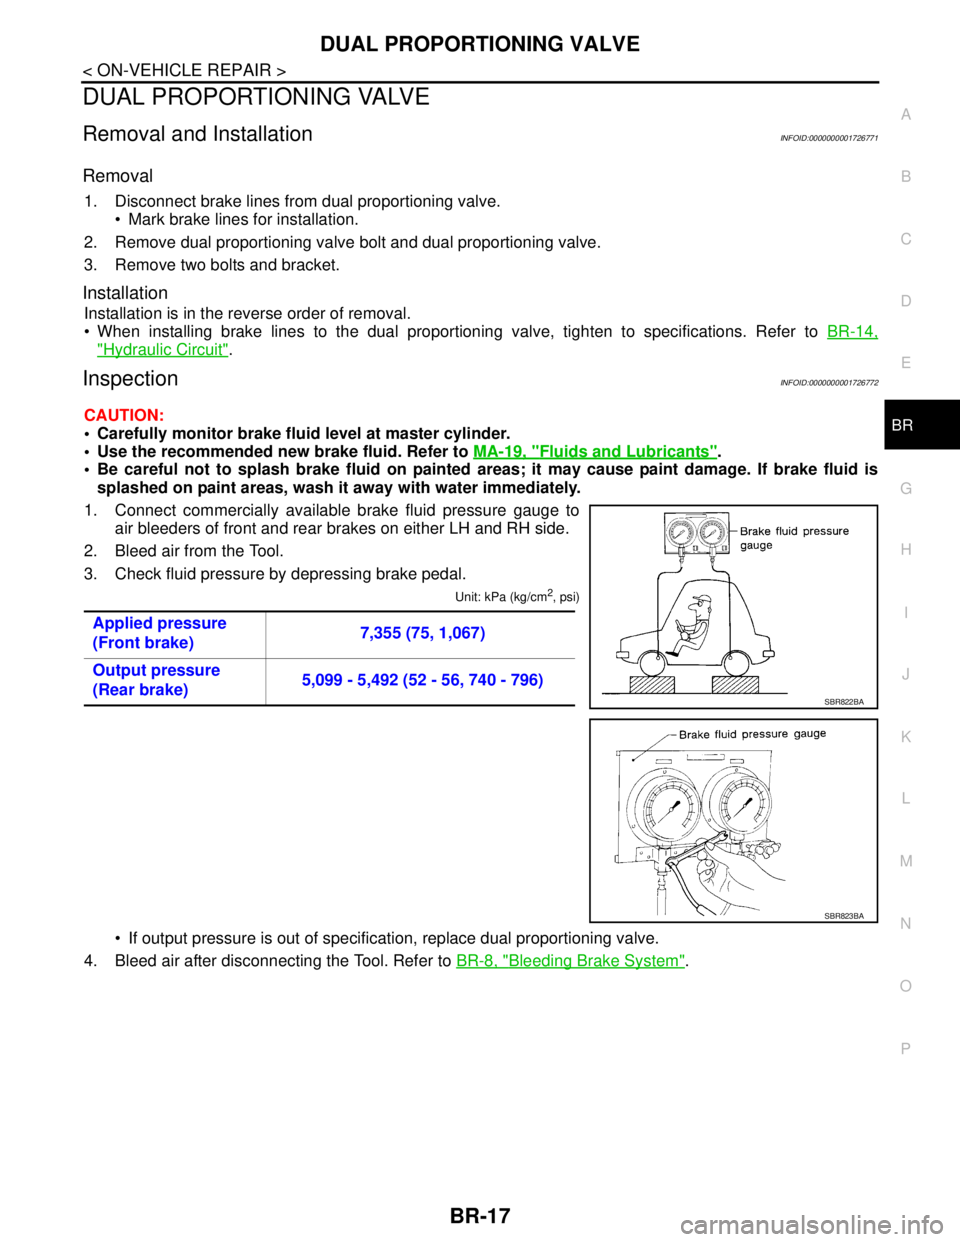
1. Connect commercially available brake fluid pressure gauge to
air bleeders of front and rear brakes on either LH and RH side.
2. Bleed air from the Tool.
3. Check fluid pressure by depressing brake pedal.
Unit: kPa (kg/cm2, psi)
If output pressure is out of specification, replace dual proportioning valve.
4. Bleed air after disconnecting the Tool. Refer to BR-8, "
Bleeding Brake System". Applied pressure
(Front brake)7,355 (75, 1,067)
Output pressure
(Rear brake)5,099 - 5,492 (52 - 56, 740 - 796)
SBR822BA
SBR823BA
Page 210 of 5883
BR-18
< ON-VEHICLE REPAIR >
BRAKE MASTER CYLINDER
BRAKE MASTER CYLINDER
On-Board InspectionINFOID:0000000001716996
LEAK INSPECTION
Check for leaking in a master cylinder installation surface, a reservoir tank installation surface, and brake
tube connections.
Removal and InstallationINFOID:0000000001716997
CAUTION:
Be careful not to splash brake fluid on painted areas; it may cause paint damage. If brake fluid is
splashed on painted areas, immediately wipe them with cloth and wash it away with water.
REMOVAL
1. Drain brake fluid. Refer to BR-8, "Drain and Refill" .
2. Remove battery. Refer to PG-6, "
Removal and Installation" .
3. Remove air duct and air cleaner. Refer to EM-27, "
Removal and Installation" (HR16DE), EM-154,
"Removal and Installation" (MR18DE), EM-269, "Removal and Installation" (K9K).
4. Disconnect brake fluid level switch harness connector.
5. Using a flare nut wrench, remove brake tube from master cylinder.
6. Remove master cylinder assembly nuts, and remove master cylinder assembly from vehicle..
INSTALLATION
CAUTION:
Refill using recommended brake fluid. Refer to MA-19, "
Fluids and Lubricants".
Never reuse drained brake fluid.
Check if the rod of primary piston has dust or scratches.
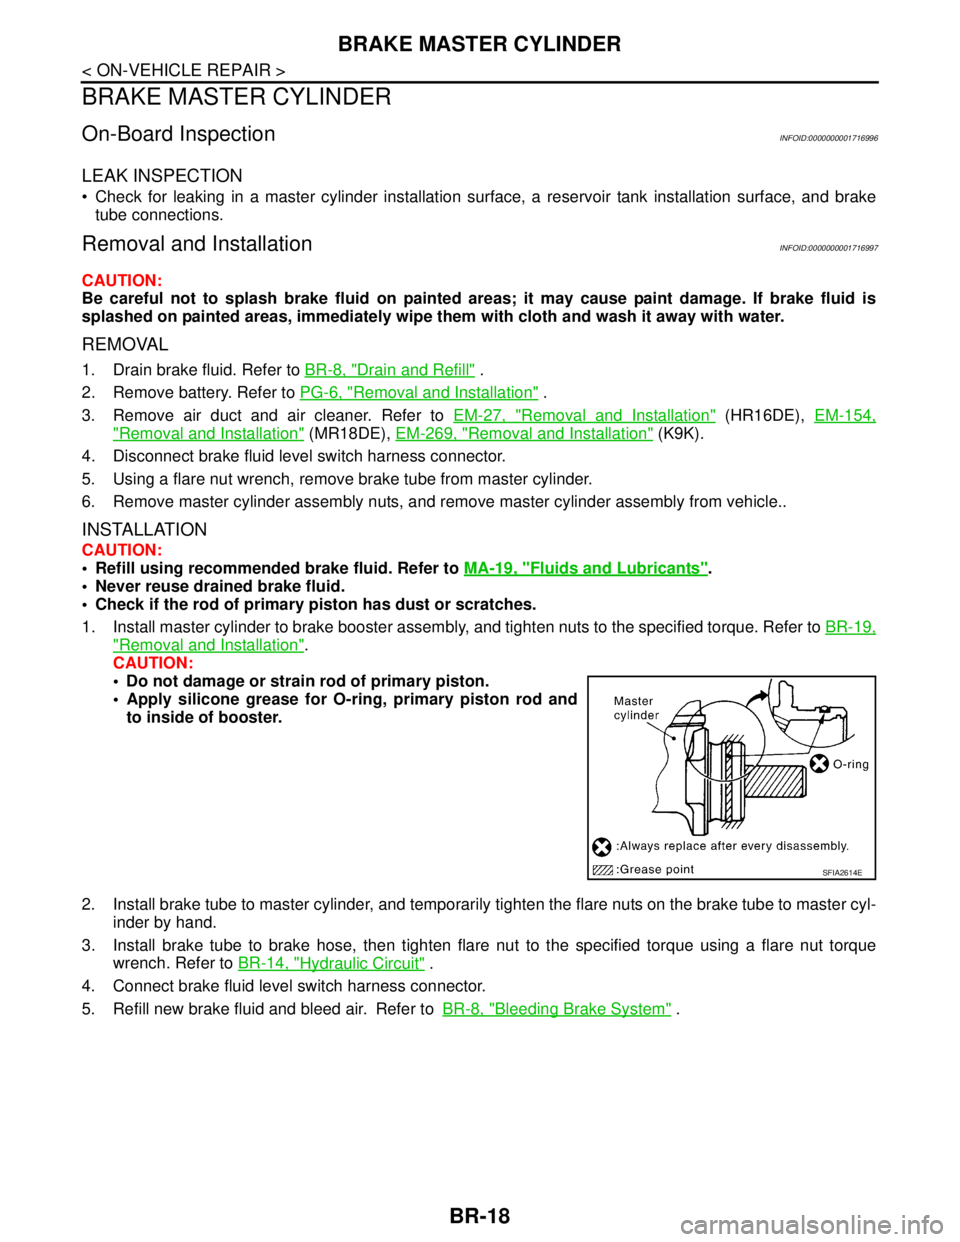
1. Install master cylinder to brake booster assembly, and tighten nuts to the specified torque. Refer to BR-19,
"Removal and Installation".
CAUTION:
Do not damage or strain rod of primary piston.
Apply silicone grease for O-ring, primary piston rod and
to inside of booster.
2. Install brake tube to master cylinder, and temporarily tighten the flare nuts on the brake tube to master cyl-
inder by hand.
3. Install brake tube to brake hose, then tighten flare nut to the specified torque using a flare nut torque
wrench. Refer to BR-14, "
Hydraulic Circuit" .
4. Connect brake fluid level switch harness connector.
5. Refill new brake fluid and bleed air. Refer toBR-8, "
Bleeding Brake System" .
SFIA2614E